
When using Microsoft Word, there will be times you want to re-use a certain picture or text in different documents. There is a handy tool where you can save the content you want to re-use. This is known as a Quick Part or Building Block in word.
What are Quick Parts and Building Blocks?
Quick Parts is a feature in Word that lots you create, store and reuse pieces of content. These Quick Parts are also known as Building Blocks.
Word Building Blocks can be pieces of reusable text, images or objects that you can freely reuse in your documents. They can be made up of anything, all the way from a simple line of text to entire cover pages made of text and images. If you want to learn more about how to format your text using the ruler and paragraph tools, read our guide.
Therefore you won’t have to search and insert the same picture or type out the same text every time you want to use it. The Building Block will keep it ready for you.
This guide was written using Office365, but Building Blocks have been in Microsoft Word since Word 2007. The instructions will be the same, but the pictures will not match up with older versions.
This is how you can create a Building Block with text.
First you need to select the content you want to save, then go to the ‘Insert’ tab and under the ‘Text’ group, click the ‘Quick Parts’.
Then go to ‘AutoText’ and click on ‘Save Selection to AutoText Gallery’
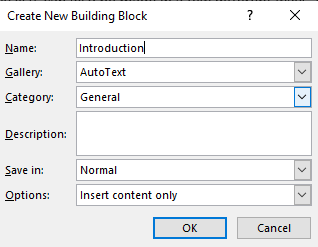
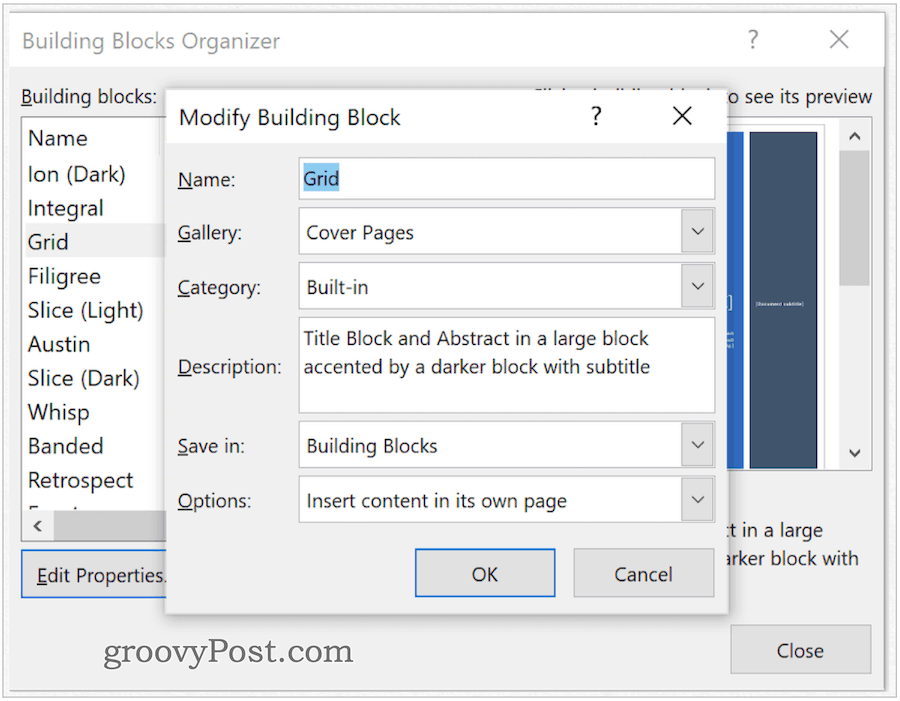
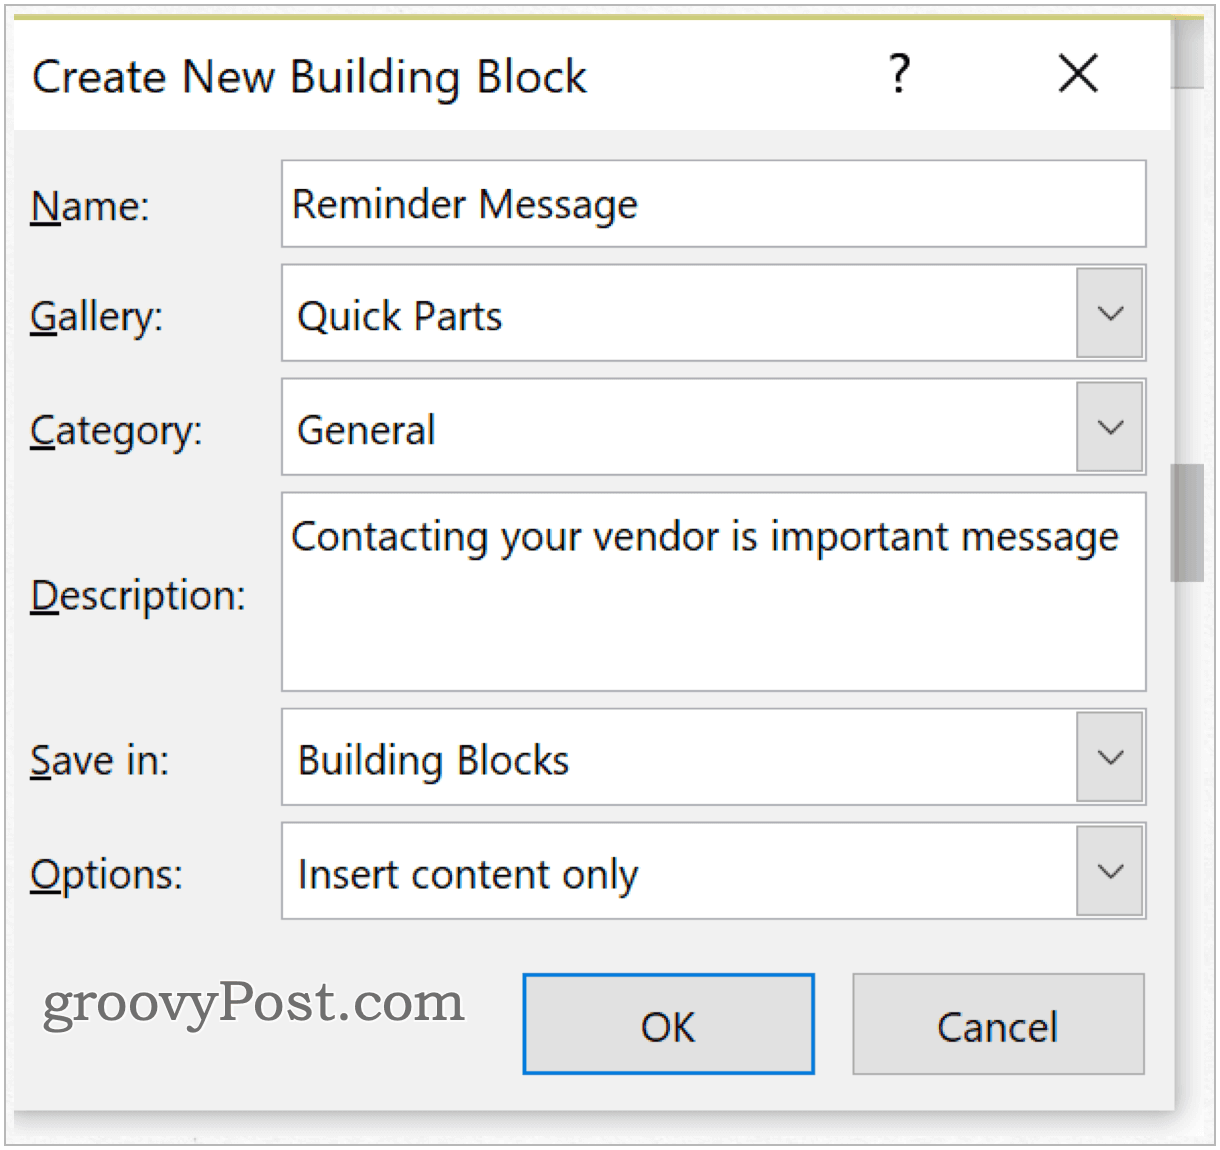
Now the “Create New Building Block” dialog box will pop up. Here you can Name your building block, put in a Description and there are also other options you can change if you want to. Once you have done that then just click ‘OK’.
Go back to this QuickParts menu in the Insert Tab to create as many building blocks as you want.
To find your new Building Block just go back to ‘AutoText’ under ‘Quick Parts’ and it will be there for you to select quickly next time you want to use it.
Remember to use Save Selection to AutoText Gallery for text!
Image Building Blocks
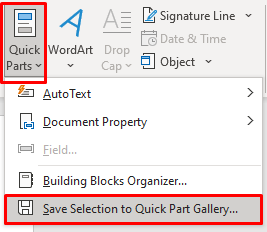
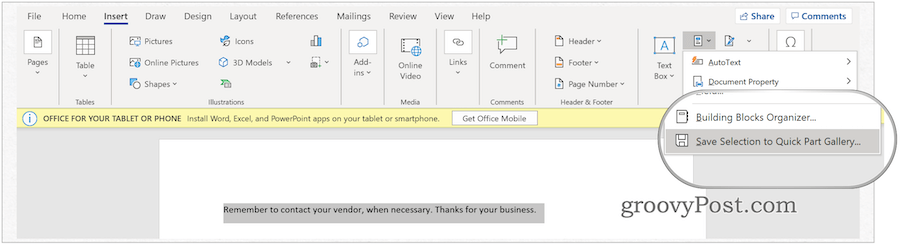
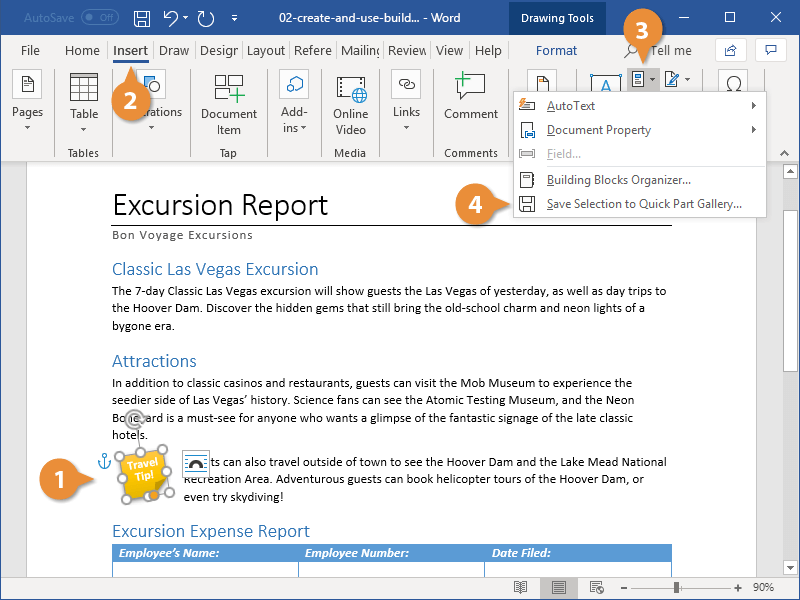
If you want to save a picture or any other content then what you need to do is select the picture and then go to ‘Quick Parts’ under the ‘Insert’ tab in the ‘Text’ group.
This time you need to click on ‘Save Selection to Quick Part Gallery’
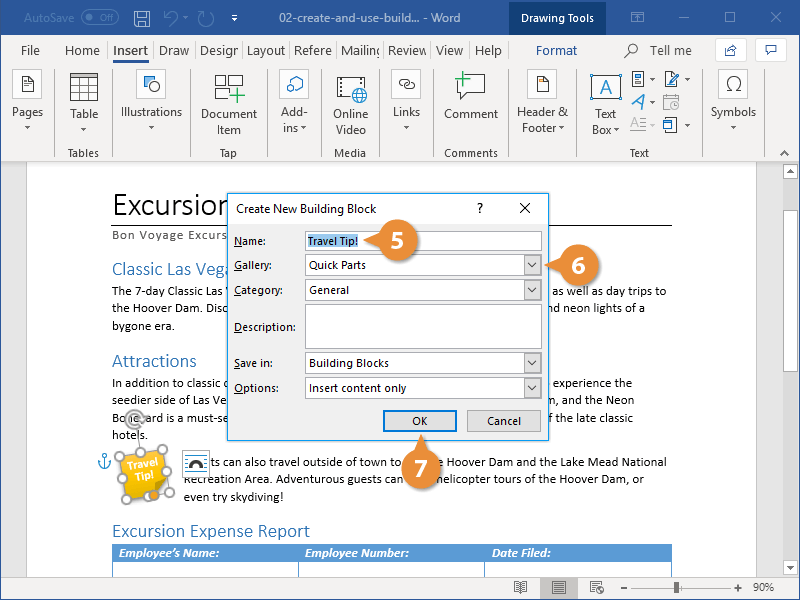
Then you can Name, Describe and change any options that you want to. Here it may be more important for you to choose which gallery you want to save the building block in. Here I have just used the General category, but you can create a new category for your image too! Once you have done this click ‘OK’

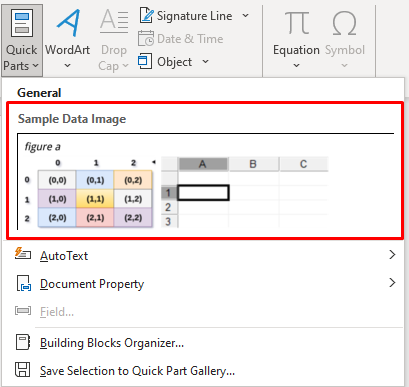
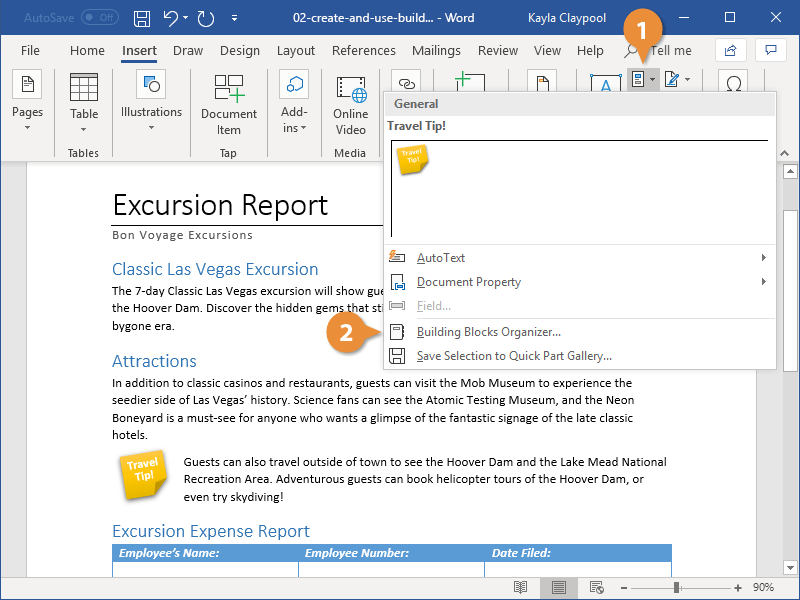
Now your image will be found in the Quick Parts Gallery.
Remember to use Save Selection to Quick Part Gallery for images!
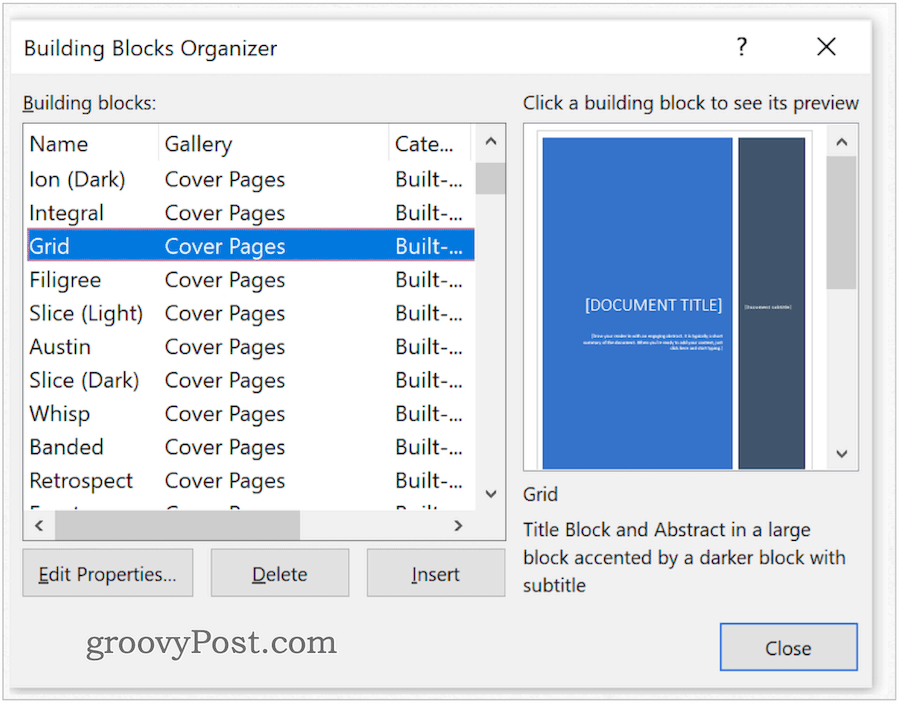
Building Blocks Organizer
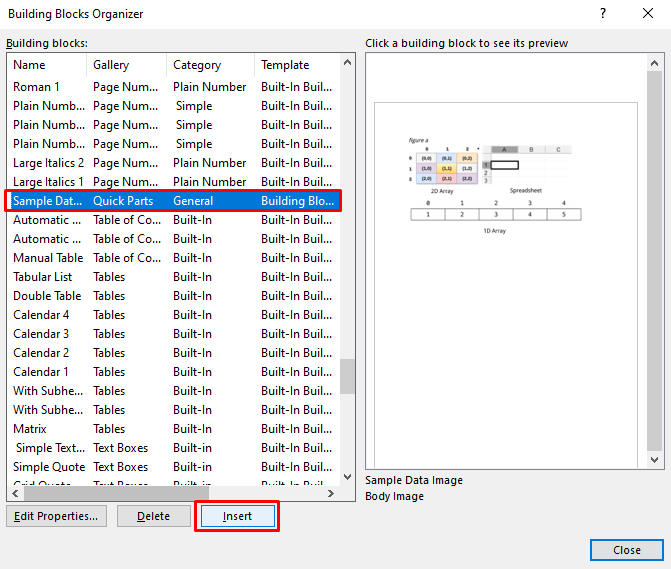
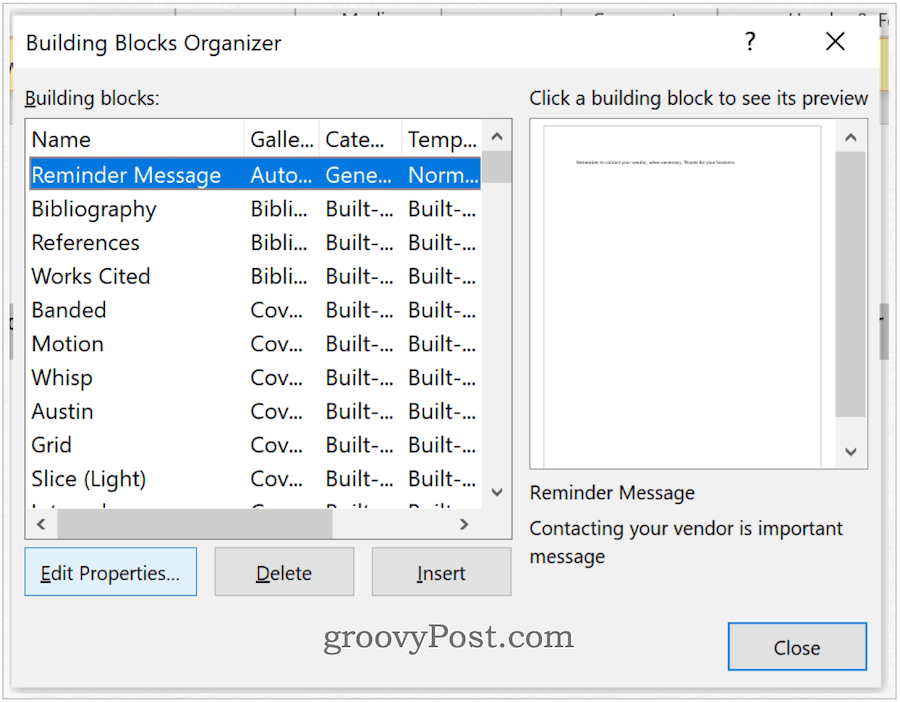
To find your new picture Building Block you need to go to ‘Quick Parts’ and click on ‘Building Blocks Organizer’. This is where all existing Building Blocks are found.
Then you need to find the section you saved your building block in within the Building Blocks Organizer. This is where the category will come in handy. Your Building Block can also be found by navigating to the Building Blocks Template in the final field.
Once you have found your Building Block content, select it and click ‘Insert’. This will insert the Building Block to your current page!

Building blocks in Microsoft Word are pre-designed and customized blocks of text and formatting. This feature for inserting content makes document creation much easier.
When it comes to word processing, finding ways to save time is essential to maintaining productivity and mental quickness. Microsoft understands this, and it’s the primary reason behind building blocks in Microsoft Word. These pre-designed and customized blocks of text and formatting techniques make it easier to insert content, including text and graphics, thereby cutting down on typing.
Say Hello to Building Blocks
Located in the Microsoft Word Quick Part Gallery, these building blocks take many forms, including preformatted headers, footers, text boxes, cover pages, page numbers, quick tables, watermarks, table of contents, bibliographies, and equations. The often-used AutoText feature in Microsoft Word is a common type of building block. In fact, the feature grew out of AutoText in previous versions of Word.
Theme-enabled, building block content automatically changes with the many available styles. You can also customize the blocks to match your needs better. In the Quick Part Gallery, you can create, store, and reuse the blocks. The Building Blocks Organizer is where you can find or edit a building block.
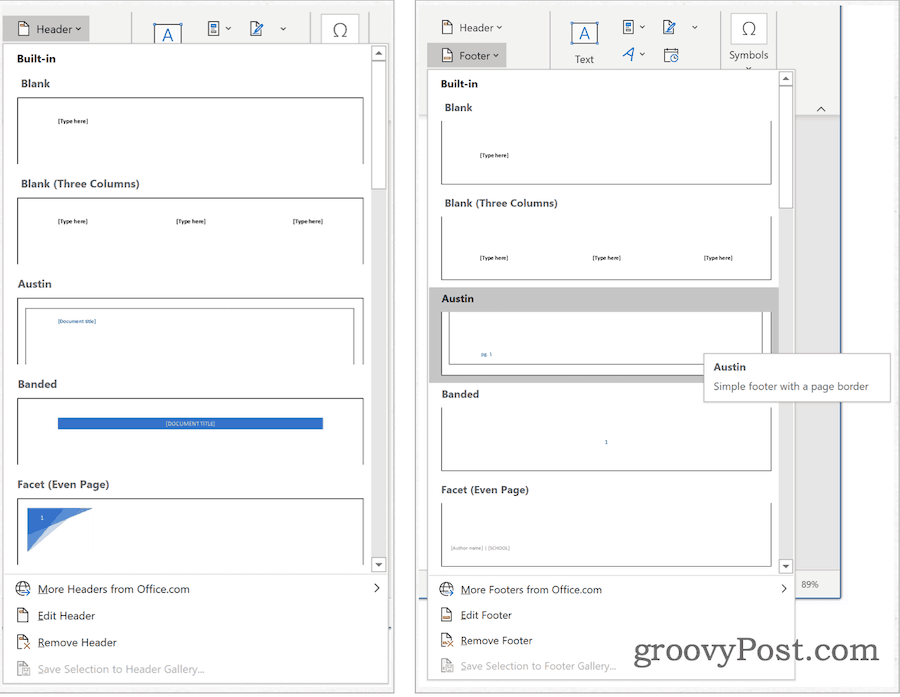
You can find many of the existing building blocks under the Microsoft Word Insert tab. In the example below, you can see the header and footer examples.
Quick Part Gallery
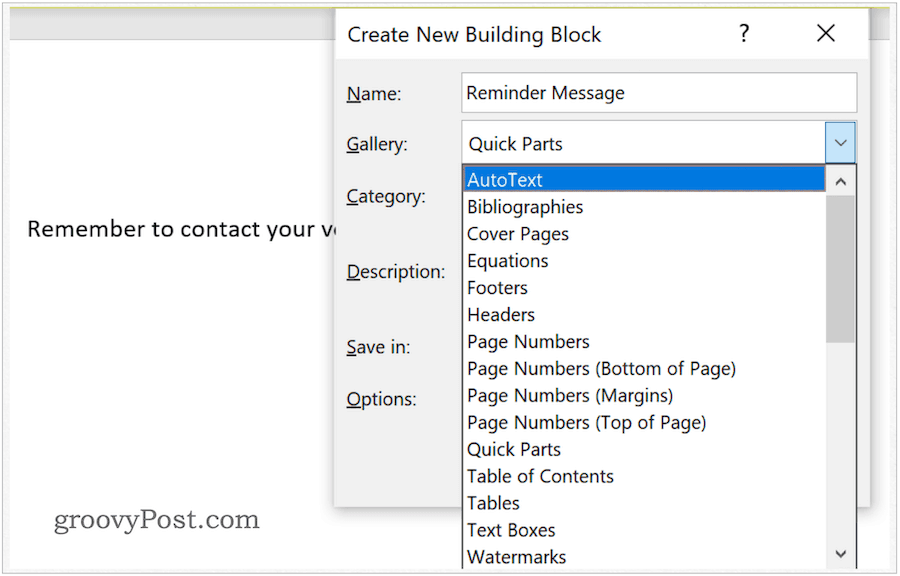
You can find the Quick Part Gallery under the Insert tab in Microsoft Word. From there, click Quick Parts under the Text group. Quick Parts is organized under five sections, including:
- AutoText: It’s here where you’ll find reusable content. By clicking on AutoText, you gain access to the AutoText gallery, which you create by clicking Save Selection to AutoText Gallery (see below).
- Document Property: This allows you to insert properties into your current document, such as author, category, and publish date.
- Field: With field codes, you can insert automatically updated information into your document. Examples include time, title, page numbers, and more.
- Building Blocks Organizer: From this location, you’ll find all the building blocks available to you in Microsoft Word. You can also edit or delete existing blocks or create new ones from there.
- Save Selection to AutoText Gallery: the Highlighted text is easily added to the AutoText Gallery using this tool. Use this tool to add frequently required text.
Reviewing Existing Quick Part Building Block
You can take a look at existing building blocks in the Quick Part Gallery:
- Have your cursor in the correct spot in Microsoft Word.
- Under the Insert tab, click Quick Parts.
- Choose the Building Blocks Organizer.
- Click Name to sort by name.
- Highlight the building block you wish to review.
- Click Edit Properties.
- Review the information contained in the Quick Part.
In the following screenshots, you can see a Cover Page building block:
Creating a Quick Part
To add a new Quick Part:
- Highlight the phrase, sentence, or another portion of your current document.
- Click Quick Parts under the Inset tab, Text group in Microsoft Word.
- Choose Save Selection to Quick Part Gallery.
- Change the name of the new Quick Part, if necessary.
- Add a description.
- Click OK to save the Quick Part.
Which Gallery?
When you’re creating a new building block, you can assign it to whatever gallery you choose. During the Create New Building Block process (see above), use the pull-down to select a gallery. To insert the block into your existing document:
- Have your cursor in the correct spot in Microsoft Word.
- Under the Insert tab, click Quick Parts.
- Choose AutoText.
- Select the AutoText to insert.
The new building block has been assigned to the AutoText gallery and then inserted into the document in the following example.
Adjust the Content of a Quick Part
You can change the content of a Quick Part by overriding it:
- Have your cursor in the correct spot in Microsoft Word.
- Under the Insert tab, click Quick Parts.
- Choose the Building Blocks Organizer.
- Click Name to sort by name.
- Highlight the building block you wish to change.
- Click Insert.
- Change the content of y0ur building block.
- Highlight the revised text.
- Click Quick Parts under the Inset tab, Text group in Microsoft Word.
- Choose Save Selection to Quick Part Gallery.
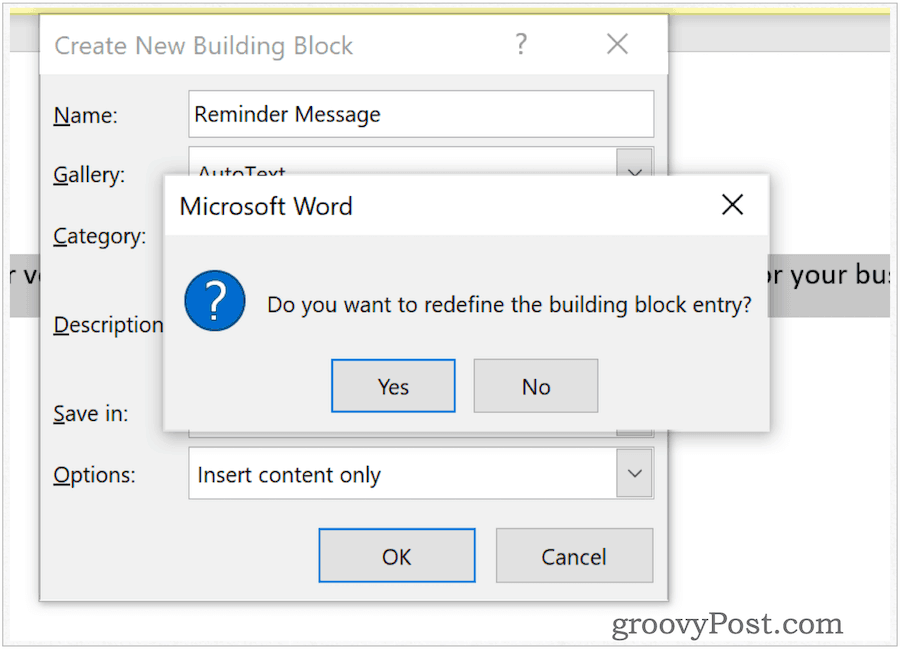
- Use the same name as the previously saved Quick Part.
- Click OK to save.
- Choose Yes to the message indicating whether you wish to change the building block.
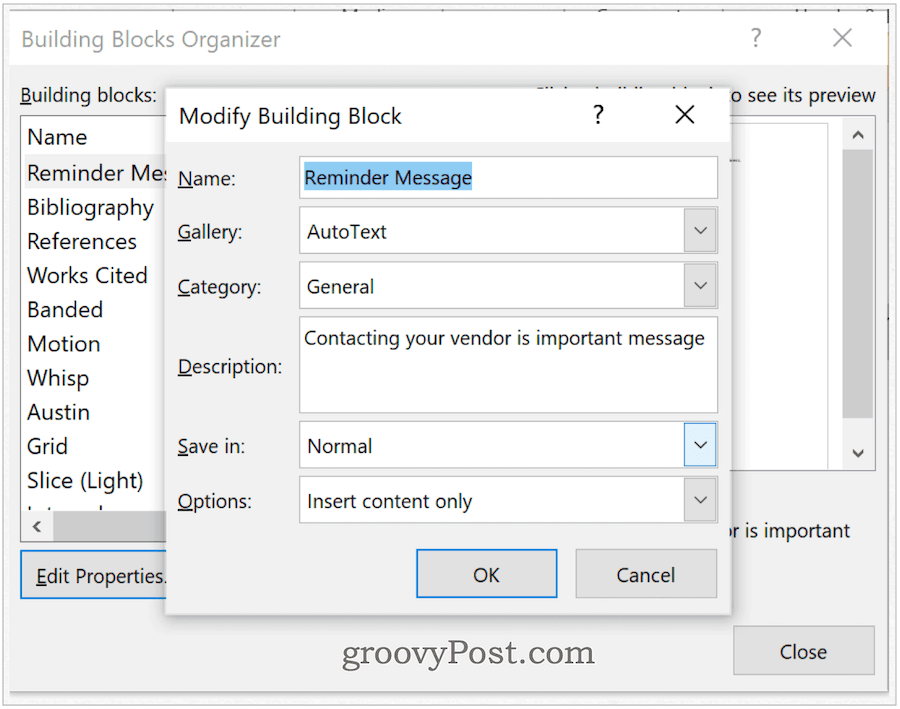
Renaming Quick Parts
At any time, you can change the name of Quick Parts. To do so:
- Under the Insert tab, click Quick Parts in Microsoft Word.
- Choose the Building Blocks Organizer.
- Click Name to sort by name.
- Highlight the building block you wish to change.
- Click Edit Properties.
- In the Name box, change the name.
- Select OK to save.
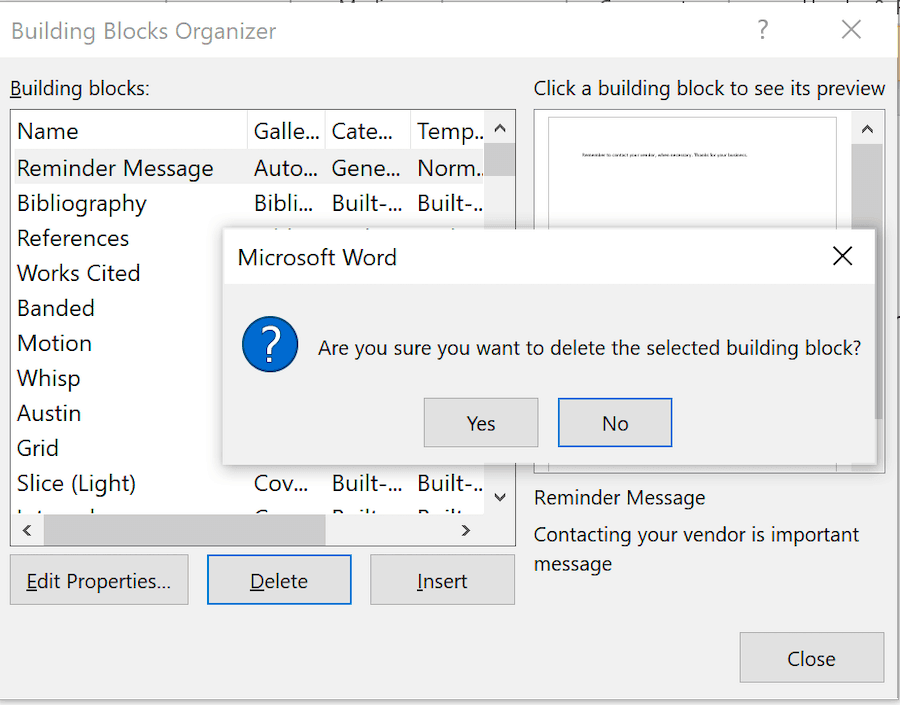
Deleting Quick Parts
To remove Quick Parts from Microsoft Word:
- Under the Insert tab, click Quick Parts in Microsoft Word.
- Choose the Building Blocks Organizer.
- Click Name to sort by name.
- Highlight the building block you wish to delete.
- Choose Delete.
- Select OK to confirm the deletion.
Using building blocks in Microsoft Word is a fairly straightforward process. Using these, you can quickly add text to your documents. These blocks are either pre-designed or customized. Use them to make your Microsoft Word experience more efficient.
![]()

Create Building Blocks in Word: Overview
You can create building blocks in Word to make reusable content you can insert into your future documents, when needed. For example, you could save your company’s logo and name as a custom building block. Doing this then lets you insert it into future documents without recreating all its content and formatting. The content you can save as a building block can include simple items, like text entries. However, it can also include more complex logos and watermarks, too, if desired. The building block content is saved into and organized by galleries. Also, note that you can save building blocks with your document templates for easy distribution.
To create building blocks in Word, you must first create the content to save and reuse. To do this, create the text, pictures, or whatever it is you want to save as a building block. Then select all the content to save as a building block. Note that if you want to save the formatting associated with a text selection, you must also include the paragraph mark that follows the selection as part of the building block. To do this, you may need to enable the display of non-printing characters by clicking the “Show/Hide Non-printing characters” button in the “Paragraph” button group on the “Home” tab of the Ribbon to see the paragraph marks.
After selecting the content to save, then click the “Insert” tab in the Ribbon. Then click the “Quick Parts” button in the “Text” button group. From the drop-down menu of choices, choose the “Save Selection to Quick Part Gallery…” command. Doing this then opens the “Create New Building Block” dialog box. Here is where you give Word the information it needs to store and organize the content for later use.
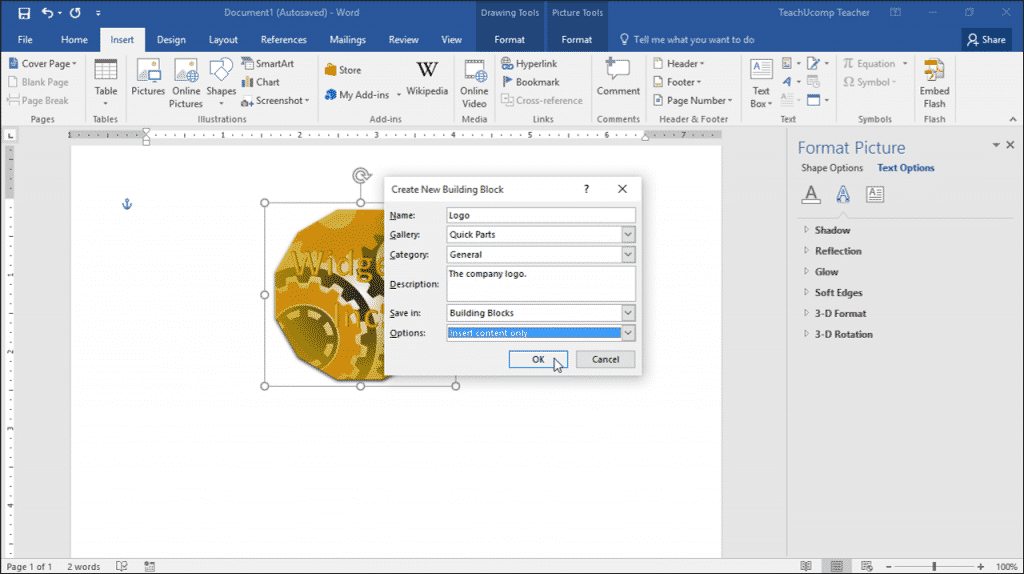
Create Building Blocks in Word – Instructions: A picture of a user creating a building block in Microsoft Word.
Enter a name for the building block into the “Name:” field. Then use the “Gallery:” drop-down to choose the type of gallery into which to save the content. Then use the “Category:” drop-down to either choose an existing classification category or create a new category. Next, enter a brief description of the content into the “Description:” field.
Then use the “Save in:” drop-down to choose the document template into which to save the content. Any document later created from the selected template will have the building block available for use. The default template for new, blank documents is called the “Normal” template. To make this building block available to all new, blank documents on the computer, choose the “Normal” choice from the “Save in:” drop-down. Otherwise, select the name of the custom template to which to save the building block. Note that to save it into a custom template, you must first open the template in Word before it can appear in the “Save in:” drop-down list in this dialog box.
After selecting a template, then use the “Options:” drop-down to choose how Word inserts the content into a document when used in the future. Your choices are “Insert content in its own page,” which inserts the building block content into its own page, with page breaks placed before and after the insertion point; “Insert in own paragraph,” which inserts the content into its own paragraph within the page; or “Insert content only,” which only inserts the building block content. After entering the information, click the “OK” button to save the selected content as a building block into the selected template.
Create Building Blocks in Word: Instructions
- To create building blocks in Word, first create and select the content to include in the building block.
- If you want to include the formatting for the content you select for a custom building block, you must include the paragraph mark that follows the selection as part of the building block.
- To save the selected content as a new building block, click the “Insert” tab in the Ribbon.
- Then click the “Quick Parts” button in the “Text” button group.
- From the drop-down menu of choices, choose the “Save Selection to Quick Part Gallery…” command to open the “Create New Building Block” dialog box.
- Then enter a name for the building block into the “Name:” field.
- Then use the “Gallery:” drop-down to choose the type of gallery into which to save the content.
- Use the “Category:” drop-down to either choose an existing classification category or create a new category.
- Then enter a brief text description of the saved content into the “Description:” field.
- Then use the “Save in:” drop-down to choose the document template into which to save the content. Any future document created from the selected template will contain the building block. Choose the “Normal” template to make the building block available to all new, blank Word documents. If you wish to save it into a custom template, you must first open the template in Word before it will appear in the “Save in:” drop-down list within this dialog box.
- Then use the “Options:” drop-down to choose how Word inserts the content into a document when used in the future. Choose “Insert content in its own page,” “Insert in own paragraph” or “Insert content only.”
- Finally, click the “OK” button.
Create Building Blocks in Word: Video Lesson
The following video lesson, titled “Creating Building Blocks,” shows you how to create building blocks in Word 2016. This video lesson is from our complete Word tutorial, titled “Mastering Word Made Easy v.2016-2013.”
Tagged under:
building block, building blocks, create, Create Building Blocks in Word, creating, document, documents, file, files, help, how-to, instructions, learn, lesson, make, making, Microsoft Office 365, microsoft word, office 365, overview, page, pages, save, saving, self study, teach, training, tutorial, video, word, Word 2013, Word 2016
Most
of us use Microsoft Office for professional and personal purposes. When you
create many documents, you may need to use same content blocks on some of your
documents. For example, you have a company logo in WordArt and need to insert
on all the documents. Another example is that you want to insert notes on
certain pages in pre-formatted text block. Word by default offers many reusable
building blocks; however, you can also create reusable content blocks in
Microsoft Word based on your need.
Related: How to changed embedded file name in Office documents?
We
will discuss the following topics in this article:
- What is content block?
- Using default content block from Quick Parts
- Insert content blocks with F3
- Creating custom content blocks
- Inserting custom content blocks
1. What is Content Block?
Open
a new Word document and navigate to “Insert” tab. Here you can see many
pre-defined blocks for Cover Page, Shapes, WordArt, Header, Footer, etc.
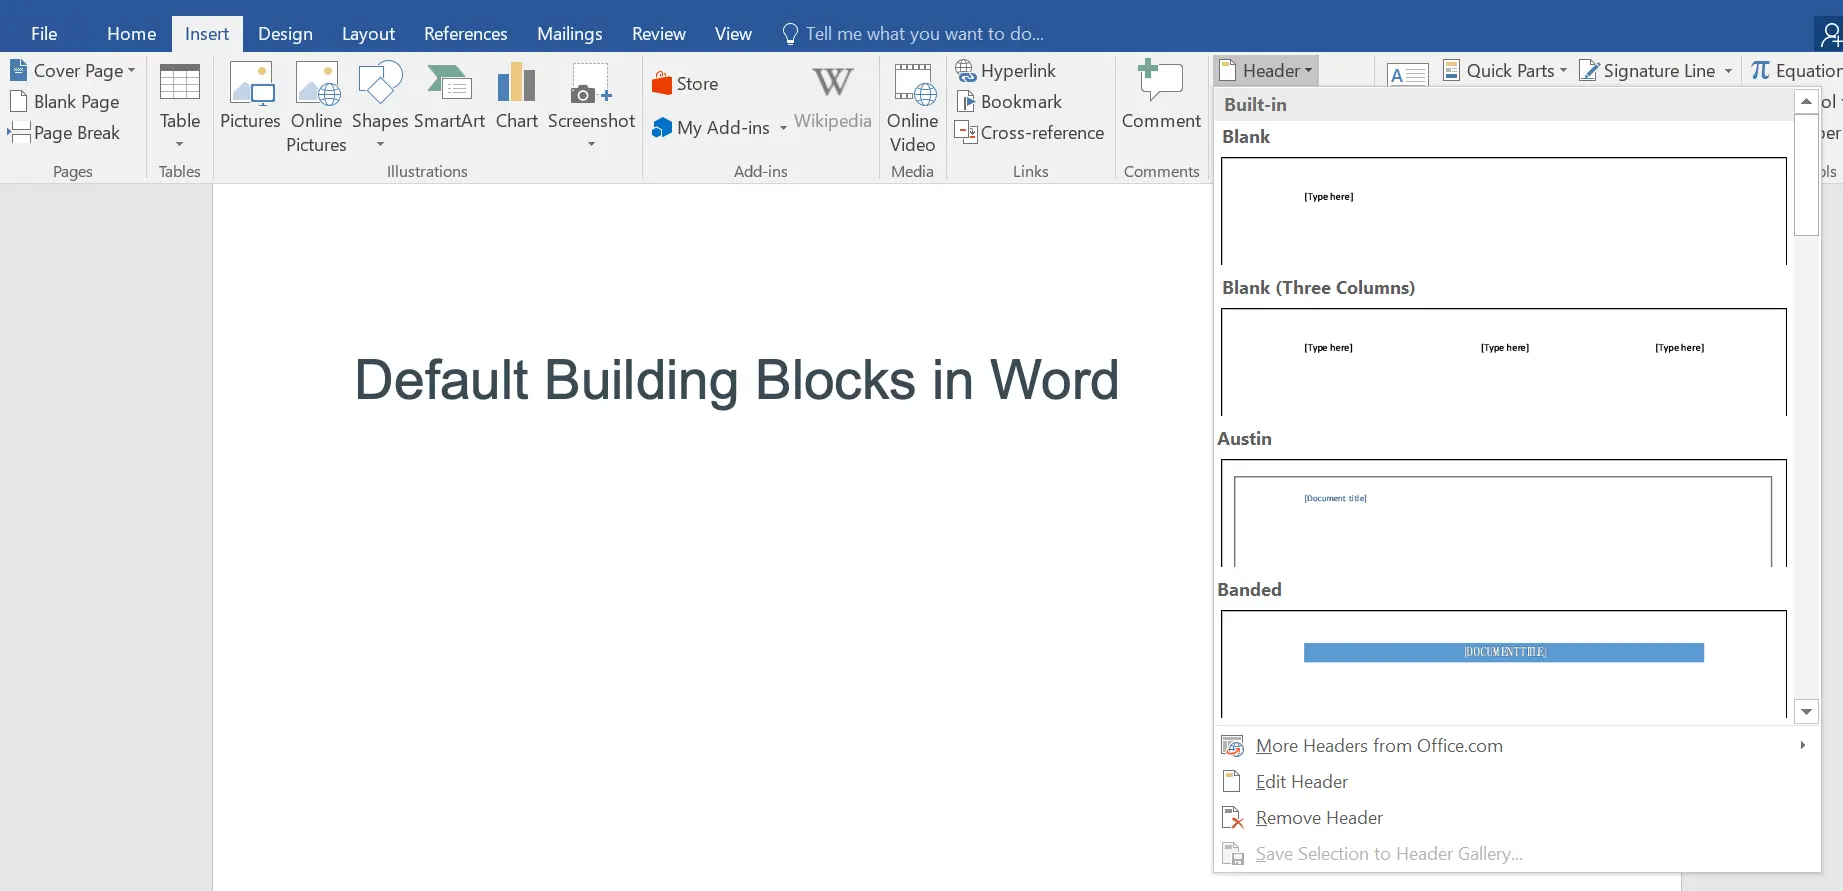
For
example, click on the “Header” and choose one of the available design for your
document. The advantage of the building blocks is that they are available on
the Word global document template and you can use on all your documents with
few clicks.
You
can also create and save custom building blocks so that you can insert anywhere
on your documents.
2. Using Quick Parts
Since
there are so many content blocks available in Word, finding it will be a
difficult task. However, Word offers a Quick Parts option to find all the
reusable content blocks in one place. Click on the “Quick Parts” option under
“Insert” tab.

You
can use Auto Text, Document Property and Field options to quickly insert
reusable blocks on documents. For example, you can quickly insert the published
date of a document by selecting the “Publish Date” option from “Document
Property”.
Click
on the “Building Blocks Organizer…” option to view all the available building
blocks.

You
can quickly filter with the “Gallery” column to select the required content
block. For example, select “Double Table” option from “Tables” “Gallery”
column. Preview the table and click on “Insert” to add on your document.
Be
cautious before deleting any of the built-in content blocks category items. You
may not be able to recover the block permanently. We also don’t recommend editing
the properties of the default content blocks. If you want to have custom blocks
then create a new block and customize as per your requirement.
Related: Quickly insert dividers in Word.
2.1. Insert Content Blocks Using F3
Before
we create custom block, you can easily insert the blocks using the name and F3
key. As you can see, Double Table is the name of the block, which is unique on
the template level. Simply type double table and press F3 key to insert a
table. Similarly, you can insert any content blocks available in the Quick
Parts.
3. Creating Custom Content Blocks
As
explained above, reusing existing blocks may not be helpful for inserting your
company logo or any custom text blocks. Let us explain two cases for creating
content blocks in Word.
3.1. Create Content Block of WordArt Logo
It is
obvious; you may need to use elements like company logo frequently on your
documents. In order to improve your productivity and avoid repeatedly creating
/ formatting a logo, save it as a reusable content building block. You can use
the logo later any point of time and on any Word documents.
- First select your logo and go to “Insert > Quick Parts” and choose
“Save Selection to Quick Part Gallery” option.

- Word will open a pop-up for creating a custom building block.

- Fill up the following details:
- Name – unique name for your
block, ensure to provide a name that does not already exist.
- By default, Word uses the
“General” category for its own quick parts. You can also define your own
categories if necessary. You can use this category name to filter the custom
blocks when searching.
- Gallery – select where you
want to add your building block. We recommend selecting “Quick Parts” so that
you can access the block from “Quick Parts” drop-down menu. However, you can
select any available gallery like “Header” and the custom block will be added
under that section.
- Word saves graphic elements
of text boxes automatically in the “Building Blocks” template. You can also
choose “Normal” template or ay other global template you use. Remember, both
these templates are global which means your custom block will be available on
all the documents.
- Click on the “Options”
dropdown to choose how you want to insert the block. You can choose to save
only inserting the content, inserting on own paragraph or inserting on own
page.
- Now confirm the settings
with “OK” and check the logo block under “Quick Parts”. You can quickly insert
anywhere on your documents and save time in formatting repeatedly.
- Name – unique name for your

3.2. Saving Text as a Building Block
You
can save any element in a document as a quick part, including titles,
formatting and graphics. Similar to logo as explained above, you can also save
text passages. Frequently used phrases like headings, signatures or an opening
passage can so be inserted easily.

- Select the text block on your document. This time, use the keyboard shortcut Alt+ F3 to open the dialog window.
- Word uses the beginning of the text as the name of the building block. Replace it with a more meaningful name.
- This quick part contains only text and is saved in the “Normal” file template.
- Confirm the settings with “OK”.
- You can view the custom text block under “Quick Parts > AutoText” section.
4. Inserting Building Blocks
Once
you have defined the building blocks you need, you can place them in your
document whenever you like. Using a simple function you can precisely insert
your building blocks and so save a lot of time and energy.
- Enter the name of the building block.
- Press the F3 key to insert the quick part.
- After inserting the block, you can edit it in the normal way.
- Word provides another option for inserting building blocks. To do this, open the “Insert” tab and the “Quick Parts” menu. Choose the block you have previously saved from the list.
- Remember that the text you have saved as “Normal” template appears under the “AutoText” submenu. However, the logo you have saved as “Building Blocks” will appear right under the “Quick Parts” drop-down.
You
can also right click on the custom block under “Quick Parts” menu and choose
where you want to insert the block on your document.

If
you want to modify the properties, choose “Edit Properties” and change the
options
Note: Whenever you enter the name of a building block text, Word will recognize it while you are typing. You can see this in a small window and insert the building block using the return key.
Related: How to create eBook in Microsoft Word?
5. Moving Content Blocks in Word
In addition to creating building blocks, you can structure
your document with headings. When using heading, enable the “Navigation Pane”
under “View” tab.

Now, you can see all the heading structure of your document. Simply drag and drop the heading block up or down to move the entire content under the heading. This will help you to easily organize the structure of your document after writing the content.
You can also select the content block on your document, simply drag and drop anywhere to move the entire block.
Building blocks are pieces of reusable text, graphics, and objects that you can easily insert in your documents. They can be as simple as an opening line to a paragraph, or as complex as an entire cover page.
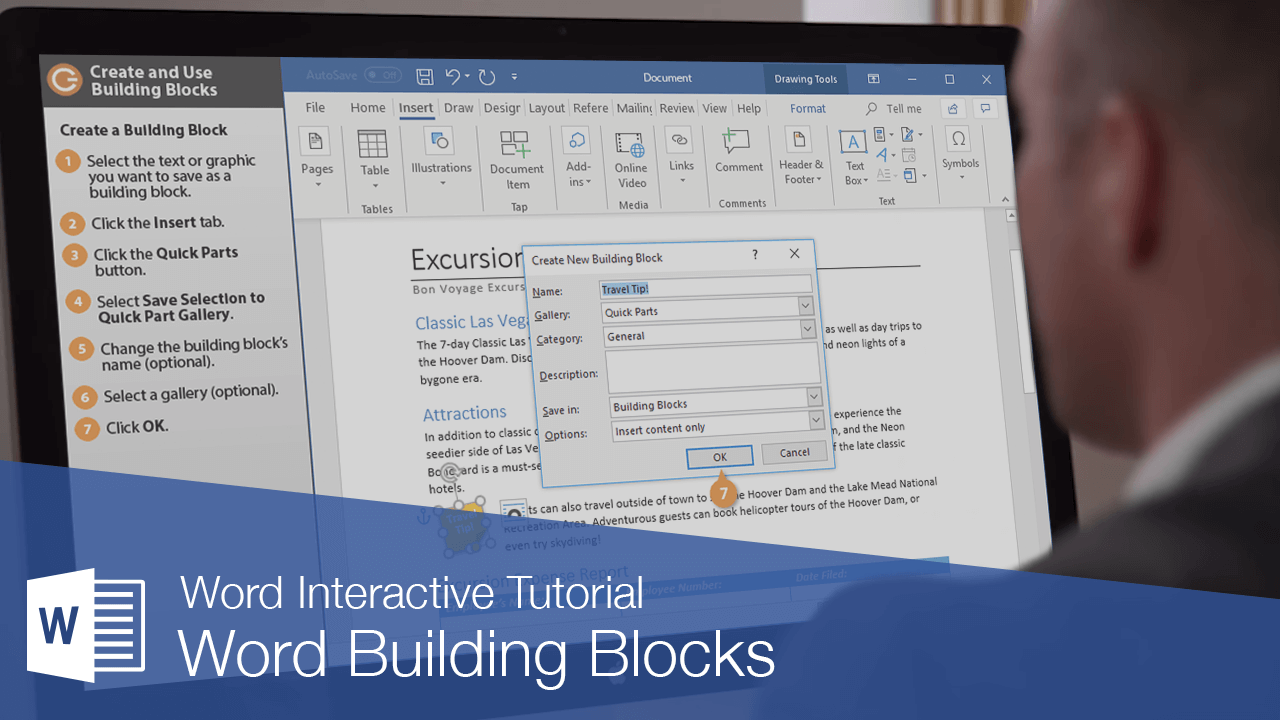
Create a Building Block
- Select the text or graphic you want to save as a building block.
- Click the Insert tab.
- Click the Quick Parts button.
- Select Save Selection to Quick Part Gallery.
The Create New Building Block dialog box opens, where you can give the building block a name, category, and description.

- (Optional) Change the building block’s name, category, and description.
If the building block you’re creating is a cover page, page number, header, footer, quick table, or watermark, you can add it to one of those existing galleries. Otherwise, you can specify Quick Parts so that it will appear in the Quick Parts gallery.
- (Optional) Select a gallery.
- Click OK.
The building block is added to the selected gallery.
Insert a Building Block
Building blocks that you’ve added to certain galleries, such as the cover page, page number, or watermark galleries, will be available when you open those galleries.
If you want to see all the building blocks in one place, no matter which gallery you added them to, you can browse the Building Blocks Organizer.
- Click the Quick Parts button on the Insert tab.
The Quick Parts gallery will display the building blocks that you’ve added to that gallery. If the building block you want to insert is here, you can just select it.
- Select Building Blocks Organizer.
The Building Blocks Organizer window opens, listing all the building blocks available to insert.
- Sort the building blocks by name, gallery, or category by clicking the column headers.
- Select a building block.
A preview of the building block appears on the right side of the window, with its name and description below.
- Click Insert.
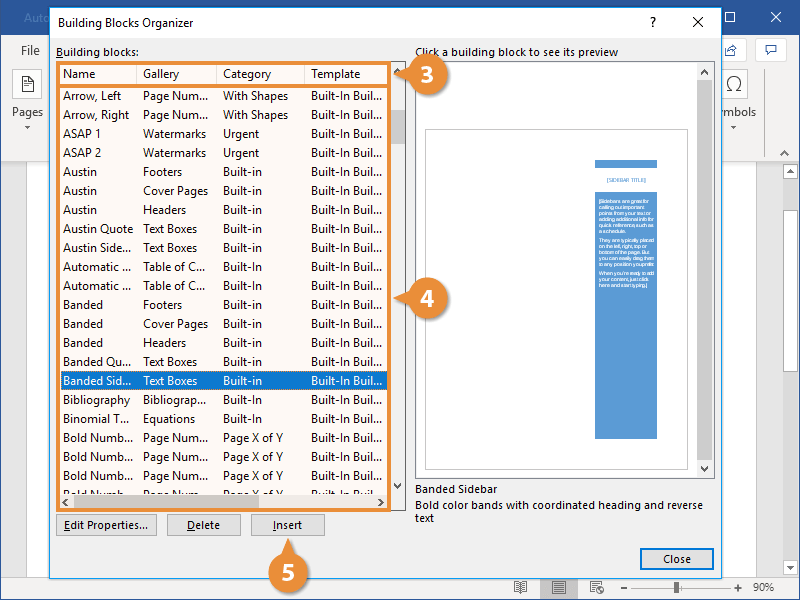
The building block is inserted.
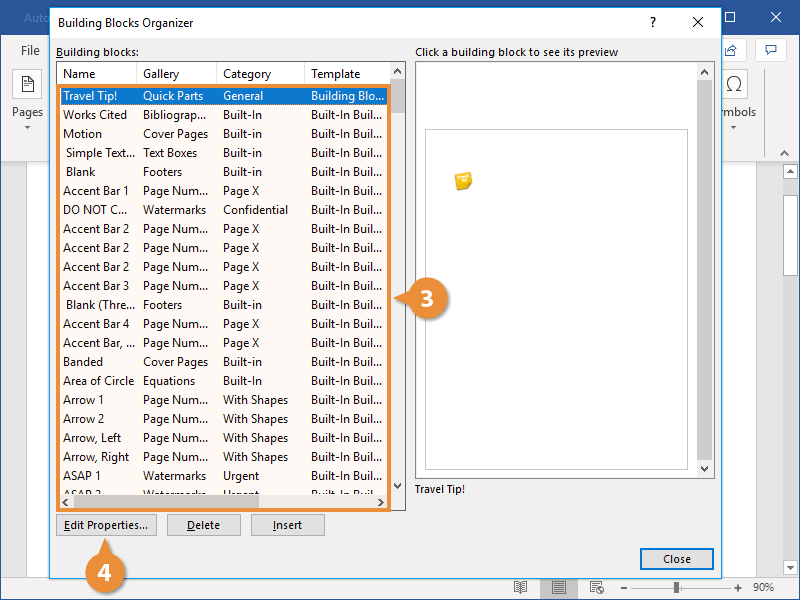
Move a Building Block to Another Template
When you create a building block, it’s saved as part of a special Building Blocks template. Anything saved in this template will be available in any document you work on, from the computer it was created on. If you’ll only need a certain building block in documents based off one template, or if you want to distribute a building block with that template, you can save a building block to another template instead.
- Click the Quick Parts button on the Insert tab.
- Select the Building Blocks Organizer.
As you can see in the Template column, building blocks can be stored in either document templates, or a special Building Blocks template.
- Select a building block that you want to move.
- Click the Edit Properties button.
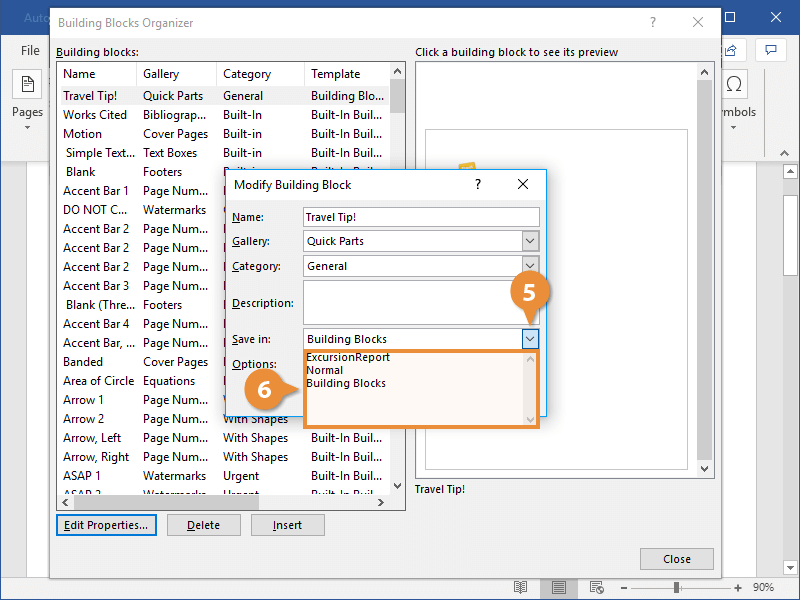
The Modify Building Block window opens, where you can edit the same properties that are available when you first create a building block.
- Click the Save In list arrow.
This list displays the Building Blocks template, as well as the template or templates that the current document is based on.
- Select a template.
- Click OK.
- Click Yes.

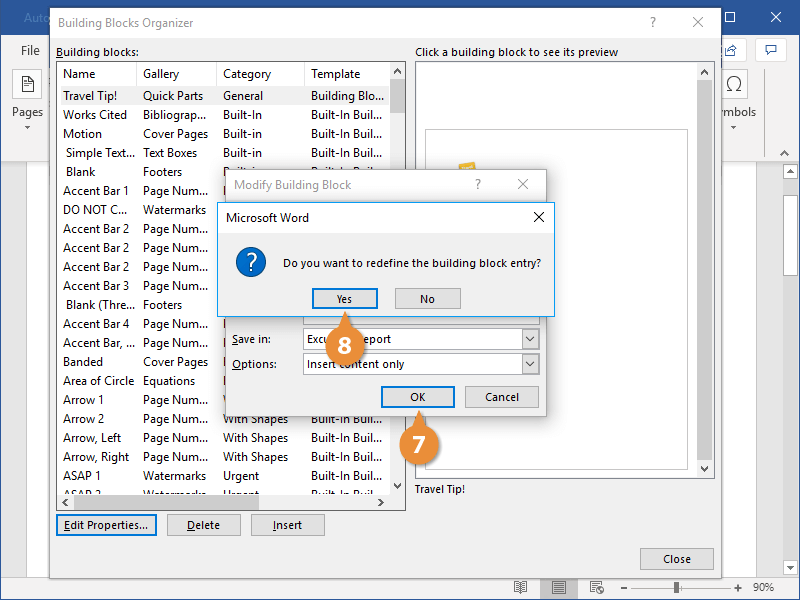
The building block is moved to the selected template.

FREE Quick Reference
Click to Download
Free to distribute with our compliments; we hope you will consider our paid training.