
If I want to describe two financial investments that are mutually beneficial, that is, the first investment increases the value of the second, while the second increases the value of the first, what single word can I use in the phrase «reciprocating ______».
It would be the opposite of devaluation, I guess, but somehow no one ever got around to making «envaluation» a word. «Mutally beneficial» doesn’t work because it’s not specifically pecuniary.
Edit: It’s to be used in a heading, so I’m hoping for an «action thing», or, as I just learned, a deverbal noun [Wikipedia]. Like the noun attack from the verb attack, except specifically and solely pecuniary.
asked Oct 24, 2015 at 23:49
![]()
CWillCWill
1,2868 silver badges16 bronze badges
3
Consider, appreciation [in value].
: an increase in the value of something
He bought the statue because he believed there would be an appreciation in its value.
Based on the history of the company, you can expect a significant appreciation in your investment over a number of years.
There’s been no appreciation in the stock’s value.
M-W Learner’s Dictionary
answered Oct 25, 2015 at 3:37
![]()
ElianElian
42.8k25 gold badges128 silver badges238 bronze badges
Growth is a term that is frequently used to describe gains in the value of a financial asset. While it’s not specifically «pecuniary» as you put it, it fits in the phrase you provided:
Reciprocating growth
Return, yield, and gain are similar alternatives that may work as well.
answered Oct 25, 2015 at 1:20
2
elevate ( —> elevation)
1: to lift up or make higher : raise
2: to raise in rank or status
improvement
the act of improving something : the act or process of making something better
I don’t know of a solely pecuniary word to fit in there. Maybe you could say reciprocating financial improvement/elevation, or something like that.
answered Oct 25, 2015 at 2:00
![]()
FærdFærd
4,1635 gold badges27 silver badges53 bronze badges
1
You could use an analogy from biology:
-
symbiosis (n)
-
symbiotic (adj)
These have the popular connotation of «mutually beneficial». Unfortunately, the current biological definition of symbiosis encompasses relationships that are NOT mutually beneficial (e.g. parasitic) so the more accepted term among biologists is
- Mutualism (n)
http://dictionary.reference.com/browse/mutualism
You didn’t say whether a drop in value of one investment also implies a drop in value of the other. If so, they both move in the same direction in either case, and you could use statistical terms:
-
positive correlation
-
positively correlated
answered Oct 25, 2015 at 8:17
![]()
Brian HitchcockBrian Hitchcock
13.5k1 gold badge21 silver badges38 bronze badges
«Enrichment» strikes me as both useful and situationally-appropriate for you.
Dictionary.com, for instance, lists a definition for «enrich» that says, «to add greater value or significance to».
Mind you, your full term, which would be «reciprocating enrichment», feels somewhat awkward. You would probably be better-served by something a little more concise, like «symbiosis».
answered Mar 15, 2016 at 15:55
![]()
Aiken DrumAiken Drum
6474 silver badges12 bronze badges
If I want to describe two financial investments that are mutually beneficial, that is, the first investment increases the value of the second, while the second increases the value of the first, what single word can I use in the phrase “reciprocating ______”.
It would be the opposite of devaluation, I guess, but somehow no one ever got around to making “envaluation” a word. “Mutally beneficial” doesn’t work because it’s not specifically pecuniary.
Edit: It’s to be used in a heading, so I’m hoping for an “action thing”, or, as I just learned, a deverbal noun [Wikipedia]. Like the noun attack from the verb attack, except specifically and solely pecuniary.
Answer
Consider, appreciation [in value].
: an increase in the value of something
He bought the statue because he believed there would be an appreciation in its value.
Based on the history of the company, you can expect a significant appreciation in your investment over a number of years.
There’s been no appreciation in the stock’s value.
M-W Learner’s Dictionary
Attribution
Source : Link , Question Author : CWill , Answer Author : Elian
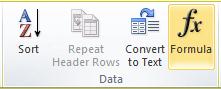
You can perform calculations and logical comparisons in a table by using formulas. The Formula command is found on the Table Tools, Layout tab, in the Data group.
A formula in Word automatically updates when you open the document that contains the formula. You can also update a formula result manually. For more information, see the section Update formula results.
Note: Formulas in Word or Outlook tables are a type of field code. For more information about field codes, see the See Also section.
In this article
-
Insert a formula in a table cell
-
Update formula results
-
Update the result of specific formulas
-
Update all the formula results in a table
-
Update all the formulas in a document
-
-
Examples: Sum numbers in a table by using positional arguments
-
Available functions
-
Use bookmarknames or cell references in a formula
-
RnCn references
-
A1 references
-
Insert a formula in a table cell
-
Select the table cell where you want your result. If the cell is not empty, delete its contents.
-
On the Table Tools, Layout tab, in the Data group, click Formula.
-
Use the Formula dialog box to create your formula. You can type in the Formula box, select a number format from the Number Format list, and paste in functions and bookmarks using the Paste Function and Paste Bookmark lists.
Update formula results
In Word, the result of a formula is calculated when it is inserted, and when the document containing the formula opens. In Outlook, the result of a formula is only calculated when it is inserted and won’t be available for the recipient of the email to edit.
You can also manually update:
-
The result of one or more specific formulas
-
The results of all formulas in a specific table
-
All the field codes in a document, including formulas
Update the result of specific formulas
-
Select the formulas that you want to update. You can select multiple formulas by holding down the CTRL key while you make selections.
-
Do one of the following:
-
Right-click the formula, then click Update field.
-
Press F9.
-
Update all the formula results in a table
-
Select the table that contains formula results that you want to update, and then press F9.
Update all the formulas in a document
Important: This procedure updates all the field codes in a document, not just formulas.
-
Press CTRL+A.
-
Press F9.
Examples: Sum numbers in a table by using positional arguments
You can use positional arguments (LEFT, RIGHT, ABOVE, BELOW) with these functions:
-
AVERAGE
-
COUNT
-
MAX
-
MIN
-
PRODUCT
-
SUM
As an example, consider the following procedure for adding numbers by using the SUM function and positional arguments.
Important: To avoid an error while summing in a table by using positional arguments, type a zero (0) in any empty cell that will be included in the calculation.
-
Select the table cell where you want your result. If the cell is not empty, delete its contents.
-
On the Table Tools, Layout tab, in the Data group, click Formula.
-
In the Formula dialog box, do one of the following:
|
To add the numbers… |
Type this in the Formula box |
|---|---|
|
Above the cell |
=SUM(ABOVE) |
|
Below the cell |
=SUM(BELOW) |
|
Above and below the cell |
=SUM(ABOVE,BELOW) |
|
Left of the cell |
=SUM(LEFT) |
|
Right of the cell |
=SUM(RIGHT) |
|
Left and right of the cell |
=SUM(LEFT,RIGHT) |
|
Left of and above the cell |
=SUM(LEFT,ABOVE) |
|
Right of and above the cell |
=SUM(RIGHT,ABOVE) |
|
Left of and below the cell |
=SUM(LEFT,BELOW) |
|
Right of and below the cell |
=SUM(RIGHT,BELOW) |
-
Click OK.
Available functions
Note: Formulas that use positional arguments (e.g., LEFT) do not include values in header rows.
The following functions are available for use in Word and Outlook table formulas:
|
Function |
What it does |
Example |
Returns |
|---|---|---|---|
|
ABS() |
Calculates the absolute value of the value inside the parentheses |
=ABS(-22) |
22 |
|
AND() |
Evaluates whether the arguments inside the parentheses are all TRUE. |
=AND(SUM(LEFT)<10,SUM(ABOVE)>=5) |
1, if the sum of the values to the left of the formula (in the same row) is less than 10 and the sum of the values above the formula (in the same column, excluding any header cell) is greater than or equal to 5; 0 otherwise. |
|
AVERAGE() |
Calculates the average of items identified inside the parentheses. |
=AVERAGE(RIGHT) |
The average of all values to the right of the formula cell, in the same row. |
|
COUNT() |
Calculates the count of items identified inside the parentheses. |
=COUNT(LEFT) |
The number of values to the left of the formula cell, in the same row. |
|
DEFINED() |
Evaluates whether the argument inside the parentheses is defined. Returns 1 if the argument has been defined and evaluates without error, 0 if the argument has not been defined or returns an error. |
=DEFINED(gross_income) |
1, if gross_income has been defined and evaluates without error; 0 otherwise. |
|
FALSE |
Takes no arguments. Always returns 0. |
=FALSE |
0 |
|
IF() |
Evaluates the first argument. Returns the second argument if the first argument is true; returns the third argument if the first argument is false. Note: Requires exactly three arguments. |
=IF(SUM(LEFT)>=10,10,0) |
10, if the sum of values to the left of the formula is at least 10; 0 otherwise. |
|
INT() |
Rounds the value inside the parentheses down to the nearest integer. |
=INT(5.67) |
5 |
|
MAX() |
Returns the maximum value of the items identified inside the parentheses. |
=MAX(ABOVE) |
The maximum value found in the cells above the formula (excluding any header rows). |
|
MIN() |
Returns the minimum value of the items identified inside the parentheses. |
=MIN(ABOVE) |
The minimum value found in the cells above the formula (excluding any header rows). |
|
MOD() |
Takes two arguments (must be numbers or evaluate to numbers). Returns the remainder after the second argument is divided by the first. If the remainder is 0 (zero), returns 0.0 |
=MOD(4,2) |
0.0 |
|
NOT() |
Takes one argument. Evaluates whether the argument is true. Returns 0 if the argument is true, 1 if the argument is false. Mostly used inside an IF formula. |
=NOT(1=1) |
0 |
|
OR() |
Takes two arguments. If either is true, returns 1. If both are false, returns 0. Mostly used inside an IF formula. |
=OR(1=1,1=5) |
1 |
|
PRODUCT() |
Calculates the product of items identified inside the parentheses. |
=PRODUCT(LEFT) |
The product of multiplying all the values found in the cells to the left of the formula. |
|
ROUND() |
Takes two arguments (first argument must be a number or evaluate to a number; second argument must be an integer or evaluate to an integer). Rounds the first argument to the number of digits specified by the second argument. If the second argument is greater than zero (0), first argument is rounded down to the specified number of digits. If second argument is zero (0), first argument is rounded down to the nearest integer. If second argument is negative, first argument is rounded down to the left of the decimal. |
=ROUND(123.456, 2) =ROUND(123.456, 0) =ROUND(123.456, -2) |
123.46 123 100 |
|
SIGN() |
Takes one argument that must either be a number or evaluate to a number. Evaluates whether the item identified inside the parentheses if greater than, equal to, or less than zero (0). Returns 1 if greater than zero, 0 if zero, -1 if less than zero. |
=SIGN(-11) |
-1 |
|
SUM() |
Calculates the sum of items identified inside the parentheses. |
=SUM(RIGHT) |
The sum of the values of the cells to the right of the formula. |
|
TRUE() |
Takes one argument. Evaluates whether the argument is true. Returns 1 if the argument is true, 0 if the argument is false. Mostly used inside an IF formula. |
=TRUE(1=0) |
0 |
Use bookmarknames or cell references in a formula
You can refer to a bookmarked cell by using its bookmarkname in a formula. For example, if you have bookmarked a cell that contains or evaluates to a number with the bookmarkname gross_income, the formula =ROUND(gross_income,0) rounds the value of that cell down to the nearest integer.
You can also use column and row references in a formula. There are two reference styles: RnCn and A1.
Note: The cell that contains the formula is not included in a calculation that uses a reference. If the cell is part of the reference, it is ignored.
RnCn references
You can refer to a table row, column, or cell in a formula by using the RnCn reference convention. In this convention, Rn refers to the nth row, and Cn refers to the nth column. For example, R1C2 refers to the cell that is in first row and the second column. The following table contains examples of this reference style.
|
To refer to… |
…use this reference style |
|---|---|
|
An entire column |
Cn |
|
An entire row |
Rn |
|
A specific cell |
RnCn |
|
The row that contains the formula |
R |
|
The column that contains the formula |
C |
|
All the cells between two specified cells |
RnCn:RnCn |
|
A cell in a bookmarked table |
Bookmarkname RnCn |
|
A range of cells in a bookmarked table |
Bookmarkname RnCn:RnCn |
A1 references
You can refer to a cell, a set of cells, or a range of cells by using the A1 reference convention. In this convention, the letter refers to the cell’s column and the number refers to the cell’s row. The first column in a table is column A; the first row is row 1. The following table contains examples of this reference style.
|
To refer to… |
…use this reference |
|---|---|
|
The cell in the first column and the second row |
A2 |
|
The first two cells in the first row |
A1,B1 |
|
All the cells in the first column and the first two cells in the second column |
A1:B2 |
Last updated 2015-8-29
See Also
Field codes in Word and Outlook
You may have found that it is possible to copy data from a Microsoft Excel spreadsheet to a Microsoft Word document, but sometimes you are working with data in Microsoft Word and need to be able to perform some simple functions. Word 2010 does have the capabilities of performing some basic arithmetic functions, and adding table values is one of them.
Our tutorial below will walk you through the process of getting a sum total into one of the cells in a table in Microsoft Word so that you can continue to create the rest of your document.
Use a SUM Formula in a Table in Word 2010
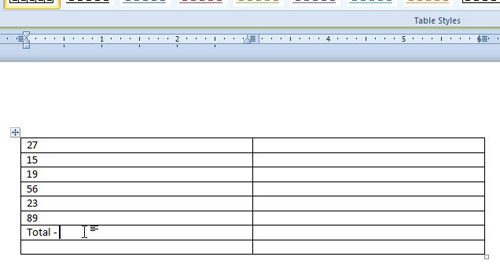
The steps in this article will assume that you already have a Word table containing the cell values that you want to add. We will be inserting the sum of a column of values into the cell below those values, behind the word “Total.” Including the word “Total” is optional, but can be helpful in identifying information in the table.
Step 1: Open your document in Word 2010.
Step 2: Click at the position in your table where you wish to insert the sum total of the cell values above.
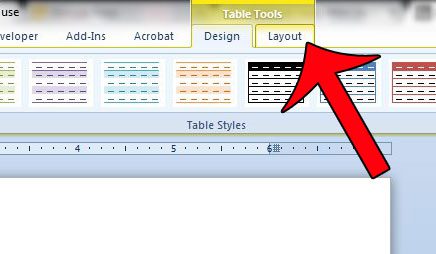
Step 3: Click the Layout tab under Table Tools at the top of the window.
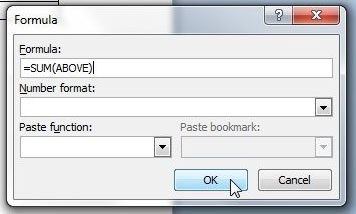
Step 4: Click the Formula button in the Data section of the ribbon at the top of the window.
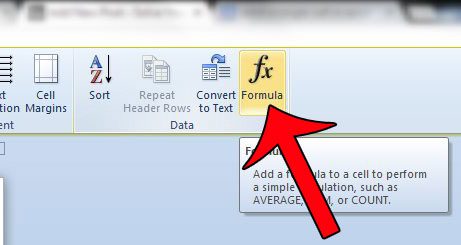
Step 5: Confirm that the formula in the Formula field says =SUM(ABOVE), then click the OK button. If you want to display the sum as a percentage or as currency, then click the Number format drop-down menu and select the appropriate format.
If you only want to add some of the values from a range, then you can modify the formula a bit. For example, in the image above, I could add the first three numbers in my column. The modified formula to do so would instead be =SUM(A1:A3). The cell locations in a Word table are organized the same way as they are in Excel, so the first column from the left is column A, the second column is Column B, etc. The first row is Row 1, the second row is Row 2, etc.
If you wish to add the values in a row instead of the values in a column, you can click in a cell to the left or right of the data that you want to add, and Word will update the formula based upon what it thinks you are trying to do.
You can perform some other tasks on your table data, including a sort. This article will show you how to sort data within a table in Word 2010.

Matthew Burleigh has been writing tech tutorials since 2008. His writing has appeared on dozens of different websites and been read over 50 million times.
After receiving his Bachelor’s and Master’s degrees in Computer Science he spent several years working in IT management for small businesses. However, he now works full time writing content online and creating websites.
His main writing topics include iPhones, Microsoft Office, Google Apps, Android, and Photoshop, but he has also written about many other tech topics as well.
Read his full bio here.
Insert Fields in a Microsoft Word Document to Display Variable Content
by Avantix Learning Team | Updated January 10, 2021
Applies to: Microsoft® Word® 2010, 2013, 2016, 2019 or 365 (Windows)
You can insert built-in or custom fields in Word documents to display variable content that will change when you update the fields. Some fields (like page numbers, merge fields or cross-references) are inserted automatically when you use Microsoft Word features. If you want to insert custom fields, you will need to create custom document properties.
By default, Word displays the result of a field rather than its field codes. You can right-click a field and select Toggle Field Codes to display field codes or field results.
Recommended article: How to Hide Comments in Word (or Display Them)
Do you want to learn more about Microsoft Word? Check out our virtual classroom or live classroom Word courses >
If you are working with fields in Microsoft Word, you will be using quite a few function keys (such as F9). On some laptops, you will need to press the Fn key on your keyboard to enable your function keys. For example, instead of pressing F9 to update a field or fields, you would press Fn + F9.
Inserting built-in fields
To insert a field, click Quick Parts in the Text group on the Insert tab in the Ribbon. The Field command appears in the Quick Parts drop-down menu as follows:

Below is the Field dialog box in Microsoft Word with Page selected:

To insert a built-in field using the Field dialog box:
- Navigate to the location in the Word document where you want to insert a field.
- Click the Insert tab in the Ribbon and then click Quick Parts in the Text group. A drop-down menu appears.
- Select Field. A dialog box appears.
- In the list of Field names, select a field. You can filter the list by clicking the down arrow in the Categories list and selecting a category first. Select All to display all fields.
- Under Field properties, select any properties or options you want.
- To view the codes for a field in the Field box, click Field Codes. For some fields, this button is clicked by default.
- Ensure that Preserve Formatting During Updates is checked so that formatting you apply is not removed when the fields are updated.
- Click OK. The field is inserted into the document.
Format the field results by applying text formatting to the field using the Home tab in the Ribbon.
You can view or hide all field codes in your document by pressing Alt + F9. Field codes appear between braces or curly brackets { } and you cannot type these braces. Be sure to hide the field codes again by pressing Alt + F9.
To edit a built-in field in the Field dialog box:
- Right-click the field and then click Edit Field. A dialog box appears.
- Change the field properties and options.
- Click OK.
Understanding Word document properties
There are 3 different types of document properties in Word:
- Standard document properties (also called built-in document properties)
- Custom document properties
- Document library properties
Word documents contain a set of standard document properties such as Title, Author, Keywords and Comments. These properties are used to store metadata about your document. You cannot change the name of standard properties but you can edit the value of some of them (such as Title). Other standard properties that cannot be edited store data that is updated automatically (such as Size or Last Modified).
Document library properties are related to documents that are stored in a document library on a website or in a public folder (such as files in SharePoint).
In addition to the standard properties, you can create your own custom document properties. These properties can be created to store additional information in a document other than the standard document properties. For example, custom document properties could be created for Product1, Product2, Product3, Sponsor, Project Manager, Cell Phone or Disclaimer. Each custom document property must be assigned a name, a data type and a value. The four data types are Text, Date, Number and Yes or No.
After you create custom document properties for your Word document, you can then insert them as custom fields.
Adding a custom document property
To add a custom document property:
- Open the Word document in which you want to add a custom document property.
- Click the File tab in the Ribbon and then click Info on the left. Info is usually selected by default.
- On the right side of screen, click Properties. A drop-down menu appears.
- Select Advanced Properties. A dialog box appears.
- Click the Custom tab in the dialog box.
- Type a name for the custom document property in the Name box. You can also choose one of the other properties that appear in the drop-down list.
- Select Text, Date, Number or Yes or No as the data type for the custom property.
- Enter a value for the property in the Value box.
- Click Add. The custom property appears in the list at the bottom of the dialog box.
- Click OK.
After you have added a custom document property, you will be able to insert it into your document as a field.
In the example below, we’re adding a field for Project Manager:

After you click Add, the custom field appears in the Properties list:

Inserting custom document property fields
The value of a custom document property can be inserted in a Word document using DocProperty fields. Custom document properties that have been added to a document are saved with the document whether they are inserted as a DocProperty field or not. You can insert DocProperty fields multiple times in a document.
To insert a custom document property field using the Field dialog box:
Navigate to the location in the Word document where you want to insert a field.
- Click the Insert tab in the Ribbon and then click Quick Parts in the Text group. A drop-down menu appears.
- Select Field. A dialog box appears.
- In the list of Field names on the left, select DocProperty.
- Under Field properties, select a property name.
- To view the codes for a field in the Field box, click Field Codes. For some fields, this button is clicked by default.
- Ensure that Preserve Formatting During Updates is checked so that formatting you apply is not removed when the fields are updated.
- Click OK. The field is inserted into the document.
In the example below, we’re inserting the custom Project Manager field we created in Advanced Properties:

Updating built-in and custom fields
Word should automatically update fields when a document is opened. Many fields are also updated automatically when you go to Print Preview (click the File tab and then click Print). If you prefer, you can update fields manually.
To update a field manually, right-click the field and then click Update Field or press F9.
To update all fields manually in the main body of a document, press Ctrl + A to select all and then press F9.
Some fields in headers, footers or text boxes must be updated separately. Click in the header, footer or text box, press Ctrl + A to select all and then press F9. Page fields do not need to be updated manually because they update when you go the Print Preview.
If you want to edit a custom DocProperty field, you will need to edit it in the Advanced Properties dialog box.
Subscribe to get more articles like this one
Did you find this article helpful? If you would like to receive new articles, join our email list.
More resources
How to Create, Save, Edit and Use Templates in Word
How to Insert, Format and Update Cross-References in Word
5 Ways to Insert the Division Symbol in Word (Type or Insert ÷)
10 Microsoft Word Tips, Tricks and Shortcuts for Selecting in Tables
How to Create a Table of Contents in Word (Insert, Format and Update a TOC)
Related courses
Microsoft Word: Intermediate / Advanced
Microsoft Excel: Intermediate / Advanced
Microsoft PowerPoint: Intermediate / Advanced
Microsoft Word: Long Documents Master Class
Microsoft Word: Styles, Templates and Tables of Contents
Microsoft Word: Designing Dynamic Word Documents Using Fields
VIEW MORE COURSES >
Our instructor-led courses are delivered in virtual classroom format or at our downtown Toronto location at 18 King Street East, Suite 1400, Toronto, Ontario, Canada (some in-person classroom courses may also be delivered at an alternate downtown Toronto location). Contact us at info@avantixlearning.ca if you’d like to arrange custom instructor-led virtual classroom or onsite training on a date that’s convenient for you.
Copyright 2023 Avantix® Learning
Microsoft, the Microsoft logo, Microsoft Office and related Microsoft applications and logos are registered trademarks of Microsoft Corporation in Canada, US and other countries. All other trademarks are the property of the registered owners.
Avantix Learning |18 King Street East, Suite 1400, Toronto, Ontario, Canada M5C 1C4 | Contact us at info@avantixlearning.ca