
Taking advantage of Microsoft Word’s proofing and editing options can help you maintain a scholarly level of writing and complete the dissertation process more quickly. For many writers, it is hard to focus on the minute details, including spacing between sentences and whether the use of affect or effect is correct. With so much emphasis on the content and making sure one’s ideas and findings come across clearly, the meticulous details often fall by the wayside. However, Microsoft Word has various built-in features to help combat formatting and grammatical errors. Through this blog, I specifically reference features in Word 2016, but many of these features are available and similarly labelled in earlier versions.

Discover How We Assist to Edit Your Dissertation Chapters
Aligning theoretical framework, gathering articles, synthesizing gaps, articulating a clear methodology and data plan, and writing about the theoretical and practical implications of your research are part of our comprehensive dissertation editing services.
- Bring dissertation editing expertise to chapters 1-5 in timely manner.
- Track all changes, then work with you to bring about scholarly writing.
- Ongoing support to address committee feedback, reducing revisions.
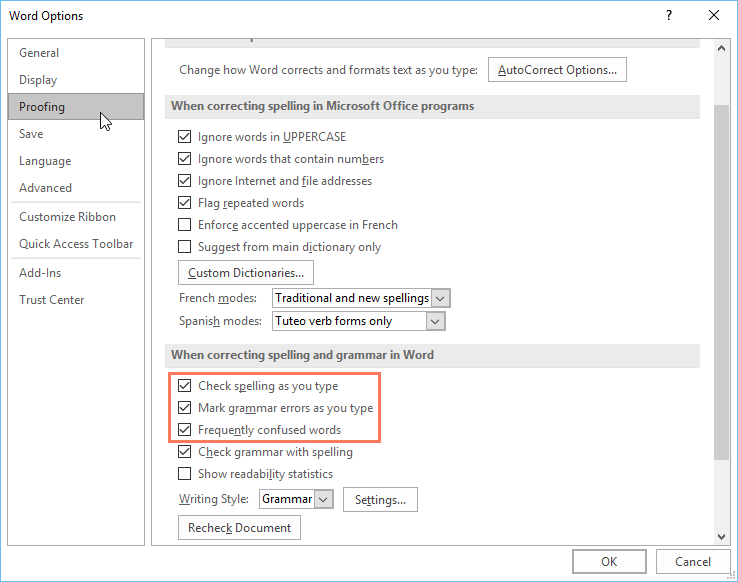
The first step to turning on the proofing and editing features is knowing how to access these options. The quickest way to access this is to go File à Options (should be at the bottom of the File drop-down). After selecting Options, a more in-depth panel should appear that includes a new list of options to choose from (see Figure 1). The Proofing option should appear on the left; in Word 2016, this option is the third down from the top.
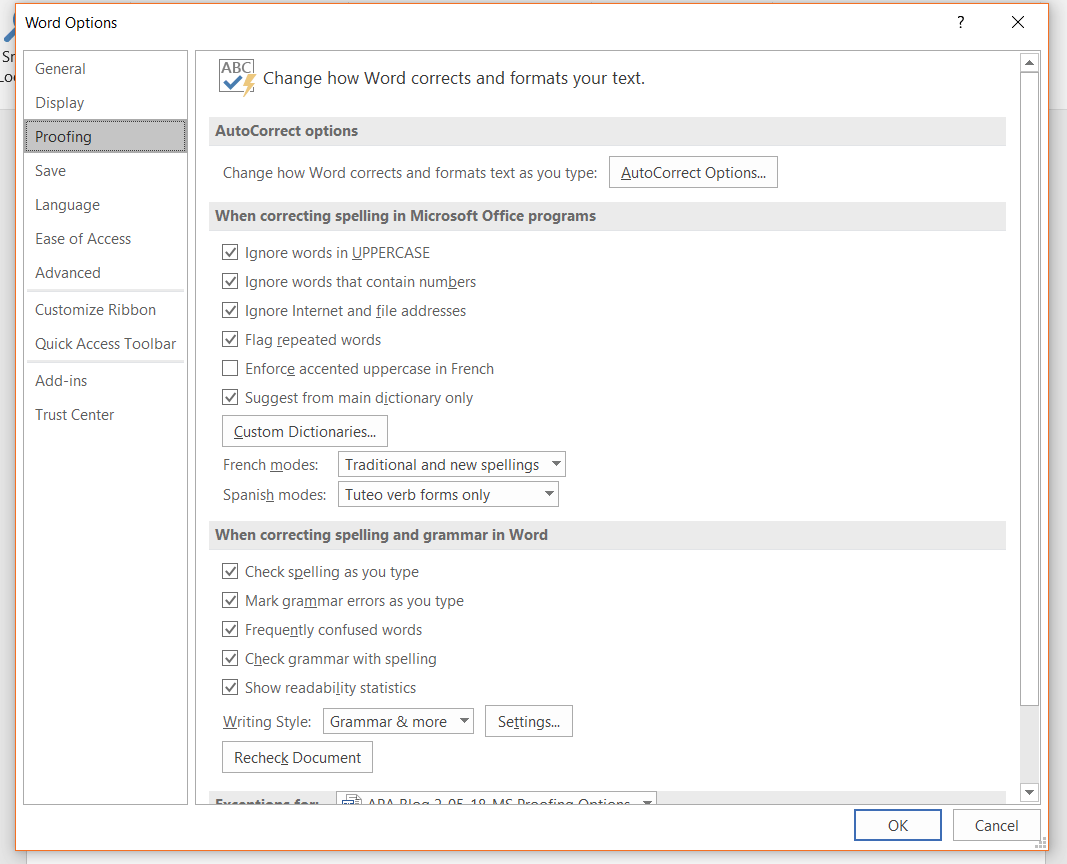
Figure 1. Word Options panel.
Within the Proofing tab, there are various formatting choices that one can make, depending on school and formatting guideline requirements. If following APA style, make sure that the Dictionary is set to English (United States). To check this, click on the Custom Dictionaries… button and under the Dictionary language drop-down and select English (United States). This will ensure that Microsoft Word is checking the proper spelling of words throughout the entire document.
As shown in Figure 1, it is best to select all of the options in the section titled When correcting spelling and grammar in Word, such as Check spelling as you type. This will help limit spelling errors while writing, instead of conducting one long spell-check at the end of the document—which can be daunting when the document contains more than 100 pages of text! At the bottom of this same section, there is a drop-down menu to the right of Writing Style. At this drop-down menu, make sure Grammar & Style is selected (you want to check both, not just grammar). To the right of this drop-down, there is a button titled Settings… This option is very important to choosing the basic style or formatting elements required by APA or the university style guide.
Under Settings. . . it is generally best to select all options and then decide whether you agree or not when Microsoft Word flags them throughout the document (see Figure 2). For example, you may not care about Date Formatting, but do want to check for the use of Comma Missing after Introductory Phrase (which is an APA requirement, e.g., According to Author,).

Figure 2. Grammar settings in Microsoft Word 2016.
Make sure to scroll through and read the options, as you may be surprised to learn the lengthy list of grammar and style elements that Microsoft Word will automatically change or highlight as errors. At the bottom of the Options, there is a section titled Punctuations Conventions. Per APA, make sure the Oxford Comma box is selected, the Punctuation Required With Quotes is set at inside, and the Space Between Sentences is set at one space OR two spaces (see Figure 3). APA prefers two spaces between sentences; however, most university guidelines require one space between sentences. Either way, it is best to keep this formatting consistent throughout and selecting this feature will ensure that Microsoft Word underlines any spacing between sentences that do not meet this requirement. Select OK when you have finished reviewing and choosing the options.
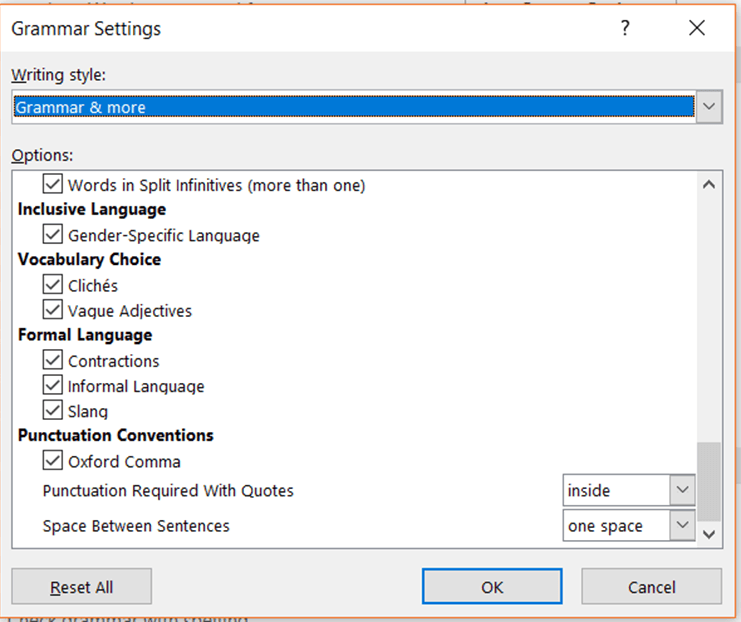
Figure 3. Grammar settings continued.
As a final step, and to verify that you have applied these settings to the document you are working in, select the Recheck Document button (see bottom of Figure 1) and then choose Yes when presented with a prompt. Before closing out of the Word Options box, Proofing settings, verify that the Hide spelling errors in this document only and Hide grammar errors in this document only options are NOT selected. Having either of the boxes checked will essentially turn off Microsoft Word’s spelling and grammar check features.
I hope this blog has been helpful and informative! Knowing how to turn on and navigate these basic grammar and formatting features will help speed up the editing process and decrease the number of errors that may hold back your dissertation from advancing toward publication.
Lesson 25: Checking Spelling and Grammar
/en/word2016/charts/content/
Introduction
Worried about making mistakes when you type? Don’t be. Word provides you with several proofing features—including the Spelling and Grammar tool—that can help you produce professional, error-free documents.
Optional: Download our practice document.
Watch the video below to learn more about using the Spelling and Grammar tool.
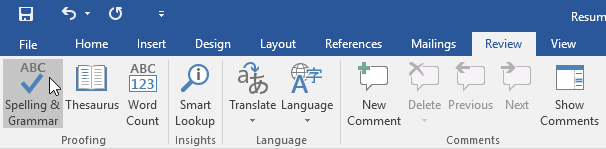
To run a Spelling and Grammar check:
- From the Review tab, click the Spelling & Grammar command.

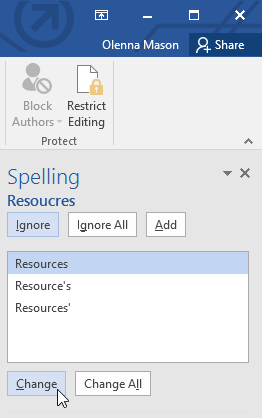
- The Spelling and Grammar pane will appear on the right. For each error in your document, Word will try to offer one or more suggestions. You can select a suggestion and click Change to correct the error.
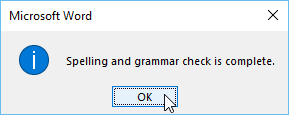
- Word will move through each error until you have reviewed all of them. After the last error has been reviewed, a dialog box will appear confirming that the spelling and grammar check is complete. Click OK.
If no suggestions are given, you can manually type the correct spelling in your document.
Ignoring «errors»
The spelling and grammar check is not always correct. Particularly with grammar, there are many errors Word will not notice. There are also times when the spelling and grammar check will say something is an error when it’s actually not. This often happens with names and other proper nouns, which may not be in the dictionary.
If Word says something is an error, you can choose not to change it. Depending on whether it’s a spelling or grammatical error, you can choose from several options.
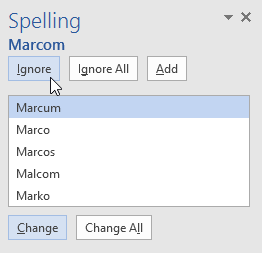
For spelling «errors»:
- Ignore: This will skip the word without changing it.
- Ignore All: This will skip the word without changing it, and it will also skip all other instances of the word in the document.
- Add: This adds the word to the dictionary so it will never come up as an error. Make sure the word is spelled correctly before choosing this option.
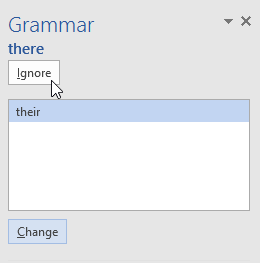
For grammar «errors»:
- Ignore: This will skip the word or phrase without changing it.
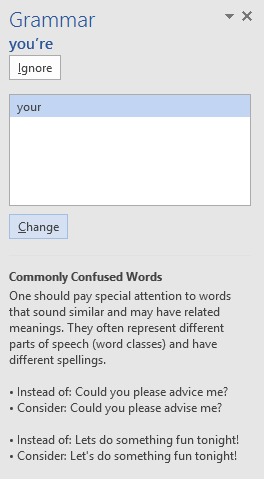
For some grammatical errors, Word will provide an explanation for why it thinks something is incorrect. This can help you determine whether you want to change or ignore it.
Automatic spelling and grammar checking
By default, Word automatically checks your document for spelling and grammar errors, so you may not even need to run a separate check. These errors are indicated by colored wavy lines.
- The red line indicates a misspelled word.
- The blue line indicates a grammatical error, including misused words.
A misused word—also known as a contextual spelling error—occurs when a word is spelled correctly but used incorrectly. For example, if you used the phrase Deer Mr. Theodore at the beginning of a letter, deer would be a contextual spelling error. Deer is spelled correctly, but it is used incorrectly in the letter. The correct word is Dear.
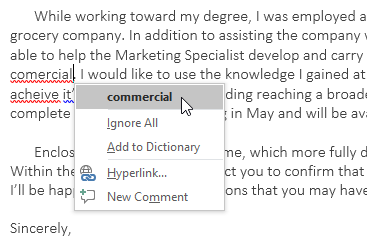
To correct spelling errors:
- Right-click the underlined word, then select the correct spelling from the list of suggestions.
- The corrected word will appear in the document.
You can also choose to Ignore All instances of an underlined word or add it to the dictionary.
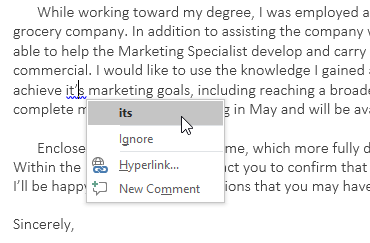
To correct grammar errors:
- Right-click the underlined word or phrase, then select the correct spelling or phrase from the list of suggestions.
- The corrected phrase will appear in the document.
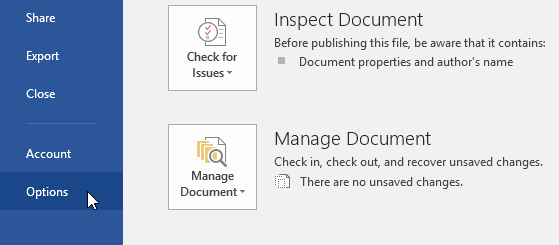
To change the automatic spelling and grammar check settings:
- Click the File tab to access Backstage view, then click Options.
- A dialog box will appear. On the left side of the dialog box, select Proofing. From here, you have several options to choose from. For example, if you don’t want Word to mark spelling errors, grammar errors, or frequently confused words automatically, simply uncheck the desired option.
If you’ve turned off the automatic spelling and/or grammar checks, you can still go to the Review tab and click the Spelling & Grammar command to run a new check.
To hide spelling and grammar errors in a document:
If you’re sharing a document like a resume with someone, you might not want that person to see the red and blue lines. Turning off the automatic spelling and grammar checks only applies to your computer, so the lines may still show up when someone else views your document. Fortunately, Word allows you to hide spelling and grammar errors so the lines will not show up on any computer.
- Click the File tab to go to Backstage view, then click Options.
- A dialog box will appear. Select Proofing, then check the box next to Hide spelling errors in this document only and Hide grammar errors in this document only, then click OK.
- The lines in the document will be hidden.
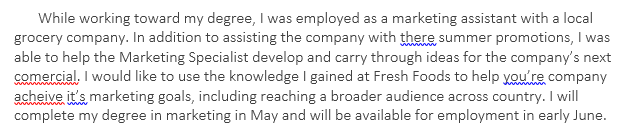
Challenge!
- Open our practice document. If you already downloaded our practice document in order to follow along with the lesson, be sure to download a fresh copy by clicking the link in this step.
- Run a Spelling & Grammar check.
- Ignore the spelling of names like Marcom.
- Correct all other spelling and grammar mistakes.
- When you’re finished, your document should look like this:


/en/word2016/track-changes-and-comments/content/
Hi,
I am trying to get all the grammatical and style error from a word file. as of now I can find the sentences and count of errors in a file. I enabled all the grammatical and style option from proofing option (showing in the Image
here) then try to parse the file with following code, by running the script on on the File (https://1drv.ms/w/s!Ah-Jh2Ok5SuHfVUM4dkUGuUfiZc).
Word.ProofreadingErrors spellErrorsColl = document.GrammaticalErrors;
errorCount = spellErrorsColl.Count;
for (int i=1;i<=errorCount;i++)
{
	var a1 = spellErrorsColl[i].GrammaticalErrors;
	var text = (dynamic)a1.Parent.Text;
	//string category = ??
	//string subCategory = ??

	//string ErrorWord = ??

	Console.WriteLine(text);
}
this file contain 2 Errors (Error1
and
Error2)
In the error1, the error type is «Inclusive language» and the sub category is «consider Gender-natural language» and the word is Master
in the code I want these values like
string category = «Inclusive language»;
string subCategory = «consider Gender-natural language»;
string errorWord = «Master»;
If I can get the error word then it is a plus to my application but other are mandatory for me.
same as for 2nd error
string category = «Clarity And Conciseness»;
string subCategory = «Consider using a simple word»;
string errorWord = «providing«;
Please help me to find these values.
-
Edited by
Tuesday, April 4, 2017 8:40 AM
As this is a code review request, some of my comments may be considered «best practices» by me and not by others (though most of my habits I’ve picked up from sites and reviews such as this one). Your code is successful already because it accomplishes the task for which you have designed. Most of the improvements I can suggest are in terms of software design and presentation.
- It is far less desirable to present a «wall of declarations» at the beginning of a method because it forces the reader to constantly refer back and forth between the logic and the declaration to figure out which variable is declared as what. It also makes it easier to declare a variable and then never use it. So… always declare your variables as close as practical to where they are first used.
- Always keep a wary eye out of repetitive-seeming steps or logic. When you find yourself cutting and pasting the same code with some tweaks to perform a nearly identical action, breaking it out into a separate method makes your logic much easier to read, PLUS it isolates your logic in a single location. This way if you have to modify that logic, you only do it once. In your code, you need to count the number of highlighted words of several different colors.
Breaking that out into its own Sub helps to keep the focus on how this is done:
Private Function CountFormattedWords(ByVal checkIndex As WdColorIndex, _
                                     Optional ByRef checkDoc As Document = Nothing) As Long
    '--- counts the number of words in the document highlighted with
    '    the given highlight color index
    Dim thisDoc As Document
    If checkDoc Is Nothing Then
        Set thisDoc = ThisDocument
    Else
        Set thisDoc = checkDoc
    End If

    Dim checkWord As Variant
    For Each checkWord In thisDoc.Words
        If checkWord.HighlightColorIndex = checkIndex Then
            CountFormattedWords = CountFormattedWords + 1
        End If
    Next checkWord
End Function
Notice the Optional ByRef checkDoc As Document = Nothing parameter. This is something I’ll throw into the parameter list of a method based on long experience, knowing that I just might want to reuse this sub for a different Document. Clearly you can easily assume you’re accessing the local document, but it might not always be the case.
Also, note that I used ThisDocument instead of ActiveDocument. The difference here is important. By specifying ThisDocument here, I’m telling the code to refer to the MS Word document in which the VBA code resides. If I used ActiveDocument, then I would be referring to whichever MS Word document is currently «on top» or actively being viewed/edited by the user. So in the case of this parameter, I’m giving myself the option to default it one way, but use it in a different way if I need to (see below).
So now the beginning of your logic can look like this
    Dim testDoc As Document
    Dim yellowErrors As Long
    Dim blueErrors As Long
    Dim greenErrors As Long
    Dim totalErrors As Long
    Set testDoc = ActiveDocument
    yellowErrors = CountFormattedWords(wdYellow, testDoc)
    blueErrors = CountFormattedWords(wdTurquoise, testDoc)
    greenErrors = CountFormattedWords(wdBrightGreen, testDoc)
    totalErrors = yellowErrors + blueErrors + greenErrors
You can note that here is where I slip in the reference to the ActiveDocument, which overrides the default of my parameter.
-
Avoid using
Select. This is a major point when programming VBA for Excel, but less rigorous when using VBA in MS Word. With all the examples on the webz showingSelect, you might find it hard to avoid. Since I started my VBA journey in Excel, I still stick with this rule though. So for usingFindon a range to look for your word count, I created aRangevariable calledwordCount. Initially, you can see the range is set to encompass the entire document. After executing theFindhowever, this variable collapses to only the found text (in this case the text that is italic). A simple cast/conversion fromStringtoLonggets me the integer word count.'--- total word count should be the only text in the document ' using Italic format Dim wordTotal As Long Dim wordCount As Range Set wordCount = testDoc.Content With wordCount.Find .Font.Italic = True .Wrap = wdFindStop .Execute If .Found Then wordTotal = CLng(wordCount) Else '--- do something if we didn't find it MsgBox "ERROR! Can't find the Total Words count!" Exit Sub End If End With -
Your longest section of code is creating/appending the various details of the score to the end of the document. Again, it’s pretty repetitive and pretty much the same. So… we have a separate sub to isolate the logic. This logic avoids using
Selectand simplifies some of what you were doing. Because it’s nicely isolated, you can add any additional paragraph formatting you like here (and only do it once!).Private Sub AppendScoreDetail(ByVal thisText As String, _ ByVal thisHighlight As WdColorIndex, _ Optional ByRef checkDoc As Document = Nothing) Dim thisDoc As Document If checkDoc Is Nothing Then Set thisDoc = ThisDocument Else Set thisDoc = checkDoc End If Dim newText As Paragraph Set newText = thisDoc.Content.Paragraphs.Add With newText.Range .Text = thisText .Font.Italic = False .Font.Underline = False .Font.Bold = True .Font.Name = "Arial Black" .Font.Size = 11 .HighlightColorIndex = thisHighlight .Paragraphs.Add End With End SubNow adding your score details is simply
'--- add totals and overall score at the end of the document AppendScoreDetail "Incorrect: " & yellowErrors, wdYellow, testDoc AppendScoreDetail "Omitted: " & blueErrors, wdTurquoise, testDoc AppendScoreDetail "Added: " & greenErrors, wdBrightGreen, testDoc AppendScoreDetail "Total: " & totalErrors, wdNoHighlight, testDoc AppendScoreDetail "Score: " & Format$(score, "00.00%"), wdNoHighlight, testDoc AppendScoreDetail "Grader's Name: ", wdNoHighlight, testDoc -
I left the logic for copying your score to the clipboard largely intact since there is no real way to improve that. However, as I’m reading the code I don’t understand why you’re copying it to the clipboard or if a specific format is required. The comments you have in your code are redundant because the code itself is documenting what you’re doing (especially if you continue to use descriptive variable names). The comments I appreciate are the ones that tell me why something is being done. You might always be the only person ever to look at your code, but I guarantee you’ll forget why you did things a certain way three years from now.
-
Don’t forget to re-enable
Application.ScreenUpdating = Trueat the end of your logic.
For convenience, here is the entire module in a single block:
Option Explicit
'@Folder("Grading Macro")
Public Sub GradingMacro()
Application.ScreenUpdating = False
Dim testDoc As Document
Dim yellowErrors As Long
Dim blueErrors As Long
Dim greenErrors As Long
Dim totalErrors As Long
Set testDoc = ActiveDocument
yellowErrors = CountFormattedWords(wdYellow, testDoc)
blueErrors = CountFormattedWords(wdTurquoise, testDoc)
greenErrors = CountFormattedWords(wdBrightGreen, testDoc)
totalErrors = yellowErrors + blueErrors + greenErrors
'--- total word count should be the only text in the document
'    using Italic format
Dim wordTotal As Long
Dim wordCount As Range
Set wordCount = testDoc.Content
With wordCount.Find
    .Font.Italic = True
    .Wrap = wdFindStop
    .Execute
    If .Found Then
        wordTotal = CLng(wordCount)
    Else
        '--- do something if we didn't find it
        MsgBox "ERROR! Can't find the Total Words count!"
        Exit Sub
    End If
End With
Dim score As Double
score = (wordTotal - totalErrors) / wordTotal
'--- add totals and overall score at the end of the document
AppendScoreDetail "Incorrect: " & yellowErrors, wdYellow, testDoc
AppendScoreDetail "Omitted: " & blueErrors, wdTurquoise, testDoc
AppendScoreDetail "Added: " & greenErrors, wdBrightGreen, testDoc
AppendScoreDetail "Total: " & totalErrors, wdNoHighlight, testDoc
AppendScoreDetail "Score: " & Format$(score, "00.00%"), wdNoHighlight, testDoc
AppendScoreDetail "Grader's Name: ", wdNoHighlight, testDoc
'--- but WHY are you copying the score to the clipboard (the code
' says what you're doing)
Dim clipboard As DataObject
Dim textToClip As String
Dim formattedScore As Variant
Dim pasteScore As Variant
formattedScore = Format$(score, "Percent")
pasteScore = Format$(score * 100, "Standard")
Set clipboard = New DataObject
textToClip = pasteScore
clipboard.SetText textToClip
clipboard.PutInClipboard
Application.ScreenUpdating = True
End Sub
Private Function CountFormattedWords(ByVal checkIndex As WdColorIndex, _
Optional ByRef checkDoc As Document = Nothing) As Long
'--- counts the number of words in the document highlighted with
' the given highlight color index
Dim thisDoc As Document
If checkDoc Is Nothing Then
Set thisDoc = ThisDocument
Else
Set thisDoc = checkDoc
End If
Dim checkWord As Variant
For Each checkWord In thisDoc.Words
If checkWord.HighlightColorIndex = checkIndex Then
CountFormattedWords = CountFormattedWords + 1
End If
Next checkWord
End Function
Private Sub AppendScoreDetail(ByVal thisText As String, _
                              ByVal thisHighlight As WdColorIndex, _
                              Optional ByRef checkDoc As Document = Nothing)
    Dim thisDoc As Document
    If checkDoc Is Nothing Then
        Set thisDoc = ThisDocument
    Else
        Set thisDoc = checkDoc
    End If

    Dim newText As Paragraph
    Set newText = thisDoc.Content.Paragraphs.Add
    With newText.Range
        .Text = thisText
        .Font.Italic = False
        .Font.Underline = False
        .Font.Bold = True
        .Font.Name = "Arial Black"
        .Font.Size = 11
        .HighlightColorIndex = thisHighlight
        .Paragraphs.Add
    End With
End Sub
In previous versions, the right-click pop-up on a misspelled word would allow me to ignore all spelling in that particular document. But it’s not there anymore and I can find no reference to being able to do it, neither in the app nor online. Help?
asked Jun 19, 2014 at 23:24
![]()
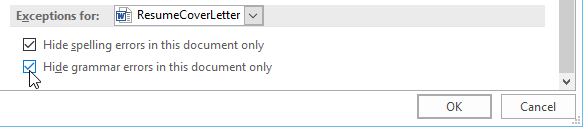
For Word 2013, if you want to ignore spelling errors for a particular document while still check spelling errors for other documents, you can go to the Exceptions for: section at the end of the File -> Options -> Proofing section.
Your current document should be selected in the drop-down as default. Check the Hide spelling errors in this document only.
answered Aug 8, 2016 at 21:48
![]()
dstrandstran
1111 silver badge3 bronze badges
File >> Options >> Proofing
Should be an option to turn off grammar/spell-checking for your document.
Reference
answered Jun 19, 2014 at 23:42
![]()
EriksterErikster
2331 gold badge2 silver badges7 bronze badges
File >> Options >> Proofing.
Uncheck «Check spelling as you type» and «Mark grammar errors as you type».
Here is a view of the settings windows (with relevant options highlighted).
For more information, see Microsoft Support.
answered May 14, 2016 at 9:41
![]()
guyzylguyzyl
1112 bronze badges
I believe the File >> Options >> Proofing setting is global.
An alternative is to use a different style for the affected areas, then select:
- Modify style
- Format
- Language
- Tick «Do not check spelling or grammar»
answered Oct 30, 2019 at 15:30
![]()
file-> Options-> Proofing-> Exceptions for: —> check[ Hide spelling errors in this document only] (& if you want to ignore grammar errors also then) check[ Hide grammar errors in this document only]
answered Nov 13, 2019 at 9:37
![]()