
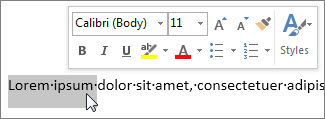
Select the text or cells with text you want to change. To select all text in a Word document, press Ctrl + A. On the Home tab, click the font size in the Font Size box.
Contents
- 1 How do I increase the height of my font?
- 2 How do I stretch font height in Word?
- 3 How do you change the width and height of a text box in Word?
- 4 How do you change height in Word?
- 5 How do I change the Font size in Windows 10?
- 6 How do I stretch text to fill a text box?
- 7 What is font stretch?
- 8 How do you add 6 spaces in Word?
- 9 Can you change the size of the text box?
- 10 How do I increase the height of a textbox in Windows form?
- 11 How do I center text vertically in Word?
- 12 Why can’t I adjust cell height in Word?
- 13 When we increase the font size the Row height is automatically adjusted?
- 14 How do I make the text on my screen bigger?
- 15 What is the shortcut for increasing font size?
- 16 How do I make my computer screen bigger using the keyboard?
- 17 How do I automatically expand a text box in Word?
- 18 Can I use font-stretch?
- 19 Why font-stretch is not working?
- 20 What is font size adjust?
How do I increase the height of my font?
Changing the Height of a Font
- Select the text you want to affect.
- Enlarge the font size to 15 points. (12 times 1.25 is 15.)
- Display the Character Spacing tab of the Font dialog box. (See Figure 1.)
- Using the Scale control, specify a scaling of 80%. (100 divided by 1.25 is 80.)
How do I stretch font height in Word?
You can scale text by stretching it or by compressing it.
- Select the text that you want to stretch or compress.
- On the Home tab, click the Font Dialog Box Launcher, and then click the Advanced tab. Note: If you’re using Word 2007 the tab is called Character Spacing.
- In the Scale box, enter the percentage that you want.
How do you change the width and height of a text box in Word?
To resize a shape, text box, or WordArt, under Drawing Tools, on the Format tab, in the Size group, enter the measurements that you want into the Height and Width boxes.
How do you change height in Word?
To fit the table to the text, click [AutoFit] > select “AutoFit Window.” To keep Word from automatically adjusting your column size, click [AutoFit] > select “Fixed Column Width.” To adjust the row height, click the up and down arrows within the “Height” field.
How do I change the Font size in Windows 10?
To change your display in Windows 10, select Start > Settings > Ease of Access > Display.To make only the text on your screen larger, adjust the slider under Make text bigger. To make everything larger, including images and apps, choose an option from the drop-down menu under Make everything bigger.
How do I stretch text to fill a text box?
Click anywhere in the text. On the Text Box Tools Format tab, in the Text group, click Text Fit, and do one of the following: To reduce the point size of text until there is no text in overflow, click Shrink Text On Overflow. To shrink or expand text to fit in the text box when you resize the box, click Best Fit.
What is font stretch?
Definition and Usage. The font-stretch property allows you to make text narrower (condensed) or wider (expanded). Note: Some fonts provide additional faces; condensed faces and expanded faces. For these fonts, you can use the font-stretch property to select a normal, condensed, or expanded font face.
How do you add 6 spaces in Word?
Select the paragraphs you want to change. Go to Home > Line and Paragraph Spacing. Choose the number of line spaces you want or select Line Spacing Options, and then select the options you want under Spacing.
Can you change the size of the text box?
Resize a text box
Select the text box. Select one of the handles and drag until the text box is the size you want.
How do I increase the height of a textbox in Windows form?
There are two ways to do this : Set the textbox’s “multiline” property to true, in this case you don’t want to do it so; Set a bigger font size to the textbox.
- Set the textboxes to multiline.
- Change the height.
- Change the font size. (so it fit into the big textboxes)
- Set the textboxes back to non-multiline.
How do I center text vertically in Word?
1 Select the text you want to center between the top and bottom margins. 2 On the Page Layout tab, click the Page Setup Dialog Box Launcher. 3 Select the Layout tab. 4 In the Vertical alignment box, click Center 5 In the Apply to box, click Selected text, and then click OK.
Why can’t I adjust cell height in Word?
From the Table menu, select “Table Properties.” Click on the Table tab, then the Options button. Uncheck “Automatically resize to fit contents.” Click “OK.” Now click on the “Row” tab in Table Properties. Make sure that “Specify Height” is checked and the size in the middle box is the height you want your rows to be.
When we increase the font size the Row height is automatically adjusted?
yes, it is true that when you increase the font size,the row height is automatically adjusted.
How do I make the text on my screen bigger?
Make text bigger on your screen
- To go to the Ease of Access settings on your computer, press the Windows key+U.
- Under Make text bigger on the Display tab, drag the slider to the right to increase the size of the sample text.
- Once you’re happy with the text size, select Apply. Windows scales up the size of all text.
What is the shortcut for increasing font size?
Keyboard shortcut
Hold down the Ctrl and press the + to increase the font size or – to decrease the font size. Pressing either of these keys while continuing to hold down the control key continues to increase or decrease the font until it reaches its maximum.
How do I make my computer screen bigger using the keyboard?
You can use your keyboard to zoom in or out. This method works in many applications and web browsers. Click anywhere on the Windows desktop or open the webpage you want to view. Press and hold the CTRL key, and then press either the + (Plus sign) or – (Minus sign) to make objects on the screen larger or smaller.
How do I automatically expand a text box in Word?
Follow these general steps.
- Place the text box in your document.
- Adjust the width of your text box to reflect what you need.
- Right-click the text box and choose Format Text Box from the resulting Context menu.
- Make sure the Text Box tab is displayed.
- Make sure the Resize AutoShape to Fit Text check box is selected.
Can I use font-stretch?
You can use font-stretch to select a condensed or expanded face from such fonts. If the font you are using does not offer condensed or expanded faces, this property has no effect.
Why font-stretch is not working?
According to this, here is why : In order to use font-stretch and see a result of some kind, the font being used has to have a face that matches the value given. In other words, font-stretch will not work on just any font, but only on fonts that are designed with different faces matching the defined sizes.
What is font size adjust?
The font-size-adjust CSS property sets the size of lower-case letters relative to the current font size (which defines the size of upper-case letters).
Excel for Microsoft 365 Word for Microsoft 365 PowerPoint for Microsoft 365 Excel 2021 Word 2021 PowerPoint 2021 Excel 2019 Word 2019 PowerPoint 2019 Excel 2016 Word 2016 PowerPoint 2016 Excel 2013 Word 2013 PowerPoint 2013 Excel 2010 Word 2010 PowerPoint 2010 More…Less
You can change the font size for all text or just selected text in desktop Excel, PowerPoint, or Word.
Change the default font size for all text
The way you change the default font size varies by app. Select your app below, and then follow the steps.
-
Click File > Options.
-
In the dialog box, click General.
-
Under When creating new workbooks, in the Font Size box, enter the font size you want.

Or, you can type in any size you want, between 1 and 409, in multiples of .5, such as 10.5 or 105.5. You can also choose a different default font style.
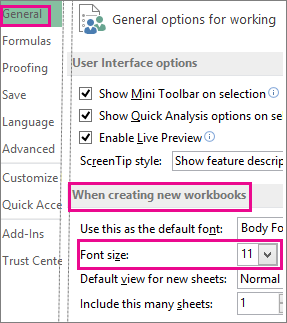
Note: To begin using the new default font size or font, you must restart Excel. The new default font and font size are used only in new workbooks created after you restart Excel; any existing workbooks are not affected. To use the new default font and size in existing workbooks, move worksheets from an existing workbook to a new workbook.
To change the font size for all slides, change it on the slide master. Every PowerPoint presentation contains a slide master with related slide layouts.
Note: If you want to change the theme, you should do that before changing the font, as a different theme may use different fonts.
-
On the View tab, click Slide Master.
In Slide Master View, the slide master is at the top of the thumbnail pane with the related layouts beneath it.
-
Click the slide master to change the font on all slides, or click any of the layouts to change the font size on just that layout.
-
On the slide master or layout, select the level of placeholder text for which you want to change the font size.
-
On the Home tab, click the font size you want in the Font Size box.
You can also type in any size you want in multiples of .1, such as 10.3 or 105.7.
The bullet automatically increases or decreases in size to match the font size changes.


-
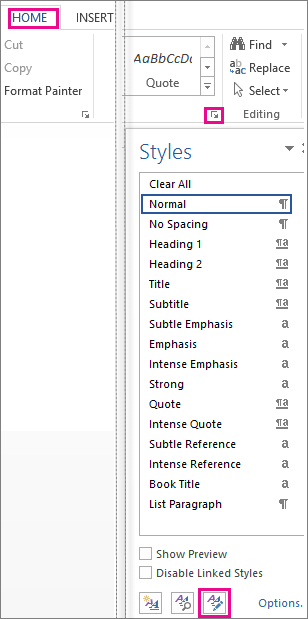
Open a new blank document.
-
On the Home tab, in the Styles group, click the dialog box launcher
..Or press Ctrl+Alt+Shift+S.
-
Click the Manage Styles button (third from left at the bottom).
-
Click the Set Defaults tab and pick the size you want in the Size box.
You can also type in any size you want, between 1 and 1638, in multiples of .5, such as 10.5 or 105.5.
-
Click the New documents based on this template option.
-
Close and reopen Word. If you’re prompted to save the Normal template, say Yes.
Tip: You can also change the default font or font color on the Set Defaults tab.
 ..
..
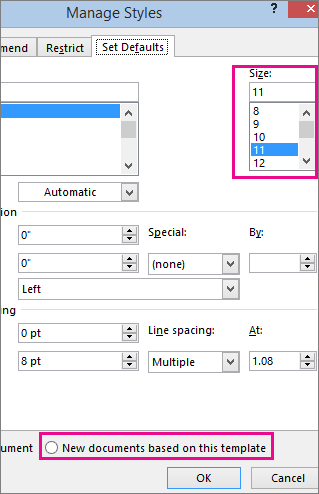
When you set a default font, every new document you open will use the font settings you selected and set as the default. The default font applies to new documents that are based on the active template, usually Normal.dotm. You can create different templates to use different default font settings.
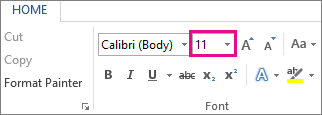
Change the size of selected text
To change the font size of selected text in desktop Excel, PowerPoint, or Word:
-
Select the text or cells with text you want to change. To select all text in a Word document, press Ctrl + A.
-
On the Home tab, click the font size in the Font Size box.
You can also type in any size you want, within the following limits:
-
Excel: between 1 and 409, between 1 and 409, in multiples of .5 (such as 10.5 or 105.5)
-
PowerPoint: between 1 and 3600, in multiples of .1 (such as 10.3 or 105.7)
-
Word: between 1 and 1638, in multiples of .5 (such as 10.5 or 105.5)
-
Tips:
-
When you select text, a mini toolbar appears near your cursor. You can also change the text size in this toolbar.
-
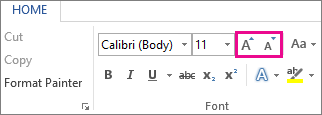
You can also click the Increase Font Size or Decrease Font Size (Grow Font and Shrink Font in some earlier versions of Office programs) icons until the size you want is displayed in the Font Size box.
See Also
Change or set the default font in Word
Change the fonts in a footer on a slide
Change a theme (Excel and Word)
Format text in cells (Excel)
Need more help?
 Please Note:
This article is written for users of the following Microsoft Word versions: 2007, 2010, 2013, 2016, 2019, and Word in Microsoft 365. If you are using an earlier version (Word 2003 or earlier), this tip may not work for you. For a version of this tip written specifically for earlier versions of Word, click here: Changing the Height of a Font.
![]()
Written by Allen Wyatt (last updated June 5, 2021)
This tip applies to Word 2007, 2010, 2013, 2016, 2019, and Word in Microsoft 365
Word makes it easy to change the horizontal scale of a font, by using the Scale control on the Advanced tab of the Font dialog box. Using the control changes only the horizontal scale; the vertical height of the font remains exactly the same.
It is interesting to note that Word does not provide any corresponding method to change the vertical scale of a font without affecting the width. There is a way around this disparity, however: You can play with the font size and adjust the horizontal scale negatively.
For instance, let’s say that you have a text selection that is formatted using 12-point type. Now suppose that you want your font to be 25 percent taller, but not to have the width changed. You could follow these general steps:
- Select the text you want to affect.
- Enlarge the font size to 15 points. (12 times 1.25 is 15.)
- Display the Advanced tab of the Font dialog box. (On the Home tab of the ribbon, click the small icon at the bottom-right of the Font group, then click the Advanced tab.) (See Figure 1.)
- Using the Scale control, specify a scaling of 80%. (100 divided by 1.25 is 80.)
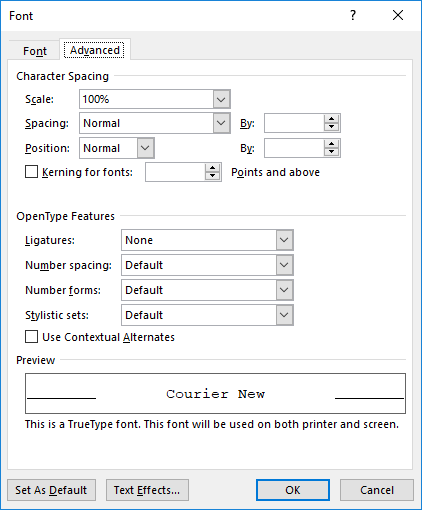
Figure 1. The Character Spacing tab of the Font dialog box.
That’s it. You now have a font that is the same width as its base font but is the desired height. Depending on the font, you may need to play with the sizing just a bit to get the desired effect, but this approach should work in all instances. Just remember that whatever you multiply the height by, you need to divide the width by (always starting at 100%).
WordTips is your source for cost-effective Microsoft Word training.
(Microsoft Word is the most popular word processing software in the world.)
This tip (9079) applies to Microsoft Word 2007, 2010, 2013, 2016, 2019, and Word in Microsoft 365. You can find a version of this tip for the older menu interface of Word here: Changing the Height of a Font.
Author Bio
With more than 50 non-fiction books and numerous magazine articles to his credit, Allen Wyatt is an internationally recognized author. He is president of Sharon Parq Associates, a computer and publishing services company. Learn more about Allen…
MORE FROM ALLEN
Pulling All Fridays
It can be handy to know when specific weekdays occur within a range of dates. Figuring out this information, using …
Discover More
Making a Drop-Down List Indicator Visible
Data validation allows you to create drop-down lists that aid data entry. If you want the indicator for the drop-down …
Discover More
Changing the Document Inspector’s Comment Name
The Document Inspector can be a great tool when you want to prepare your document to be shared with others and you want …
Discover More
Изменение размера шрифта в Word выше или ниже стандартных значений

Те, кто хотя бы пару раз в своей жизни пользовался текстовым процессором MS Word, наверняка знают о том, где в этой программе можно изменить размер шрифта. Это небольшое окошко во вкладке «Главная», расположенное в группе инструментов «Шрифт». В выпадающем списке этого окошка представлен перечень стандартных значений от меньшего к большему — выбирайте любой.
Проблема в том, что далеко не все пользователи знают, как увеличить шрифт в Ворде больше 72 единиц, указанных по умолчанию, или как сделать его меньше стандартных 8, или же как можно задать любое произвольное значение. На самом деле сделать это довольно просто, о чем мы и расскажем ниже.
Изменение размера шрифта на нестандартные значения
1. Выделите текст, размер которого вы хотите сделать больше стандартных 72 единиц, с помощью мышки.

Примечание: Если вы только планируете ввести текст, просто кликните в том месте, где он должен находиться.
2. На панели быстрого доступа во вкладке «Главная» в группе инструментов «Шрифт», в окошке, расположенном рядом с названием шрифта, где указано его числовое значение, кликните мышкой.

3. Выделите заданное значение и удалите его, нажав «BackSpace» или «Delete».

4. Введите необходимое значение размера шрифта и нажмите «ENTER», не забывая о том, что текст все же должен как-то уместиться на странице.
5. Размер шрифта будет изменен согласно заданным вами значениям.

Точно таким же образом вы можете изменить размер шрифта и в меньшую сторону, то есть, меньше стандартных 8. Кроме того, аналогично можно задавать и произвольные значения, отличные от стандартных шагов.
Пошаговое изменение размера шрифта
Далеко не всегда можно понять сразу, какой именно размер шрифта нужен. Если и вы этого не знаете, можете попробовать изменять размер шрифта по шагам.
1. Выделите фрагмент текста, размер которого требуется изменить.

2. В группе инструментов «Шрифт» (вкладка «Главная») нажмите кнопку с большой буквой А (справа от окна с размером) для увеличения размера или кнопку с меньшей буквой А для его уменьшения.

3. Размер шрифта будет изменяться с каждым нажатием на кнопку.

Примечание: Использование кнопок для пошагового изменения размера шрифта позволяет увеличивать или уменьшать шрифт только по стандартным значениям (шагам), но не по порядку. И все же, таким образом можно сделать размер больше стандартных 72 или меньше 8 единиц.
Узнать больше о том, что еще можно делать со шрифтами в Ворде и как их изменять, вы можете узнать из нашей статьи.
Как видите, увеличить или уменьшить шрифт в Ворде свыше или ниже стандартных значений довольно просто. Желаем вам успехов в дальнейшем освоении всех тонкостей этой программы.
Мы рады, что смогли помочь Вам в решении проблемы.
Помимо этой статьи, на сайте еще 11902 инструкций.
Добавьте сайт Lumpics.ru в закладки (CTRL+D) и мы точно еще пригодимся вам.
Отблагодарите автора, поделитесь статьей в социальных сетях.
Опишите, что у вас не получилось. Наши специалисты постараются ответить максимально быстро.
Изменение шрифта в тексте в Word
В программе Word используются все те шрифты, что установлены в вашей операционной системе. Все эти шрифты можно применить как ко всему тексту в документе, так и к какому-то отдельному фрагменту. Дополнительно шрифты можно менять в документе: делать их жирными, курсивом, задавать какие-то ещё стили, менять размер.

- Как изменить шрифт в Word
- Смена шрифта
- Изменение размера шрифта
- Изменение толщины, наклона, добавления чёрт
- Изменение цвета и фона текста
- Дополнительные стили шрифта
- Установка шрифта в качестве используемого по умолчанию
- Изменение шрифта в формуле
Как изменить шрифт в Word
Вы можете менять шрифт текста в документе Word только на тот шрифт, который либо установлен в самой системе, либо «вшит» в документ. Если нужно расширить стандартный набор шрифтов, то вы можете установить его из сторонних источников. Про это у нас была отдельная статья.
Далее рассмотрим все основные аспекты изменения шрифта в документе в MS Word.
Смена шрифта
Сменить шрифт текста можно по следующей инструкции:
- Выделите нужный отрезок текста или весь текст (Ctrl+A).
- Обратите внимание на верхний блок «Шрифт», который расположен во вкладке «Главная». Она открыта по умолчанию.
- Там, в специальном поле, выберите шрифт, который собираетесь применить к тексту. Вам необязательно его применять. Достаточно просто подвести курсором к нужному шрифту и увидеть, как будет смотреться текст с данным шрифтом. Если всё устраивает, то нажмите по названию шрифта, чтобы он окончательно применился к тексту.

Обратите внимание, что выбранный шрифт может не примениться, например, к русскому тексту. Это значит, что данный шрифт не поддерживает кириллические символы. В таком случае найдите среди встроенных шрифтов тот, что поддерживает русские буквы и похож по стилю или скачайте похожий по стилю и установите его в систему.
Изменение размера шрифта
Выбранный шрифт может оказаться меньше, чем тот, что был выбран ранее. Исправить это можно очень просто:
- Выделите текст с нужным шрифтом.
- В верхней части, в блоке «Шрифт», нажмите на меню с размера шрифтов (выделено на скриншоте). Выберите в нём нужный размер.


Дополнительно можно быстро менять регистр (прописные и строчные буквы) в выделенном сегменте текста. Для этого выделите нужный текст и нажмите Shift+F3. Используйте эту комбинацию клавиш, пока не получите нужный результат. Всего там встроено три шаблона:
- Каждое слово с большой буквы;
- Весь текст написан большими буквами;
- Весь текст написан маленькими буквами.
Изменение толщины, наклона, добавления чёрт
Для каждого шрифта могут быть применимы стандартные стили Word:
- Жирный шрифт – буквы сильно утолщаются. Отвечает за применение кнопка в виде буквы «Ж» в русских версиях или «B» в остальных может вызываться сочетанием клавиш Ctrl+B.
- Курсив – написание текста идёт под наклоном. Обозначается буквой «К», может вызываться сочетанием клавиш Ctrl+K.
- Подчёркивание – создаёт черту под текстом. За применение отвечает кнопка в виде буквы «Ч» или сочетание клавиш Ctrl+U.
- Также можно зачеркнуть написанный текст. Он вызывается нажатием на кнопку в виде перечёркнутых латинских букв.

Изменение цвета и фона текста
По умолчанию весь текст в Word написан чёрным цветом с бесцветным фоном. Вы можете это изменить:
- Чтобы сменить цвет самого текста, воспользуйтесь кнопкой в виде буквы «А» с красным подчёркиванием. Из выпавшего меню можете выбрать какой-то стандартный цвет или задать какой-то другой, воспользовавшись соответствующей кнопкой.
- Для замены фона можно воспользоваться инструментом «Заливка». Здесь на выбор доступны стандартные цвета, но можно выбрать какой-то другой из расширенной палитры.

Все инструменты применяются к выделенным фрагментам текста.
Дополнительные стили шрифта
Если вам нужно как-то разнообразить визуальное оформление текста, то можно воспользоваться встроенными стилями. За их использование отвечает кнопка в виде буквы «А» с синим свечением. Здесь уже доступно несколько стилей на выбор.
Если ни один из стилей вас не устраивает полностью, то вы можете изменить некоторые элементы стиля: контур, тень, отражение, подсветку.
Для применения стилей к тексту его нужно предварительно выделить.
Установка шрифта в качестве используемого по умолчанию
По умолчанию современные версии Word используют в документах шрифт Calibri. Некоторым категориям пользователям он может не подходить, а менять постоянно шрифты вручную не очень удобно. В таком случае для конкретного документа или всего Word можно задать другой стандартный шрифт.
- В блоке «Шрифт» нажмите по кнопке, которая отмечена на скриншоте.

Изменение шрифта в формуле
В Word есть инструменты для вставки и настройки математических формул. Они вставляются отдельным блоком, поэтому взаимодействие с ними отличается от взаимодействия с обычным текстом. Например, изменить шрифт в формуле стандартными способами будет невозможно.
В этом случае воспользуйтесь инструкцией:
- Выделите формулу, для которой вы хотели бы поменять шрифты. В верхней части интерфейса раскройте вкладку «Конструктор».
- Выделите всё содержимое данной формулы с помощью сочетания клавиш Ctrl+A. Для этого можно использовать и мышку, но сочетание клавиш работает точнее.
- В блоке «Сервис», что расположен в верхней части интерфейса Word, нажмите на кнопку, отмеченную на скриншоте.

Как видите, в Word предусмотрено много аспектов изменения шрифтов. Однако в самом процессе смены шрифта текста нет ничего сложного.
Как изменить цвет, размер, толщину, высоту, стиль и тип шрифта в Ворде: пошаговая инструкция. Как изменить шрифт нумерации страниц, всех сносок, оглавления, содержания в Ворде? Как в Ворде заглавный шрифт изменить на прописной, обычный — на красивый?
Статья расскажет, как менять шрифт в «Microsoft Word».
Программа «Word» наиболее популярна среди всех текстовых редакторов благодаря своим обширным возможностям. В число таких возможностей входит также и работа со шрифтом текста. Пользователи, которые уже привыкли к «Word», хорошо осведомлены об этом.
Но наша задача – помощь новичкам. Поступает достаточно много вопросов на счет работы с «Word», среди которых имеются и вопросы по поводу шрифта. Новых пользователей интересует, как в программе «Word 2007/2010/2013/2016» изменить стиль текста: размеры, цвет, высоту, толщину, содержание и оглавление, нумерацию страниц, сноски и так далее.
Постараемся охватить большинство этих вопросов и дать подробный пошаговый ответ со скриншотами.
Как в текстовом редакторе «Microsoft Word» менять шрифт текста?
Итак, приступим к работе. На самом деле все вышеуказанные вопросы решаются достаточно быстро и просто. Когда вы начнете изучать данную инструкцию, вы практически сходу научитесь менять шрифт текста в «Word».
Разные версии «Word» имеют немного свою навигацию. Например, в последних версиях весь инструментарий, связанный со шрифтом, расположен в разделе «Главная», в более старых версиях – в «Разметка страницы». Но, в принципе, сама суть остается общей:

Меняем стиль шрифта
- Обратите внимание на инструментарий, который мы отметили выше на скриншоте. Здесь можно заметить два выпадающих списка: первый с текстом, второй – с цифрами. Нажмите на первый (а точнее на черную стрелочку). Вы увидите выпадающий список с большим набором различных шрифтов.

Выпадающий список с большим набором различных шрифтов
- Выберите один из них, и текст в окне редактора изменится соответствующим образом. Здесь программа дает нам даже подсказки. Каждый стиль шрифта в выпадающем списке уже представлен в том самом виде, в который он приведет печатаемый вами текст в окне редактора.

Выберите стиль шрифта
Меняем размер шрифта
- С размером шрифта все происходит точно так же, как и со стилем. Теперь нажмите на черную стрелочку возле второго выпадающего пункта – с цифрами. Кстати, эти цифры как раз и представляют собой параметры размеров текста. Чем больше цифра – тем, соответственно, и больше будет размер вашего шрифта.

Выберите размер шрифта
- Прежде чем менять размер уже имеющегося текста — выделите его. Далее меняйте размеры текста так, как вам необходимо.

Выберите размер шрифта

Выберите размер шрифта
- Кстати, если вы не хотите всякий раз обращаться к выпадающему списку, то вы сможете воспользоваться двумя кнопками с буквами «A» чуть правее регулятора размеров текста. Эти цифры тоже являются регуляторами: при нажатии на большую «A» размеры текста увеличивается, при нажатии на малую «A» — уменьшаются.

Выберите размер шрифта
- Правее указанных кнопок есть следующая кнопка – «Aa». По нажатию на нее вы сможете менять регистр печатаемого текста.

Выберите размер шрифта
Меняем наклон и толщину шрифта
- Вы также можете, помимо размеров или типа текста, менять такие его характеристики, как толщина и наклон. То есть текст можно представить жирным шрифтом, курсивом, подчеркнутым. Если вы желаете таким образом изменить уже имеющийся текст, то выделите его, а если вы только собираетесь напечатать текст — ничего выделять не надо. Итак, обратите внимание на выделенный на скриншоте в красной рамке инструментарий.

Выберите наклон и толщину шрифта
- В частности, здесь вам нужны будут три кнопки с изображением букв. При нажатии на жирную «Ж», текст станет жирным.

Выберите толщину шрифта
- По нажатию на «К» в виде Пизанской башни – текст намного наклонится

Выберите наклон шрифта
- Нажатие на подчеркнутую «Ч» — делает текст подчеркнутым

Нажатие на подчеркнутую «Ч»
- Кстати, если вы нажмете на черную стрелку возле «Ч», то вы можете выбрать тип подчеркивания: жирные линии, тонкие линии, пунктирные линии, волнистые линии и т.д.

Выберите тип подчеркивания
- Теперь обратите внимание чуть правее на кнопку с зачеркнутыми буквами «abc» — клик мышкой на нее сделает ваш текст зачеркнутым.

Делаем зачеркнутый шрифт
Меняем цвет текста
- После проведенных экспериментов нам не помешает заняться цветом нашего текста и всем, что с этим связано. Теперь обратите внимание на большую полупрозрачную букву «А» синего цвета и нажмите возле нее на черную стрелку. Эта команда вызовет меню со списком предложенных эффектов для оформления вашего текста.

- Вот, например, мы изменили наш текст таким образом

- Также мы можем добавить в текст дополнительных эффектов (выделены в красной рамке на скриншоте).

Выберите дополнительные эффекты
- Далее обратите внимание на кнопку с буквами «ab», подчеркнутую по умолчанию жирной желтой линией. При помощи этих инструментов мы можем менять фон, на котором отображаются сами буквы.

Выберите фон шрифта
- Но это еще не все. У нас есть возможность менять цвет и самих букв в тексте. Теперь посмотрите на скриншоте, где (нами в красной рамке) отмечена соответствующая кнопка с буквой «А».

Выберите цвет шрифта
- При нажатии на черную стрелку возле нее вы будете выбирать список предложенных цветов для вашего текста.

Выберите цвет шрифта

Выбираем шрифт по умолчанию
- Выше мы разобрались, как в редакторе «Word» следует менять стиль текста, его размеры, цвет и т.д. Теперь же нам не помешает узнать, как установить по умолчанию один определенный выбранный нами шрифт. Для этого нажмите на стрелочку, как показано на скриншоте.
Change the size of selected text
- Select the text or cells with text you want to change. To select all text in a Word document, press Ctrl + A.
- On the Home tab, click the font size in the Font Size box. You can also type in any size you want, within the following limits:
let’s discuss this in detail below!
When working in Microsoft Word, your highest priorities should include the look and feel of your document. It’s possible that you just typed up an excellent essay or made an awesome business report. However, if you don’t format your documents correctly, people might have a hard time reading your files. This can cause dissatisfied teachers, clients or employers.
If you want to avoid making this mistake, you need to learn how to format your Word documents correctly. The very first step is learning how you can modify the size of your text, as well as the font you’re using. Follow our step-by-step guide to make your documents more readable, eye-catching and memorable.
Things you’ll need
- A device with Microsoft Word installed and activated.
How to change Text Size and Font in Word
Let’s start learning!
- Launch Word, then either open an existing document or create a new one from the welcome screen, then type in your text.
- If you only want to change the size and font of a portion of your text, you need to select it. Hold down the left mouse key and make your selection. Now, only the selected text will be affected by the font and size change. If you want to change your entire document, you need to select everything by pressing the Ctrl + A keys on your keyboard.

- To change your text to a different font or size, you need to be on the Home tab in the Ribbon.

- In the Font section, you’ll see two drop-down menus. The one on the left shows the name of the current font you’re using. The default font in Word is either Calibri or Times New Roman, you’re most likely seeing one of the two.

- The other drop-down menu shows the current size of your text. By default, Word sets the size to either 11 or 12 points.
- To change the font you’re using, open the first drop-down menu. This will display every font installed on your computer. When you hover over a font, you’ll see a preview of how it’ll look like in your document. Simply click on the font you want to use to select it.

- Similarly, you can click on the second drop-down menu with the numbers to change the text size. Hovering over a number will preview how your text will look like, and clicking on it finalizes the change.


How to Change the default text size and font in Word
You can also change the default text size and font in Word. This means that each time you start a new document, Word will automatically use the font and text size you define.
- Click on the arrow in the bottom-right corner of the Font section (again, found in the Home tab).

- A new window will appear. Here, you can select a font, modify the size of it and even apply font styles and effects. However, if you’re settings a default font, we recommend sticking to the Regular style without any effects.

- After you customized the font you want to use, click on the Set As Default button in the bottom-left corner of the window.

- Another window will come up. Here, select if you want to make your settings the default font in the currently open document only (first option), or make it the default font for all documents (second option).
- Press the OK button.


We hope that this article was able to help you learn how you can change the size and font of your text in Microsoft Word. Do you know someone who’s starting out with Word and other Microsoft Office products? Don’t forget to share this article with them! Your friends, classmates, colleagues or employees can all get help in getting started with Word. If you want to learn more about Word or other Microsoft Office suite applications, feel free to browse our section of guides.
If you’re looking for a software company you can trust for its integrity and honest business practices, look no further than SoftwareKeep. We are a Microsoft Certified Partner and a BBB Accredited Business that cares about bringing our customers a reliable, satisfying experience on the software products they need. We will be with you before, during, and after all the sales.
Learn Microsoft Word from articles in our Help Center
Here are some more content to help you learn Microsoft Word:
» How To Change Your Apple ID Password on Any Device
» 7 Microsoft Word Hacks You Need to Know in 2022
» MS Word Features: 20 Secret Functions Revealed
» How to Create a Hanging Indent in Microsoft Word
» How to make columns in Microsoft Word
» How to Fix the Spell Check Not Working in Word
» How to Install Fonts to Word on Mac
» How to Unfreeze Word on Mac Without Losing Work
» Top 14 Microsoft Word Tips and Tricks for Productivity
Final Thoughts
This guide has been about Microsoft Word. We hope you’ve learned how to use Microsoft Word and more tricks.
We’re glad you read the article up to here  Thank you
As we’ve shared above, there are more articles you can read about Microsoft Word and Microsoft Office in our Help Center and Blog.
Please share this article on your socials or with your friends. Someone else may benefit from it too.
One more thing …
Subscribe to our newsletter and be among the first to receive these documents in your inbox. We also share deals, promotions, and more through email. Don’t be left out.