
Indent the first line of a paragraph

To indent the first line of a paragraph, put your cursor at the beginning of the paragraph and press the tab key. When you press Enter to start the next paragraph, its first line will be indented.
Tip: If you want to change indentation for paragraphs that have already been written, use the tab-key method on the first paragraph, as described above. Then put your cursor at the beginning of the next paragraph. Press Backspace and then Enter. Repeat the process for subsequent paragraphs.
First-line indent by default
If you always want first-line indentation, modify the Normal style:
-
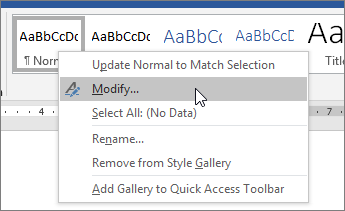
Put the cursor anywhere in the paragraph.
-
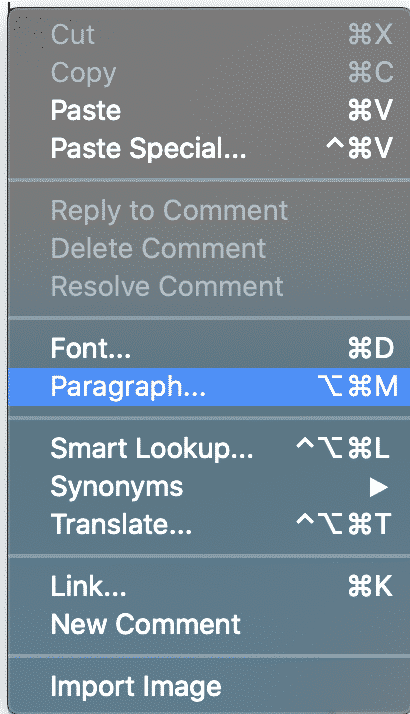
On the Home tab, right-click the Normal style, and choose Modify.

-
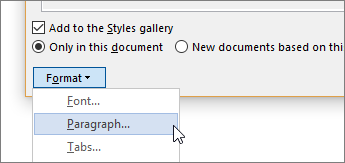
Select Format, and then choose Paragraph.
-
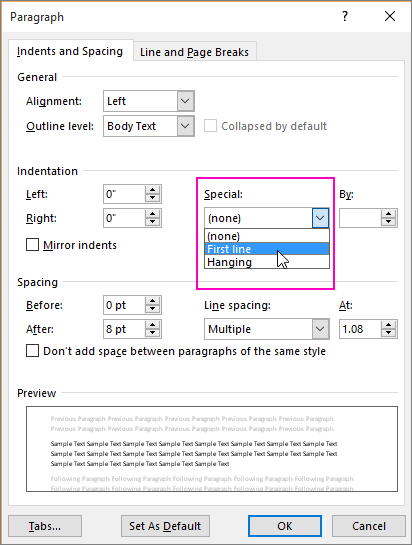
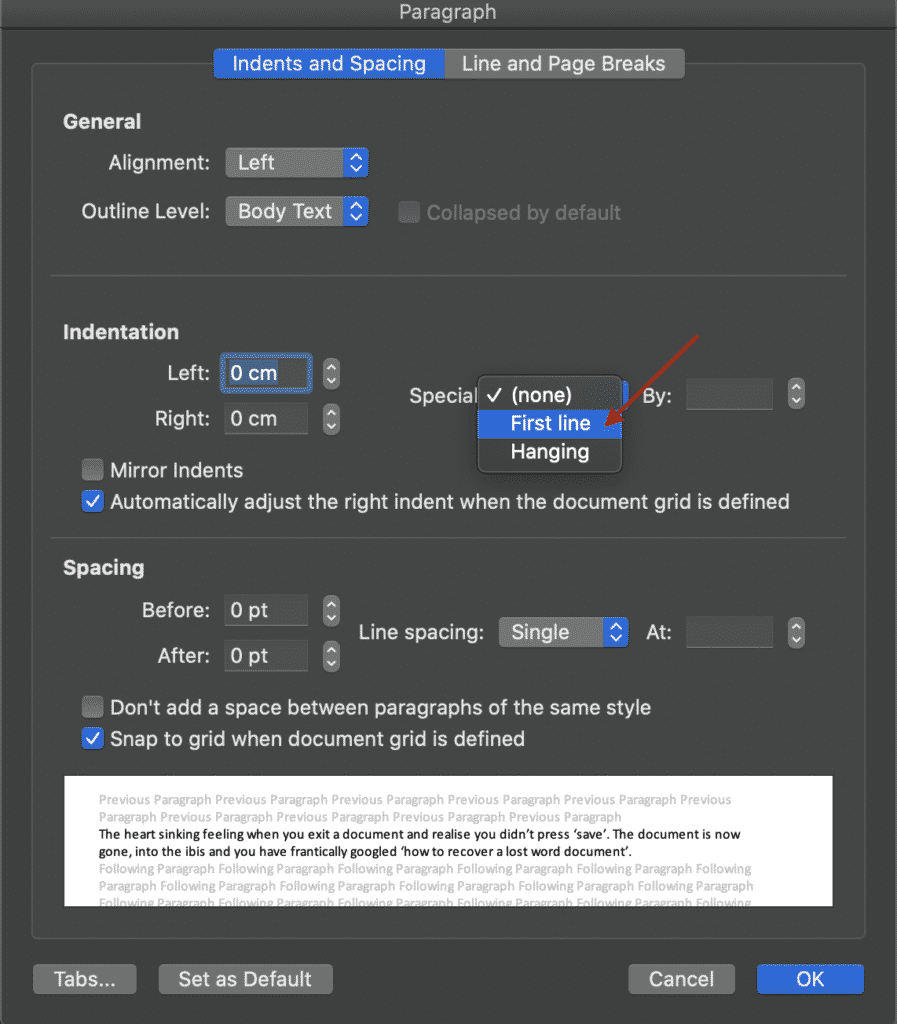
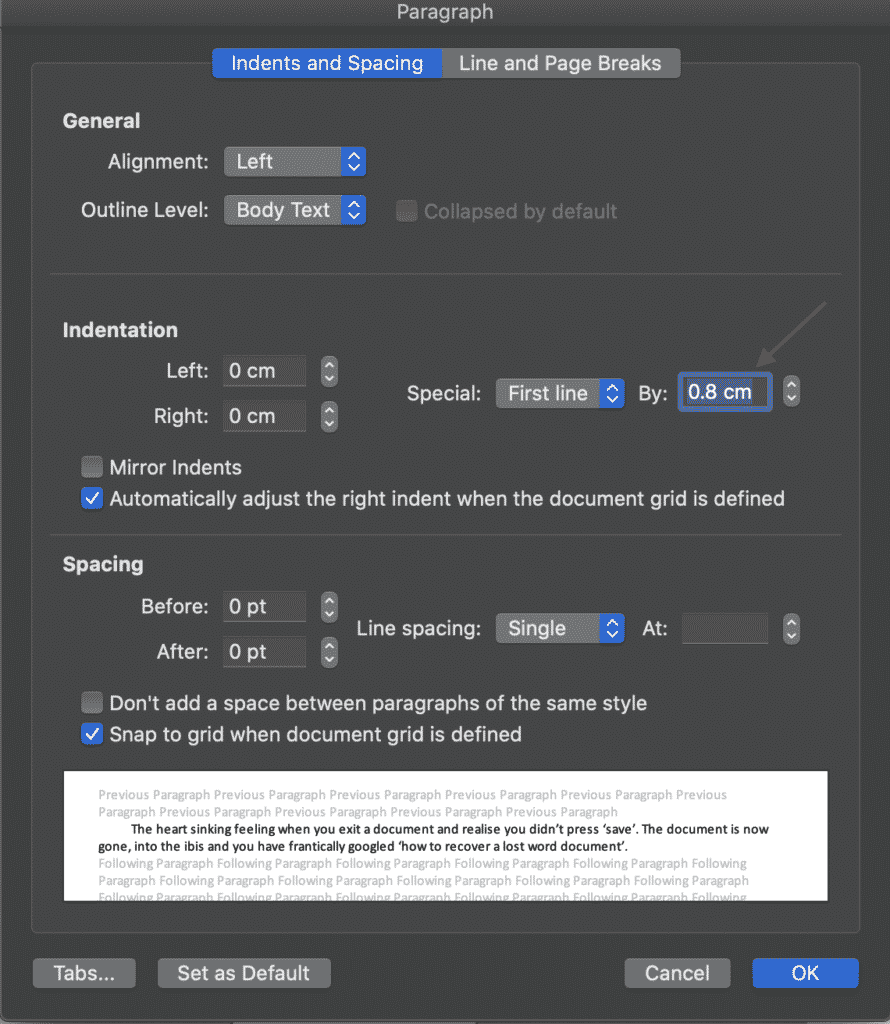
On the Indents and Spacing tab, under Indentation, select First line.
-
Select OK.
-
Select OK again.
Note: If you always want first-line indentation whenever you start a new document, choose the New documents based on this template option before you select OK.

Need more help?
Want more options?
Explore subscription benefits, browse training courses, learn how to secure your device, and more.
Communities help you ask and answer questions, give feedback, and hear from experts with rich knowledge.
With a first line indent, the first line of a paragraph is indented more than the other lines in the paragraph. Use the tab key to create a first line indent in Word for the web.
-
Place your cursor at the beginning of the first line in the paragraph.
-
Press the tab key.
When you press enter at the end of a paragraph that has a first line indent, Word will automatically format the following paragraph the same way. To remove the indent, place your cursor at the beginning of the first line and press the backspace key.
If you’d like more precise control over indents and you have the desktop version of Word, use the Open in Word command.

Changes you make in Word desktop will continue to be saved in Word for the web. To learn more, see Create a first line indent in Word 2013 or Adjust indents and spacing in Word for Mac. If you don’t have Word, you can try or buy it in the latest version of Office now.
Tip:
Word for the web works seamlessly with Word and other Office desktop programs, and we update it based on input like yours. For the latest feature announcements, visit the Office Online blog.
Need more help?
![]()
Download Article
![]()
Download Article
Are you sick of pressing the Tab key for each new paragraph in your document? Word allows you to automatically indent your new paragraphs with just a few simple menu changes. Follow this guide to learn how for Word 2007, 2010, and 2013.
-
1
Open the Paragraph dialog box. On the lower right corner inside “Paragraph” group, click the small arrow. You can open this through the “Paragraph” group in the “Home” tab or the “Page Layout” tab.
- You may do this process before you start typing your document or, if you have already typed a document, just highlight the paragraphs you want indented.
-
2
Find the “Indentations” section. This can be found in the “Indents and Spacing” tab.
Advertisement
-
3
Click the drop down menu under “Special”. Select “First Line” to automatically indent the first line of each new paragraph.
-
4
Enter the indent size. This is the amount that each line will be indented. The most commonly used size is 0.5” or 1/2 of an inch. You can see a preview of the changes in the Preview section at the bottom of the dialog box.
-
5
Click OK to save your changes and apply them to the document. Click the “Set as default” button if you want to set the changes to automatically take effect for new documents.


Advertisement
-
1
Click on the «Page Layout» tab, at the top of the Ribbon in Microsoft Word. In the image on the right, it is encircled in red.
-
2
Go to the section that is headed «Indents» and «Spacing». Click on the little arrow in the bottom right-hand corner. In the image on the right it is encircled in red. This arrow opens up the Paragraph Dialog Box.
-
3
Look for the heading «Indentations» in the Paragraph Dialog Box. In this section, there is a drop-down box with the heading «Special:». Click on the drop-down box and select the «First line» option.
-
4
Choose the amount you want the lines indented by. You can change this in the «By:» box. Half an inch (0.5”) is the standard indent size.
-
5
Click on «OK», and continue typing. Now, Word will automatically indent the first line every time you press Enter.


Advertisement
Ask a Question
200 characters left
Include your email address to get a message when this question is answered.
Submit
Advertisement
-
If you want to prevent a line from being indented when this setting is on, hold the Shift key down while pressing Enter.
Thanks for submitting a tip for review!
Advertisement
About This Article
Thanks to all authors for creating a page that has been read 347,430 times.
Is this article up to date?
wikiHow Tech Help:
Tech troubles got you down? We’ve got the tips you need
Subscribe
You’re all set!
An indentation or indent is an empty space at the beginning of a line of
written or printed text recommended to use instead of spaces or tabs at the beginning of lines. Automatic text indentation makes Word documents formatting consistent and easy to change.
There are several types of indents in the Word document:
- The First Line Indent indicates the first line of the paragraph.
Instead of using the first-line indents, a
space between paragraphs
or even an empty line is often used. In modern word-processing, it is not
recommended to use the first-line indents and the
spaces between paragraphs in the same document.Notes:
- The first-line indent in the first paragraph of any text
is optional since it is obvious where the paragraph begins.
However, the
Drop caps
may apply for such paragraphs. - Do not use spaces or tabs to indent the first line — when you
change the style of different paragraphs. It will be difficult
to reconcile them.

- The first-line indent in the first paragraph of any text
- Professionally printed material in English typically does not indent the first
paragraph but indents those that follow. So, a negative indent or
hanging indent is used, as an indent that indents all text except the
first line:
The hanging indents are used in Bibliographies, Reference pages, and sometimes in scripts, dictionary entries, and footnotes.
- Another standard modern English style is the lack of indentation, and the addition of vertical white space to create «block paragraphs»:
The block paragraphs are commonly used for block quotations.


Customize the paragraph format
1. Click the paragraph you want to format or select
multiple paragraphs.
2. Do one of the following:
- On the Home tab, in the Paragraph group, click the dialog box
launcher:
- Choose Paragraph… from the shortcut menu (right-click or press
Shift+F10) to display the Paragraph dialog box:


3. In the Paragraph dialog box, choose or
type the appropriate values for Left, Right, or Special
(First line or Hanging) indents:

Use the ruler
To do so, click in the paragraph you want to format or select multiple paragraphs, and
then drag the First Line Indent marker left or right to the desired location.
Increase/decrease text indentation
- Using the keyboard:
You can press Ctrl+T to create a hanging indent that aligns body text with the first tab marker. (By default, tabs are set every 0.5 inches).
You can press Ctrl+Shift+T to “unhang” an indent, regardless of how the hanging indent was created.
Press Ctrl+Shift+M to decrease a paragraph’s indent by one tab stop. By default, tab stops are set every 0.5 inches.
Press Ctrl+M to increase a paragraph’s indent by one tab stop. By default, tab stops are set every 0.5 inches.
You can instantly add a full line space before a paragraph by selecting the paragraph(s) you want to format and pressing Ctrl+0 (zero). If you select multiple paragraphs, pressing Ctrl+0 adds a blank line space before each paragraph in the selection.
- Using the mouse:
To increase/decrease text indentation for the selected text, on the Home tab, in the Paragraph group, click the Decrease Indent or Increase Indent button:

or


See also this tip in French:
Comment
créer un retrait négatif de première ligne.
While preparing a document in Word, you may find yourself having to add a hanging indent or first line indent. They’re used to set off one paragraph from each other. In that way, indents help make your document more pleasant to look at and easier to read.


This tutorial shows you, step-by-step, how to add a hanging indent in Word. You’ll also learn the steps for adding a first line indent.
As you’ll soon see, you can use different methods to make indents and hanging indents in Word. I’ll walk you through each of those methods and when to use one or the other. Plus, I’ll share a bit about how premium Word templates can help you work more quickly and produce a better-looking document.
Note: In this tutorial, I’m using Microsoft Word for Mac version 16.46. If you’re on a different version, the interface may look a little different for you.
What Is a Hanging Indent and Why Would You Use It?
A hanging indent is when the first line of the paragraph is flush at the margin, and all succeeding lines of the paragraph are indented. It’s also known as a “second line indent” and “reverse indent.”
Hanging indents are typically used in bibliographies, citations of works, and reference lists. They’re required by style guides like:
- American Psychological Association (APA)
- Associated Press Stylebook
- Chicago Manual of Style
- Modern Language Association (MLA)
Hanging indents are usually used in academic and scholarly works. But even in a business document, you may also decide to use hanging indents. They’re helpful because they visually separate citations, making it easy to quickly scan through the author names or works titles.
First Line Indent: Another Type of Indentation
A more common kind of indentation is the first line indent. As the name implies, only the first line of the paragraph is indented. The rest of the lines are set to the left margin.
First line indents visually separate one paragraph from another. Now that word processing software like Microsoft Word makes it easy to increase the spaces between paragraphs, first line indents are no longer in popular use.
But the Chicago Manual of Style, APA, and other style guides still recommend first line indents instead of extra spacing between paragraphs. Check the style you’re using to know if you should use first line indents of paragraph spacing.
Let’s get started by making a hanging indent in Microsoft Word.
How to Make a Hanging Indent in Word
There are three methods you can use to make a hanging indent. In this section, I’ll explain the steps for each method:
Method 1. Keyboard Shortcut
This method is fast and easy. It’s best to use this method if you’ve already typed or pasted all the citations in your document. The keyboard shortcut for a hanging indent is Cmd+T in Mac and Ctrl+T in Windows.
By default, the succeeding lines are indented by 0.5 inch. If that’s what your style guide recommends, then you can use this method.
1. Click and drag the mouse to select the text where you’d like to apply the hanging indent.


2. Type the Cmd+T (Mac) or Ctrl+T (Windows).
The selected paragraphs now have a hanging indent, with succeeding lines indented by 0.5 inch (the default).


Method 2. Paragraph Format
If you want more control over the hanging indent, then use this method. As with the first method, this works best after you’ve typed or pasted the citations into your document. Here are the steps:
1. Select the text.
2. Go to Format > Paragraph.


The Paragraph settings window opens.
3. Beside Special, open the dropdown menu, and select Hanging.


4. Specify the amount of indentation you want. Then click OK.


Note that the indentation is now only 0.25 inch, as I specified.


Method 3. Paragraph Styles
Another way to add a hanging indent in Microsoft Word is by using paragraph styles. Use this method if you’ll be adding more citations to the document later.
1. Follow the steps in either Method 1 or 2 to add a hanging indent to a paragraph.
2. With the cursor on the formatted paragraph, go to Format > Style.


The Style settings window opens.
3. Click New.


The Create New Style from Formatting window opens.
4. Give the new paragraph style a name.


Look at the paragraph preview and Microsoft Word indent settings to make sure they’re what you want. If everything looks the way you’d like them to look, click OK.
5. Back in the Styles window, click Apply.


Now all you’ve got to do is apply the Citation paragraph style to new citations.
Whichever method you choose to create a hanging indent, new paragraphs will automatically have a hanging indent. After you’ve applied the hanging indent, follow these steps:
Place the cursor at the end of an existing citation.


Hit the Return key, then type or paste the new citation on the next line. It’ll automatically have a hanging indent.


How to Make a First Line Indent in Word
There are three ways to make a first line indent. Here are the steps for each method:
Method 1. Tab
This is the simplest way to create a first line indent. But it’s not a convenient method to use if you’ve already typed the entire document. It’s also more suitable for shorter documents with just a few paragraphs.
1. Place the cursor before the first letter of the paragraph.


2. Click the tab key.


Now the first line has been indented to the first tab of the document.
When you hit return at the end of the paragraph, the next paragraph you type will automatically have a first line indent as well.


The next two methods for adding a first line indent in Word are more suitable for longer documents.
Method 2. Paragraph Format
This method works well for longer documents after you’ve typed or pasted the text.
1. Select the text.


2. Go to Format > Paragraph.


The Paragraph settings window opens.
3. Beside Special, open the dropdown menu and select First Line.


Specify the amount of indentation you wish to apply, then click OK.
Now all the selected paragraphs have first line indents.


Method 3. Paragraph Styles
This method of adding first line indents is good for long documents that already use paragraph styles.
1. Follow any of the previous methods to add a first line indent in an existing paragraph.


2. With the cursor on the paragraph, right-click on the style name on the ribbon.


3. Click Update Normal to Match Selection.


Now all paragraphs with the Normal style will have a first line indent.


3 Tips for Using Indents in Word
Style guides recommend hanging indents and first line indents because they make documents easier to scan and read. Microsoft Word helps you create indents easily, but as with other features, indents can be abused and misused. Keep these tips in mind to make sure you’re using indents properly.
1. Stick to One Style Guide
Follow one style guide and use it consistently in the entire document. Don’t mix up styles! Your school or business may specify which style guide you should use. If not, pick one and stick to it.
You may also decide to create your own style guide for your business or organization. If you do, remember to document it well so that anyone in your team or institution will be able to create documents that follow your style.
Study the tutorial below for tips on how to write your document:
2. Choose Only One Way to Separate Paragraphs
Don’t use both first line indents and paragraphs spacing. If using first line indents, don’t put extra spaces between paragraphs.
And if you’ve placed extra spaces between paragraphs, don’t use first line indents. Use only one way to separate paragraphs from each other.
When in doubt, follow the style guide you’re using.
3. It May Not Be Necessary to Indent the First Paragraph
Some experts say some paragraphs don’t need to have a first line indent. For example, if a paragraph is preceded by a title or heading, then a first line indent is unnecessary to set the paragraph apart from it.
Again, follow the recommendation of the style guide you’re using. Whatever you decide, apply it consistently throughout your document.
The Easiest Way to Create an Impressive Word Document: Use a Word Template
Microsoft Word delivers robust features and tools at your fingertips. But there’s an even easier way to create an impressive document in Word. That’s by starting with a template for Word.
Whatever type of document you’re creating—whether it’s a resume for job hunting, a brochure to promote your services, or the invitation to your child’s birthday party—you’ll find hundreds of Word templates that meet your needs.


The best source of templates for Word that I know of is Envato Elements. You’ll find thousands of Word templates that are designed by professional graphic artists. This means the biggest and hardest design decisions have already been made for you! All you have to do is to personalize the text, images, and colors to align with your branding. You can even change the design and layout if you’re inclined to do so.
With millions of creative assets for various types of projects, Elements offers tremendous value. Get unlimited downloads for one small monthly subscription. That includes unlimited downloads of Word templates as well as fonts, stock photos, graphics, and so much more. And you can cancel your subscription at any time.
Elements is a valuable tool to use in your MS Word workflow. It’ll cut down the amount of time you spend hunting for creative assets you need in your document.
Use Microsoft Word Indents to Create an Effective Document
You’ve just learned how to do a hanging indent on Microsoft Word. Hanging indents and first line indents are only two of the ways to make your document visually pleasing and easier to read.
Microsoft Word indents make your document attractive by visually separating paragraphs from each other. Hanging indents make it easy to scan through a list of references or citations. But first line indents give readers a visual cue of where each paragraph begins. Note that you don’t have to use first line indents if you’ve already added spacing between each paragraph.
You can also have a terrific-looking document by building it from a Word template. Professionally designed templates, like the ones you’ll find in Envato Elements, have the design decisions made for you. At the same time, you’ll still be able to change the formatting settings as you see fit. To get unlimited downloads of templates for Word and other creative assets, get an Elements subscription.
Whether creating a Word document from scratch or starting from a Word template, follow the steps in this tutorial to create a first line indent or hanging indent in Word.
Formatting text in MS Word is both pleasingly simple and annoyingly complicated. Take text indentation, for example. The basics are very easy to grasp. But there are many extra options that you may miss if you’re not already a confident Microsoft Word user. To help out, then, we’ve prepared this complete guide on how to indent text in a document.
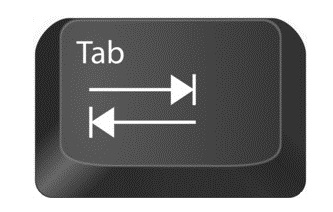
The Tab Key
One simple way to indent text is to place the cursor at the start of a paragraph and hit the tab key on your keyboard. In Microsoft Word, this adds a 0.5” (1.27cm) indent at the left margin. It also automatically formats the text so that subsequent paragraphs have a first-line indent.
If all you want to do is begin each paragraph with a half-inch indent, this is fine. But for more control over text indentation in your document, read on.
How to Indent Text
You can find the basic indentation options in Microsoft Word on the main ribbon. This includes the Paragraph section of the Home tab, where you will find Increase Indent and Decrease Indent buttons.
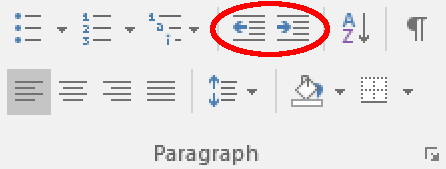
The Increase Indent button adds a 0.5” (1.27cm) indent at the left margin for the entire paragraph (not just the first line). The Decrease Indent button, meanwhile, does the exact opposite.
Alternatively, go to Layout > Paragraph on the ribbon and adjust the values in the left and right indent boxes as required. This has the added bonus of letting you indent text by a custom amount.
Find this useful?
Subscribe to our newsletter and get writing tips from our editors straight to your inbox.

Special Indentations
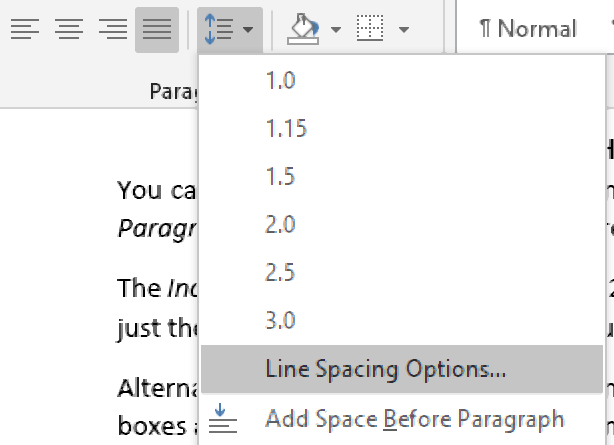
For even more control over the indentation in your document, you can open the main Paragraph menu. This can be accessed by going to Home > Paragraph, clicking the Line and Paragraph Spacing button, and then selecting Line Spacing Options… from the dropdown menu.
In the new window, you will find an Indentation section. The left and right indent options here work the same as in the Layout tab on the ribbon.
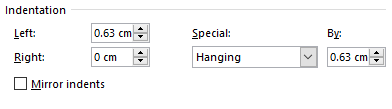
The other settings here can be used to add special indentations to your document. These include:
- First line – This option indents the first line of each paragraph to a custom value. Typically, this type of indent would be used as an alternative to paragraph spacing.
- Hanging – This will indent each line after the first in a paragraph. The most common use for this is to add a hanging indent in a reference list (e.g., as required in APA referencing).
- Mirror indents – Clicking this will change the left and right indent options to say Inside and Outside This will mean that indents are “mirrored” on odd and even pages, which helps ensure consistent formatting when printing something in a book format.
To use these options, simply select the text you want to format with the cursor, open the paragraph menu, choose the type and size of indent you want to apply, and click OK to change the indentation for the selected text.
What is a first-line indent?
The first-line indent is as it sounds; the first line of a paragraph is slightly indented in comparison to the remainder of the text in the paragraph.
Adding the first-line indent makes it easy for your reader to identify where a new paragraph or topic starts. They are not ‘required’ but are commonly used in Microsoft Word Documents to provide readers with a user-friendly layout.
There are two ways to insert the first-line indent, manually, by pressing ‘Tab’. Using the Tab button to insert an indent will move your text to the right by 1/2 and inch.
If you are looking to customise or change the size of your first-line indent, continue reading the steps below.
Adding or Changing the first-line indent in Word
- Open Word
- Place your cursor where you would like the insert or edit the first-line indent
- Right Click
- Click Paragraph
- Select First Line under ‘Special’
- Customise the indentation you would like on the first line
- Press OK
You have now successfully inserted and customised the first line indent in your Microsoft Word Document.
Need a simple solution to your collaboration problems?
Collaborating together in a Microsoft Word document is something most of us will do during our working careers. Some more than others, some may even collaborate daily, which is why collaborating with ease is so important.
When it’s your turn to review and edit a shared Word Document you usually received an email in your inbox ‘for your review’, you open the email, click the attachment and a Word Document pops up.
You start reading the text, making some edits, add a few comments and then press save.
Where do you save the document? Does this live deep in your company shared drive somewhere, under Client>2020>reports>Q3Report>Draft>Final? Your guess is as good as anyone else’s, so you save it here hoping that’s the right spot and move on.

Without realising it you have accidentally saved your find in the wrong spot, making it near impossible to source later. You also forgot to turn on tracked changes when you made your edits (don’t worry, you’re not alone, most of us do this monthly). With no tracked changes, there is no way of knowing what edits you made, to then re-do them or highlight them for your manager. So you are forced to start all over again.
It’s painful and time-consuming and happens to the majority of people collaborating in Word.
Luckily, there are some new purpose built tools on the market that were built with seamless collaboration in mind. Tools such as Simul Docs.
Simul Docs was built to ensure you never forget to turn on tracked changes again, in fact, Simul will track your changes automatically. Open a document, start making changes and Simul will begin tracking them. It sounds simple, and it is, but it is something that makes a huge difference when collaborating in Word.

Not sure where to save your document?
Simul has you covered.
Simul will keep track of every, single version your team creates. If the document is opened and a change made, Simul will automatically save this as a new version. Because, if there are new edits or changes you probably don’t want to miss them.
Automatically saving new versions is one thing, but Simul thought they would take it one step further, just to make sure you never have to stress about where your files are again. Simul manages version control on your behalf. When a new version is created, Simul will save it and give it a new version number such as 0.0.2 or 0.0.3, depending on how many versions of the document currently exist.

As your team continues collaborating, Simul will continue saving and managing your version control. Keeping track of every change and every file, while storing them neatly in a Versions List for you to review at any time.
If you want to pull a document out of Simul and save it or forward it on in an email, no worries, you can do that directly from Simul as well.
Simul allows you to access your documents from anywhere, anytime. without the need for shared drive or server access. If you have an internet connection (or not, because Simul is happy for you to work offline too), you can access all of your files.
Is there honestly anything Simul Docs can’t do?
We haven’t found it yet.
Create a Hanging Indent in a Microsoft Word Document
by Avantix Learning Team | Updated May 16, 2022
Applies to: Microsoft® Word® 2010, 2013, 2016, 2019, 2021 and 365 (Windows)
You can create a hanging indent in Microsoft Word using the Ruler, the Paragraph dialog box or a keyboard shortcut. A hanging indent is created when the first line of a paragraph is at a location to the left of the subsequent lines in the paragraph. The term is often used to refer to a first line indent. Either way, the first line of a paragraph is indented or outdented. A hanging indent is typically used for bullets and numbering or to cite a reference.
Recommended article: How to Keep Text Together in Word (Paragraphs, Lines or Words)
Do you want to learn more about Microsoft Word? Check out our virtual classroom or in-person Word courses >
A paragraph in Word is anything with a hard return after it (you have pressed Enter or Return). If you want to create a hanging or first line indent in a multi-line paragraph, there should not be hard returns at the end of each line of text.
To view hard returns or paragraph marks and other non-printing characters in Microsoft Word:
- Click the Home tab in the Ribbon.
- Click Show/Hide ¶ in the Paragraph group. Paragraph marks, tabs, spacing and manual page breaks will display but will not print.
Creating a hanging indent using the Ruler
A common way to create a hanging or first line indent is to use the Ruler. If the Ruler is not displayed at the top of the document, click the View tab in the Ribbon and select the Ruler checkbox.
To create a hanging using the Ruler:
- Select the paragraph(s) you want to indent. If you are changing only one paragraph, simply click in it.
- On the Ruler, drag the First Line Indent marker (top triangular marker) to the position where you want the first line of text in the selected paragraph(s) to start.
- Drag the bottom triangular marker to the position where you want the second line and all subsequent lines in the selected paragraph(s) to start (the box below will move with it).
- If you want the triangular markers to move at the same time, drag the box below the bottom marker. If the top and bottom markers are at the same location, this is called a nested indent.
In the following examples, the first line indent marker and the left indent marker are at different locations on the Ruler:
![]()
![]()
Creating a hanging indent using the Paragraph dialog box
To create a hanging or first line indent using the Paragraph dialog box:
- Select the paragraph(s) you want to indent.
- Click the Home tab in the Ribbon.
- Click the dialog box launcher on the bottom right of the Paragraph group. The Paragraph dialog box appears.
- Enter the desired amount for the left indent (which will affect all lines in the paragraph except the first one (enter in inches or centimeters depending on your measurement system units).
- Under Special, select Hanging or First Line from the drop-down menu and then in the By box, enter the desired amount for the hanging indent.
- Click OK.
In the following example, indents have been entered for the Left and First Line in the Paragraph dialog box (in this case, entered in inches):

Creating a hanging indent using a keyboard shortcut
You can press Ctrl + T to apply a hanging indent to a paragraph. This shortcut will move all lines except the first one to the next tab stop. If there are no user-defined tab stops in the paragraph, Word indents to the first default tab stop. If you keep pressing Ctrl + T, Word will keep indenting by tab stop to the right.
Press Ctrl + Shift + T to decrease or remove the indent (move to the left).
If you click at the beginning of a paragraph and press Tab, Word will indent the first line to the first user-defined tab stop or the first default tab stop.
Other ways to indent paragraphs
When you apply bullets or numbering, Microsoft Word changes the indents of the first and subsequent lines in a paragraph or paragraphs automatically.
If you are comfortable using styles in Word, you can apply, modify or create styles that include hanging or first line indents. If you are working on a long document with a lot of indented paragraphs, this is the best approach.
Subscribe to get more articles like this one
Did you find this article helpful? If you would like to receive new articles, join our email list.
More resources
How to Create a Table of Contents in Word
How to Insert the Mu or Micro Symbol in Word
14+ Word Selection Shortcuts to Quickly Select Text
How to Insert a Check Mark or Tick Mark in Word (5 Ways)
3 Strikethrough Shortcuts in Microsoft Word to Cross Out Text
Related courses
Microsoft Word: Intermediate / Advanced
Microsoft Excel: Intermediate / Advanced
Microsoft PowerPoint: Intermediate / Advanced
Microsoft Word: Long Documents Master Class
Microsoft Word: Styles, Templates and Tables of Contents
Microsoft Word: Designing Dynamic Word Documents Using Fields
VIEW MORE COURSES >
Our instructor-led courses are delivered in virtual classroom format or at our downtown Toronto location at 18 King Street East, Suite 1400, Toronto, Ontario, Canada (some in-person classroom courses may also be delivered at an alternate downtown Toronto location). Contact us at info@avantixlearning.ca if you’d like to arrange custom instructor-led virtual classroom or onsite training on a date that’s convenient for you.
Copyright 2023 Avantix® Learning
Microsoft, the Microsoft logo, Microsoft Office and related Microsoft applications and logos are registered trademarks of Microsoft Corporation in Canada, US and other countries. All other trademarks are the property of the registered owners.
Avantix Learning |18 King Street East, Suite 1400, Toronto, Ontario, Canada M5C 1C4 | Contact us at info@avantixlearning.ca
Select the paragraph to be indented; From the Home tab, Paragraph group, select the dialog box launcher; Check that the Indents and Spacing tab is selected; In the Indentation section set the indent value you require.
Contents
- 1 How do you indent 0.5 in Word?
- 2 How do I indent the second line in Word?
- 3 What is the shortcut key for 1.5 line spacing?
- 4 How will you use indent commands?
- 5 How do I put spaces before paragraphs in Word?
- 6 How do I do 1.5 spacing on Word?
- 7 How do you do 1.5 spacing on Microsoft Word?
- 8 What is L Ctrl?
- 9 How do I indent tab in Word?
- 10 How do you make a 0.2 hanging indent?
- 11 What is indent example?
- 12 How do I add a space between words in Word?
- 13 How do I make no space between lines in Word?
- 14 Is 1.0 single-spacing?
- 15 Where is the spacing in Microsoft Word?
- 16 How do you set 1 inch margins on Microsoft Word?
- 17 What does Ctrl Shift E?
- 18 What is Ctrl E in word?
- 19 What does Ctrl k do in word?
- 20 Why can I not indent on word?
How do you indent 0.5 in Word?
One simple way to indent text is to place the cursor at the start of a paragraph and hit the tab key on your keyboard. In Microsoft Word, this adds a 0.5” (1.27cm) indent at the left margin. It also automatically formats the text so that subsequent paragraphs have a first-line indent.
How do I indent the second line in Word?
Select OK.
- Select the paragraph where you want to add a hanging indent.
- Go to Format > Paragraph.
- Under Special, select one of the following indent styles: Hanging. First Line. None. On Hanging and First Line indents, you can adjust the depth of the indent with the By field.
- Select OK.
What is the shortcut key for 1.5 line spacing?
Ctrl+5
Pressing Ctrl+5 changes to 1.5 line spacing.
How will you use indent commands?
To use the Indent commands:
- Select the text you want to indent.
- Make sure you are on the Home tab.
- Click the Increase Indent command to increase the indent by increments of 1/2 inch. Increasing the indent.
- Click the Decrease Indent command to decrease the indent by increments of 1/2 inch.
How do I put spaces before paragraphs in Word?
To format paragraph spacing:
- Select the paragraph or paragraphs you want to format.
- On the Home tab, click the Line and Paragraph Spacing command. Click Add Space Before Paragraph or Remove Space After Paragraph from the drop-down menu.
- The paragraph spacing will change in the document.
How do I do 1.5 spacing on Word?
To format line spacing:
- Click Format on the menu bar.
- Select Paragraph. The Paragraph dialog box appears.
- Click the Indents and Spacing tab.
- In the line spacing drop-down menu, you can select single, 1.5, or double spacing. The default is single spacing.
- Click OK.
How do you do 1.5 spacing on Microsoft Word?
Change the line spacing in a portion of the document
- Select one or more paragraphs to update.
- Go to Home > Line and Paragraph Spacing.
- Select Line Spacing Options and choose an option in the Line spacing box.
- Adjust the Before and After settings to change spacing between paragraphs.
- Select OK.
What is L Ctrl?
Alternatively referred to as Control+L and C-l, Ctrl+L is a keyboard shortcut whose function differs depending on the program being. For example, in Microsoft Word, Ctrl+L is used to align text with the left edge of a document (margin).Ctrl+L in Excel and other spreadsheet programs.
How do I indent tab in Word?
To indent using the Tab key:
- Place the insertion point at the very beginning of the paragraph you want to indent.
- Press the Tab key. On the Ruler, you should see the first-line indent marker move to the right by 1/2 inch.
- The first line of the paragraph will be indented.
How do you make a 0.2 hanging indent?
Create a hanging indent
- Select the text where you want to add a hanging indent.
- Go to Home > Paragraph dialog launcher. > Indents and Spacing.
- Under Special, select Hanging. You can adjust the depth of the indent using the By field.
- Select OK.
What is indent example?
When you press the “Tab” button in a word processing program so the first line of your text starts further inward than the second, this is an example of indent.A space left when you “tab” to move text inward in a word processing program is an example of an indent.
How do I add a space between words in Word?
Change the spacing between characters
- Select the text that you want to change.
- On the Home tab, click the Font Dialog Box Launcher, and then click the Advanced tab.
- In the Spacing box, click Expanded or Condensed, and then specify how much space you want in the By box.
How do I make no space between lines in Word?
Change the line spacing in Word
- Select Design > Paragraph Spacing.
- Hover the cursor over each option to see a preview, and then select the option you want. For single spacing, select No Paragraph Space.
Is 1.0 single-spacing?
Line spacing is the distance between lines. In earlier versions of Word, the default line spacing distance is “1.0,” or single-spacing, which stacks lines closely together with minimal space between. The amount of that space varies depending on the font used.
Where is the spacing in Microsoft Word?
Go to Home > Line and Paragraph Spacing. Select Line Spacing Options, and then choose the options you want under Spacing. To change the spacing before or after the selected paragraphs, select the arrow next to Before or After and enter the amount of space that you want. Select Set as Default.
How do you set 1 inch margins on Microsoft Word?
To set the top margin of all other pages to 1 inch:
- At least one line down from the top of Page 1, place cursor before or after any text in the order.
- Click Page Layout > Margins > Custom Margins.
- In the Page Setup Window, change the top margin to 1 inch.
- Select “This point forward” from the Apply to selection box.
- Click Ok.
What does Ctrl Shift E?
Ctrl-Shift-E. Turn revision tracking on or off. Ctrl-A. Select everything in the document.
What is Ctrl E in word?
Ctrl+E. Align the text to the left. Ctrl+L. Align the text to the right. Ctrl+R.
What does Ctrl k do in word?
In Microsoft Word and other word processors, pressing Ctrl + K inserts a hyperlink at the text cursor’s current location.
Why can I not indent on word?
To fix this, click the Microsoft Office button, select Word Options . Under Proofing , click AutoCorrect Options… . Under AutoFormat As You Type tab (in the Automatically as you type section), make sure that the “Set left- and first-indent with tabs and backspaces” option is checked.