
Recently, I upgraded a client’s computer from Office 2003 to Office 2013 and the following strange problem is occurred when printing from Word 2013: The print Preview looks OK, but the printer output is different and wrong. In fact, the printed document is smaller than the original and all margins are wrong.
The problem is occurred for many documents that printed fine in the past, using the same printer driver at the same machine.
In this tutorial you ‘ll find detailed instructions to fix the wrong size printed output (Margins) when printing from Word 2013 or Word 2016.
How to fix: Page preview and actual print don’t match (Word 2013 & Word 2016)
Print problems in Office or other programs, typically occur because of invalid printer drivers or a defective third-party add-in that affects the document layout. So, before you continue to the fix below, try the following steps:
Step 1. Disable any third party Office add-ins and then try to print.
Step 2. Uninstall the printer from your computer and then re-install the latest driver version for your Printer model and then try to print again. If after reinstalling the printer driver you face the same problem proceed to next step.
Step 3. Modify Scale Content options.
1. Open Word and from the File menu, select Options.
2. Click Advanced on the left and then at the right pane, scroll down to find the Print section.
3. Uncheck the Scale content for A4 or 8.5″x11″ paper sizes option.

4. Click OK and try to print a document. (At my case that was the solution to the «wrong print output» problem). *
* Note: If after unchecking the «Scale content…» option, you still receive a wrong print output, try the following:
a. Open Printer Properties and make sure that the Paper size is A4.
b. Go to File > Options > Advanced > Compatibility options and set «Lay out this document as if created in: Microsoft Word 2010» or «Microsoft Word 2007», etc. Additionally, expand the Layout options and clear all boxes.

c. Change document’s fonts.
d. Go to File menu > Save As and save as type: «Word 97-2003 Document (*.doc)«, instead of .docx. Then, go to File > Options > Advanced > Compatibility options and at Layout Options check the «Use printer metrics to lay out document».
That’s it! Let me know if this guide has helped you by leaving your comment about your experience. Please like and share this guide to help others.
If this article was useful for you, please consider supporting us by making a donation. Even $1 can a make a huge difference for us in our effort to continue to help others while keeping this site free:

If you want to stay constantly protected from malware threats, existing and future ones, we recommend that you install Malwarebytes Anti-Malware PRO by clicking below (we
do earn a commision from sales generated from this link, but at no additional cost to you. We have experience with this software and we recommend it because it is helpful and useful):
Full household PC Protection — Protect up to 3 PCs with NEW Malwarebytes Anti-Malware Premium!
Does your printer produce Microsoft Word documents with strange fonts, jumbled paragraphs, missing text, or almost nothing? Try these potential fixes.
There are many reasons for Microsoft Word documents to print out strangely. Some involve errors with the program; others could hint at more far-reaching issues.
If your Microsoft Word documents are printing out incorrectly on Windows, try these troubleshooting options to get perfect prints every time.
Finding Out What the Problem Is
Before we begin, you should know that a few of these troubleshooting techniques to find out why Microsoft Word isn’t printing correctly involve some test printing. If you want to conserve printer toner or ink, here’s how to change settings to make Microsoft Word print in black and white.
Print a Test Page
Before you try any other potential fix, it’s best to rule out an error with your printer. This will give you an idea of where the issue lies. Follow these steps to print a test page on your printer.
- Click on the Start menu and type ‘control panel.’
- Click on the Control Panel app.
- In Category view, look under Hardware and Sound for the View devices and printers option. In Icon view, it is called Devices and Printers.
- Right-click on your printer and select Printer properties. (Make sure your printer is connected to your computer and switched on. The printer will be grayed out if it is not.)
- Under the General tab, click on the Print Test Page button.
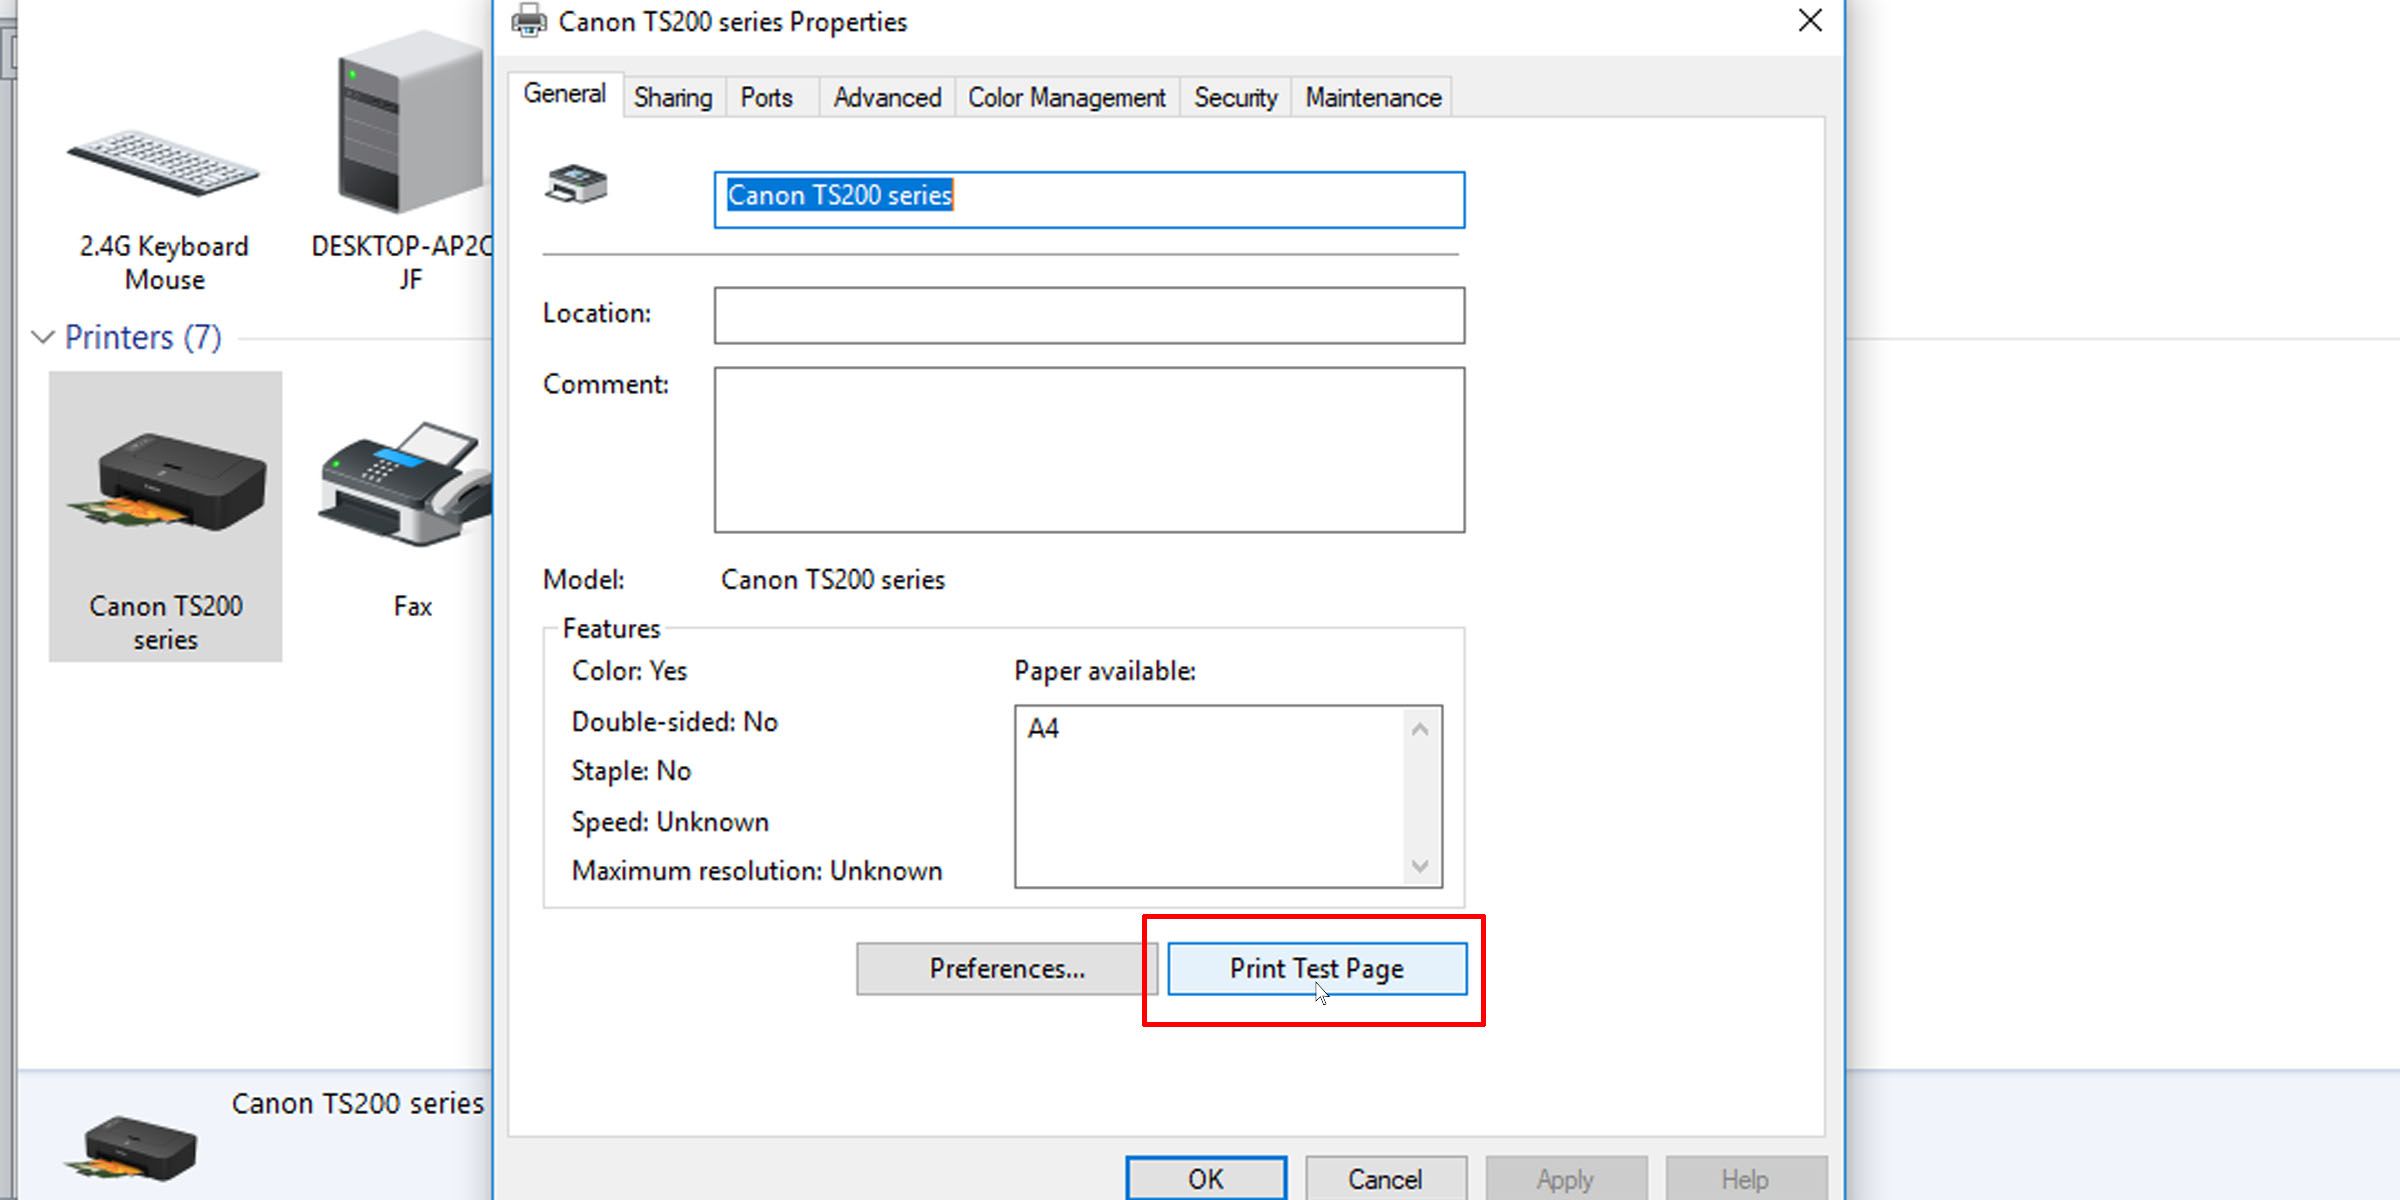
The test page should tell you whether your printer has been installed correctly. If there is an issue with your printer, this guide on what to do when your printer is not working should help you resolve the issue.
If the test page prints out correctly, the issue is probably not with your printer. It could be Microsoft Word or even Windows that is causing the print error.
Fixes You Can Try to Fix Printing Issues in Microsoft Word
1. Print Other Microsoft Word Documents
Is the problem with a specific document? A particular file may have corrupted contents, or the file itself may be corrupted. This could cause printing errors with Microsoft Word. Try the following fix:
- Open a new Microsoft Word file.
- Copy and paste your text and other data into the new Word document.
- Print the newly created document.
If your document prints out as desired, it may be an error with the original file. This probably means that the print error was an isolated issue, and this should resolve it.
If the page doesn’t print out correctly, it could be an issue with Microsoft Word or some of its settings.
2. Print Documents in Other Formats
To know whether the printing issue you are having is Microsoft Word-specific, try printing another document on your computer, maybe a PDF file or even a website. Pressing Ctrl + P on most web pages should pull up the print options.
If PDF documents print out correctly, here’s a temporary fix: When you’ve finalized the contents in your Microsoft Word document, covert it to PDF and print that instead.
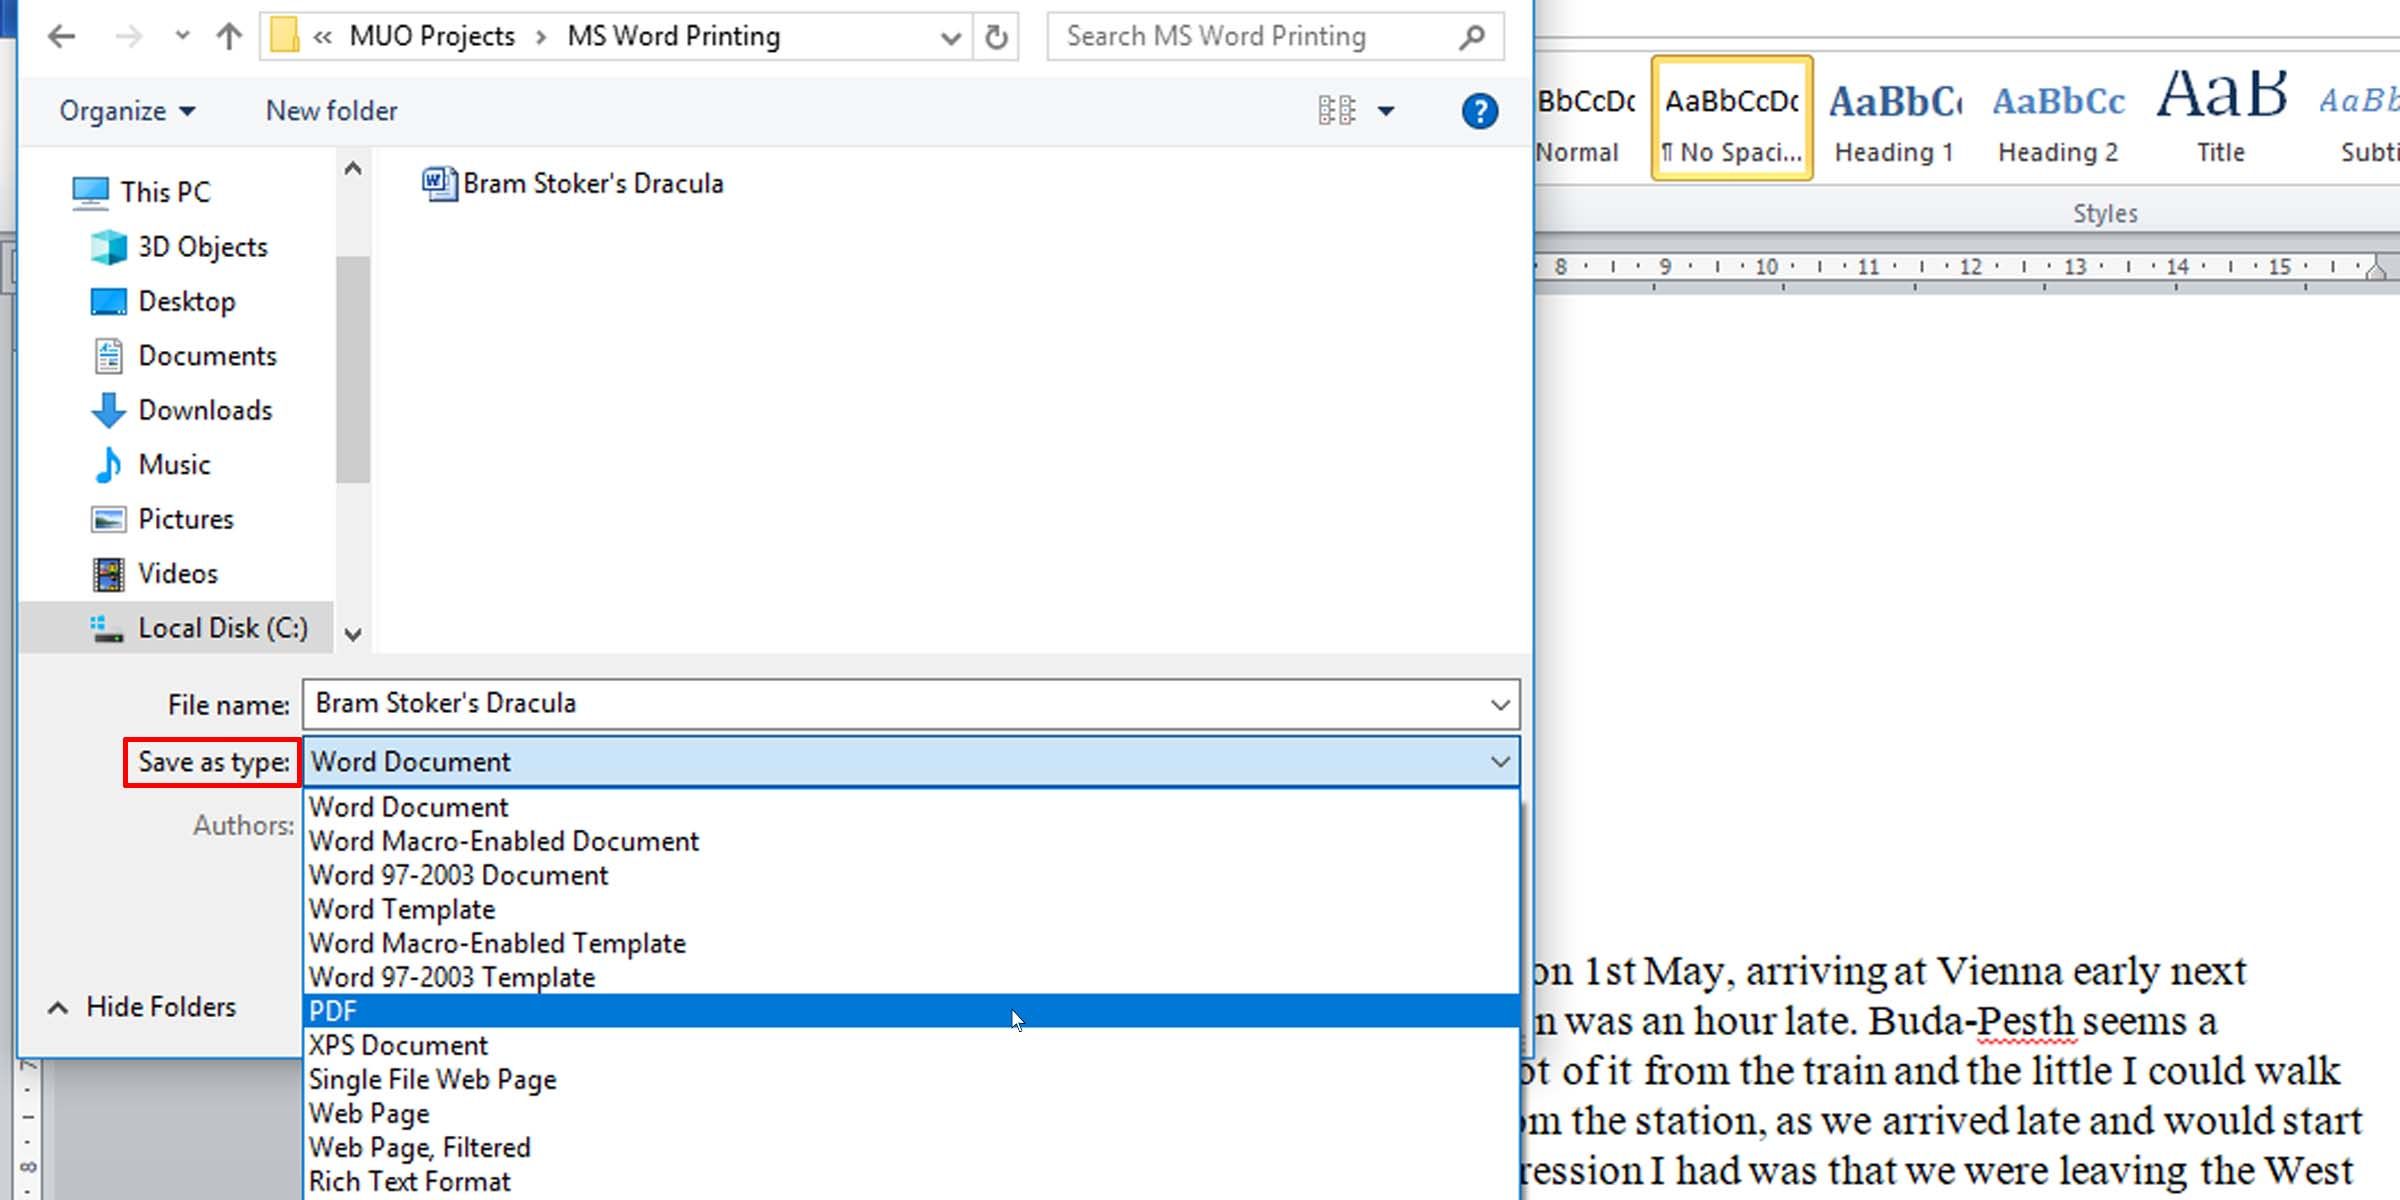
Here’s how to convert a Microsoft Word document into a PDF document. In Microsoft Word on Windows, simply go to File > Save As, then choose PDF at the Save as type dropdown.
Here’s a helpful article on how to convert Word files to PDF on a Mac computer.
3. Check Printer Drivers
If other documents are printing out correctly, a potential fix may be to uninstall and reinstall either your printer drivers or your printer, or both. As Microsoft themselves put it, “Word is a very printer-intensive program. Therefore, a minor problem in the printer driver tends to affect Word before it affects other programs.”
Here’s a guide on fixing printer driver issues and getting your printer functioning normally again on Windows.
4. Check for Problems With Windows
The problem might be add-ons that you’ve installed with Microsoft Word or even misbehaving device drivers. Follow this guide to get in and out of Safe Mode in Windows 10 to test why Microsoft Word won’t print documents correctly.
If you are able to print properly in Safe Mode, you may want to perform a clean boot to isolate and identify the cause of your problem.
5. Scaled Printing Issue
A less common issue is when pages print at a fraction of the actual size, taking up only a small portion of the printed paper. This is possibly a problem with scaling factors. Here’s how to check and remove the scaling on Microsoft Word documents when printing.
- Press Ctrl + P or go to File > Print when working in the Word document.
- Click on Printer Properties under your printer.
- Under the Page Setup tab, in the Page Layout section, make sure the Scaled option isn’t selected. If it is, switch it to Normal-size.
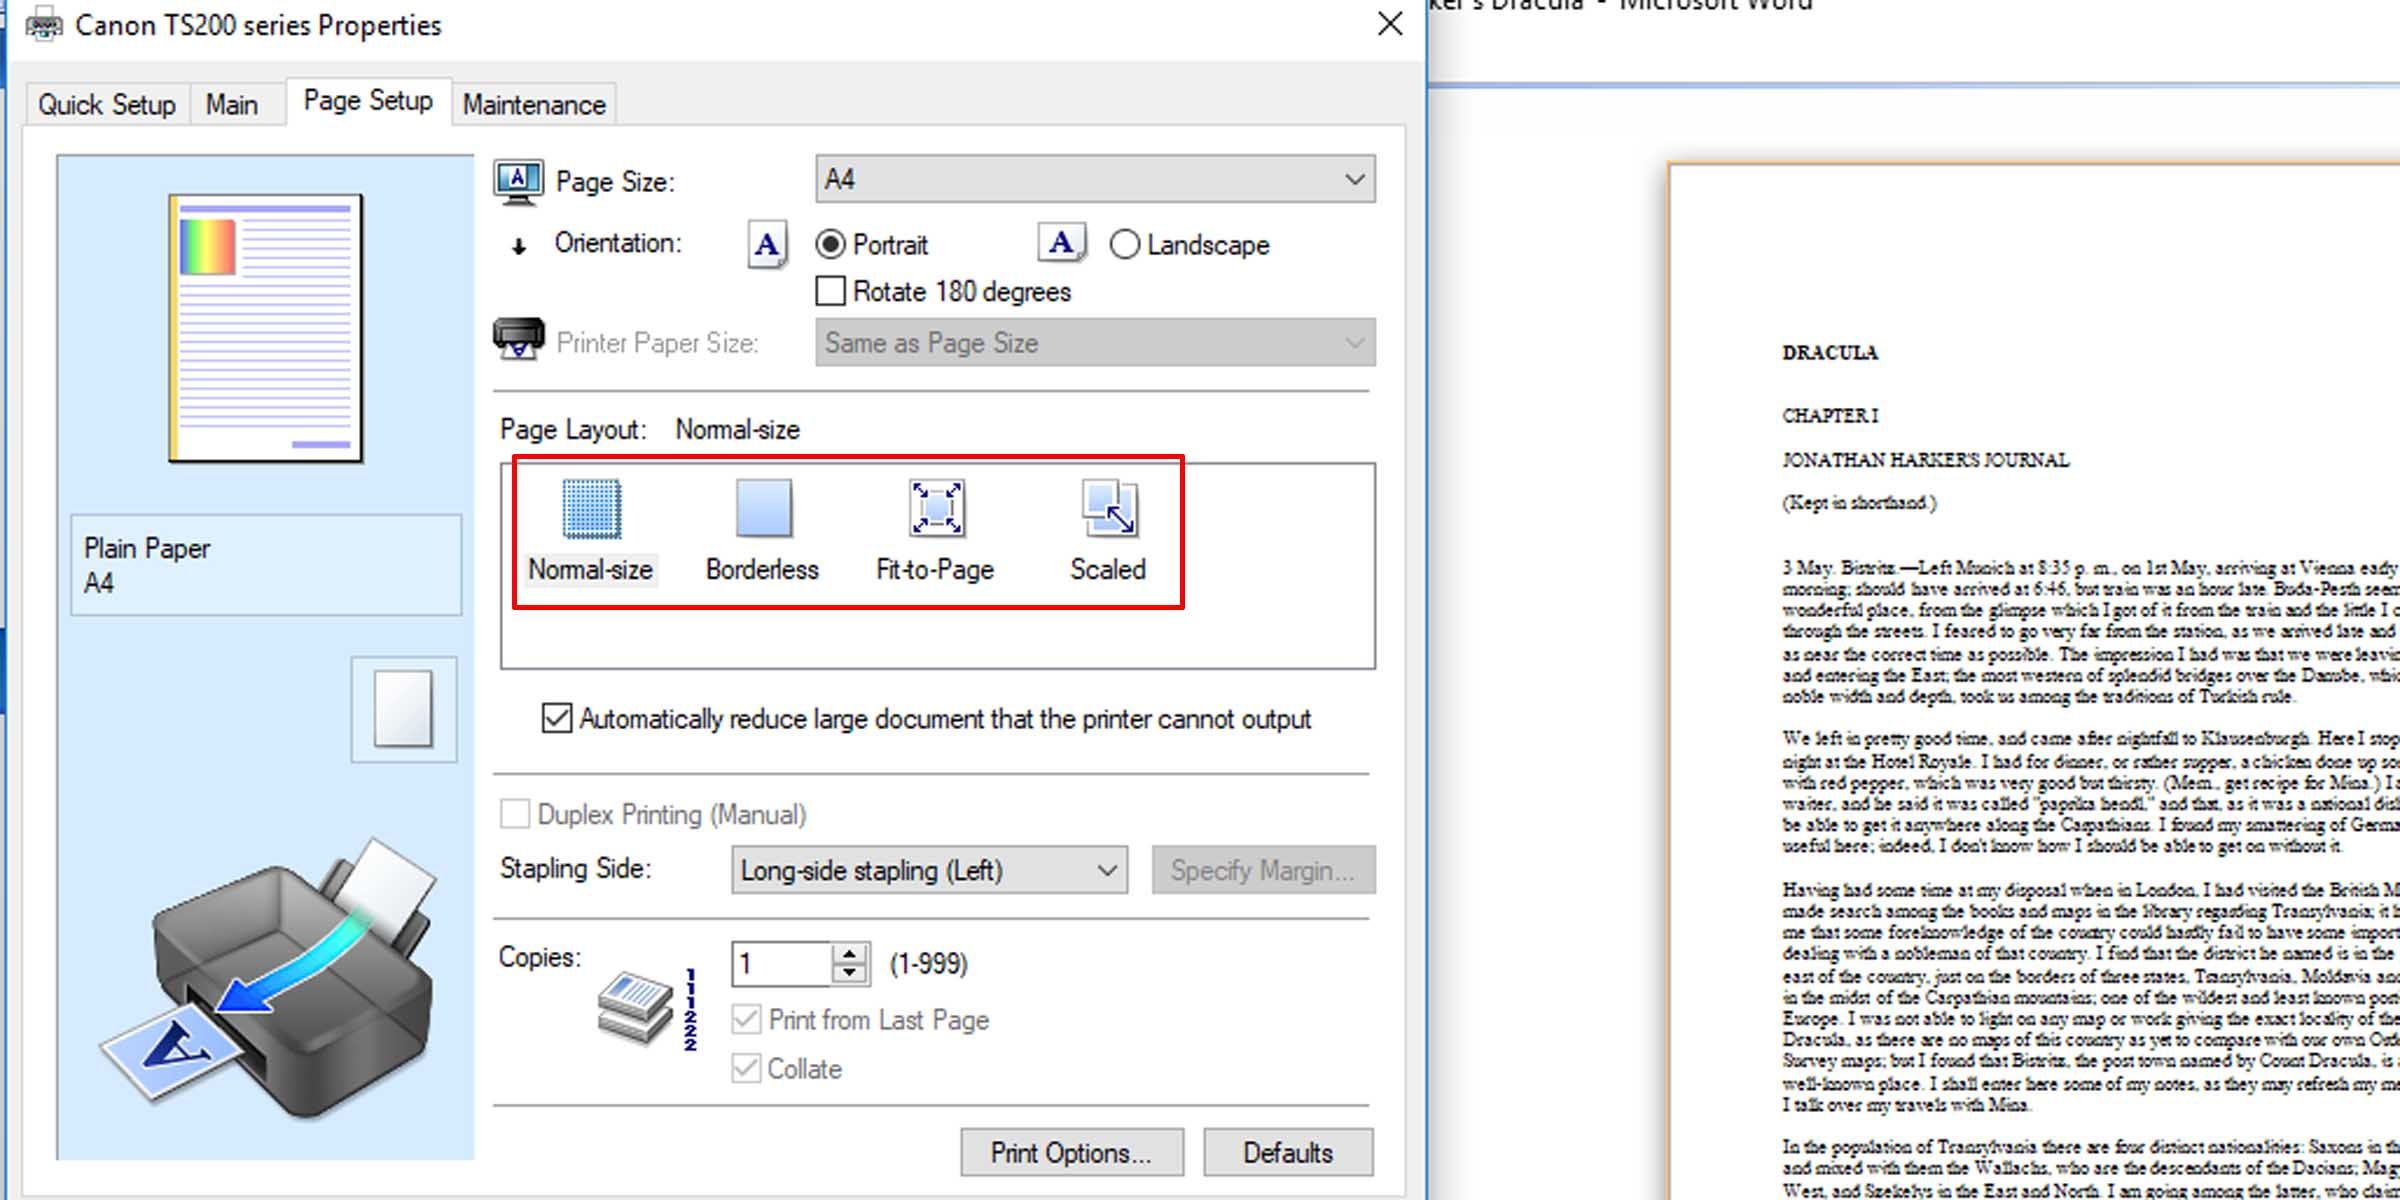
This should make the pages print at full size, with text and any graphics filling the entire page.
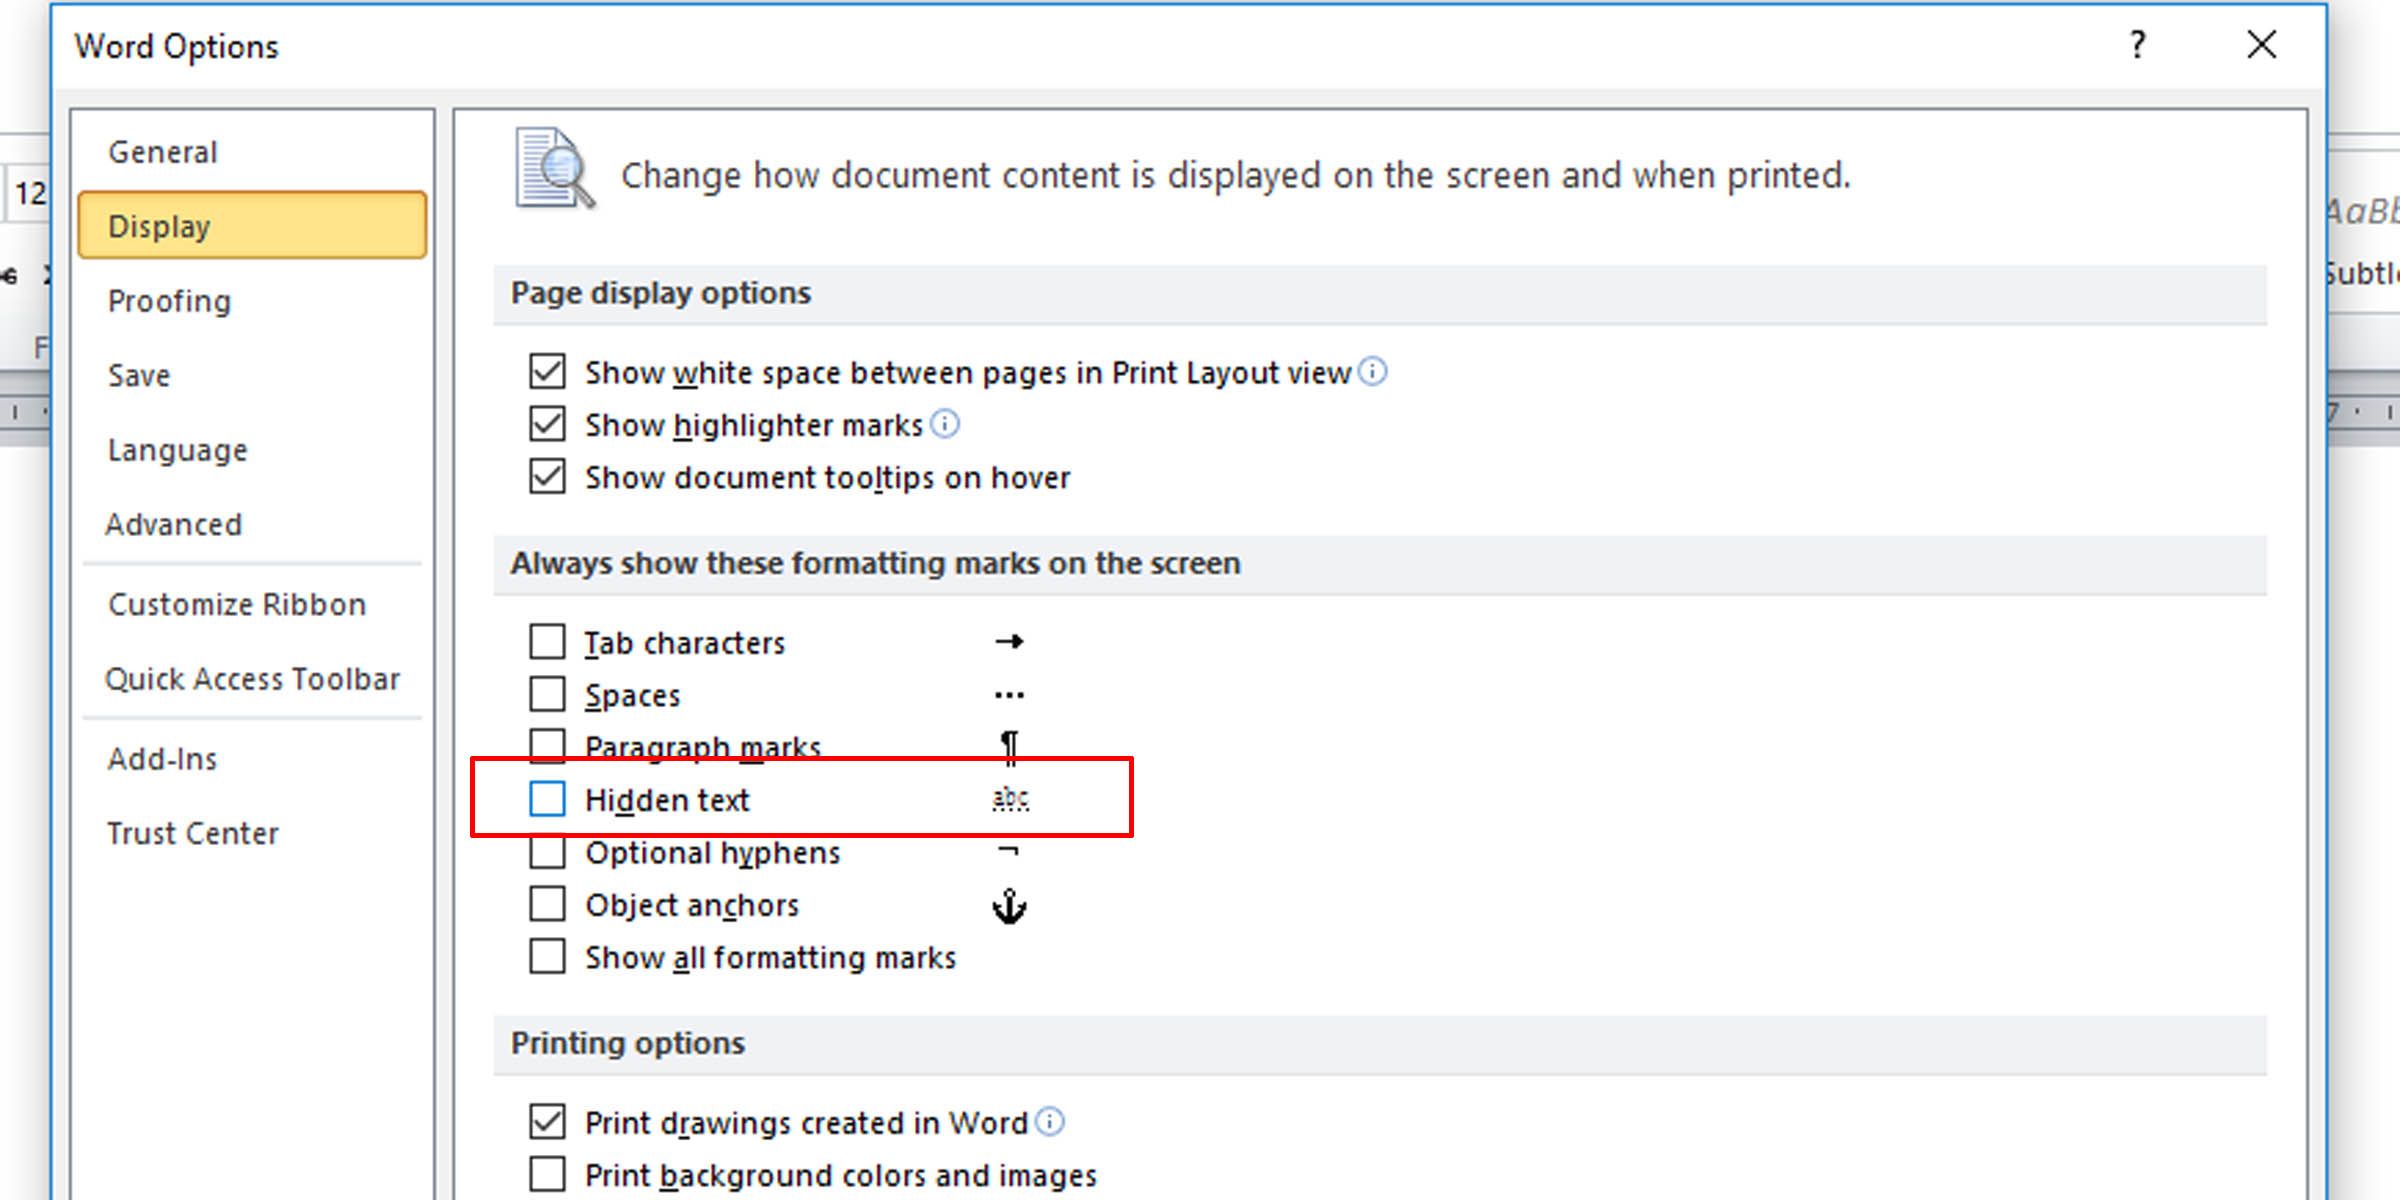
6. Check for Hidden Text
Microsoft Word affords the option of hiding text on the page. The hidden text has the same properties as formatting marks, which are characters that take up space in a document but don’t appear when printed, such as spaces, line breaks, and tab characters.
If your prints are missing part of your soft copy text, here’s how to check whether you have text hidden in the document.
- In the Word document you want to check, click on File > Options.
- Under the Display tab, make sure the Hidden text option in unchecked.
-

Print the document to see if this fixes the problem.
This informative article gives more background on non-printing or invisible characters in word processors.
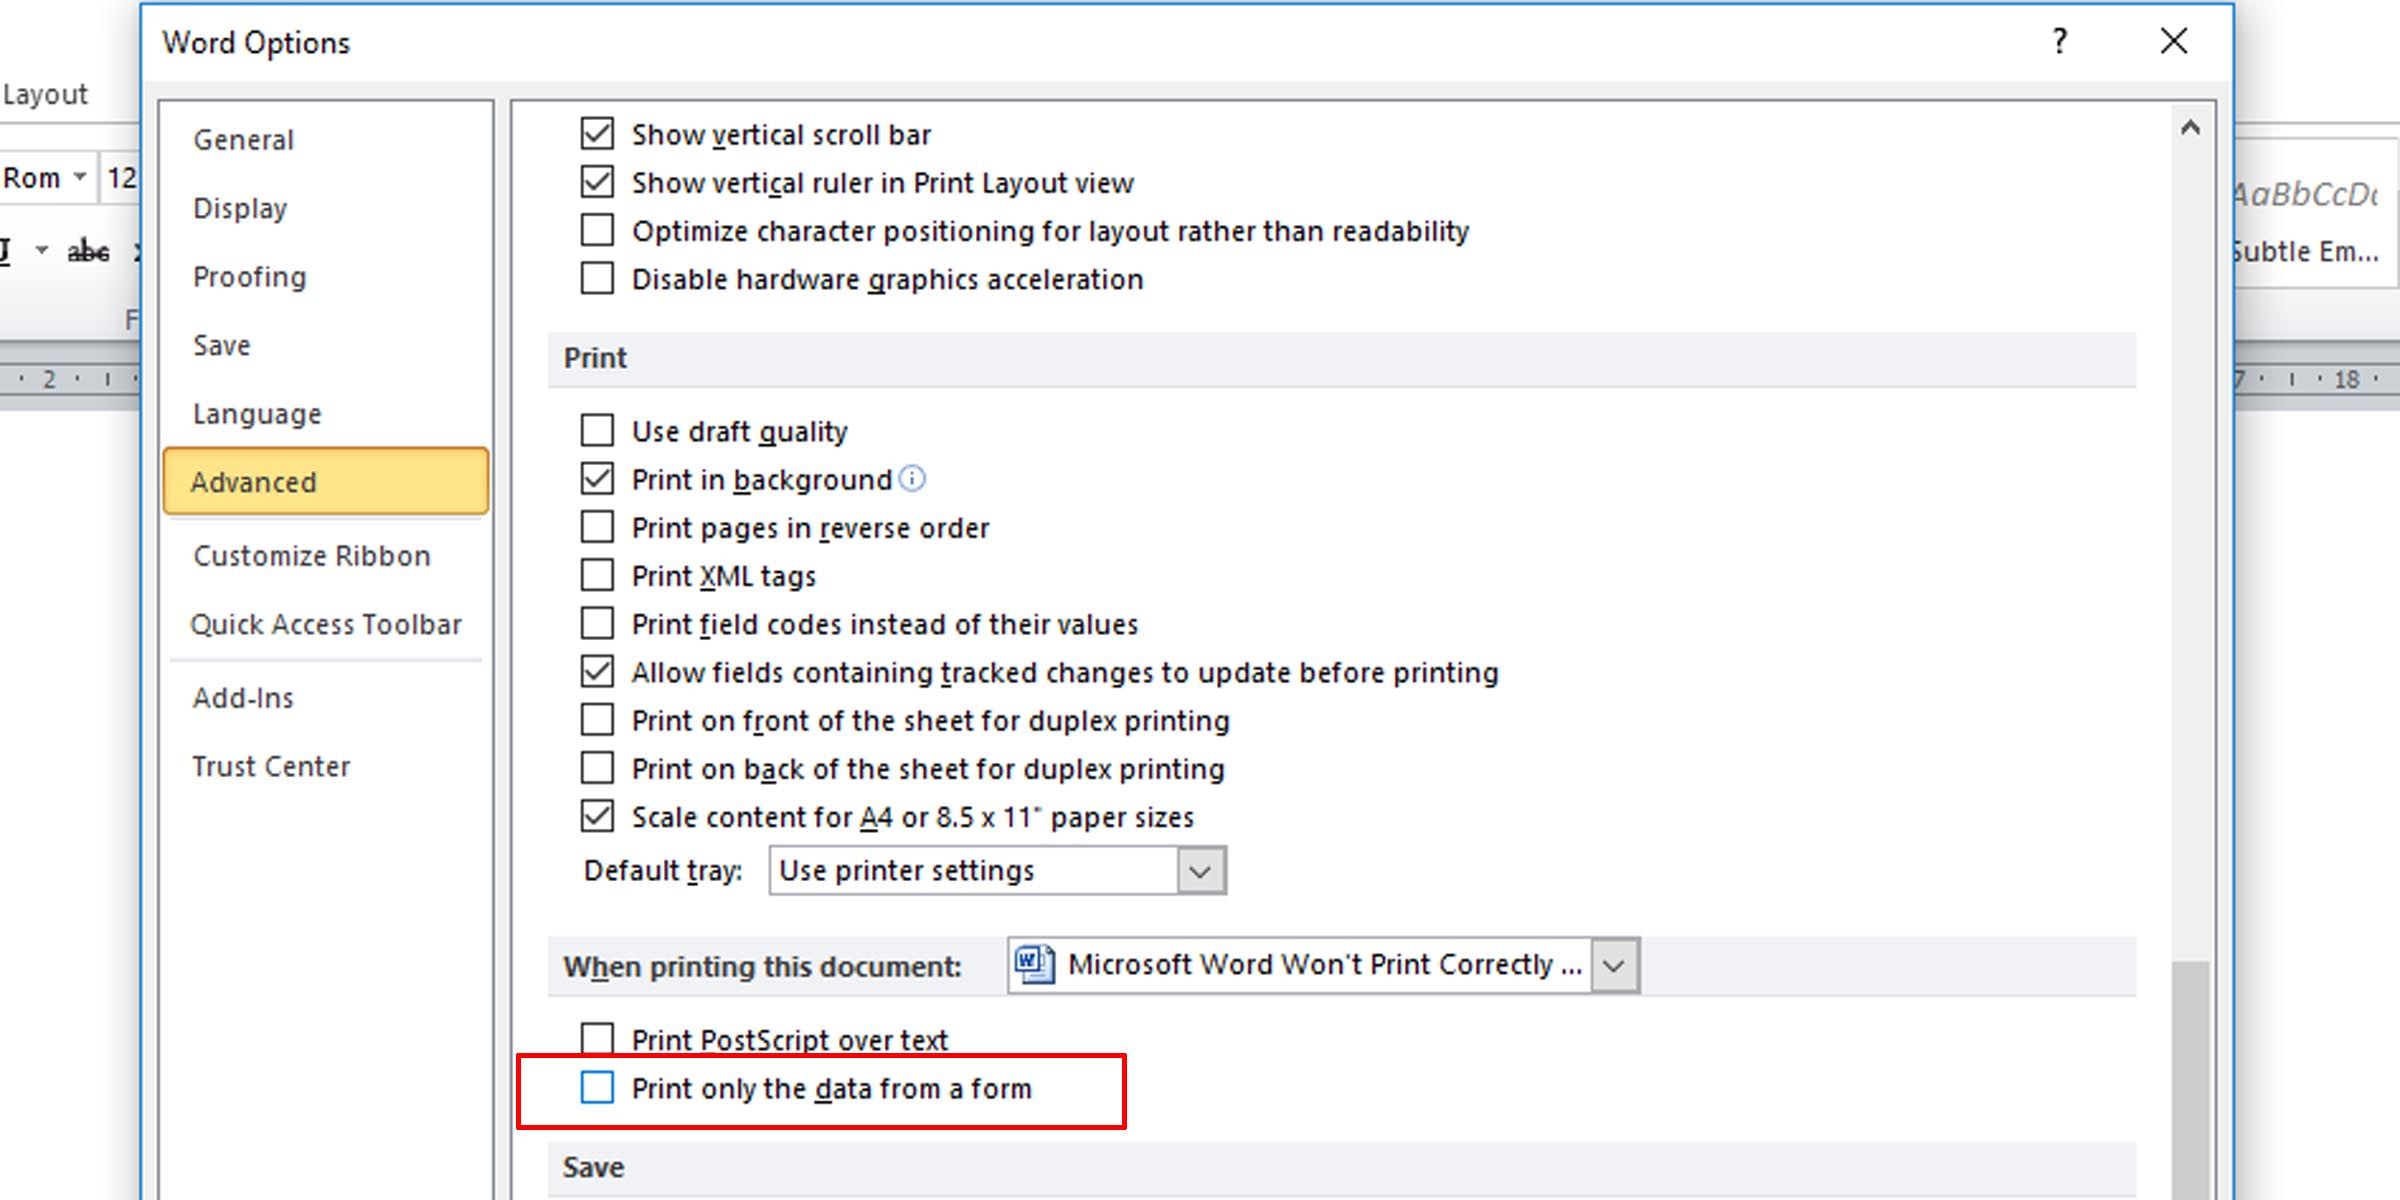
7. Check Form Data Print Options
A not-so-common occurrence is table borders not showing up in final prints. This can be easily remedied.
- In the Word document, go to File > Options.
- Under the Advanced tab, scroll down to the Print section.
- Make sure that the checkbox for printing only the data from a form is unchecked.
8. Print Directly to the Printer
Some errors when printing Microsoft Word documents causes pages to have only portions of text. This might be because of a spooling issue.
- Open the Control Panel app.
- Click on the option for devices and printers.
- Right-click on your printer and select Printer properties.
- Under the Advanced tab, select Print directly to the printer.
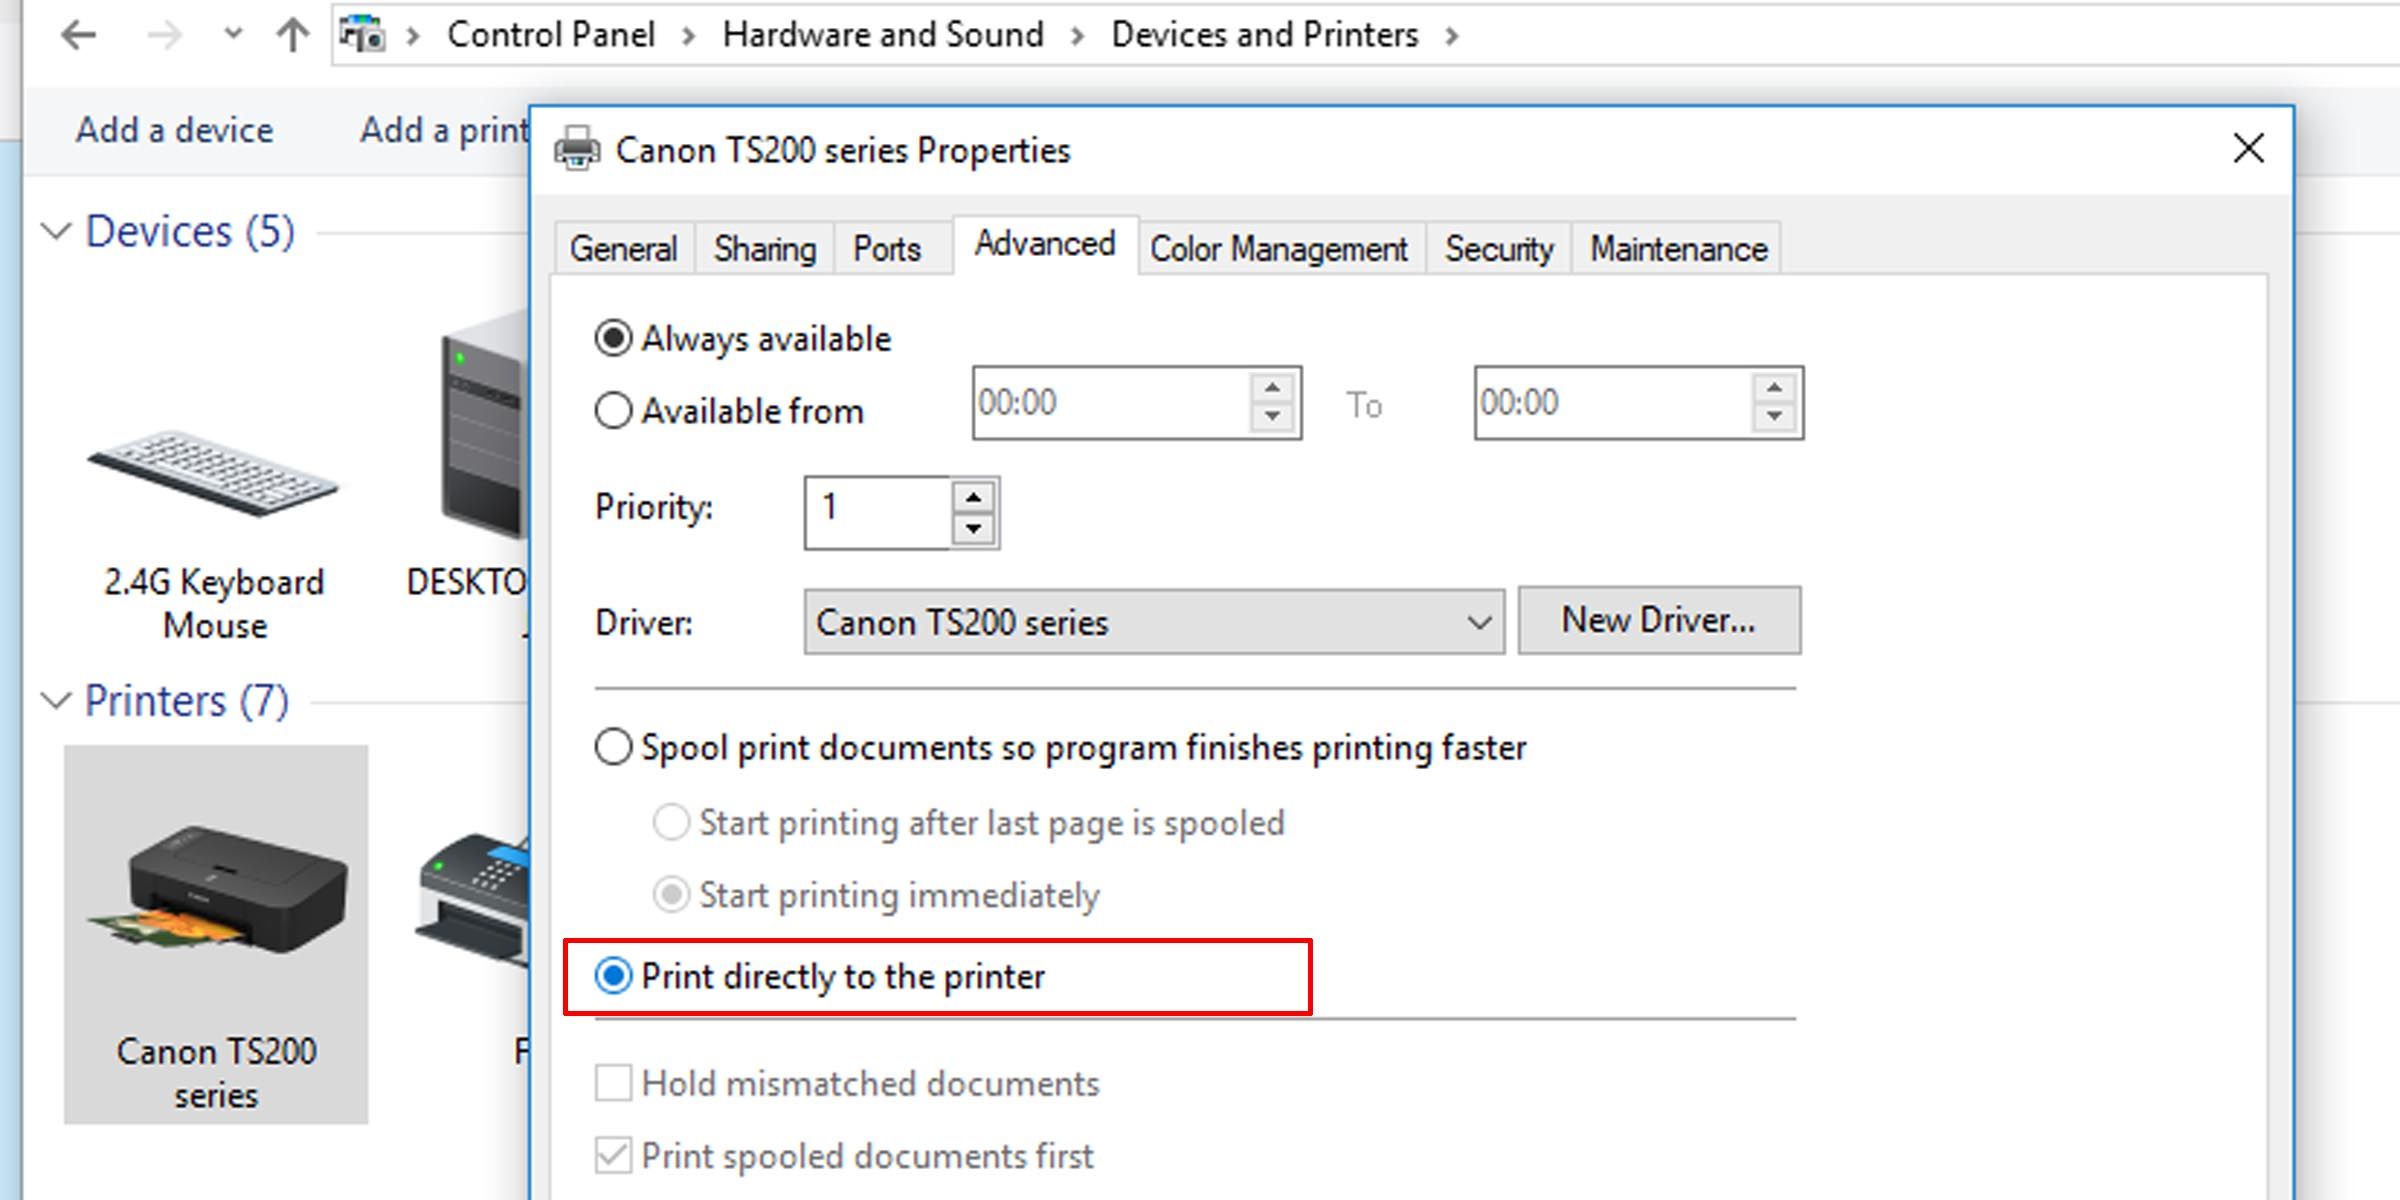
If your computer is connected directly to a printer, you don’t need the spool print option turned on. However, turning it off may slow down your PC when printing.
9. Repair Microsoft Office Suite
If you’ve tried all these potential fixes for Microsoft Word not printing properly and the issue persists, repairing your copy of Microsoft Word might solve the problem. To detect problems and repair Word on your Windows PC, do the following:
- Click on the Start menu and type «control panel.”
- Click on the Uninstall a program option under the Program heading in Category view, or the Programs and Features option in Icon view.
- Search for your Microsoft Office suite or Word program; right-click it and select Change or Modify.
- Select the Repair option and click Continue.
This will reset the settings on the 2010, 2013, 2016, and 2019 editions of Microsoft Word.
Get Printing Again
Hopefully, one of these troubleshooting tips should serve its purpose and resolve your printing issue, and you’ll be printing error-free pages just as you see them on your computer.
Download PC Repair Tool to quickly find & fix Windows errors automatically
While Word offers an excellent way to preview the document before it is printed, at times, users have reported that they do not see anything in it. Some reported that even when put to print, the print out turns out to be blank. There can be multiple reasons. It can be a setting in the Word document that is restricting it, or it could be the printer software.
Follow these suggestions resolve the print preview or print issue with Microsoft Office Word:
- Enable Print Drawing Options for Office Word
- Troubleshoot Word Document
- Reinstall Printer Software
- Repair Microsoft Office
You may need admin permission for some of them.
1] Enable Print Drawing Options for Office Word

If you have a large image in the image, and that’s what you need to print, but you cannot see it, follow the steps to make sure the picture is available in the preview.
- Click on File > Options > Display
- Check the box which says, “Print drawings created in Word.”
- Next under Advanced > Show document content > Show picture placeholders
Other options include printing of background color, images, document properties, hidden text, etc.
2] Troubleshoot Word Document
We have written two guides that can help you to fix issues with the word documents. The first one helps you to troubleshoot damaged Word documents, and the second one is related to Word Printing
3] Reinstall Printer Software
Many prefer to use Printer’s software to get a preview of the file. If that is the case and you cannot see it there, you have two options. Either reinstall the software or use the preview offered by Word Document. As long as it prints, it should work out fine.
4] Repair Microsoft Office
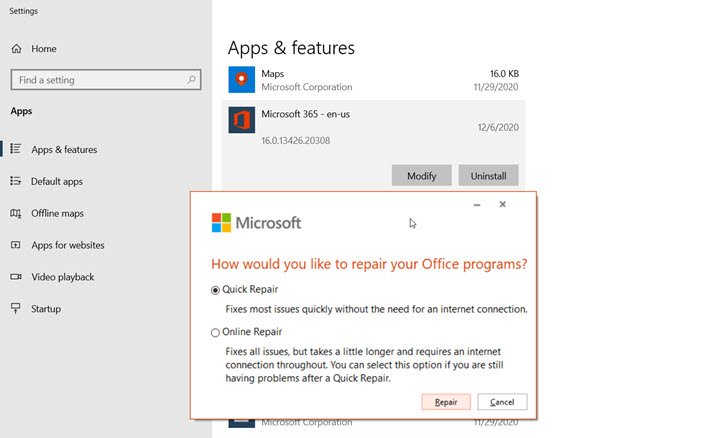
If nothing else works, you can try repairing Microsoft Office. The feature is built-in. Follow the steps as below:
- Right-click the Start button (lower-left corner), and select Apps and Features on the pop-up menu.
- Select the Microsoft Office product you want to repair, and select Modify.
- Then you can choose to run Quick Repair or Online Repair.
Quick Repair fixes most of the issues quickly without the need for an internet connection, while Online Repair takes longer and should be used when the quick repair doesn’t work.
I hope the post was easy to follow, and you are now seeing the preview of the Word document, and you can print it out.

Ashish holds a Bachelor’s in Computer Engineering and is a veteran Windows and Xbox user. He has work experience as a Database and Microsoft.NET Developer. He has been a Microsoft MVP (2008-2010) and excels in writing tutorials to improve the day-to-day experience with your devices.
Форум программистов Vingrad
| Модераторы: Poseidon, Snowy, bems, MetalFan |
Поиск: |
  
|
|
Опции темы |

| Medved |
|
||

Эксперт Профиль
Репутация: 14
|
PrintOut.
——————— http://extreme.sport-express.ru/ |
||
|
|||


| Serggggg |
|
||

Шустрый Профиль
Репутация: нет
|
Я делал так — ничего не вылетало. Попробуй.
Добавлено @ 14:18 ——————— C уважением, Serggggg. |
||
|
|||
| <Spawn> |
|
||

Око кары:) Профиль
Репутация: 44
|
Для того, чтобы не было вопросов у Ворда, попробуй выставить DisplayAlerts в False ——————— «Для некоторых людей программирование является такой же внутренней потребностью, подобно тому, как коровы дают молоко, или писатели стремятся писать» — Николай Безруков. |
||
|
|||
| Girder |
|
||

Лентяй 2 Профиль Репутация: 31
|
Если ни чего из выше сказанного не поможет, P.S. для Serggggg: Прежде чем выводить что нить на печать надо проверить, а если ли принтеры вообще(EnumPrinters), и если есть предоставить пользователю выбрать принтер для печати. Это сообщение отредактировал(а) Girder — 25.6.2004, 16:13 ——————— Как слышим, так и пишим. |
||
|
|||
| Michail |
|
||
|
Новичок Профиль
Репутация: нет
|
Похожая проблема, нужно распечатать документ ворда. В офисе 2003 все проходит на ура.
Как победить сообщение? Это сообщение отредактировал(а) Girder — 17.10.2006, 15:02 |
||
|
|||


|
|
| Правила форума «Delphi: Общие вопросы» | |
 |
Запрещается! 1. Публиковать ссылки на вскрытые компоненты 2. Обсуждать взлом компонентов и делиться вскрытыми компонентами
Если Вам понравилась атмосфера форума, заходите к нам чаще! С уважением, Snowy, MetalFan, bems, Poseidon, Rrader. |
| 0 Пользователей читают эту тему (0 Гостей и 0 Скрытых Пользователей) |
| 0 Пользователей: |
| « Предыдущая тема | Delphi: Общие вопросы | Следующая тема » |
My program needs to search for a word in a text file, and if it finds that word, to print out/display the entire line. Example:
employee   name    date joined    position       project        annual salary
tom jones           1/13/2011     accountant    pricing         55000
Susan lee           2/5/2007      Manager       policy          70000
User enters a search word:
accountant
Program searches text for accountant. When it finds it, it returns the following:
employee   name    date joined    position       project        annual salary
tom jones           1/13/2011     accountant    pricing         55000
This is the code I came up with but it doesn’t work.
void KeyWord(ifstream &FileSearch)
{
     string letters;
     int position =-1;
     string line;
     ifstream readSearch;
     cout<<"enter search word ";
     cin>>letters;
     "n";
     FileSearch.open("employee");
     if(FileSearch.is_open())
     {
         while(getline(FileSearch, line))
         {
             FileSearch>>line;
             cout<<line<<endl;
             position=line.find(letters,position+1);
             if(position==string::npos);
             if(FileSearch.eof())
                 break;

             cout<<line<<endl;
         }

     }
     cout<<"Cant find"<<letters<<endl;
 }

There’s nothing more frustrating than working endless hours on a document only to be greeted with an error message when it’s time to print. Here are a few suggestions to get Word to work with your printer again.
Basic Checks
First, it’s a good idea to do some basic hardware checks to ensure everything is hooked up as it should be.
Here are a few things to check before we look at Word:
- Make sure the USB cable that connects your PC to your printer is hooked up properly. If your printer is wireless, make sure it’s turned on.
- Double-check the internet connection (wired or wireless).
- Make sure the printer is plugged in and turned on.
- See if there’s a paper jam.
- Ensure your printer is compatible with your computer. Search Google and the printer manufacturer’s website for more information.
These might seem like obvious things to check, but they’re also easy to forget. It’s always best to try the basics first and avoid wasting time unnecessarily.
A Quick Solution
This tip won’t fix your printing issues, but it will allow you to print from your computer in a pinch. If you don’t have time to figure out what’s going on with Word, but really need to print a document, convert the file to a PDF. Then, you can print it from a different application.
To convert a Word document to a PDF, open the document you want to convert, click “File,” and then click “Save As” in the pane on the left.

You see a box that shows you the type of file the document is; click the arrow next to it. In the drop-down menu, click “PDF,” and then click “Save.”
Now, open the file in another program (like Acrobat) and print it.
Microsoft’s Printing Troubleshooter for Windows
Microsoft has a printing troubleshooter you can download. To get it, click the link in “Step 5” on the Microsoft support page.
Open the tool. On the homepage, you see basic information about what the software does; click “Next.”
The diagnosis runs. If the troubleshooter doesn’t find anything, Microsoft will suggest you run the tool as an Administrator—go ahead and do so.
A message appears that asks you to choose the printer with which you’re having issues. Select it, and then click “Next.”
The program runs the diagnosis and makes suggestions as it goes. When the troubleshooter is finished, try to print your Word document again.
Install the Latest Driver
Outdated drivers are often the cause of printing problems, so make sure yours is up to date. There are two ways you can do this. First, check the “Drivers” section on your printer manufacturer’s website for any driver updates.
RELATED: How to Manage a Printer in Windows 10
The second way is to update your PC because Windows might find an updated driver for your printer. To check for an update, click the Start button on your Windows PC, and then click the gear icon to open the “Settings” menu.
In the “Settings” window, click the last option on the list, “Update & Security.”
Click “Windows Update.”
If you’re on a Mac, click the Apple icon in the top-left corner, and then click “Software Update.”
When the update is complete, try to print your Word document again.
Remove and Reinstall a Printer in Windows
Another solution is to remove and reinstall your printer, as this will include all the latest updates.
RELATED: How to Install the Same Printer Twice (With Different Settings) on Windows
To remove your printer, click the Start button on your Windows PC, and then click the gear icon to open the “Settings” menu.
Click “Devices.”
Next, click “Printers & Scanners.”
Select the printer you want to remove from the list, and then click “Remove Device.”
Now, to reinstall the printer, click “Add a Printer or Scanner” at the top of the menu.
Select your printer from the list, and then click “Install.”
When the installation is complete, try to print your Word document.
Remove and Reinstall a Printer in MacOS
On a Mac, the process to remove and reinstall a printer is a bit different.
To get started, click the Apple icon in the top-left corner, and then select “System Preferences.”
Next, click “Printers & Scanners.”
Finally, select the printer you want to remove, and then click the minus sign (-) at the bottom of the screen to delete it.
To reinstall the printer, click the plus sign (+). Select your printer from the list that appears, and then click “Add.”
After you reinstall your printer, try again to print your Word document.
Low System Resources
Low system resources can definitely cause issues when you try to print a document.
To see if this is the problem in Windows, press the Windows key, and then type “resource monitor.” The Resource Monitor app appears in the results; press “Enter” to select it.
On a Mac, this app is called “Activity Monitor.” To find it, press Command+Spacebar, and then type “Activity Monitor” in the Spotlight search bar.
After it opens, you can investigate if low system resources are causing your printing issues. The simplest way to find out is to restart your computer, and then try to print your Word document again.
These are just a few ways you can diagnose and fix printing issues in Word. However, there could be other causes we didn’t cover.
If you’ve experienced a printing issue with Word and resolved it, please share your tips in the comment section—it might help others who are dealing with the same problem.
READ NEXT
- › How to Make a Poster Using Microsoft PowerPoint
- › How to Print Double-Sided in Microsoft Word
- › How to Print Double-Sided on Windows 11
- › Windows 11 Has a New Photo Gallery in the File Explorer
- › The New Winamp Is Here, but It’s Not What You’d Expect
- › How to Get a Refund on the PlayStation Store
- › Discord Direct Message Won’t Go Away? Here’s the Fix
- › Save Hundreds on Elegoo’s New PHECDA Laser Engraver Through Kickstarter
I was interested in this official Microsoft Word blog post on using WordPad to find out your printer’s printable area: https://www.microsoft.com/en-us/microsoft-365/blog/2010/09/03/print-borders-without-problems/
However, the information provided in this post didn’t work for me in WordPad. Instead, I tried something similar in the various versions of Word that I have and I was able to see the minimum margins that my printer requires.
Here’s how:
- Open a new Word document.
- Go to page setup:
- Word 2003: File > Page Setup
- Word 2007 and later: Page Layout tab > Margins > Custom Margins
- Set all margins to 0.
- Click OK.
- You’ll get a message saying the margins are outside the printable area (the message may vary slightly depending on which version of Word you’re using). Click Fix.
- Your printer’s margins will now populate the margin fields.


[Links last checked April 2019]