
In this article, we will focus on demonstrating you 3 effective ways to find hidden text boxes in your Word document.
Sometimes, we prefer to remove outlines of text boxes in document as to make it look more organized. However, if you need to revise document later, you may have difficult in locating where the text box is. Thus, it would be a practical need to find hidden text boxes in your document.
Method 1: Use “Find” Command
- First of all, press “Ctrl+ Home” to go to the beginning of the document.
- Then under “Home” tab, click on “Find” command to open the “Navigation” pane.
- Next click on the drop-down menu and choose “Graphics” there.

- Note this will bring you to each graph in your document. And now the first graph is in selection. Click the “Previous Search Result” or the “Next Search Result” to go back to the previous or next result.

- Finally when you have a text box in selection, you can choose to click it to trigger the “Format” tab. Then set a style of outline for the box.


Method 2: Show Gridlines in a Document
- To begin with, click “View” tab in the Ribbon.
- Then check “Gridlines” option.


Next you can see all text boxes in white squares, such as below:
Method 3: Run VBA Codes to Set Outlines for Text Boxes
- First and foremost, open VBA editor pressing “Alt+ F11”.
- Next click on the “Normal” at the left column.
- Then click “Insert” tab on menu bar.
- And choose “Module” on the drop-down menu.

- Next open new module with double click and paste following codes there:

Sub FindInvisibleTextBoxesInDoc()
  Dim objShape As Shape
  Dim objInlineShape As InlineShape

  For Each objShape In ActiveDocument.Shapes
    If objShape.Type = msoTextBox Then
      objShape.Line.Visible = msoTrue
    End If
  Next objShape
  For Each objInlineShape In ActiveDocument.InlineShapes
    If objInlineShape.Type = msoTextBox Then
      objInlineShape.Line.Visible = msoTrue
    End If
  Next objInlineShape
End Sub
- Last but not the least, click “Run” or hit “F5” to execute codes. Now you have added outlines for all text boxes.


Comparison of 3 Methods
| Methods | Advantages | Disadvantages |
| Method 1: Use “Find” Command | It brings you to each graph in the document one by one, and you won’t miss a single text box. | It finds all graphs in document, so it may take quite a time to go to the text box you need format. |
| Method 2: Show Gridlines in a Document | Easy way and easy to recognize text boxes | 1. You text boxes must have a style of shape fill. If not, this method will fail to recognize hidden text boxes.
2. Ensure the text boxes are inserted before texts are entered. Or this method will fail to recognize hidden text boxes. |
| Method 3: Run VBA Codes to Set Outlines for Text Boxes | A quick way to add and show outlines for all text boxes in a document. | You will have to go to a specific text box through navigating the document manually. |
Solutions to Damaged Documents
It happens now and then to get a collapsed Word or a broken document, which you are unable to access. Then you will feel it urgent to recover docx. In such scenario, what you need is a sufficient repairing tool. It’s also the very reason that we suggest you getting one in advance.
Author Introduction:
Vera Chen is a data recovery expert in DataNumen, Inc., which is the world leader in data recovery technologies, including recover xls and pdf repair software products. For more information visit www.datanumen.com
 Please Note:
This article is written for users of the following Microsoft Word versions: 2007, 2010, 2013, 2016, 2019, and Word in Microsoft 365. If you are using an earlier version (Word 2003 or earlier), this tip may not work for you. For a version of this tip written specifically for earlier versions of Word, click here: Finding Text Boxes.
![]()
Written by Allen Wyatt (last updated August 12, 2022)
This tip applies to Word 2007, 2010, 2013, 2016, 2019, and Word in Microsoft 365
Word has a powerful search and replace capability that lets you search for virtually anything in your document. Word even includes codes you can use to search for special items. (Click the Special button in the Find and Replace dialog to see what codes are available.) One thing you cannot search for, however, is text boxes. There is no special code that allows you to find text boxes, and you can’t search for them using the Object Browser.
You can, however, use a macro to look through a document and stop when it finds a text box. The following macro stops on each text box it finds and asks the user if that is the text box wanted.
Sub SearchTextBox()
    Dim shp As Shape
    Dim sTemp As String
    Dim iAnswer As Integer

    For Each shp In ActiveDocument.Shapes
        If shp.Type = msoTextBox Then
            shp.Select
            Selection.ShapeRange.TextFrame.TextRange.Select
            sTemp = Selection.Text
            sTemp = Left(sTemp,20)
            iAnswer = MsgBox("Box contains text beginning with:" & vbCrLf _
              & sTemp & vbCrLf & "Stop here?", vbYesNo, "Located Text Box")
            If iAnswer = vbYes Then Exit For
        End If
    Next
End Sub
If you would like to know how to use the macros described on this page (or on any other page on the WordTips sites), I’ve prepared a special page that includes helpful information. Click here to open that special page in a new browser tab.
WordTips is your source for cost-effective Microsoft Word training.
(Microsoft Word is the most popular word processing software in the world.)
This tip (12249) applies to Microsoft Word 2007, 2010, 2013, 2016, 2019, and Word in Microsoft 365. You can find a version of this tip for the older menu interface of Word here: Finding Text Boxes.
Author Bio
With more than 50 non-fiction books and numerous magazine articles to his credit, Allen Wyatt is an internationally recognized author. He is president of Sharon Parq Associates, a computer and publishing services company. Learn more about Allen…
MORE FROM ALLEN
Adding Up Tops and Bottoms
When you are working with sequenced values in a list, you’ll often want to take some action based on the top X or bottom …
Discover More
Deleting Everything Except Formulas
Need to get rid of everything in a worksheet except the formulas? It’s easier to make this huge change than you think it is.
Discover More
Margins for All Documents Changing
Have you had the margins in a group of documents change without you knowingly doing anything? This tip explores some …
Discover More
More WordTips (ribbon)
Making Text Boxes Appear in a Printout
Add some text boxes to your document, and you might be surprised if they don’t appear when you print the document. If …
Discover More
Adding a Drop Shadow to a Text Box
Drop shadows add a nice touch to text boxes, making it seem like they are hovering above the page. Here are the simple …
Discover More
Removing All Text Boxes In a Document
Text boxes are a common element of many types of documents. At some point you may want to get rid of all the text boxes …
Discover More
This article is for people with visual or cognitive impairments who use a screen reader program such as Microsoft’s Narrator, JAWS, or NVDA with Microsoft 365 products. This article is part of the Microsoft 365 screen reader support content set where you can find more accessibility information on our apps. For general help, visit Microsoft Support home.
Use Word with your keyboard and a screen reader to select and read images, shapes, and text boxes in Word documents. We have tested it with Narrator, JAWS, and NVDA, but it might work with other screen readers as long as they follow common accessibility standards and techniques.
Using the Selection pane in Word, you can display all the images, shapes, and text boxes within the document as a list. You can read the list with your screen reader, and select list items to read the alt texts or to edit them.
Notes:
-
New Microsoft 365 features are released gradually to Microsoft 365 subscribers, so your app might not have these features yet. To learn how you can get new features faster, join the Office Insider program.
-
To learn more about screen readers, go to How screen readers work with Microsoft 365.
In this topic
-
Access text inside text boxes
-
Access images using the Selection pane
-
Access floating objects without using the Selection pane
-
Access inline objects without using the Selection pane
Access text inside text boxes
When screen readers read the body text, they cannot find text boxes that float above the document’s text layer. To access text inside a text box, use the Selection pane.
-
In the document, press Alt+H to open the Home tab.
-
To open the Selection pane, type S, L, P. You hear: “Show All button.” The text boxes, images, and shapes appear in a list.
Note: If there are multiple pages in your document, the Selection pane lists only the items on the current page.
-
Use the arrow keys to move up and down the list. Your screen reader announces the list items as you move.
-
To select a text box, press Spacebar.
-
To open the context menu, press Shift+F10. You hear: “Cut menu item.”
-
Use the arrow keys to move to the Edit Text item, and press Enter. Press any key to place the cursor inside the text box.
In JAWS, you need to place the text box in line with the document text first. To set the text box in line with the text, move to Wrap Text, and use the Right or Left arrow key to go to In Line with Text, and press Enter. Press Esc to return to the body of the document.
-
Your screen reader can now read the text inside the text box. To start reading in Narrator and NVDA, press the SR key+M. To return to the body of the document afterwards, press Esc twice.
To read the text box contents in JAWS, press Alt+Num Pad 5.
Access images using the Selection pane
Images that are not inline images might be inaccessible to screen readers. To access all images in a document, use the Selection pane.
-
In the document, press Alt+H to open the Home tab.
-
To open the Selection pane, type S, L, P. The images, shapes, and text boxes appear in a list.
Note: If there are multiple pages in your document, the Selection pane lists only the items on the current page.
-
Use the arrow keys to move up and down the list. Your screen reader announces the list items as you move.
-
To select an image, press Spacebar.
-
To go back to the document body, press Esc. You hear the file name of the document.
-
Your screen reader can now read the image alt text, if there is one. To start reading in Narrator and NVDA, press the SR key+Ctrl+R.
In JAWS, press Ctrl+Num Pad 5.
Access floating objects without using the Selection pane
You can quickly move the focus between floating objects without using the Selection pane.
-
To move focus to the first floating object in the document, press Ctrl+Alt+5.
-
Press the Tab key to cycle through the floating objects in the document.
-
To return to the normal navigation, press Esc.
Access inline objects without using the Selection pane
You can work on the inline objects as you read a document, without using the Selection pane.
-
Your screen reader announces the objects when it reads through a document. To stop on an object, press the Ctrl key.
Tip: If you miss the right spot and need to go back or forward in the document one word at a time, press the Left or Right arrow key until you hear the screen reader announce the object you want.
-
To select the object, press Shift+Right arrow key.
-
You can now work on the object. For example, to open the context menu, press Shift+F10.
See also
Use a screen reader to insert a picture or image in Word
Use a screen reader to check spelling and grammar in Word
Keyboard shortcuts in Word
Basic tasks using a screen reader with Word
Set up your device to work with accessibility in Microsoft 365
Use a screen reader to explore and navigate Word
Use Word for Mac with your keyboard and VoiceOver, the built-in macOS screen reader, to select and read images, shapes, and text boxes in Word documents.
Using the Selection Pane in Word, you can display all the images, shapes, and text boxes within the document as a list. You can read the list with VoiceOver, and select list items to read the alt texts or to edit them.
Notes:
-
New Microsoft 365 features are released gradually to Microsoft 365 subscribers, so your app might not have these features yet. To learn how you can get new features faster, join the Office Insider program.
-
This topic assumes that you are using the built-in macOS screen reader, VoiceOver. To learn more about using VoiceOver, go to VoiceOver Getting Started Guide.
-
We recommend you read and edit documents in Print Layout View. VoiceOver might not work reliably in other view modes.
In this topic
-
Access text inside text boxes
-
Access images using the Selection pane
-
Access inline images without using the Selection pane
Access text inside text boxes
As text boxes float above the document’s text layer, VoiceOver cannot find them while reading the body text. To access text inside a text box, use the Selection Pane.
-
In the document, press F6 until you hear the currently selected tab, followed by «Selected, tab,» and then press the Right arrow key until you hear: «Layout, tab.» Press Control+Option+Spacebar to open the Layout tab.
-
To open the Selection Pane, press the Tab key until you hear «Selection pane, unchecked checkbox,» and then press Control+Option+Spacebar. VoiceOver announces: “Check, Selection pane, checkbox.» The text boxes, images, and shapes appear on a list.
Note: If there are breaks (such as page and section breaks) in your document, the Selection Pane lists only the items up to the next break.
-
Press the Tab key until you hear «Table» and the first item on the list.
-
Use the Up or Down arrow key to move up and down the list. VoiceOver announces the list items as you move. Text boxes are announced as «Text box,» followed by the number of the text box. When on the item you want to access, press F6 until VoiceOver announces the item and «Edit text, contents selected,» followed by the text box contents and then, «You are currently on a text area.»
-
To edit the text, press Control+Option+Shift+Down arrow key, and type the text you want.
-
After editing the text, do one of the following:
-
To move back to the Selection Pane, press F6 until you hear: «Selection pane, tab.»
-
To go back to the document body, press Esc.
-
Access images using the Selection pane
Images that are not inline images might be inaccessible to VoiceOver. To access all images in a document, use the Selection Pane.
-
In the document, press F6 until you hear the currently selected tab, followed by «Selected, tab,» and then press the Right arrow key until you hear: «Layout, tab.» Press Control+Option+Spacebar to open the Layout tab.
-
To open the Selection Pane, press the Tab key until you hear «Selection pane, unchecked checkbox,» and then press Control+Option+Spacebar. VoiceOver announces: “Check, Selection pane, checkbox.» The text boxes, images, and shapes appear on a list.
-
Press the Tab key until you hear «Table» and the first item on the list.
-
Use the Up or Down arrow key to move up and down the list. VoiceOver announces the list items as you move. Images are announced as: «Picture,» followed by the number of the image. When on the item you want to access, press F6 until VoiceOver reads the alt text of the item, followed by «Image.»
-
To open the context menu, and access the options to format the picture, or add or change alt text, press Control+Option+Shift+M. To go back to the document body, press Esc.
Access inline images without using the Selection pane
If you want to work on inline images as you read a document, you don’t need to open the Selection Pane.
-
VoiceOver announces the images when you move the cursor through the document. VoiceOver announces the alt text of each inline image, followed by «Image, in line with text, layout item.»
-
To select the image, press Shift+Right arrow key.
-
You can now work on the image. For example, to open the context menu, press Control+Option+Shift+M.
See also
Use a screen reader to insert a picture or image in Word
Use a screen reader to check spelling and grammar in Word
Keyboard shortcuts in Word
Basic tasks using a screen reader with Word
Set up your device to work with accessibility in Microsoft 365
Use a screen reader to explore and navigate Word
Use Word for iOS with VoiceOver, the built-in iOS screen reader, to navigate to and read text boxes and images in Word documents on your phone.
Notes:
-
New Microsoft 365 features are released gradually to Microsoft 365 subscribers, so your app might not have these features yet. To learn how you can get new features faster, join the Office Insider program.
-
This topic assumes that you are using the built-in iOS screen reader, VoiceOver. To learn more about using VoiceOver, visit Apple accessibility.
In this topic
-
Read text inside text boxes
-
Access images within text
Read text inside text boxes
As text boxes float above the document’s text layer, VoiceOver skips them while reading the page text, but you can navigate to them separately.
-
Open the Word document on your phone. Swipe right until you reach the document body text. VoiceOver starts reading the text.
-
When VoiceOver has reached the end of the page, swipe right until VoiceOver announces the first text box and reads the contents.
-
To move to the next text box on the page, swipe right.
When you enter the page footer, all text boxes on the page have been read. To move to the next page, swipe right.
Access images within text
-
Open the Word document on your phone. Swipe right until you reach the document body text. VoiceOver starts reading the text.
-
When VoiceOver has reached the end of the page, swipe right. VoiceOver reads the alt text of the first image on the page. If the image has no alt text, you hear: «Image.»
-
To move to the next image on the page, swipe right.
When you enter the page footer, you’ve navigated through all the images on the page. To move to the next page, swipe right.
See also
Use a screen reader to insert and change text in Word
Basic tasks using a screen reader with Word
Set up your device to work with accessibility in Microsoft 365
Use a screen reader to explore and navigate Word
Use Word for Android with TalkBack, the built-in Android screen reader, to navigate to and read text boxes and images in Word documents on your phone.
Notes:
-
New Microsoft 365 features are released gradually to Microsoft 365 subscribers, so your app might not have these features yet. To learn how you can get new features faster, join the Office Insider program.
-
This topic assumes that you are using the built-in Android screen reader, TalkBack. To learn more about using TalkBack, go to Android accessibility.
In this topic
-
Read text inside text boxes
-
Access images within text
Read text inside text boxes
-
Open the Word document on your phone. Swipe right until TalkBack starts to read the document text one paragraph at a time.
-
To move to the next paragraph, swipe right. When you hear «Rectangle, text box,» you’ve reached a text box within the document. TalkBack reads the text box contents. When done, swipe right to continue reading the document or to move to the next text box.
Access images within text
-
Open the Word document on your phone. Swipe right until TalkBack starts to read the document text one paragraph at a time.
-
To move to the next paragraph, swipe right. When you reach an image, TalkBack reads the image alt text, followed by «Image.» If the image has no alt text, you hear just «Image.» When done, swipe right to continue reading the document or to move to the next image.
See also
Use a screen reader to insert and change text in Word
Basic tasks using a screen reader with Word
Set up your device to work with accessibility in Microsoft 365
Use a screen reader to explore and navigate Word
Use Word for the web with your keyboard and a screen reader to select and read images in Word documents. We have tested it with Narrator in Microsoft Edge and JAWS and NVDA in Chrome, but it might work with other screen readers and web browsers as long as they follow common accessibility standards and techniques.
Notes:
-
If you use Narrator with the Windows 10 Fall Creators Update, you have to turn off scan mode in order to edit documents, spreadsheets, or presentations with Microsoft 365 for the web. For more information, refer to Turn off virtual or browse mode in screen readers in Windows 10 Fall Creators Update.
-
New Microsoft 365 features are released gradually to Microsoft 365 subscribers, so your app might not have these features yet. To learn how you can get new features faster, join the Office Insider program.
-
To learn more about screen readers, go to How screen readers work with Microsoft 365.
-
When you use Word for the web, we recommend that you use Microsoft Edge as your web browser. Because Word for the web runs in your web browser, the keyboard shortcuts are different from those in the desktop program. For example, you’ll use Ctrl+F6 instead of F6 for jumping in and out of the commands. Also, common shortcuts like F1 (Help) and Ctrl+O (Open) apply to the web browser – not Word for the web.
Access inline images
-
After opening a document in Word for the web, press the SR key+Ctrl+R to start the continuous reading mode. Your screen reader announces all images when it reads through the document. To stop on an image, press the Ctrl key.
Note: If you miss the right spot and need to go back or forward in the document a word at a time, press the Left or Right arrow key until you hear your screen reader announce the image you want.
-
To select the image, press Enter.
-
You can now work on the image. For example, to access the picture tools, press Alt+Windows logo key, and then press the Tab key until you hear “Picture tools, non-selected, Format tab item,” and press Enter to open the Format tab.
-
You can adjust image settings such as its size, style, and alt text. Press the Tab key until you hear the name of the setting you want, and then press Enter.
See also
Use a screen reader to insert a picture or an image in Word
Use a screen reader to check spelling and grammar in Word
Keyboard shortcuts in Word
Basic tasks using a screen reader with Word
Use a screen reader to explore and navigate Word
Technical support for customers with disabilities
Microsoft wants to provide the best possible experience for all our customers. If you have a disability or questions related to accessibility, please contact the Microsoft Disability Answer Desk for technical assistance. The Disability Answer Desk support team is trained in using many popular assistive technologies and can offer assistance in English, Spanish, French, and American Sign Language. Please go to the Microsoft Disability Answer Desk site to find out the contact details for your region.
If you are a government, commercial, or enterprise user, please contact the enterprise Disability Answer Desk.
Ask a Question
All Questions
All Unanswered
FAQ
![]()
![]()
![]()
![]()
![]()
Please Sign up or sign in
to vote.
0.00/5 (No votes)
See more:
C#
Iam working with microsoft word.my word document having no of textboxes i want to identify the textboxes which are empty which are not empty….
and want to replace empty text boxes with «________».
Thankyou.
Srinath
Posted 4-Jul-13 22:56pm
srinath.pothineni
Add a Solution
1 solution
![]()
![]()
![]()
![]()
![]()
Please Sign up or sign in
to vote.
Solution 1
Hi,
I suggest that you use macros — VBA programming for that. This will help you to achieve your task.
You can refer to this link for more information about the VBA programming in Word 2010
Thanks,
SJ
Permalink
Share this answer
Posted 4-Jul-13 23:35pm
Sruthi Jain
Add a Solution
This content, along with any associated source code and files, is licensed under The Code Project Open License (CPOL)


| Top Experts | |||||||||||||||||||||
| Last 24hrs | This month | ||||||||||||||||||||
|
|
Related Questions
How to replace words in a text file using C#
Replacing text in Textbox
Replace text between two words in text file C#
Replace a text of textbox in same position of textbox in word document in c#
replace textbox in word documents in c#
Find & Replace exact Words in C#
How to find & replace text in word document in bulk using c#.net?
Cannot find/Replace a text in Word Using C# and Microsoft.Office.Interop.Word
Find specific text and replace with Image file in MS Word
How do I replace text inside MS-word textbox?
Advertise
Privacy
Cookies
Terms of Use
Last Updated 5 Jul 2013
Layout: fixed
|
fluid
Copyright © CodeProject, 1999-2023
All Rights Reserved.
Web03
2.8:2023-03-27:1
CodeProject,
20 Bay Street, 11th Floor Toronto, Ontario, Canada M5J 2N8
+1 (416) 849-8900
Let’s delve even deeper into the ‘Find’ function, looking specifically at a number of options that can be accessed in the Word “Find” feature (CTRL+F) by clicking its “More” button.
In a recent issue of Office for Mere Mortals we looked at how to search within a Word document. There is a lot of hidden power accompanying the relatively simple process of finding text within a document.
Advanced Find
The clever Find features are in Advanced Find. Press Ctrl + F to open the Word navigation pane, click on the pull-down menu then Advanced Find …

It’s called Advanced Find but many long-time Word users will know it as the standard Find dialog that’s been in Word for many, many years.
Click on the More … button to see a lot of power in Word’s Find.
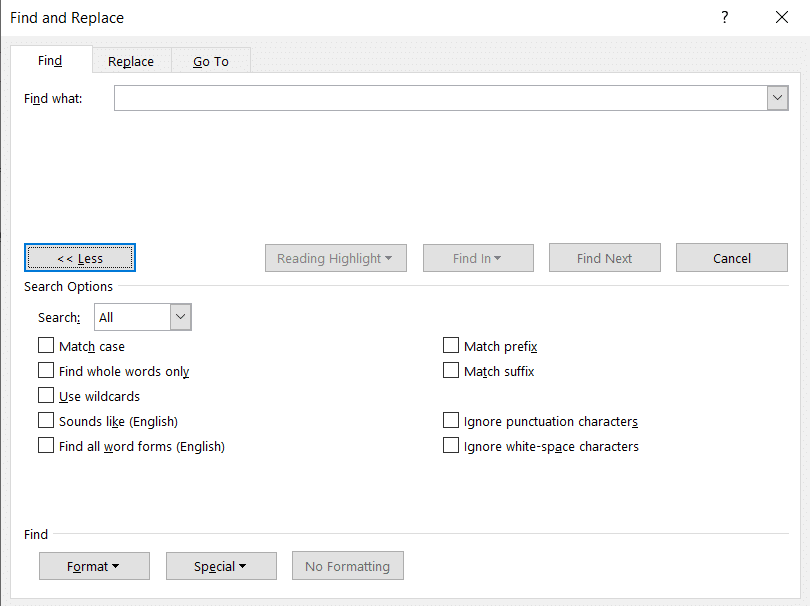
FIND WHOLE WORDS ONLY
‘Find whole words only’ is a selectable option in Word that can be accessed in the Find feature (Ctrl-F) by clicking the ‘More’ button to display more specific search features.
But what does it mean to find whole words only? Isn’t that what a normal search is meant to do? Well… yes and no. A ‘whole word’ is defined in Office as a group of characters surrounded on either side by one or more spaces or punctuation marks.
To demonstrate the difference between having the ‘Find whole words only’ option selected and not having it selected, I will use a very simple example. Feel free to try it for yourself in Microsoft Word.
Let’s pretend that you are searching for the word ‘ample’ out of the following short text: “This sample sentence is one way to demonstrate the ample finding flexibility of Office”.
There is only one instance of the word ‘ample’ within the text, searching without the ‘Find whole words only’ option would actually find 2 matches. The less obvious match comes as part of the tail-end of the second word of the text, which is ‘sample’.
To further demonstrate my point, the word ‘in’ does not appear within the sample sentence on its own using ‘Find whole words’, but would be found twice within the word “finding” with that choice off.
By selecting the ‘Find whole words only’ option, Office will omit matches to any search query that is found _within_ a word of the document. Such a search is less intensive for the program and will therefore be faster with large amounts of text.
Before you go setting this option, be forewarned that it will omit any plurals from your search results. Searching for the word ‘sport’ in the following text will not produce any matches: “Why are all the sports I want to watch on at the same time?”
USE WILDCARDS
A wildcard is a special character that you can use to represent one or more characters in a search string. Any character or set of characters can be represented by a wildcard character. It is really just another name for a “regular expression”.
With just a few special characters and the knowledge of what they represent, searching for strings that conform to a predefined grammar (or pattern) now becomes extremely easy.
The first step to using wildcards in your search terms is to select the ‘Use Wildcards’ option, which can be found in find dialog box after clicking the ‘More’ button. The ‘Match case’ and ‘Find whole words only’ check boxes are now unavailable (grayed out).
There are two ways to incorporate wildcards into your search query string. The first is to choose the particular wildcard character from a list. To do this, click the ‘Special’ pull-down menu and select the desired wildcard character from the resulting list. Then type any additional text into the ‘Find what’ box. The second way is to simply type in the wildcard character directly into the ‘Find what’ box!
The asterisk (*) is the most commonly used wildcard to search for a string of one or more characters. For example, just say you want to find all words that start with “a” and end with “m”. Then you could write “a*m” as your search term. Your results could be anything from “aim” to “antidisestablishmentarianism”.
The next most commonly used wildcard is the question mark (?), which can be used to substitute for any single character. For example, sat?n finds “satin” and “satan”.
SOUNDS LIKE… FO-NE-TIKS
The ‘Sounds like’ option is a type of search mechanism for words that may have been spelt phonetically. To make this point, searching for the word ‘phonetically’ with the ‘Sounds like’ option switched on, will find all of the words that would sound like the word ‘phonetically’ if you were to say them out aloud. As a test, I wrote down ‘fonetikalee’ in a document and searched for the word ‘phonetically’ with the ‘Sounds like’ option activated. The find feature was indeed able to determine that I was searching for the word ‘fonetikalee’.
This function may be of use for people who type up conversations between people in real-time. If someone uses a word you are not familiar with in such a situation, you don’t really have the time find out how to spell it properly. In such a situation, the common solution would be to simply type it phonetically (as it sounds) and then move on. Sometime after scribing the conversation, you may have a flash of enlightenment and realize what word the person actually said.
Instead of scrolling through pages of text to find it and change the potentially numerous incarnations of phonetic spelling, you can simply type in the correct word to the search facility with the ‘Sounds like’ option selected, and hope that your phonetic spelling was sufficient for the ‘Sounds like’ search algorithms to pick up.
FIND ALL WORD FORMS – PAST, PRESENT AND FUTURE TENSE
The ‘Find all word forms’ option has a simple, but powerful function. It acts by finding all possible tenses of the search word.
For example, if I searched for “run”, then both “run” and “ran” could be potential search results.
Similarly, searching for “talk” could have both “talk” and “talked” as potential search results.
Searching for “laugh” on the other hand, could have “laugh”, “laughed” and “laughing” as potential search results.
READER QUESTION: HOW DO YOU FIND A SPACE?
A question from an OfMM reader recently queried us how to find a space within a document. This is quite simply a case of typing a space into the ‘Find what’ text box and clicking the ‘Find Next’ button. This will find each and every space from the start to the end of the document. A useful application of this would be to insert two spaces in the “Find what” box in order to any occurrences of two consecutive spaces within a document, in order to ensure consistency of spacing between sentences.
Another way of doing this was mentioned in passing in the last OfMM newsletter in the section entitled “Strange Characters”. Selecting the ‘Special’ pull-down list in the Find dialog box will bring up a list of special search character types. The last option on this list is called ‘White-space’ and as the name suggests, can be used to find groups of white space within the search area. This is equivalent to typing /w into the ‘Find what’ text box.
THE ‘GO TO’ TAB
Another way of quickly accessing a certain area of a document, or even jumping through a document in regular increments, is to use the ‘Go To’ tab on the Find dialog box.
On this tab you can select between a number of document elements including: page, section, line, bookmark, comment, footnote, endnote, field, table, graphic, equation, object, and heading.
Then simply jump through the document For example, if the page option has been selected, you can type in the page you wish to ‘Go To’ in the ‘Enter page number’ text box. Then click the ‘Next’ button and you will be taken there.
An interesting function is to go to the heading in the document. If you have headings few and far between, then this is a useful tool. You have to make sure that your headings are formatted as a “Heading” within word, and aren’t simply bolded or formatted “Normal” text.