
Someone sends you a long Word document and asks you to check only the changes, which they’ve highlighted. You have limited time so you need to find those highlighted passages quickly.
Here are two ways you can quickly find highlighted text — use the one that best suits your way of working
Zoom in/out
Zoom out the view of the document and look for pages that contain highlighting, then click on a page and zoom back in again to view and edit the highlighted text.
You can go down to about 10 or 20% to see as many pages as possible without losing the ability to see the pages containing highlights.
To zoom in/out:
- Word 2003: Select View > Zoom from the menu, then select or enter the percentage zoom you want.
- Word 2007 and later: Use the zoom slider at the bottom right of the Word window.
Here’s a few pages at 20% zoom — you can see the highlighted section easily:

A highlighted section shows easily at 20% zoom
Find
The other way to find highlighted text is to use the Find function. Find is particularly handy if there’s a lot of highlighting, and you think you might miss some using the zoom function. It’s also handy for finding highlights you can’t see, such as those hiding behind empty paragraph marks or graphics. Both Word 2003 and 2007 work the same way, as do later versions of Word for Windows, such as 365:
- Press Ctrl+h to open the Find and Replace window.
- Click More.

- Click Format.
- Select Highlight.

- Highlight should be the only ‘find’ option. Click Find Next to find the next highlighted passage.


I’m using Word 2013. I can use the Find feature to pick out words from a document, then Highlight All examples that meet the search criteria. But the highlighting disappears when I try to edit the document or close the Find window. Is there any way to actually permanently highlight all items that match search criteria, without having to jump to each item and press the highlight button, or manually select each item?
asked Mar 1, 2015 at 14:42
![]()
0
Choose the colour you wish to highlight your words in
In the FIND, enter your word
In REPLACE, type ^&
In FORMAT (for replace), select Highlight.
answered May 12, 2015 at 22:19
![]()
nbcauthornbcauthor
1411 silver badge3 bronze badges
2

When you want certain text in your document to stand out, you can use a handy built-in tool. Here’s how to highlight text in Word.
Ever used a highlighter pen to make certain sections of text pop out to you on a page? Great for making notes, but there’s a problem—highlighting a piece of paper is final. You can’t erase the color from your paper when you’re done.
In Microsoft Word, things are a bit different. Unlike real highlighter pens, you can replicate the highlighter effect in Word, but you can find and remove your highlights.
This lets you go through and review your highlighted points using Word’s Find feature, but you can also remove any text highlights afterward. It’s easy to learn how to apply, remove, and find highlighted text in Word—here’s what you’ll need to do.
How to Highlight a Selection of Text in Word
If you plan only to highlight one portion of text using a single color, you can do this in just seconds in Word.
To highlight a section of text in Word:
- Select your text. You can do this by simply dragging through it with your cursor.
- Go to the Home tab.
- Click the arrow next to the Text Highlight Color button.
- Choose the color you want to use from the drop-down menu.

Once you choose a color from the drop-down menu, your selected text will update immediately to show a highlighted background in that color.
How to Highlight Multiple Selections of Text
If you have several portions of text you want to highlight, you can still use the highlighter tool to make your text stand out.
You don’t have to use the method above to do this, however, as there’s an easier way to select multiple text sections. Once you enable the highlighter, it will remain turned on until you turn it off, allowing you to highlight additional areas.
To highlight multiple sections of text in Word:
- Press Home on the ribbon bar.
- Select the arrow next to the Text Highlight Color button and select a color from the drop-down menu.
- Your cursor will change to show a blinking text cursor with a marker attached. Select the text you want to highlight by dragging through it with your mouse.

- Repeat this step with any other sections of text you want to highlight.
- When you’re done, press the arrow next to the Text Highlight Color button.
- Select Stop Highlighting.


You can do this when the highlighter tool is active if you want to change colors. Click the Text Highlight Color button, choose another color, and then continue to drag through your text portions to highlight them.
How to Remove a Highlight From Text
You can do this using the Text Highlight Color tool when you want to remove highlights from your text in Word. This allows you to remove highlights from specific text or your entire document.
To remove highlights from selected text in Word:
- Select the specific text you want to unhighlight or select all of the text in your document using Ctrl + A.
- Press Home on the ribbon bar.
- Press the arrow next to the Text Highlight Color button.
- Select No Color.

You don’t need to manually scroll through your document to find portions of text that you’ve highlighted. Thanks to the Find feature in Word, you can locate any highlighted text quickly.
Find Specific Highlighted Text
Maybe the highlighted text you’re looking for contains a particular word. If so, use these steps to find it:
- Go to the Home tab.
- Click the arrow next to Find, then select Advanced Find.
- When the Find and Replace window opens, enter your search term in the Find What box at the top.
- Click More on the bottom left.
- Click the Format drop-down box at the bottom below Find and select Highlight.
- Hit the Find Next button.

When you run the search, you’ll see any highlighted text that matches your search term. At this point, click Find Next to cycle through your search results, or press Cancel to close the window.

Find All Highlighted Text
To find all of the text you’ve highlighted in your Word document, repeat the steps above, but eliminate Step 2. You don’t need to use an Advanced Find here, and make sure to leave the Find What box empty.
When you click Find Next, you’ll see the first portion of highlighted text found. Continue to click Find Next to cycle through and see each additional section of the highlighted text in your document.

When no further instances are found, you’ll see a message letting you know.

Pack Away Your Highlighter
Fifteen nifty colors, a handy method for finding your highlighted text, and an easy way to remove it afterward—you can pack away your physical highlighter pen and use Word’s highlighter tool to start making notes instead.
For more, take a look at how to find and replace formatting in Word or how to clear all formatting in your Word document.
Are you interested in upcoming tutorials for Microsoft Word? Connect with us on Twitter or Facebook to stay in the loop!
![]()
![]()
Written by Allen Wyatt (last updated September 19, 2022)
This tip applies to Word 2007, 2010, 2013, 2016, 2019, and Word in Microsoft 365
When Wayne uses the Find feature of Word to locate text in his document, he can have it highlight all instances of whatever it is that he’s searching for. This is great, but Wayne would like the highlighting to be permanent, so that it doesn’t go away as he makes additional edits in the document. He wonders if there is a way to search for something and apply the highlighter to all instances of what is found.
This is actually easier to do than you might, at first, presume. You cannot do it, however, simply using the Find feature—you must use Find and Replace by following these steps:
- Press Ctrl+H. Word displays the Replace tab of the Find and Replace dialog box.
- Click the More button, if it is available. Word expands the Find and Replace dialog box. (See Figure 1.)
- In the Find What box, enter the text you want to find and highlight.
- In the Replace With box, enter ^&. This informs you Word that you want to replace whatever is found with whatever it is that you actually found (the contents of the Find What box).
- With the insertion point still in the Replace With box, click the Format button. Word expands some options.
- Click the Highlight option. The word «Highlight» should now appear under the Replace With box.
- Click the Replace All button. Word makes all the changes, effectively adding a permanent highlight to everything you were searching for.
- Click the Close button to dismiss the Find and Replace dialog box.
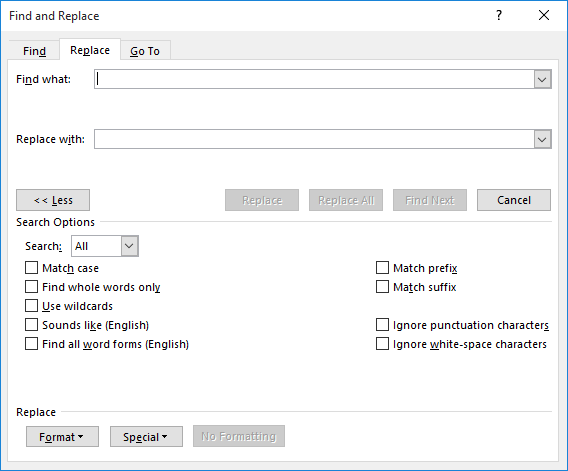
Figure 1. The Replace tab of the Find and Replace dialog box.
That’s it; your highlighting is done. After these steps, the instances of what you searched for are probably highlighted in yellow. If you want a different highlight color, you might try changing the highlight color selected in the Highlight tool on the Home tab of the ribbon before going through the steps. (This may not have an effect on all versions of Word.)
It should also be noted that step 4 is technically optional—you don’t need to place ^& in the Replace With box. You could, if desired, simply leave the box blank. I think it is a good «safety feature,» however, to place the ^& code in the box, as this can help avoid any potential mistakes that will actually delete what you are searching for.
WordTips is your source for cost-effective Microsoft Word training.
(Microsoft Word is the most popular word processing software in the world.)
This tip (1270) applies to Microsoft Word 2007, 2010, 2013, 2016, 2019, and Word in Microsoft 365.
Author Bio
With more than 50 non-fiction books and numerous magazine articles to his credit, Allen Wyatt is an internationally recognized author. He is president of Sharon Parq Associates, a computer and publishing services company. Learn more about Allen…
MORE FROM ALLEN
Formatting Currency
If you want to format currency values so that Excel uses periods between groups of thousands and commas as a decimal …
Discover More
Working In Feet and Inches
Your chosen occupation may require that you work with linear distances in feet and inches. Excel can do this, to a …
Discover More
Changing the Number of Columns in the Middle of a Document
Need to have multiple columns in a page layout that normally consists of a single column? You can change the column …
Discover More
Use the word processor’s search function to locate text and more
Updated on December 15, 2020
What to Know
- Basic word search: Go to the Home tab. Select Find and enter the text for the search.
- Advanced search: Go to Home > Find. Choose the search drop-down arrow. Select Options and select your criteria.
This article explains how to search for text in Microsoft Word. The information applies to Word 2019, Word 2016, Word 2013, Word 2010, Word Online, and Word for Microsoft 365.
How to Do a Basic Word Search in MS Word
Microsoft Word includes a search function that makes it easy to search for different elements in a document, including text. Use the basic tool to look for instances of a specific word, or the advanced options to perform tasks such as replace all instances of a word with another one or search for equations.
To run a basic search for a specific word or phrase in Word:
-
Go to the Home tab and select Find, or press Ctrl+F.
In older versions of Microsoft Word, select File > File Search.
-
In the Navigation pane, enter the text you want to search for. A list of matching words displays in the Navigation pane and instances of the word are highlighted in the main document.
-
Cycle through the results in the Navigation pane in one of three ways:
- Press Enter to move to the next result.
- Select a result with the mouse.
- Select the Up and Down arrows to move to the previous or next result.
-
Make any changes or edits to the document as needed.
-
Select the Down arrow to move to the next instance of the word.
Match Case, Whole Words Only, and More
Beyond searching for every instance of a word, you can get more specific about what you want to find. For example, to find whole instances of a word and not every word that contains the letter combination or to find instances of a word that aren’t capitalized.
Here’s how to do an advanced search:
-
Select Home > Find.
-
In the Navigation pane, select the Search drop-down arrow.
-
Choose Options.
-
In the Find Options dialog box, choose the description that best fits what you’re trying to find. For example, to find instances of a word with the same capitalization, select Match case.
-
Select OK.
Use Advanced Find
Many of the choices available in the Find Options dialog box are also available in Advanced Find. Advanced Find includes the option to replace the text with something new. Based on your selection, Word replaces one instance or all instances at once. You can also replace the formatting, or change the language, paragraph, and tab settings.
Find Instances of Other Elements
Other options in the Navigation pane include searching for equations, tables, graphics, footnotes, endnotes, and comments.
Thanks for letting us know!
Get the Latest Tech News Delivered Every Day
Subscribe