
If Statements / If Fields / Comparison Statements
IF statements (also called IF fields) allow you to compare two values and display document content based on the result of the comparison. When used in a Word template, IF statements are especially useful for comparing the values of Composer merge fields and then displaying the appropriate content.
Example use cases:
- If an Account’s billing country is not in the United States, display information about international shipping terms. Otherwise, show domestic shipping terms.
- If a Contact’s mailing address is blank, show the billing address from his related Account. If it’s not blank, show the Contact’s mailing address.
- If an Opportunity’s amount is greater than $10,000, show information about a complimentary service package. If not, show nothing.
![]()
Nested IF statements in Word, where the else value is another IF statement, will work with Conga Composer but are not recommended. Conga Technical Support will not assist with nested IF statements. Conga highly recommends evaluating nested IF statement logic using Salesforce formula fields and then merging the formula field values into the document.
Watch this video on How to Add IF Statements to Templates.
Create IF Statements in a Word Template
![]()
IF statements can use Word merge fields or text-based merge fields, with one exception: the IF statement itself must be a Word merge field. This means that all the fields inside or around the IF statement can be either Word or text-based merge fields, but again, the IF statement itself must be a Word merge field. Following are examples of both types of syntax.
Syntax
{IF "Expression 1" Operator "Expression 2" "TrueValue" "FalseValue"}
Below is a very basic example using Word merge fields as Expressions. The single braces ({ }) on either end of the IF statement indicate the beginning and end of a Word merge field when the field codes have been toggled open.
{IF "{{Opportunity_Amount}}" > "100000 "Big Deal Opptye" "Normal Oppty"}
Components of an IF Field
Expression1 & Expression2:
- Both Expression1 and Expression2 represent fields and values that you want to compare.
- Expressions are usually Word or text-based merge fields, text strings, or numbers. Expression1 and Expression2 should be surrounded with quotation marks («»).
Operator
- A comparison operator. There is always a space before and after the operator.
- Supported operators:


TrueValue & FalseValue
- Content that is shown when the comparison is true (TrueValue) or false (FalseValue). Each must be surrounded with quotation marks.
![]()
If the content of your TrueValue or FalseValue contains quotation marks ( “ or ” ), you need to replace those quotes with two pairs of single quotation marks (‘’ ‘’ instead of “ ”). Otherwise, Word will consider the first quotation mark from your merged data as the end of your text string and the IF statement will not work.
Creating an IF Field — Conga Best Practices
It is important to follow best practices to ensure the stability and sustainability of your IF statements. In the example below, we will show in detail the best practice method for creating IF statements. We will also show the syntax for both Word merge field and text-based merge fields.
Example scenario: If the Opportunity Amount is greater than $10,000, show information about a complimentary service package. If it’s not, do not show anything.
We recommend the following approach:
| Procedure Step | Result |
|---|---|
| Create a traditional merge field with a placeholder name. | «IF_Amount>10000» |
| Open the merge field by toggling field codes. | {MERGEFIELD IF_Amount>10000 * MERGEFORMAT} |
| Delete the contents of the field, entering IF instead. | {IF} |
| Add Expression1 to the IF field. In our example, Expression1 is the Opportunity Amount field. |
Word
Text-based
|
| Insert your Operator. We’re using greater than (>). |
Word
Text-based
|
| Insert Expression2. Our example is $10,000. |
Word
Text-based
|
| Insert TrueValue. Our example is a merge field that displays the details of a complimentary service package. |
Word
Text-based
|
| Insert FalseValue. In our example, we don’t want to display anything if the Opportunity Amount is less than $10,000, so our FalseValue is null. This is represented by a pair of quotation marks. |
Word
Text-based
|
Our finished IF field looks like this:
Word{IF “«OPPORTUNITY_AMOUNT»” > “10000” “«OPPORTUNITY_SERVICE_PACKAGE»” “”}
Text-based{IF “{{OPPORTUNITY_AMOUNT}}” > “10000” “{{OPPORTUNITY_SERVICE_PACKAGE}}” “”}
![]()
An IF statement that is toggled open should look exactly like the examples above when it is completed. When initially creating the IF statement, Word will include the following text at the end: * MERGEFORMAT. This text needs to be removed to ensure the IF statement renders consistently.
When we toggle the field codes closed, the IF statement will revert to the Word merge field with the placeholder name:
«IF_Amount > 10000»
Using the IF statement we just created, let’s consider an example:
The Merge Nation Opportunity has an amount of $25,000. Once we merge the Composer template that uses our IF statement, our merged document will look like this:

We are showing the value of the OPPORTUNITY_SERVICE_PACKAGE field since that is our TrueValue.
Now let’s say we use a different Opportunity called Merge Republic, which only has an amount of $8,000. Our merged document will show nothing («»), since that is our FalseValue.
Warnings
- Checkbox fields: Although the Composer View Data Workbook and the Template Builder show the values of checkbox fields as TRUE and FALSE, those values do not work in an IF statement. Change your value from TRUE to True.
Example:{IF "<<Checkbox_MergeField>>" = "True" "Yes" "No"} - Tables: IF statements placed inside a table row cannot hide the table row when the statement evaluates to show nothing. You will instead have a blank table row. Word IF statements cannot be used to hide rows within a table.
- IF statements do not work in a Conga Email template.
I’m trying to create an if statement (in MS Word) that looks at a custom field.
The custom field is DocProperty Client_ABV
I want it to print a line of text if client_abv matches a certain value else be completely blank (or delete the empty line if possible)
I believe it needs to look something like this:
{IF DocProperty.Client_ABV=»Test» «Print this line if Test»,»»}
I’ve very little experience with this function in Word but I have some with conditional programming.
Can anyone shed any light. I’ve been googling it for the last 45 minutes and have had little success with the example pages I’ve found.
asked Jun 22, 2016 at 14:43
![]()
Use Ctrl+F9 to insert the field code { brackets }. They look like wavy brackets, but these are actually special «escape codes» that tell Word this is a field code.
You need a pair of brackets for both the IF and the DocProperty fields.
When performing a string comparison it’s a good idea to put «quotes» around the field code as well as around the literal string.
There is no punctuation in the DocProperty field code (no period). And no comma between the true/false evaluation, only a space between the closing » and opening «.
If a paragraph mark should be part of the true/false evaluation (for example, you want to suppress the paragraph mark if the comparison is false) include it inside the «quotes» for the evaluation result. The field code will look a bit odd, but that does work.
For example:
{ IF "{ DocProperty Client_ABV }"="Test" "Print this line if Test
" ""}
answered Jun 22, 2016 at 16:35
![]()
Cindy MeisterCindy Meister
24.9k21 gold badges35 silver badges43 bronze badges
1
Conditional logic allows you to create multiple variations of a document all in one template. Any sections/lines/paragraphs of the document can be made conditional based on the value of a field in your Lawmatics CRM. This is particularly useful for automating your documents, so that you do not need to take the time to make nit-picky changes to each client’s document, the template will simply make those changes for you automatically.
Just like you are used to with our start fresh document editor, it is simple to create DOCX documents with dynamic data, changing depending on the value of certain fields. While the start fresh editor is a bit more simple to use, creating a DOCX template is useful for more highly formatted/designed documents, since it will preserve your formatting from Word.
Before moving forward with conditional logic, make sure you are familiar with using merge fields in DOCX documents.
To build conditional logic into your document you will need to use our conditional field language in your Word document. This will be simple to use once you get the hang of it, but keep in mind you will need to get things just right in order for the logic to work properly.
Remember that all of these edits will need to take place in your Microsoft Word document before uploading it to Lawmatics.
Using IF, THEN statements
The first thing to know about setting conditional logic in a DOCX document is that you can only use true/false fields (AKA boolean) or picklist type fields to set conditional logic. This means that you can not use an open text field to set conditions. Only fields that have defined responses can be used for setting conditional logic. You also cannot use a multi-picklist field to set conditional logic.
Below is an example of how conditional logic is built in your Word templates. This example uses the field practice_area, but note that you can do conditional logic with any field.
{{#practice_area == Family Law}}We look forward to handling your Family Law matter.{{/practice_area}}{{#practice_area == Estate Planning}} We look forward to handling your Estate Planning matter.{{/practice_area}}
Let’s break this down.
You can see that all information contained inside the {{}} brackets is meant to be Lawmatics «code». Information inside these brackets will be evaluated as fields or conditions in the document.
You will need to use information inside brackets to set the IF statement for the conditional logic, then include the text of your conditional THEN statement, and lastly you will use another set of brackets to signify where the THEN statement ends.
The first line {{#practice_area == Family Law}} is what sets the first IF condition. Note that the bracketed line must be placed on its own line of text.
The text after these brackets «We look forward to handling your Family Law matter.» is your THEN statement.
The following brackets, {{/practice_area}}, tell the system where the THEN statement ends. Notice that this text is also on its own line.
So, IF the practice area is Family Law, THEN this statement will be shown in the document. If the condition is met, then any text before the closing brackets, {{/practice_area}}, will be used.
We’ve also added a second condition to the example above. Immediately following the close of the first THEN statement, there is a second IF condition for if the practice area is estate planning, coded as such: {{#practice_area == Estate Planning}}
We then have our THEN statement for this IF condition, «We look forward to handling your Estate Planning matter.», and lastly we have closed the statement with one more closing bracket: {{/practice_area}}
So in this example, if the practice area is family law then the first sentence is shown, and if the practice area is estate planning the second sentence will be used.
This example uses the field practice_area, but note that you can create a conditional IF statement with any field.
To create an if condition you must place the condition within double brackets, {{}}. Then, inside the brackets, start with a «#» immediately followed by the field code, which again is obtained from the DOCX Field Reference mentioned above.
You will then place a space after the field code, followed by two equal signs == and another space, and then put the value of the field that will set the IF condition. Then close the brackets.
After this opening condition, you can type all the text you would like. Then, close the IF statement with another set of double brackets, then use / immediately followed by the same field code. Not the value of the field, just the field code name.
You can create multiple if statements for the same field, enabling you to create options for each value of a field, just as demonstrated in the practice area example above.
Using IF NOT, THEN Statements
It is also possible to create an IF NOT statement. In order to accomplish this, simply use «^» in place of «#». So, for example, the following would represent text to be used if the practice area WAS NOT Estate Planning:
{{^practice_area == Estate Planning}}We look forward to handling your matter that is not Estate Planning.{{/practice_area}}
Conditional Mail Merge in MS Word
Microsoft Word provides basic personalization options for mail merges using merge fields. What if you want to apply more advanced personalization in a Word mail merge (beyond the basic first name/last name changes) or include conditionally formatted content in the merge fields? You can accomplish that with conditional mail merge rules in Microsoft Word.
Unlike Excel, there is no conditional formatting button in Microsoft Word. In addition, when sending out emails, MS Word does not preserve the formatting of MS Excel data files. However, you may employ an IF…THEN…ELSE rule to modify formatting and replace text/paragraphs depending on the conditions you define. Conditional mail merge allows you to change the content of your emails based on specific criteria or variable data in your excel data file, such as gender, client sector, purchase date, and so on.
Conditional mail merge capabilities in Microsoft Word are limited and need strong software expertise to set up. In addition, if you make a small error, you’ll run into a slew of formatting issues.
In this article, we’ll show you how to set up a conditional mail merge in MS Word correctly, as well as the most common mistakes to avoid. We’ll also go through a simple method for hyper-personalizing your emails using GMass.
How to Insert Conditional Content (If…Then…Else) in Word Mail Merge Fields
In Microsoft Word, the IF function is enclosed in curly braces. It begins with a condition and then contains the action to perform if true, as well as the action to take if false, as shown below:
{ IF Condition “Truetext” “Falsetext”}
Examples:
{ IF { MERGEFIELD Gender } = “Male” “Mr.” “Ms. }
{ IF { MERGEFIELD Industry } = “Recruiting” “hope the recruiting business is going well, and you’re placing lots of candidates!” “hope things are going well for you.”}
Note: In Microsoft Word, these curly braces must be placed using an If…then…else rule as shown below. Alternatively, you may use the Ctrl+F9 key combination to add them. The conditional formatting will not work if the curly braces are entered manually.
Here’s how to implement conditional mail merge in MS Word:
1. Open MS Word > Go to Mailings tab
2. Click Start mail merge and choose Letters
3. Select the Insert Merge Field option from the dropdown menu to insert merge fields.
4. Select where you want the conditional text to be placed.
5. Press Alt + F9 so you can see the field codes
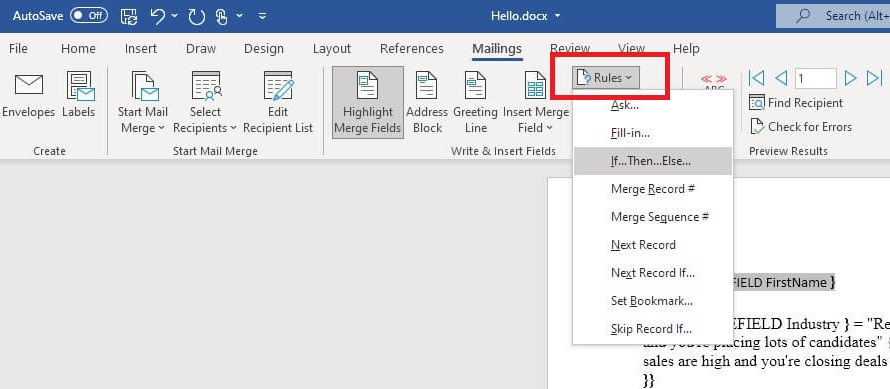
6. To apply conditional formatting, Go to Mailings > Rules > If…Then…Else and a pop-up box will open
7. In the Field name dropdown select the desired field from the data source (MS Excel File) you want to use for conditional text

8. In the Comparison box, choose a method for comparing the data value.
9. In the Compare to box, type in the comparison value
10. In the Insert this text box, enter the content that appears in the document when the comparison criteria is met.
11. In the Otherwise insert this text box, type in the words that would be included in the document when the comparison criteria is not met
12. Select OK.
13. If you want to apply conditional formatting manually, you need to use Ctrl+F9 to add the curly braces and the field codes.
Note: Don’t use spaces in your field names.
Formatting the Conditional Text in Word Mail Merge
When you perform a merge mail in Microsoft Word, the formatting of an MS Excel data file is lost. You must edit the field code if you want to change the color of the conditional text. For example, if you want to change the color of “Truetext” to blue, modify the field code as follows:
{ IF { MERGEFIELD Industry } = “Recruiting” “hope the recruiting business is going well and you’re placing lots of candidates!” “hope things are going well for you.”}
Nesting Conditional Statements / Multiple If- Else Conditions in Word Mail Merge
If you want to use multiple IF statements, simply add more IF functions in the field code, as shown below:
{ IF Condition1 “Truetext” { IF Condition2 “Truetext” “Falsetext” }}
{ IF { MERGEFIELD Industry } = “Recruiting” “hope the recruiting business is going well and you’re placing lots of candidates!” { IF { MERGEFIELD Industry } = “Sales” hope your sales are high and you’re closing deals left and right! “hope things are going well for you.”}}
Problems with Conditional Formatting in Word Mail Merge
- If you have more than one condition or wish to perform more complex mail merge personalization, the procedure gets considerably more difficult.
- You can not simply type the curly braces {}; MS Word must add these. You can only create a blank field by pressing Ctrl+F9. If you type the curly braces manually, the conditional formatting won’t work.
- The text you use for your TrueText or FalseText should not include any special characters, such as slashes (/), Inverted Commas, Quotation Marks, brackets ([]), or braces ({). This is because MS Word will not output them during the mail merge.
- If any of the “IF” fields are blank during mail merge, MS word won’t be able to suppress them. As a result, you will see additional blank lines or inconsistent output in your mail merge letters. To eliminate them, you need to add a “b” after the merge field.
- If you have any hyperlinks in the conditional text, those will not be outputted by the simple If…Then…Else… rule.
Conditional Text Automation with GMass and Gmail
GMass has created a simple solution to send personalized mail merges using Gmail that eliminates the typical conditional formatting and other mail merge issues associated with MS Word. With GMass, you can use If/Then and other statements in your Subject and Message to hyper-personalize content based on any criteria you have associated with each email address. Read our full guide on conditional content for personalized emails.
Along with this, you can also:
Personalize links and URLs for each recipient, including anchor links without link breakage that can otherwise occur in the Compose window.
Personalize attachments by sending individual images, invoices, or documents to each recipient in a mass email.
Personalize images for each recipient to include a different team logo, pet breed, or astrological sign, etc.
Personalize large blocks of text according to the needs of each recipient, such as a different promotional offer for different levels of customers, or for customers in different zip codes.
Send your campaign to a personalized CC or BCC address for each recipient to keep the associated salesperson or distributor in the loop according to their respective territories or accounts.
Personalize the To header of each individual email so that your contact’s First and Last name appear as part of the To line instead of just their email address.
For our full set of personalization documentation see the personalization category page on this blog.
We’ve tried to make GMass as simple to use as possible. It is simple to double-check your personalization before sending your email to all of your recipients. You may use the Send Test button with the Create Drafts option to see instantly what personalization to everyone on your list will look like. Simply select the “Send Test” option and check your Gmail DRAFTS folder. When you’re ready to send your campaign with the red GMass button, don’t forget to switch the Action back to “Send email.”
Conclusion
The Microsoft Word mail merge tool is powerful, but it has certain limits. For example, it isn’t well-equipped to handle complex mail merges or conditional content, resulting in errors and formatting issues that are difficult to troubleshoot. You can use GMass to create hyper-personalized bulk email campaigns using Gmail. With in-depth analytics and automation, you’ll have all you need to easily send, manage, and follow up on your emails. Why not download the GMass Chrome extension today and try it yourself?
See why 99% of users say they’ve had their best deliverability ever with GMass
Email marketing, cold email, and mail merge all in one tool — that works inside Gmail
TRY GMASS FOR FREE
Download Chrome extension — 30 second intall!
No credit card required
Love what you’re reading? Get the latest email strategy and tips & stay in touch.
Home/ Mail Merge/ Conditional Formatting with Mail Merge Fields in Word
You may be familiar with Conditional Formatting in Excel. Well, Conditional Formatting can also be applied to fields in Word.
Now, Word does not have a Conditional Formatting button like in Excel, but you can write an IF function in the field and format the true and false responses. This will create the perfect Conditional Formatting behaviour.
In this example, Mail Merge is being used to inform members of how many points they have earned this week. If the number of points is greater than 20, I want the number formatted in red, and if not formatted in black.
The name of the Mail Merge field we need to edit is number.
Inserting an IF Function to a Word Field
To write the IF function, we first need to see the field code. To do this, press Alt + F9 on the keyboard. This will toggle the field codes of your document.
The document will look like below with field codes shown instead of the field enclosed in chevrons such as <<number>>.

Click inside the field code to edit it.
The structure of the IF function is shown below. It is enclosed in curly braces and begins with the expression or condition, then the action to take if true and then the action to take if false.
{ IF Expression Truetext Falsetext }
To get the IF function to conditionally format the number in our Mail Merge we need to edit the field code to the below.
You do not type the curly braces. It will not work if they are typed. They must be entered by pressing Ctrl + F9.
{ IF { MERGEFIELD number } > "20" { MERGEFIELD number } { MERGEFIELD number } }
When entering the IF function, format the true text and false text as you want them to appear. This could be a different colour, bold, underlined, larger. Whatever you need.
The end result of our document is shown below with field codes visible. The true text is red, with the false text left with the automatic black.

Watch the Video
More Awesome Word Tutorials
- 10 Great Word Productivity Hacks
- Change the Default Font in Word
- 5 Awesome Time Saving Word Tricks
- Mail Merge to Labels in Word