
Here’s an example of how the Address Block and Greeting Line collections of merge fields might pull data from an Excel spreadsheet into a form letter.

The Address Block and Greeting Line fields are collections of merge fields.
Note: If the merge field commands appears dimmed, click Select Recipients and choose the kind of mailing list you’re using. If you don’t have a mailing list yet, click Type New List to create your list in Word.
Add an Address Block
-
Click or tap where you want to add the address block in your document.
-
On the Mailings tab, choose Address Block
Word gives you options for choosing the formality of the name in the address.
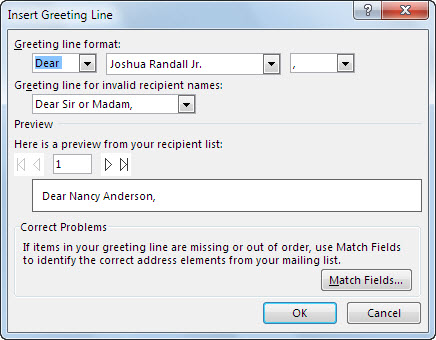
Add a Greeting Line
-
Click or tap where you want to add the greeting in your document.
-
Choose Greeting Line.
-
Choose the name style that you want to use, and set other options.

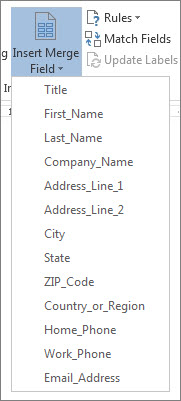
Add individual merge fields
To include data like phone numbers or email addresses, you insert those merge fields specifically. Also, a merge field like First Name doesn’t have to be part of an Address Block or Greeting Line. If you want to personalize a document by including your recipients’ first names, insert the First_Name merge field on its own.
-
Click or tap where you want the merge field.
-
Choose the down-arrow under Insert Merge Field, and select a field.
-
If you don’t see your field name in the list, choose Insert Merge Field.
-
Choose Database Fields to see the list of fields that are in your data source.
-
Choose Insert.
Use rules for more sophisticated personalization
You might want your message to differ, depending on data in certain fields of your data source. For example, invoices could include the words «Past Due» for customers where the value of the Due Date field is a date in the past.
This level of sophistication depends on setting up rules and field codes. On the Mailings tab, in the Write & Insert Fields group, choose Rules, and select the kind of rule you want to add.
For more information about how you can use mail merge rules, see Set the rules for a mail merge.
Add individual merge fields
To include data like phone numbers or email addresses, you insert those merge fields specifically. Also, a merge field like First Name doesn’t have to be part of an Address Block or Greeting Line. If you want to personalize a document by including your recipients’ first names, insert the First_Name merge field on its own.
-
Click or tap where you want the merge field.
-
Choose the down-arrow under Insert Merge Field, and select a field.
Use rules for more sophisticated personalization
You might want your message to differ, depending on data in certain fields of your data source. For example, invoices could include the words «Past Due» for customers where the value of the Due Date field is a date in the past.
This level of sophistication depends on setting up rules and field codes. On the Mailings tab, choose Rules, and select the kind of rule you want to add.
For more information about how you can use mail merge rules, see Set the rules for a mail merge.
Add individual merge fields
- Click or tap where you want the merge field.
- Choose the down-arrow under Insert Merge Field, and select a field.
- If you don’t see your field name in the list, choose Insert Merge Field.
- Choose Database Fields to see the list of fields that are in your data source.
- Choose Insert.
Contents
- 1 How do I enable insert merge fields?
- 2 How do I show merge fields in Word?
- 3 Where will you find the merge field icon?
- 4 How do you insert an IF field in Word?
- 5 How do you insert a new field in Word?
- 6 How do you create a merge in Word?
- 7 How do I create a merge document in Word?
- 8 How do I edit mail merge fields in Word?
- 9 How does a merge field appear?
- 10 What does Alt F9 do in Word?
- 11 How do you show field results in Word?
- 12 Which shortcut key is used to insert a merge field?
- 13 How do I insert a merge field in Word for Mac?
- 14 How do you insert an if/then else merge field in a document?
- 15 How do I insert a mail merge field in Word?
- 16 How do you automatically update fields in Word?
- 17 What is a merge field?
- 18 Why is insert mail merge field grayed out?
- 19 What is the purpose of a mail merge field?
- 20 How do I create a mail merge in Word 2007?
How do I enable insert merge fields?
Adding Simple Merge Fields
- Open a Microsoft Word document.
- Click where you want to place a merge field.
- In the Insert tab, click Quick Parts and then Field….
- Under Categories, select (All).
- Under Field names, select MergeField.
- Type the name of the merge field under Field name.
- Click OK.
How do I show merge fields in Word?
Checking Merge Fields in Word
Right-click on the Merge Field in question. From the Word pop-up menu, select Toggle Field Codes. Or, to show all the Merge Fields as code in your Word document, click Alt+F9.
Where will you find the merge field icon?
On the Mailings tab, click the arrow on the Insert Merge Field button, opening a menu. Click the desired field to insert. Choose an individual field to insert.
How do you insert an IF field in Word?
Click in your document where you want the condition to go, then press Ctrl+F9 (on a Windows computer) on your keyboard to insert a blank field (2 curly brackets ). If you have a Mac, click the Insert tab > Field, under Field names choose “If”, then click OK.
How do you insert a new field in Word?
How to Add Built-in Fields in Microsoft Word
- Place the cursor in your document where you want to insert the field.
- From the Insert tab on the Ribbon, in the Text group, select Quick Parts and then select Field .
- In the Field dialog box, from the Field names list, select the field.
How do you create a merge in Word?
How to Use Mail Merge in Microsoft Word
- In a blank Microsoft Word document, click on the Mailings tab, and in the Start Mail Merge group, click Start Mail Merge .
- Click Step-by-Step Mail Merge Wizard .
- Select your document type.
- Select the starting document.
- Select recipients.
- Write the letter and add custom fields.
How do I create a merge document in Word?
To do this, follow these steps:
- Click Edit individual letters.
- In the Merge to New Document dialog box, select the records that you want to merge.
- Click OK.
- Scroll to the information that you want to edit, and then make your changes.
- Print or save the document just as you would any regular document.
How do I edit mail merge fields in Word?
Right-click the field code that you want to edit, and then click Edit Field. In the Field dialog box, click Field Codes. In the Field codes box, make the changes that you want to the merge field.
How does a merge field appear?
A merge field is where you want to insert the information from a data source into a main document. Merge fields appear with chevrons (« ») around them. An example would be: Dear «FirstName». A group of merge fields that make up an address in a mail merge document.
What does Alt F9 do in Word?
Pressing Alt + F9 toggles between fields and their results, and it doesn’t matter where the cursor is. But when you update an individual field (by pressing F9), the cursor must be inside the field you’re updating. If a field doesn’t update as you expect, make sure the cursor is inside the field and try again.
How do you show field results in Word?
You can also use the ALT + F9 keyboard shortcut to toggle between field results and field codes. Scroll down to the Show document content section. Select the desired option from the Field shading drop-down list.
Which shortcut key is used to insert a merge field?
Alt+H. To manage Mail Merge tasks, or to work with envelopes and labels, open Mailings tab . Alt+M. To insert tables, pictures and shapes, headers, or text boxes, open Insert tab.
How do I insert a merge field in Word for Mac?
Insert a Merge Field in Word for Mac
- In the Macintosh Word, navigate to Insert > Field.
- Click the Categories arrow and select Mail Merge.
- In the Field names field, click MergeField.
- In the Field codes field, enter a space after “MERGEFIELD” then type the field name you want to insert, e.g. Account.Name .
- Click OK.
How do you insert an if/then else merge field in a document?
In the Write and Insert Fields section, select Rules, If…Then… Else…
On the Insert Word Field:IF screen:
- In the Field name drop-down, select the field name on which to base the conditional statement.
- In the Comparison drop-down, select the appropriate operator.
- In the Compare to field, enter the appropriate value.
How do I insert a mail merge field in Word?
Add individual merge fields
- Click or tap where you want the merge field.
- Choose the down-arrow under Insert Merge Field, and select a field.
- If you don’t see your field name in the list, choose Insert Merge Field.
- Choose Database Fields to see the list of fields that are in your data source.
- Choose Insert.
How do you automatically update fields in Word?
Press Ctrl + A. Press F9. If your document has tables with fields or formulas, you might need to select each table separately and press F9. Tip: To make sure that you don’t forget to update your table of contents before you print the document, set Word to update fields automatically before printing.
What is a merge field?
A merge field is a field you can put in an email template, mail merge template, custom link, or formula to incorporate values from a record. For example, you can place a merge field in an email template so that the greeting includes the recipient’s name rather than a generic “Hello!”.
Why is insert mail merge field grayed out?
If the buttons on the Mailings ribbon are grayed out, you have not connected the main document with the data source. 2. Position the insertion point in the envelope where you want data from the Excel file to appear, and then click on the Insert Merge Field button (Mailings ribbon).
What is the purpose of a mail merge field?
Mail Merge is a handy feature that incorporates data from both Microsoft Word and Microsoft Excel and allows you to create multiple documents at once, such as letters, saving you the time and effort of retyping the same letter over and over.
How do I create a mail merge in Word 2007?
Steps 1-3
- Choose the type of document you want to create. In this example, select Letters.
- Click Next:Starting document to move to Step 2.
- Select Use the current document.
- Click Next:Select recipients to move to Step 3.
- Select the Type a new list button.
- Click Create to create a data source.
 |
When you create a merge field in Microsoft Word
(see Creating a WordWriter Template), you can
apply formatting to the field. For example, you can set a merge field’s
format to «Uppercase» to display the field’s value in uppercase letters.
WordWriter supports most text, date, and time formats available in Microsoft
Word.
- General Text Formatting Options
- Date and Time Formatting Options
- Formatting Options Not Supported in WordWriter 1.0
This section explains how to apply special merge field formatting.
You can apply all standard formatting (bold, italic, underline, etc.)
to merge fields from Word’s Format menu or toolbar.
General Text Formatting Options
The Field dialog opens when you add a new merge field to
a template. To open the dialog for an existing merge field,
right-click the field and select Edit Field…
|
The following text formatting options can be set
|
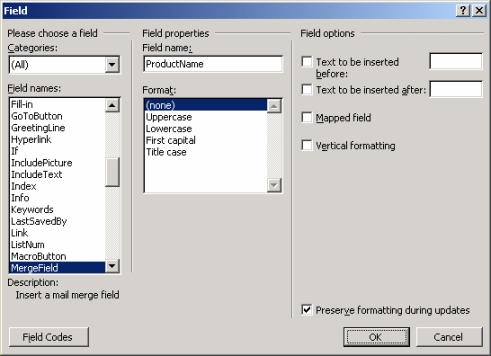
The Field Dialog in Microsoft Word 2002 (XP) |
WordWriter 1.0 does not support the following formatting
options: Mapped field, Vertical formatting, and NumberedItem.
To set a merge field’s formatting to Uppercase, Lowercase, Title case, or
First capital using the Field dialog:
- The Field dialog opens automatically when you insert a new merge field.
If you are formatting an existing merge field, right-click the merge field and
select Edit Field… - From the Format list select a format. For example, select Uppercase.
To display text before and/or after a merge field value:
- The Field dialog opens automatically when you insert a new merge field.
If you are formatting an existing merge field, right-click the merge field and
select Edit Field… - Check Text to be inserted before and/or Text to be inserted after.
- In the Text Before text box, enter a phrase to display before the merge field
value, and/or, in the Text After text box, enter a phrase to display after the
merge field value.
You can also set these formatting options by entering special codes in the
merge field. To view and edit a merge field’s field codes, right-click the field
and select Toggle Field Codes. A field without special formatting looks like
this:
{MERGEFIELD FieldName}
| Format | Field Codes | Example |
|---|---|---|
| Uppercase | {MERGEFIELD FieldName * Upper} | {MERGEFIELD ProductName * Upper} |
| Lowercase | {MERGEFIELD FieldName * Lower} | {MERGEFIELD ProductName * Lower} |
| First capital | {MERGEFIELD FieldName * FirstCap} | {MERGEFIELD ProductName * FirstCap} |
| Title case | {MERGEFIELD FieldName * Caps} | {MERGEFIELD ProductName * Caps} |
| Text Before | {MERGEFIELD FieldName b «Text to insert before«} | {MERGEFIELD OrderDate b «Order Date: «} |
| Text After | {MERGEFIELD FieldName f «Text to insert after«} | {MERGEFIELD OrderDate f » (Order Date)»} |
Top
Date and Time Formatting Options
Using field codes, you can apply date/time formatting to merge fields
that will bind to database fields of types Date, Time, and Timestamp, or
to an object of type System.DateTime. The general format for applying
date/time format codes is:
{MERGEFIELD FieldName @ "Formatting Pattern"}
| Date/Time Format Code | Description | Field Code Example | Output Example |
|---|---|---|---|
| Day | |||
| d | Displays the day of the week or month as a number. Single digit day numbers will not include a leading zero. |
{MERGEFIELD Date @ «M/d/yyyy»} | 4/7/2003 |
| dd | Displays the day of the week or month as a number. Single digit day numbers will include a leading zero. |
{MERGEFIELD Date @ «d MMMM yyyy»} | 07 April 2003 |
| ddd | Displays a three-letter abbreviation for the day of the week. | {MERGEFIELD Date @ «ddd, d-MMM-yy»} | Mon, 7-Apr-03 |
| dddd | Displays the full name of the day of the week. | {MERGEFIELD Date @ «dddd, MMMM d, yyyy»} | Monday, April 7, 2003 |
| Month (Use uppercase M for months, lowercase m for minutes) | |||
| M | Displays the month as a number. Single digit month numbers will not include a leading zero. |
{MERGEFIELD Date @ «M/d/yy»} | 4/7/03 |
| MM | Displays the month as a number. Single digit month numbers will include a leading zero. |
{MERGEFIELD Date @ «yyyy-MM-dd»} | 2003-O4-07 |
| MMM | Displays a three-letter month abbreviation. | {MERGEFIELD Date @ «MMM-yy»} | Apr-03 |
| MMMM | Displays the full month name | {MERGEFIELD Date @ «MMMM d, yyyy»} | April 7, 2003 |
| Year | |||
| yy | Displays a two-digit year number. For years 1-9, the year number will include a leading zero. |
{MERGEFIELD Date @ «MMM-yy»} | Apr-03 |
| yyyy | Displays a four digit year number | {MERGEFIELD Date @ «MMMM d, yyyy»} | April 7, 2003 |
| Hours | |||
| h | Use lowercase h to display times based on the 12-hour clock. Lowercase h displays single-digit hours as single-digit numbers, without a leading zero. |
{MERGEFIELD Time @ «h:mm»} | 6:05 |
| hh | Use lowercase hh to display times based on the 12-hour clock. Lowercase hh displays single-digit hours with a leading zero. |
{MERGEFIELD Time @ «hh:mm am/pm»} | 06:05 am |
| H | Use uppercase H to display times based on the 24-hour clock (military clock). Uppercase H displays single-digit hours as single-digit numbers, without a leading zero. |
{MERGEFIELD Time @ «H:mm»} | 7:05 |
| HH | Use uppercase HH to display times based on the 24-hour clock (military clock). Uppercase HH displays single-digit hours with a leading zero. |
{MERGEFIELD Time @ «HH:mm»} | 18:30 |
| Minutes (Use lowercase m for minutes, uppercase M for months) | |||
| m | Displays single-digit minutes without a leading zero. | {MERGEFIELD Time @ «m ‘minutes'»} | 2 minutes |
| mm | Displays single-digit minutes with a leading zero. | {MERGEFIELD Time @ «hh:mm am/pm»} | 06:05 am |
| AM & PM | |||
| AM/PM | Displays uppercase AM or PM. | {MERGEFIELD Time @ «hh:mm AM/PM»} | 08:30 PM |
| am/pm | Displays lowercase am or pm. | {MERGEFIELD Time @ «hh:mm am/pm»} | 07:55 am |
| Other Text | |||
| ‘text‘ | To display text within a date or time, enclose the text in single quotation marks. |
{MERGEFIELD Date @ «hh:mm ‘EST'»} | 06:15 EST |
| character | To include a character, such as — (hyphen), in a date or time, do not enclose in quotation marks. |
{MERGEFIELD Date @ «MMM-yy»} | Apr-03 |
Top
Formatting Options Not Supported in WordWriter 1.0
WordWriter 1.0 does not support the Microsoft Word following formatting options:
- Mapped field
- Vertical formatting
- NumberedItem
Top
Copyright © 2003, SoftArtisans, Inc.
Создание полей
Использование полей
Для нумерации страниц печатного документа, необходимо вставить в него поле нумерации страниц – PAGE. Это можно сделать двумя способами:
- командами меню Вставка – Номера страниц ;
- кнопкой Номер страницы на панели инструментов Колонтитулы .
Рассмотрим второй способ :
- Выполните команды меню Вставка – Номера страниц – откроется окно диалога “Номера страниц” :
- В поле Положение укажите, где должен находиться счетчик страниц : внизу или вверху страницы.
- В списке Выравнивание уточните положение счетчика : справа, слева, от центра, внутри (для зеркальных страниц), снаружи (для зеркальных страниц).
- Если вы хотите убрать нумерацию с первой страницы документа, снимите флажок Номер на первой страницы. Первая страница остается без номера, хотя она учитывается при нумерации остальных страниц.
- Для изменения стиля нумерации, или нумерации с другого номера, нужно воспользоваться кнопкой Формат. Данная кнопка открывает окно диалога “Формат номера страницы”.
Ввод даты и времени
- Установите курсор в нужную позицию текста документа (месторасположения даты).
- Выполните команды меню Вставка – Дата и время – откроется окно диалога “Дата и время” .
- В списке Форматы – выберите формат даты, времени или их комбинацию.
- Для вставки даты в виде поля (это информация будет обновляться) установите флажок Обнавлять автоматически .
Замечание : Дату можно вставить в области колонтитулов с помощью кнопки Дата на панели инструментов Колонтитулы .
Добавление названий к таблицам, рисункам, формулам и другим элементам
Word допускает ручное и автоматическое добавление названия к таблице, рисунку, формуле и любому другому элементу документа при его вставке.
Добавление названий к существующим объектам:
- Выделите элемент, к которому следует добавить название;
- Выполните команды меню Вставка -Название, откроется диалоговое окно «Название» ;
- В списке Постоянная часть укажите постоянную часть в названии объекта (рисунок, таблица, диаграмма ит.д.), если значение отсутствует в списке — его можно добавить кнопкой Создать;
- В поле Название, после постоянной части и номера объекта введите название объекта;
- С помощью списка Положение определите положение подписи относительно объекта (под выделенным объектом, над выделенным объектом);
- Тип нумерации можно изменить с помощью кнопки Нумерация;
- Кнопка Автоназвание позволяет задать типы объектов, название к которым добавляется автоматически при вставке очередного объекта.
- Нажмите кнопку ОК .
Замечание : тексту названия объекта применяется стандартный стиль Название объекта.
Вставка ссылок на объекты
В отчетах, докладах, электронных документах часто приходиться ссылаться на разделы, иллюстрации, таблицы, рисунки. Это может быть:
- текстовая ссылка на заглавие темы, заголовок таблицы, подрисуночную подпись (См. раздел “…”) ;
- ссылки на номер страницы, где начинается тема, таблица, находится рисунок (См. страницу …) ;
- номер объекта (См. таблицу …).
Можно ссылки создавать вручную, а можно использовать поля ссылок. Для добавления ссылки :
- Выполните команды меню Вставка – Перекрестная ссылка – откроется окно “Перекрестные ссылки”
- В списке Тип ссылки укажите объект, на который вы делаете ссылку (рисунок, таблица, заголовок).
- Выберите нужное значение из списка Вставить ссылку на… Содержание списка определяется выбранным типом ссылки (шаг 2). Например, Тип ссылки – заголовок, Вставить ссылку на – текст заголовка, номер страницы (на которой он находится), номер заголовка.
- Выберите конкретный объект ссылки из списка Для какого … Данный список содержит элементы документа выбранного типа, на которые можно сослаться с помощью поля ссылка..
- Установите параметр Вставить как гиперссылку , если необходимо организовать гиперссылку к перекрестной ссылке.
- Нажмите кнопку Вставить .
Замечание : Название объектов ( заголовки, названия таблиц, рисунков и т.д.), на которые может ссылаться Word, должны быть отформатированы стандартными стилями. Например, заголовки – стилями Заголовок1-9 , название таблиц, рисунков стилем Название объекта.
Вставка сноски
- Укажите место для вставки знака сноски.
- В меню Вставка выберите команды Ссылка — Сноска .
- В разделе Положение выберите тип вставляемой сноски: сноски или концевые сноски .
- Укажите место расположения сноски. По умолчанию обычные сноски помещаются внизу страницы, а концевые — в конце документа. Расположение сносок можно изменить, выбрав нужный вариант в списке сноски или концевые сноски .
- Выберите нужный формат сноски в разделе Формат
- В поле Формат номера выберите формат, который следует применять в данном разделе.
- Для создания пользовательского формата номера в поле другой введите свой знак сноски или нажмите кнопку Символ для использования встроенного символа.
- В списке Нумерация выберите, следует ли начинать нумерацию заново в каждом разделе или на каждой странице, либо последовательно нумеровать сноски по всему документу.
- В поле Применить выберите, в какой части документа следует вставлять сноски с номерами нового формата.
- Для вставки обычной сноски нажмите клавиши CTRL+ALT+F .
- Для вставки концевой сноски нажмите клавиши CTRL+ALT+D .
Перемещение, копирование и удаление сносок
- В документе выделите знак сноски, которую следует переместить, скопировать или удалить.
- Переместите, скопируйте или удалите знак сноски:
Чтобы переместить знак сноски, перетащите его на новое место. Чтобы скопировать знак сноски, нажмите клавишу CTRL и, удерживая ее, перетащите его на новое место. Для удаления нажмите клавишу Del.
Создание оглавления
Изменение оформления оглавления
- В меню Вставка последовательно выберите команды меню Ссылка и Оглавление и указатели , а затем откройте вкладку Оглавление .
- 2. В списке Форматы выберите параметр Из шаблона и нажмите кнопку Изменить .
- 3. В группе Стили выберите стиль, который требуется изменить, и нажмите кнопку Изменить .
- 4. В группе Формат выберите нужные параметры.
Обновление оглавления
Удаление оглавления
- Выделите оглавление вручную или с помощью кнопки Оглавление на панели инструментов Структура .
- Нажмите клавишу DEL .
Использование полей слияния
Иногда в текстовом редакторе Word требуется напечатать несколько документов (писем, конвертов, каталогов), незначительно отличающихся друг от друга. Для решения этой задачи можно воспользоваться простым копированием и редактированием, а можно — методом слияния документов .
Принцип слияния состоит в следующем :
- Готовится два документа :
- основной документ содержит общую для всех документов часть (например, текст письма) и поля слияния, с помощью которых в документ будут вставляться данные из источника данных; это всегда документ Word;
- источник данных – список различий, представленных в виде таблицы (например, таблица, содержащая фамилию, имя, адрес получателя); это может быть таблица Word, Excel, файл базы данных .
- При слиянии для каждой записи (или записи, удовлетворяющей заданному условию) в таблице – источнике данных , создается новый документ, текст которого совпадает с основным документом , а вместо полей слияния указываются данные из источника.
Для слияния документов используются поля слияния : MergeField
Данное поле вставляет в основной документ ссылку на поле данных в источнике данных. В основном документе слияния имя поля данных отображается внутри двойных угловых скобок (например “Имя”). При слиянии основного документа с выбранным источником данных содержимое указанного поля данных будет вставлено вместо данного поля.
Перед вставкой полей слияния необходимо выбрать источник данных для основного документа. Чтобы вставить поле :
- установите курсор в тексте основного документа в позицию, где должно располагаться данное значение ;
- нажмите кнопку Добавить поле слияния на панели инструментов Слияние (данная панель появиться на экране после выбора основного документа и источника данных) и выберите название поля из списка.
Fillin
Данное поле предлагает пользователю с помощью окна диалога ввести текст. Ответ печатается там, где расположено поле. Приглашение ввести текст выводится при обработке каждой записи данных из источника данных. Вставить поле можно с помощью панели инструментов Слияние :
- установите курсор в позицию, где должен находиться текст ответа ;
- нажмите кнопку Добавить поле Word ;
- 3. из списка выберите поле Fillin;
- 4. в поле Сообщение введите текст сообщения, которое будет выводиться в диалоговом окне (пример, “Укажите дату и место совещания”) ;
- 5. в поле Стандартный ответ можно ввести значение, выводимое в качестве ответа по умолчанию ;
- 6. установите флажок Только один раз , чтобы во время создания типовых документов диалоговое окно выводилось только в самом начале, а не при обработки каждой записи источника данных ;
- нажмите кнопку ОК.
IF…THEN…ELSE
Поле IF…THEN…ELSE позволяет выводить в нужной позиции текста информацию только при выполнении указанных условий.
Поле можно вставить с помощью панели инструментов Слияние :
- установите курсор в позицию, где должен находиться текст ответа ;
- нажмите кнопку Добавить поле Word ;
- из списка выберите поле IF…THEN…ELSE;
- задайте условие
- в списке Поле выберите название анализируемого поля источника данных ;
- в списке Оператор выберите нужную операцию сравнения ;
- в поле Значение задайте сравниваемое значение.
- в поле Вставить следующий текст введите текст выводимый в случае, если условие является истинным ;
- в поле В противном случае вставить следующий текст введите текст выводимый, если условие является ложным ;
- нажмите кнопку Ок .
Пример (план выполнения процедуры слияния): Напечатать несколько одинаковых писем разным адресатам, используя данные из таблицы Word.
Для решения этой задачи необходимо выполнить следующие действия :
- Создать таблицу данных, содержащую ФИО адресата и его адрес .
Имя Фамилия Адрес Сергей Иванович Иванов Томск, пр.Кирова, 25 кв.4 Тарас Петрович Бульба Томск, ул.Новгородская, 15 кв.56 Мария Викторовна Сидорова Томск, ул.Енисейская,4 кв.3 - Набрать текст письма
Адрес >
Милый > > Имя>
Я повзрослела еще на год. Это событие нужно отпраздновать с шиком. Я жду тебя в . Обещаю веселую компанию, много хорошей музыки и еще больше разных деликатесов.
Имя>, я верю ты порадуешь меня своим присутствием.
Поле IF
Чтобы отправить ответ, вы должны войти или зарегистрироваться
Сообщений [ 5 ]
1 Тема от Koba123v 22.03.2016 09:47:41
- Koba123v
- рядовой
- Неактивен
- Зарегистрирован: 22.03.2016
- Сообщений: 2
Тема: Поле IF
Имеется поле:
по-русски:
если значение в закладке по имени Результат равно «удовлетворить частично» значение поля «Иск в остальной части – оставить без удовлетворения».
Однако использование закладки для сравнения в моем случае жутко не удобно, при этом в справке указано, что значением для сравнения может быть, среди прочего, строкой текста.
Пожалуйста подскажите как задать строку текста в качестве значения для сравнения, а не поле слияние, числа или закладки?
2 Ответ от Alex_Gur 22.03.2016 10:33:03
- Alex_Gur
- Модератор
- Неактивен

- Откуда: Москва
- Зарегистрирован: 28.07.2011
- Сообщений: 2,758
- Поблагодарили: 492
Re: Поле IF
Выражение может быть именем закладки, строкой текста, числом, вложенным полем, возвращающим значение, или математической формулой.
Как я понимаю, строка текста — это текст, который вводится в поле IF, а не текст из файла.
Привожу полное описание работы с полем IF:
В зависимости от результата сравнения двух выражений вставляет тот или иной текст. В основном документе слияния поле IF можно использовать для анализа записей данных, таких как почтовые индексы или номеров банковских счетов. Например, можно разослать письма только клиентам, проживающим в определенном городе.
Выражение1, Выражение2
Значения, которые требуется сравнить. Выражение может быть именем закладки, строкой текста, числом, вложенным полем, возвращающим значение, или математической формулой. Если выражение содержит пробелы, оно должно быть заключено в кавычки.
Оператор
Оператор сравнения. Пробелы перед оператором и после него являются обязательными.
Оператор Описание
= Равно
<> Не равно
> Больше
= Больше или равно
, то Выражение2 может содержать вопросительный знак (?), заменяющий любой отдельный знак, или звездочку (*), заменяющую любую строку символов. Такое выражение должно быть заключено в кавычки. Если Выражение2 содержит звездочку, то сумма длин фрагмента Выражения1, соответствующего этой звездочке, и остальных знаков значения Выражения2 не должна превышать 128 знаков.
Примеры
В приведенном ниже примере указано, что если заказ клиента равен или больше 100 единиц продукции, то будет выведено слово «Спасибо», а если клиент заказывает менее 100 единиц продукции, то будет выведено уведомление «Минимальный заказ равен 100 единиц».
=100 «Спасибо» «Минимальный заказ равен 100 единиц»>
Примеры полей IF
Поле IF выполняет одну из двух операций в зависимости от указанных условий. Например, утверждение «Если погода будет хорошей, мы прогуляемся по парку, а если нет — пойдем в кино» определяет условие, (хорошая погода), при котором произойдет определенное событие (прогулка по парку). Если это условие не соблюдено, происходит альтернативное событие (поход в кино).
Приведенное ниже поле IF представляет собой утверждение того же типа. Если текущая запись данных содержит значение «Саратов» в поле «Город», в документ, полученный в результате слияния с этой записью данных, будет включен текст, содержащийся в первых кавычках. В противном случае будет добавлен второй текст. Следующий пример использует поля IF и MERGEFIELD.
< IF < MERGEFIELD Город >= «Саратов» «Пожалуйста, позвоните в местное отделение нашей фирмы.» «Пожалуйста, отправьте заполненный формуляр в приложенном конверте.» >
Чтобы вставить поле IF в документ, на панели инструментов Слияние нажмите кнопку Добавить поле Word, а затем выберите поле IF. THEN. ELSE.
Ниже приведены некоторые примеры способов изменения кодов поля IF.
Сравнение поля данных с другим полем или закладкой
В приведенном ниже примере выполняется сравнение значения поля данных «Ставка» со значением поля данных «Скидка». Если числа равны, печатается указанный текст.
< IF < MERGEFIELD Ставка >= < MERGEFIELD Скидка >«Мы предложим вам еще большую скидку. » » » >
(Если число в поле данных «Ставка» не равно числу в поле данных «Скидка», текст не печатается.)
Вставка других полей Word в поле IF
Пример 1
В случае выполнения условия, указанного в приведенном ниже поле IF, в документ вставляется содержимое файла, указанного в поле INCLUDETEXT. При задании местоположения и имени включаемого документа следует использовать двойные обратные косые черты (), как показано в примере. Если условие не будет выполнено, будет вставлен элемент списка автотекста «Авторское право».
< IF < MERGEFIELD Штат >= » Нью-Йорк » «< INCLUDETEXT c:worddocscontract.doc >» «< AUTOTEXT Авторское право >» >
Пример 2
Если поле «Компания» в записи данных содержит какую-либо информацию — т. е. не является пустым, — печатается текст из поля «АдресКомпании». В противном случае печатается текст из поля «ДомашнийАдрес».
< IF < MERGEFIELD Компания ><> » » «< MERGEFIELD АдресКомпании >» «< MERGEFIELD ДомашнийАдрес >» >
Выполнение вычислений в поле IF
В приведенном ниже примере первое поле = (Формула) вычисляет текущее сальдо для каждого счета. Если сальдо положительно, печатается значение второго поля = (Формула). Если вычисленное сальдо равно 0 (нулю) или отрицательно, печатается альтернативный текст «Ваш счет пуст. Спасибо.».
< IF < = < MERGEFIELD Сальдо >— > > 0 «Текущее сальдо < = < MERGEFIELD Сальдо >— < MERGEFIELD Платеж ># «#,##0.00р.; » >.» «Ваш счет пуст. Спасибо» >
Задание нескольких условий
Чтобы задать несколько условий в поле IF, в него следует включить поле COMPARE или другие поля IF.
Пример 1
В приведенном ниже примере при слиянии каждой записи данных поле COMPARE сравнивает поля данных «НомерКлиента» и «РангКлиента». Функция AND в поле = (Формула) возвращает значение «1» (истина), если значения обоих полей указывают на удовлетворительное состояние счета. В этом случае печатается текст из первых кавычек.
< IF < = AND ( < COMPARE < MERGEFIELD НомерКлиента >>= 4 >, < COMPARE < MERGEFIELD РангКлиента >Удобной и приятной работы в Word!
Перевести спасибо на Яндекс кошелёк — 41001162202962; на WebMoney — R581830807057.
Подготовка документов при массовых изменениях: Слияние шаблона Word и источника данных Excel
Недавно в одной организации наблюдала дикую картину 🙂
Компания переезжала в новое здание — из МО в Москву. Речь, соответственно, об изменении существенных условий трудового договора для всех сотрудников. По процедуре сотрудников нужно уведомить под роспись о предстоящем переезде, а затем заключить со всеми дополнительные соглашения к трудовым договорам. В организации работают около 1,5 тысяч человек, отдел кадров должен срочно подготовить документы.
Что же происходит дальше?
Начальник отдела кадров направляет запрос в отдел информационных технологий о доработке кадровой системы: нужно создать печатные формы — уведомление и дополнительное соглашение. ИТ отвечают, что подобная доработка будет стоить столько-то тысяч евро, а расходы в бюджет не заложены, и, кроме прочего, реализация возможна не ранее, чем через два месяца.
Посылая проклятия в адрес отдела ИТ, кадровики выходят на работу в выходные, бросив дома маленьких детей. Бессмертный трудовой подвиг: за двое суток создано 3000 документов! В шаблон вручную добавляли имя и паспортные данные каждого работника, и так 3000 раз!
Смогут ли они простить себе так бездарно потраченное время, когда узнают, что используя Слияние (Mail Merge) шаблона в Word с таблицей Excel, содержащей персональные данные, сделать это можно было минут за двадцать 🙂
ШАГ 1. Создаем шаблон документа в Word.
Красным выделены те данные которые будут изменяться: фамилия, имя, отчество, номер, дата трудового договора, должность, подразделение и окончания в словах уважаемый(-ая) и получил(-а) в зависимости от пола.
ШАГ 2. Создаем источник данных в Excel.
После того, как мы настроим Слияние, программа будет подставлять данные из источника в шаблон. Каждая строка — отдельный документ.
ШАГ 3. Возвращаемся к шаблону документа, который мы создали в Word. Нам предстоит работать со вкладкой «Рассылки», внимательно изучите ее.
Нажимаем кнопку «Выбрать получателей», выбираем вариант «Использовать существующий список» и открываем источник данных (файл Excel с информацией о сотрудниках).
В следующем окне выбираем лист файла, на котором содержатся нужные данные.
ШАГ 4. Ставим курсор в том месте текста шаблона, куда нужно вставить данные из источника, нажимаем кнопку «Вставить поле слияния» и выбираем нужное поле.
Вот так выглядит мой шаблон после того, как вставлены все поля слияния:
ШАГ 5. Создаем Правила, изменяющие окончания слов «уважаемый» и «получил» в зависимости от пола сотрудника.
Ставим курсор после перед окончанием слова. Нажимаем кнопку «Правила» и выбираем «IF. THEN. ELSE» в выпадающем списке.
Записываем правило: если пол женский — тогда . иначе .
ШАГ 6. Форматируем даты.
Если раньше вам уже приходилось использовать Рассылки (Слияние), вы наверняка сталкивались с тем, что даты, перенесенные из Excel, выглядят в Word совершенно не так, как нужно. Например, вместо 19.06.2012 вы, скорее всего, увидите 6/19/2012, вряд ли такой результат вас устроит.
Есть разные способы решить эту проблему, воспользуемся самым простым и удобным.
Нажмем сочетание клавиш Alt+F9, теперь мы можем видеть коды полей слияния.
Внутри кода поля Дата_договора перед закрывающей фигурной скобкой поставим обратную косую черту, а после нее ключ форматирования:
< MERGEFIELD «Дата_договора» @ «DD.MM.YYYY» >
@ — обозначение даты, «DD.MM.YYYY» — ключ формата даты вида 19.06.2012.
Вы можете использовать любой другой формат. Например, чтобы дата имела вид 19 июня 2012 г., используйте ключ @ «DD MMMM YYYY г.» .
Чтобы выйти из режима редактирования кодов, снова нажимаем Alt+F9.
ШАГ 7. Нажимаем кнопку «Просмотр результатов», чтобы проверить, что получилось.
ШАГ 8. Редактируем список сотрудников.
Нажав на кнопку «Изменить список получателей» можно исключить отдельные записи из списка, проверить, нет ли повторов, установить сортировку или фильтры.
Сортировке стоит уделить особое внимание, чтобы не пришлось тратить время на раскладывание документов после того, как они будут распечатаны. Удобнее всего использовать сортировку по фамилиям сотрудников или по названиям подразделений.
ШАГ 8. Завершаем слияние.
Нажимаем кнопку «Найти и объединить». Если выбрать вариант «Печать документов», документы будут сразу отправлены на принтер. Если же нужно перед печатью просмотреть документы и внести правки, выбираем «Изменить отдельные документы».
Будет сформирован отдельный файл Word с результатами слияния.
Готово! Наслаждаемся сэкономленным временем!
UPDATE в ответ на комментарий alexey_lao :
При помощи несложного макроса можно сохранить каждый документ как отдельный файл.
[ Подробнее. ]
Сохраняем наш шаблон как файл с расширением .docm (файл Word с поддержкой макросов).
Нажимаем сочетание клавиш Alt+F8 (вызов окна Макрос).
В открывшемся окне задаем «Имя» макроса (например, SaveFiles) и выбираем наш файл с шаблоном в выпадающем списке «Макросы из» (я предпочитаю создавать макросы непосредственно в файле, чтобы они работали и тогда, когда файл открыт на другом компьютере). Нажимаем кнопку «Создать».
В том месте, где мигает курсор, записываем код макроса:
Dim DocNum As Integer
For DocNum = 1 To ActiveDocument.MailMerge.DataSource.Reco rdCount
ActiveDocument.MailMerge.DataSource.Acti veRecord = DocNum
With ActiveDocument.MailMerge
.Destination = wdSendToNewDocument
.SuppressBlankLines = True
With .DataSource
.FirstRecord = ActiveDocument.MailMerge.DataSource.Acti veRecord
.LastRecord = ActiveDocument.MailMerge.DataSource.Acti veRecord
End With
.Execute Pause:=False
End With
With ActiveDocument
.SaveAs FileName:=»C://Test/» & DocNum , FileFormat:=wdFormatXMLDocument
.Close
End With
Вместо C://Test/ укажите адрес папки, в которой вы хотите сохранить документы.
Закрываем окно редактора Visial Basic и возвращаемся в наш документ с шаблоном.
Снова нажимаем Alt+F8, выбираем макрос SaveFiles в списке и нажимаем кнопку «Выполнить».
Пока компьютер по очереди создает и сохраняет каждый документ, можно выпить чашку кофе с печенькой. Или пойти домой поспать, если документов больше, чем пара сотен 🙂
Truncating a mergefield in Microsoft Word for mailmerge
I’m looking to create a formula and apply to a mergefield in Word 2013. I have no access to the db and only given merge fields. My goal is truncate/shorten certain mergefields. E.g. Full Name to just initial, Age [27 years] to short age [27].
Access and excel have the formula ‘left’ which i’ve tried to use with no success. There seems to be a low more options available for numbers.
However this gives a syntax error. Is there a list of formulas that work for mergefield?
Outcome
1 Answer 1
The short answer to your question is that there is nothing in the Word field language that can reliably do string manipulation such as left(), m >
As a simple example, let’s take the «27 years» thing.
If every value in the relevant data source column is in the same general format, which I will describe as «something that Word recognises as an individual number, followed by an alpha string», then you can in fact use
Notice that in that case, if you are merging to a new document, < =dat >fields will remain in the output, and updating those fields will cause errors. You can avoid that by nesting either the < =dat >field or the all the fields in a QUOTE field:
However, if your data source field could contain a value such as
then this will not work because in that case < =dat >will evaluate to 6, not 2. Word will also evaluate anything that looks like an < = >field expression, e.g. if your data source contains
then < =dat >will evaluate to 48. There are further oddities that I will not describe now.
The simplest unreliable approach to extracting the first letter from a field is to use a large number of IF fields to test for every possible initial letter, e.g.
If you don’t need to distinguish between lower and upper case you can use
That’s OK if you know (for example) that the names can only start with A-Z,a-z (and you could obviously test for 0-9 etc. as well. But what if it could start with any Unicode letter? Not sure that inserting thousands of IF fields is a reliable approach.
There is a similarly «unreliable» — and resource-consuming — way to use functions such as left, mid etc., as long as you are using recent versions of Windows Word (not Mac Word).
What you can do is create a completely empty Access/Jet database .mdb (let’s say it is at c:ii.mdb , then insert a DATABASE field nested in a QUOTE field like this
Normally, a DATABASE field inserts a Word table (unless the data source has more columns than a Word table can contain), but when you only insert a single value with no headings, Word does not put the value in a cell. Unfortunately, these days Word does add a paragraph mark, but nesting the DATABASE field inside a QUOTE field appears to remove that again.
So why is that «unreliable»? Well, the main reason is if the First_Name field contains any quotation marks (certainly single-quotation marks, and OTTOMH I think double quotation marks) then the query that Word sends to Jet will look like this like this
and Jet will return a syntax error.
There are other problems with the DATABASE field approach, including
- Word restricts the SELECT statement to 255 characters (I think). If your data source filed causes the SLEECT statement length to exceed that, Jet will return an error.
- You have to put the database somewhere. If you are just using this merge yourself, that may not be a problem, but if you have to distribute the Word document etc. for others to use, you also have to ensure they have the .mdb and that it’s at the specified location.
- Word sometimes gets confused between a Mail Merge data source and a data source introduced via a DATABASE field.
- Even one DATABASE field will execute a query for every record in the data source. If you use this technique in several places, a very large number of queries will be issued. That could cause problems.
As far as «single letter extraction» is concerned, there is another approach, rather similar to the DATABASE one, that uses an external .XML file and a set of INCLUDETEXT fields to specify a node in the file and return its content. But there are also similar difficulties. I may modify this Answer to describe that approach at some point, but as far as I know it has never been used in a real-world scenario.
So what if you need something more reliable? Well, there are several approaches, but all of them suffer from shortcomings of one kind or another. The main approaches I know are:
- use Word VBA and the OpenDataSource method to open the data source. That allows you to specify a query in the SQL dialect understood by the data source.
- use a Query/View defined in an intermediate database to extract the data items you need, and use that Query/View as your data source
- Use Word VBA’s MailMerge Events to manipulate the data for each record in the data source as Word processes the mailmerge
- use a manual intermediate step
- (more drastic) ditch Word MailMerge and find another approach altogether, e.g. create a .docx using .NET, the relevant database provider, and the Office Open XML SDK
If you are creating this merge for use by other people, two side-effects of all those approaches is that the overall process becomes more complicated or unfamiliar for the user, and in particular, they may not be able to use Word’s facilities for data source record filtering and so on. Another issue that some people encounter is that if your database contains long text fields/memo fields longer than 255 characters, they have a tendency to be truncated by Jet whenever you do something much more complicated than the default «SELECT * FROM TABLE»
(1) requires that you can write a suitable query to get the columns you need from your data source. Because the query is executed using OLE DB you don’t actually need to create any permanent objects in your database. So it may be a viable approach as long as the backend database allows you to execute external queries. But Word also imposes a 255 or 511 character limit on the query, so if you have to manipulate a lot of fields or the functions you need are complicated, you may find that you exceed the character limit quite quickly.
(2) is rather similar to (1) but may allow you to specify a much more complex query. For example, if your data source is a Jet .accdb, you may be able to create your own .accdb and define a query in that that accesses the tables in the .accdb that you are not allowed to modify. You might either used «linked tables» to achieve that, or in certain cases you can specify the locations of the underlying tables/queries in the SQL.
(3) means that you use VBA to intercept Word as it processes each data source record. I leave you to research that. You have to control the process from VBA to ensure that the MailMerge events are invoked. There have been reports of various unreliabilities. VBA can only access the first 255 characters of any memo fields.
(4), e.g. you create an Excel workbook and use it to query the database. In that case you may be able to issue a much longer SQL query than you can in Word, and you may be able to create new Excel columns that manipulate the data using excel formulas. (I have never tried that, though). Then use that as your data source.
Finally, a web search should reveal a list of functions recognised by Word’s «=» field, but recent Microsoft documentation tends to omit the IF() function. The ISO29500 documents on the .docx standard omit it as well, but I think that was not the intention and may be fixed in a future version of the standard. The functions are:
ABS, AND, AVERAGE, COUNT, DEFINED, FALSE, IF, INT, MIN, MAX, MOD, NOT, OR, PRODUCT, ROUND, SUM, TRUE.
Merge fields are used to present the information correctly in the documents (such as contracts and invoices) that you export from System One. This tutorial explains the steps how to add new merge fields and update existing ones.
Inserting a new merge field
- 1
- Open the document you want to edit and go to the Insert tab.
-
- 2
- Open the Quick Parts menu and select Field. The Field dialog window will open.
-
- 3
- In the field dialog menu, choose Merge field from the list on the left side. Enter the System One merge field code in the Field name text box on the right side and click OK.
-
- 4
- The merge field is inserted in the Word file. The object should be highlighted in gray if you click on it.
Updating an existing merge field
- 1
- Right click on the field. Choose the Edit field option from the context menu.
-
- 2
- Update the System One field code in the Field name text box and click OK.
Related articles:
- Merge fields in Word for Mac
- Managing document templates
- How to style artist riders
- What fonts can be used in document templates