
Follow the link to the field code you’re interested in, in the alphabetized list below.
Note: For detailed information about inserting and editing field codes, using switches, setting and changing properties, displaying results vs. field codes, locking fields, and other common tasks, see Insert, edit, and view fields in Word.
A
AddressBlock field
Advance field
Ask field
Author field
AutoNum field
AutoNumLgl field
AutoNumOut field
AutoText field
AutoTextList field
B
Bibliography field
C
Citation field
Comments field
Compare field
CreateDate field
D
Database field
Date field
DocProperty field
DocVariable field
E
Embed field
Eq field
F
FileName field
FileSize field
Fill-In field
= (Formula) field
G
GoToButton field
GreetingLine field
H
Hyperlink field
I
If field
IncludePicture field
IncludeText field
Index field
Info field
K
Keywords field
L
LastSavedBy field
Link field
ListNum field
M
MacroButton field
MergeField field
MergeRec field
MergeSeq field
N
Next field
NextIf field
NoteRef field
NumChars field
NumPages field
NumWords field
P
Page field
PageRef field
Print field
PrintDate field
Private field
Q
Quote field
R
RD (Referenced Document) field
Ref field
RevNum field
S
SaveDate field
Section field
SectionPages field
Seq (Sequence) field
Set field
SkipIf field
StyleRef field
Subject field
Symbol field
T
TA (Table of Authorities Entry) field
TC (Table of Contents Entry) field
Template field
Time field
Title field
TOA (Table of Authorities) field
TOC (Table of Contents) field
U
UserAddress field
UserInitials field
UserName field
X
XE (Index Entry) field
Top of Page
If the v1, v2 are MERGE fields, in the general case you need { MERGEFIELD v1 } and { MERGEFIELD v2 }. You can then do an OR using a construct like this:
{ IF { =OR({ COMPARE { MERGEFIELD v1 } = 0 },{ COMPARE { MERGEFIELD v2 = 0 }) } = 0 "Lorem Ipsum.." }
(As usual, all the { } have to be the special field code brace pairs that you can insert on Windows Word using ctrl-F9.
Or for short result texts you can use a numeric picture switch to produce the correct result, e.g.
{ =OR({ COMPARE { MERGEFIELD v1 } = 0 },{ COMPARE { MERGEFIELD v2 = 0 }) }) #"'';'';'Lorem Ipsum..'" }
For more comparands you need to nest the ORs
In this case you could also do stuff such as
{ IF { =ABS({ MERGEFIELD v1 })+ABS({ MERGEFIELD v2 }) } = 0 "Lorem Ipsum.. }
FWIW I do not believe the syntax has changed in Word 2013 in this area, but if you have an example of such a difference, please share!
Word field codes are a way to add some automation or automatic content into your documents. A simple example is the { DATE } field which will add the current date to a letter.
Chances are good that you’ve already used field codes and not realised it. Date, PrintDate, Page numbering (current and total pages), chapter names in a header are just some Word features that use Field Codes. Word Mail Merge is all about field codes.
Even the humble web link is a field code – any link in Word looks like this when you view field codes: {HYPERLINK “https://office-watch.com/”} . That’s essential knowledge if you want to find/replace web links or just figure out why a link isn’t working.
Insert Field Codes
The quick way to add a Word field code is from Insert | Text, click on the Quick Parts icon and choose ‘Fields …’ in Word for Windows or Mac.
Then choose the field code you want from the list on left.

The options in the center and right sections will change, depending on the field code selected. In the above case, a list of all Quick Parts / Building Blocks.
Here’s the DATE field with formatting and other options:

All the options in the Insert | Field dialog are available from the switches and settings in the field itself.
Choose the options you want and click OK to insert the field.
Show the field code
Normally, Word shows the result of the field code unless you click inside it, then it turns to gray.
Often, you’ll want to see the field code and perhaps change it. Press Alt + F9 to reveal the field codes or Shift + F9 to reveal only the currently selected field code.
You can now alter the field code and details. Alt + F9 again to hide the field codes.
Ctrl + A (Select all) then F9 will update all the fields in a document.
All the Field Code options
For some, but not all, field codes Word shows a more easily understood version of the options. Here’s the Field Properties for PrintDate as shown by Insert Field

Choose from the options shown. To see more choices or tinker with the preset options click Field Codes at bottom left.
Now you can see the exact field code and can change it. We’ve edited the date/time format away from the preset choice to something similar.

At bottom left is ‘Hide Codes’ which takes you back to the main field properties window.
OR choose ‘Options…’ which appears for some field codes.

Now you can see more General Switches or formats.
Field Specific Switches
The Field Specific Switches tab shows the options and their field codes

If you want to learn more about field codes and switches, this dialog is a good way to understand the options and the matching switches.
Typing field code curly brackets
The curly brackets/braces you see aren’t the normal { } you can type from the keyboard.
Make the field code brackets by pressing Ctrl + F9
The Insert | Field command is a more reliable way to start a new field code.
Convert a field to text
Sometimes you want to remove the field code and leave only the result. Do this so the field code isn’t updated any more.
A common use for this is the DATE or PRINTDATE fields which you may want to stay fixed at the current date and not change.
Microsoft calls this ‘Unlinking’ a field. The rest of us would say it’s converting a field code into it’s result or text.
Unlinking/converting is only available via the Ctrl + Shift + F9 shortcut.
Locking a field
The alternative to unlinking or converting a field is to Lock it.
Lock a field: Ctrl + F11
Unlock a field: Ctrl + Shift + F11
Locking a field prevents the field from being updated while retaining the field code. That means the displayed result of the field won’t change until the field is unlocked and updated.
A locked field has the Update Field option greyed out.
Whether you use unlinking or locking is up to you.

Personally, for the final version of a letter or other important document, we use Unlinking. That especially applies to dates. All manner of confusion, embarrassment and accusations can arise if an important past letter appears with the wrong date, because the Word field code has been updated. Unlinking ‘fixes’ the date shown in the document with no risk of accidental updating.
More Word Find / Search tricks
Find and Replace links in Word documents
All the * named format switches for Word field codes
Choices for formatting fields in Word Mail Merge
Show field codes gaffe
Insert Fields in a Microsoft Word Document to Display Variable Content
by Avantix Learning Team | Updated January 10, 2021
Applies to: Microsoft® Word® 2010, 2013, 2016, 2019 or 365 (Windows)
You can insert built-in or custom fields in Word documents to display variable content that will change when you update the fields. Some fields (like page numbers, merge fields or cross-references) are inserted automatically when you use Microsoft Word features. If you want to insert custom fields, you will need to create custom document properties.
By default, Word displays the result of a field rather than its field codes. You can right-click a field and select Toggle Field Codes to display field codes or field results.
Recommended article: How to Hide Comments in Word (or Display Them)
Do you want to learn more about Microsoft Word? Check out our virtual classroom or live classroom Word courses >
If you are working with fields in Microsoft Word, you will be using quite a few function keys (such as F9). On some laptops, you will need to press the Fn key on your keyboard to enable your function keys. For example, instead of pressing F9 to update a field or fields, you would press Fn + F9.
Inserting built-in fields
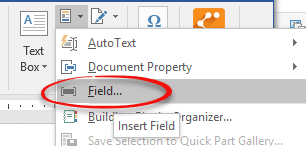
To insert a field, click Quick Parts in the Text group on the Insert tab in the Ribbon. The Field command appears in the Quick Parts drop-down menu as follows:

Below is the Field dialog box in Microsoft Word with Page selected:

To insert a built-in field using the Field dialog box:
- Navigate to the location in the Word document where you want to insert a field.
- Click the Insert tab in the Ribbon and then click Quick Parts in the Text group. A drop-down menu appears.
- Select Field. A dialog box appears.
- In the list of Field names, select a field. You can filter the list by clicking the down arrow in the Categories list and selecting a category first. Select All to display all fields.
- Under Field properties, select any properties or options you want.
- To view the codes for a field in the Field box, click Field Codes. For some fields, this button is clicked by default.
- Ensure that Preserve Formatting During Updates is checked so that formatting you apply is not removed when the fields are updated.
- Click OK. The field is inserted into the document.
Format the field results by applying text formatting to the field using the Home tab in the Ribbon.
You can view or hide all field codes in your document by pressing Alt + F9. Field codes appear between braces or curly brackets { } and you cannot type these braces. Be sure to hide the field codes again by pressing Alt + F9.
To edit a built-in field in the Field dialog box:
- Right-click the field and then click Edit Field. A dialog box appears.
- Change the field properties and options.
- Click OK.
Understanding Word document properties
There are 3 different types of document properties in Word:
- Standard document properties (also called built-in document properties)
- Custom document properties
- Document library properties
Word documents contain a set of standard document properties such as Title, Author, Keywords and Comments. These properties are used to store metadata about your document. You cannot change the name of standard properties but you can edit the value of some of them (such as Title). Other standard properties that cannot be edited store data that is updated automatically (such as Size or Last Modified).
Document library properties are related to documents that are stored in a document library on a website or in a public folder (such as files in SharePoint).
In addition to the standard properties, you can create your own custom document properties. These properties can be created to store additional information in a document other than the standard document properties. For example, custom document properties could be created for Product1, Product2, Product3, Sponsor, Project Manager, Cell Phone or Disclaimer. Each custom document property must be assigned a name, a data type and a value. The four data types are Text, Date, Number and Yes or No.
After you create custom document properties for your Word document, you can then insert them as custom fields.
Adding a custom document property
To add a custom document property:
- Open the Word document in which you want to add a custom document property.
- Click the File tab in the Ribbon and then click Info on the left. Info is usually selected by default.
- On the right side of screen, click Properties. A drop-down menu appears.
- Select Advanced Properties. A dialog box appears.
- Click the Custom tab in the dialog box.
- Type a name for the custom document property in the Name box. You can also choose one of the other properties that appear in the drop-down list.
- Select Text, Date, Number or Yes or No as the data type for the custom property.
- Enter a value for the property in the Value box.
- Click Add. The custom property appears in the list at the bottom of the dialog box.
- Click OK.
After you have added a custom document property, you will be able to insert it into your document as a field.
In the example below, we’re adding a field for Project Manager:

After you click Add, the custom field appears in the Properties list:

Inserting custom document property fields
The value of a custom document property can be inserted in a Word document using DocProperty fields. Custom document properties that have been added to a document are saved with the document whether they are inserted as a DocProperty field or not. You can insert DocProperty fields multiple times in a document.
To insert a custom document property field using the Field dialog box:
Navigate to the location in the Word document where you want to insert a field.
- Click the Insert tab in the Ribbon and then click Quick Parts in the Text group. A drop-down menu appears.
- Select Field. A dialog box appears.
- In the list of Field names on the left, select DocProperty.
- Under Field properties, select a property name.
- To view the codes for a field in the Field box, click Field Codes. For some fields, this button is clicked by default.
- Ensure that Preserve Formatting During Updates is checked so that formatting you apply is not removed when the fields are updated.
- Click OK. The field is inserted into the document.
In the example below, we’re inserting the custom Project Manager field we created in Advanced Properties:

Updating built-in and custom fields
Word should automatically update fields when a document is opened. Many fields are also updated automatically when you go to Print Preview (click the File tab and then click Print). If you prefer, you can update fields manually.
To update a field manually, right-click the field and then click Update Field or press F9.
To update all fields manually in the main body of a document, press Ctrl + A to select all and then press F9.
Some fields in headers, footers or text boxes must be updated separately. Click in the header, footer or text box, press Ctrl + A to select all and then press F9. Page fields do not need to be updated manually because they update when you go the Print Preview.
If you want to edit a custom DocProperty field, you will need to edit it in the Advanced Properties dialog box.
Subscribe to get more articles like this one
Did you find this article helpful? If you would like to receive new articles, join our email list.
More resources
How to Create, Save, Edit and Use Templates in Word
How to Insert, Format and Update Cross-References in Word
5 Ways to Insert the Division Symbol in Word (Type or Insert ÷)
10 Microsoft Word Tips, Tricks and Shortcuts for Selecting in Tables
How to Create a Table of Contents in Word (Insert, Format and Update a TOC)
Related courses
Microsoft Word: Intermediate / Advanced
Microsoft Excel: Intermediate / Advanced
Microsoft PowerPoint: Intermediate / Advanced
Microsoft Word: Long Documents Master Class
Microsoft Word: Styles, Templates and Tables of Contents
Microsoft Word: Designing Dynamic Word Documents Using Fields
VIEW MORE COURSES >
Our instructor-led courses are delivered in virtual classroom format or at our downtown Toronto location at 18 King Street East, Suite 1400, Toronto, Ontario, Canada (some in-person classroom courses may also be delivered at an alternate downtown Toronto location). Contact us at info@avantixlearning.ca if you’d like to arrange custom instructor-led virtual classroom or onsite training on a date that’s convenient for you.
Copyright 2023 Avantix® Learning
Microsoft, the Microsoft logo, Microsoft Office and related Microsoft applications and logos are registered trademarks of Microsoft Corporation in Canada, US and other countries. All other trademarks are the property of the registered owners.
Avantix Learning |18 King Street East, Suite 1400, Toronto, Ontario, Canada M5C 1C4 | Contact us at info@avantixlearning.ca
Word автоматически вставляет коды полей, когда пользователи используют определенные команды, а коды полей по умолчанию скрыты. Из этого туториала Вы узнаете, как отображать и скрывать коды полей в Word.
Отображение или скрытие кодов полей в Word 2003
Отображение или скрытие кодов полей в Word 2007/2010/2013
Показать или скрыть код поля с помощью Kutools for Word
 Отображение или скрытие кодов полей в Word 2003
Удивительный! Используйте эффективные вкладки в Word (Office), например Chrome, Firefox и New Internet Explorer!

Подробнее Скачать бесплатно
Шаг 1: нажмите Tools
меню> щелкните Опции

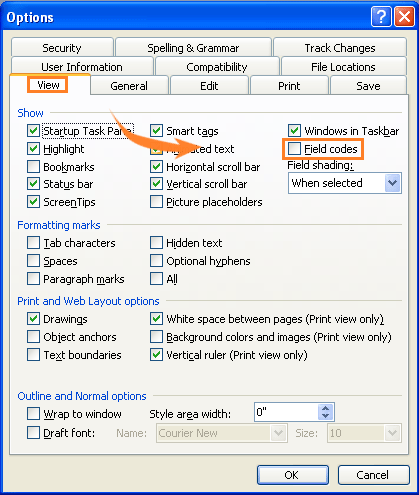
Шаг 2: нажмите Вид вкладку, проверьте Коды полей in Показать группа для отображения кодов полей в документе.
Отображение или скрытие кодов полей в Word 2007/2010/2013
Шаг 1. В Word 2007 щелкните Офисы значок ![]() , А затем нажмите параметры Word;
, А затем нажмите параметры Word;
в Word 2010/2013 щелкните Файл таб ![]() , А затем нажмите Опции.
, А затем нажмите Опции.
Шаг 2: нажмите Дополнительно, а затем проверьте Показать коды полей вместо их значений для отображения кода поля в документе.

Отобразите или скройте коды полей с помощью Kutools for Word
После того, как вы Kutools for Word установлен, вы можете быстро показать или скрыть коды полей в документе.
Kutools for Word, удобная надстройка, включает группы инструментов, облегчающих вашу работу и расширяющих ваши возможности обработки текстовых документов. Бесплатная пробная версия на 45 дней! Get It Now!
1. Пожалуйста, примените эту утилиту, нажав Предприятие > Параметры дисплея. Смотрите скриншот:
2. в Настройка экрана диалог, проверьте Коды полей , затем нажмите Закрыть. Отображаются все коды полей в текущем документе. Смотрите скриншот:
Для получения дополнительной информации, пожалуйста, посетите: быстро отображать коды полей в Word.
Рекомендуемые инструменты для повышения производительности Word


Kutools For Word — Более 100 расширенных функций для Word, сэкономьте 50% времени
- Сложные и повторяющиеся операции можно производить разово за секунды.
- Вставляйте сразу несколько изображений из папок в документ Word.
- Объединяйте и объединяйте несколько файлов Word из папок в одну в желаемом порядке.
- Разделите текущий документ на отдельные документы в соответствии с заголовком, разрывом раздела или другими критериями.
- Преобразование файлов между Doc и Docx, Docx и PDF, набор инструментов для общих преобразований и выбора и т. Д.
Комментарии (16)
Оценок пока нет. Оцените первым!