
How to draw in Word
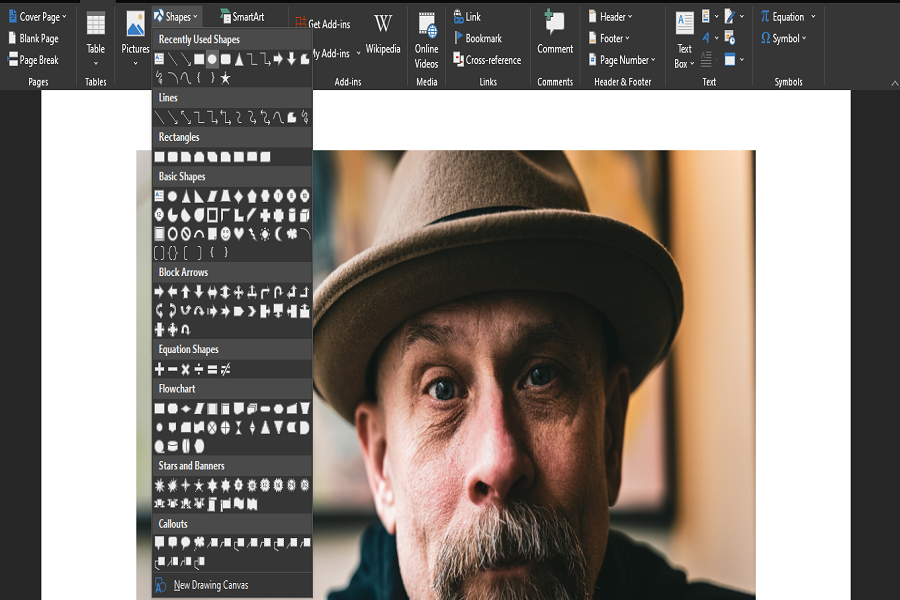
- In the ‘Insert tab,’ click the ‘Shapes’ button, and in the drop-down menu select ‘Scribble’
- Click and hold down your mouse to draw the shape you want.
- Release the mouse when you’ve finished drawing.
- Go to the ‘Shape Format’ tab to edit your shape.
Contents
- 1 How do I draw a circle in a screenshot in Word?
- 2 How do I draw freehand on a Word document?
- 3 How do you write on photos?
- 4 How do I put text and pictures side by side in Word?
- 5 How do I circle something in a picture?
- 6 How do you use pen in Word?
- 7 How do I enable the pen in Word?
- 8 Is there a drawing tool on word?
- 9 How do I edit text in a picture in Word?
- 10 How can I edit a picture in Word?
- 11 How do you put a picture in the corner of a Word document?
- 12 What app lets me draw on my pictures?
- 13 How do you make a Venn diagram on Microsoft Word?
- 14 Where is the pencil in Microsoft Word?
- 15 How do you write on screen?
- 16 Where are drawing tools in Word?
- 17 How do you draw on docs?
- 18 Where is the Drawing toolbar in Word 2013?
How do I draw a circle in a screenshot in Word?
Draw an oval or circle
On the Insert tab, click Shapes. Under Basic Shapes, click Oval. Click where you want the oval to start, and drag to draw the shape. To draw a circle, press Shift while you drag.
How do I draw freehand on a Word document?
Draw a freeform shape
Click anywhere in the document, and then drag to draw. To draw a straight segment with the Freeform tool, click one location, move your pointer to a different location, and then click again; to draw a curved segment, keep your mouse button pressed as you drag to draw.
How do you write on photos?
Add Text to Photos on Android Using Google Photos
- Open a photo in Google Photos.
- At the bottom of the photo, tap Edit (three horizontal lines).
- Tap the Markup icon (squiggly line). You can also select the color of text from this screen.
- Tap the Text tool and enter your desired text.
- Select Done when you’ve finished.
How do I put text and pictures side by side in Word?
Word – insert side by side images into document
- Click on the first of the two images that you want to align.
- Click the “Format” tab, then click “Wrap Text” in the Arrange group.
- Click the second image and repeat the process of changing the way text interacts with the image.
How do I circle something in a picture?
After you’ve taken a photo, tap on Edit, then Draw. Then select the shape you want to use. If you’re going to circle something on a picture, select either the square or the circle shape and drag it around your focus area.
How do you use pen in Word?
How to Use a Pen With MS Word
- Connect your writing tablet to your computer.
- Open the document you wish to write pen marks on.
- Click on the “Review” tab.
- Click “Start Inking” on the far right of the screen to begin using the tablet with Microsoft Word.
- Touch on the tablet to write using the pen tool.
How do I enable the pen in Word?
Select File > Options > Advanced. In the Pen section, select the box next to Use pen to select and interact with content by default.
Is there a drawing tool on word?
You can draw freely in Microsoft Word using the “Draw” feature whether you have Word for Mac or Windows. You can also insert customizable shapes into your document, or draw using the “Scribble” feature. The process of drawing in Word varies based on which version of Word and device you’re using.
How do I edit text in a picture in Word?
Click the picture to reveal the “Format” tab. Press the “Corrections” option to reveal the dropdown. This will reveal to you how to edit image text in word. Apply the required correction to complete the process in full.
How can I edit a picture in Word?
Open your collage, design, or photo in Fotor. Using the “Text” button, select and drag a text box to the desired location. Modify the text, change the font, color, size, background or transparency. Preview and save your work, choosing the size and format you wish.
How do you put a picture in the corner of a Word document?
To move an image a small amount to align it with another element in the document, select the image. Then, press and hold the Ctrl key while you press one of the arrow keys to move the picture in the direction you want it to go.
What app lets me draw on my pictures?
Annotate is a rather popular drawing and image editing tool on the Android ecosystem.Users can also upload or open images on its user interface. The application comes with custom-built filters and tools for editing and drawing on pictures.
How do you make a Venn diagram on Microsoft Word?
How to make a Venn diagram using SmartArt graphics in MS Word
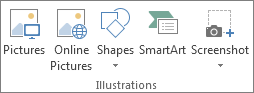
- In Word, go to Insert > Illustrations > SmartArt.
- Go to Relationship > Basic Venn.
- Double-click “Text” to modify the text or use the text pane.
- Select the graphic, and click “Add Shape” to make your Venn diagram larger.
- Once finished, save the document.
Where is the pencil in Microsoft Word?
To start, press the Draw tab on the ribbon bar. This will display the pen drawing tool options for you to use. Three drawing options are available under the Tools section.
How do you write on screen?
How could I write on computer screen?
- In the Screen Draw Tools Pane, click Pen. tool.
- Drag the pointer to write on computer screen.
Where are drawing tools in Word?
Click View > Toolbars > Drawing. The Drawing toolbar is displayed or hidden. The Drawing toolbar contains a collection of icon buttons that allows the user to draw shapes and images in the document.
How do you draw on docs?
How to draw in Google Docs
- Log into Google Drive and open your Google Doc.
- In the toolbar, click “Insert.” Using your cursor, highlight “Drawing” in the sub-menu, then click “+ New” when it appears.
- A checkered window will pop up; this is, essentially, your digital sketchbook.
Where is the Drawing toolbar in Word 2013?
Click Insert. Click the Shapes button, then click the Scribble icon in the Lines section. Click and hold down the mouse button, then move the mouse cursor to draw. Click the Format tab under Drawing Tools to make any changes to your drawing.
How to draw in Word Click the ‘Shapes’ button and select ‘Scribble’ Open up your Microsoft Word document. Hold down your mouse to draw. Click and hold down your mouse to draw. Release the mouse. As soon as you release your mouse, the drawing will be finished. Edit your drawing. Double-click your drawing.
How do I draw freehand on a Word document?
Draw a freeform shape Click anywhere in the document, and then drag to draw. To draw a straight segment with the Freeform tool, click one location, move your pointer to a different location, and then click again; to draw a curved segment, keep your mouse button pressed as you drag to draw.
How do you paint on Microsoft Word?
Use the Format Painter Select the text or graphic that has the formatting that you want to copy. On the Home tab, click Format Painter. Use the brush to paint over a selection of text or graphics to apply the formatting. To stop formatting, press ESC.
How do I draw a circle in a screenshot in Word?
Draw an oval or circle On the Insert tab, click Shapes. Under Basic Shapes, click Oval. Click where you want the oval to start, and drag to draw the shape. To draw a circle, press Shift while you drag.
How can I write on a picture?
Add Text to Photos on Android Using Google Photos Open a photo in Google Photos. At the bottom of the photo, tap Edit (three horizontal lines). Tap the Markup icon (squiggly line). You can also select the color of text from this screen. Tap the Text tool and enter your desired text. Select Done when you’ve finished.
How do I put an image behind text in word?
If you are working win an image you created by using the Drawing toolbar, you can follow these steps: Select the image. Choose the Order option from the Draw menu on the Drawing toolbar. Word displays a submenu. Choose Send Behind Text from the submenu. The image should move behind the text.
How do I enable the pen in Word?
Select File > Options > Advanced. In the Pen section, select the box next to Use pen to select and interact with content by default.
How do I use drawing tools in Word?
Add a drawing to a document Click in your document where you want to create the drawing. On the Insert tab, in the Illustrations group, click Shapes. When you find the shape you want to insert, double-click to insert it automatically, or click and drag to draw it in your document.
How do you turn on Draw in Word?
Right-click the Ribbon and select Customize the Ribbon. Check the box next to Draw, then click OK. The Draw tab will now be available in the Ribbon.
How do you draw in docs?
What to Know Open a document in Google Docs. Place the cursor where you want the drawing to appear. Select Insert > Drawing. Choose New to open the Drawing window. Choose a drawing type from the Actions menu. Options include word art, shapes, arrows, callouts, and equations.
How do I circle something in a picture?
After you’ve taken a photo, tap on Edit, then Draw. Then select the shape you want to use. If you’re going to circle something on a picture, select either the square or the circle shape and drag it around your focus area.
How do you draw a circle around a screenshot?
To draw a circle or any part of a circle, click the down arrow for the Ruler icon and select Protractor. Position the on-screen protractor and select your drawing tool.
How do I edit text in a picture in Word?
Click the picture to reveal the “Format” tab. Press the “Corrections” option to reveal the dropdown. This will reveal to you how to edit image text in word. Apply the required correction to complete the process in full.
How can I edit a picture in Word?
Open your collage, design, or photo in Fotor. Using the “Text” button, select and drag a text box to the desired location. Modify the text, change the font, color, size, background or transparency. Preview and save your work, choosing the size and format you wish.
How do you put captions on pictures?
Choose a Photo Caption That Fits the Platform. Use a Conversational Tone and Present Tense. Decide on the Purpose of Your Caption. Know Who Your Audience Is. Identify the Main People in Your Photo. Use a Quote or Lyrics Wisely. Add Value with Your Photo Caption. Create Involvement With Your Photo Caption.
How do you put a picture behind text?
How To Place Text Behind An Object Step 1: Open your image. Step 2: Add your text. Step 3: Duplicate the Background layer. Step 4: Drag the copy above the Type layer. Step 5: Choose the Quick Selection Tool. Step 6: Select the area that will hide the text. Step 7: Refine the selection with Select and Mask.
Where is the Drawing toolbar in Word?
Accessing the Drawing Toolbar The View menu gives the option of viewing any toolbar for your particular needs. From the View menu, select Toolbars » Drawing. The Drawing toolbar appears at the bottom of the screen.
How do you put a picture behind text on Microsoft Word 2010?
How to Put an Image Behind Text in Word 2010 Open the document. Click the Page Layout tab. Select the Watermark button. Click Custom Watermark. Choose Picture watermark and click Select Picture. Click the Scale dropdown menu and choose a size. Select Apply, then OK.
How do you insert ink in Word?
To add Ink annotations in Microsoft Office applications, select the Review menu, then select Start Inking. Note: In Microsoft Word or Excel, select the Insert tab and then click on Start Inking.
Does scribble work in Word?
Turn handwriting into text with Scribble In a document, tap Apple Pencil in the body of a word-processing document where you want to write. Or tap in a text box, shape, or in a table cell in a word-processing or page layout document. Tap the Scribble tool in the toolbar at the bottom of the screen, then start writing.
How do you draw freehand in Word 2016?
Draw or edit a freeform shape On the Insert tab, in the Illustrations group, click Shapes. Under Lines, do one of the following: To draw a shape that has both curved and straight segments, click Freeform . Click anywhere in the document, and then drag to draw. To finish drawing the shape, do one of the following:.
Can you draw on an image in Word?
You can draw freely in Microsoft Word using the “Draw” feature whether you have Word for Mac or Windows. You can also insert customizable shapes into your document, or draw using the “Scribble” feature.
How do you draw on top of a picture in Word?
Click the drawing canvas, and then, on the Insert tab, in the Illustrations group, click Picture. Browse to and double-click the photo that you want to use, and then click outside the drawing canvas. On the Insert tab, in the Text group, click Text Box, and then at the bottom of the menu, click Draw Text Box.
Can you freehand draw on word?
While it hasn’t been designed with drawing in mind, you can still use shapes, lines, and freehand pen drawings to create simplistic images in Microsoft Word. You can use shapes to create a flow chart or diagram or use free-hand drawings to show your artistic drawing skills.
How do you type freehand in Word?
Format Shapes With the Drawing Tools in Word The Format tab gives you a variety of options to change the look, color, and style of the shapes you’ve added to your Word document. To change the color and appearance of a shape, select it, then select Format.
Where is the Drawing toolbar in Word 2016?
Click View > Toolbars > Drawing. The Drawing toolbar is displayed or hidden. The Drawing toolbar contains a collection of icon buttons that allows the user to draw shapes and images in the document.
How do you circle something on a picture in Word?
Draw an oval or circle On the Insert tab, click Shapes. Under Basic Shapes, click Oval. Click where you want the oval to start, and drag to draw the shape. To draw a circle, press Shift while you drag.
How do you use pen in Word?
How to Use a Pen With MS Word Connect your writing tablet to your computer. Open the document you wish to write pen marks on. Click on the “Review” tab. Click “Start Inking” on the far right of the screen to begin using the tablet with Microsoft Word. Touch on the tablet to write using the pen tool.
How can I write on top of a picture?
Google Photos has a similar tool for adding text to photos: Open a photo in Google Photos. At the bottom of the photo, tap Edit (three horizontal lines). Tap the Markup icon (squiggly line). Tap the Text tool and enter your desired text. Select Done when you’ve finished.
How do I put a box around a picture in Word?
To add a border to a picture: Select the picture you want to add a border to, then click the Format tab. Click the Picture Border command. A drop-down menu will appear. From here, you can select a color, weight (thickness), and whether the line is dashed. The border will appear around the image.
How do I put a red box around a picture in Word?
Place your image in the document, then set the “Wrapping” to “Behind the text”. Now draw a square over the appropriate part of the picture. Then set the Fill to “No Fill” so it becomes a box.
How do you insert a drawing canvas in Word?
Go to the Insert tab. Click the Shapes button and choose New Drawing Canvas. You can find the New Drawing Canvas command at the bottom of the Shapes drop-down list. A drawing canvas appears on your screen.
How do I draw a box in Word?
Go to Insert > Text Box, and then select Draw Text Box. Click or tap in the document, and drag to draw the text box the size that you want. To add text to a text box, select inside the text box, and then type or paste text.
How do you scribble on word?
How to draw in Word Click the ‘Shapes’ button and select ‘Scribble’ Open up your Microsoft Word document. Hold down your mouse to draw. Click and hold down your mouse to draw. Release the mouse. As soon as you release your mouse, the drawing will be finished. Edit your drawing. Double-click your drawing.
What is Picture toolbar?
The Picture toolbar contains a collection of icon buttons to allow the user to insert and manage pictures and clip art in the document.
How do I circle part of a picture?
Open your image in Photoshop. Convert your background image into an editable layer by double-clicking your Background in the Layers panel, or choose Layer › New › Layer from Background. Select the Elliptical Marquee tool and draw a perfect circle by holding the shift key and dragging your shape into place.
How do you write on screen?
How could I write on computer screen? In the Screen Draw Tools Pane, click Pen. tool. Drag the pointer to write on computer screen.
How do I edit text in a picture in Word?
Click the picture to reveal the “Format” tab. Press the “Corrections” option to reveal the dropdown. This will reveal to you how to edit image text in word. Apply the required correction to complete the process in full.
How can I edit a picture in Word?
Open your collage, design, or photo in Fotor. Using the “Text” button, select and drag a text box to the desired location. Modify the text, change the font, color, size, background or transparency. Preview and save your work, choosing the size and format you wish.
How do I add text to a picture in paint?
To add a text box in Paint, open an image with the program and locate the “A” symbol in the “Tools” group of the “Home” tab. Click the “A” and then click on the image and drag the mouse pointer to place a text box. To resize the text box, click and drag one of the small squares around the edge of the box.
Word for Microsoft 365 Word 2021 Word 2019 Word 2016 Word 2013 Word 2010 Word 2007 More…Less
These are the basic types of graphics that you can use to enhance your Word documents: drawing objects, SmartArt, charts, pictures, and clip art. Drawings refer to a drawing object or a group of drawing objects.
Drawing objects include shapes, diagrams, flowcharts, curves, lines, and WordArt. These objects are part of your Word document. You can change and enhance these objects with colors, patterns, borders, and other effects.
Note: It is no longer necessary to insert a drawing canvas to work with drawing objects in Word. However, you may still use a drawing canvas as an organizational aid when working with several drawing objects, or if you want to add connectors between shapes. To insert a drawing canvas, on the Insert tab, click Shapes, and then click New Drawing Canvas.
What do you want to do?
-
Add a drawing to a document
-
Delete all or part of a drawing
Add a drawing to a document
-
Click in your document where you want to create the drawing.
-
On the Insert tab, in the Illustrations group, click Shapes.

-
You can do any of the following on the Format tab, which appears after you insert a drawing shape:
-
Insert a shape. On the Format tab, in the Insert Shapes group, click a shape, and then click somewhere in the document.
-
Change a shape. Click the shape you want to change. On the Format tab, in the Insert Shapes group, click Edit Shape, point to Change Shape, and then choose a different shape.
-
Add text to a shape. Click the shape you where you want text, and then type.
-
Group selected shapes. Select several shapes at a time by pressing CTRL on your keyboard and clicking each shape you want to include in the group. On the Format tab in the Arrange group, click Group so that all of the shapes will be treated like a single object.
-
Draw in the document. On the Format tab, in the Insert Shapes group, expand the shapes options by clicking the arrow. Under Lines click Freeform or Scribble.
Tip: To stop drawing with the Freeform or Scribble lines, double-click.
-
Adjust the size of the shapes. Select the shape or shapes you want to resize. On the Format tab, in the Size group, click the arrows or type new dimensions in the Height and Width boxes.
-
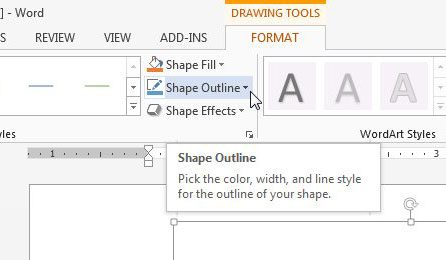
Apply a style to a shape. In the Shape Styles group, rest your pointer over a style to see what your shape will look like when you apply that style. Click the style to apply it. Or, click Shape Fill or Shape Outline and select the options that you want.
Note: If you want to apply a color and gradient that aren’t available in the Shape Styles group, select the color first, and then apply the gradient.
-
Add flow charts with connectors. Before you create a flow chart, add a drawing canvas by clicking the Insert tab, clicking Shapes in the Illustrations group, and then clicking New Drawing Canvas. On the Format tab, in the Insert Shapes group, click a Flow chart shape. Under Lines, choose a connector line such as the Curved Arrow Connector.
-
Use shadow and three-dimensional (3-D) effects to add interest to the shapes in your drawing. On the Format tab, in the Shape Styles group, click Shape Effects, and choose an effect.
-
Align the objects on the canvas. To align the objects, press and hold CTRL while you select the objects that you want to align. On the Format tab, in the Arrange group, click Align to choose from an assortment of alignment commands.
-

Delete all or part of a drawing
-
Select the drawing object that you want to delete.
-
Press DELETE.
See also
Add shapes
Draw a curve or circle shape
Insert pictures
Crop a picture
Add clip art to your file
What do you want to do?
-
Add a drawing to a document
-
Delete all or part of a drawing
Add a drawing to a document
-
Click in your document where you want to create the drawing.
-
On the Insert tab, in the Illustrations group, click Shapes.
-
When you find the shape you want to insert, double-click to insert it automatically, or click and drag to draw it in your document.
You can do any of the following on the Format tab, which appears after you insert a drawing shape:
-
Insert a shape. On the Format tab, in the Insert Shapes group, click a shape, and then click somewhere in the document.
-
Change a shape. Click the shape you want to change. On the Format tab, in the Shape Styles group, click Change Shape, and then choose a different shape.
-
Add text to a shape. Right-click the shape, click Add Text, and then type.
-
Group selected shapes. Select several shapes at a time by pressing CTRL on your keyboard and clicking each shape you want to include in the group. On the Format tab in the Arrange group, click Group so that all of the shapes will be treated like a single object.
-
Draw in the document. On the Format tab, in the Insert Shapes group, expand the shapes options by clicking the arrow. Under Lines click Freeform or Scribble.
-
Adjust the size of the shapes. Select the shape or shapes you want to resize. On the Format tab, in the Size group, click the arrows or type new dimensions in the Shape Height and Shape Width boxes.
-
Apply a style to a shape. In the Shape Styles group, rest your pointer over a style to see what your shape will look like when you apply that style. Click the style to apply it. Or, click Shape Fill or Shape Outline and select the options that you want.
Note: If you want to apply a color and gradient that aren’t available in the Shape Styles group, select the color first, and then apply the gradient.
-
Add flow charts with connectors. Before you create a flow chart, add a drawing canvas by clicking the Insert tab, clicking Shapes in the Illustrations group, and then clicking New Drawing Canvas. On the Format tab, in the Insert Shapes group, click a Flow chart shape. Under Lines, choose a connector line such as the Curved Arrow Connector.
-
Use shadow and three-dimensional (3-D) effects to add interest to the shapes in your drawing. On the Format tab, choose an option in either the Shadow Effects or the 3-D Effects group.
-
Align the objects on the canvas. To align the objects, press and hold CTRL while you select the objects that you want to align. On the Format tab, in the Arrange group, click Align to choose from an assortment of alignment commands.
-

Delete all or part of a drawing
-
Select the drawing object that you want to delete.
-
Press DELETE.
See also
Draw a curve or circle shape
Insert pictures
Crop a picture
Add clip art to your file
Need more help?
Содержание
- Добавление поверх рисунка надписи в стиле WordArt
- Добавление поверх рисунка обычного текста
- Добавление подписи к рисунку
- Вопросы и ответы
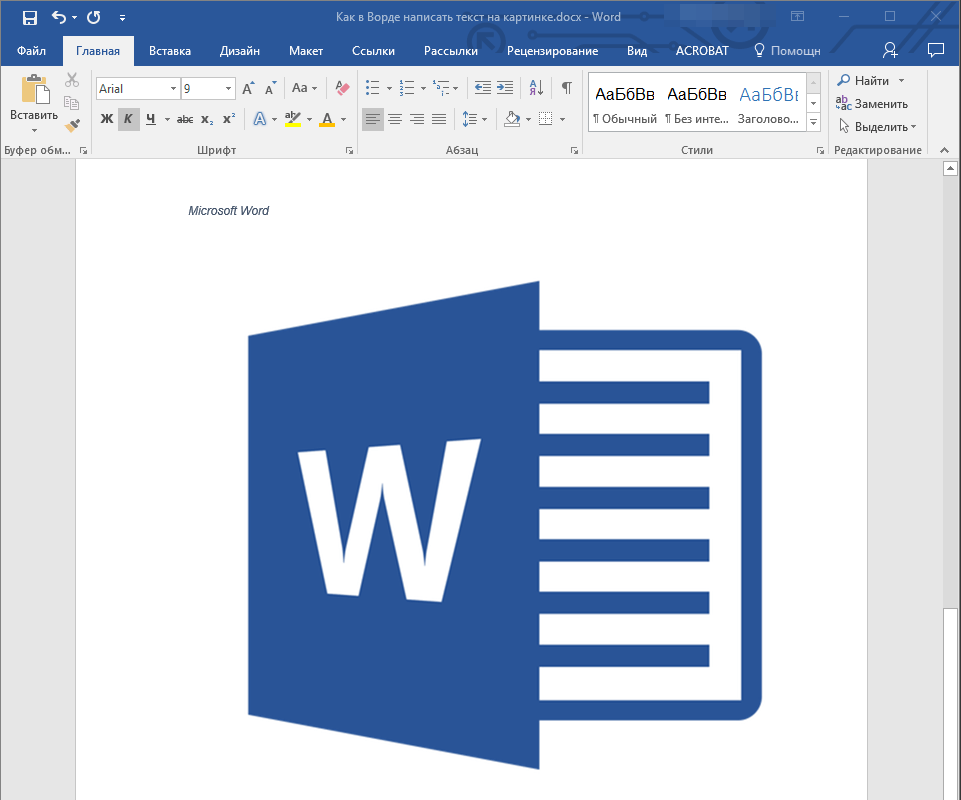
Помимо работы с текстом, программа MS Word также позволяет работать и с графическими файлами, которые в ней можно изменять (хоть и по минимуму). Так, нередко добавленную в документ картинку требуется как-нибудь подписать или дополнить, причем, сделать это необходимо так, чтобы сам текст находился поверх изображения. Именно о том, как наложить текст на картинку в Ворде, мы и расскажем ниже.
Существует два метода, с помощью которых можно наложить текст поверх картинки — это использование стилей WordArt и добавление текстового поля. В первом случае надпись будет красивая, но шаблонная, во втором — вы имеете свободу выбора шрифтов, типа написания и форматирования.
Microsoft Word заслужено считается одним из лучших текстовых редакторов, но для работы с графическими элементами, даже элементарной, он подходит с большой натяжкой. Поэтому для наложения надписи на картинку целесообразнее будет воспользоваться не этой программой, а более специализированным средством – онлайн-сервисом Canva, где данная задача решается буквально в несколько кликов, а доступные во встроенном редакторе шаблоны помогут качественно улучшить подобный проект.
Урок: Как в Word изменить шрифт
Добавление поверх рисунка надписи в стиле WordArt
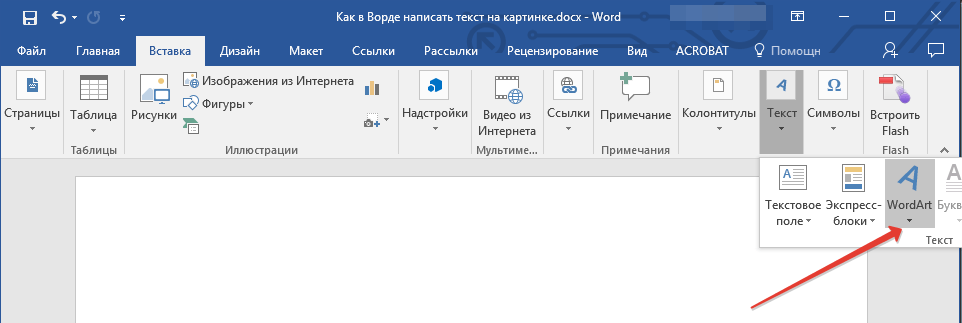
1. Откройте вкладку “Вставка” и в группе “Текст” нажмите на пункт “WordArt”.
2. Из развернувшегося меню выберите подходящий стиль для надписи.
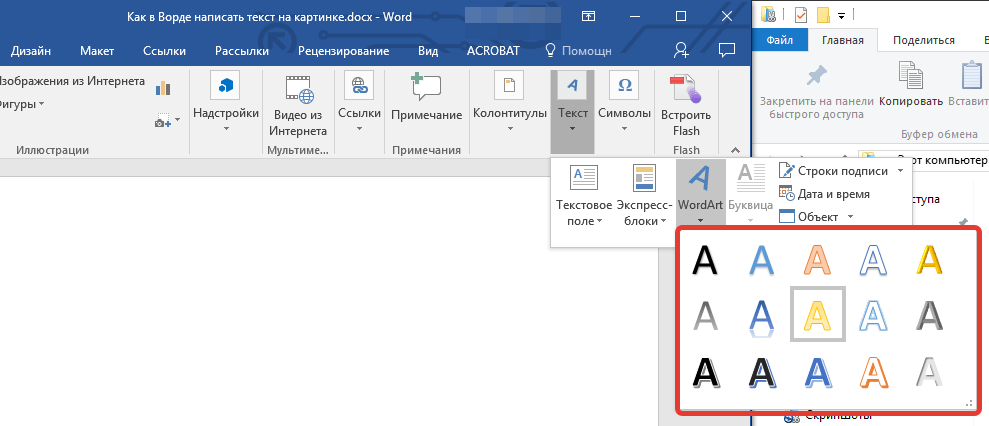
3. После того, как вы кликните по выбранному стилю, он будет добавлен на страницу документа. Введите необходимую надпись.
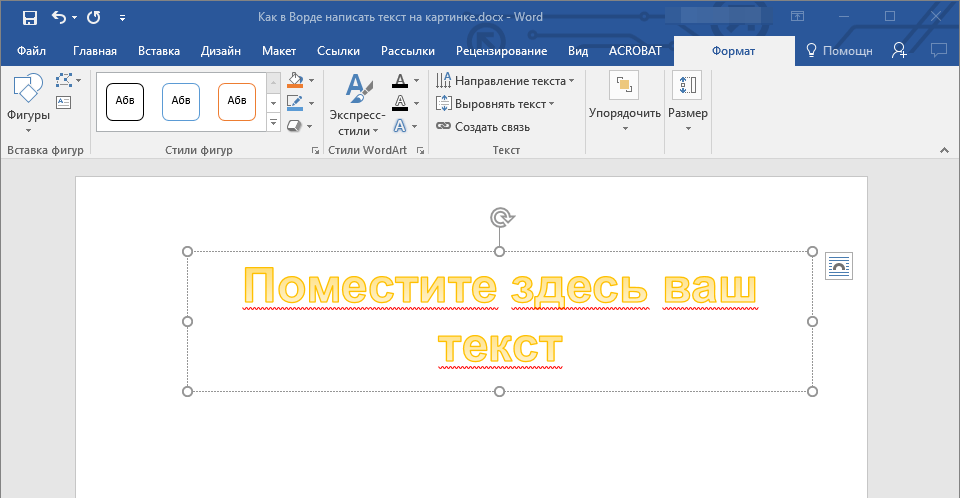
Примечание: После добавления надписи WordArt появится вкладка “Формат”, в которой можно выполнить дополнительные настройки. Кроме того, вы можете изменить размер надписи, потянув за границы поля, в котором она находится.

4. Добавьте в документ изображение, воспользовавшись инструкцией по ссылке ниже.


Урок: Как в Word вставить картинку
5. Переместите надпись WordArt, расположив ее поверх изображения так, как вам это необходимо. Кроме того, вы можете выровнять положение текста, воспользовавшись нашей инструкцией.
Урок: Как в Ворде выровнять текст
6. Готово, вы наложили надпись в стиле WordArt поверх изображения.
Добавление поверх рисунка обычного текста
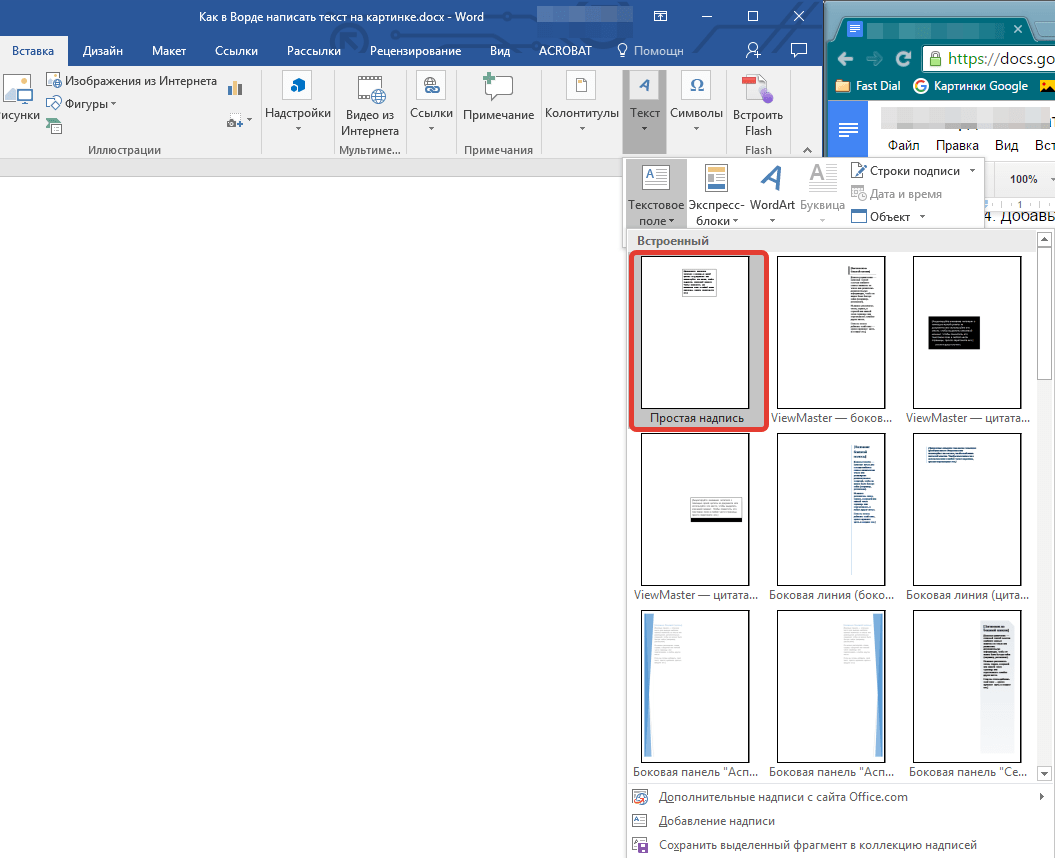
1. Откройте вкладку “Вставка” и в разделе “Текстовое поле” выберите пункт “Простая надпись”.

2. Введите необходимый текст в появившееся текстовое поле. Выровняйте размеры поля, если это необходимо.

3. Во вкладке “Формат”, которая появляется после добавления текстового поля, выполните необходимые настройки. Также, вы можете изменить внешний вид текста в поле стандартным способом (вкладка “Главная”, группа “Шрифт”).

Урок: Как в Word повернуть текст
4. Добавьте изображение в документ.

5. Переместите текстовое поле на картинку, если это необходимо, выровняйте положение объектов, воспользовавшись инструментами в группе “Абзац” (вкладка “Главная”).

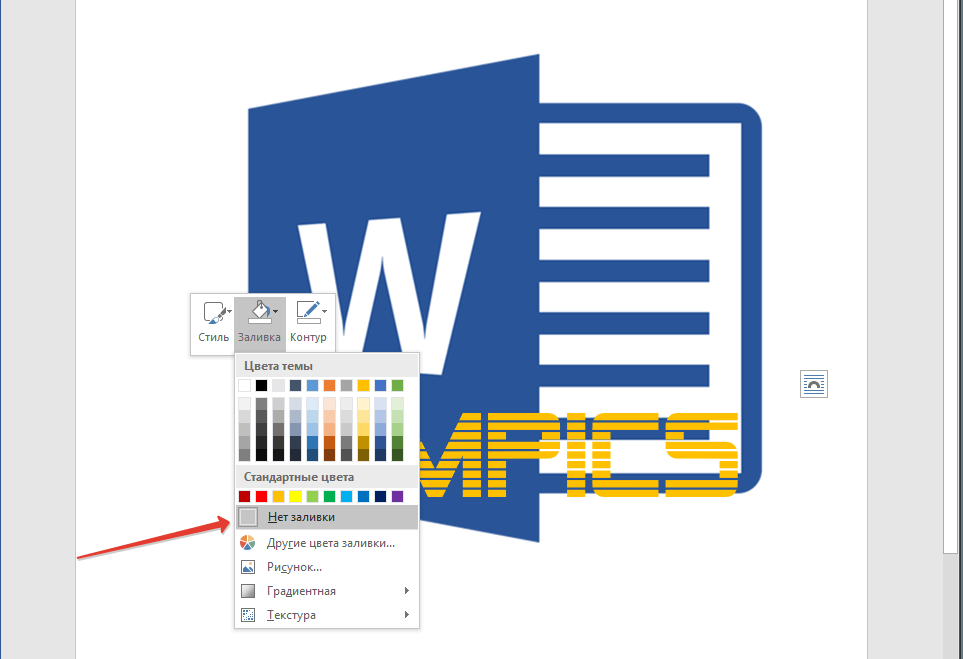
- Совет: Если текстовое поле отображается в виде надписи на белом фоне, перекрывая таким образом изображение, кликните по его краю правой кнопкой мышки и в разделе “Заливка” выберите пункт “Нет заливки”.
Добавление подписи к рисунку
Кроме наложения надписи поверх изображения, вы также можете добавить к нему подпись (название).
1. Добавьте изображение в документ Word и кликните по нему правой кнопкой мышки.

2. Выберите пункт “Вставить название”.
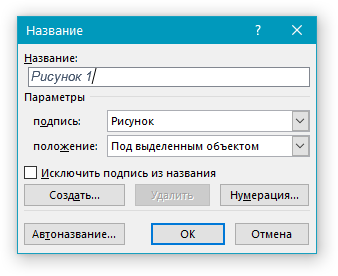
3. В открывшемся окне введите необходимый текст после слова “Рисунок 1” (остается неизменным в этом окне). Если это необходимо, выберите положение подписи (над или под изображением), развернув меню соответствующего раздела. Нажмите кнопку “ОК”.
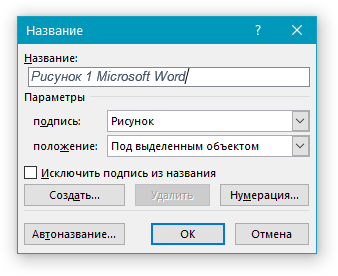
4. Подпись будет добавлена к графическому файлу, надпись “Рисунок 1” можно будет удалить, оставив только введенный вами текст.

На этом все, теперь вы знаете, как сделать надпись на картинке в Ворде, а также о том, как подписывать рисунки в этой программе. Желаем вам успехов в дальнейшем освоении этого офисного продукта.
Sometimes, you can’t express yourself in words and numbers alone.
Sometimes, you need to express yourself through art. Luckily, Microsoft Word recognizes this need and gives users the option to draw on a document.
If you want a new way to showcase your ideas, give drawing a try! It’s easy, adds some flair to your document and might be a more effective way to communicate your thoughts.
- In the ‘Insert tab,’ click the ‘Shapes’ button, and in the drop-down menu select ‘Scribble’
- Click and hold down your mouse to draw the shape you want
- Release the mouse when you’ve finished drawing
- Go to the ‘Shape Format’ tab to edit your shape

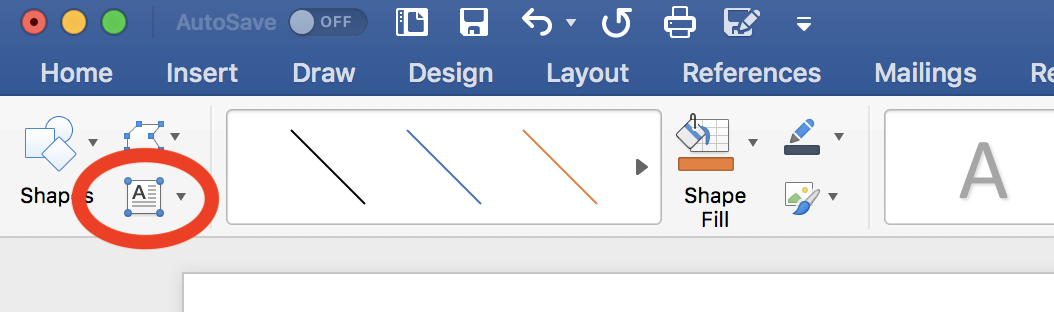
How to draw in Word
For all my visual learners in the house, follow along as I go through the drawing process step-by-step. I also include some formatting and editing tips and tricks to consider.
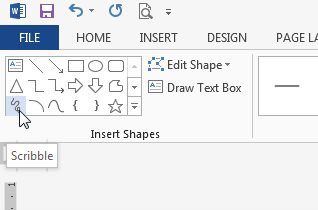
1. Click the ‘Shapes’ button and select ‘Scribble’
Open up your Microsoft Word document. It can be an empty document or it can be filled with an essay — you can draw over words if you want.
Navigate to the ‘Insert’ tab. From there, select ‘Shapes.’ A drop-down menu will appear. Under the ‘Lines’ options, select the very last button. It looks like a scribble and is aptly named ‘Scribble.’
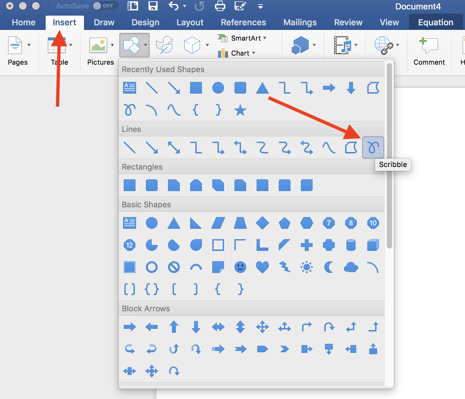
2. Hold down your mouse to draw
Click and hold down your mouse to draw. Admittedly, this isn’t the most intuitive thing in the world and your drawings probably won’t look like they do on paper. That’s okay, you do get a chance to tweak and sculpt your drawing later — as well as adjust the line coloring, width, fill color, and more.
Here’s the strange shape I chose to draw (don’t ask me what it is):
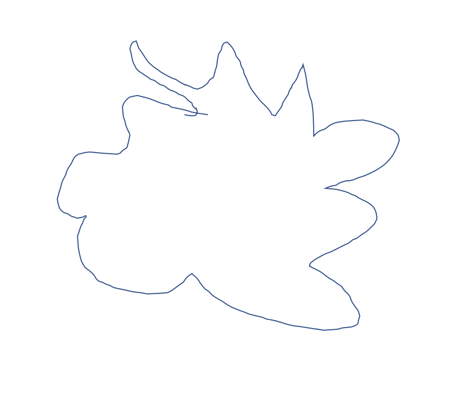
3. Release the mouse
As soon as you release your mouse, the drawing will be finished. You’ll no longer be able to continue drawing, like you would if it were pen and paper.
If you released the mouse too early, you can delete the shape and start over. If you want to add another shape to complement the one you just drew, go ahead and click the ‘Scribble’ button and go through the drawing process once more.
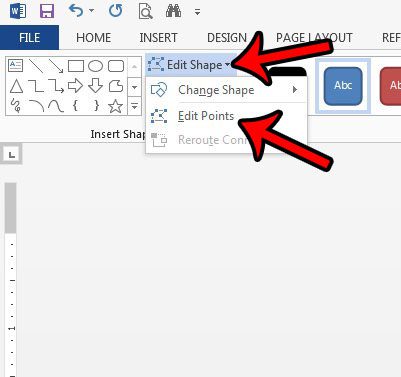
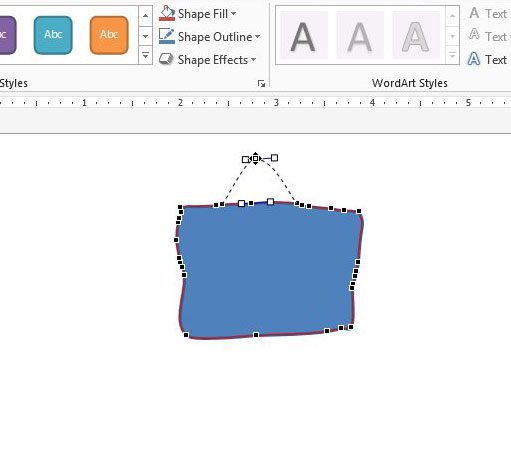
If you have the basic idea of the drawing done but it’s not exactly what you wanted, you can tweak the lines a bit. Double-click on the drawing. Click on the small ‘Edit Shape’ button in the top left corner. Then, select ‘Edit Points.’

A bunch of, you guessed it, points will appear on your drawing. Dragging a point out, in, or sideways effectively drags the line of the drawing with it. When you click off of the point, the drawing will be altered accordingly.
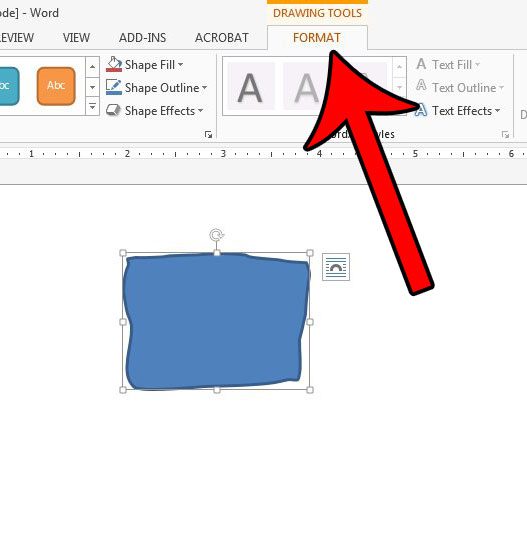
4. Edit your drawing
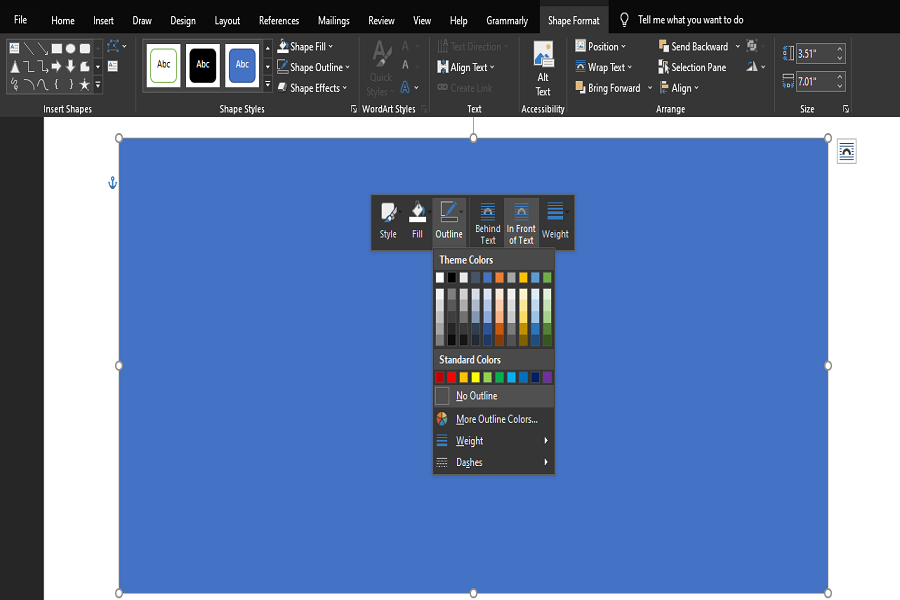
Double-click your drawing. A new tab will appear in the menu banner called ‘Shape Format.’ Now you can resize your shape by dragging the corners of the box around it. You can use the ‘Shape Fill’ button to add color inside your shape.
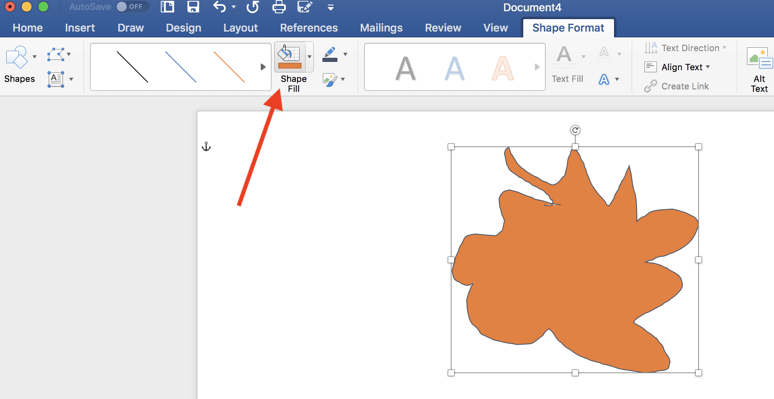
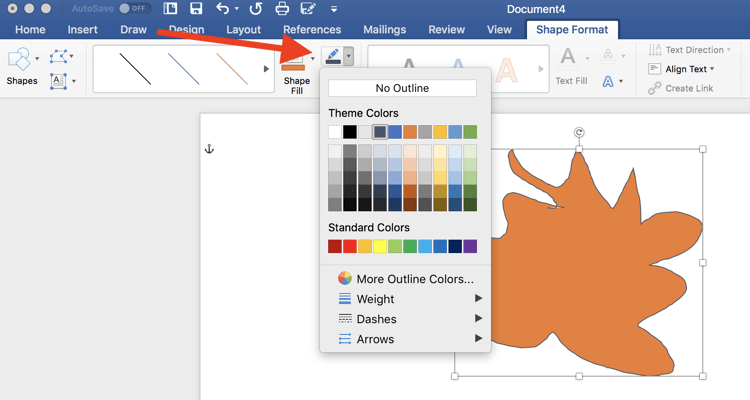
You can change the color of the outline by clicking the pencil button, located next to the ‘Shape Fill’ button. You can also choose to have ‘No Outline’ if you want.
Another way to make your drawing stand out is by adding text to it. Click on the ‘Draw a Text Box’ icon located next to the ‘Shapes’ button.
Drag your mouse over where you want the text box to live inside your shape. You can play with all the text editing options and include hanging indents, if you want.
To unlock more editing options, select the ‘Format Pane’ on the far right. This will open a sidebar where you can edit the line type of the outline, play with color effects for the fill color, and more!
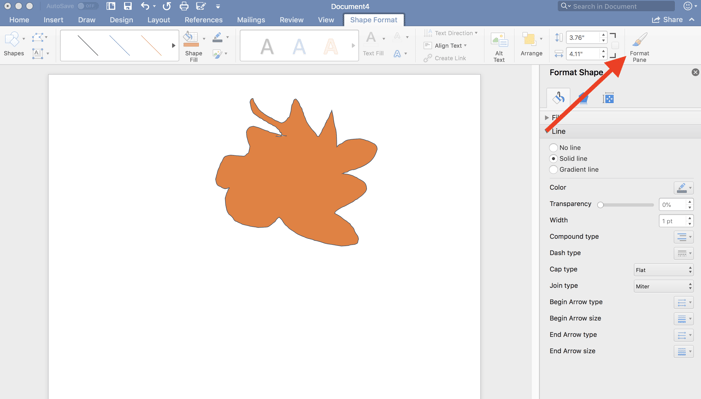
Once you’ve manipulated your shape into a final product that you’re happy with, go ahead and ‘Save As.’ Now you’re ready to share your creativity with the world!

Other things to know about drawing in Word
It will be very difficult for you to draw straight lines in Word. That’s simply due to the impossibility of dragging a mouse precisely. If that’s frustrating you to no end, there are work arounds.
How to draw a line in Word
If you want to have a very straight line, maybe the ‘Scribble’ tool is not the right one for you. Go back to the ‘Shapes’ drop-down menu under the ‘Insert’ tab and go through the different line options available to you. Select what’s best for your vision and go from there!
You’ll also notice that Word offers a variety of pre-made shapes to choose from. If you’re struggling to draw a star that doesn’t look like a sad blob, maybe try select the pre-made star shape. You can still play with the coloring, size, lines and more.
TIP: If you are dead-set on drawing freehand but Word isn’t working out for you, try drawing in Microsoft Paint. You can always insert that image into Word later on.
Want to put your artistry to the test in other ways? Discover how to make a brochure in Word.

Holly is the director of content marketing at G2. An avid reader and writer, Holly graduated from the University of Missouri with a dual major in Journalism and English. She firmly believes in the power of content and is constantly seeking ways to better engage and delight readers.

- Using a Text Wrapping Style
- Inserting a Text Box
- Inserting a WordArt
Method 1: Place Text Over Image Using Text Wrapping Style
If you have a long chunk of text and you just want to put a background image or a watermark on a document, then this method is best for you.
Step 1: Open up a Word document.

Step 2: Set the image as background.
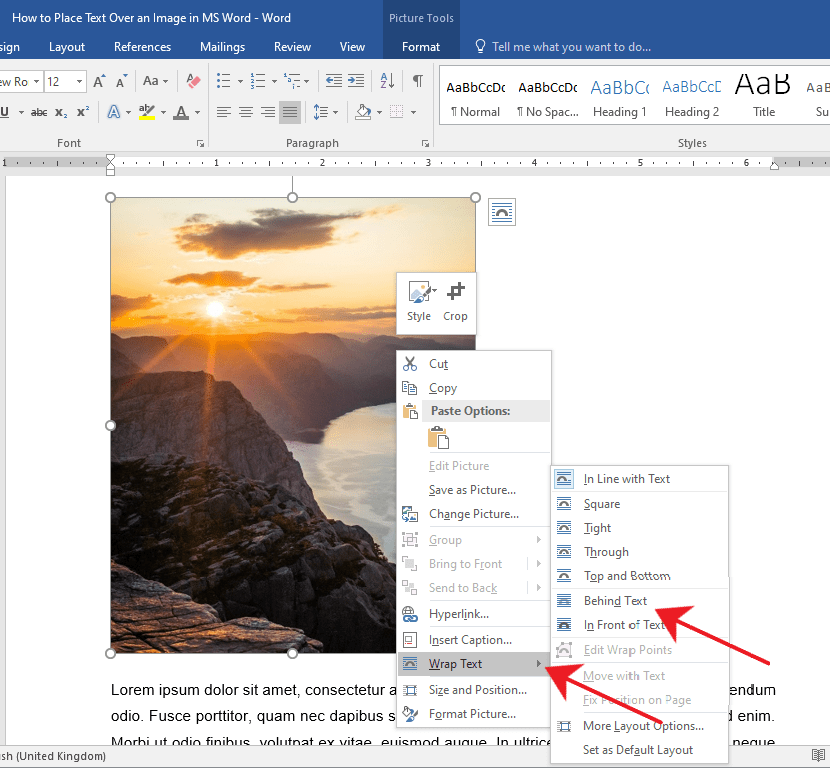
Right-click on the image and select the Wrap Text option.
This will display a horizontal drop-down menu on the right. Once you see the drop-down menu, select Behind Text.
You’ll notice the images and text will rearrange automatically as you hover over the text wrapping options.
If after you’ve inserted a background image and the text becomes unreadable, you can change the image’s opacity or color.
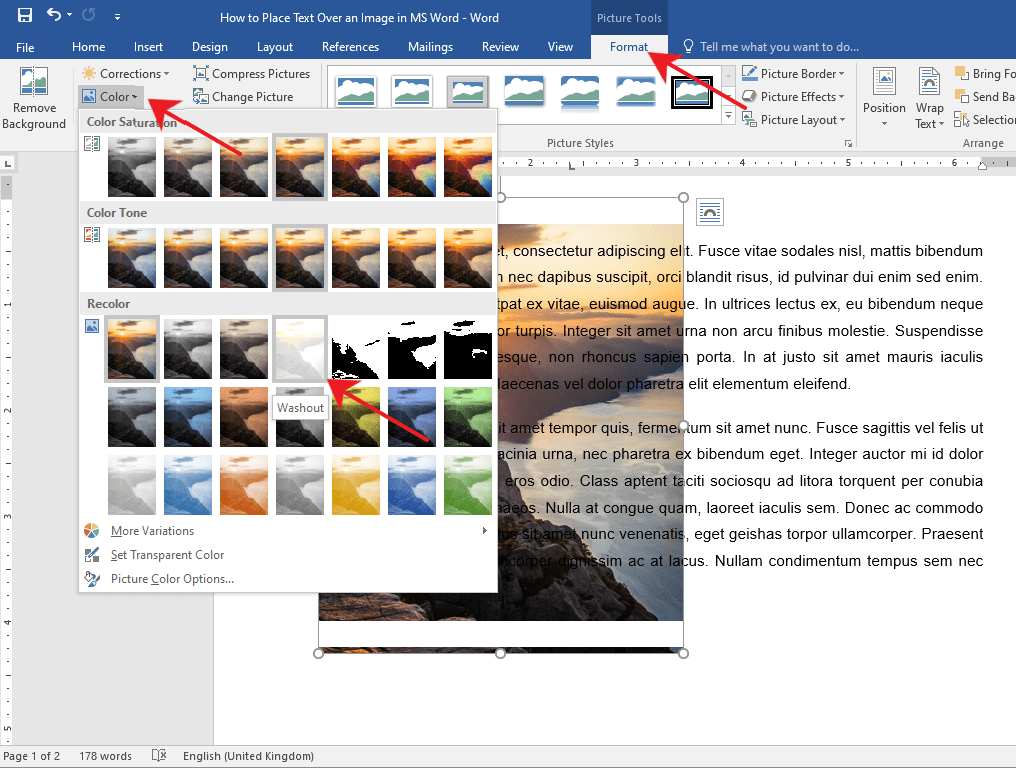
Simply double-click on the image to activate the Format tab in the Ribbon.
After that, click on the Color drop-down menu and select Washout under the Recolor group.
You can also get creative and explore other options to suit your needs.
Method 2: Place Text Over Image Using a Text Box
Step 1: Open up a Word document.
Step 2: Insert a text box.
Go to the Insert tab on the Ribbon.
Now, navigate to the right side of the Ribbon and click on the Text Box drop-down menu.
Then, select a text box style of your preference. For this example, we’ll use the Simple Text Box.
Step 3: Type in the text.
Type in the text that you want to put on top of your image.

Step 4: Set the text wrapping style of the text box.
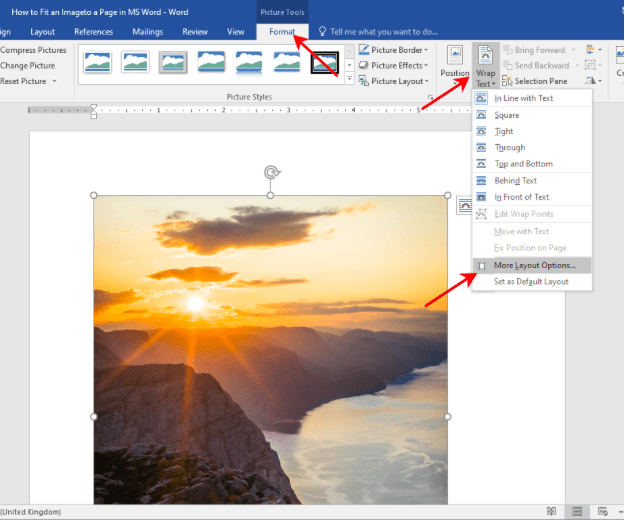
Select the text box and click the Layout button found at the upper right-hand corner of the text box.
Then, select the In Front of Text option.
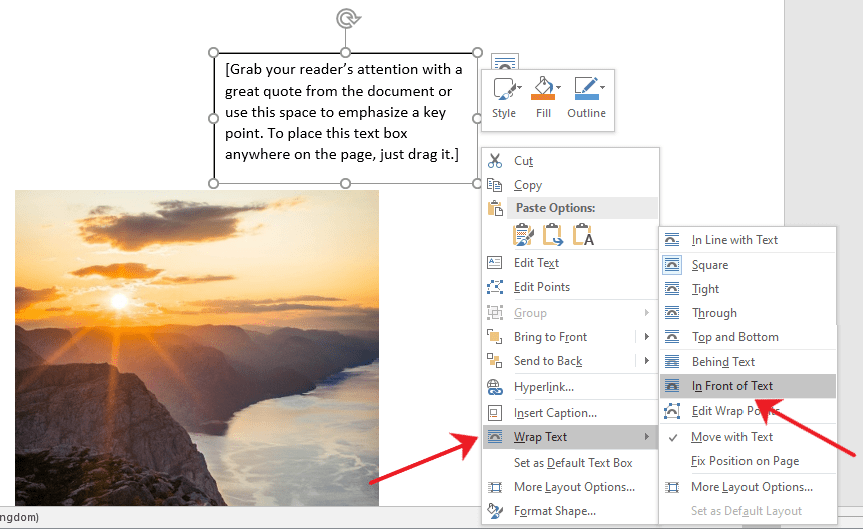
Step 5: Place the text box over the image.
Click and drag the text box to place it over your image. You’ll notice that your text box has a background color by default and is covering a part of the image.

You can change your text box’s background and border color by accessing the Format tab.
This way, only the text will be visible on top of your image. Now, Double-click the text box and go to the Format tab.
From there, click on the Shape Fill drop-down menu and choose No Fill.
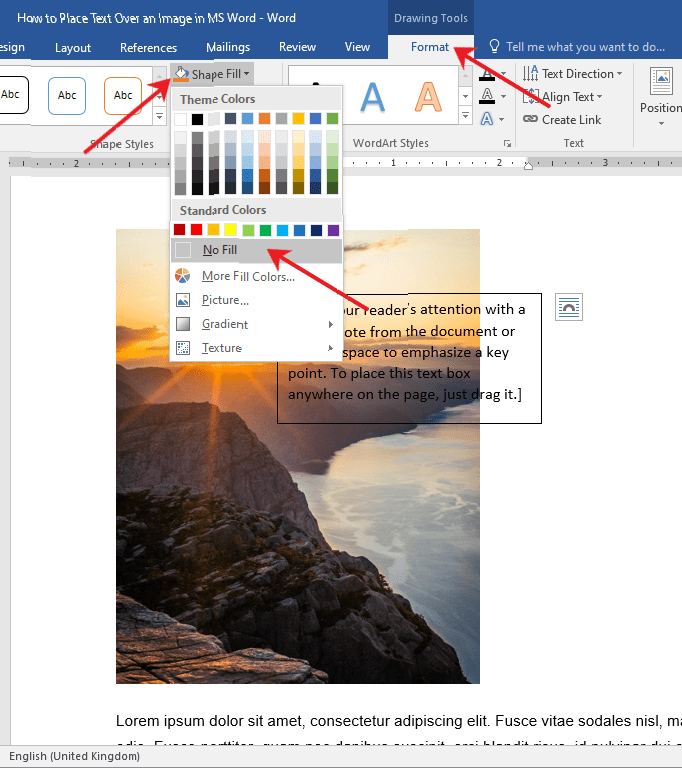
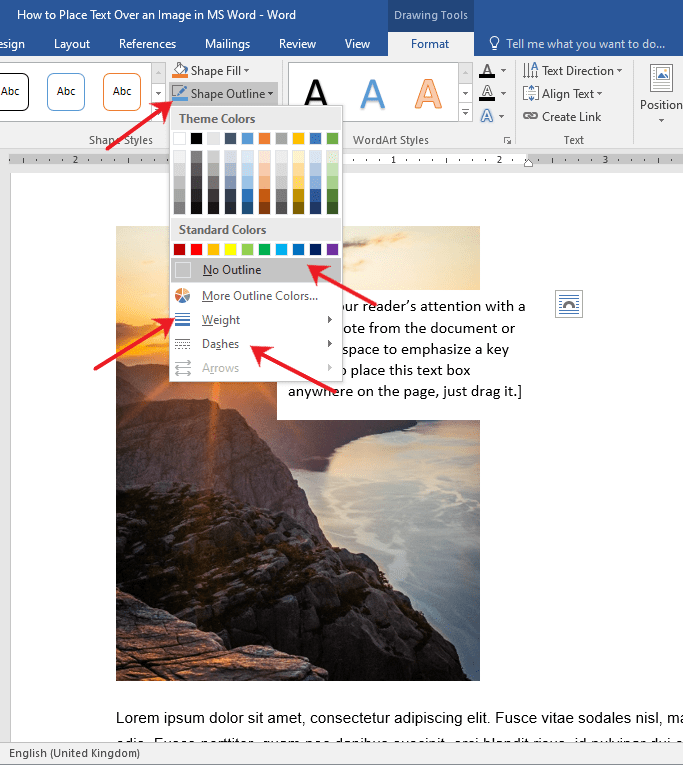
To change the border color, select the Shape Outline drop-down menu and choose No Outline.
You can also change the border’s weight and design by exploring the Dashes and Weight options.
Method 3: Place Text Over Image Using Word Art
If you find yourself needing to put a title, a name, or a couple of words over an image, then this method has got you covered.
Step 1: Open up a Word file.

Step 2: Insert the WordArt
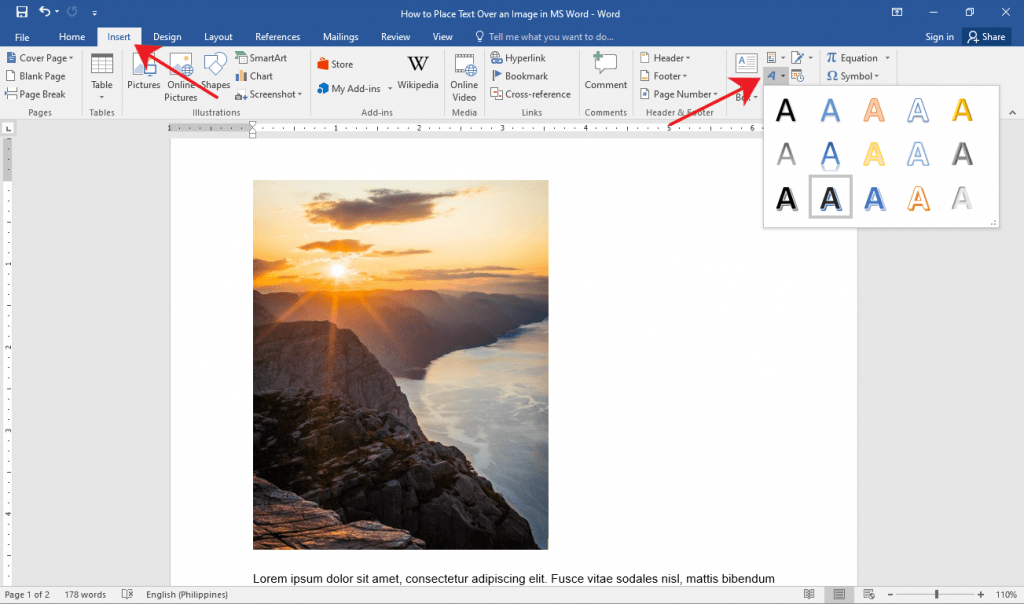
Click the Insert tab on the Ribbon.
Now, click the WordArt button found at the right side of your screen.
It’s the slanted letter A icon under the Text group. After that, choose a WordArt that suits the style of your document.
Step 3: Place the WordArt over the image.
Click on the WordArt and type in the text you want.
From there, select and drag the WordArt to easily move it around to the perfect location on your document.
You can also resize the WordArt like any other text box by grabbing either one of its corners.

Tip: If you’re using a pen or touch-enabled computer, you can directly write text over an image using the Draw option.
Editing and Deleting Text Over an Image
If you used Method 1, simply select the erroneous text and edit or delete it just as you would with any other text.
For Methods 2 and 3, click on the inside of the text box or the WordArt and start editing.
If you want to delete the entire text box or WordArt, click on any of the borders of the text box or WordArt and hit the Delete button on your keyboard.
Conclusion
That’s the rest of it. We hope you’ve found this article helpful!
Do you need to add something to your Word 2013 document, but the only way that you can accurately express the information is through a drawing? Fortunately you can draw in Microsoft Word 2013 with the Scribble shape.
The scribble shape allows you to make a freehand drawing directly in your document. Word will then convert the drawing to a shape object, where you can adjust the appearance of the shape that you just drew.
Note that Word will create a new shape every time that you let go of your mouse with the scribble shape, so you will need to re-select it after letting go. You can also select one of the other shapes on the menu in our guide below, if your needs require a specific shape or straight lines.
This article will show you how to draw in Word and provide you with a new way to express your ideas and information that might have otherwise required you to use a different program.
How to Make Drawings in Word
- Click Insert.
- Click the Shapes button, then click the Scribble icon in the Lines section.
- Click and hold down the mouse button, then move the mouse cursor to draw.
- Click the Format tab under Drawing Tools to make any changes to your drawing.
Our article continues below with additional information on how to draw on Word, including pictures of these steps.
How to Make a Freehand Drawing in Microsoft Word 2013 (Guide with Pictures)
The steps in this article will show you how to do freehand drawing in a Microsoft Word document. You will be selecting the “Scribble” shape, which gives you complete control over what is output on your screen. You can also draw freely anywhere in the document, even on top of text that has already been entered.
Please note that drawing in Microsoft Word can be very difficult. If you find that you are having trouble achieving your desired result, then you may have more luck with Microsoft Paint, or with a more advanced tool like Adobe Photoshop.
Step 1: Open a document in Microsoft Word 2013.
Step 2: Click the Insert tab at the top of the window.

Step 3: Click the Shapes button in the Illustrations section of the navigational ribbon, then click the Scribble button in the Lines section.

Step 4: Use your mouse to draw on the canvas.
The drawing shape will be completed once you let go of the mouse, which will bring up a new Drawing Tools option. This menu will have options for ways to change the color of the drawing, or to change the fill color.
If you need to draw more, then you can re-click the Scribble shape at the left side of the navigational ribbon, as in the image below.
How to Edit the Shape of an Existing Drawing in Word
This section will show you a way to change the shape of your drawing. This method is a little cumbersome, but can be effective if you only need to make minor adjustments to your drawing.
Step 1: Select your drawing, then click the Format tab under Drawing Tools.
Step 2: Click the Edit Shape button in the Insert Shapes section of the ribbon, then click the Edit Points option.
Step 3: Click on one of the points on your drawing, then drag the point to adjust the shape.
Making drawings in Word is a helpful option in the application when you need to include a simple drawing in your document and either don’t want to use a dedicated image-editing application or don’t have one at your disposal.
I use the Word drawing tool mainly when I need to make something basic, or when the quality of the drawing isn’t terribly important for the document. I’m also a terrible artist (as indicated by my drawings in the guide above) so I haven’t spent a lot of time getting good with Word’s drawing tools.
Note that drawing in Microsoft Word can be somewhat difficult, even frustrating at times. If you find that the drawing capabilities of Word are limited, then you might have better luck drawing in Microsoft Paint and inserting the saved Paint drawing into your document. This article will show you how to insert a picture in Word 2013.
More Information on How to Draw in Word
While our article above focuses specifically on how to draw on Word using the “scribble” tool, there are other ways that you can draw in your document as well.
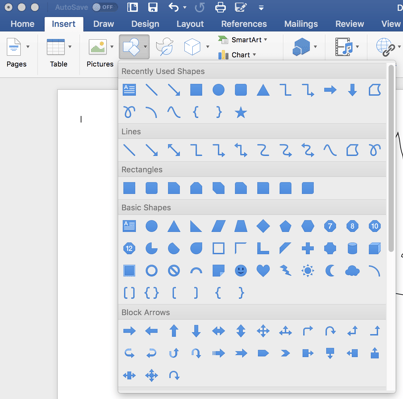
When you go to the “Shapes” tool from the Insert tab there are a lot of different shapes that you can use. For example, if you wanted to draw a line, a square, or a circle, you could select that shape instead. This can be a preferable option if you are struggling to draw a freehand shape, as it can be very difficult to do with a mouse.
You may want to consider getting a USB drawing tablet if you are going to be doing a lot of drawings in Microsoft Word. It can be much easier to use that type of tool, as it allows you to draw in the same manner that you would when drawing on paper.
Where is the Draw Tool in Word?
Finding the Draw tool can be a little tricky, simply because there isn’t a tool that is directly called “Draw” by default. You need to use one of the shape tools, specifically the “scribble” tool that is found on the Shapes menu.
Alternatively, however, you could go to File > Options > Customize Ribbon, then check the box to the left of Draw. This is going to add a new tab to the ribbon where you can find some drawing tools and options.
How Do I Use the Pen Tool in Word?
As we mentioned in the section above, you will need to enable the Drawing tab in the ribbon by opening the Word Optiones menu, then checking the box to the left of Draw.
Once you have the Draw tab in your ribbon you will find an assortment of different drawing tools, including some pen options. While you can use these with a mouse, many people find them easier to use with a touchscreen tablet or laptop, or a drawing tablet accessory.
How Do I Use Handwriting in Word?
You can use handwriting in Microsoft Word with either the scribble tool, then Pen tool on the Draw tab, or with a connected tablet.
Alternatively you could use on of the script fonts found in Word by default, or by downloading a script font from a resource like Google Fonts.
How Do You Get Word Art on Microsoft Word?
The Word Art option is located on the Insert tab, at the right side, in the Text section of the ribbon.
This is going to add a text box with the WordArt style that you selected. You can then customize the appearance of the Word Art by selecting the text in the text box, then choosing a formatting option from the Format Shape tab in the ribbon.
See also
- How to insert a check mark in Microsoft Word
- How to do small caps in Microsoft Word
- How to center text in Microsoft Word
- How to merge cells in Microsoft Word tables
- How to insert a square root symbol in Microsoft Word

Matthew Burleigh has been writing tech tutorials since 2008. His writing has appeared on dozens of different websites and been read over 50 million times.
After receiving his Bachelor’s and Master’s degrees in Computer Science he spent several years working in IT management for small businesses. However, he now works full time writing content online and creating websites.
His main writing topics include iPhones, Microsoft Office, Google Apps, Android, and Photoshop, but he has also written about many other tech topics as well.
Read his full bio here.
Want to edit an image in Microsoft Word? The program provides a variety of tools to let you customize the image as you want. Find out how!

Microsoft Word includes various tools for editing images, starting from cropping an image to making it transparent. This eliminates the need to use third-party applications for basic image touch-ups before adding to a Microsoft Word document.
In this article, you will learn how to edit an image in Microsoft Word using the tools at your disposal. Let’s explore how to make images transparent, blur some part of it, adjust brightness/contrast, add alt text, change picture borders, define layout, and much more.
1. Changing Image Transparency in Microsoft Word
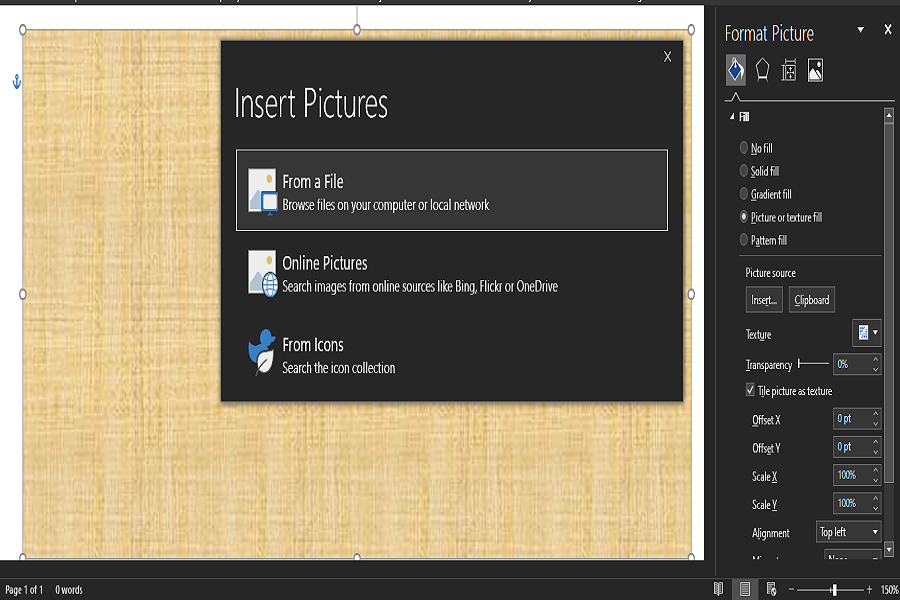
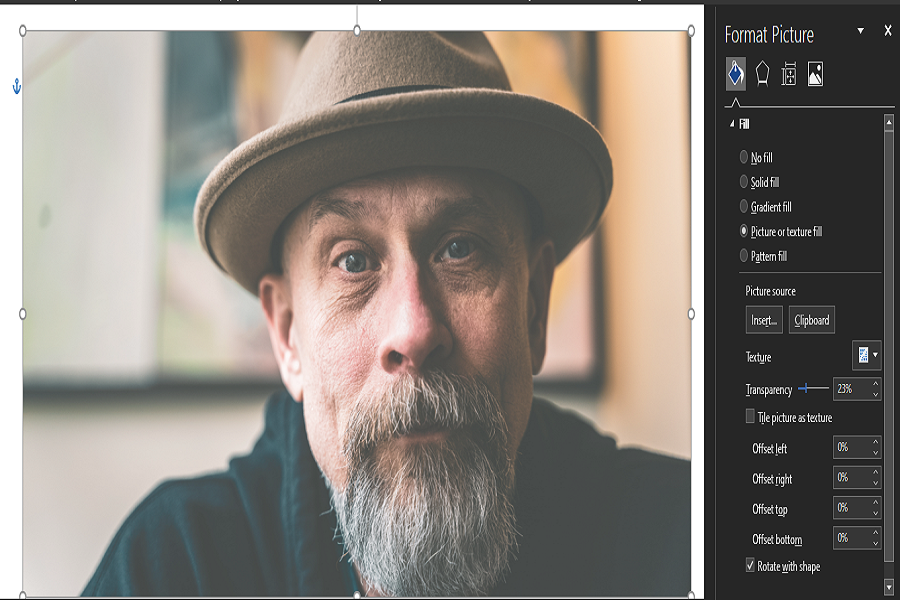
For an image to be used as a text background, it needs to be transparent. In recent versions of Microsoft Word, methods to make images transparent have changed, so following these steps will help you achieve that:
- Navigate to Shapes in the Insert tab.

- Pick a shape and draw it to fit the image size you intend to make transparent.
- Then, right-click the shape and select No Outline in the Outline menu.
- Then, right-click again and click the Format Shape in the menu.
- In the Fill option on the right-sidebar, click Picture or texture fill.
- Then click on the Insert button under Picture source to add an image you want to make transparent.
- Use the Transparency slider to adjust the image transparency between -100% and 100% as required.

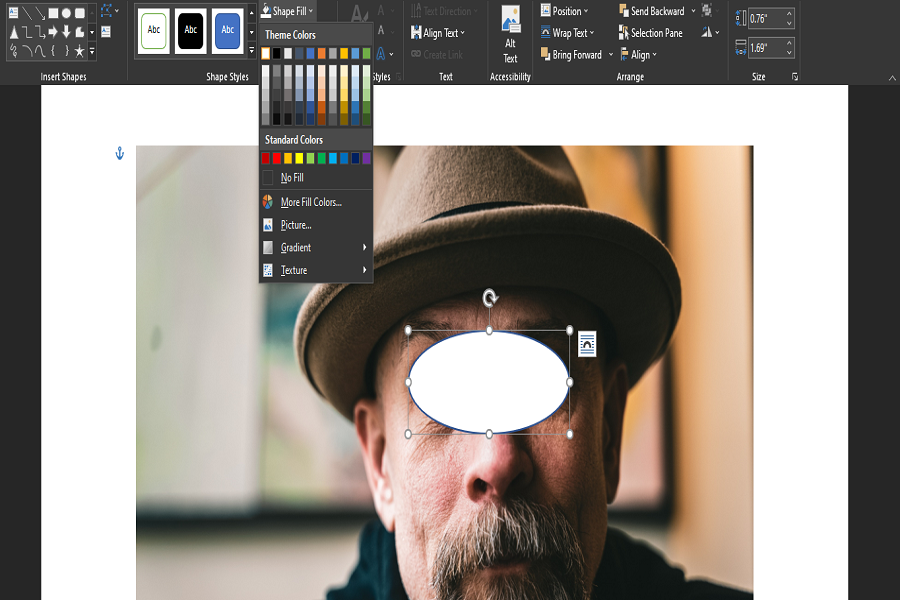
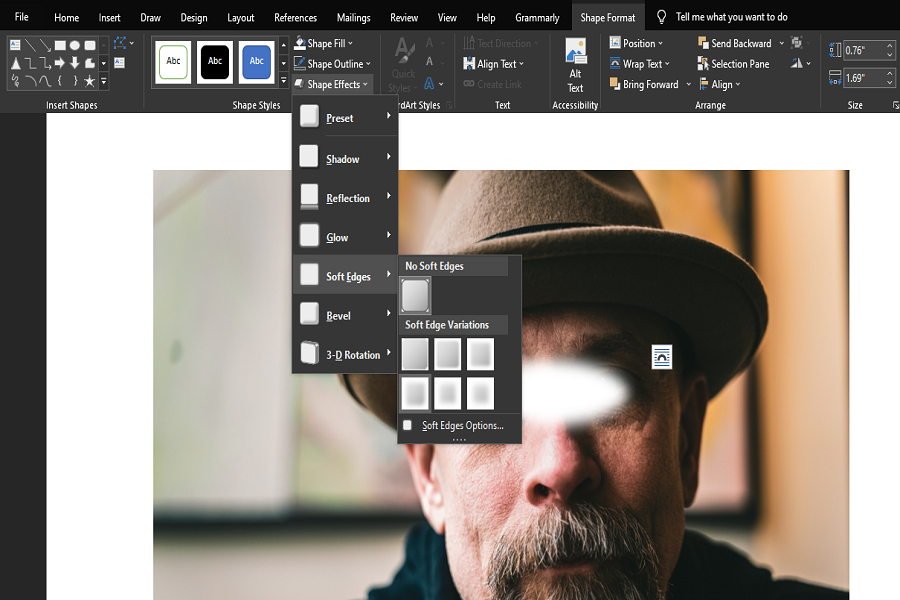
2. Adding Blur Effect to Images in Microsoft Word
Microsoft Word doesn’t have a dedicated feature for blurring images. You can be creative with the image softening and texture effects to hide or blur specific parts of an image. Here’s what you can do:
- Add an image that you want to blur.
- Navigate to Shapes.
- Select a shape and draw it over the part of the image you want to blur.
- Now, change the shape’s color to White.
- Navigate to Shape Effects dropdown menu.
- Go to the Soft Edges effect to apply it to the shape to get the blur effect.
- With Soft Edge Variations, you can select the desired blur intensity.
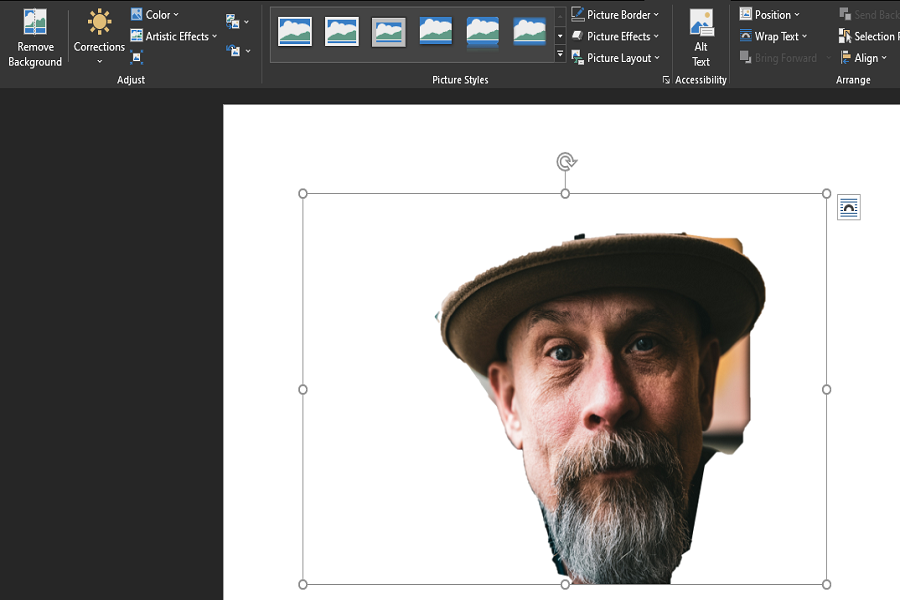
3. Removing Picture Background in Microsoft Word
Microsoft Word allows you to remove the image background as well. All you have to do is add your image to the document, select the added image and click the Remove Background option in the upper left corner.
![]()
As a result, background areas will automatically be marked to be removed, but it would be pretty random. To remove the desired area, you must select it manually. By clicking on the Mark Areas to Keep tool, you can select the image section that you want to keep and remove the rest.
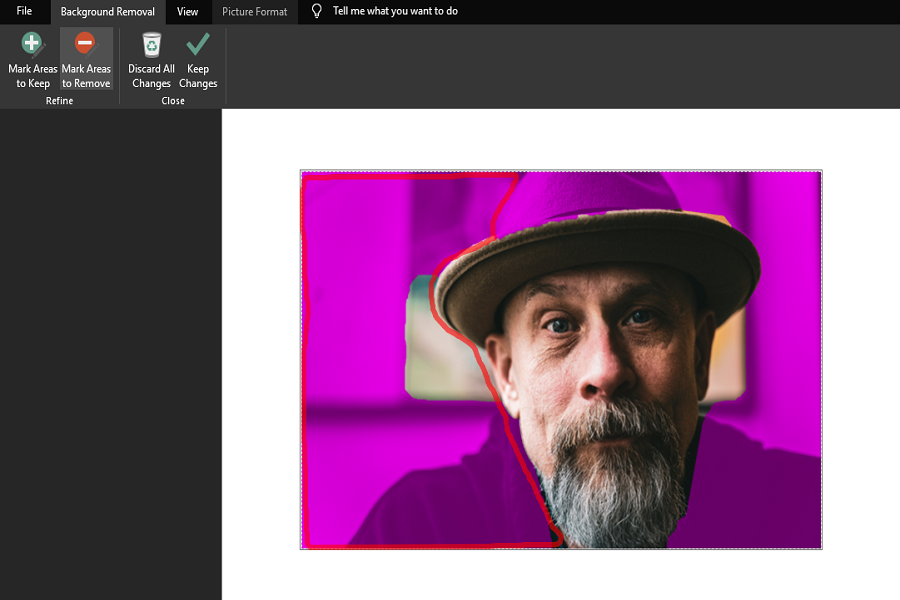
When you are satisfied with your selection, click on Keep Changes. Only the selected part will be retained, and the rest will be removed. Remember that this method explains how to remove a background from an image, not how to change the background color.
4. Changing Image Brightness, Contrast, and Sharpness in Microsoft Word
There are presets available in the Microsoft Word image editor that allows you to change a picture’s brightness, contrast, and sharpness. To utilize these presets, follow these steps:
- Click the Corrections dropdown menu to open the Brightness/Contrast and Sharpen/Soften preset menus.
- To preview the changes, move the mouse cursor over each preset.
- Apply the presets to your image by clicking on them.
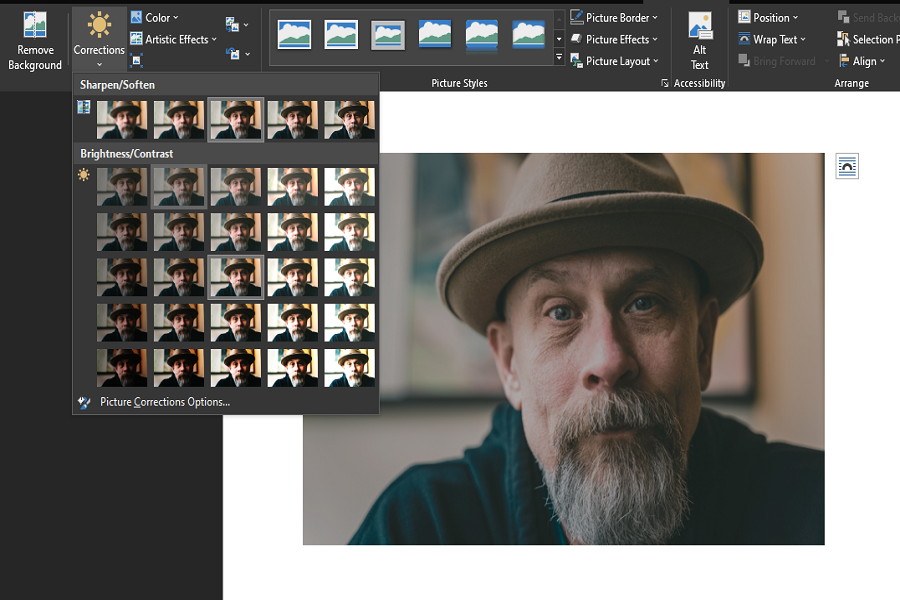
The editor also provides options to do these changes manually in a separate menu. To do that, click on the Corrections button and navigate to Picture Correction Options…
Doing so will open a Format Picture menu with the Picture Corrections option to use presets, change sharpness, brightness, and contrast manually. In addition, you can add color to images or crop them to make them appear more streamlined.
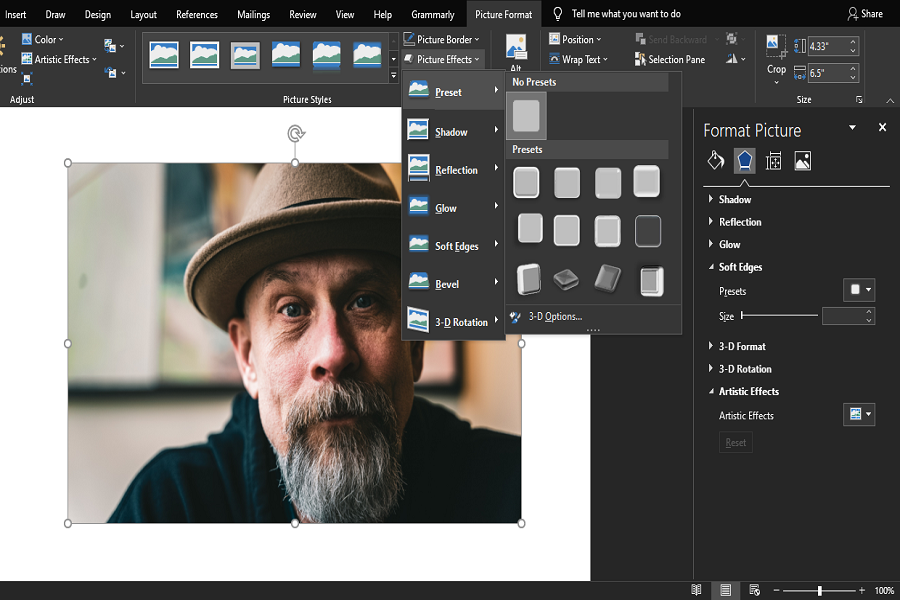
5. Adding Special Effects and Picture Styles to Images in Microsoft Word
When necessary, you can also apply special artistic effects and picture effects to images in Microsoft Word to give them a new, elegant appearance.
To add Artistic Effects, click on the Artistic Effects dropdown menu and hover your mouse cursor over each effect to preview. Click on the desired effect to apply on the image.
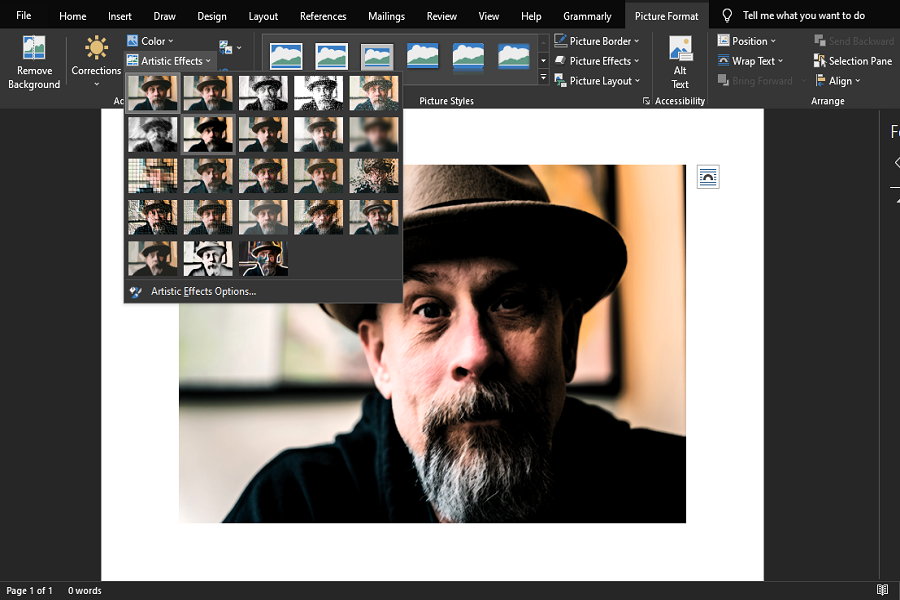
Other than these, you can access more of these effects with presets by clicking the Picture Effects menu. Picture styles are built-in frames that you can use to make your work more creative—useful when designing Presentations.
Follow the below steps to add Picture Effects:
- Select image in Microsoft Word.
- Click on the Picture Effects dropdown menu located in the middle of the Format toolbar.
- To view the preview of your favorite style or preset, hover over it.
- To apply any style, simply click on it.
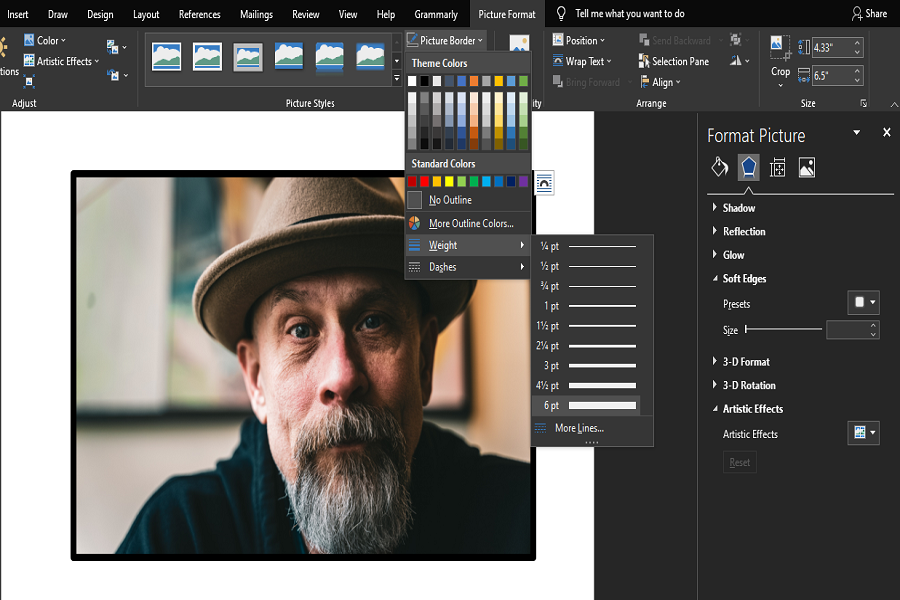
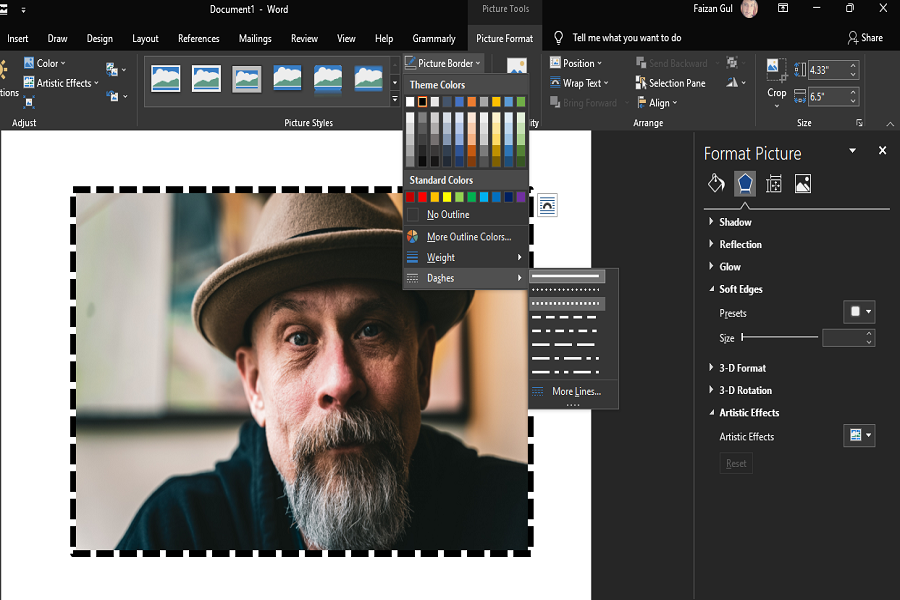
6. Adding Picture Border and Picture Layout to Images in Microsoft Word
Adding borders to an image is another useful image editing feature available in Microsoft Word. In case you haven’t used it before, here’s how you can use it:
- Click on the Picture Border dropdown menu located just above Picture Effects after selecting your image.
- Choose the border color of your choice.
- To select the border thickness, use the Weight option.
- Change border style in the Dashes option.
- To customize border style, navigate to Dashes > More Lines.
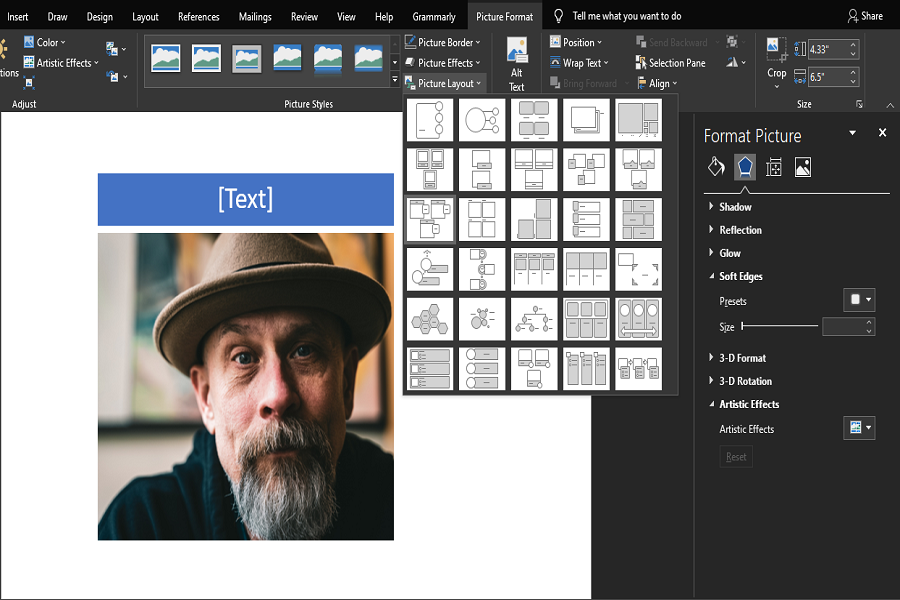
The Picture Layout tool in Microsoft Word helps create captions and descriptions for images. In Microsoft Word, you can add textual information to your images by choosing preset designs.
To do that, follow these steps:
- Select your image and click on the Picture Layout dropdown menu below Picture Effects.
- Select the desired layout from the menu.
- Once selected, you can edit text and set the layout’s frame colors, among other things.
7. Adding Alt Text to Images in Microsoft Word
The alt text describes the image if the file to which it has been rendered does not load on time. It explains what the image is all about.
In just a few easy steps, you can add Alt Text to any image in Microsoft Word:
- Double-click the image to open Word’s picture editing tools
- Click the Alt Text option.
- Write a description in the text box.

Microsoft Word can also generate an automatic description for you. For that, click Generate a description for me.
8. How to Resize an Image in Microsoft Word
Microsoft Word offers a dedicated resizing feature that allows you to resize any image to meet a particular format or size requirement. Follow the below steps to resize an image in Microsoft Word:
- Right-click on the image and click the Size and Position option.
- In the Size tab, you can manually enter the Height and Width values to resize the image.
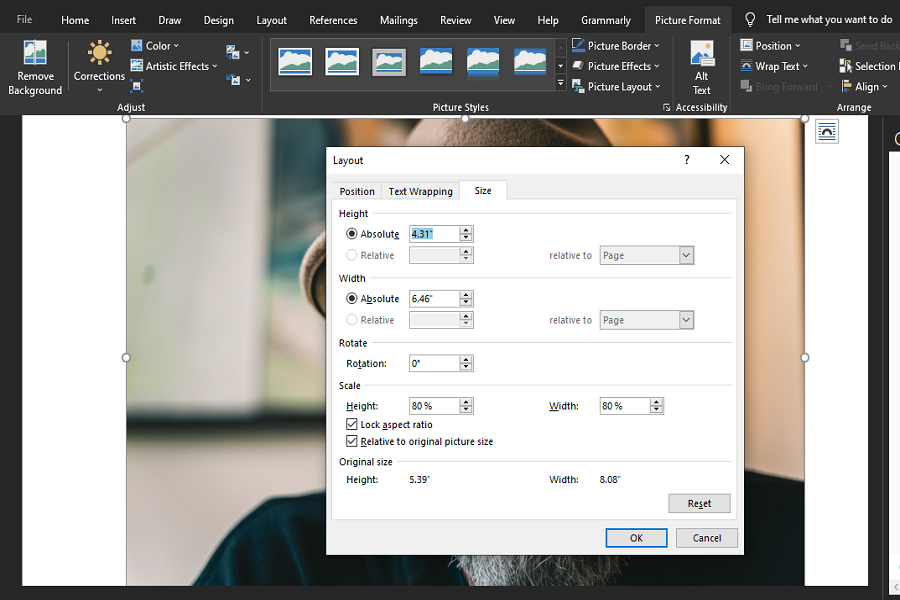
Keep the Lock aspect ratio button checked if you want the width to change relative to height. If you have already thought of specific height and width values, don’t forget to uncheck this box.
When resizing images with the aspect ratio not locked, you risk stretching the image or dragging it unusually, so be cautious when doing that.
Enhance Your Images in Microsoft Word
You can now make basic image edits in Microsoft Word. However, if you want to create professional edits, you’ll probably have to use design software since Microsoft Word’s editing functionality is pretty limited.
When you add or delete text in a Microsoft Word document, do your images lose their position? You can prevent your images from moving by restricting editing options, adding images as watermarks, and fixing image positions on the page.
Microsoft Office
Microsoft Word is more than just a document-creation app. With it, you can also draw objects and shapes like you do with digital painting tools.

Download the Free How to Draw on Microsoft Word Article in PDF
![]() Download
Download
How to Draw on Microsoft Word
Drawing in Microsoft Word is easy. It’s as easy as inserting images. Just follow these steps and you’ll be able to create shapes and objects in MS Word.
-
Step 1: Start a Blank MS Word Document

First, open MS Word on your computer and start a blank document. You may also open a saved document with content as long as adding drawings to it is appropriate. -
Step 2: Open the Drawing Pane

Once you’ve started a blank document, proceed to open the drawing pane. Simply go to the Insert tab and click on the Drawing option. The drawing pane will then appear on your screen. -
Step 3: Start Drawing

>
You can then start drawing shapes and objects after doing Step 2. Click the pen icons in the toolbar. Hold the left-click button of your mouse and drag your mouse to start drawing on the drawing board. -
Step 4: Click the Save and Close Button

Once you’re drawing is complete, you can then insert it into the document. Simply click the Save and Close button in the upper-right corner of the Drawing pane. This will automatically attach your drawing to the blank document. -
Step 5: Adjust the Drawing and Save the Doc

Your drawing will be inserted in the doc like an image. You can make adjustments to its width and height measurements and position it anywhere like moving a picture in Microsoft Word. Once that’s done, make sure to save your document in MS Word.


FAQs
Can I draw freehand in MS Word?
Yes, you can draw freehand in MS Word using a mouse, and if you’re using a mobile device, you can draw using your fingertips in MS Word mobile.
Can I draw over images in MS Word?
Yes, you can draw over images in MS Word by following the usual steps in drawing objects in MS Word and dragging your finished drawing over an image, or even better, you can draw freehand on the image itself.
Is there are Microsoft Office app made for drawing?
Yes, there’s an MS Office app specifically made for drawing called Microsoft Drawing.
How many objects can I draw and insert in MS Word?
You can draw and insert as many objects and shapes as you need in MS Word.
Can MS Word serve as my drawing app or tool?
If you have no other apps or tools for drawing on your computer or device, then you can use MS Word as your primary drawing tool.
Can I use gridlines to draw on MS Word?
Yes, you can use gridlines to draw on MS Word, but first, you need to make the gridlines visible in the document through the Page Layout tab.
More in Microsoft Office
| 46+ Best Hand Drawn Poster Fonts Free Download | 40+ Best Graffiti Drawings / Artworks for your Inspiration |
| 43+ Premium Hand Drawn Photoshop Brushes Free Download | 26+ 3D Pencil Drawings |
| 32+ Amazing Collection of Realistic WaterColour Drawings for Download | 49+ Best Pencil Drawings Pictures |
| 33+ Best Graffiti Pencil Drawings & Sketches for your Inspiration | Collection of 70+ Best Photorealistic Pencil Drawings for your Inspiration |
| 15+ Architectural Drawings | 49+ Cartoon Drawings |
| 28+ Love Drawings Templates | 24+ Drawing Deer Drawings |