
While typing word documents, you usually separate words and sentences by pressing the Space key (also known as Spacebar), which inserts a regular general-purpose space character. However, some Microsoft Word documents may contain other kinds of spaces. You can discover those white-space symbols during editing the document but not on printing.
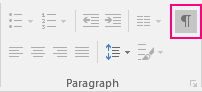
To show non-printable and white-space symbols in Microsoft Word, click the button button Show/Hide ¶ (or pressing Ctrl+* or Ctrl+Shift+8):

You will be able to see the following marks for white-space characters:
1) A little dot between words represents a normal space (also called word space):

A general rule of publishing is to use only one normal space between words (the only exception is a pre-formatted text, e.g., code listings). If you need to align text at fixed positions of the line, use
tabs and tab stops.
2) A degree symbols between word represents a nonbreaking space (also called non-breaking space, no-break space, non-breakable space (NBSP), hard space, or fixed space) that prevents text wrapping at the end of the line. A Nonbreaking space in the Word document looks like:
![]()
A general rule of publishing is to use non-breaking spaces between words of
organization and person names, postal addresses, etc.
Some popular rules:
- Insert a nonbreaking space between the copyright symbol and the following year(s) to ensure they will not end up on different lines or pages. For example:

- Insert a nonbreaking space before and after ellipses (also called a suspension point, points of ellipsis, periods of ellipsis, or even «dot-dot-dot» is a sequence of three dots used to indicate an omission in quoted material). For example:

3) A little dot with varying gaps before and after the dot represents Em Space and En Space. These spaces have different widths on printing:
- Em space is a space with the width of the lowercase m character.
- En space is a space with the width of the lowercase n character.
4) A vertical bar between words represents a ¼ Em space (also known as mid-space) is a space with the ¼ width of the lowercase m character:
![]()
If you want to see only space marks and no other non-printable symbols, do the following:
1. On the File tab, click the Options button:

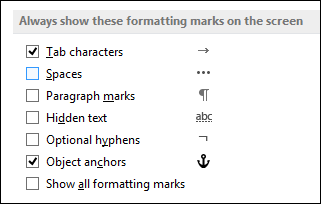
2. In the Word Options dialog box, on the Display tab, under Always show these formatting marks on the screen, check or uncheck the Spaces option:

See also this tip in French:
Types d’espaces spéciaux dans les documents Word.
Formatting marks like dots (…) for spaces or arrows (→) for tab characters are used in Word to show the text layouts of documents. You might find these formatting marks useful when you’re designing content with a specific look in mind.
Note: Publisher uses some formatting marks.
What are formatting marks?
Formatting marks are a set of symbols that provide a visual representation of specific formatting in a document.
Tab characters
Display tab characters as arrows.
Spaces
Display spaces between words as dots.
Paragraph marks
Display the ends of paragraphs with the paragraph symbol.
Hidden text
Display a dotted line under text that is formatted as hidden.
Optional hyphens
Display hyphens that indicate where to divide a word at the end of a line. Optional hyphens are not printed unless a word actually breaks at the end of a line. When a word breaks at the end of the line, the optional hyphen is printed as a regular hyphen.
Object anchors
Display object anchors, which indicate that an object is attached to a specific paragraph.
Optional breaks
Control where a word or phrase breaks if it falls at the end of a line. If you use Word with an East Asian language, this option prevents the incorrect breaking of text. This option is available only if an East Asian language is enabled for editing text.
Show (turn on) or hide (turn off) formatting marks in a document
The Show/Hide button is like a switch that lets you turn on or turn off a view.
-
On the Home tab, in the Paragraph group, choose Show/Hide.

Note: The background of the Show/Hide button is shaded when it’s turned on.
Turn on the display of formatting marks
You can choose which formatting marks always are displayed on the screen, regardless if the Show/Hide button is turned on or turned off. For example, you can display paragraphs and spaces at all times, but can hide tab characters and hidden text when Show/Hide is turned off.
Note: The background of the Show/Hide button is shaded when it’s turned on.
-
On the File tab, choose Options > Display.
-
Under Always show these formatting marks on the screen, select the check box for each formatting mark that you always want to display, regardless if the Show/Hide button is turned on or turned off.
-
On the File tab, under Help, click Options > Display.
-
Under Always show these formatting marks on the screen, select the check box for each formatting mark that you always want to display, regardless if the Show/Hide button is turned on or turned off.
-
Click the Microsoft Office Button
, and then click Word Options. -
Click Display.
-
Under Always show these formatting marks on the screen, select the check box for each formatting mark that you always want to display, regardless if the Show/Hide button is turned on or turned off.
 , and then click Word Options.
Turn off the display of formatting marks
You can clear any formatting mark you select to display on the screen at all times. Once you clear a check box for a formatting mark, that mark no longer displays on the screen at all times, regardless if the Show/Hide button is turned on or turned off
-
On the File tab, choose Options > Display.
-
Under Always show these formatting marks on the screen, clear the check box for each formatting mark that you don’t always want to be displayed on the screen.
-
On the File tab, under Help, click Options > Display .
-
Under Always show these formatting marks on the screen, clear the check box for each formatting mark that you don’t always want to be displayed on the screen .
-
Click the Microsoft Office Button
, and then click Word Options. -
Click Display.
-
Under Always show these formatting marks on the screen, select the check box for each the formatting mark each formatting mark that you don’t always want to be displayed on the screen .
Turn off squiggly lines in Word
The red squiggly lines in Word indicate potential spelling or grammar errors. The blue squiggly lines indicate words that might be incorrect in their context—a «pear» of shoes versus a «pair» of shoes, or «there» report versus «their» report.
-
On the File tab, click Options > Proofing.
-
Under When correcting spelling and grammar in Word, clear the check box next to an item you want to turn off.
-
Click the Microsoft Office Button
, and then click Word Options. -
Click Proofing.
-
Under When correcting spelling and grammar in Word, clear the check box next to an item you want to turn off.
-
On the File tab, click Options > Proofing.
-
Under When correcting spelling and grammar in Word, clear the check box next to each item you want to turn off.
Turn off squiggly lines in Publisher
The red squiggly lines in Publisher indicate potential spelling errors. .
-
On the File tab, click Options > Proofing.
-
Under When correcting spelling in Publisher, clear the Check spelling as you type check box
-
On the Tools tab, click Spelling > Spelling Options.
-
Under When correcting spelling in Publisher, clear the Check spelling as you type check box.
Stephanie
-
#1
All my word documents are showing dots for spaces and arrows for tabs and P
for new line. How do I change this? It doesn’t affect printing, but it does
affect creating a web page…and it’s annoying.
Stephanie
Advertisements
Douglas J. Steele
-
#2
You should be asking this in a newsgroup related to Word. This one’s for
questions about Access, the database product that’s part of Office
Professional.
What you’ve done, though, is turn on the Formatting marks in Word (something
I always do). I find it helps significantly when trying to see how the
formatting is working. However, if you want to turn it off, look at the View
tab under Tools | Options.
Want to reply to this thread or ask your own question?
You’ll need to choose a username for the site, which only take a couple of moments. After that, you can post your question and our members will help you out.
Ask a Question
| Paragraph numbering in Word | 1 | Mar 6, 2022 |
| White space above heading inconsistently applied | 1 | Jul 16, 2020 |
| Lost my Table of Contents , Appendices and Page numbers ? | 2 | Nov 10, 2017 |
| Need help modifying code | 0 | Nov 9, 2021 |
| MS Word Page Layout/Break/Margin Issues, help | 0 | Nov 25, 2020 |
| Automatically insert «Continued» in footer based on existing STYLEREF | 2 | Mar 24, 2019 |
| Word 2016 — Difficulties Learning Style Creation/Application | 0 | Oct 27, 2020 |
| Margins on Word document which will not let me move them using the ruler arrows | 2 | Dec 4, 2017 |
Guest
-
#1
All my word documents are showing dots for spaces and arrows for tabs and P
for new line. How do I change this? It doesn’t affect printing, but it does
affect creating a web page…and it’s annoying.
Stephanie
Advertisements
Douglas J. Steele
-
#2
You should be asking this in a newsgroup related to Word. This one’s for
questions about Access, the database product that’s part of Office
Professional.
What you’ve done, though, is turn on the Formatting marks in Word (something
I always do). I find it helps significantly when trying to see how the
formatting is working. However, if you want to turn it off, look at the View
tab under Tools | Options.
Want to reply to this thread or ask your own question?
You’ll need to choose a username for the site, which only take a couple of moments. After that, you can post your question and our members will help you out.
Ask a Question
![]()
Written by Allen Wyatt (last updated June 1, 2020)
This tip applies to Word 2007, 2010, 2013, and 2016
Have you ever worked on a document that included multiple fonts and the printout didn’t quite match what you wanted? Sometimes there was more space between words or sentences than what seemed right, and you didn’t quite know what the problem was?
I have found that the culprit is often my own fault. I may have placed extra spaces between words or sentences in such a manner that the text looks fine on screen, but doesn’t quite fit the bill when finally printed. The solution, of course, is to remove the extra spaces and make sure there are a consistent number of them between both words and sentences. The problem with the solution is that it is often difficult to see how many spaces there really are.
Fortunately, Word allows you to easily see where spaces occur in your documents. All you need to do is follow these steps:
- Display the Word Options dialog box. (In Word 2007 click the Office button and then click Word Options. In Word 2010 and later versions display the File tab of the ribbon and then click Options.)
- Click Display at the left side of the dialog box. (See Figure 1.)
- Make sure the Spaces check box is selected.
- Click on OK.
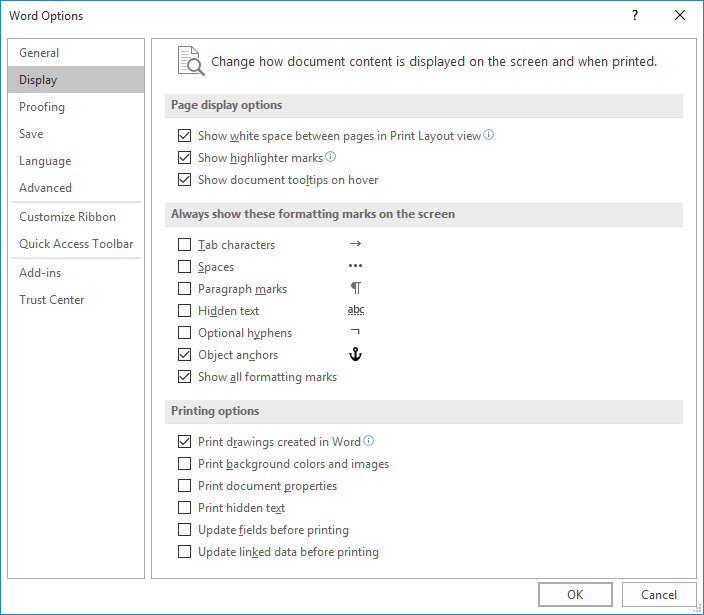
Figure 1. The Display options of the Word Options dialog box.
Now, all your spaces appear as small visible dots. It is very easy to tell where two visible dots appear, as opposed to two invisible spaces. Delete any extra spaces you want, as you would delete any other characters, and you will have your document cleaned up in no time.
WordTips is your source for cost-effective Microsoft Word training.
(Microsoft Word is the most popular word processing software in the world.)
This tip (6827) applies to Microsoft Word 2007, 2010, 2013, and 2016.
Author Bio
With more than 50 non-fiction books and numerous magazine articles to his credit, Allen Wyatt is an internationally recognized author. He is president of Sharon Parq Associates, a computer and publishing services company. Learn more about Allen…
MORE FROM ALLEN
Using GEOMEAN with a Large List
When performing a statistical analysis on a large dataset, you may want to use GEOMEAN to figure out the geometric mean …
Discover More
Calculating an Age On a Given Date
Start putting dates in a worksheet (especially birthdates), and sooner or later you will need to calculate an age based …
Discover More
Merging Many Workbooks
If you need to combine the contents of a bunch of workbooks into a single workbook, the process can get tedious. Here’s a …
Discover More
More WordTips (ribbon)
Selecting a Word
Selecting text is a critical skill to possess when you want to work with a Word document. This tip explains how you can …
Discover More
Preventing the Insertion of Non-Breaking Spaces
When you copy and paste information from the Internet, you may end up with a lot of non-breaking spaces in the pasted …
Discover More
Making Highlighting Disappear when Typing
Select a highlighted word or phrase and start typing, and Word maintains the highlighting on what you enter. If this …
Discover More
This tutorial shows how to insert nonbreaking spaces in Microsoft Word using the Symbol dialog box method and the keyboard shortcut method. Before we start the tutorial, we’ll briefly define nonbreaking spaces and see what they look like compared to regular spaces.
Watch all the steps shown here in real time!
Explore more than 200 writing-related software tutorials on my YouTube channel.
The images below are from Word for Office 365, which is currently the same as Word 2019. However, the steps are the same for Word 2016 and are similar for Word 2013 and Word 2010.
What Are Nonbreaking Spaces?
Nonbreaking spaces are special characters that keep words or individual characters from separating at line breaks. Nonbreaking spaces are particularly useful between ellipsis points. However, you can use them between any words or characters that you want to stay together.
In Microsoft Word, regular spaces are represented by a small, solid dot and nonbreaking spaces are represented by a slightly larger circle positioned higher than the regular-space dot.

To see these and other formatting symbols in your Word document, select the Show/Hide button in the Paragraph group of the Home tab. To hide the formatting symbols, reselect the Show/Hide button.

Insert Nonbreaking Spaces in Microsoft Word Using the Symbol Dialog Box
1. Place your cursor where the nonbreaking space should be inserted. Alternately, if a regular space already appears where the nonbreaking space should be inserted, select the regular space, as shown in the image below.

2. Select the Insert tab.

3. Select Symbols in the Symbols group.

4. Select More Symbols in the drop-down menu.

5. Select the Special Characters tab in the Symbol dialog box.

6. Select Nonbreaking Space from the Character menu.

7. Select the Insert button to insert the nonbreaking space.

Pro Tip: You can move your cursor around the document and insert additional nonbreaking spaces or other special characters while the Symbol dialog box is open.
8. Select the Close button to close the Symbol dialog box.

Insert Nonbreaking Spaces in Microsoft Word Using the Keyboard Shortcut
1. Place your cursor where the nonbreaking space should be inserted. Alternately, if a regular space already appears where the nonbreaking space should be inserted, select the regular space (see figure 1).
2. Select Ctrl + Shift + Space on your keyboard to insert the nonbreaking space.
Further Reading:
How to Insert Special Characters in Microsoft Word
How to Find and Replace Special Characters in Microsoft Word
How to Create a Nonbreaking Dash in Microsoft Word
Updated December 06, 2022