
Microsoft Word – How to Print Track Changes (Only)
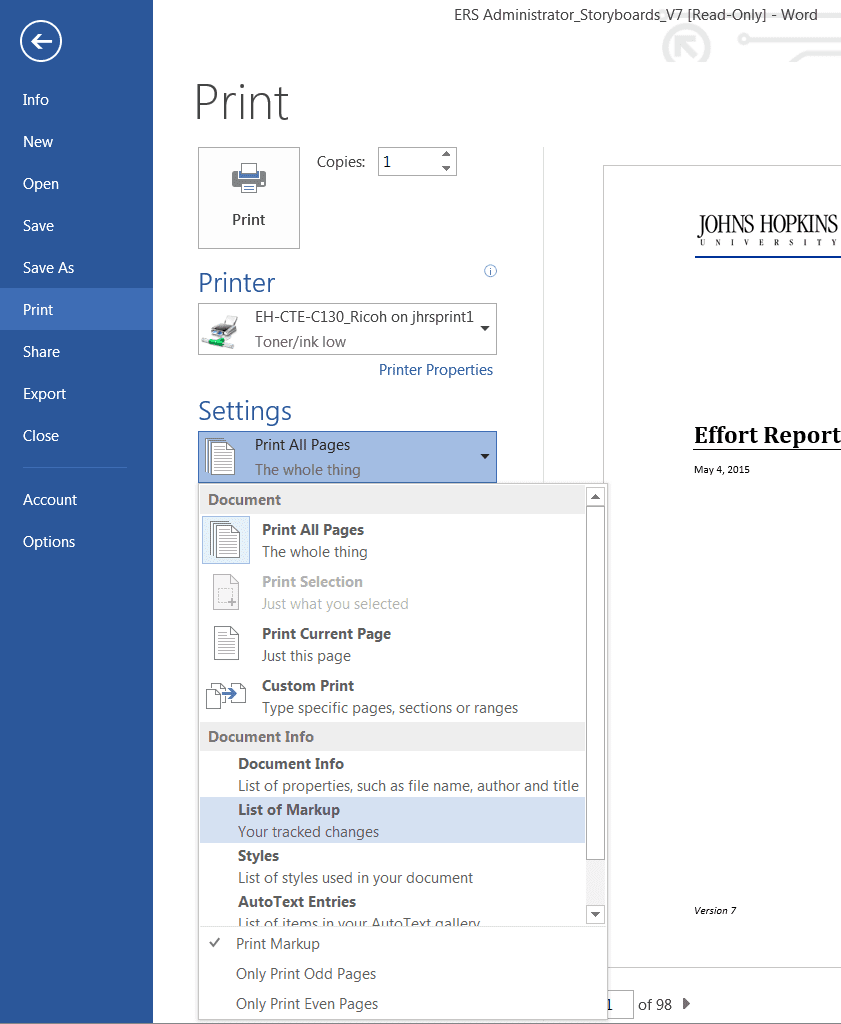
- Access the Print menu.
- From the Settings drop-down menu, select List of Markup.
- Click Print.
- Review the printed document.
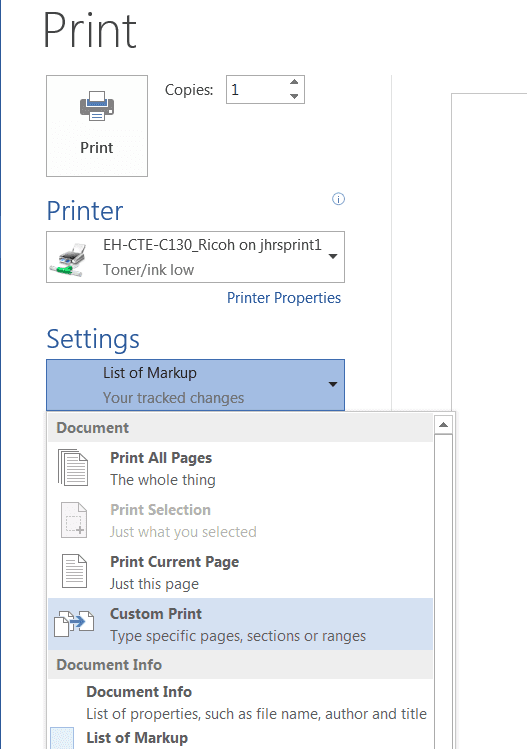
- Access the Print menu again.
- From the Settings drop-down menu, select Custom Print.
- Enter the pages that contain changes.
- Click Print.
Contents
- 1 Can you Print a document with track changes?
- 2 Why is word not printing track changes?
- 3 How do I show track changes and markups in Word?
- 4 How do I print without track changes in Word 2016?
- 5 Can you print just the comments in Word?
- 6 How do I turn on track changes without changing the view?
- 7 How do I print a Word document without the markup area?
- 8 Why are my track changes not showing different colors?
- 9 How do I change all track changes to one author?
- 10 How do I Redline Track Changes in Word?
- 11 How do I save a clean copy after track changes?
- 12 How do I make a clean copy after track changes?
- 13 How do I copy comments and track changes in Word?
- 14 How do I print in simple markup?
- 15 How do I print comments in pages?
- 16 How do I print a letter with different names?
- 17 How do I track changes?
- 18 How do I print a document without markup?
- 19 Can you change the author of track changes in Word?
- 20 Why does track changes change to author?
Can you Print a document with track changes?
Print tracked changes
Tracked changes can be useful to include in a printed version of a document. Open the document that contains the tracked changes that you want to print. On the File menu, select Print.
Why is word not printing track changes?
To prevent the Track Changes marks from being printed, click the button below “Settings” (the button probably says “Print All Pages”). Under “Document Info” on the drop-down menu, notice there’s a check mark next to “Print Markup”. Select “Print Markup” to remove the check mark.
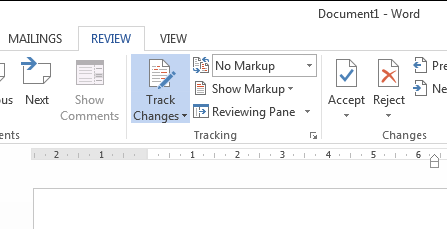
How do I show track changes and markups in Word?
Turn on Track Changes to show edits made in a document, and use Show Markup to show the types of revisions you’d like to display. Select Review > Track Changes to turn it on. Make edits in your document and Word captures any edits you make. Select Review > Track Changes to turn it off.
How do I print without track changes in Word 2016?
Printing without Track Changes Marks
- Press Ctrl+P. Word displays the File tab of the ribbon with the print options visible.
- Click the drop-down list directly under the Settings label.
- In the options that appear, you’ll see a check mark next to Print Markup.
- Click Print.
On the Document menu that appears, in the “Document Info” section, select the “List of Markup” option. Also, make sure the “Print Markup” option is selected at the bottom. Next, above the “Settings” menu, click “Print.” You will now have a printed version of only the comments of the document.
How do I turn on track changes without changing the view?
How Can I Turn on Track Changes Without Changing the View on Microsoft Word?
- Click the Review tab on the editing ribbon at the top of the Microsoft Word window.
- Locate the Tracking group and click the Track Changes icon to enable the feature.
How do I print a Word document without the markup area?
Print without all markup and comments
Click File > Print > Print All pages in Settings section, then uncheck Print Markup.
Why are my track changes not showing different colors?
The Track Changes tab of the Options dialog box. Make sure that all the Color settings (with the exception of the color setting for the change bars) are set to “By Author.” If these settings are for a specific color, then it can affect how changes are displayed in the document.
Change the track changes color
- Go to Review > Tracking Dialog Launcher .
- Select Advanced Options.
- Select the arrows next to the Color boxes and the Comments box, and choose By author. You can also color-code text moves and changes made to table cells.
How do I Redline Track Changes in Word?
In the toolbar at the top of the screen, click the “Review” tab. This tab contains tools to help with spell checking and editing, including the “Track Changes” feature. Click the “Track Changes” button to enable Track Changes. This feature places a red line in the margins next to any edited text.
How do I save a clean copy after track changes?
Revise the document, and save it by going to File and clicking on Save. Print out a copy of the revised document showing the tracked changes. Hide the tracked changes by going to View and clicking on Markup. Print a “clean” copy of the document.
How do I make a clean copy after track changes?
Word 2016
- Go to the “Review” toolbar.
- Click the “Accept” button, and a dropdown menu will appear.
- Clicking “Accept All Changes” will give you a clean version of your text.
- On the same toolbar (i.e., “Review”), you’ll see “Delete”.
- Click “Delete All Comments in Document.”
How do I copy comments and track changes in Word?
Copy and paste with track changes in Word
- Open the source document that you will copy text with track changes from, and turn off the track changes with clicking Review > Track Changes > Track Changes.
- Select the text you will copy, and press Ctrl + C keys together to copy.
How do I print in simple markup?
To do this:
- Click File in the menu and select Print.
- In the drop-down box directly below Settings, you should see the pages you can print. Click that arrow to display the settings.
- Go toward the bottom of the list and pick Print Markup to deselect it. You should see the checkmark next to it disappear.
Print with comments in Pages, Numbers and Keynote
- 1) Click File > Print from the menu bar.
- 2) In the print options window, click the Show Details button if necessary, in Pages and Keynote.
- 3) In Pages and Numbers, check the Print comments box.
- 4) Click Print when you’re ready.
How do I print a letter with different names?
To do this, follow these steps:
- Click Edit individual letters.
- In the Merge to New Document dialog box, select the records that you want to merge.
- Click OK.
- Scroll to the information that you want to edit, and then make your changes.
- Print or save the document just as you would any regular document.
How to use Track Changes
- Open Microsoft Word.
- Choose the Review tab at the top of the document.
- Either click the Track Changes button (PC) or toggle the Track Changes switch (Mac).
- Make sure that you change ‘Simple Markup’ to ‘All Markup’ from the drop down bar next to Track Changes.
How do I print a document without markup?
Method 1: Alter Print Options
- To begin with, click “File” tab in the Ribbon.
- Next click “Print” command.
- Then go to “Settings” section and click on the first drop-down box.
- On the menu, deselect “Print Markup” option.
- Finally, choose printer and set other formatting and click “Print”.
Can you change the author of track changes in Word?
The default setting to display changes is Simple Markup, which you will see in a drop-down menu above Markup Options. This setting is much like the one in recent versions of Word for PC. If you want to see all the changes in the text, select All Markup from the drop-down menu.
Why does track changes change to author?
In Word 2010, when using an existing document (in . DOC) and tracking changes, we can edit the document and our changes which will appear in a different color. This is the normal behavior up to there. As soon as we hit SAVE, all changes done in the document are changed to belong to AUTHOR and are of the same color.
Problem
You have a Word document that has comments and track changes mark-up that you want to print, without the comments and track changes mark-up.
When you go to print you notice that these are included.
You need to print the document without removing these.

Solution
By default the comments and track changes mark-up will be printed. The get around this you need to hide all the changes from the screen. If you cannot see them on the screen they will not print.
To do this, open the ‘Review’ tab then under ‘Tracking’ select ‘No Markup’
NOTE:
- When saving or printing to PDF – check “best for printing” to exclude the markup from the PDF.
Jun 26, 2015
in Microsoft Office, Technology
Tags: Microsoft, Microsoft Word, printing, technology, tips

Do you ever use the Track Changes feature in any Microsoft Office products? It’s great! I use it in Word all the time. It’s especially useful when I’m working with a client and they have revisions to make to documents. Track Changes makes it easy to locate and see exactly what changes they’ve made.
Recently, we’ve had to update older documents. One document came to me that was nearly 100 pages long. My colleague had made numerous changes, but not on every page. I only needed to print the changed pages so I could physically take them into the audio recording booth. But wait – Word does not have the capability to just print Track Changes! (Trust me, I used the Help menu and tried to Google how it was done. Nope – it’s not possible.) I was fearful that I’d have to look through page by page and write down which individual pages to print. Before I gave in to that solution, I found a much better work-around. Here’s a trick to help you save a serious amount of time and paper.
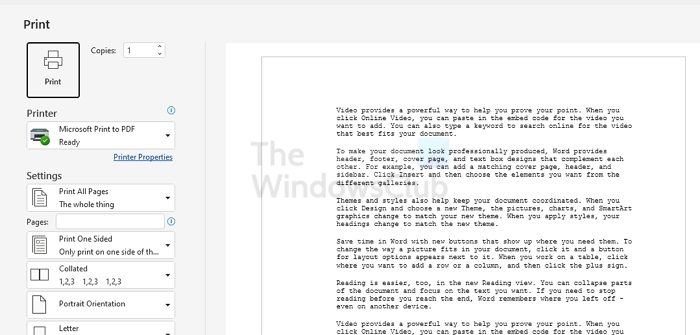
- Access the Print menu.
- From the Settings drop-down menu, select List of Markup.

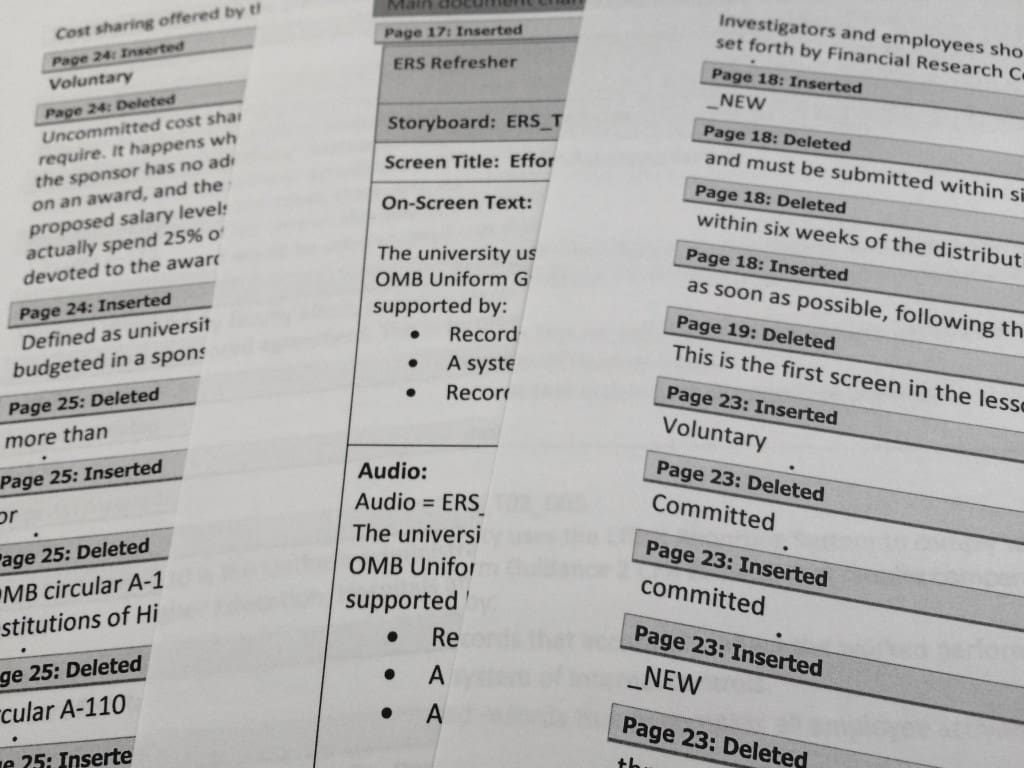
- Click Print.
- Review the printed document. It’s a concise list that indicates every page where a change was made.

- Access the Print menu again.
- From the Settings drop-down menu, select Custom Print.

- Enter the pages that contain changes.

- Click Print.

If your Microsoft Office Word documents are not printing correctly or properly, here are some solutions you can try to fix the problem. The problem could be a driver issue, font problem, the Word document itself, or even a general PC issue. However, before we go ahead, we suggest you go to System > Troubleshoot > Other Troubleshooters. Click the Printer Troubleshooter option, and then click on the Run button. Then try to print and see if it works. If it doesn’t, go ahead with the advanced troubleshooting.

Follow these suggestions if the Microsoft Office Word documents are not printing correctly or properly:
- Test printing of other documents
- Test in WordPad
- Test printing from other programs
- Repair Office
- Test for problems in Windows
- Test printing with different printer drivers
You will need an administrator account to get this done.
1] Test printing of other documents
If your documents or graphics contain damaged fonts, this can cause printing problems in Microsoft Word. Before reinstalling your drivers or software, try testing Word’s printing ability. You can achieve this by testing in a new word document.
- Open Word, and then click the new blank document template.
- To insert ten paragraphs of sample text on the document’s first line, type
=rand(10)and press Enter. - Turn on the Printer, and use Ctrl + P to check if the document prints.
- If the document prints, then you need to try with different objects that Word supports. The list includes
- Clip art, a table
- Drawing object
- Fonts
- Online Photos and so on.
- Try to print again and check if this works.
These tests determine whether Microsoft Word can print documents correctly. They may also reveal issues with specific fonts or graphics not printing correctly.
If you are not receiving any errors when trying to print a document, but the document will not print, the document may be damaged. Even if you can print the same document on another computer, this may be due to file damage that is not apparent on all computers. In this case, check out how you can fix the damaged Word documents.
Additionally, if the printer works when you change the font, you must remove it from the PC and reinstall it to check. If it doesn’t, choose a different font.
If none of these works, check out the second method.
2] Test in WordPad
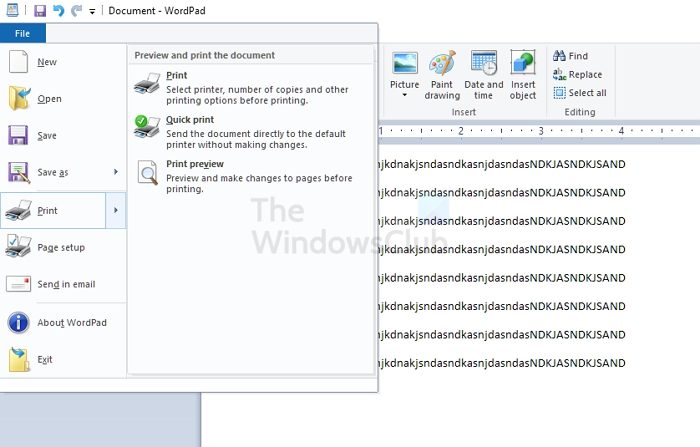
- Click on the Start button.
- In the Search box, type Wordpad.
- In the list of programs, click on WordPad.
- In the WordPad document, type some random words
- On the File menu, click Print.
- In the Print dialog box, click OK or Print.
If this is the first time you use WordPad, you may be prompted to select the printer. Done that, you can also add images and other supported objects to check if the print works.
If this doesn’t work, we need to check if the print is working from another program.
3] Test printing from other programs
After you finish creating the document in WordPad, you can test the print functions in your web browser or another Office program. You can also try to print a test page for your printer. To print a text page, follow these steps:
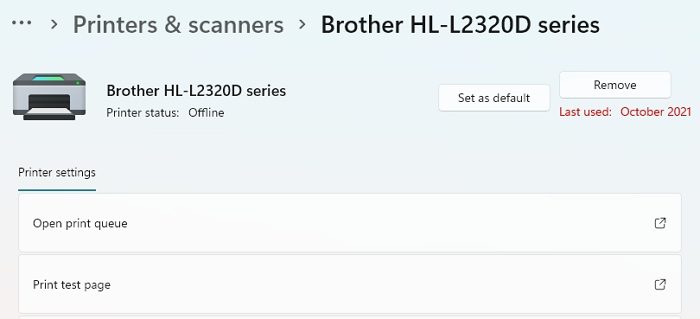
- Open Windows Settings using Win + I
- Navigate to Bluetooth and devices > Printers and Scanners
- Select your printer to expand the option
- Click on select Print Test Page.
If this doesn’t work, then the issue is with the printer. You must reinstall the printer driver and check if the issue is resolved. However, if this solution works, you can print from anywhere except Microsoft Word. Check out the following suggestion to fix the issue.
4] Repair Office
If the printing problem continues, follow these steps to run the repair program and reinstall any missing or damaged program files.
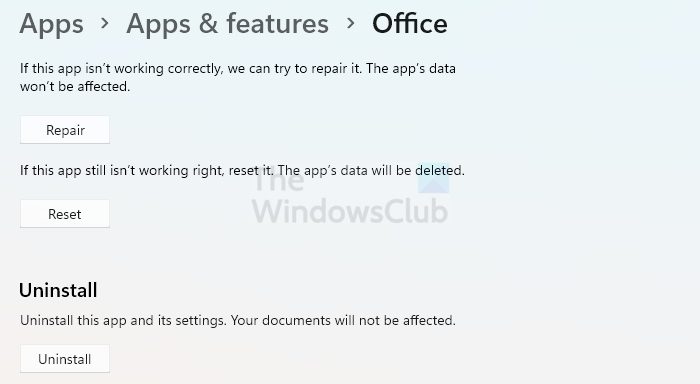
- Exit all Office programs.
- Open Windows Settings, navigate to Apps > Apps & features list,
- Locate, and select the Office and then click on the three-dot menu and click on Advanced Options
- Scroll, look for the Repair button, click on it, and let the wizard complete the process.
Once done, open Word again and check if you can print.
5] Test for problems in Windows

To troubleshoot potential issues with your device drivers or memory-resident programs, you can start Windows in safe mode and test printing to a file in Word. To start Windows in safe mode, follow the steps below.
- Remove all USB devices from your computer, and then restart your computer.
- Restart your PC, and press the F8 keys as the computer boots.
- Keep it pressed unless you see the Advanced Boot Options screen
- You can then navigate to Safe Mode by going to Troubleshoot
- Log on to your PC, and try printing from Word again.
If you don’t experience the Word printing problem when you start Windows in safe mode, you can use the same steps to troubleshoot after you do a clean start. It will help you determine the source of the problem.
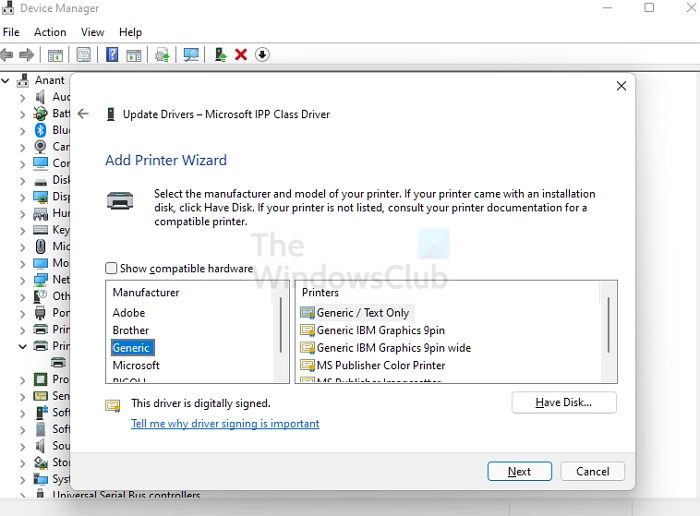
6] Test printing with different printer drivers
To determine whether the printer driver is the cause of the problem, you can test different drivers. You can start by updating the printer driver, and if that doesn’t work, you need to use the generic, text-only printer driver to test printing from Word. To do this, follow these steps:
- Open Power Menu using Win + X
- Click on Device Manager
- Expand the Printers section, and select the printer
- Right-click and click on Update driver > Browser for drivers on your computer
- Then click on Let me pick from the list of available drivers on my computer
- Uncheck Show Compatible Hardware

- Click on Generic and then select Generic / Text only
- Click next to apply the changes, and then try to print.
If you see an error message when you try to print a file that only contains text but not when you use the generic, text-only printer driver, your printer driver may be damaged. In this case, contact the manufacturer to help remove the printer driver and install an updated version.
Why is my Microsoft Word not opening?
When Word’s document cannot be opened, it may be because of corrupted documents or mistakes like using a picture as a document’s icon. Other reasons include using Word with other programs and add-ons.
Where are unsaved Word documents stored?
These Word files can be found via File > Open and click the Recover Unsaved Documents button at the bottom of the Recent File List.
Does your printer produce Microsoft Word documents with strange fonts, jumbled paragraphs, missing text, or almost nothing? Try these potential fixes.
There are many reasons for Microsoft Word documents to print out strangely. Some involve errors with the program; others could hint at more far-reaching issues.
If your Microsoft Word documents are printing out incorrectly on Windows, try these troubleshooting options to get perfect prints every time.
Finding Out What the Problem Is
Before we begin, you should know that a few of these troubleshooting techniques to find out why Microsoft Word isn’t printing correctly involve some test printing. If you want to conserve printer toner or ink, here’s how to change settings to make Microsoft Word print in black and white.
Print a Test Page
Before you try any other potential fix, it’s best to rule out an error with your printer. This will give you an idea of where the issue lies. Follow these steps to print a test page on your printer.
- Click on the Start menu and type ‘control panel.’
- Click on the Control Panel app.
- In Category view, look under Hardware and Sound for the View devices and printers option. In Icon view, it is called Devices and Printers.
- Right-click on your printer and select Printer properties. (Make sure your printer is connected to your computer and switched on. The printer will be grayed out if it is not.)
- Under the General tab, click on the Print Test Page button.
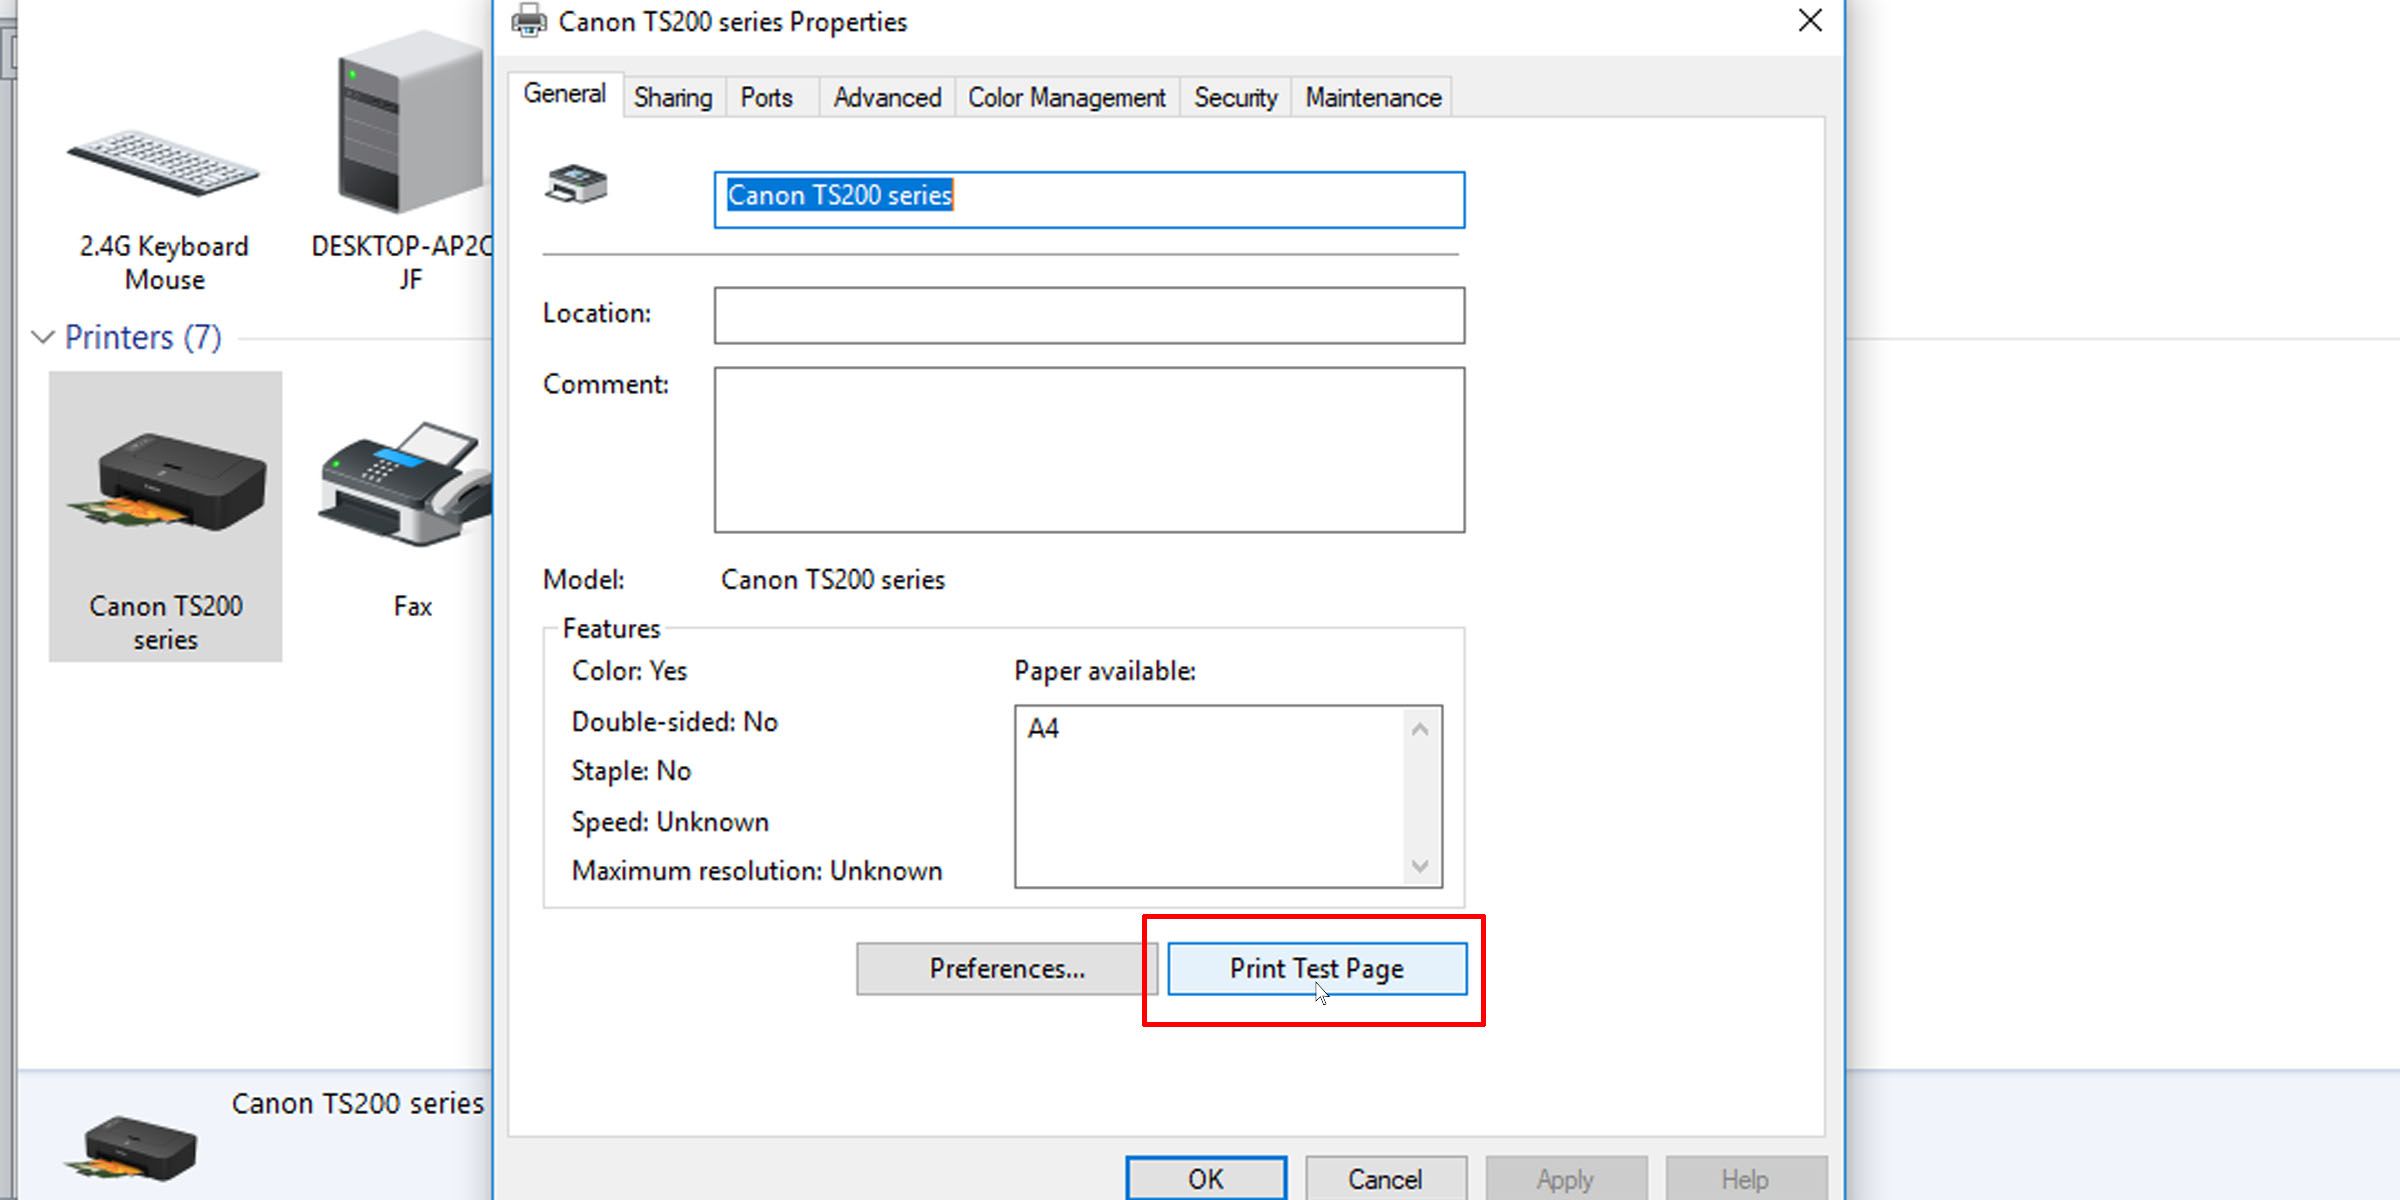
The test page should tell you whether your printer has been installed correctly. If there is an issue with your printer, this guide on what to do when your printer is not working should help you resolve the issue.
If the test page prints out correctly, the issue is probably not with your printer. It could be Microsoft Word or even Windows that is causing the print error.
Fixes You Can Try to Fix Printing Issues in Microsoft Word
1. Print Other Microsoft Word Documents
Is the problem with a specific document? A particular file may have corrupted contents, or the file itself may be corrupted. This could cause printing errors with Microsoft Word. Try the following fix:
- Open a new Microsoft Word file.
- Copy and paste your text and other data into the new Word document.
- Print the newly created document.
If your document prints out as desired, it may be an error with the original file. This probably means that the print error was an isolated issue, and this should resolve it.
If the page doesn’t print out correctly, it could be an issue with Microsoft Word or some of its settings.
2. Print Documents in Other Formats
To know whether the printing issue you are having is Microsoft Word-specific, try printing another document on your computer, maybe a PDF file or even a website. Pressing Ctrl + P on most web pages should pull up the print options.
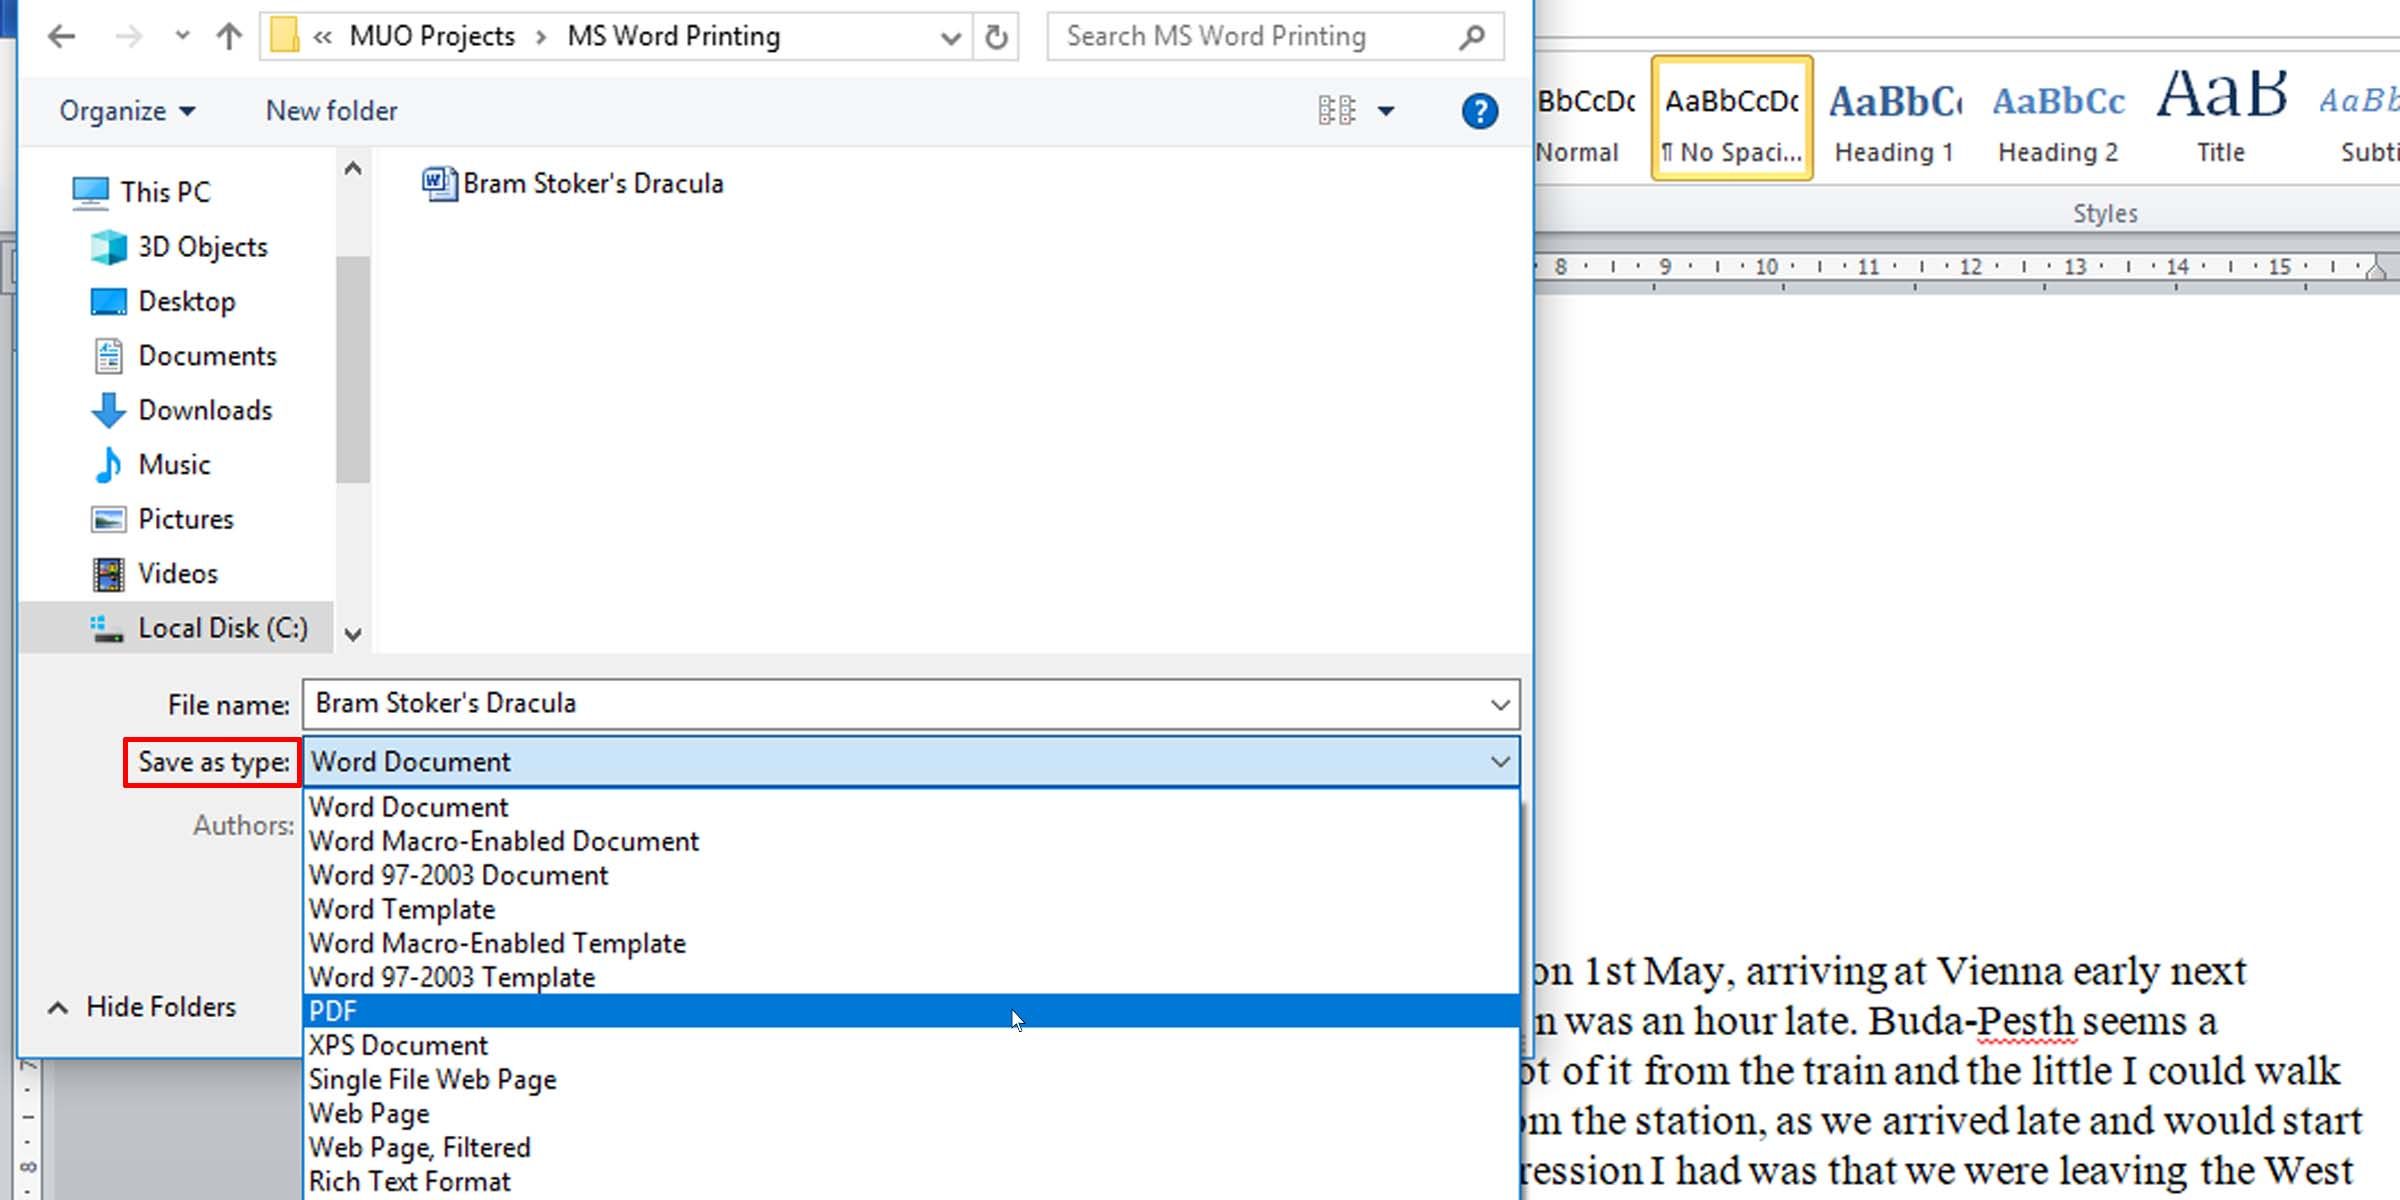
If PDF documents print out correctly, here’s a temporary fix: When you’ve finalized the contents in your Microsoft Word document, covert it to PDF and print that instead.
Here’s how to convert a Microsoft Word document into a PDF document. In Microsoft Word on Windows, simply go to File > Save As, then choose PDF at the Save as type dropdown.
Here’s a helpful article on how to convert Word files to PDF on a Mac computer.
3. Check Printer Drivers
If other documents are printing out correctly, a potential fix may be to uninstall and reinstall either your printer drivers or your printer, or both. As Microsoft themselves put it, “Word is a very printer-intensive program. Therefore, a minor problem in the printer driver tends to affect Word before it affects other programs.”
Here’s a guide on fixing printer driver issues and getting your printer functioning normally again on Windows.
4. Check for Problems With Windows
The problem might be add-ons that you’ve installed with Microsoft Word or even misbehaving device drivers. Follow this guide to get in and out of Safe Mode in Windows 10 to test why Microsoft Word won’t print documents correctly.
If you are able to print properly in Safe Mode, you may want to perform a clean boot to isolate and identify the cause of your problem.
5. Scaled Printing Issue
A less common issue is when pages print at a fraction of the actual size, taking up only a small portion of the printed paper. This is possibly a problem with scaling factors. Here’s how to check and remove the scaling on Microsoft Word documents when printing.
- Press Ctrl + P or go to File > Print when working in the Word document.
- Click on Printer Properties under your printer.
- Under the Page Setup tab, in the Page Layout section, make sure the Scaled option isn’t selected. If it is, switch it to Normal-size.
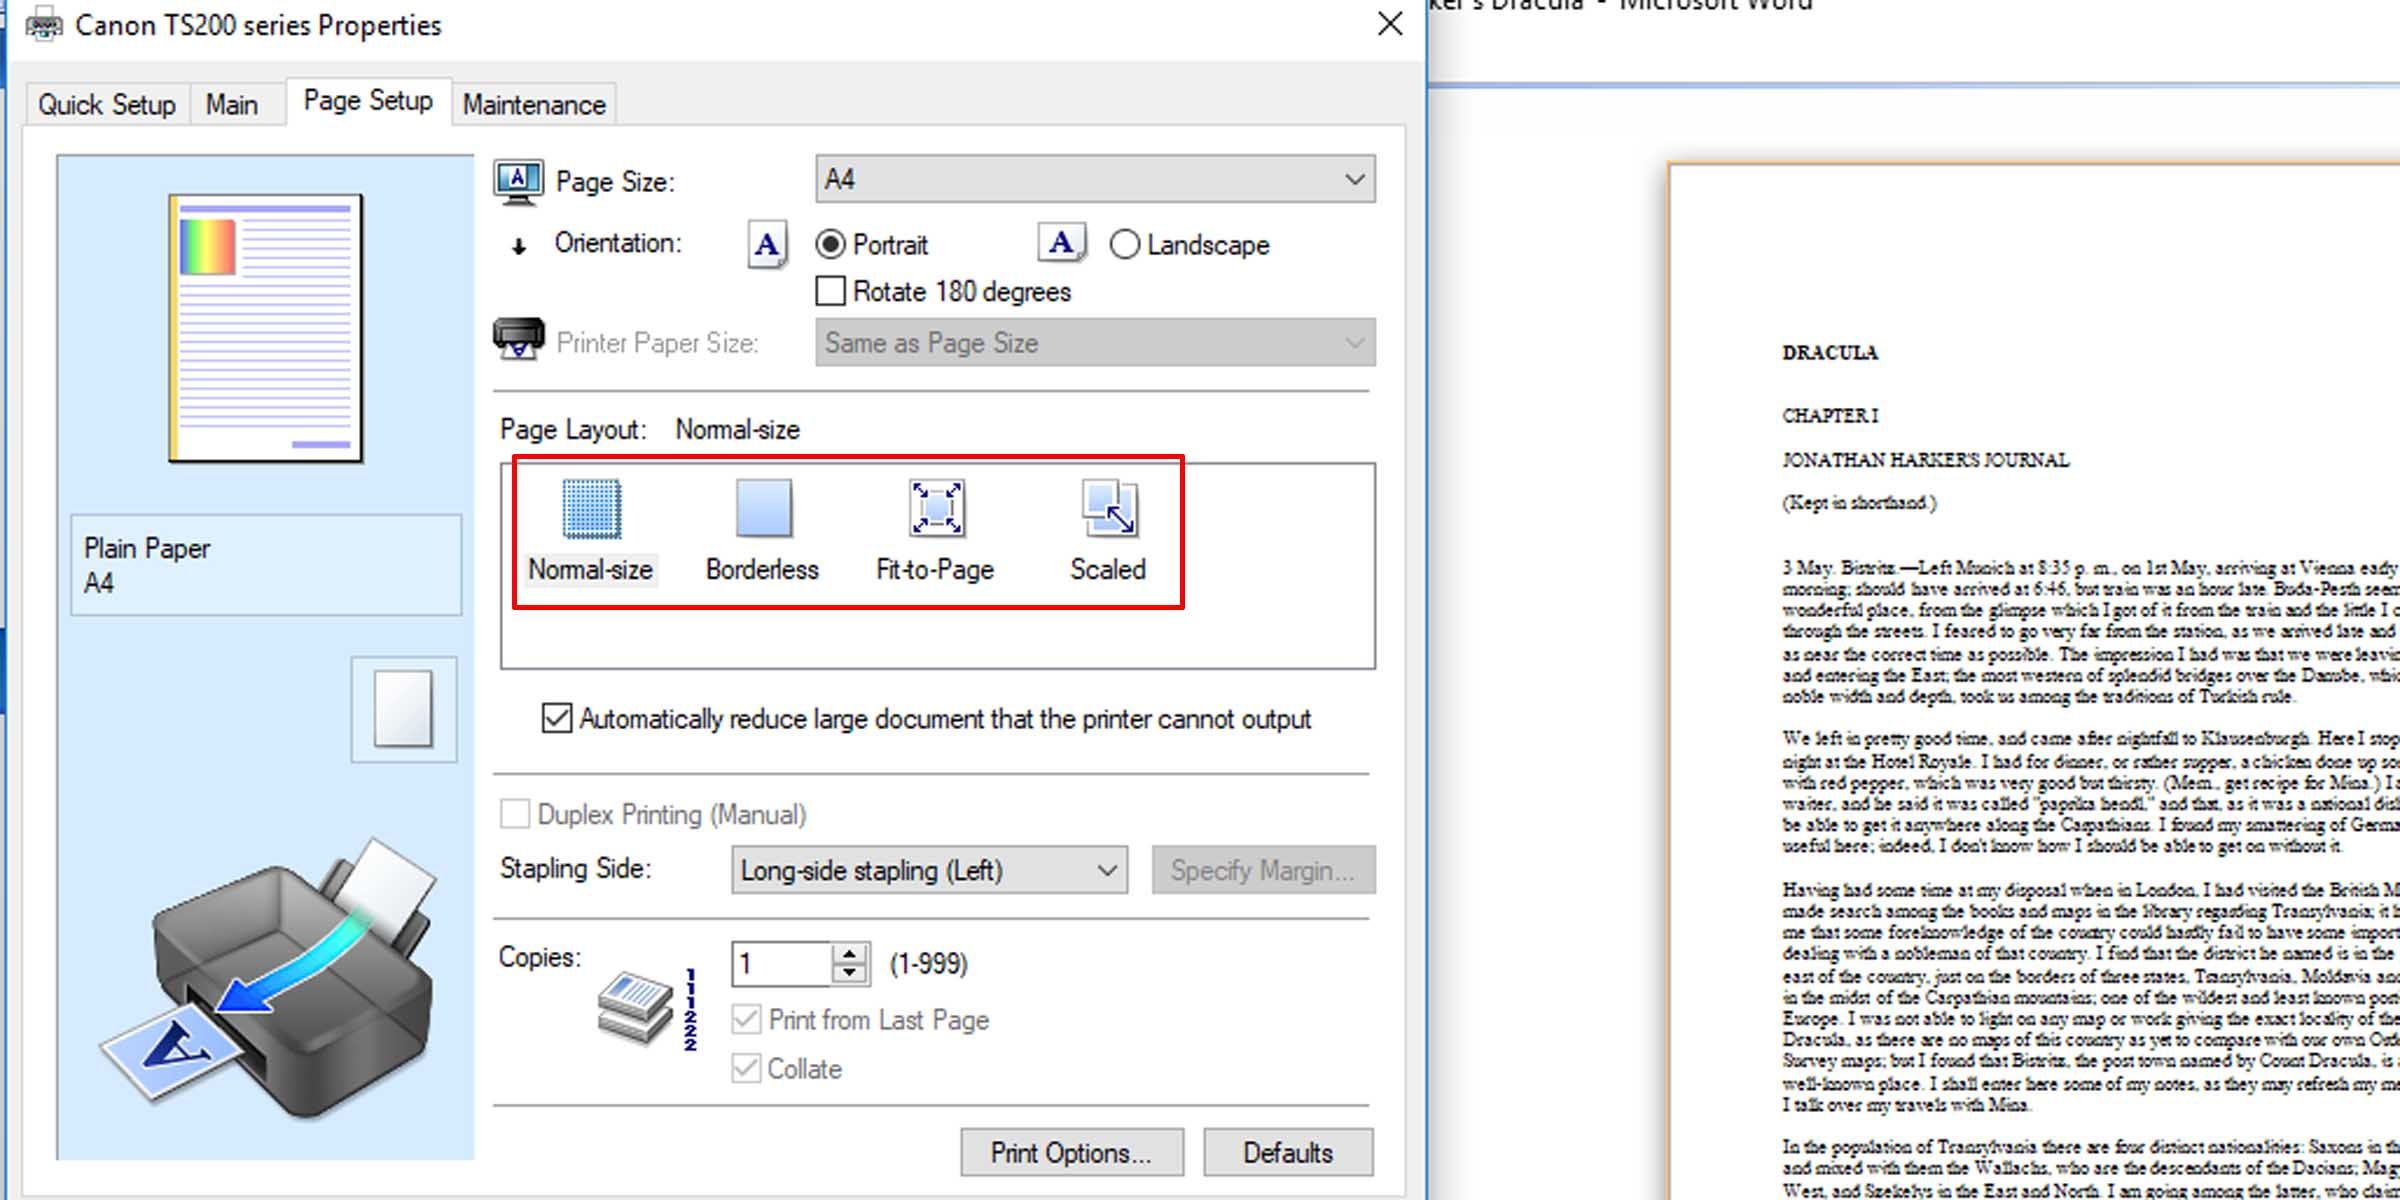
This should make the pages print at full size, with text and any graphics filling the entire page.
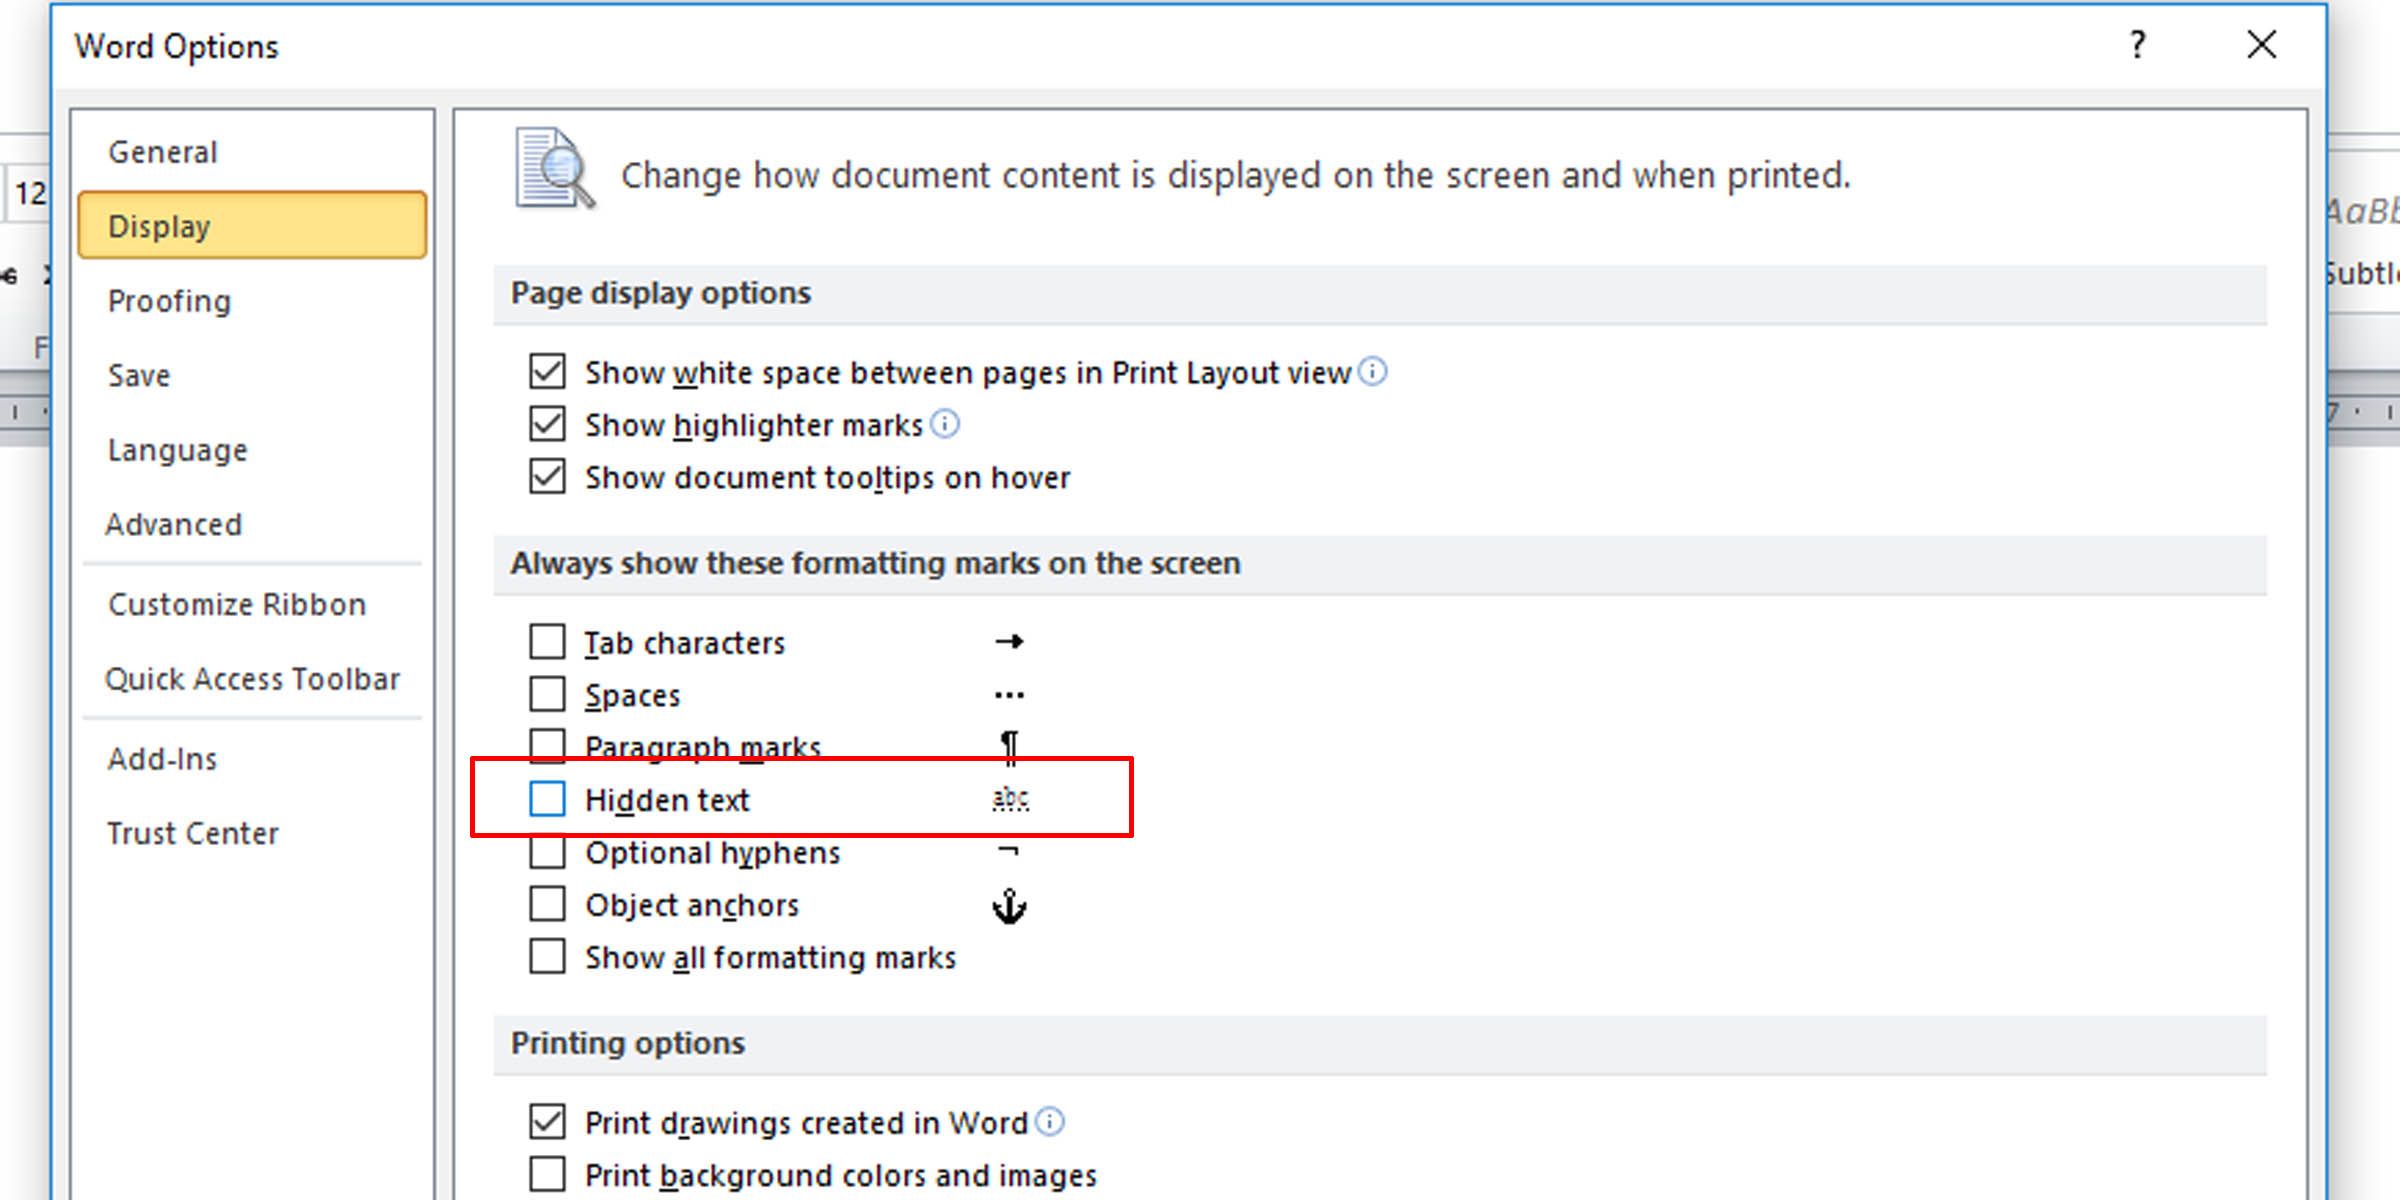
6. Check for Hidden Text
Microsoft Word affords the option of hiding text on the page. The hidden text has the same properties as formatting marks, which are characters that take up space in a document but don’t appear when printed, such as spaces, line breaks, and tab characters.
If your prints are missing part of your soft copy text, here’s how to check whether you have text hidden in the document.
- In the Word document you want to check, click on File > Options.
- Under the Display tab, make sure the Hidden text option in unchecked.
-

Print the document to see if this fixes the problem.
This informative article gives more background on non-printing or invisible characters in word processors.
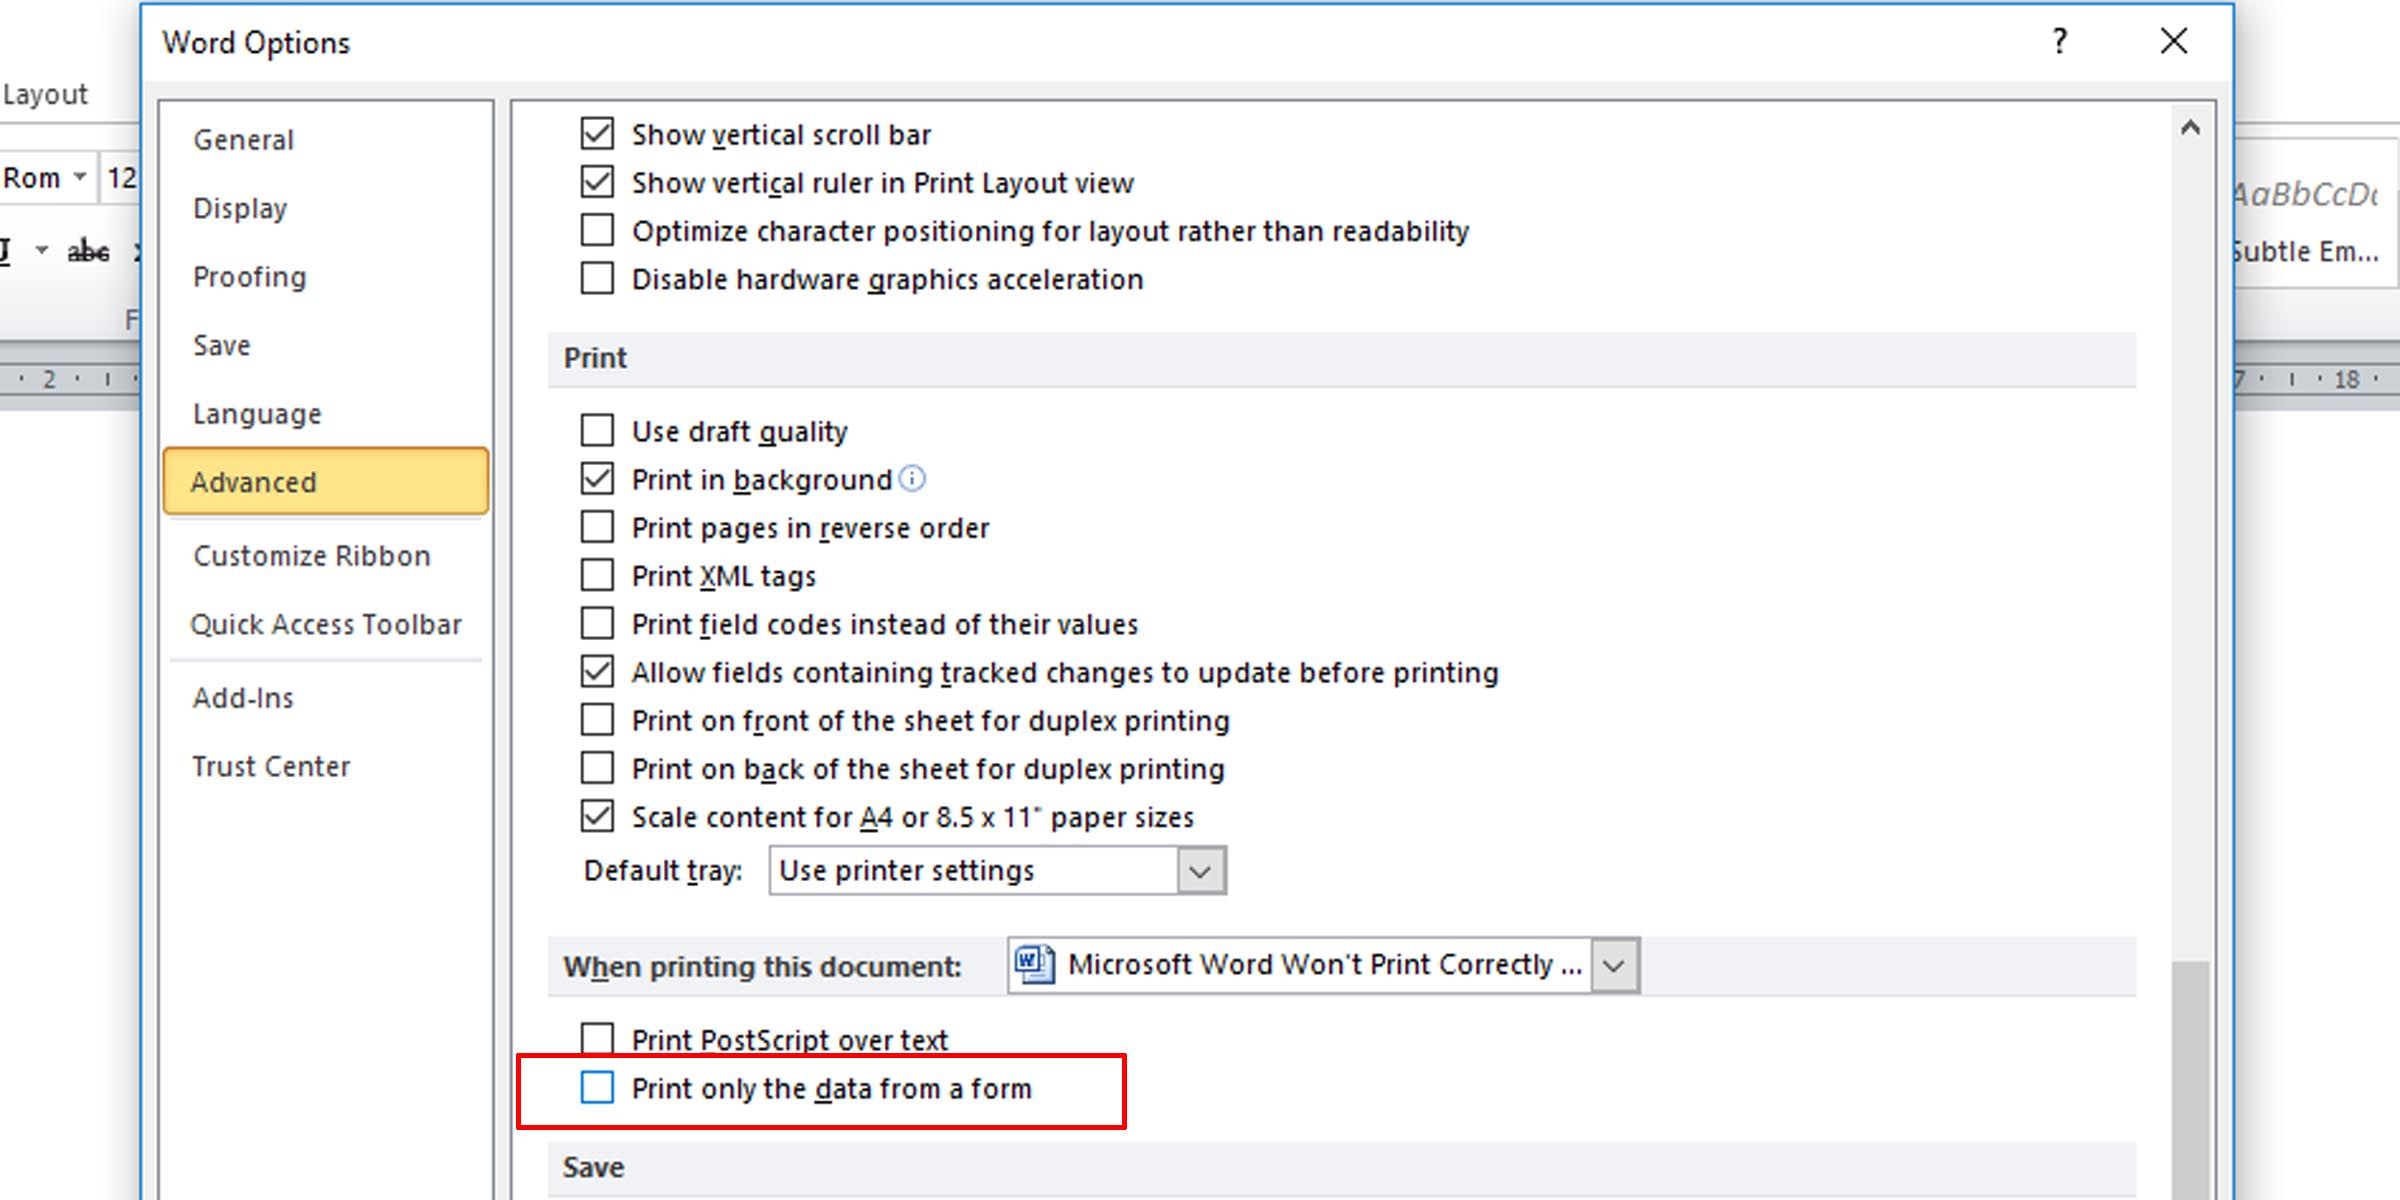
7. Check Form Data Print Options
A not-so-common occurrence is table borders not showing up in final prints. This can be easily remedied.
- In the Word document, go to File > Options.
- Under the Advanced tab, scroll down to the Print section.
- Make sure that the checkbox for printing only the data from a form is unchecked.
8. Print Directly to the Printer
Some errors when printing Microsoft Word documents causes pages to have only portions of text. This might be because of a spooling issue.
- Open the Control Panel app.
- Click on the option for devices and printers.
- Right-click on your printer and select Printer properties.
- Under the Advanced tab, select Print directly to the printer.
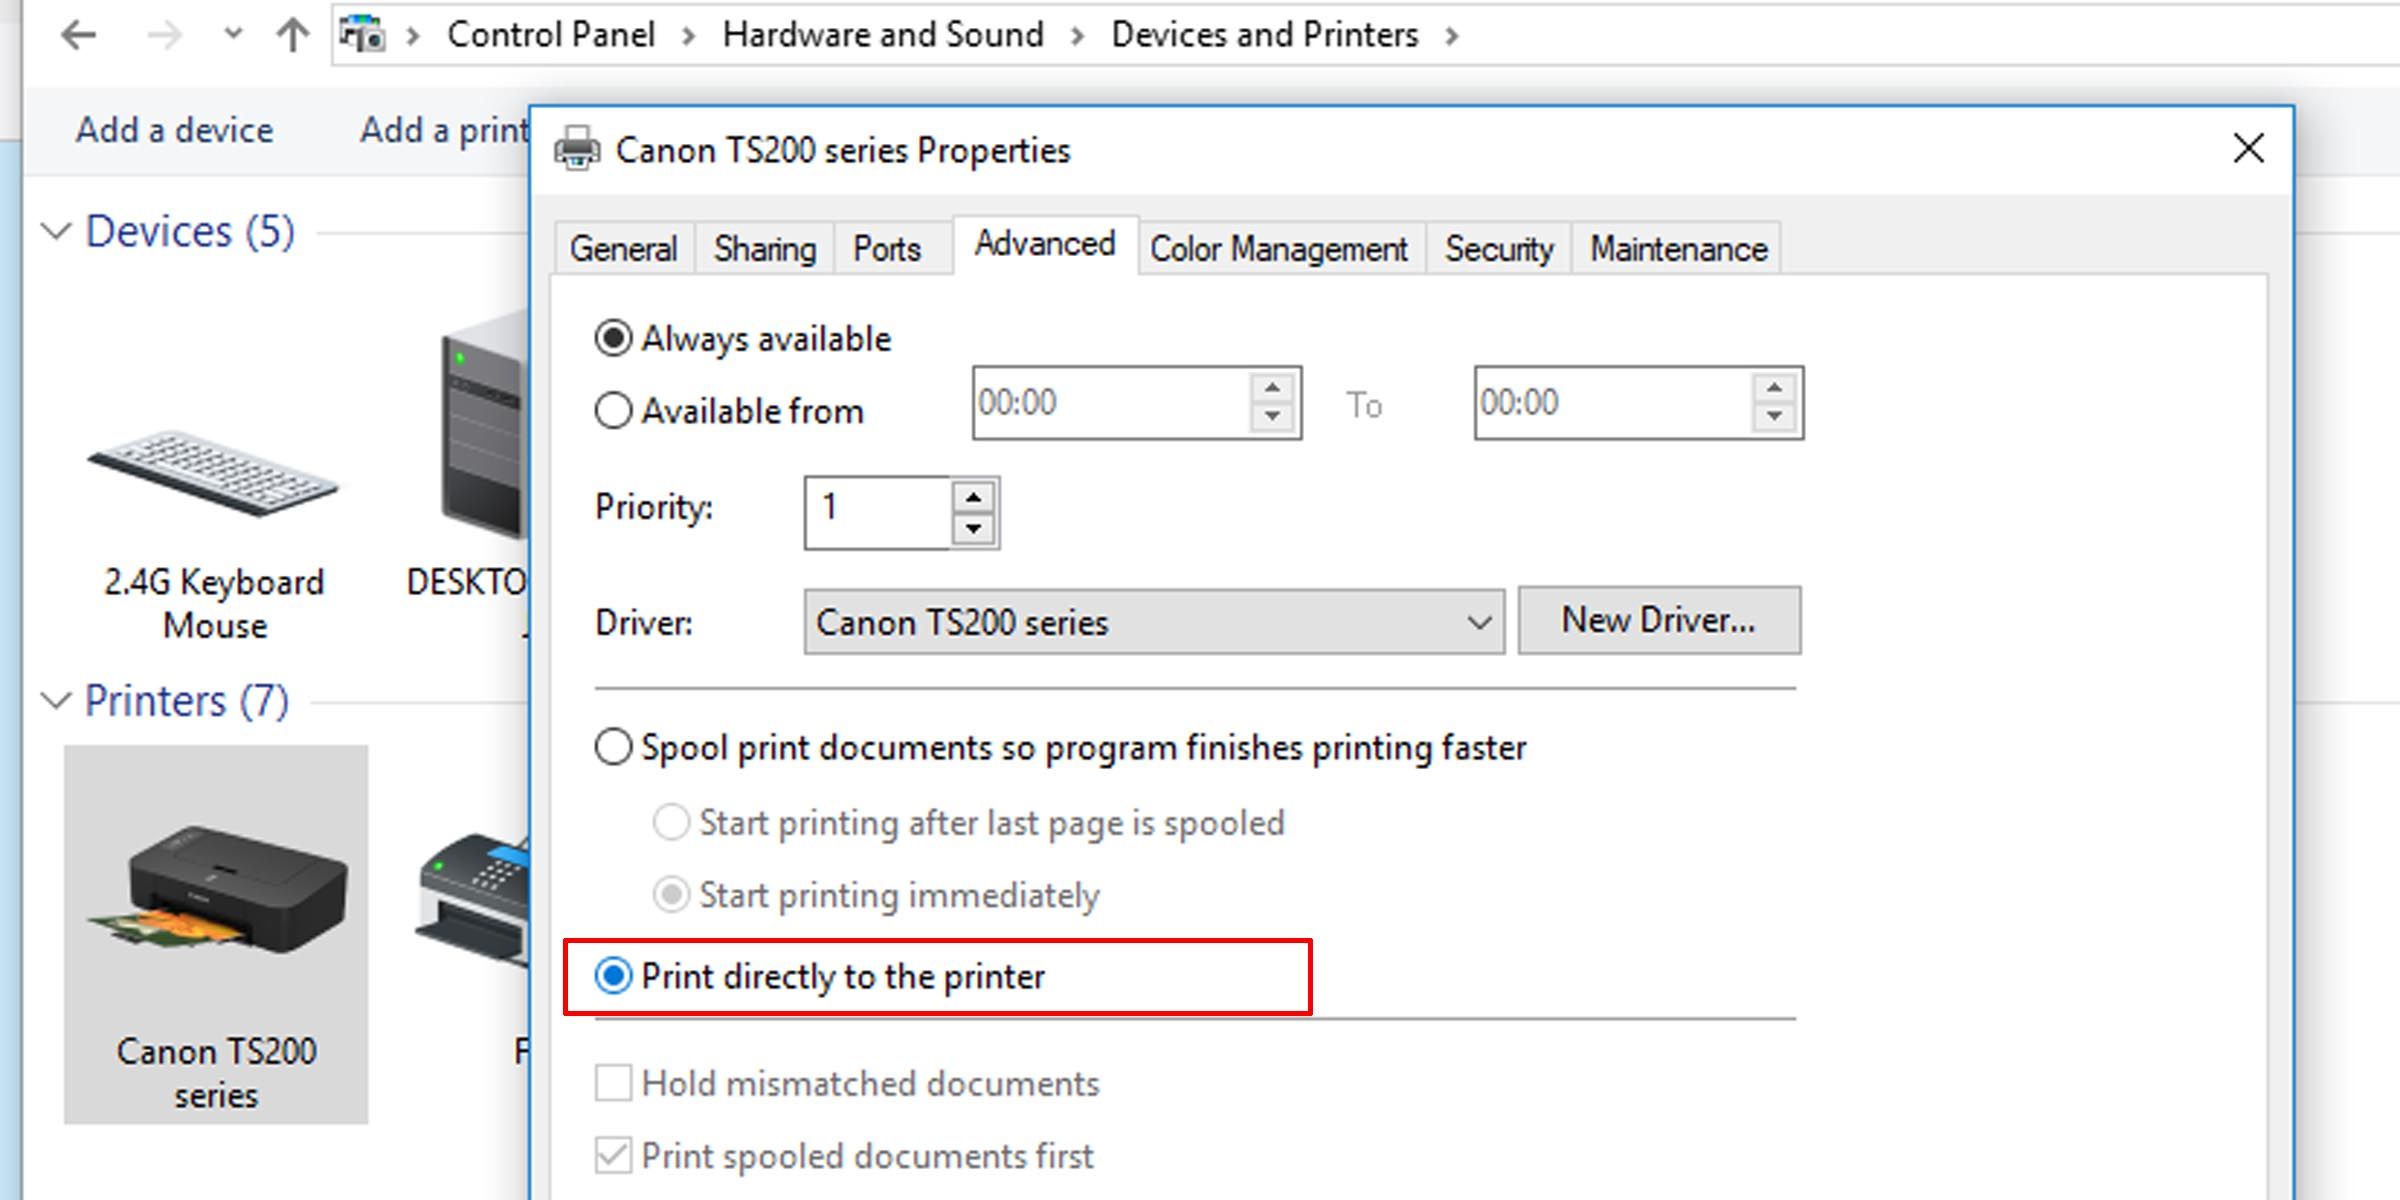
If your computer is connected directly to a printer, you don’t need the spool print option turned on. However, turning it off may slow down your PC when printing.
9. Repair Microsoft Office Suite
If you’ve tried all these potential fixes for Microsoft Word not printing properly and the issue persists, repairing your copy of Microsoft Word might solve the problem. To detect problems and repair Word on your Windows PC, do the following:
- Click on the Start menu and type «control panel.”
- Click on the Uninstall a program option under the Program heading in Category view, or the Programs and Features option in Icon view.
- Search for your Microsoft Office suite or Word program; right-click it and select Change or Modify.
- Select the Repair option and click Continue.
This will reset the settings on the 2010, 2013, 2016, and 2019 editions of Microsoft Word.
Get Printing Again
Hopefully, one of these troubleshooting tips should serve its purpose and resolve your printing issue, and you’ll be printing error-free pages just as you see them on your computer.