
Download PC Repair Tool to quickly find & fix Windows errors automatically
Some users have reported the issue whereby when they try to open any application Excel, Word or PowerPoint in Microsoft 365, they receive the error prompt with the message Unable to create new documents. This post provides the most suitable solutions to resolve the issue.

When you encounter this issue, you may see the following error description:
- We’re unable to create a new document at this time. Please try again later.
- A problem with your OneDrive account is preventing you from creating a new document
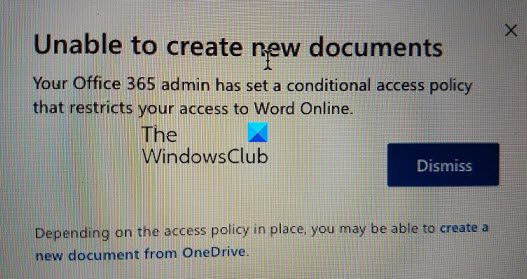
- Your Office 365 admin has set a conditional access policy that restricts your access to Word
Investigations shows that this issue occurs when you try to create documents in Office online via the Office 365 portal.
If you’re unable to create new documents in Office 365 on your Windows 11/10 computer, you can try our recommended solutions below and see if that helps to resolve the issue on your system.
- Initial checklist
- Disable OneDrive sync for Office applications
- Disable Continuous Access Evaluation (CAE)
- Install Microsoft 365 locally
Let’s take a look at the description of the process involved concerning each of the listed solutions.
1] Initial checklist
Before you try the solutions below, you can do the following, and after each task see if you can create the document successfully without issues:
- Check operation status of Microsoft Services. As this issue is related to Office online, it’s likely a case of services outage which could be region-specific or widespread. So, you can check the operation status of Microsoft Services for Office 365 and try again. Also, check to make sure there are no connectivity issues at your end – if any, you can fix Network & Internet connection problems in Windows 11/10.
- Check your Microsoft 365 license. There are three necessary licenses for using Office online apps, viz;
-
- OneDrive Online
- SharePoint Online
- Office Online
So, ensure that you have the appropriate Microsoft 365 license, then you can clear Cache, Cookies, and Browsing History on your web browser, then head back to Office 365 portal and try creating new online files again.
2] Disable OneDrive sync for Office applications
This solution requires you to disable OneDrive sync for Office applications; and the fix specifically applies to the A problem with your OneDrive account is preventing you from creating a new document error description when you’re unable to create new documents in Office 365.

The following instructions will guide you on this:
- Click on the OneDrive icon on the Taskbar.
- Click on the gear-shaped icon and select Settings.
- Select the Office tab and clear the checkbox that says Use Office applications to sync Office files that I open.
- Click OK.
3] Disable Continuous Access Evaluation (CAE)
")
This solution requires you to disable Continuous Access Evaluation (CAE); and the fix specifically applies to the Your Office 365 admin has set a conditional access policy that restricts your access to Word error description.
Continuous Access Evaluation (CAE) in Azure AD is now enabled by default and allows for a quicker response by forcing an access token refresh in case of certain events taking place. You can set Strict enforcement or Disable CAE altogether. Keep in mind that the strict option though can break the user experience when they are working in Office on the web. Strict enforcement should only be used in environments where this is a hard requirement.
4] Install Microsoft 365 locally

Given that you’re having issues creating new Office documents online, this is another viable solution to the issue in hand, which requires you to install Microsoft Office 365 locally on your Windows 11/10 device. Once you have your Office 365 version installed, you should be able to create new documents normally and start using your Office applications.
Hope this helps!
Related post: Office documents do not open after upgrading Windows
Your Office 365 admin has set a Conditional access policy that restricts your access to Word
This may be related to the user-enabled MFA and your organization’s conditional access policy settings. Azure AD Multi-Factor Authentication and Conditional Access policies give you the flexibility to require MFA from users for specific sign-in events.
How do I fix unable to create a new document?
To resolve the error “Unable to create new document” when opening WordPad or Microsoft Paint on your Windows 11/10 device, you can simply uninstall and then reinstall the respective program.
Why can’t I create a new document on Microsoft Word?
There could be a number of reasons why you can’t create a new document on Microsoft Word – mostly it could be due to a corrupt Office installation. To fix this issue, you can try opening Word in Safe Mode, then check if you can create new documents. Otherwise, you can repair Word or repair the Office suite entirely. If that didn’t work you can uninstall and install Office on your device.
How do I create a document in Office 365?
To create a document in Office 365, do the following:
- Open Word. Or, if Word is already open, select File > New.
- In the Search for online templates box, enter a search word like letter, resume, or invoice. Or, select a category under the search box like Business, Personal, or Education.
- Click a template to see a preview.
- Select Create.
Why is Microsoft not letting me save a document?
The problem can be caused by your template file, so be sure to recreate it and check if that solves the issue. Microsoft Word won’t save documents – This issue can occur due to your add-ins. To fix the problem, be sure to start Word in Safe Mode and disable all add-ins.
Obinna has completed B.Tech in Information & Communication Technology. He has worked as a System Support Engineer, primarily on User Endpoint Administration, as well as a Technical Analyst, primarily on Server/System Administration. He also has experience as a Network and Communications Officer. He has been a Windows Insider MVP (2020) and currently owns and runs a Computer Clinic.
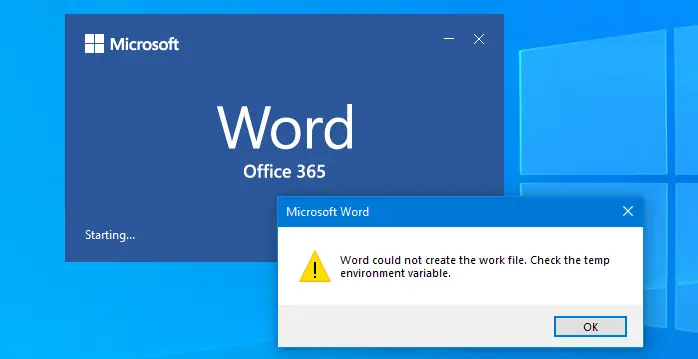
Microsoft Word Could Not Create the Work File Check the Temp Environment Variable Windows PC is an error message that many Microsoft Users have received while trying to use Microsoft Word or Microsoft Outlook. Some users experienced this problem with even other applications that are included in the Microsoft Office Pack. With more and more advancement of the Word, there also came new errors that were not seen by us before. The first instances of this particular error started while Windows Vista was the latest Windows Operating System for us. People also said that they could not insert images into the Word documents, and some could not see any pictures in the Outlook emails.
This shows an error code message like,
Through various research, it has been found that the leading cause of this Error Word Could Not Create the Work File Check the Temp Environment Variable error is the corruption or missing files from the Temporary Internet Files folders. We know that Microsoft Outlook and almost all the other applications under the Microsoft Office Package is associated with the Internet Explorer for communicating with the Internet. This is the apparent reason for storing the temporary internet files of both the Internet Explorer and Microsoft Office in the same place and even slight corruption of a file, or if even a single file is missing here, then the following error will appear.
Again when Word is opened, it creates a lot of hidden files temporarily in different locations inside the hard drive. Generally, these files get deleted when no longer required, but in case the Word crashes and unable to recover, then these files are left behind, and this can cause havoc. In the worst-case scenario, it will prevent you from reopening the document.
Causes of Error Word Could Not Create the Work File Windows Issue:
- Microsoft Office Word Error Issue
- Windows PC problem
- Temp environment variable error
- Word access denied
- Temporary internet files folder missing
- Opened with read-only access
Again Microsoft Office is the most widely used application currently present in the world, and that is why this Error Word Could Not Create the Work File Check the Temp Environment Variable issue is very significant and need to be solved.
How to Fix & Solve Error Word Could Not Create the Work File Check the Temp Environment Variable
The following few solutions have effectively solved the Microsoft Office Word Could Not Create the Work File Check the Temp Environment Variable problem for many users. Hopefully, this will work correctly for you too.
1. Deleting Temporary Internet Files –
Firstly, we would be looking into a solution that is quite easy and does not involve messing with the registry either. You will have to try to fix the Error Word Could Not Create the Work File Check the temp environment variable issue by deleting the Temporary Internet files by using Internet Explorer. First, as a part of the safety precaution, you should close all the open programs.
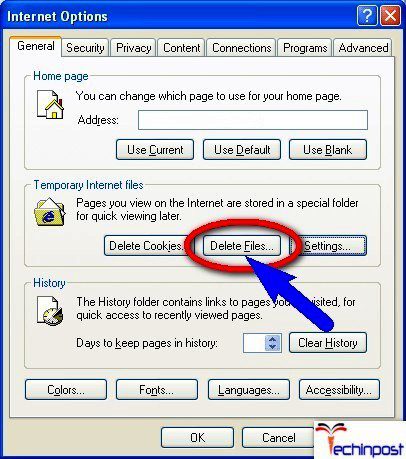
Follow the steps below to fix the Error Word Could Not Create the Work File Check the temp environment variable problem.
- Open Internet Explorer.
- Now, click on the Tools from the top right corner.
- Then click on the Internet Options from the contextual drop-down menu.
- Click on the Delete which is under your Browsing history
- Uncheck the Preserve Favourite website data.
- You only need to check the Temporary Internet Files, but just to be more accurate, check all the other options too.
- Click on the Delete option.
- Now close the Internet Explorer and restart your system.
- Once your system boots up, check whether the problem still exists are is it solved.
2. Deleting %TEMP% Files –
First, make sure to shut down all the office applications before following the Error Word Could Not Create the Work File Check the Temp Environment Variable steps.
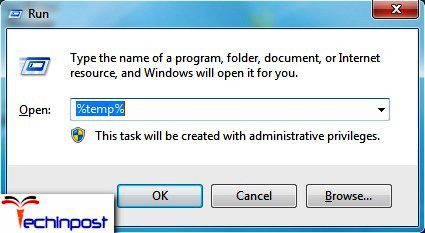
- First, Click on Start and type %TEMP% inside the text field.
- Now select all the files and folders in the temp folder by pressing Ctrl+A and then press the SHIFT key and the DELETE key together. A prompt will appear with a warning of permanently deleting all these files. Click on yes to confirm.
- Finally, launch it once again and check whether the Error Word Could Not Create the Work File Windows 10 PC problem persists.
3. Moving Temporary Internet Files –
Moving the temporary internet files or the folder in Internet Explorer can also fix this Error Word Could Not Create the Work File Check the temp environment variable windows 10 issue. Follow the steps below to solve the problem.
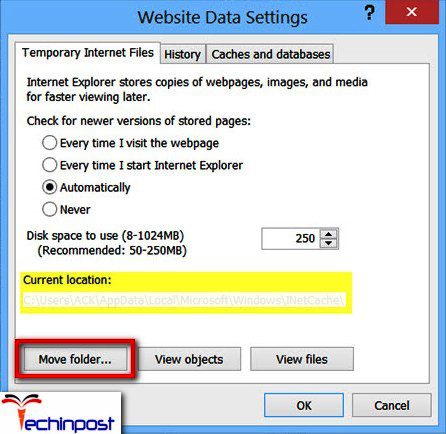
- Open Internet Explorer and go to the Tools and then Internet Options.
- Hereunder the General Tab, go to the browsing history section, and click on Settings.
- Now check the current location. Windows Vista/7 should have the following location: C:usersusernameAppDataLocalMicrosoftWindowsTemporary Internet Files.
- If the location is different from the above, then click on Move Folder and then change the location to the one above.
- This will ask you to log off, and this is normal. Finally, Log back in, and the problem should be solved.
4. Creating a New Folder –
You can also resolve this Preview pane Error Word Could Not Create the Work File Windows 10 issue by creating a new folder on your system.

- First, start the Windows Explorer
- Now locate the following folder location C:Users<userprofile>AppDataLocalMicrosoftWindows
- Here create a new folder and name it as INetCacheContent.Word.
*Note: It can be necessary for you to turn on the Hidden Items from the View Ribbon of the Windows Explorer.
5. Edit Computer Registry –
The above methods should solve your Error Word Could Not Create the Work File Check the temp environment variable issue without any problem. Still, in case it was unable to help you, then there is also a good chance for you to resolve this problem by editing your system’s registry.
*Note: You should follow this Error Word Could Not Create the Work File Check the Temp Environment Variable step very carefully as doing this step incorrectly will lead to some other problem. Thus it is advisable to create a backup of the registry in case you face issues after using this solution.
You need to follow the following steps to get rid of Error Word Could Not Create the Work File Check the Temp Environment Variable error:
Close all the open programs first, especially the Office Applications.
Press the Windows logo + R keys to open the Run dialog box. Type here regedit inside the Run dialog box and then press Enter in order to open the Registry Editor.
Inside the left pane of Registry Editor, go to the following directory:
HKEY_CURRENT_USER > Software > Microsoft > Windows > Current Version > Explorer
Click on the User Shell Folders from the left pane to display its contents in the right pane.
Now inside the right pane, look for the registry value Cache and double-click on it to modify it.
The Value data field can have anything written on it, but you need to delete it and paste the following line in it:
%USERPROFILE%Local SettingsTemporary Internet Files
Now close the Registry Editor and Restart your system.
When your system restarts, check to see whether the Error Word Could Not Create the Work File Check the Temp Environment Variable problem is solved.
So these are the solutions and guides for getting rid out of this Microsoft Office Word Could Not Create the Work File Check the Temp Environment Variable Windows PC Error Problem. I hope these Word Could Not Create the Work File Check the Temp Environment Variable helpful methods will work for you.
If you are facing are getting this Microsoft Office Word Could Not Create the Work File Check the Temp Environment Variable Windows PC Error Issue, then comment down that error here below in the comment section or directly mail us.
Updated: 12/31/2020 by

In Microsoft Word, the default action when pressing Enter is to create a new paragraph and not move to the next line. For most writing, this is not a problem until you want Word to not create a new paragraph.
Thankfully, there is a keyboard shortcut that moves to the next line. Move the text cursor to where you want the new line to begin, press Enter, hold down Shift, and then press Enter again. You can continue to press Shift+Enter to move to each new line, and when ready to move to the next paragraph, press Enter.
Word could not create the work file. Check the temp environment variable – Fixed!
If, like me, you’ve received the “Word could not create the work file. Check the temp environment variable” error shown above when starting Word, here’s a couple of quick simple fixes that should address the problem.
Fix – Creating Environment Variables
This issue can be caused by profile corruption, viruses, or disk corruption, however in some cases I have simply been unable to come up with a reason for why this would change. I will address the corruption/possible virus issues towards the end – for now the fix:
- Open system properties. This can be done either of two ways:
- Open explorer, right click “This PC” (or my computer if you’re stuck in the past like me) and go to properties.
- Press the windows key + Pause/Break on your keyboard.
- Choose “Advanced system settings” on the left hand side.

- Then press System Variables in the window that appears.

- In the next window, click the first add button.

- Create a new environment variable as follows, replacing USERNAME in the value field with your username:

- Finally, click OK on each of the windows to confirm the settings and close them.


You should now be able to launch Word without receiving the “Word could not create the work file. Check the temp environment variable” error. In most cases, this will fix the issue, however if not, please read on for Microsoft’s recommended fix. Please also note the points raised after the fixes to address possible corruption or virus issues.
Fix Number 2 – Microsoft’s fix
This method is what’s advised by Microsoft to fix the issue in their knowledge base article. Unfortunately, Microsoft advise the issue is caused by “The Temporary Internet Files folder for Windows Internet Explorer is set to be in a location where you do not have permission to create new temporary files”. In my experience this has not been the case, so I can only make the same assumptions I’ve made above and advise you read on after the fix to ensure no viruses are present or corruption is occurring.
- Browse to C:UsersUSERNAMEAppDataLocalMicrosoftWindows (you may need to show hidden files for this to appear).
- Create a new folder named “INetCacheContent.Word”
You should now be able to launch Word without receiving the “Word could not create the work file. Check the temp environment variable” error. I’ve personally not had this working in many cases, however it’s worth a shot and won’t do any harm if it doesn’t work for you. Either way, please also note the points raised after the fixes to address possible corruption or virus issues.
Other Pointers
I’ve mentioned this above, however it’s worth checking for viruses or corruption on your now you’ve solved the above issue. If you’re happy on how to go about this, then you don’t need to read any further – however I’ll leave some basic instructions for those that aren’t.
- Check your computer for viruses by running a scan with your antivirus package. I also recommend running a scan using Malwarebytes – available for free for home users. Malwarebytes will run as secondary protection, therefore there’s no need to remove your existing package.
- Run system file check. Open command prompt and run the following command: “sfc.exe /scannow”. This will check all core operating system files and repair any corruption.
- Run a disk check. Open command prompt and run the following command: “chkdsk /r /f”. This will scan the drive for data inconsistencies and repair what it can.
If none of this helps, it is my recommendation to try system restore or consulting a local computer professional to investigate this further or you.
When you try to open or save a document in Microsoft Office Word, you receive the following error message:
Word could not create the work file. Check the Temp environment variable.
The error message can also appear when you preview a .docx or .xlsx file using File Explorer preview pane.
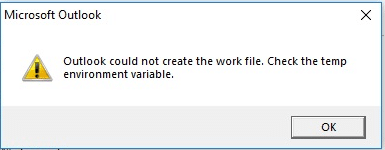
The same error occurs when you start any other Office application — e.g., Outlook, Excel, etc.,
Outlook could not create the work file. Check the Temp environment variable.
Cause
This problem can occur if you’ve installed 64-bit Office earlier, uninstalled it, and installed the 32-bit version on Windows 64-bit. If a 64-bit version of Office 365 is installed, then uninstalled, and then a 32-bit version of Office 365 is subsequently installed, Explorer may not show document previews. Instead, an error may be shown:
Word: Word could not create the work file. Check the temp environment variable.
PowerPoint: Access denied. Contact your administrator.
Excel: This file cannot be previewed.
Outlook: Outlook could not create the work file. Check the Temp environment variable.
The above errors can also happen if the Temporary Internet Files location for Internet Explorer is set incorrectly. It could be possible that the Temporary Internet Files location is pointed to a folder location in which the user does not have permissions to create new temporary files. Office applications use the Temporary Internet Files folder to create temporary files when you open Office documents or preview a document using the File Explorer preview pane.
 Easy fix: If you’re using Office 32-bit on Windows 64-bit Edition and facing this issue, you can fix the error by uninstalling the Office 32-bit version and installing the 64-bit version.
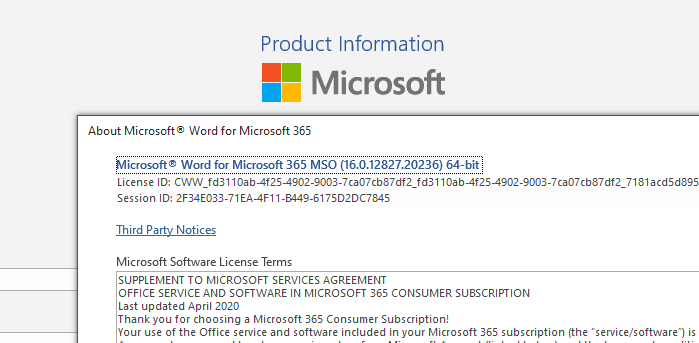
You can check the bitness of your Office installation by opening an Office product, click on the File menu, choose Accounts, and click the About button.
If installing the 64-bit Office is not a feasible option for you due to plugin compatibility or other issues, then here are some other solutions that help you get rid of the preview errors without having to switch to the Office 64-bit version.
Delete the Office 64-bit Previewer registry entries
If you’re running Office 32-bit Edition, then follow these steps to remove the 64-bit previewer registry entries. Follow these steps:
- Start the Registry Editor (
regedit.exe) - Go to the following branches one by one:
[Word Preview] HKEY_CLASSES_ROOTCLSID{84F66100-FF7C-4fb4-B0C0-02CD7FB668FE} [PowerPoint Preview] HKEY_CLASSES_ROOTCLSID{65235197-874B-4A07-BDC5-E65EA825B718} [Excel Preview] HKEY_CLASSES_ROOTCLSID{00020827-0000-0000-C000-000000000046} - Delete all of the above registry keys. Make sure you export each registry key to a separate .reg file before deleting the keys.
- Exit the Registry Editor.
- Logoff and login back to your account.
Windows will now use the preview handlers registered under the HKEY_CLASSES_ROOTWow6432NodeCLSID branch. This should fix the preview issues in Office 32-bit version running on Windows 64-bit.
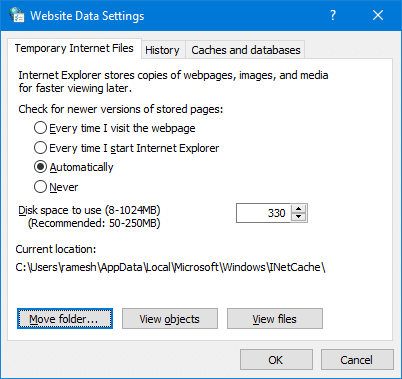
Change the Temporary Internet Files location for Internet Explorer
Incorrect Temporary Internet Files location can cause Office document preview issues in Explorer. To fix this, follow these steps:
Method 1: Using Internet Options
- Open Internet Options (
inetcpl.cpl) - In the Internet Options dialog box, click the General tab.
- In the Browsing history section, click Settings to open the Website Data Settings dialog box.
- In the Website Data Settings dialog, click Move Folder to open the Browse for Folder dialog box.
- In the Browse for Folder dialog box, select the following location:
C:Users<user name>AppDataLocalMicrosoftWindows
- Note Whichever location you select, a folder that is called INetCache is created.

- Click OK to close the Browse for Folder dialog box.
- Click OK to close the Website Data Settings dialog box.
- Click OK to close the Internet Options dialog box.
- Logoff and login back to your user account.
Method 2: Using the Registry Editor
- Start the Registry Editor (regedit.exe) and go to the following branch:
HKEY_CURRENT_USERSoftwareMicrosoftWindowsCurrentVersionExplorerUser Shell Folders
- Double-click Cache and set its data to:
%USERPROFILE%AppDataLocalMicrosoftWindowsINetCache
(Make sure that the value named Cache is of type REG_EXPAND_SZ. If it’s showing up as REG_SZ, delete the value and create a new one.)
- Exit the Registry Editor.
- Logoff and login back for the change to take effect.
Automate using .reg file
You can also apply the above settings using the following .reg file:
Windows Registry Editor Version 5.00

[HKEY_CURRENT_USERSoftwareMicrosoftWindowsCurrentVersionExplorerUser Shell Folders]
"Cache"=hex(2):25,00,55,00,53,00,45,00,52,00,50,00,52,00,4f,00,46,00,49,00,4c,
00,45,00,25,00,5c,00,41,00,70,00,70,00,44,00,61,00,74,00,61,00,5c,00,4c,00,
6f,00,63,00,61,00,6c,00,5c,00,4d,00,69,00,63,00,72,00,6f,00,73,00,6f,00,66,
00,74,00,5c,00,57,00,69,00,6e,00,64,00,6f,00,77,00,73,00,5c,00,49,00,4e,00,
65,00,74,00,43,00,61,00,63,00,68,00,65,00,00,00
In the above .reg file, the hex code simply refers to the following path:
%USERPROFILE%AppDataLocalMicrosoftWindowsINetCache
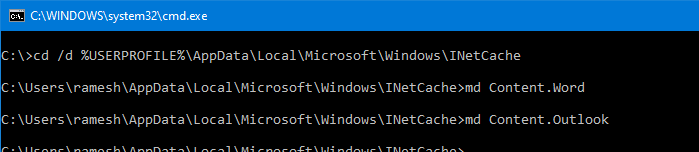
Create the Office app temp folders
If the above solution isn’t sufficient, create the temp folders for Word, and/or Outlook manually. To do so, run the following commands via Command Prompt:
cd /d %USERPROFILE%AppDataLocalMicrosoftWindowsINetCache
md Content.Word
md Content.Outlook
Check INetCache folder permissions
The INetCache folder has the following permissions by default:
NT AUTHORITYSYSTEM:(I)(OI)(CI)(F)
BUILTINAdministrators:(I)(OI)(CI)(F)
Computer_nameyour_username:(I)(OI)(CI)(F)
To check the permissions, run the command in the Command Prompt window.
icacls %USERPROFILE%AppDataLocalMicrosoftWindowsINetCache
Hope the one or more of the above methods helped you resolve the error “could not create the work file. Check the Temp environment variable” when starting Microsoft Word or Outlook. The solution should work in any version of Office and Windows, even in Office 365 Word 2016 running on Windows 10.
One small request: If you liked this post, please share this?
One «tiny» share from you would seriously help a lot with the growth of this blog.
Some great suggestions:
- Pin it!
- Share it to your favorite blog + Facebook, Reddit
- Tweet it!
So thank you so much for your support. It won’t take more than 10 seconds of your time. The share buttons are right below. 