
Word for Microsoft 365 Word 2021 Word 2019 Word 2016 Word 2013 Word 2010 Word 2007 More…Less
Options is where you can view and update settings for Word, your documents, your personal information and your preferences. General options lets you change user interface, personalization, and startup settings for your copy of Word and documents.
To see general options for working with Word, click File > Options > General.
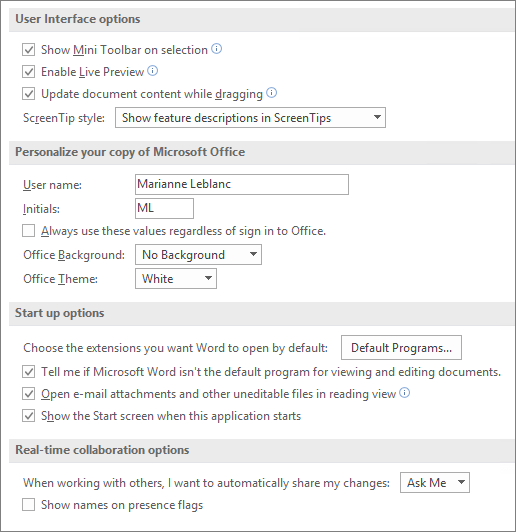
Show Mini Toolbar on selection
Select this option to show the Mini toolbar when you select text. The Mini toolbar provides quick access to formatting tools.
Enable Live Preview
Select this option to preview the effects of formatting changes in the document.
Update document content while dragging
Select this option if you want Word to adjust the layout when you drag objects such as pictures and text boxes.
ScreenTip style
Select a style to control whether Word displays screentips and feature descriptions with button names.
User name
Type a name in the User name box to change your user name.
Note: This user name is associated with any revisions you make to documents when using the Track Changes feature. It’s also the author name associated with the documents that you create. For example, in predesigned cover pages that include the author name, Word displays this user name automatically.
Initials
Type your initials in the Initials box to change the initials associated with your user name.
Note: These initials are associated with any comments you add when you review documents.
Always use these values regardless of sign in to Office
Select this option if you want Word to display this user name and these initials even if you sign into Office with an account that displays different information.
Office Background
Choose from a list of built-in background patterns.
Office Theme
Choose from a list of built-in Office themes.
Choose the extensions you want to open by default
Click Default programs to see and change the list of file types that Word opens by default.
Tell me if Word isn’t the default program for viewing and editing documents
Select this option if you want to be prompted to set Word as your default application for viewing and editing documents.
Open e-mail attachments and other uneditable files in reading view
Clear this check box to open e-mail attachments in Print Layout view instead of reading view.
Show the start screen when Word starts
Clear this check box if you want to bypass the start screen when you open Word.
To see general options for working with Word, click File > Options > General.
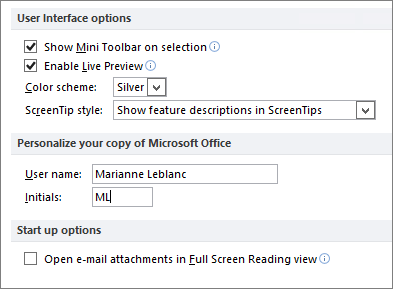
Show Mini Toolbar on selection
Select this option to show the Mini toolbar when you select text. The Mini toolbar provides quick access to formatting tools.
Enable Live Preview
Select this option to preview the effects of formatting changes in the document.
Color scheme Select an option from the list to change the color scheme of the programs.
ScreenTip style
Select a style from the list to control the display of the names of buttons and additional helpful information. Select Show feature descriptions in ScreenTips for names and helpful information, select Don’t show feature descriptions in ScreenTips for button names only, or select Don’t show ScreenTips for neither.
User name
Type a name in the User name box to change your user name.
Note: The name that appears here will be associated with revisions that you make when you review documents by using the Track Changes feature. It is also the author name that is associated with the documents that you create. For example, in predesigned cover pages that include the author name, the name that appears in the User name box is used automatically.
Initials
Type your initials in the Initials box to change the initials that are associated with your user name.
Note: The initials that appear here are associated with comments that you add when you review documents.
Open e-mail attachments in Full Screen Reading view
Selected by default, this option displays documents in Full Screen Reading view when they are opened from e-mail attachments. Clear this check box to open e-mail attachments in Print Layout view.
To see popular options for working with Word, click the Microsoft Office Button  , click Word Options, and then click Popular.
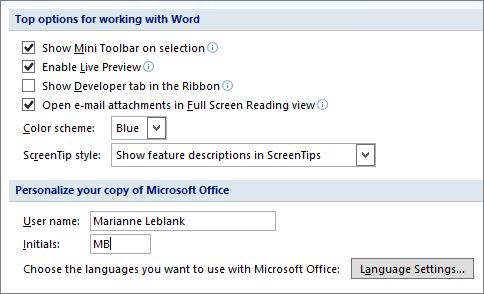
Show Mini Toolbar on selection
Select this option to show the Mini toolbar when you select text. The Mini toolbar provides quick access to formatting tools.
Enable Live Preview
Select this option to preview the effects of formatting changes in the document.
Show Developer tab in the Ribbon
Select this option to show the Developer tab on the Ribbon in 2007 Microsoft Office system programs. The Ribbon is a component of the Microsoft Office Fluent user interface. The Developer tab includes macro and form authoring tools, as well as XML-related features. Clear this check box to hide the Developer tab.
Always use ClearType
Selected by default, this option turns on ClearType to make the text easier to read. If you change this setting, you must restart Microsoft Office Word for the setting to take effect.
Notes:
-
This setting applies to all Office programs.
-
On computers running Microsoft Windows XP, turning this option on overrides the ClearType setting in Windows. This option is not available on computers running Windows Vista.
Open e-mail attachments in Full Screen Reading view
Selected by default, this option displays documents in Full Screen Reading view when they are opened from e-mail attachments. Clear this check box to open e-mail attachments in Print Layout view.
Color scheme Select an option from the list to change the color scheme of the programs.
ScreenTip style
Select a style from the list to control the display of the names of buttons and additional helpful information. Select Show feature descriptions in ScreenTips for names and helpful information, select Don’t show feature descriptions in ScreenTips for button names only, or select Don’t show ScreenTips for neither.
User name
Type a name in the User name box to change your user name.
Note: The name that appears here will be associated with revisions that you make when you review documents by using the Track Changes feature. It is also the author name that is associated with the documents that you create. For example, in predesigned cover pages that include the author name, the name that appears in the User name box is used automatically.
Initials
Type your initials in the Initials box to change the initials that are associated with your user name.
Note: The initials that appear here are associated with comments that you add when you review documents.
Choose the languages you want to use with Office
Click Language Settings to turn on the features necessary for the languages you want to use in 2007 Microsoft Office system.
We’re listening!
Updated May 11, 2018 thanks to customer feedback.
Was this article helpful? If so, please let us know at the bottom of this page. If it wasn’t helpful, let us know what was confusing or missing. Please include the Word and Operating System versions you’re using. We’ll use your feedback to double-check the facts, add info, and update this article.
Need more help?
Home > Microsoft Word > Using Settings and Preferences in Microsoft Word 2013
After reading this article, you’ll know how to work with Settings and Preferences in Microsoft Word 2013. Usually, before working with documents, you need to do some customizing. Depending on what you need to do in MS Word 2013, this can be very useful. For example, you may need to check spelling after typing in a foreign language, or get more screen tips for learning the software.
How to use Settings and Preferences in Microsoft Word 2013
Settings and Preferences are in the Option menu of the Backstage view. To access that, click File, and then Options in the drop-down. A pop-up window named Word Options will come up.

This contains many different options, such as General, Display, Proofing, Save, Language, and Advanced in the left part of the dialog window. Let’s talk about them.
The first option is named General. The main feature of this is the possibility to personalize your document by creating a User Name and Initials. By doing this, everyone will see the author of the document. That can be helpful when you need to be contacted, or if you need to identify the person who last made changes to the document when working on an item collectively.
Another useful possibility is to adopt Office components such as PowerPoint or Excel by using the Office Background button.
If you need more tips displayed on the screen to know how to use buttons or options, use the Screen Tip Style. After dropping that down, you’ll see three options, each of which makes changes in Screen Tips after selecting and pressing OK:
• Show feature description in Screen Tips. Hit this if you need to get the description of every feature. The name of the button and short description will come up after moving the mouse’s cursor over it.
• Don’t show feature description in Screen Tips. If you don’t need a description anymore, you can switch it off through this button.
• Don’t show Screen Tips. Neither Screen Tips nor descriptions will be shown.
Now, tap the Save button on the right to discover another main option. Here you can change the Default local file location where Word documents will be saved on your computer. Click on Browse, and select the Desktop or any folder on the hard drive, depending on where you need to store files.

Now, let’s move to the Language option. You can choose an editing language here. This language will be used for checking spelling after you’re done typing. You need to have a keyboard with that language to type.
Click it, and you’ll see another window.

To select the language, click the Add additional editing languages drop-down, and you’ll get a long list of options.
Now, let’s look at the option named Advanced. Using the scroll down, find the Display section which contains the long list of options. At the top, you’ll see Show this number of recent documents and a corresponding number. To control Screen Tips, you can also use Show shortcut keys in Screen Tips.

Finally, you’ll see the list so you can select any of the Advanced Options you need.

Simon Calder

Chris “Simon” Calder was working as a Project Manager in IT for one of Los Angeles’ most prestigious cultural institutions, LACMA.He taught himself to use Microsoft Project from a giant textbook and hated every moment of it. Online learning was in its infancy then, but he spotted an opportunity and made an online MS Project course — the rest, as they say, is history!
Microsoft Word allows its users to personalize their experience. With our guides below, you can learn where to look for settings and how to change them. Features can be useful to someone but make Word hard to use for another person. When looking around in Word’s settings, you might even find features you never knew existed. If you want to learn about Word’s many options, follow the steps below.

Quick Answer
When you open up Microsoft Word, you can find each one of its settings somewhere in the menu above the ribbon. Click on the File menu, then choose Options to bring up the many options necessary to alter Word’s features.

These allow you to customize the application to work how you want it to. You can also use the View menu from the ribbon to change the way Word looks.

You can often change settings by adding or removing a tick in the box next to a setting. You can find more settings by clicking on buttons that bring up further options in a tab.
After altering settings, click OK to apply the changes. Experts recommend that you restart Word for your customized settings to work.
How to change your ribbon on Windows
There are many ways you can personalize the ribbon in Office products, including Word.
What can you change in the ribbon?
Before you make any changes, it’s important to review what you can alter in the ribbon.
One way to customize your ribbon is to rearrange tabs and commands in the most beneficial way. You can even hide and unhide tabs and commands you use less often.
If needed, you can hide the entire ribbon itself.
You can also export your customized ribbon and import different ribbons.

What can you not change in the ribbon?
You can’t change the size of the ribbon itself or the size of the icons and text inside it.
Changing your screen resolution is an option if you want to resize your ribbon. Note that everything else will also scale accordingly to the resolution you choose.
It’s impossible to change the color of the ribbon unless you change the theme that Word is using.
How to change default settings
If you want to change the default settings for new documents, you can make changes to the Normal template. Every new document uses the Normal template when it’s created.
When you modify the Normal template, every new document will adjust to the changes. This allows you to personalize your Word experience further.
- Open Word and go to the File menu.

- Click on Open.

- Navigate to C:UsersusernameAppDataRoamingMicrosoftTemplates.
- Open the Normal template (Normal.dotm).
You can change the default font, character spacing, margins, layout, and some other settings. Make your desired changes as you would to any document, then Save.
Your defaults will be updated to the new settings.
Note: You can always restore the default Normal template. This will change Word back to its original settings for new documents.
Restore the Normal template by deleting, renaming or moving it. This will cause Word to recreate the original Normal template automatically.
However, you can’t use this method for any of the other templates. You should always make a backup of any template you plan to tamper with.
How to change the spelling, grammar, and proofing settings
Want to change the way Word is handling your spelling and grammar? You can customize many settings related to this topic.
- Select the File menu.
- Click on Options.
- Find the Proofing tab. This allows you to optimize your experience using Word to help you type.
- Enable or disable any feature, then click the OK button to save your changes.
You can also find extra settings for features such as AutoCorrect and AutoFormat by clicking the AutoCorrect options button.

Conclusion
The instructions above open the door for anyone curious about Word’s many settings. Of course, you can check other tabs and windows for more ways of altering how Word behaves that weren’t mentioned above.
Don’t be afraid to change things around. You can always return to Word’s default settings. Follow this video by HOWZA to quickly get everything back to normal.
Aside from changing settings in Word, we got a lot of tips on our blogs! One of which is how you can effectively add or remove buttons from the toolbars in Office.
If you’re looking for a software company you can trust for its integrity and honest business practices, look no further than SoftwareKeep. We are a Microsoft Certified Partner and a BBB Accredited Business that cares about bringing our customers a reliable, satisfying experience on the software products they need. We will be with you before, during, and after all the sales.
Further Reading
» 7 Microsoft Word Hacks You Need to Know
» How to Collaborate In Microsoft Word
» Google Docs vs. Microsoft Word: Which One Is Suitable for You?
» What’s New in Office 2021: Everything You Need To Know
» An Insanely Simple Way To Improve Productivity With Microsoft Word
» Top 14 Microsoft Word Tricks and Tips that you Should Know
Things You Should Know
- To create a basic document, choose a template from the list provided or start with a blank document.
- Use the File tab to open, save, and start documents, and the Insert tab to add any images, symbols, or other media to your document.
- Highlight your text and play around with formatting options in the «Home» tab. You can change the font, italicize/bold/underline your words, and play around with font size.
-

1
Open the Microsoft Word application. Do this by double-clicking the Microsoft Word icon.
-
2
Review the available templates. On the right side of the screen, you’ll see several templates of interest:
- Blank document — A blank document with default formatting.
- Creative Resume/Cover Letter — A clean, pre-formatted resume (and accompanying cover letter) document.
- Student Report with Cover Photo — A document format geared toward an academic demographic.
- Fax Cover Sheet — A document to preface fax reports.
- You can also search for specific templates online from within Word by using the search bar at the top of this screen.
Advertisement
-
3
Choose a template. Doing so will open the template in Word with whatever pre-determined formatting applies to it. Now that your document is open, you’re ready to review your Toolbar options.
- When in doubt, open a blank document.


Advertisement
-
1
Click the File tab. It’s in the top left side of the screen (or in the menu bar for Mac users). From here, you have several useful options on the far left side of your screen:
- Info (PC only) — Click this to review the documents statistics, such as when it was last modified, as well as any potential issues with the document.
- New — Click this to bring up the «New Document» page that lists all of the pre-formatted templates. Opening a new document will prompt you to save your old one.
- Open — Click this to review a list of recently-opened documents. You can also select a directory (e.g., «This PC») in which to search.
- Save — Click this to save your document. If this is your first time saving this particular document, you’ll be prompted to enter a name, save location, and preferred file format as well.
- Save As — Click this to save your document «as» something (e.g., a different name or file format).
- Print — Click this to bring up your printer settings.
- Share — Click this to view sharing options for this document, including email and cloud options.
- Export — Click this to quickly create a PDF or change the file type.
-
2
Click ← in the top left corner of your screen. If you’re using a Mac, you won’t have this option—simply click your document to exit the «File» menu.
-
3
Review the Home tab to see your formatting options. At the top of your screen—from left to right—are five sub-sections of this tab:
- Clipboard — Whenever you copy text, it is saved on your clipboard. You can view copied text by clicking the Clipboard option here.
- Font — From this section, you can change your font style, size, color, formatting (e.g., bold or italic), and highlighting.
- Paragraph — You can change aspects of your paragraph formatting—such as line spacing, indentation, and bullet formatting—from this section.
- Styles — This section covers different types of text for various situations (e.g., headings, titles, and subtitles). You’ll also see the popular «No Spacing» option here, which removes excess spaces between lines of text.
- Editing — A couple of commonly-used tools—such as «Find and Replace», which allows you to quickly replace all appearances of one word with another—live here.
-
4
Click the Insert tab to review the types of media you can place in your document. Insert is to the right of the Home tab. The Insert tab allows you to add things like graphics and page numbers to your document. From left to right, a couple of notable options include the following:
- Table — Clicking this option will allow you to create an Excel-style table right in your document.
- Pictures — Use this feature to insert a picture into your document.
- Header, Footer, and Page Number — These options are all essential for writing in MLA- or APA-style formatting. The Header places a space at the top of the document for comment, while the Footer goes at the bottom—page numbers are customizable.
- Equation/Symbol — These options use special formatting to accurately display simple equations. You can select these equations or symbols from the pertinent drop-down menu.
-
5
Click the Design tab to create your own template. It’s to the right of the Insert tab.
- The Design tab contains pre-designed themes and formats listed across the top of the page.
-
6
Click the Layout tab to customize your page’s formatting. This tab contains options for changing the following aspects of your document:
- Margins
- Page orientation (vertical or horizontal)
- Page size
- Number of columns (defaults to one)
- Location of page breaks
- Indentation
-
7
Click the References to manage your citations. If you have a bibliography page, you can also manage it from here.
- For quick bibliography formatting, click the Bibliography drop-down menu and select a template.
- In the «Citations & Bibliography» group of options, you can change your bibliography formatting from APA to MLA (or other citation styles).
- The «Captions» group has an option to insert a table of figures. This is useful for scientific review papers or similar documents in which statistical data is prioritized over quotations.
-
8
Click the Mailings tab to review your document sharing options. You can review your email settings and share your documents from within this section.
- You can also print an envelope or label template by clicking the pertinent option in the top left corner of your screen.
- The Select Recipients drop-down menu allows you to choose Outlook contacts as well as an existing contact list within Word.
-
9
Click the Review tab. The Review section is geared towards editing, so it includes options for marking up documents and proofreading. A couple of important options include:
- Spelling & Grammar — Click this option (far left corner) to underline any spelling or grammatical errors.
- The «Changes» section — This is to the far right of the toolbar. From here, you can enable the «Track Changes» feature which automatically formats any additions or deletions you make in a document to appear in red print.
-
10
Decide on the set of options that best apply to your work. If you’re a student, for example, you’ll likely use the Insert and References tab often. Now that you’re familiar with the toolbar options, you can format your first Word document.


Advertisement
-
1
Open a new Blank Document in Word. If you have an existing document, you can open that instead.
-
2
Enter text. Do this by clicking on the blank section of the document and typing away.
- If you opened an existing document, be sure to save your work before re-formatting.
-
3
Highlight a section of text. To do this, click and drag your cursor across your writing, then let go when you’ve highlighted the section you wish to edit.
-
4
Consider what you want to do to the writing. Some potential options include:
- Quickly format your writing. Do this by right-clicking (or two-finger clicking) your highlighted text and then selecting an option from the right-click menu.
- Change the font of your selection. You can do this by clicking the drop-down bar at the top of the «Font» section (Home tab) and then selecting a new font.
- Bold, italicize, or underline your highlighted section. To do this, click the B, I, or U in the «Font» section of the Home tab.
- Change your document’s spacing. This is easiest to accomplish by right-clicking your selected text, clicking Paragraph, and modifying the «Line Spacing» value in the bottom right corner of this window.
-
5
Continue working with Word. Your preferred options for your documents will differ based on the intention behind creating them, so the more you work within your own particular format, the more proficient you’ll become.


Advertisement
Add New Question
-
Question
How do I copy and paste?

To copy a certain piece of text, highlight it and press Ctrl + C. Then click the spot you want to place the copied text and press Ctrl + V to paste.
-
Question
How do I place a logo in MS Word?
Press the Insert tab and then press the Pictures button. You will then be allowed to select the image.
-
Question
How can I save a document to a specific location?
Click File —> Save As… and you’ll be allowed to select the destination location (and filename and format) of the file.
Ask a Question
200 characters left
Include your email address to get a message when this question is answered.
Submit
Advertisement
-
A red line under a word means the word is misspelled, a green underline suggests a grammatical error, and a blue underline pertains to formatting.
-
If you right-click (or two-finger click) an underlined word, you’ll see a replacement suggestion at the top of the right-click menu.
-
You can quick-save your document by holding down Control (or Command on Mac) and tapping S.
Thanks for submitting a tip for review!
Advertisement
-
Don’t forget to save your work before closing Word.
Advertisement
About This Article
Article SummaryX
1. Create blank documents or from templates.
2. Format text colors, fonts, and sizes.
3. Insert media like photos and animations.
4. Insert data like tables, page numbers, headers, and equations.
5. Customize the on-screen and print layouts.
6. Add references and citations.
Did this summary help you?
Thanks to all authors for creating a page that has been read 213,472 times.
Is this article up to date?
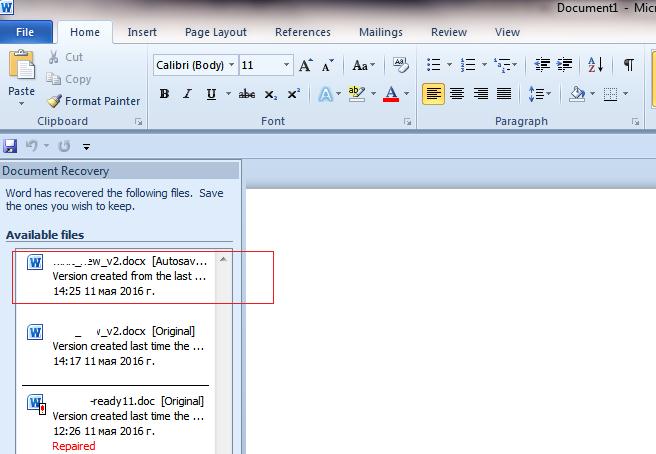
Не часто публикую посты о таких банальных пользовательских вещах, но сегодня столкнулся с неприятной ситуацией, когда процесс winword.exe намертво завис, аварийно завершился и не сохранил изменения в редактируемом документе. Пришлось в авральном порядке разбираться с функционалом автосохранения в Microsoft Word 2010 и пытаться восстановить документ. Свои изыскания добавлю в копилку знаний сайта в виде готового мануала по восстановлению несохраненных версий документов в MS Word 2010. В других программах пакета MS Office автосохранение работает аналогично.
В MS Office 2010 существует функция автосохранения, которая должна периодически в процессе редактирования файла сохранять копии документа. Если запустить Word после сбоя, система должна в панели Document Recovery отобразить список документов, которые не были ранее сохранены. Щелкнув по имени документа (содержит в имени метку [Autosaved]), можно открыть последнюю автоматически созданную копию.
Если это окно не появилось, нужно запустить Word и в разделе File –> Info –> Manage Versions нажать на кнопку Recover Unsaved Documents.
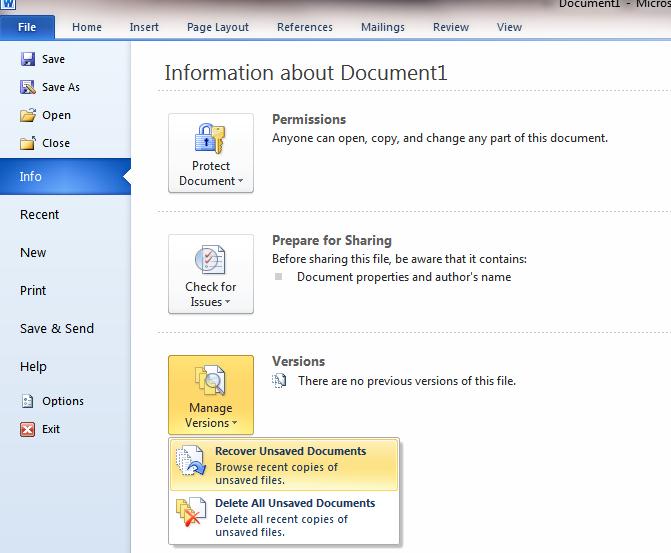 Откроется диалоговое окно с каталогом, в котором хранятся копии несохраненных документов всех приложений MS Office.
Совет. В Windows XP это каталог C:Documents and Settings%username%Local SettingsApplication DataMicrosoftOfficeUnsaved Files
В Windows Vista / 7 / 8 /10 — C:Users%username%AppDataLocalMicrosoftOfficeUnsavedFiles
Где %username% — имя вашей учетной записи.
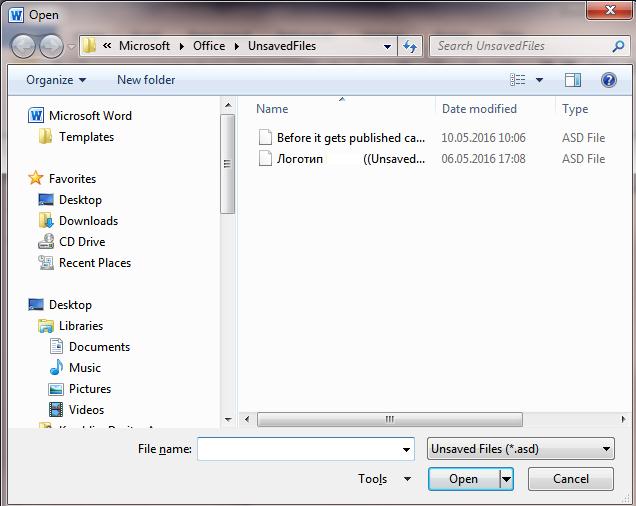 Как вы видите, файлы имеют расширение .asd – это файлы автовосстановления Word. Если документ новый и ранее не был сохранен пользователем, его имя будет выглядеть примерно так «Autorecovery save of Document1.asd«.
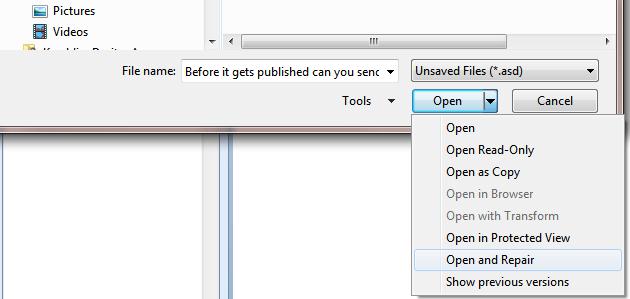
Попытайтесь открыть такой документ. Если он не открывается из-за повреждения, можно попробовать воспользоваться встроенной функцией восстановления файла (Open and Repair). Копии несохранных документов хранятся в течении 4 дней, после чего они автоматически удаляются. Поэтому не забудьте сохранить восстановленный документ через меню File -> Save as.
 При редактировании документа, Word с определенной периодичностью (по умолчанию раз в 10 минут) сохраняет текущую версию файла в свой служебный каталог. Настройки автосохранения документов определяются в разделе File –> Options –> Save.
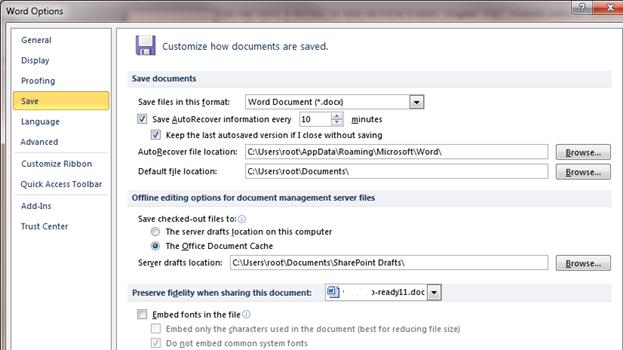 Здесь же указан каталог автосохранения.
- Для XP это C:Documents and Settings%username%Application DataMicrosoftWord
- Для Windows 7 и выше — C:Users%username%AppDataRoamingMicrosoftWord
Эти каталоги по умолчанию скрыты.
Совет. Для централизованного управления параметрам автосохранения документов Word 2010 на компьютерах пользователя, можно воспользоваться возможностью управления ключами реестра через групповые политики.
Каталог автосохранения задается в параметре AUTOSAVE-PATH (REG_EXPAND_SZ) ветки HKEY_CURRENT_USERSoftwareMicrosoftOffice14.0(Product)OptionsAutoRecoverPath
(Product) нужно заменить на Word, Excel, Powerpoint и т.д.
Частота сохранения файла: задается параметром wautosaveinterval_112_16 (тип REG_DWORD) в ветке HKEY_CURRENT_USERSoftwarePoliciesMicrosoftOffice14.0WordOptionsvpref
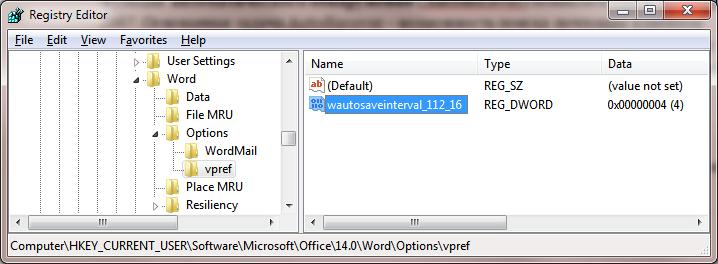
Возможные значение параметра (в минутах) от 0 до 120
 В этом каталоге присутствуют файлы автосохранения (*.asd), временные файлы (*.tmp), и резервные файлы (*.wbk). Имена файлов имеют служебный вид и не подходят для навигации по версиям документа, поэтому, чтобы найти сохраненную версию документа, имеет смысл открывать файлы с датой, когда последний раз были внесены изменения в документ.