
![]()
Download Article
Step-by-step guide to inserting pictures in Word
![]()
Download Article
- Windows
- Mac
- Web App
- Video
- Q&A
- Tips
|
|
|
|
|
Whether you’re working on a hefty research project or a friendly holiday greeting card, adding images to your Word document can really add value to your project. Whether you want to insert a picture from your computer or find one online, it’s easy to add photos in Word. This wikiHow teaches you how to insert an image into a Microsoft Word document using Windows, a Mac, and the free web version of Word.
Things You Should Know
- Use the Insert tab on Windows, Mac, and the web app to add a picture.
- Select Pictures > This Device to use an image on your computer.
- Click the image to resize and reformat it.
-

1
Click the place in your document where you want to insert the picture. Word’s insertion cursor, a vertical blinking bar, will appear at this point. When you insert the image, its bottom-left corner will be at this point.
- This method works for all modern versions of Word beginning with Word 2016. You can also use it as a guide for earlier versions of Windows, although there will be fewer tools and features.
- Changing the background is done through a different method, using the Design tab.
-
2
Click the Insert tab. It’s near the top of Word between «Home» and «Draw» (or «Home» and «Design» in some versions).
Advertisement
-
3
Click the Pictures tool. It’s in the «Illustrations» section of the toolbar running along the top of Word. Some location options will appear. If you’re using Word 2019 or later, a menu will expand. If you’re using Word 2016 or earlier, your file browser will appear.
-
4
Select the type of image you want to insert. You can choose an image on your computer, a stock image from Microsoft, or an image from the internet.
- Word 2019 or later:
- Click This Device if the picture is on your computer.
- Click Stock Images to select a free stock image from Microsoft’s collection.
- Click Online Pictures to use Bing’s image search to find photos on the web.
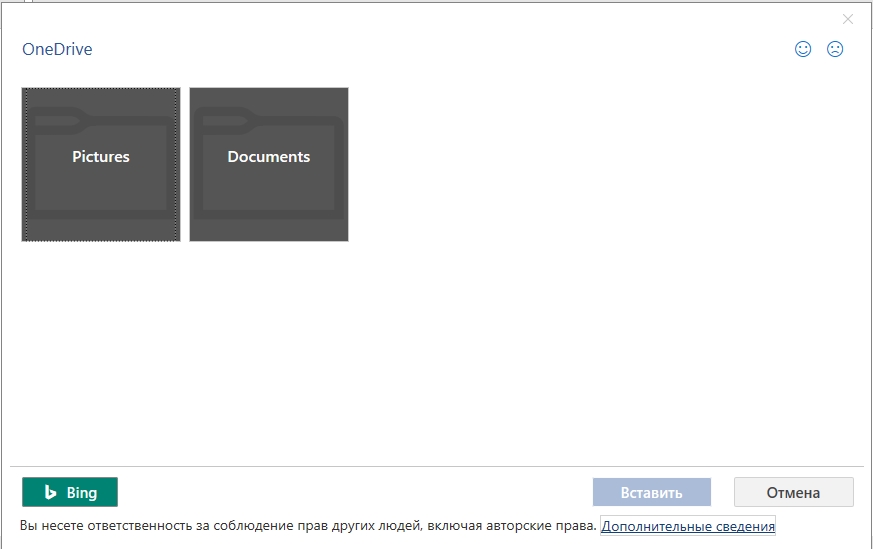
- If the photo is on your OneDrive, select Online Pictures and click OneDrive at the bottom-left corner.
- Word 2016:
- If the picture is on your computer, simply navigate to it in the file browser.
- If you want to search for a photo online or insert one from Facebook, Flickr, or your OneDrive, close the file browser and click the Online Pictures icon next to the «Pictures» in the toolbar. You can then select an image from Bing image search, Flickr, or Facebook.
- If the picture is on your OneDrive, click Online Pictures instead of Pictures and click Browse next to «OneDrive.»
- Word 2019 or later:
-
5
Select the image you want to insert. When you find the picture, click it once to select it.
- If you’re selecting from stock images or online images, you can click multiple pictures to add more than one.
- If you’re choosing files from your computer and want to add more than one picture, hold the Ctrl button down as you click each image.
-
6
Click Insert. It’ll be near the bottom-right corner of the window no matter where you’ve selected your image(s). You’re done! Continue to the next steps for formatting information, or print the document when you’re ready.
-
7
Resize the picture. If you want to change the picture’s size, click it once to select it, and then drag any of the corner circles in or out.[1]
- You can also specify the size if you want. Double-click the picture to open the Picture Format tab at the top, and then set your desired measurements next to «Height» and «Width.»
-
8
Use the curved arrow at the top of the picture to rotate it. It’s above the dot at the top-center part of the picture. To rotate, place the mouse cursor over the curved arrow, and then click and drag the cursor left or right until you’re satisfied.
-
9
Double-click the picture to access more editing tools. This opens the «Picture Format» (2019 and later) or «Format» (2016) tab at the top of Word. On this tab, you can:
- In the «Arrange» panel in the top-right area, click Wrap Text to choose how to situate the picture in blocks of text. You can also set alignment preferences here. Wrapping the text is a good way to get your document formatted exactly the way you want.
- To crop the picture, click the Crop tool in the «Size» panel at the top-right corner.
- The «Adjust» panel near the top-left corner has additional tools for background removal, color effects, and corrections.
- To add a border or effect around the picture, select one of the «Picture Styles» at the center of the Format bar, or choose any of the other options in the section to have more control over the style.


Advertisement
-
1
Click the place in your document where you’d like to insert a picture. This places the cursor at that location.
-
2
Click the Insert tab. It’s at the top of Word between the «Home» and «Design» or «Home» and «Draw» tabs.
-
3
Click the Pictures icon. It’s on the toolbar that runs along the top of Word. Look for an icon of a green mountain with a yellow sun between «Tables» and «Shapes.»
-
4
Click Photo Browser or Picture from File. If you want to browse images in your Mac’s Photos app, use Photo Browser. To select an image file using Finder, choose Picture from File.
-
5
Insert the picture into the document. If you’re using the Photo Browser option, simply drag the photo into your document. If you’re using Picture from File, select the image and click Insert.
-
6
Resize the picture. If you want to increase or reduce the picture’s size, click the image to select it, and then do one of the following:
- To maintain the picture’s proportions so it doesn’t stretch or warp, hold down the Shift key as you drag any of the sizing handles (the circles) inward or outward.[2]
- To keep the image’s center in place as you resize, hold down the Option key as you drag the handles.
- You can also specify a size. Double-click the Picture to open the Picture Format tab, then enter your desired measurements next to «Height» and «Width.»
- To maintain the picture’s proportions so it doesn’t stretch or warp, hold down the Shift key as you drag any of the sizing handles (the circles) inward or outward.[2]
-
7
Drag the curved arrow at the top of the picture to rotate it. It’s above the dot at the top-center edge of the picture. Just place the mouse cursor over the curved arrow, and then click and drag it left or right until it’s correct.
-
8
Double-click the picture to access more editing tools. This opens the «Picture Format» tab at the top of Word, which has a bunch of editing features, including the ability to remove the background and add styles.
- Click Corrections near the top-left corner to correct lighting and color problems.
- Click Artistic Effects to play around with filters, and Transparency to make the picture more see-through.
- To crop the picture, click the Crop tool next to the height and width controls.
- Click Wrap Text to choose how to situate the picture in blocks of text, and use Align and Position to ensure correct placement.
- Click Quick Styles to choose pre-styled borders, shadows, and other options.


Advertisement
-
1
Click the place in your document where you’d like to insert a picture. This places the cursor at that location.
- If it’s your first time using Office Online on the web, go to https://www.office.com, sign in with your Microsoft account, and select Word to get started.
-
2
Click Insert. This opens the Insert tab.
-
3
Click Pictures. This opens a drop down options menu.
-
4
Select a picture type. There are four options to choose from:
- This Device — choose a picture on your computer
- OneDrive — choose an image from your OneDrive
- Stock Images — insert a stock image or sticker
- Bing Pictures — search Bing for an image
-
5
Select an image. If you choose the This Device option, you’ll be prompted to select an image from your computer. Click it to select it.
-
6
Click Open. This is in the bottom right corner of the image selection window. This will confirm your selected image and insert it into the document.
-
7
Resize the picture. If you want to change the picture’s size, click it once to select it, and then drag any of the corner circles in or out.
- You can also specify the size if you want. Double-click the picture to open the Picture tab at the top, and then set your desired measurements next to «Height» and «Width.»
-
8
Use the curved arrow at the top of the picture to rotate it. It’s above the dot at the top-center part of the picture. To rotate, place the mouse cursor over the curved arrow, and then click and drag the cursor left or right until you’re satisfied.
-
9
Double-click the picture to access more editing tools. This opens the «Picture» tab at the top of the Word web app. On this tab, you can:
- In the «Arrange» panel in the top-right area, click Wrap Text to choose how to situate the picture in blocks of text. You can also set alignment preferences here.
- To crop the picture, click the Crop tool in the «Image Size» panel at the top-right corner.
- To add a border or effect around the picture, select one of the «Picture Styles» at the center of the bar, or choose any of the other options in the section to have more control over the style.


Advertisement
Add New Question
-
Question
How do I take screenshots?

On a Mac, shift command 3 to screenshot the whole screen. If you want to take a screenshot of a certain area on the screen, press shift command 4. On a Windows PC, press control and print screen at the same time, then you can paste the image into Paint or Microsoft Word.
-
Question
When I insert several photos on an age in a Word document, the photos often won’t stay in place. How do I stop the photos from bumping each other around?
You can right-click the image, hold the cursor over the «Wrap Text» menu option, and select an option from the list that is NOT «In Line with Text» (usually selected by default), such as «Tight» or «Behind/In Front of Text.» Then you should be able to move the image freely around the page.
-
Question
How do I format images in a Word document?
Try double-tapping the photo. A photo format menu should come up on the right side.
See more answers
Ask a Question
200 characters left
Include your email address to get a message when this question is answered.
Submit
Advertisement
Video
-
Adding photos to your Word document increases its size.
-
Other photo modification features available in newer versions of Microsoft Word include the ability to add borders, cutout styles, shadows, beveled edges, glows, and drop shadows.
-
When you crop a picture, the actual cropped part of the picture is hidden, not removed; unless you check the «Delete Cropped Areas of Pictures» box in the «Compression Settings» dialog box. Any compressed pictures with their cropped areas deleted cannot be restored to their original appearance.
Show More Tips
Thanks for submitting a tip for review!
Advertisement
About This Article
Article SummaryX
1. Click the place you want to insert the image.
2. Click the Insert tab.
3. Click Pictures.
4. Choose a location.
5. Select the image and click Insert.
6. Double-click the picture to open editing and format tools.
Did this summary help you?
Thanks to all authors for creating a page that has been read 650,440 times.
Is this article up to date?
Добавление картинок в файл
Word для Microsoft 365 Outlook для Microsoft 365 PowerPoint для Microsoft 365 OneNote для Microsoft 365 Publisher для Microsoft 365 Excel для Microsoft 365 для Mac Word для Microsoft 365 для Mac PowerPoint для Microsoft 365 для Mac Word для Интернета OneNote для Интернета PowerPoint для Интернета Word 2021 PowerPoint 2021 Publisher 2021 OneNote 2021 Excel 2021 для Mac Word 2021 для Mac PowerPoint 2021 для Mac Word 2019 PowerPoint 2019 Publisher 2019 Excel 2019 для Mac Word 2019 для Mac PowerPoint 2019 для Mac Excel 2016 Word 2016 Outlook 2016 PowerPoint 2016 OneNote 2016 Publisher 2016 Excel 2013 Word 2013 Outlook 2013 PowerPoint 2013 OneNote 2013 Publisher 2013 Excel 2010 Word 2010 Outlook 2010 PowerPoint 2010 OneNote 2010 Publisher 2010 Еще…Меньше
В зависимости от версии Office вы можете использовать коллекцию картинок Office или добавить картинку из Интернета.
Вставка картинок
Хотя в новых версиях Office больше нет коллекции картинок, но Office по-прежнему позволяет добавлять картинки в приложениях.
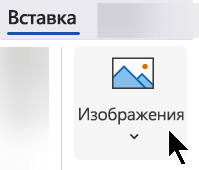
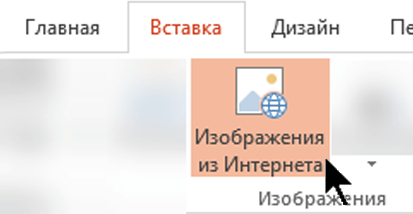
ШАГ 1.
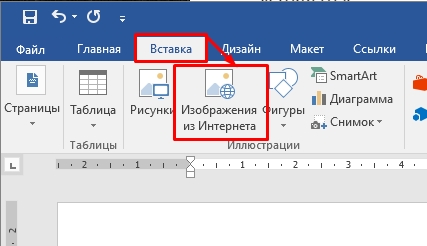
Выберите Вставка > Рисунки > Изображения из Интернета.
(В Outlook при использовании области чтения вкладка Вставкане отображается. Чтобы отобразить ее, щелкните значок Развернуть  .)
.)
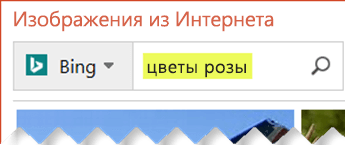
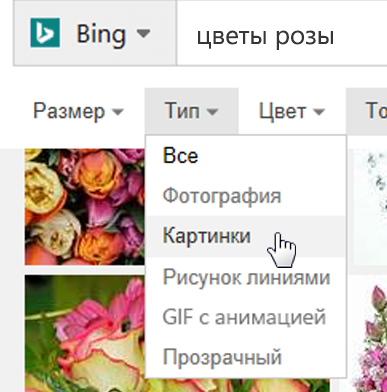
ШАГ 2.
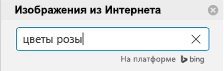
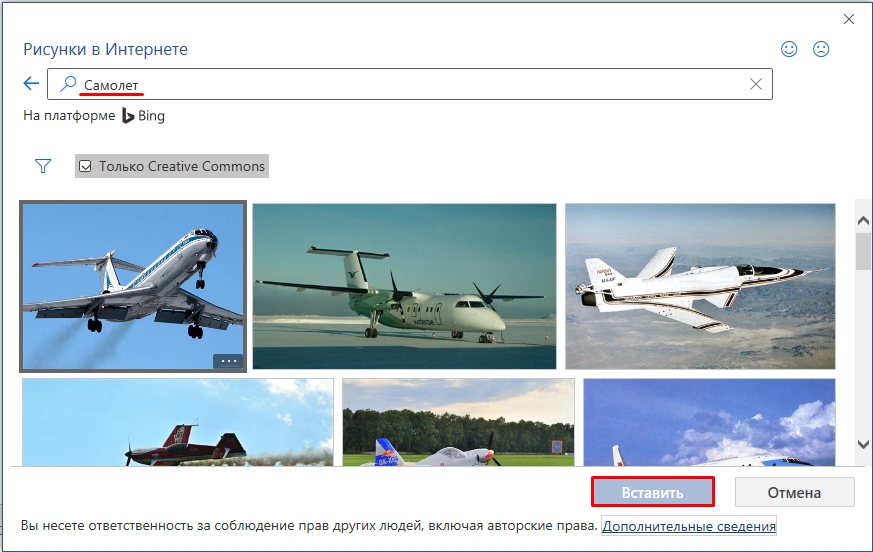
Введите слово или фразу, чтобы описать, что вы ищете, затем нажмите клавишу ВВОД.
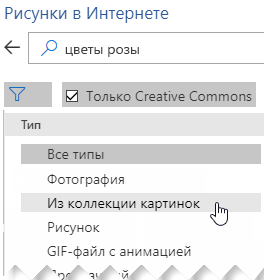
ШАГ 3.
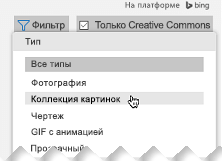
Примените фильтр к результатам, выбрав Тип для параметра Картинки.
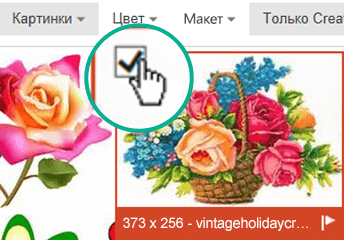
ШАГ 4.
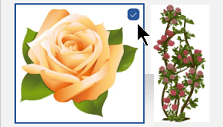
Выберите изображение.

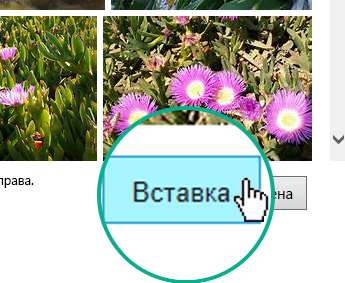
ШАГ 5.
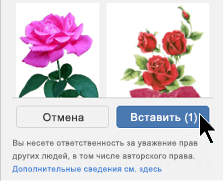
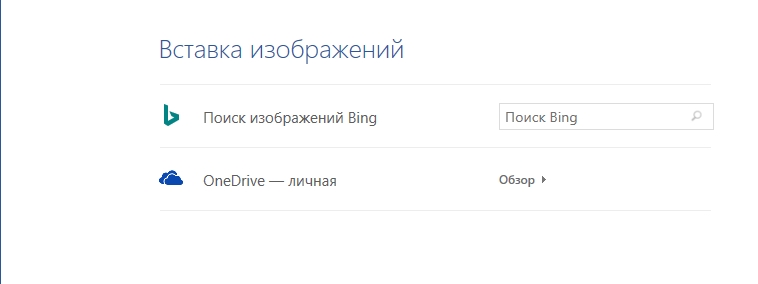
Выберите Вставка.
Готово!
Изображение будет вставлено в документ Office.

Картинки и авторские права
Фильтр типа лицензии (Только Creative Commons или Все) поможет вам выбрать изображения с учетом поставленной задачи. (Сведения о лицензиях Creative Commons см. здесь.)
Используя фотографии или картинки с сайта Bing, вы должны следить за соблюдением авторских прав. На сайте Bing есть фильтр по лицензии, с помощью которого можно выбрать подходящие изображения.
Новые типы картинок для Microsoft 365
Microsoft 365 больше не содержит традиционных картинок, но как подписчик вы бесплатно получаете вместо них несколько новых видов высококачественных изображений: фотографии с высоким разрешением, значки, фигуры людей, наклейки, иллюстрации, и анимационные люди. Выберите Вставка > Рисунки > Стоковые изображения чтобы просмотреть варианты. Дополнительные сведения см. в статьеВставка изображений, значков и т. д..
|
Значки — это готовые изображения, которые можно вставлять, вращать, поворачивать, раскрашивать, увеличивать и уменьшать (без потери качества). |
|

|
Наклейки — это причудливые иллюстрации, способные оживить любой документ. |

|
Анимационные люди — это рисунки в мультипликационном стиле. Вы можете смешивать и сочетать различные части головы/волос, лица и тела, чтобы получить именно тот образ, который вам нужен. |
Голосовые сообщения вместо картинок
Хотите узнать, как добавить на слайд аудиоклип? См. статью Добавление и удаление звука в презентации PowerPoint.
Вставка картинок
Хотя в Office 2013 и Office 2016 больше нет коллекции картинок, вы все равно можете добавлять картинки в приложениях Office.
ШАГ 1.
Выберите Вставка > Изображения из Интернета.
(В Outlook при использовании области чтения вкладка Вставкане отображается. Чтобы отобразить ее, щелкните значок Развернуть .)
ШАГ 2.
Введите слово или фразу, чтобы описать, что вы ищете, затем нажмите клавишу ВВОД.
ШАГ 3.
Примените фильтр к результатам, выбрав Тип для параметра Картинки.
ШАГ 4.
Выберите изображение.
ШАГ 5.
Выберите Вставка.
Готово!
Изображение будет вставлено в документ Office.
Картинки и авторские права
Фильтр типа лицензии (Только Creative Commons или Все) поможет вам выбрать изображения с учетом поставленной задачи. (Сведения о лицензиях Creative Commons см. здесь.)
Используя фотографии или картинки с сайта Bing, вы должны следить за соблюдением авторских прав. На сайте Bing есть фильтр по лицензии, с помощью которого можно выбрать подходящие изображения.
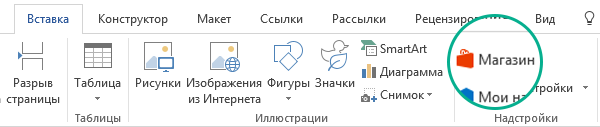
Бесплатная библиотека изображений: надстройка Pickit
Еще одним вариантом является установка надстройки Pickit для Office, которая позволяет в приложениях Office добавлять бесплатные лицензированные картинки.
Щелкните название раздела ниже, чтобы открыть его и прочесть подробные инструкции.
-
Выберите приложение Office, в которое вы хотите добавить надстройку Pickit (Word, PowerPoint или Excel).
-
На вкладке Вставка в группе Надстройки нажмите кнопку Магазин.
Откроется диалоговое окно Надстройки Office.
-
В диалоговом окне с помощью поля Поиск найдите Pickit Free Images.
-
Нажмите кнопку Добавить напротив надстройки Pickit Free Images.
-
Закройте диалоговое окно Надстройки Office.
Установка надстройки Pickit в приложение Office может занять некоторое время. Когда все будет готово, в нижней части окна приложения появится соответствующее сообщение.
На вкладке Главная у правого края ленты вы увидите круглый розовый значок Pickit.
Установленную на компьютере надстройку Pickit можно использовать для поиска изображений.
-
На ленте откройте вкладку Главная и в разделе Pickit у правого края ленты нажмите кнопку Free Images.
С правой стороны окна приложения откроется панель задач Pickit Free Images.
-
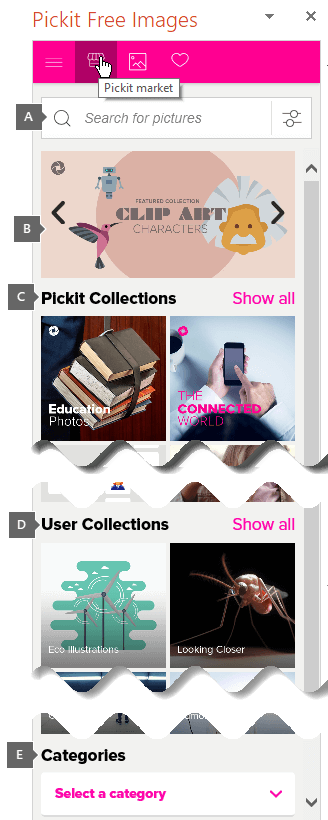
На розовой панели инструментов, расположенной вверху, откройте вторую вкладку Pickit market для поиска изображений.
В Pickit предусмотрено несколько способов поиска изображений.
-
Поле поиска (выноска А на рисунке) для ввода ключевых слов, таких как «цветок», «картинка» или «бизнес».
-
Набор популярных коллекций (B) под полем «Поиск». Этот набор включает коллекцию символов картинок.
-
25 коллекций (C), подготовленных Pickit.
-
Различные пользовательские коллекции (D) для поиска.
-
35 категорий (E) изображений (например, Animals and Pets, Cities and Places, Music and Instruments и Transportation), доступных для выбора в нижней части панели задач.
Голосовые сообщения вместо картинок
Хотите узнать, как добавить на слайд аудиоклип? См. статью Добавление и удаление звука в презентации PowerPoint.
-
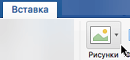
На ленте панели инструментов откройте вкладку Вставка и в разделе Изображения нажмите кнопку Клип.
(В Outlook при использовании области чтения вкладка Вставкане отображается. Щелкните значок Развернуть
, и вы увидите вкладку Вставка со значком Картинка.)С правой стороны окна приложения откроется панель задач Картинка.
-
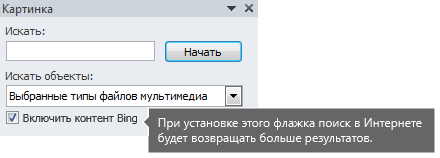
В поле Искать введите ключевые слова, которые описывают искомое изображение.
-
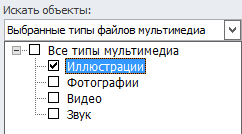
В списке Искать объекты выберите типы файлов мультимедиа, которые хотите включить в результаты поиска.
-
Если ваш компьютер подключен к Интернету и вы хотите, чтобы результаты поиска содержали изображения из Интернета, убедитесь, что установлен флажок Включить контент Bing. *
Установка этого флажка позволяет получить дополнительные результаты поиска. (В противном случае, если вы не установите этот флажок, результаты поиска будут содержать только изображения, установленные на вашем компьютере вместе с Office 2010.)
-
Нажмите кнопку Начать, чтобы начать поиск.
Результаты поиска будут показаны на панели задач.
-
Если на панели задач поместились не все результаты, можно воспользоваться вертикальной прокруткой.
-
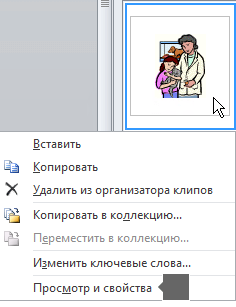
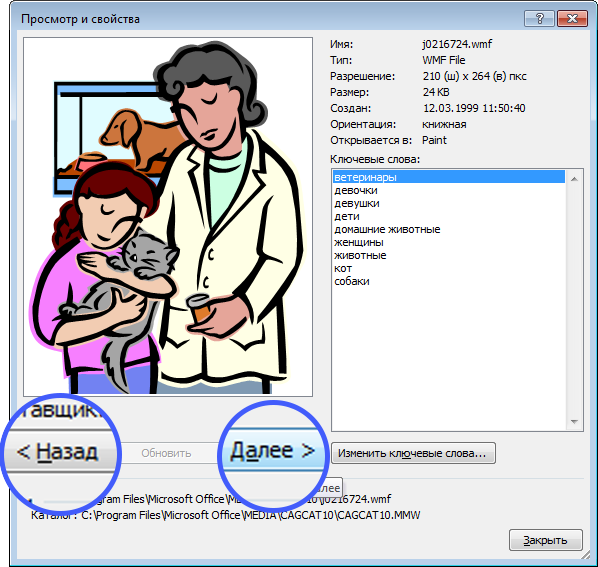
Чтобы увидеть эскиз большего размера в списке результатов или просто увидеть изображение, если вместо него отображается небольшой красный знак «X», щелкните эскиз правой кнопкой мыши и выберите команду Просмотр и свойства.
В диалоговом окне Просмотр и свойства можно листать изображения с помощью кнопок Назад и Далее.
-
-
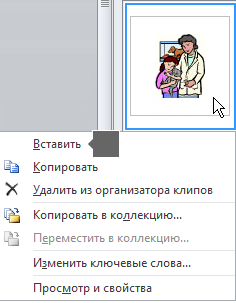
Чтобы вставить рисунок в документ, щелкните эскиз на панели задач правой кнопкой мыши и выберите команду Вставить.
После вставки изображения можно настроить его расположение, выделив и перетащив с помощью мыши.
Для поиска коллекций картинок и изображений из Интернета используется Bing. Чтобы не нарушать авторские права пользуйтесь фильтром по лицензии в Bing: он поможет выбрать изображения, которые можно использовать.
* Фильтры поиска изображений в Bing действуют на основе проверенной системы лицензий Creative Commons. Дополнительные сведения о видах лицензий см. в статье Фильтрация изображений по типу лицензии. Вы несете ответственность за соблюдение прав собственности других пользователей, в том числе авторских.
В Microsoft 365 для Mac, Office 2021 для Mac и Office 2019 для Mac начиная с версии 16.19 вы можете искать коллекции картинок и другие изображения в Интернете.
ШАГ 1.
Выберите Вставка > Рисунки > Изображения из Интернета.
ШАГ 2.
Введите слово или фразу, чтобы описать, что вы ищете, затем нажмите клавишу ВВОД.
Шаг 3:
Фильтровать результаты, выбрав в раскрывающемся списке ТипдляИллюстрации.
ШАГ 4.
Выберите изображение.
ШАГ 5.
Выберите Вставка.
Готово!
Изображение будет вставлено в документ Office.
Фильтр типа лицензии (Только Creative Commons или Все) поможет вам выбрать изображения с учетом поставленной задачи. (Сведения о лицензиях Creative Commons см. здесь.)
К сожалению, коллекция картинок не поддерживается в Office 2016 для Mac.
Чтобы вставить изображения из своего компьютера или проводника фотографий, вы можете использовать элементы Вставка > Рисунки.

Microsoft 365 поддерживает изображения из Интернета, значки, трехмерные объекты и получает обновления компонентов ежемесячно:
Купить или попробовать Microsoft 365
Вы можете вставлять картинки из Интернета в Word, PowerPoint, Excel или OneNote.
Вставка коллекции картинок в Word, PowerPoint или Excel
-
Выберите Вставка > Рисунки > Стоковые изображения.
Вкладки в верхней части окна демонстрируют типы изображений, которые можно выбрать:
-
Изображения: большой набор фотографий с высоким разрешением по разным темам.
-
Фигуры людей: фотографии людей в различных позах. Для рисунков используется прозрачный фон, что помогает легко разместить их в документе или объединить несколько рисунков.
-
Наклейки: забавные рисунки в анимационном стиле.
-
Значки (только PowerPoint): небольшие символы для разных тем. Вы можете легко изменить их цвет и размер без снижения качества изображения.
-
Иллюстрации (только PowerPoint): различные рисунки в похожем стиле для разных тем.
-
Анимационные люди (только PowerPoint): большой набор рисунков в мультипликационном стиле. Вы можете объединять и сочетать различные части, например голову/прическу и выражения лиц.
-
-
Выберите вкладку, просмотрите изображения с помощью прокрутки или введите термин в поле поиска, чтобы отфильтровать набор изображений.
-
Выберите изображение или изображения и нажмите Вставить.
Вставка картинок в OneNote
-
Выберите Вставка > Рисунок > Из Интернета.
-
Введите в диалоговом окне Рисунки в Интернете описание рисунка (например, розы) и нажмите клавишу ВВОД.
-
Нажмите кнопку фильтра
и выберите пункт Из коллекции картинок в категории Тип. -
Выберите нужное изображение и нажмите кнопку Вставить.
(Вы можете вставлять рисунки только по одному.)
 и выберите пункт Из коллекции картинок в категории Тип.
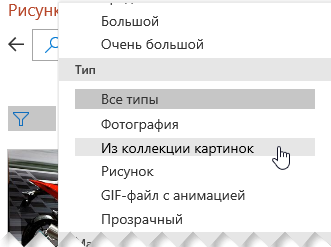
Фильтр типа лицензии (Только Creative Commons или Все) поможет вам выбрать изображения с учетом поставленной задачи. (Сведения о лицензиях Creative Commons см. здесь.)
См. также
Вставка изображений, значков и т. д. в Microsoft 365
Создание и поиск изображений в Office
Добавление рисунка в документ Word
Значки: новая коллекция картинок
Нужна дополнительная помощь?
Всем привет! В сегодняшнем уроке я покажу вам, как легко и просто вставить картинку, рисунок, или целое фото в Ворд документе. Вступление будет максимально коротким. Всю статью я разбил на два шага. Сначала мы разберем все возможные способы вставки изображения. Во втором шаге я покажу вам, как правильно его отредактировать, чтобы картинка красиво располагалась в тексте. Помните, что вы всегда можете задать дополнительные вопросы или замечания в комментариях.
Содержание
- ШАГ 1: Вставка картинки
- Способ 1: Обычная вставка
- Способ 2: Из интернета
- Способ 3: Перетаскивание
- Способ 4: Быстрая вставка скриншота
- ШАГ 2: Редактирование картинки
- Задать вопрос автору статьи
ШАГ 1: Вставка картинки
Давайте посмотрим, как можно быстро вставить любое изображение в Ворд. Напомню, что вы всегда можете использовать скриншоты. О том, как их нужно делать подробно написано в этой статье (ссылка). Вы также можете скачать картинку из интернета или облака.
Далее я расскажу несколько вариантов вставки, которые вам могут пригодиться. В следующем шаге я расскажу про редактирование и правильное расположение изображения в тексте. Давайте рассмотрим пример, без текста – так вам будет проще понять принцип вставки.
Способ 1: Обычная вставка
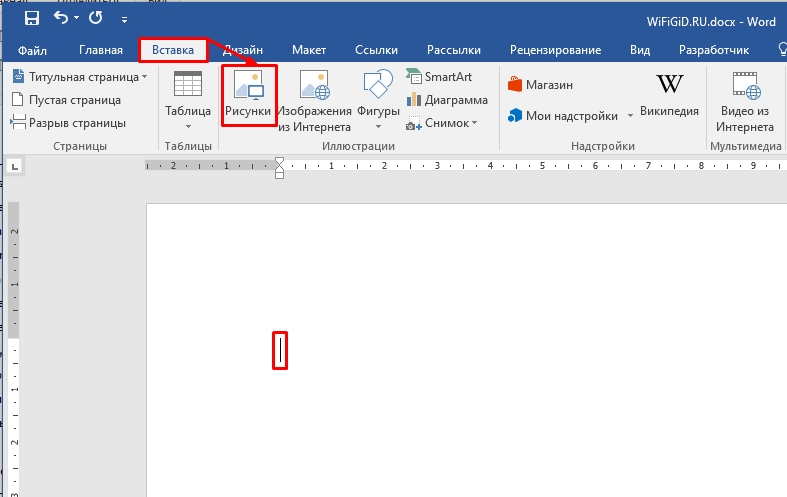
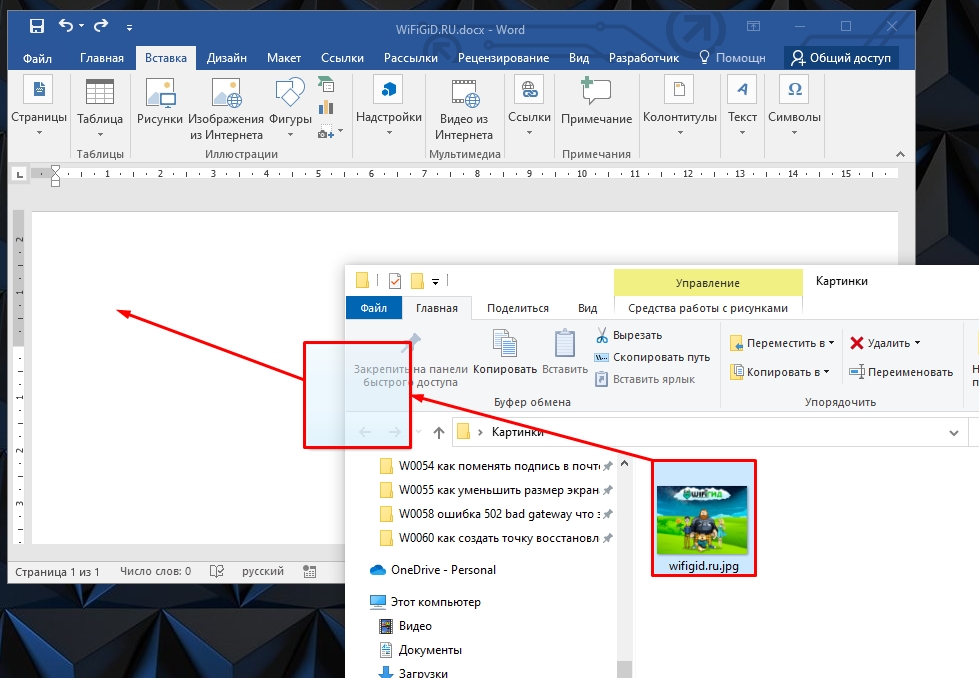
Сначала установите курсор в нужное место. После этого сверху перейдите во вкладку «Вставка» и найдите глобальный раздел «Иллюстрация» (третий слева блок). Там находим кнопку «Рисунки» и жмем по ней.
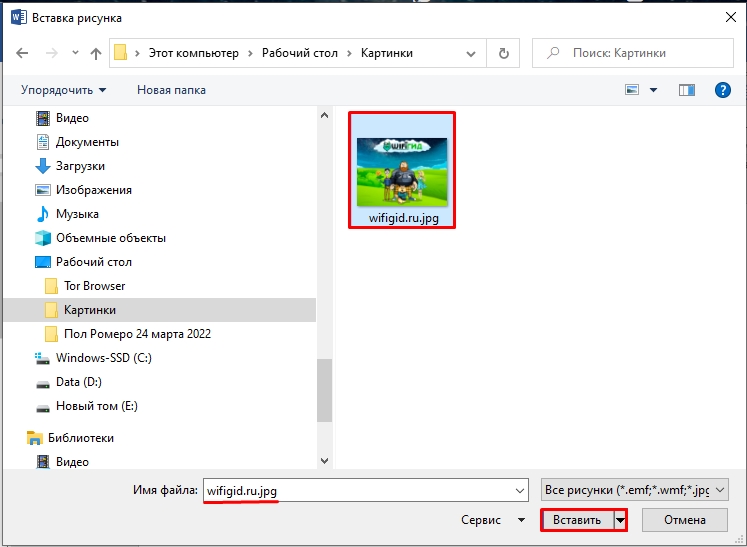
Теперь находим папку, в которой находится ваша картинка, выделяем её и жмем по кнопке «Вставить».
Теперь картинка расположена в тексте. Я вам советую также ознакомиться и с другими способами ниже.
Способ 2: Из интернета
- Там же на вкладке «Вставка» есть вторая кнопка «Изображения из Интернета».
- Далее у нас есть два варианта. Первый – позволяет выбрать изображение из поисковика «Bing». Второй – это скачать с облака от Microsoft OneDrive. Рассмотрим сначала первый вариант.
- Этот способ хорош тем, что если вам нужно быстро найти картинку по определенной тематике, но не важно, какая именно она должна быть, то лучше использовать поиск. Вводим в строку поиска любое название, ждем пока поисковик найдет определенные картинки. Далее выбираем нужный вариант и жмем по кнопке вставки.
- OneDrive – это не очень популярное в народе облачное хранилище от компании Microsoft. Если у вас там есть нужные изображения, то вам достаточно их найти и вставить. Я, к сожалению, не имею там ничего, поэтому более точно рассказать про саму процедуру не могу. Но уверяю вас, там все делается по аналогии.
Способ 3: Перетаскивание
Если вы работаете с папкой, в которой находятся много картинок, то через кнопку «Рисунки» не всегда удобно это делать. Поэтому вы можете перетаскивать картину сразу в Word документ. Все делается очень просто. Открываем папку с фотографией или изображением. Смотрите, чтобы были видны оба окошка. Теперь зажимаем левой кнопкой мыши сверху картинки, и не отпуская перетаскиваем в область Ворд-документа.
Способ 4: Быстрая вставка скриншота
Если вы работаете со скриншотами программ или рабочим столом, то можно выполнить быструю вставку с помощью горячих клавиш. Ниже на картинке у меня открыт браузер Google Chrome. Представим себе, что мне нужно сделать скриншот только этого окошка. Для этого зажимаем быстрые кнопки:
Alt + Print Screen
ПРИМЕЧАНИЕ! Кнопа «Print Screen» может называться и по-другому: «PrtSc», «PrtnScrn», «PrtnScn», «PrtScr», «PS». Обычно она находится в верхнем ряду правее клавиши F12. Если вы просто нажмете по кнопке Print Screen, то он сфотографирует весь ваш экран. В таком случае будет слишком много деталей.
Теперь открываем Ворд и просто жмем:
Ctrl + V
Скриншот сразу попадет в документ из буфера обмена. Я все же вам рекомендую использовать сторонние программы – об этом подробно написано тут.
ШАГ 2: Редактирование картинки
Как вы уже поняли, вставить картинку – это пол беды. Теперь наша задача сделать так, чтобы она красиво отображалась и не перекрывала текст, а также не вылезала по краям. Для этого картинку стоит отредактировать. Покажу на примере с текстом.
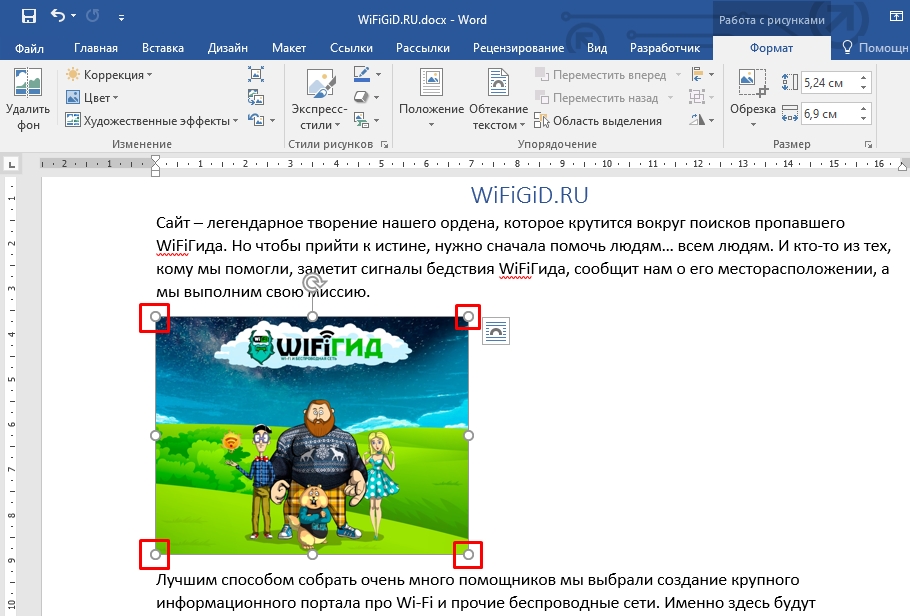
В первую очередь вам нужно отмасштабировать картинку, чтобы она была нужного размера. Для этого вам необходимо выделить изображение левой кнопкой мыши и потянуть за кружочки, которые расположены в углах квадрата выделения.
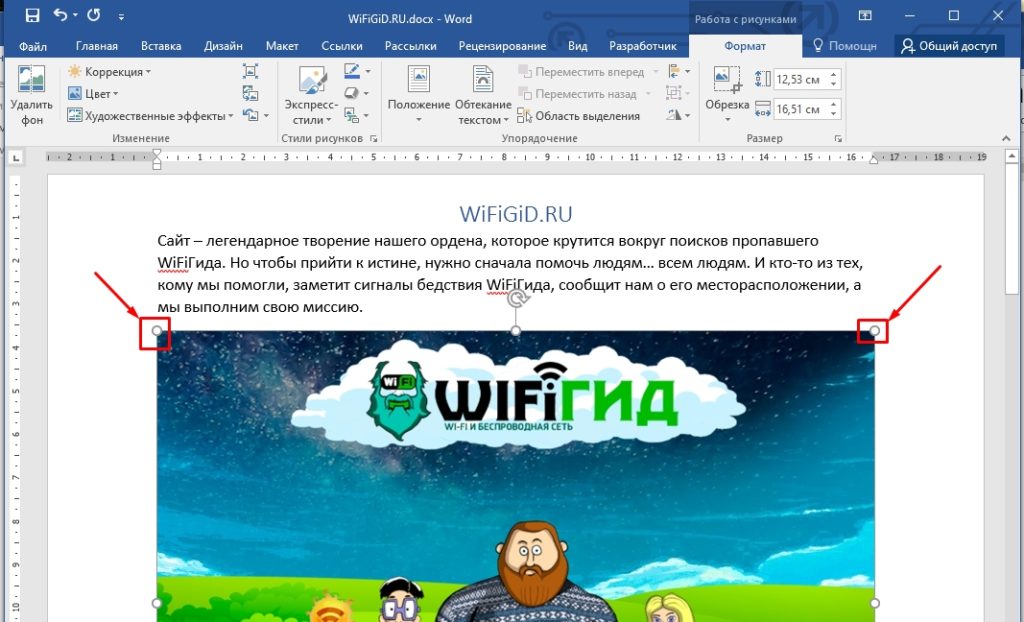
Отлично! Картинка теперь имеет меньшие размеры.
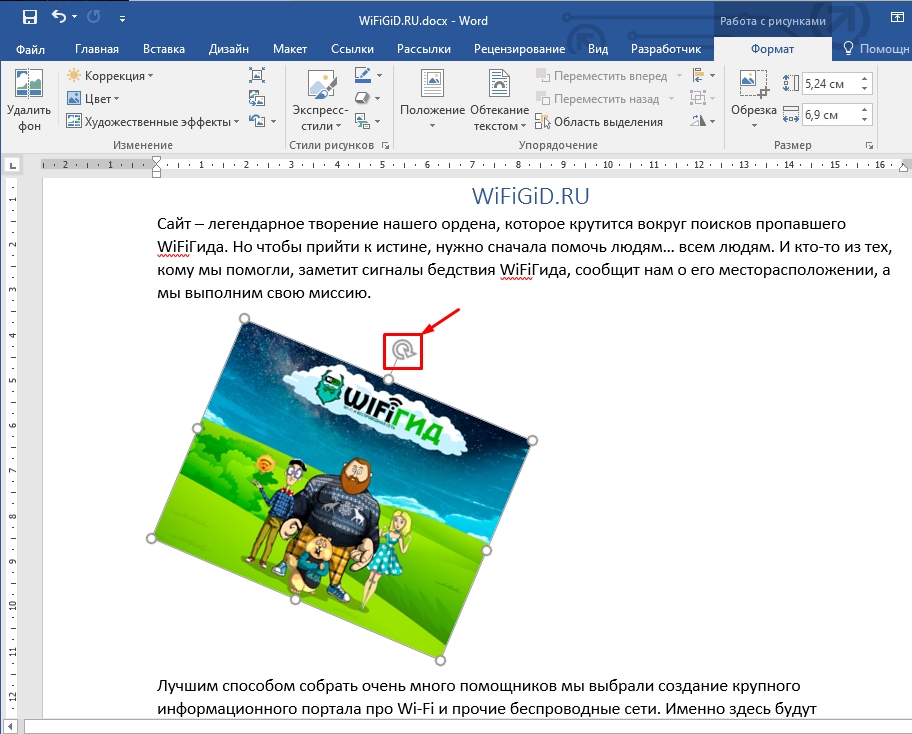
Вы могли заметить полукруглую стрелочку, сверху квадрата – если её зажать, то можно повернуть фотографию на любой угол.
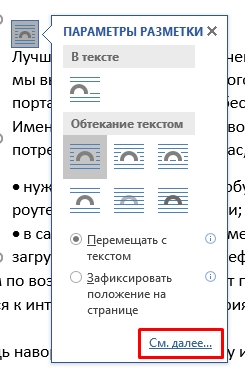
Но самая главная настройка – это параметры разметки. Посмотрите вниз. В моем примере я уменьшил скриншот, но вот текст все равно расположен сверху и снизу. Это можно исправить, поменяв параметры разметки.

Например, можно выполнить обтекание текстом: по контуру или в квадрате. Для наглядности попробуйте каждый из выбранных вариантов, чтобы вам все стало понятно, как работает этот инструмент.
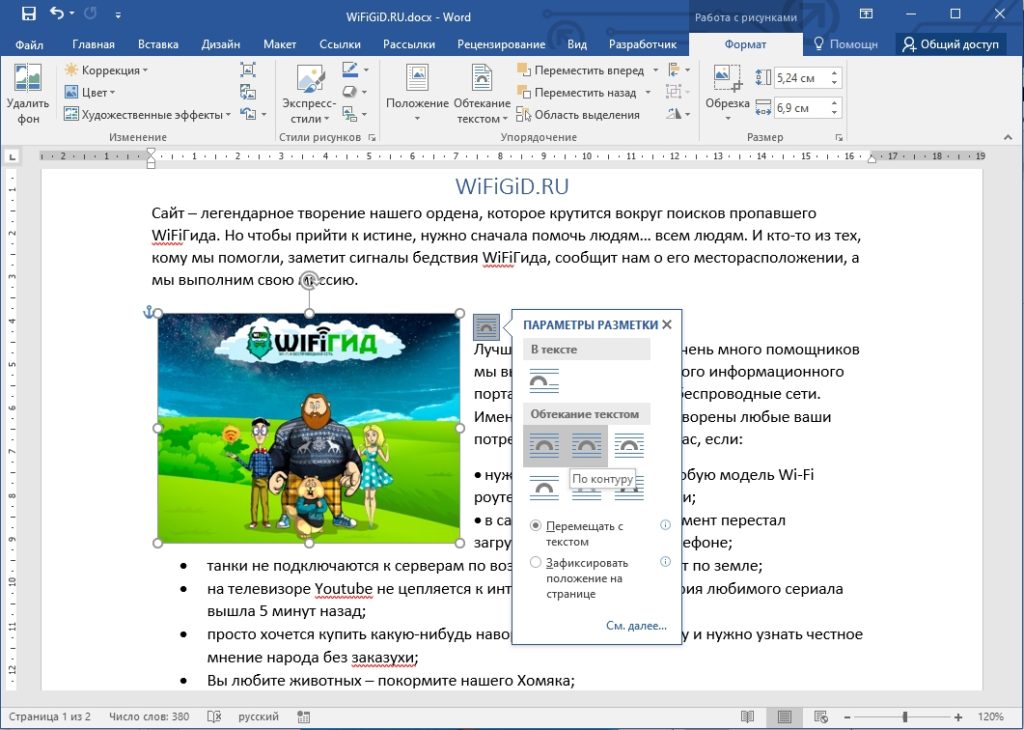
Если же вам нужно более детально выполнить форматирование расположения картинки (например, по ГОСТ), то жмем «См. далее…».
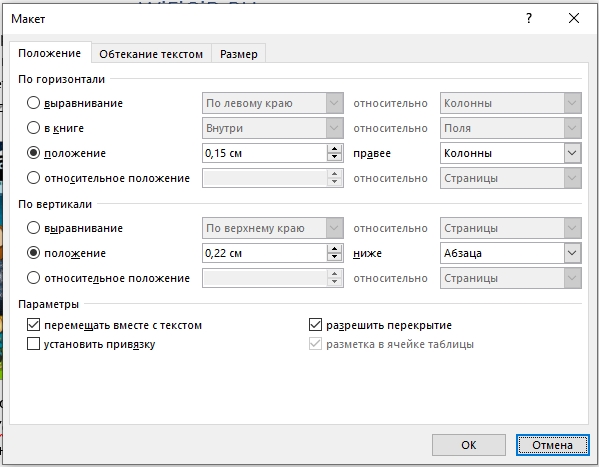
В первой вкладке «Положение» – вы можете отрегулировать само расположение изображения. Настроек достаточно много, и мы не будем их рассматривать подробно, так как они нужны не всегда. Поэтому если вам интересно, то можете просто поиграться с некоторыми параметрами.
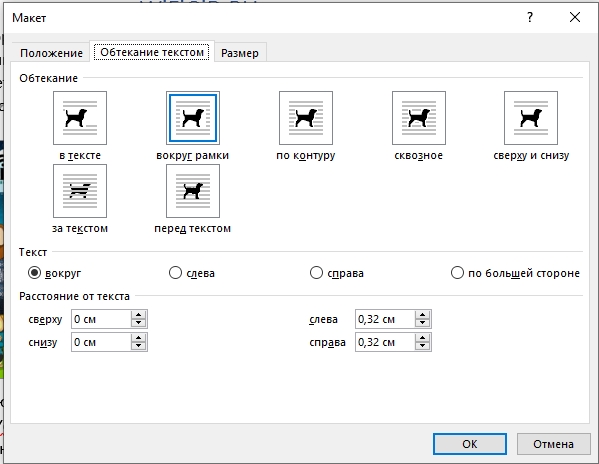
Вторая вкладка уже работает с обтеканием текста. Здесь можно изменить расстояние от текста до картинки.
При выделении фото сверху открывается вкладка «Формат». Где можно дополнительно отформатировать внешний вид. Например, вы можете добавить определенные стили, границу или заливку цветом. Можно изменить коррекцию света или применить дополнительные эффекты и фильтры. Самое главное с этим не переборщить, чтобы изображение не отвлекало от основного текста.

На этом все. Если я что-то упустил, или у вас еще остались какие-то вопросы, то смело пишите их в самом низу в комментариях. Надеюсь, статья была для вас полезной. Всем добра!
More than ever, pictures are critical to the effectiveness of your communication materials. With the image formatting and layout tools in Microsoft Word, it’s possible to add and manipulate pictures in your document—even if you’re a beginner.


Starting with a Microsoft Word template makes it even easier. With a well-designed Word template, the positioning and formatting of pictures have already been done for you. All you’ve got to do is to drag your pictures into the image placeholders.
Even if you’re using a template for Word, it’s good to know how to format pictures so you can make your document look exactly the way you want it to.
In this article, you’re going to see, step-by-step, how to work with pictures in Microsoft Word.
(Note: The screenshots below show Microsoft Word for Mac. The screens and steps may be slightly different if you’re using a different version of Word.)
How to Insert a Picture in Word
To add a picture to a Word document, click Insert > Pictures. From here, you’ve got three options:
1. Photo Browser
If you choose this option, you’ll be able to select an image from the existing photo sets on your computer. On a Mac, that includes photos in iPhoto and Photo Booth. When you find the picture you want to use, click on it, then drag it into the document.


2. Picture From File
This option lets you insert an image from another location on your computer. Find the image file, select it, then click Insert.


3. Online Pictures
Insert pictures in Word from the web by selecting Online Pictures…. This opens a Bing image search right inside your document. Type a keyword or phrase in the search bar.


By default, the Creative Commons only filter is checked. Keep this selected to make sure you don’t violate any copyright laws. Click on the filter icon to filter the image results by other parameters.


Select an image by clicking on it, then click Insert. You can select several images before clicking the Insert button.


Microsoft Word automatically includes the image attribution and license details as a caption.


Note: While you can import many image formats into Word, the ones that work best are JPG and PNG.
How to Format Pictures in Word
After importing pictures into Word, you can apply different formatting settings to each Microsoft Word picture and control its appearance. Below are some of the most basic image formatting you can apply in Word:
1. Resize an Image
Resize a picture in two ways:
Resizing Method 1
Click on the picture. Press and hold the Shift key, then click and drag one of the sizing handles either towards or away from the center.


Holding the Shift key ensures that the proportion of the picture is retained. Otherwise, it would become distorted and your entire document will look amateurish.
Resizing Method 2
This method allows you to resize the picture to a specific length or width. Click on the picture, then click on the Picture Format tab. Type the length or width you wish the image to have.


By default, the original proportion of the image is retained even when you change either the length or width of the image. Keep this checked to avoid distorting the image.
2. Rotate or Flip Images
To rotate an image, do so either manually or by a specific amount.
Manual Image Rotation
To rotate an image manually, click on the image to select it. Click on the rotation handle and drag it in the direction you want.


Flip or Rotate an Image By a Specific Amount
Rotate a picture by a specific amount. Click on the picture, then go to Picture Format > Rotate. From here, you’ve got the option to:
- Rotate Right 90°
- Rotate Left 90°
- Flip Vertical
- Flip Horizontal
- Select More Rotation Options
To rotate a picture to an exact angle, choose Select More Rotation Options.


Type in the amount you wish to rotate the object, then click OK.


How to Crop Photos in Word
If you’re wondering how to crop a picture in Microsoft Word, it’s not difficult. Follow the steps below to not only crop an image, but also to dress it up by cropping it to a shape or adding decorative borders:
1. Basic Image Cropping
To crop a picture, select the picture, then go to Picture Format > Crop > Crop.
Black cropping handles appear on the sides of the picture. From here:
- Crop one side. Drag one side handle inward.
- Crop two adjacent sides at the same time. Drag one corner inward.
Click outside the image to apply the crop.
2. Crop Image to a Shape
To crop the picture to a specific shape, select the picture. Go to Picture Format > Crop > Crop to Shape. Select a shape from the selection that appears.


Click away from the picture to apply the new shape.


3. Frames and Borders
Borders are an easy way to dress up a picture in Microsoft Word. To add a border, select the picture, go to Picture Format. Click on the Picture Border button on the ribbon to reveal the border options.


From here, choose the color, weight, and dash style you wish to use for the border.


To add a frame, click on the picture, then go to Picture Format. Click on the Picture Quick Styles button on the ribbon. Select the border you want to use.


How to Use Image Editing Tools
There are many Word image editing tools. Learn how to format pictures in Word by removing the background or adjusting the brightness. Here’s how:
1. Remove Background
Microsoft Word allows you to remove the background from your pictures. This feature works best if the color of the background is distinct from the colors on the main subject of the picture.
To remove the background, select the image. Go to Picture Format > Remove Background.


Use the tools provided to select which parts of the image you wish to keep and which parts you want to remove.


The parts that’ll be removed are colored pink.
When you’re happy with the selection, click Keep Changes.


2. Sharpness and Brightness Corrections
Improve the sharpness and brightness of your pictures in Microsoft Word. To adjust these, select the picture. Go to Picture Format > Corrections. Select the sharpness and brightness/contrast settings you wish to use.


To more finely control these settings, go to Picture Format > Corrections > Picture Corrections Options. The Format Picture sidebar appears. It allows you to provide specific settings for sharpness, brightness, and contrast.


3. Picture Color
Microsoft Word also allows you to control the color saturation and tone of your picture. And you can recolor the entire picture for special effects. Select the picture, go to Picture Format > Color. Select any of the options that appear.


From here choose:
- More Variations. Recolors the image with a different color from the options provided.
- Set Transparent Color. Makes certain colors transparent so that the color of the background shows through.
- Picture Color Options. Opens the Format Picture sidebar, where you can fine-tune the settings for color saturation, tone, and recolor.
How to Use Layout Options
Microsoft Word’s layout options for images lets you control how photos are displayed alongside text.
By default, a picture is set to be «In line with text.» This means the picture is treated as an object that moves with the text. This means whatever formatting is applied to the text applies to the picture as well, which may not be how you want it to appear. When a picture is in line with text, you won’t be able to drag and drop it to a different part of the document.
To set up a picture’s layout options, select the image, then go to Picture Format > Position. Select one of the pre-configured layout options to position your picture on the page.


Gain more control by going to Picture Format > Wrap Text.


Select one of the text wrapping options:
- Square — wraps text around the picture in a square shape


- Tight — wraps text following the shape of the picture


- Through — shows text through all the “open” parts of the picture (may only be visible with certain picture shapes)


- Top and Bottom — wraps text only above and below the picture


These text wrapping options allow you to overlay pictures in Word or merge them together into a collage-type layout.
You’ve got other options:
- Behind text. Overlays the text in front of the picture
- In Front of Text. Places text behind the picture, covering it
- Edit Wrap Boundary. Lets you fine-tune how text wraps around the picture, which is especially useful if it’s irregularly shaped
- Move with text. Keeps the picture anchored to the text
- Fix position on page. Keeps the picture on the same position relative to the page, even if the text moves
- More Layout Options …. Gives you precise control over the picture layout
How to Move Pictures in Word and Arrange them on the Page
You may be wondering how to move a picture in Microsoft Word. The easiest way to move a picture is by clicking and dragging it. If this doesn’t work, the picture is probably set to be inline with text. Follow the instructions above to select a different text wrapping option.
To move multiple images, hold the shift key down as you click on each picture. Then, drag and drop them into place.
You can also move images using precise measurements. Select the image, go to Picture Format > Position > More Layout Options …. Specify the horizontal and vertical position of the picture relative to an element of the page.


Get Creative With Pictures in Word
Use the skills you learned above to add pictures in your Word documents and display them exactly the way you envision. As you’ve seen, it’s easy to control the appearance and placement of images on the page. By following the steps above, you can produce professional-looking documents all by yourself. However, we’ve only scratched the surface of the many ways you can work with pictures in Word!
Of course, if you prefer to have these design choices made for you, you’ve got the option to start with a Microsoft Word template. If you make a lot of Word documents, then you’ll like the cost-effectiveness of Envato Elements. You get unlimited downloads of templates as well as fonts, stock photos, and more for one low subscription price. On the other hand, GraphicRiver may be a better option if you only need the one-off template.
This gives you the ultimate convenience because professionally-designed Word templates have image placeholders. All you’ve got to do is to drag and drop your own pictures into the placeholders. The picture formatting steps in this article will help you fine-tune the image settings as you wish.
Now you, too, can get more creative—and effective—with pictures in Microsoft Word. But first, get your head start by downloading your favorite MS Word Template from Envato Elements or GraphicRiver.
При оформлении текстовых документов в редакторе Word часто возникает необходимость вставить в текст картинку, фотографию или рисунок. К счастью, такая возможность была реализована разработчиками и работает она очень просто. В данной статье мы расскажем, как вставить картинку в Word. Материал будет актуален для всех современных версий программы, включая Word 2007, 2010, 2013, 2016 и 2019.
Как вставить изображение при помощи копирования
Картинку, точно также как текст или другой объект, можно вставить в Word при помощи операции копирования и вставки или так называемого Copy-Past. Для этого достаточно просто скопировать картинку в любой программе и вставить ее в текстовый документ. При этом операцию копирования и вставки можно выполнять любым удобным вам способом. Вы можете использовать комбинации клавиш (Ctrl-C – копировать, Ctrl-V – вставить) или меню, которое появляется при использовании правой кнопки мышки.
Предположим, вам вставить в Ворд фотографию, которую вы нашли в Интернете. В этом случае вам нужно сначала скопировать картинку в браузере. Для этого кликните правой кнопкой мышки по картинке и в открывшемся меню выберите пункт «Копировать картинку».

После этого вам нужно перейти к программе Word, кликнуть правой кнопкой мышки по месту, где вы хотите расположить фотографию, и в открывшемся меню выбрать пункт «Вставить рисунок». В результате картинка из вашего веб-браузера будет скопирована в документ Word.

Аналогичным способом можно вставлять фотографии и рисунки и с других программ. Например, можно скопировать изображение из графического редактора и вставить его в Ворд. Для примера продемонстрируем, как это будет работать с графическим редактором Paint. Предположим, у вас есть какое-то изображение в программе Paint. Для того чтобы перенести его в текстовый документ Word вам нужно его сначала выделить. Это можно сделать при помощи кнопки на панели инструментов или комбинации клавиш Ctrl-A (выделить все).

После того как изображение выделено, его нужно скопировать. Для этого кликаем по картинке правой кнопкой мышки и выбираем «Копировать» (также можно воспользоваться комбинацией клавиш Ctrl-C).

Нужно отметить, что если фотография уже находится на вашем компьютере, то ее не обязательно открывать в графическом редакторе для того чтобы скопировать и вставить в Word. Вы можете скопировать фотографию прямо из папки, в которой она находится и после этого сразу вставить в текст. Такой способ вставки изображений также отлично работает.

После того как изображение скопировано, его можно вставлять в Word. Для этого переходим к текстовому документу, кликаем правой кнопкой мыши и выбираем «Вставить рисунок» (также можно использовать комбинацию клавиш Ctrl-V).

Если все было сделано правильно, то картинка появится в документе Word. Теперь ее можно использовать для оформления текстового документа.
Как вставить изображение при помощи кнопки «Рисунок»
Кроме использования операции копирования и вставка, в текстовом редакторе предусмотрена специальная кнопка для вставки изображений. Данная кнопка находится на вкладке «Вставка» и называется «Рисунки» (или «Рисунок», в зависимости от версии программы). Чтобы вставить изображение в Ворд достаточно кликнуть по этой кнопке.

После этого откроется стандартное окно для выбора файла. В данном окне нужно найти изображение, которое нужно вставить, выбрать его и нажать на кнопку «Вставить».

После чего выбранный файл появится в текстовом документе Word. Таким образом можно вставить любое изображение, которое сохранено на вашем компьютере.

Какой бы вы способ вставки картинки не выбрали, результат будет одинаковым. Поэтому, можете использовать тот способ, который вам больше нравится.
Как оформить вставленное изображение в тексте
После того как вы вставили картинку в Word, вам скорее всего, нужно будет ее красиво оформить. Так как по умолчанию изображение выравнивается по левому краю документа и разрывает текст, так как это показано на скриншоте внизу.

Для того чтобы это исправить нужно воспользоваться функцией «Обтекание текстом». Для этого кликните правой кнопкой мышки по изображению, откройте вложенное меню «Обтекание текстом» и выберите один из способом обтекания изображения.

В большинстве случаев лучше всего работает вариант «Обтекание текстом – Квадрат». После использования данной опции картинка выровняется по левому краю, а текст документа будет аккуратно обтекать ее по контуру.

Изображение с обтеканием «Квадрат» можно разместить в любой точке текстового документа. Например, вы можете расположить его ближе к правому краю листа или вообще посередине страницы. Для этого достаточно просто перетащить его с помощью мышки.

Также изображение можно отредактировать прямо в Ворде. Для этого нужно выделить его мышкой и перейти на вкладку «Формат». С помощью функций, которые здесь доступны, можно изменить яркость, насыщенность, резкость и другие параметры картинки.

Также здесь можно добавить к фотографии рамку, тень или другие эффекты. По экспериментируйте с возможностями на вкладке формат для того, чтобы подобрать то, что подойдет для вашего документа.
Посмотрите также:
- Как картинку сделать фоном в Word
- Как наложить картинку на картинку в Word
- Как наложить текст на картинку в Word
- Как свободно перемещать картинку в Word
- Как уменьшить размер файла Word с картинками