
Copy a Word table into Excel
Excel for Microsoft 365 Word for Microsoft 365 Excel 2021 Word 2021 Excel 2019 Word 2019 Excel 2016 Word 2016 Excel 2013 Word 2013 Excel 2010 Word 2010 Excel 2007 Word 2007 More…Less
When you want to move data from a Word table to Excel, you can avoid having to retype that data by copying it from Word directly. When you copy data from a Word table into an Excel worksheet, the data in each Word table cell is pasted in an individual cell on the worksheet.
Important: After pasting the data, you may have to clean it up so that you can take advantage of the calculation features in Excel. For example, there may be unwanted extra spacing in cells, numbers may have been pasted as text rather than as numeric values that you can calculate, or dates are not displayed correctly. For help with formatting numbers as dates, currency, percentages, etc., see Format numbers. For help with formatting the style of your table, see Format an Excel table.
-
In a Word document, select the rows and columns of the table that you want to copy to an Excel worksheet. Make sure there aren’t any extra carriage returns in the cells of the table, otherwise this may cause extra rows in Excel.
-
To copy the selection, press CTRL+C.
-
In the Excel worksheet, select the upper-left corner of the worksheet area where you want to paste the Word table.
Note: Make sure that the paste area is empty before you paste the data. Data in Word table cells will replace any existing data in worksheet cells in the paste area. If necessary, review the table first in Word to verify its dimensions.
-
Press CRL+V.
-
To adjust the formatting, click Paste Options
 next to the data that you pasted, and then do the following:
-
To use the formatting that is applied to the worksheet cells, click Match Destination Formatting.
-
To use the formatting of the Word table, click Keep Source Formatting.
-
 next to the data that you pasted, and then do the following:
Note: Excel pastes the contents of each Word table cell into a single cell. After you paste the data, you can distribute the data across additional cells in a column (for example, to divide first and last names so that they appear in separate cells) by using the Text to Columns command. For more information, see Distribute the contents of a cell into adjacent columns.
Need more help?
DOC (WORD) to XLS (EXCEL) Converter
Convert your doc files to xls online & free
Drop files here. 100 MB maximum file size or Sign Up
Convert to DOC
doc
Microsoft Word Document
DOC is a file extension for word processing documents. It is associated mainly with Microsoft Word application. DOC files can also contain charts and tables, videos, images, sounds and diagrams. It supports almost all the Operating Systems.
XLS Converter
xls
Microsoft Excel Worksheet Sheet (97-2003)
XLS format is used to refer to the documents of the program Microsoft Excel. This file is a spreadsheet. All document data distributed and stored in the cells. Each cell has a unique address, which is denoted by letters and Arabic numerals. The cell can contain fixed data, and data in the form of formulas, which bind more cells.
How to convert DOC to XLS
Step 1
Upload doc-file(s)
Select files from Computer, Google Drive, Dropbox, URL or by dragging it on the page.
Step 2
Choose «to xls»
Choose xls or any other format you need as a result (more than 200 formats supported)
Step 3
Download your xls
Let the file convert and you can download your xls file right afterwards
DOC to XLS Quality Rating
3.8 (27,480 votes)
You need to convert and download at least 1 file to provide feedback!
Updated: 04/30/2020 by

If you have information in a Microsoft Word document that you need to import to a Microsoft Excel spreadsheet, Excel provides functionality to do the conversion. Select the version of Word and Excel you’re using and follow the steps to make a plain text version of your Word document and importing it into Excel.
Microsoft Office 365
- Open the Word document containing the information you want to convert to Excel.
- In the Ribbon, click the File tab, and click the Save As option.
- Choose the location on your computer where you want to save the plain text file, enter a name for the file, and change the file type to Plain Text. For this example, the Word file is named «CH Test File,» and the plain text file is named «CH Test File Plain.» Once you’ve chosen the location and named the file, click Save.
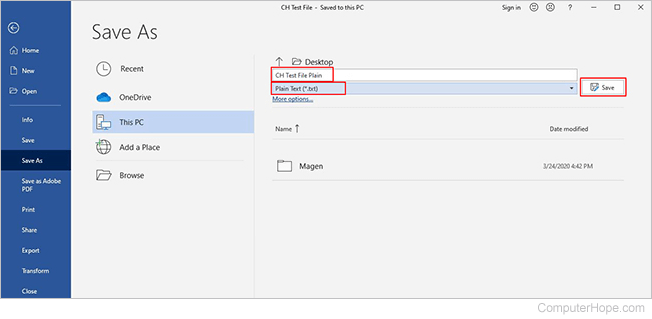
- A File Conversion pop-up window opens. Leave the Windows (default) checked, and click OK.
- You can now close the Word document and program.
- Open Microsoft Excel and click New > Blank workbook.
- In the Ribbon, click the Data tab, and click the From Text/CSV option.
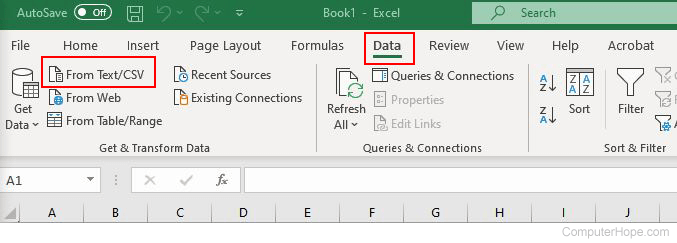
- Find the location on the computer where you saved the plain text file in step 3. Click the file, and then click Import.
- Excel opens a blank pop-up box asking you to specify the File Origin, Delimiter, and Data Type detection. Verify the default information is correct and click Load. If any information isn’t correct, make any necessary changes and click Load. The imported information is now in the correct format in Excel.
- Save the Excel file.
Microsoft Office 2016 and earlier versions
- Open the Word document containing the information you want to convert to Excel.
- In the Ribbon, click the File tab, and click the Save As option.
- Choose the location on your computer where you want to save the plain text file, enter a name for the file, and change the file type to Plain Text. Once you’ve chosen the location and named the file, click Save.
- A File Conversion pop-up window opens. Leave the Windows (default) checked, and click OK.
- You can now close the Word document and program.
- Open Microsoft Excel and click New > Blank workbook.
- In the Ribbon, click the Data tab, and click the From Text option.
- Find the location on the computer where you saved the plain text file in step 3. Click the file name, and then click Import.
- In the Text Import Wizard, on step 1 of 3, click Delimited, then click Next.
- On step 2 of 3, check the box next to the desired delimiters (space, comma, tab, etc.), then click Next.
- On step 3 of 3, review all information is correct, make any necessary changes, then click Finish.
- If you checked Existing Worksheet, select a cell where you want to put the data. Click OK. The imported information is now in the correct format in Excel.
- Save the Excel file.
In a scenario where you have a data table set up in a Word document, you can convert the table into an Excel sheet, by simply importing it – no need to recreate the table in Excel!
Likewise, you can also easily import a text Word document into Excel.
- Import Word document into Excel as an embedded object.
- Import Word data into multiple cells in Excel.
- Import Word data as a text file into Excel.
We will show you in simple step-by-step instructions how you can do this.
Let us start.
Method #1: Import Word Document as an embedded object into Excel
This is useful to create a central access point to various Word documents. By embedding the document into Excel, the Word document itself will open when you double click on it.
Step #1: Open an Excel spreadsheet
Open an Excel spreadsheet into which you want to import the Word data.
Step #2: Navigate to a cell
Navigate to the cell where you want to import the data.
Step #3: Import the data
Click on the ‘Insert’ tab in the top menu bar to change the ribbon.

In the section ‘Text’, click on Object.

This opens the ‘Insert Object’ dialog box.
Click on the option ‘Create from file’.
Ensure the options ‘Link to file’ and ‘Display as icon’ boxes are not ticked.
Click on the Browse… button.

This will open the File Manager/Explorer window.
Navigate to the Word document that you want to import.
Once you have selected it, click on the Insert button.

The name of the Word document will now appear in the ‘Insert Object’ dialog box.

Click on the OK button at the bottom.
Excel embeds the Word document as an object.

Method #2: Import Word Data into Multiple Cells in Excel
Step #1: Open a Word document
Open the Word document that contains the data you want to import.
Click on the cross symbol in the top left corner of the table to select it.

Press CTRL+C on the keyboard to copy the data into the clipboard, OR click right and select ‘Copy’ from the menu that opened.
Step #2: Close the Word document
Close the Word document. (Optional)
Step #3: Open the Excel spreadsheet
Open the Excel spreadsheet into which you want to import the Word data.
Step #4: Navigate to a cell
Navigate to the cell from where you want to start importing the data. The cell you select will be the upper left starting point of the data you want to import.
Step #5: Import the data
Right-click on this cell to open a menu.
Excel offers you two Paste Options:
- Keep Source Formatting (K) — Paste the data as it appeared in Word (lines, font, and text size will remain the same as it was originally)
- Match Destination Formatting (M) — Paste the data as it should appear in Excel (the font, text size, etc. will become the same as the rest of the spreadsheet)
Pick one of the choices to import the data.

Excel imports the data into multiple cells. In our example below, we chose Match Destination Formatting.

Method #3: Import Word Data as a Text File into Excel
This is useful if you have a simple Word document that only contains text – no images or graphs or tables.
If you have already created a project capturing information, but realize a spreadsheet will work better than a document, then this tool is for you to ensure you don’t have to redo your hard work.
Step #1: Open a Word document
Open the Word document that contains the data you want to import.
Click on the ‘File’ tab in the top menu bar.

This opens the ‘File’ menu.
In the left pane, click on the ‘Export’ option.

In the pane that opens, under Export, click on ‘Change File Type.’
Under the ‘Change File Type’ menu, select Plain Text.
Click on Save As.

Step #2: Save as a plain text document
This opens the File Manager.
Save your file as plain text type with an appropriate name. In some instances you will now see it saved as document_name.txt

Step #3: Close the Word document
Close the Word document. (Optional)
Step #4: Open the Excel spreadsheet
Open the Excel spreadsheet where you want to import the data.
Click on the ‘Data’ tab in the top menu bar to change the ribbon.

Step #5: Import the data
In the section ‘Get External Data’, click on the ‘From Text’ icon.

This opens the File Manager.
Navigate to the plain text file you have saved in step #2.
Click on the name of the plain text file.
Click on the Open button.

This opens the first dialog box of the Text Import Wizard.
Under the option ‘Choose the file type…’, click and select Delimited.

Make other changes if necessary.
Click on Next at the bottom of the dialog box.
This will open the second dialog box.
Click and select the ‘Tab’ option under ‘Delimiters’.

Make other changes if necessary.
Click on Next at the bottom of the dialog box.
This will open the third dialog box.
Under ‘Column data’ format, click and select ‘General’.
Make other changes if necessary.
Click on the Finish button at the bottom of the dialog box.

This opens the ‘Import Data’ dialog box.
Select the worksheet and the cell where Excel will import the data.

Click the OK button.
Excel imports the text data.

Step #6: Format the data
Right-click on the cell containing the data.
A menu opens.
Select ‘Format Cells…’

This opens the ‘Format Cells’ dialog box.
Click on the ‘Alignment’ tab.
Under ‘Text control’, click and select ‘Wrap Text’.

Make other changes if necessary.
Click on OK at the bottom of the dialog box.
Excel formats the text data to fit into one cell.

Conclusion
We have shown you three methods of inserting Word data into Excel, depending on your needs and the type of data in your Word document.
Dorothy wanted to learn how to insert objects into her Excel spreadsheets:
I believe that i have seen a Microsoft Excel worksheet that had a Word document embedded in it. Can you explain how can i insert Word files into Excel and in general how to embed file objects in Office? Just so you are aware, I am using Excel 365.
Thanks for the question. One of the key benefits of an integrated productivity suite, such as Office, is the ability to insert files of specific type into other files. For example – you can add Word document files into other Microsoft Office applications, namely Excel worksheets, Outlook emails and PowerPoint presentations.
This quick tutorial is aimed at explaining how you can embed Word objects (being a document, presentation, diagram, notebook) into Excel. You can use a similar process when adding docx files to PowerPoint or to other Word files.
Inserting Word docs into Microsoft Excel sheets
- First off, go ahead and open Microsoft Excel.
- Then hit File, and navigate to the Open tab.
- Now search and open for your Excel workbook. (Tip – consider pinning files for easier access in the future).
- In your Excel file, navigate to your the tab in Excel into which you would like to add the attachment/embed.
- From the Ribbon, hit Insert.
- In the right hand side of the Ribbon, hit Object (located in the Text group of the Insert tab).
- At this point, you can either add a new Word file to your worksheet or an existing one. Select Create a new file and pick Microsoft Word as the object type from the drop down list to add a brand new document or select Create from file to add an existing file to the spreadsheet.
- Now, go ahead and adjust the look and feel of your embedded object so it will fit your spreadsheet layout.
- Next, hit OK.
- And obviously, don’t forget to save your Excel spreadsheet on your computer, network drive or OneDrive.
Adding Word as attachments into Excel files
In a similar fashion you are able to insert your Word doc as an attachment to the worksheet.
Follow steps 1-6 above, but be sure of highlighting the Display as Icon and Link to File check-boxes before moving to step 8. Your document will displayed as an icon on your spreadsheet, which you can double click to open it.
Linking to a file from Word and Excel
As shown above, by using the Link to File feature, you can easily link to any embedded file or icon in your spreadsheet or document.
Notes:
- As shown above, embedded files can also be displayed as links or icons in your spreadsheet.
- The process we just outlined applies for adding any type of files (including if needed, image, graphs, equation objects and so forth) into an Excel spreadsheet.
Embedding Word documents into Excel on macOS
- Open Excel for macOS.
- Navigate and open your spreadsheet.
- Go to the Insert tab.
- Now, go ahead and hit Select Object.
- The Insert Object form will appear:

- Select Microsoft Word document to insert a brand new file, or hit the From file button to add an existing doc to your worksheet.
- Last hit OK, and don’t forget to save your file.
Finally, now that you know everything about embedding Word documents into spreadsheets, you might want to learn how to insert Excel sheets into Word docs.
Note:
- If you are using Microsoft Office on MAC, you’ll be able to embed Word documents into Excel for MAC, but not into PowerPoint presentations nor Visio diagrams.
Copying Word content into an Excel spreadsheet
A reader asked whether he is able to copy and paste between Word an Excel. A very prevalent use case for that is when you have content in a Word table and you would like to paste it into your spreadsheet. This is possible, but with a couple caveats / tricks mostly related to the pasted content formatting:
- Assuming that you have a table in your Word document, highlight it, then hit the right mouse click and hit Copy.
- Open your Excel spreadsheet and navigate to the place you would like to paste your table.
- Right click and use the Paste Options menu to set the formatting of your pasted data.
- Alternatively, use Paste Special (also available in your right mouse button) to paste as text, HTML or embed the content as a “live” Word object.