
I have a document which was created in Word and has 226 pages. When I send it to a client who is using a later version of Word, it looks totally different and has over 330 pages. How can I send the client the document without it changing? Also, they wanted a pdf version, which looks nothing like the Word document. How can I get the Word document to look like the pdf?
Word documents were never intended to do what you’re doing. They were never meant to distribute documents to others for reading.
Your client is on the right track: that’s exactly what PDF is for.
In a nutshell: it’s all about the printer.
Different printer, different look
Word processors like Word are generally designed to produce documents to be printed. When Word displays a document in a print layout or page view, it uses the characteristics of the currently-selected printer to determine what the document will look like when printed.
Printer characteristics vary a lot. Default margins, paper size, and other differences in both capability and configuration can make a document appear very differently when viewed or printed on one system as compared to another.
Different system, different look
Another common difference is fonts, which are not the same across systems.
If you create a document using one font that happens to be installed on your computer, and then view it on another system where the font is not present, things will look different. Word will substitute something “close” to the font you wanted. Unfortunately, “close” is vague, and can be startlingly different from what you intended.
The solution: PDF
The PDF file format is specifically created to solve this problem. PDF, which stands for “Portable Document Format”, is designed to display exactly the same everywhere, even across different operating systems, no matter what your system or printer characteristics.
Current versions of Microsoft Word and other word processors can save to PDF format directly. PDF creation acts like a printer — but a printer that’s the same everywhere. The interface used to save as PDF often looks very much like an interface you use to print the document.
The resulting PDF file can be viewed anywhere with a PDF reader and should look, and even print, exactly the same as your original PDF.
What PDF is not
PDF is not a format designed to be edited. Depending on the document, it can be, to some limited extent, but that’s not its purpose at all. Consider it a display-only format — not unlike the paper it’s intended to replace.
If you do need to exchange a document such that others can edit and make changes to it, Word’s “.doc” and “.docx” formats are what you need; just don’t expect the document to look the same everywhere.
The bottom line
Use the right tool for the job.
When sharing finished documents with others, use PDF. Always. Author the document so the PDF comes out the way you want it to, and then share that with your client.
If you need to share editable documents in Word format, just realize they will not display or print exactly the same everywhere.
Podcast audio
Video Narration
You can also convert DOCX into many other file formats. Please see the complete list below.
DOCX TO PDF Converter (Portable Document)
DOCX TO HTM Converter (Hypertext Markup Language File)
DOCX TO HTML Converter (Hyper Text Markup Language)
DOCX TO MHTML Converter (MIME Encapsulation of Aggregate HTML)
DOCX TO MHT Converter (MIME Encapsulation of Aggregate HTML)
DOCX TO XPS Converter (Open XML Paper Specification)
DOCX TO TEX Converter (LaTeX Source Document)
DOCX TO PPT Converter (PowerPoint Presentation)
DOCX TO PPS Converter (Microsoft PowerPoint Slide Show)
DOCX TO PPTX Converter (PowerPoint Open XML Presentation)
DOCX TO PPSX Converter (PowerPoint Open XML Slide Show)
DOCX TO ODP Converter (OpenDocument Presentation File Format)
DOCX TO OTP Converter (Origin Graph Template)
DOCX TO POTX Converter (Microsoft PowerPoint Open XML Template)
DOCX TO POT Converter (PowerPoint Template)
DOCX TO POTM Converter (Microsoft PowerPoint Template)
DOCX TO PPTM Converter (Microsoft PowerPoint Presentation)
DOCX TO PPSM Converter (Microsoft PowerPoint Slide Show)
DOCX TO FODP Converter (OpenDocument Flat XML Presentation)
DOCX TO EPUB Converter (Digital E-Book File Format)
DOCX TO MOBI Converter (Mobipocket eBook)
DOCX TO AZW3 Converter (Kindle eBook format)
Convert DOCX TO TIFF (Tagged Image File Format)
Convert DOCX TO TIF (Tagged Image File Format)
Convert DOCX TO JPG (Joint Photographic Expert Group Image File)
Convert DOCX TO JPEG (JPEG Image)
Convert DOCX TO PNG (Portable Network Graphic)
Convert DOCX TO GIF (Graphical Interchange Format File)
Convert DOCX TO BMP (Bitmap File Format)
Convert DOCX TO ICO (Microsoft Icon File)
Convert DOCX TO PSD (Adobe Photoshop Document)
Convert DOCX TO WMF (Windows Metafile)
Convert DOCX TO EMF (Enhanced Metafile Format)
Convert DOCX TO DCM (DICOM Image)
Convert DOCX TO DICOM (Digital Imaging and Communications in Medicine)
Convert DOCX TO WEBP (Raster Web Image File Format)
Convert DOCX TO JP2 (JPEG 2000 Core Image File)
Convert DOCX TO EMZ (Enhanced Windows Metafile Compressed)
Convert DOCX TO WMZ (Windows Metafile Compressed)
Convert DOCX TO SVGZ (Compressed Scalable Vector Graphics File)
Convert DOCX TO TGA (Targa Graphic)
Convert DOCX TO PSB (Adobe Photoshop Image File)
Convert DOCX TO SVG (Scalable Vector Graphics File)
Convert DOCX TO DOC (Microsoft Word Document)
DOCX TO DOCM Conversion (Microsoft Word Macro-Enabled Document)
DOCX TO DOCX Conversion (Microsoft Word Open XML Document)
DOCX TO DOT Conversion (Microsoft Word Document Template)
DOCX TO DOTM Conversion (Microsoft Word Macro-Enabled Template)
DOCX TO DOTX Conversion (Word Open XML Document Template)
DOCX TO RTF Conversion (Rich Text File Format)
DOCX TO ODT Conversion (Open Document Text)
DOCX TO OTT Conversion (Open Document Template)
DOCX TO TXT Conversion (Plain Text File Format)
DOCX TO XLS Conversion (Microsoft Excel Binary File Format)
DOCX TO XLSX Conversion (Microsoft Excel Open XML Spreadsheet)
DOCX TO XLSM Conversion (Microsoft Excel Macro-Enabled Spreadsheet)
DOCX TO XLSB Conversion (Microsoft Excel Binary Spreadsheet File)
DOCX TO ODS Conversion (Open Document Spreadsheet)
DOCX TO XLTX Conversion (Microsoft Excel Open XML Template)
DOCX TO XLT Conversion (Microsoft Excel Template)
DOCX TO XLTM Conversion (Microsoft Excel Macro-Enabled Template)
DOCX TO TSV Conversion (Tab Separated Values File)
DOCX TO XLAM Conversion (Microsoft Excel Macro-Enabled Add-In)
DOCX TO CSV Conversion (Comma Separated Values File)
DOCX TO FODS Conversion (OpenDocument Flat XML Spreadsheet)
DOCX TO SXC Conversion (StarOffice Calc Spreadsheet)
Seeting Microsoft Word Document Management System
using SVN and TortoiseSVN
Any form of writing is an iterative refinement of thoughts, language, and vocabulary. But, Microsoft Word, one of the most popular editors in the Windows world, does little to facilitate this iterative refinement of the document. Although Microsoft word provides “review” functionality that keeps track of changes in the document, using reviewing functionality makes the document cluttered and messy. Further, Microsoft Word does not provide common functionalities such as comparing, merging, or identifying differences between different versions of the document.
Managing multiple versions of a software code (written in java, C, etc) is a well established technology in the software development world. One such tool that facilitate managing multiple version of the software code is SVN. Yesterday, after getting frustrated with the limited capability of the Microsoft word in managing multiple version of the document, I thought of using SVN. After Googling and searching on blogs, I found that SVN along with TortoiseSVN can be used to setup a free home-made document management system for maintaining word documents. To get you an idea of the power of this free document management system, below is the image of the Microsoft Word (2007) that shows different version of the same document. Notice “new addition” in the title.
The image below shows the
1. The current document on which I am working (lower right panel)
2. The previous version of the same document (upper right panel)
3. Changes in the document. New additions are shown in Red Color (middle panel)
4. Only changes (left panel)

Step by Step instructions to setup Microsoft word document management system
1. download latest SVN
2. Install SVN with default setting
4. Install TortoiseSVN with default settings
5. After restarting the computer, create a folder, title SVN, on C: drive i.e. C:SVN
6. Right click on the “SVN” folder and select TortoiseSVN > Create Repository here (see fig 2) Select default Native filesystem (FSFS) and click OK. This creates a repository where SVN stores all versions.

7. Now import the files. For this select the folder that contains the files and right click and select TortoiseSVN > Import. In the popup box, select c:svn for the “url of the repository” and click OK
8. Now create another folder “svn_doc” where ever you want. In this folder we will checkout a copy of all files. For this right click on the folder and select “SVN Checkout” from the context menu.
9. All the files that were imported now should be available in this folder.
10. Now always use files from this new folder. Whenever you edit any file, commit changes to SVN by right click on the file and selecting “SVN commit”. To see difference between two versions, select the file and right click and select TortoiseSVN> diff. Mircorsoft word should start and show current file, last saved version, and the differences, as shown in the fig 1.
This setp is required only for Microsoft Office 2007
1. To be able to see the differences in the *.docx file, right click on any file and select TortoiseSVN > setting. In the tree view select Diff Viewer and click on the “Advanced” Button. Select extension .doc and click on edit. Change “doc” to “docx”. Alternatively you can create a new extension “docx” and copy the diff viewer location from “doc”.
Enjoy free document management system.

I love learning, teaching (sometimes to machines), and sharing things I am learning. This blog mostly captures my thoughts, ideas, or concepts I discovered or learned as I work on various projects related to machine learning, big data processing and statistics.
View all posts by Ritesh Agrawal

The Microsoft Word document format is extremely popular and is considered the de-facto standard by many users. Many document requests include a reminder to send the work as a DOC or DOCX Microsoft Word file. An inability to create documents in this format can definitely hinder your ability to get your work done.
There are some features of Microsoft Word that make it more useful in certain collaborative situations and some users find easier to work with than Pages. You might also have Word files on your Mac if you are an Office 365 user.
| The Reason a Word Document was Lost | Solution |
| The document was recently deleted by the user. | Search your Mac Trash for the lost file. |
| I have accidentally deleted an important Word file that is no longer in the Trash. | Use data recovery software or try recovering the file from a backup. |
| I had to force quit Word and need to recover files. | Use the AutoRecovery feature. |
| Word froze and I did not save the document. | Search in the Mac Temp folder or try AutoRecovery. |
| Word crashed while I was working on a document. | Use AutoRecovery or look in your Mac Temp folder. |
| I need to recover an unsaved Word document but AutoRecovery was not enabled. | Try searching the Mac temp folder or recovering from within the Word app. |
| I want to restore an earlier version of a Word document on my Mac. | You can recover an earlier version of a file with a backup copy or from within the app. |
You might need to recover a Word document on a Mac for a number of reasons:
- ❌ Accidentally deleting files from your hard disk.
- 💥 The application crashes while you are working on a file.
- 🔨 Damage to your hard disk or storage device that leads to corrupt or missing files.
- 🦠 Infection with a virus or malware that causes data loss.
#1 Recover Unsaved Word Docs on a Mac with AutoRecovery
Microsoft Word for Mac has an AutoRecovery feature that can help you recover unsaved Word documents. This option is turned on by default when you install the application and automatically saves a copy of open documents every 10 minutes.
You can modify this setting to have the app save at a shorter or longer time interval if you like. If the application or your computer happens to crash while you are working on a Word document, you can recover it to the state it was in when the last automatic save was performed.
Steps to recover an unsaved Word document on Mac:
Step 1. Open a Finder window on your Mac.
Step 2. Select the entire computer as the location.
That will be searched and enter ‘AutoRecovery’ in the Search field. You will be presented with a list of files. It begins with ‘AutoRecovery save of’ followed by the name of the Word document you are trying to recover.
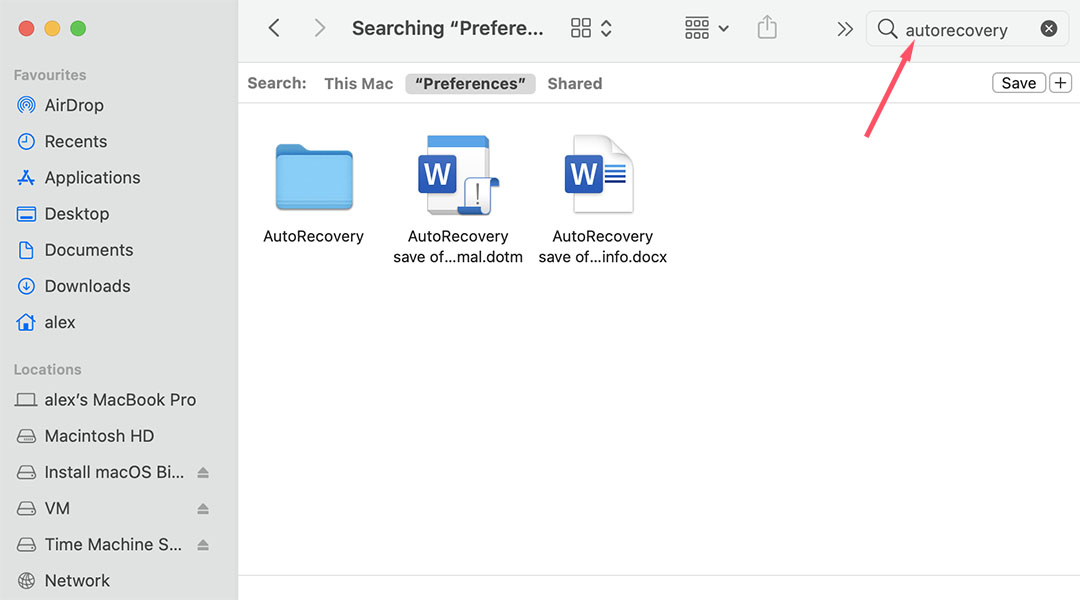
Step 3. Double-click on the file to be recovered. This will open the file in Microsoft Word.
Step 4. Select the File menu and choose Save As. Pick a new name for the document and a folder in which it will be stored and click the Save button.
#2 Recover Deleted Word Files from a Backup or the Trash
Once you have exited Microsoft Word and saved your document there are no longer any means to automatically recover a lost or deleted file. If you accidentally delete some files or are subject to a data loss scenario due to a faulty disk, there are ways that may allow you to get your files back.
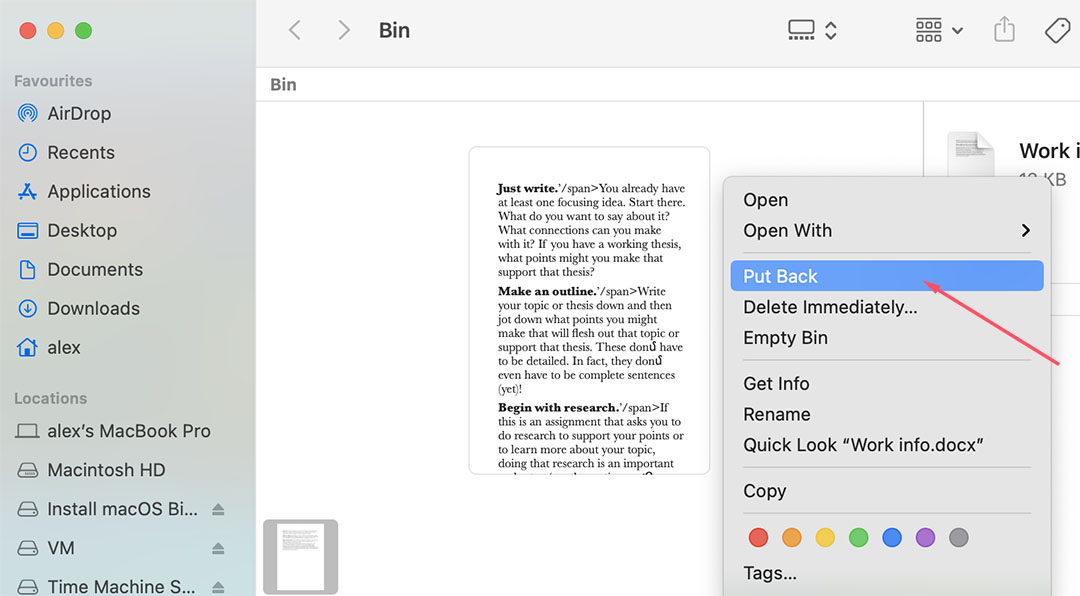
Way 1. Recover deleted Word documents from a Trash Bin
Files that have been deleted from the folder will no longer be visible in that location. They are, however, not totally removed from your Mac until you empty the Trash.
- Open the Trash folder by clicking its icon in the lower-left corner of your Mac’s screen.

- Right-click on the file name and select “Put Back”. This will return the file to its original location.


Way 2. Recover deleted Word documents from a backup
Hopefully, you are in the habit of taking regular backups of your Mac. You can use your backup to recover lost Word documents as long as the backup was made prior to the file deletion. You will need to use the media on which you save your backups and the program, perhaps Time Machine, that you use to back-up your computer.
There is still a way to recover deleted Word files even if you do not have a backup of the file in question, and it is not available through AutoRecovery or your Trash bin, by using data recovery software.
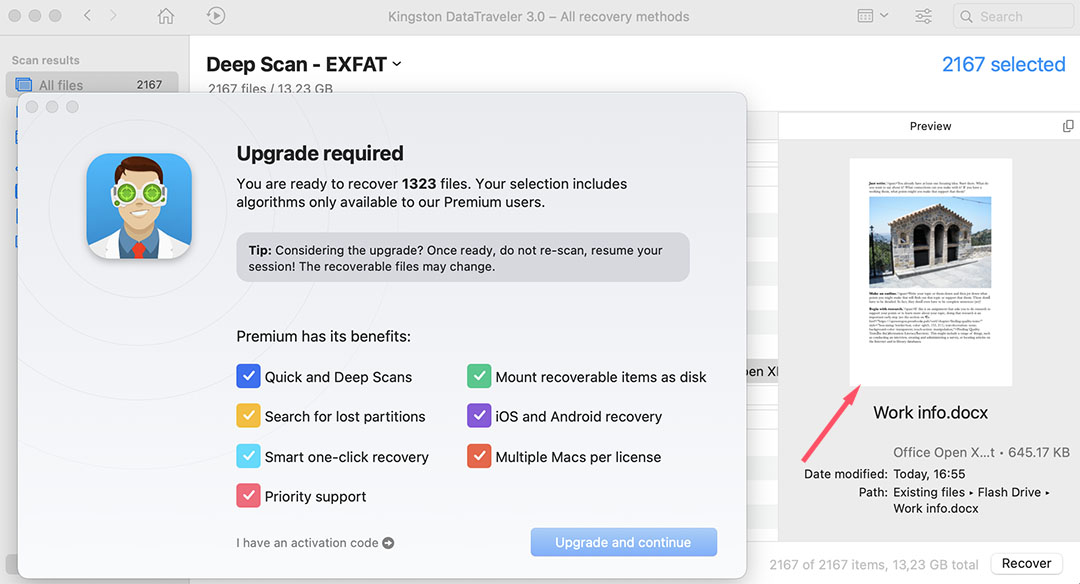
#3 Recover Deleted Word Documents using Disk Drill
Word document recovery software can prove to be instrumental in recovering those important Word files that have mysteriously vanished from your computer. It employs deep scanning technology to find deleted files and file fragments that are still physically on your computer’s storage but are no longer visible to the operating system.
Follow these steps to recover a Word document:
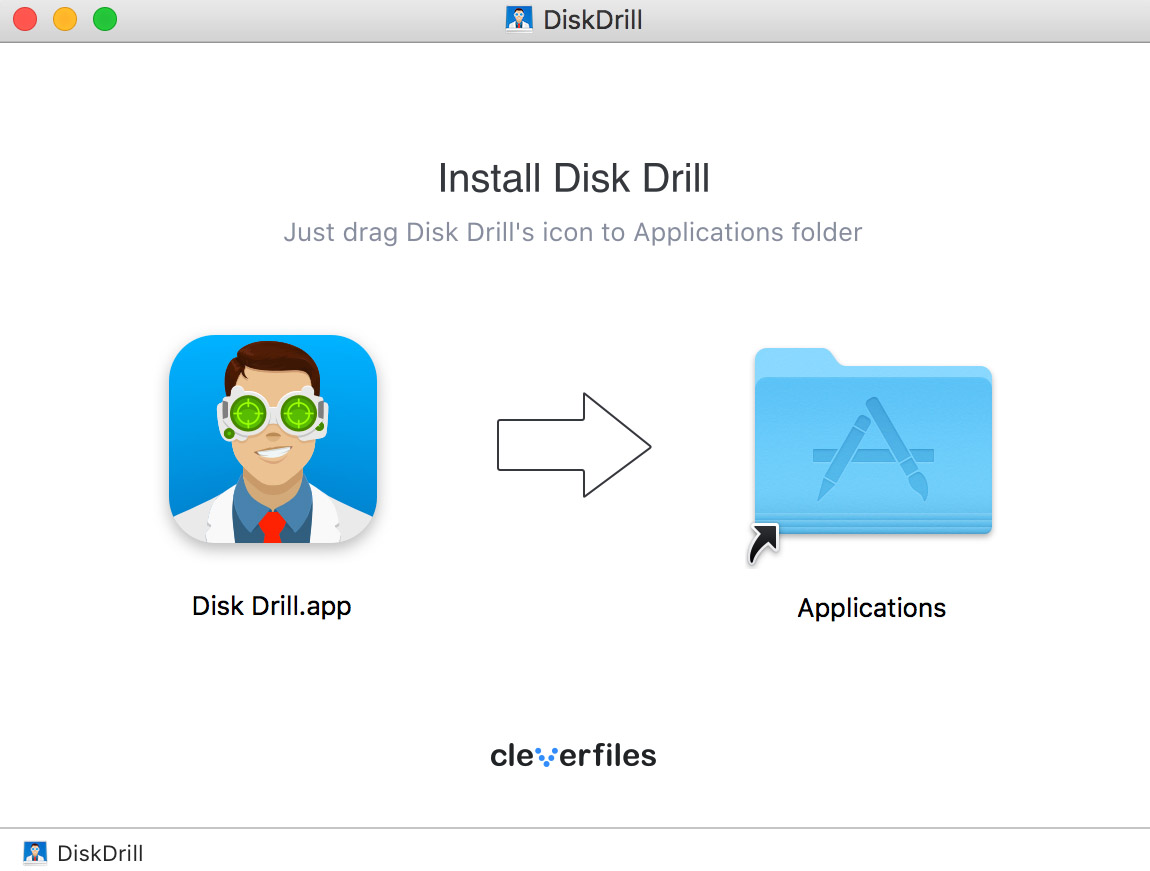
1. Download and install the free version of Disk Drill.
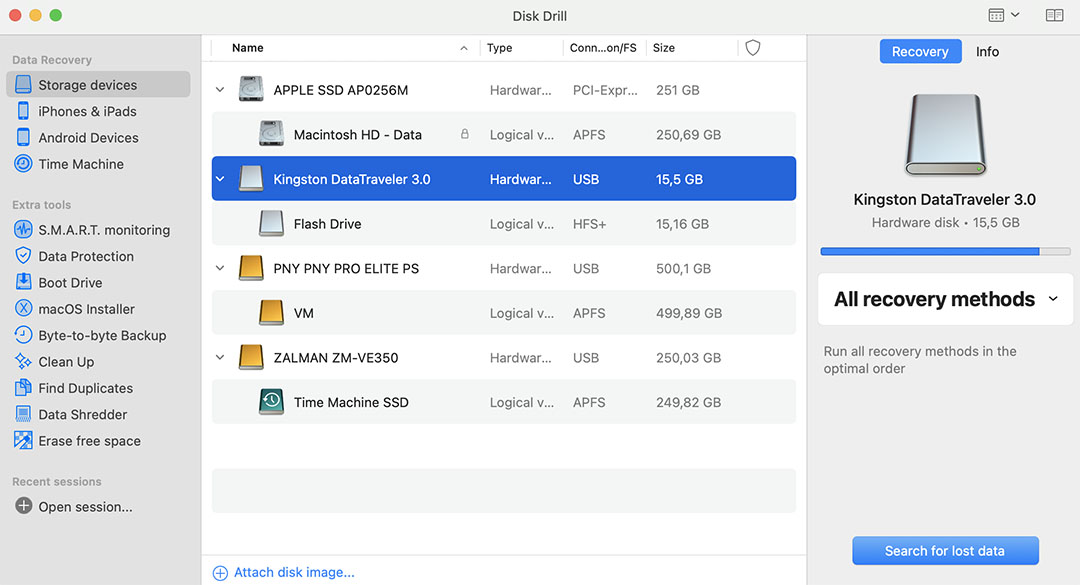
2. Launch the application and select the disk on which your lost files were last seen.
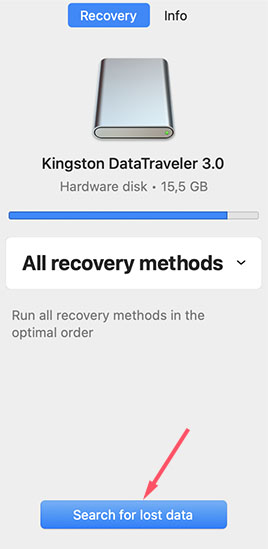
3. Click the ‘Search for lost data’ button to start a scan of your storage device.
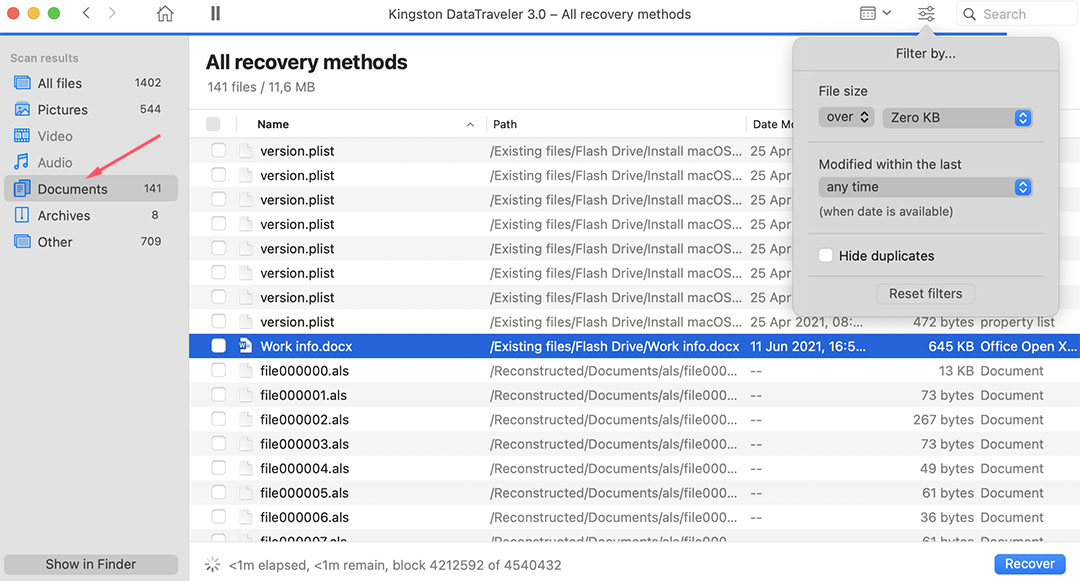
4. Use filters to search for specific types of files and speed up the scan. The application will return a list of the files that can be recovered using the tool.
5. If the preview indicates that the files you need can be recovered, you need to upgrade to the Pro version of Disk Drill to perform the recovery.
6. Select a location where you will store the files.
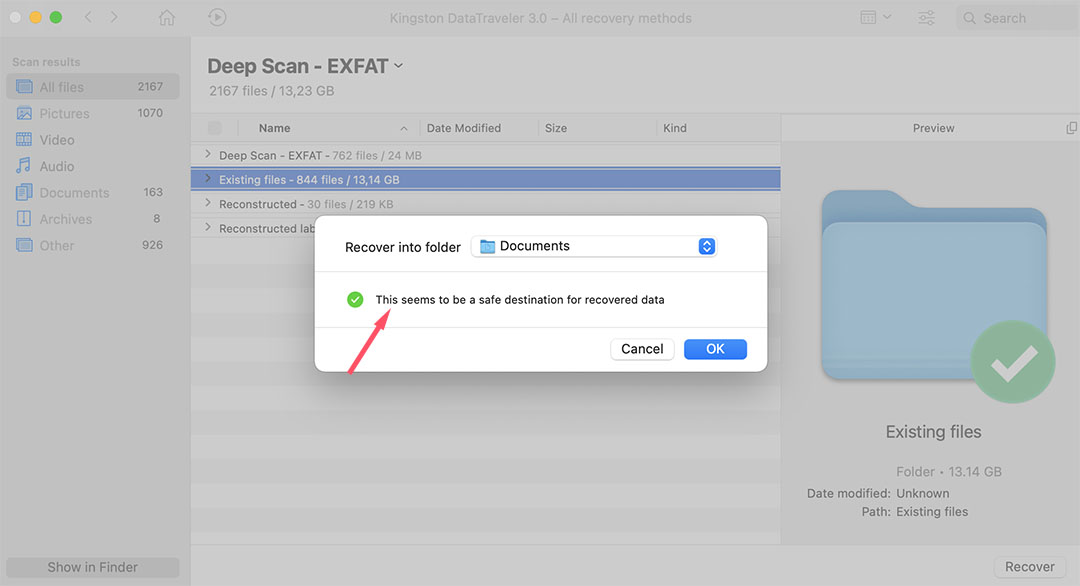
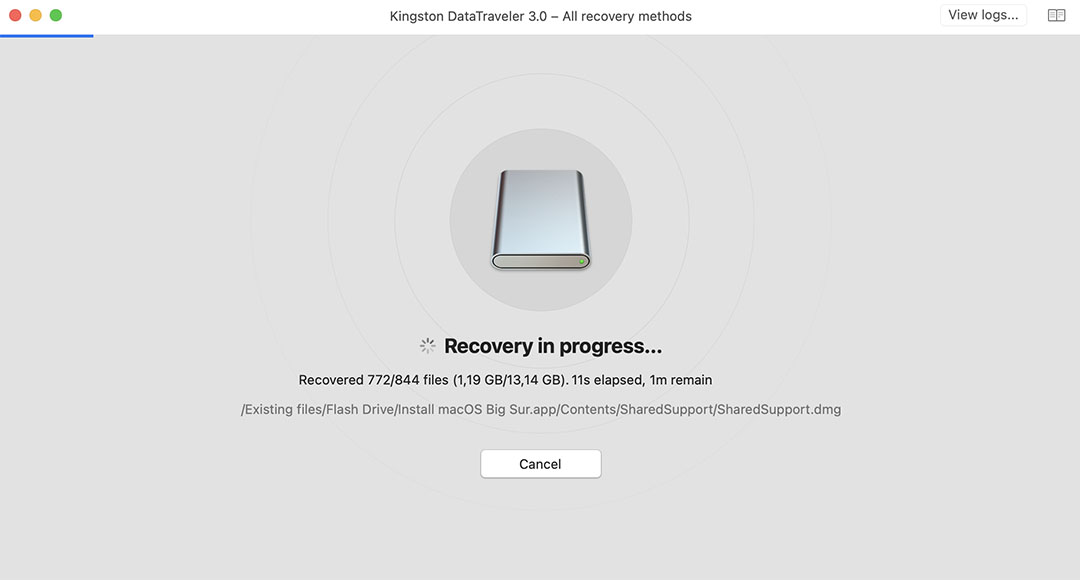
7. Click ‘Recover’ a second time to restore your lost Word files to the new location you have selected.
#4 Recover Lost Word docs from the Mac Temporary Folder
Your Mac’s temporary folder may have the lost Word file you need. Try the following procedure to check the contents of the temporary folder.
- Open Terminal.
- Type: cd $TMPDIR.
- Type: ls to display the files. Look in the TemporaryItems subfolder for your document.
- Search for the lost file. If you find the Word doc you are looking for, protect it by saving a copy to a new storage location.

#5 Restore a previous version of a Word file from within the Word app
☁️ OneDrive Method
The following steps outline the procedure you should use to attempt a recovery of a previous version of a file from within Word using OneDrive.
Use these steps to perform the recovery :
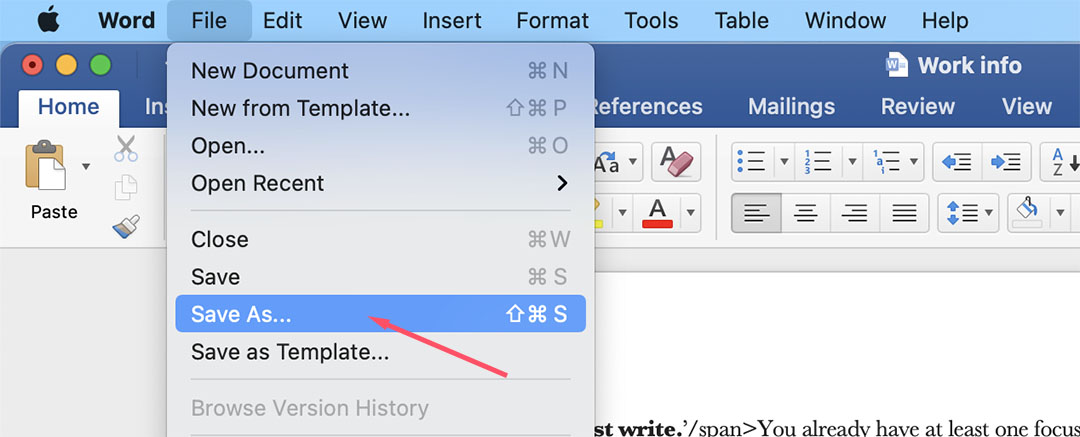
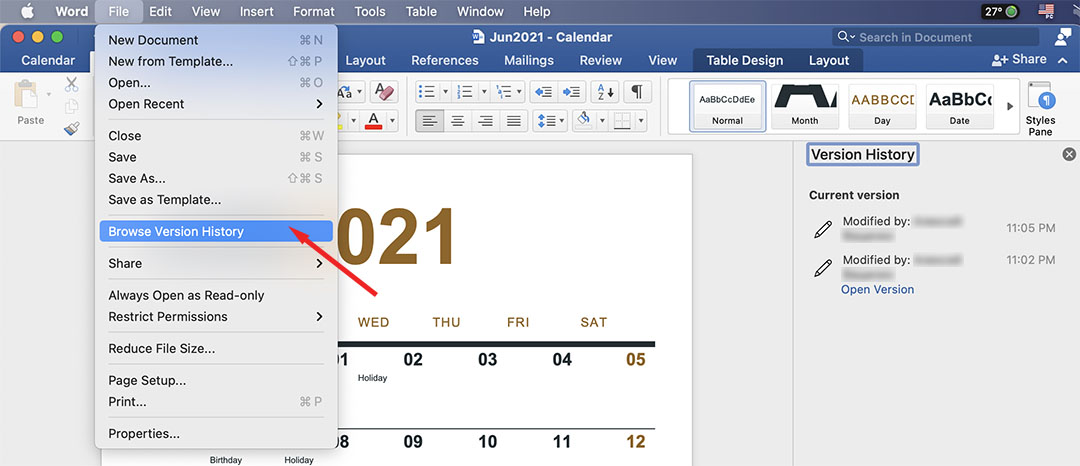
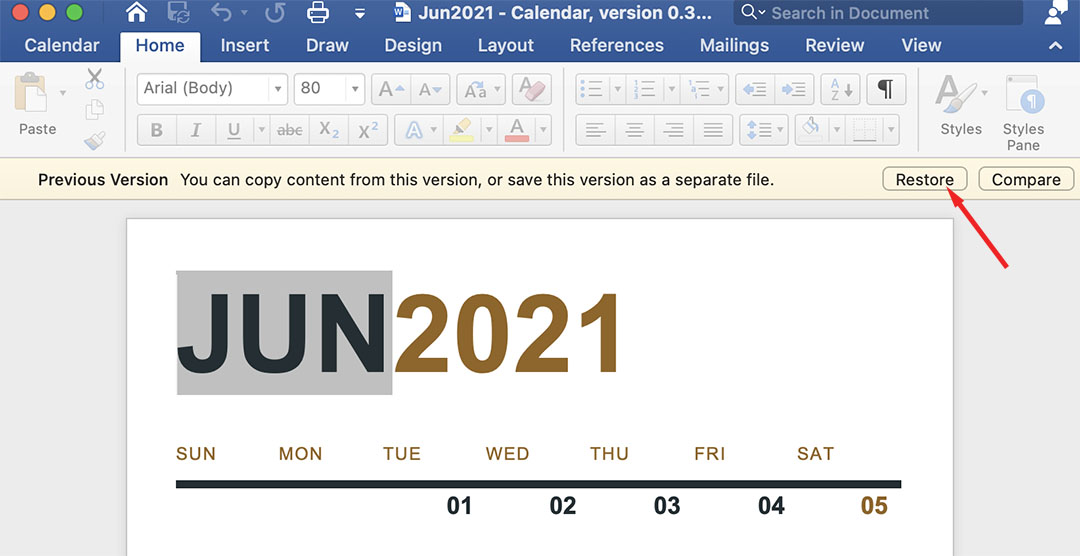
- Open the most recent version of the Word file you want to recover.
- In Word go to File > Browse Version History.

- You will see a panel displayed that shows all previously saved versions of the file.
- Select the previous version you wish to recover and choose Restore to complete the process.

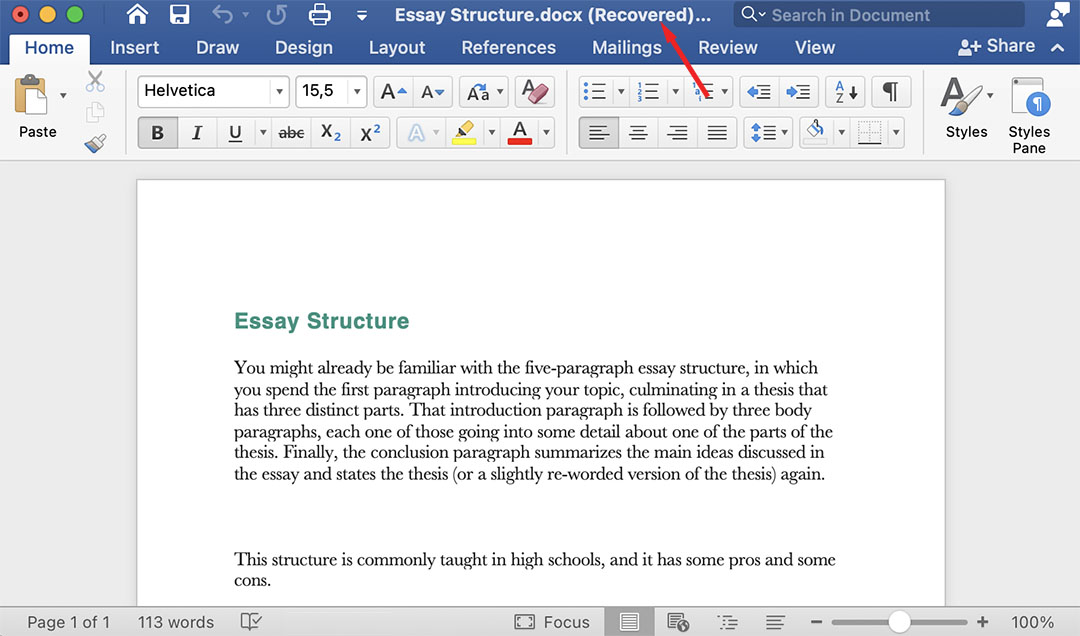
🩺 AutoRecovery Method
If Word crashes you have not saved the file and AutoRecovery is turned on, use these steps:
- Restart the Word application.
- The app will automatically recover and display the saved document.

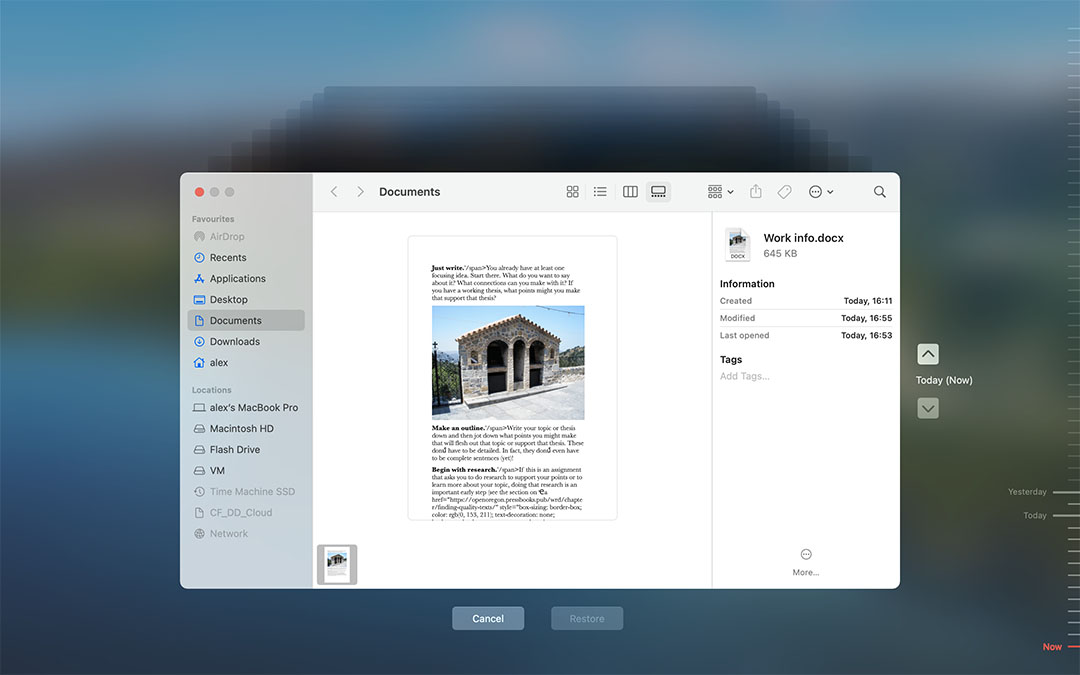
#6 Recover a Lost Word Document From a Time Machine Backup
If you’re using Time Machine to back up your Mac, you may be able the recover your lost Word doc from the backup media.
Use the following steps to recover a lost Word file from a Time Machine backup.
- Connect the storage device that contains the backup files created by Time Machine to your computer.
- Open a Finder window in the folder that previously stored the lost Word file.
- Launch Time Machine by clicking the Time Machine icon on the menu bar.
- Search through the snapshots and backups with the timeline and arrows to find the Word doc you want to restore.
- Highlight the file you want to recover and click the Restore button. The doc will be restored to its original location.

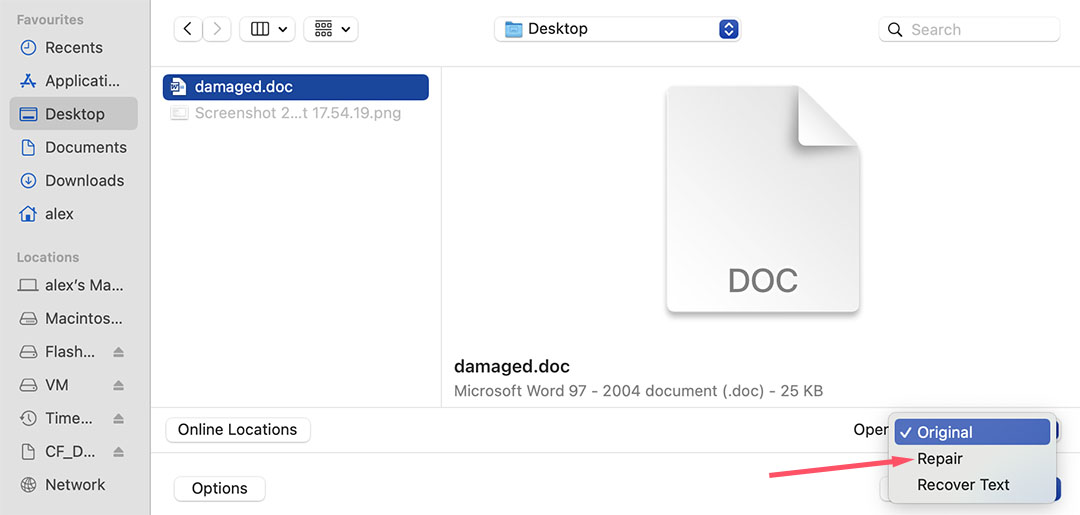
Recover text from a damaged file in Word
You can attempt to force Word to try to repair a damaged file. Use the following steps to try this recovery method.
- In Word, click File > Open.
- Select the damaged file from the dialog box.
- Click the arrow on the Open button to display the submenu.
- Click Repair or Recover Text option.

Check out this Microsoft support page for more information on handling damaged Word documents.
Tips to Help Avoid Losing Important Word Files
Here are a few tips that might help you avoid losing Word files. If the files contain important data and hold value for you, we suggest you take the necessary steps to protect them against accidental loss.
- ⏸️ Pause before manually emptying the Trash – Take a minute to see what items you are about to delete. It’s very possible that you can rescue a mistakenly deleted file easily from the Trash at this point, rather than with data recovery software after it has been emptied.
- 🛡️ Run Antivirus software – Malware and virus infections can lead to data loss. Run a reputable antivirus tool and make sure it’s always kept updated.
- 🔋 Consider a surge protector – Power spikes and surges can lead to unexpected system crashes that cause you to lose data. Using a reliable surge protector can help eliminate that source of lost Word documents.
- 💾 Turn on AutoRecovery – This Microsoft document explains everything you need to know about this feature. You should turn it on and use it to automatically protect your Word files.
- 💎 Configure Guaranteed Recovery – Guaranteed Recovery is a free data protection tool available with the trial version of Disk Drill. It allows you to configure specific files and folders for additional protection from accidental deletion and provides a one-click data recovery method.
Video Tutorial:
Disk Drill will find any lost files that can still be recovered, in some cases, even overwritten data can be recovered. It’s an excellent data recovery tool that will allow you to restore those lost Word files to your machine and let you get on with your work.
FAQ
To recover a previous version of a Word document on a Mac:
- Connect your Time Machine backup disk if it’s not already connected to your Mac.
- Open the folder that contained the deleted Word document.
- Click the Time Machine icon located in the Menu Bar and choose Enter Time Machine.
- Locate the Word document you want to recover using the timeline on the right edge of the screen.
- Click Restore to restore the selected Word document.
Yes, there are multiple ways to recover an overwritten Word document on Mac:
- Use Time Machine to recover an older version of the overwritten document.
- Open the current version of the overwritten document in Word and recover an earlier version using Version History.
- Recover the document from a cloud backup.
- Go through your backup devices to see if you have a backup of the original Word document.
Word on Mac has a special feature called AutoRecovery that is turned on by default and periodically creates a copy of the document you’re working on. So if suddenly your Mac shuts down or Word crashes, you’ll be able to use this tool to recover your unsaved document.
Usually, the unsaved document should open when you launch Word on your Mac after the shutdown. But if it didn’t, follow these steps to recover an unsaved Word document on Mac via AutoRecovery:
- Open Finder.
- From the top menu, head to Go > Go to Folder.
- Copy and paste this folder path in the window (replace username with your own username): /Users/username/Library/Containers/com.Microsoft /Data/Library/Preferences/AutoRecovery
- Click Go.
- Once you’ve found the needed file, double-click it to open.
- Click File > Save As. Type in the name for your file and choose a location for it. When ready, click Save.
If you’ve been backing up your Mac with Time Machine frequently, you can use the backups to recover the Word document. Follow these steps to do it:
- Connect the drive containing your Time Machine backup to your Mac.
- From the menu on the top of the screen, click the Time Machine icon and choose Enter Time Machine.
- Open the folder where the file should be located. Use the arrows on the right side to choose the needed backup version and search for the lost file.
- Click the needed Word document and click Restore.
The AutoRecovery files go to a hidden folder on your Mac, which is why it will be almost impossible to find such files by simply navigating through Finder. To find the unsaved Word documents on your Mac, head to Go > Go to Folder and enter this folder path (replace username with your own username):
/Users/username/Library/Containers/com.Microsoft /Data/Library/Preferences/AutoRecovery
It’s possible you can’t find a Word file on your Mac because of one of these reasons:
- You forgot the location where you saved the document;
- You deleted the document by mistake;
- Word or your Mac unexpectedly crashed, and you didn’t save the document before that;
- Your Mac got infected with a virus that caused data loss;
Whatever the reason is, the easiest and quickest way to find the lost Word document on your Mac is to use data recovery software.

Robert Agar
Robert is a freelance writer who graduated from Pace University in New York with a Computer Science degree in 1992. Former computer specialist at IBM. Over the course of a long IT career, he has worked for a number of lar…
Read full bio
Robert is a freelance writer who graduated from Pace University in New York with a Computer Science degree in 1992. Former computer specialist at IBM. Over the course of a long IT career, he has worked for a number of lar…
Read full bio

This article has been approved by Brett Johnson, Data Recovery Engineer at ACE Data Recovery. Brett has a Bachelor’s Degree in Computer Systems and Network, 12 years of experience.
This article has been approved by Brett Johnson, Data Recovery Engineer at ACE Data Recovery. Brett has a Bachelor’s Degree in Computer Systems and Network, 12 years of experience.
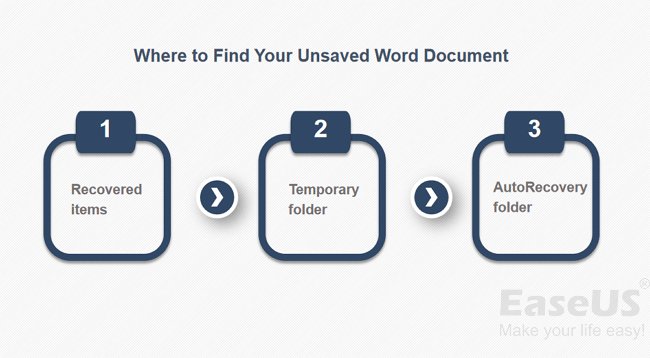
Accidentally closed Word without saving on Mac? Do you know how to recover unsaved Word documents on Mac? According to the unique features of Microsoft Word for Mac, you may find the unsaved item in the AutoRecovery folder, Temporary folder, or Recovered item in Trash. Besides, if you unintentionally lose, delete, or format your Word document, you can recover a Word document on Mac with EaseUS Word file recovery software.
| Workable Solutions | Step-by-step Troubleshooting |
|---|---|
| Recover Unsaved Word Documents |
#1. Recover from the AutoRecovery folder…Full steps |
| Recover Deleted Word Documents | #5. Recover with Word file recovery software…Full steps |
Embedded with more useful features in certain collaborative situations than recovering Pages documents, Microsoft Word has become increasingly popular among Mac computers. Office 365 even allows users to create Word files on their Mac. On the one hand, Microsoft Word offers standard DOC or DOCX file formats that are compatible with almost every OS platform; On the other hand, Word 2022, 2020, 2019, 2018…2011 featured auto-saving, which enables us to recover a Word document before we could hit Save.
Based on the features of Microsoft Word for Mac, there are three potential ways to recover your unsaved Word documents. These methods can also be applied to recover unsaved Excel files on Mac.
Before you are going to recover an unsaved word document on Mac, watch this video first. It provides you with more details on Mac document recovery.
- 00:00 — Options for Word Recovery
- 00:37 — AutoRecovery in Word
- 02:04 — Recover Doc From TMP Folder
- 03:06 — Recover Doc From Mac Trash
- 03:39 — Recovery Software
#1. Recover Unsaved Word Documents on Mac with AutoRecovery
The Word for Mac includes an AutoRecovery option. It is turned on by default. The app will automatically save a copy of an open Word file every 10 minutes. If Word freezes while you’re working on a document, or if the computer crashes, you can use the AutoRecovery copy to recover an unsaved Word document with the changes or additions you made in your last Word for Mac session.
Guide: How to recover an unsaved Word document
Unlike recovering unsaved Word documents in Windows 11/10/8/7, the file recovery on Mac from the AutoRecovery folder is different.
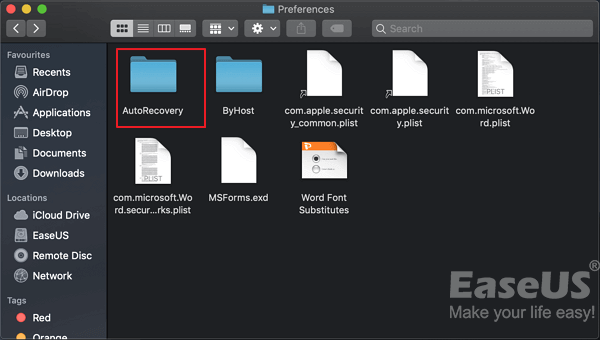
Step 1. Open «Finder» on your Mac, then head to «Go» > «Go to Folder».
Step 2. Type: ~/Library/Containers/com.microsoft.Word/Data/Library/Preferences/AutoRecovery and click «Go».
Step 3. Open the AutoRecovery folder, and locate all the files that start with the words «AutoRecovery save of». Select the one you want to recover, rename the file, then add the «.doc» filename extension.
Step 4. Double-click the file. The document now opens in Word for Mac.
Step 5. Click the File menu and select «Save As»‘. Type a new name for the file into the Name field, select a folder for the file and click the «Save» button.
#2. Recover Unsaved Word Documents on Mac from TMP Folder
The Word for Mac saves a copy of the unsaved document named Word Work File in the Temporary folder. Your Mac also temporarily keeps files in this folder. Though for many Mac users, it’s not easy to find it.
Guide: How to recover an unsaved Word document on Mac
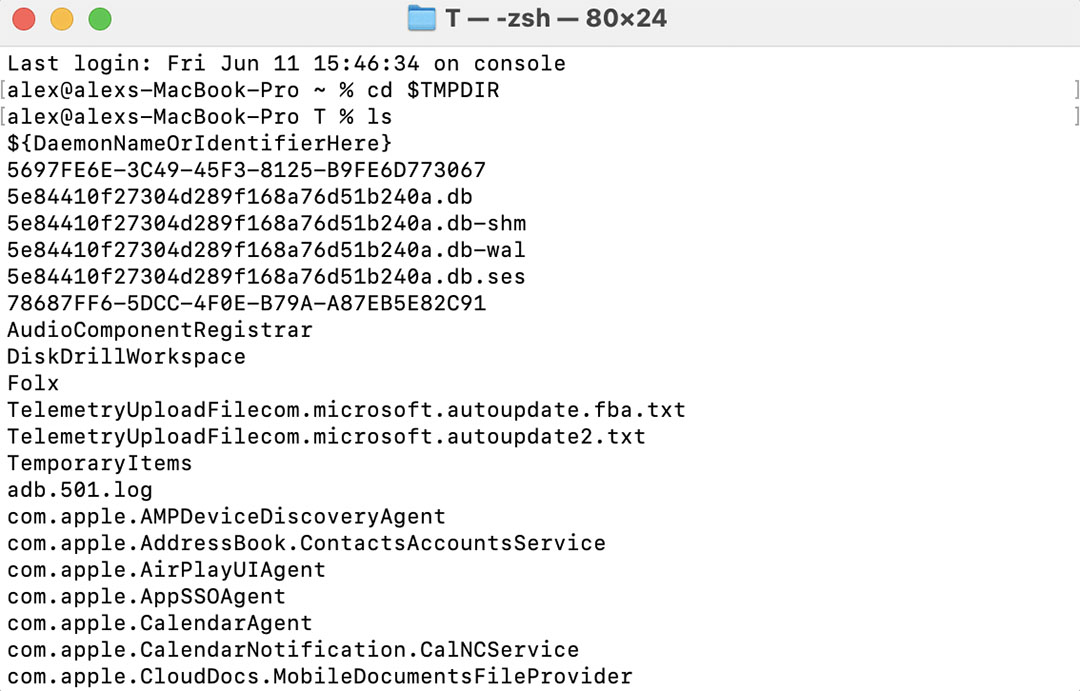
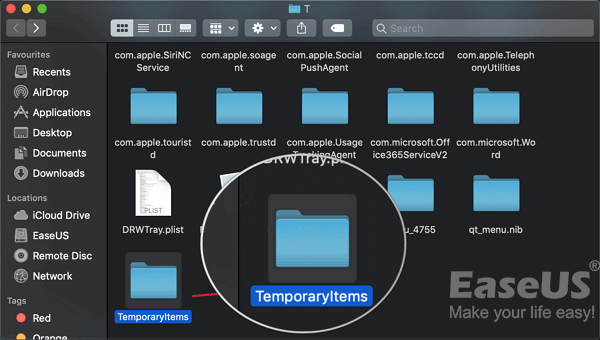
Step 1. Go to «Applications» > «Utilities» and double-click «Terminal».
Step 2. In Terminal, enter open $TMPDIR, and you will be directed to the TMP folder, which is used to keep files temporarily.
Step 3. In the TMP folder, find and open the folder named «TemporaryItems». In it, right-click the desired unsaved Word files and «Open with…» Microsoft Word.
Step 4. Save the Word file by clicking on «File» > «Save As» and save it to another location.
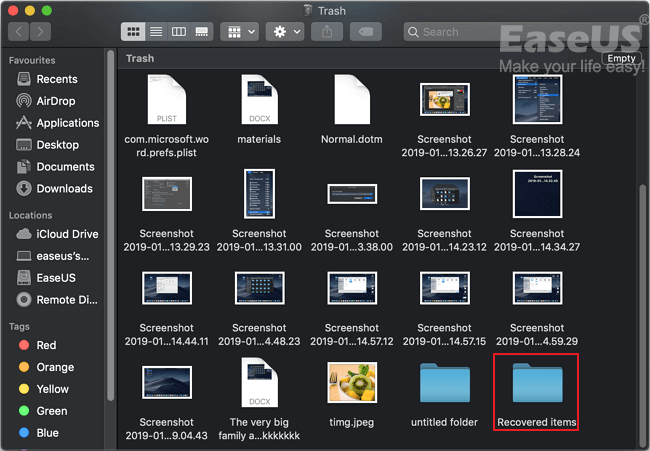
#3. Recover Unsaved Word Document on Mac from Recovered Item
The Word for Mac temporarily saves documents that the user has not yet saved themselves in a folder named «Recovered items», located in the Trash. If there are no recovered files, this folder will not appear.
Guide: How to find unsaved Word files on Mac
Step 1. Open «Trash» by clicking its icon on the dock.
Step 2. Look for a folder labeled «Recovered items» and click into it to look for your unsaved Word file. If you cannot find it, try the next solution.
#4. Recover Unsaved Word Documents with Word Recovery Software
Reliable Mac data recovery software — EaseUS Data Recovery Wizard recently upgraded with an unsaved document recovery feature that any one of you can recover unsaved Word files from Mac with only a few clicks.
Download this data recovery software and recover unsaved documents for free.
Step 1. Select the disk
Launch EaseUS Data Recovery Wizard for Mac, hover the mouse over the device where you lost an unsaved file, and click «Search for lost files».

Step 2. Choose unsaved documents
After the scan, click «Type», and expand «Unsaved Documents». Click the exact file type — Word, Excel, Powerpoint, Keynote, Pages, or Numbers you lost without saving.
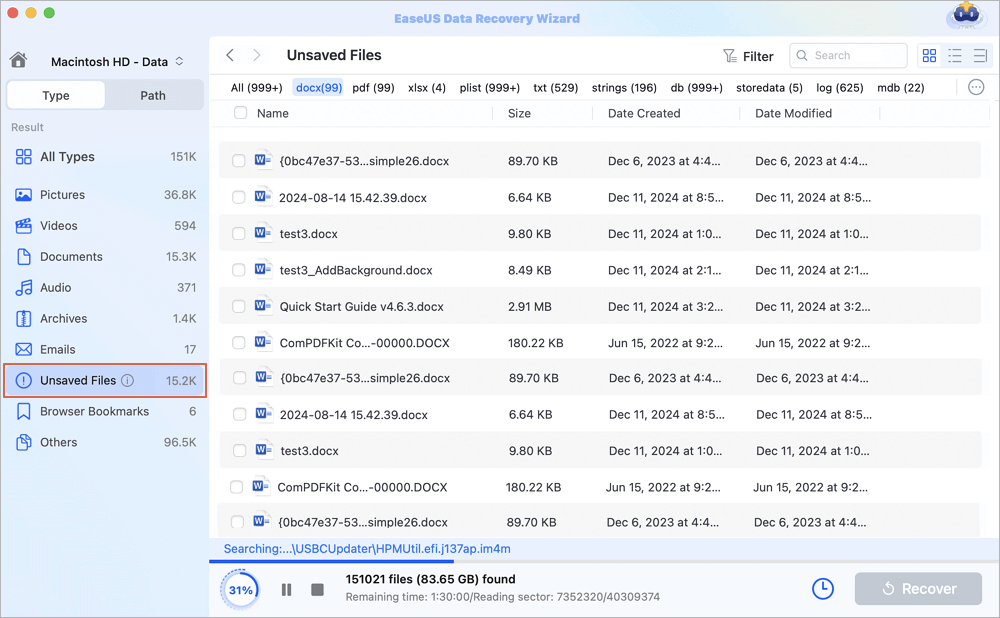
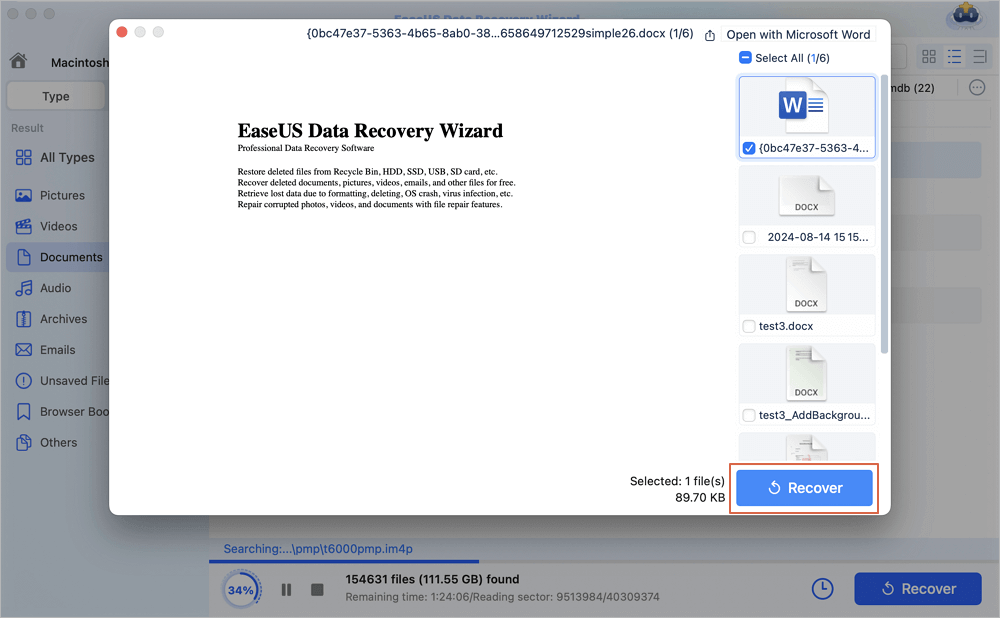
Step 3. Preview and recover unsaved files
Double-click to preview your unsaved file, select the right version and click «Recover» to save the file to another secure location on Mac.
#5. Recover Deleted Word Documents with File Recovery Software
The aforementioned three ways are exclusively for saving the file you’re currently working on but suddenly disappear before clicking the Save button. To be specific, the methods will only work for files that are being worked on when they disappear. Hence, if you lost a Word doc that already existed by deletion, disk formatting, or losing its access, you need to turn to other ways to recover a Word document on Mac.
EaseUS Data Recovery Wizard for Mac is third-party specialized Mac data recovery software that can scour your hard drive, external hard drive, SD card, or USB flash drive to recover deleted files on Mac that vanish without a trace on Mac OS X/macOS. It doesn’t matter whether you emptied the trash bin, and the deleted file will show up after you use the program to scan your selected drive.
For the first attempt, we strongly recommend you download its free data recovery software for Mac. It won’t cost you a penny to search for your missing files. And since your problem is only for a few lost Word files, the 2GB recovery limit should be more than enough. The scan & recovery process is straightforward, and we’ll show you how it works.
Guide: How to recover a Word document on Mac
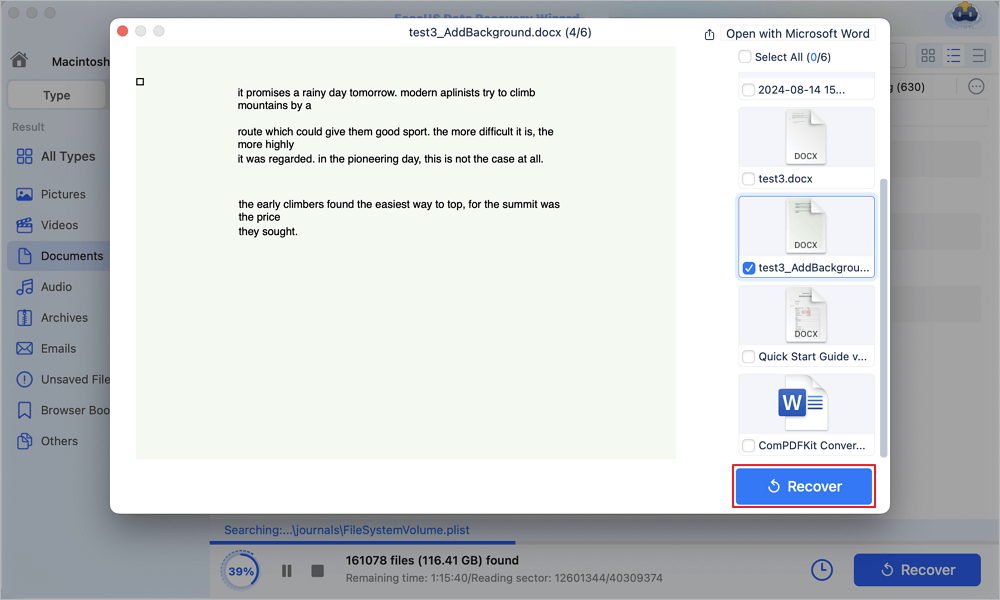
Step 1. Scan for lost documents
Select the location where your important Word/Excel/PPT/Numbers/Pages documents were lost and click «Search for lost files».
Step 2. Find lost documents on Mac
EaseUS Data Recovery Wizard for Mac will immediately start a scan on your selected disk volume. Meanwhile, the scanning results will be presented in the left pane. Select «Documents» and you can quickly filter the DOC/PDF/PPT/XLS files you’ve lost earlier.
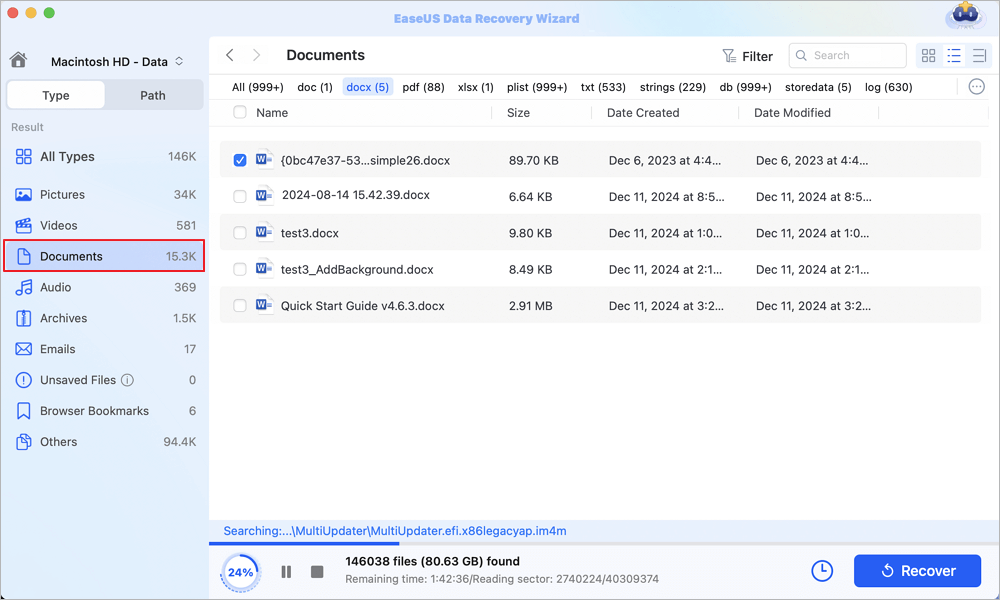
Step 3. Recover lost/deleted documents
Select the target files and preview them by double-clicking them. Then, click «Recover» to get lost documents back at once.
How to Increase the Chance of Unsaved Word Data Recovery
After suffering from the fear of losing your Word documents, you must not want to experience this kind of situation again. Thus, it’s necessary for you to know how to avoid losing your Word files. To avoid completely losing your files, you can:
Tip 1. Save the Word Document Whenever You Create a New One
An ever-unsaved Word document exists in the computer’s RAM, not on the hard disk. Thus, the chances of saving a Word Document that has never been saved before are slim. Knowing this should give you a hint that you should save the word document at least once whenever you create a new one.
Tip 2. Change the AutoSave Interval
After you save your Word document, the AutoSave feature will work. To minimize the loss of progress on the file you are working on, you can change the frequency of AutoSave:
Step 1. Open Microsoft Word on your Mac.
Step 2. Go to «Word» > «Preferences» and click «Save» under Output and Sharing.
Step 3. Check all the items under Save Options (Recommended) and change the interval of AutoSave, for example, from every 10 minutes to every 5 minutes.
Following the two tips above will substantially decrease the risk of losing your Word documents. What if you carelessly deleted your important Word files on your Mac? No worry. Try the free method to retrieve permanently deleted Word documents with EaseUS Data Recovery Wizard for Mac.
Unsaved Word Document Recovery on Mac FAQs
Don’t worry if you still have problems recovering unsaved/deleted documents on macOS. Read the questions and answers below to get additional help.
1. How to recover unsaved Word documents on Mac without Autorecovery?
There are at least two ways to recover unsaved Word documents on Mac. You can use data recovery software to restore unsaved documents or use Time Machine backup. To restore unsaved documents on Mac with Time Machine:
- Connect the drive containing your Time Machine backup to your Mac.
- Click the Time Machine icon and choose Enter Time Machine.
- Open the folder where the document should be located.
- Use the arrows on the right side to choose the needed backup version and search for the lost file.
- Click the needed Word document and click Restore.
2. Can I recover a Word document I didn’t save on Mac?
Yes, you can recover an unsaved document as long as the Word isn’t overwritten by other files.
Open its current version and then go to Version History to find the earlier version. If this operation fails, try Time Machine or EaseUS Data Recovery Wizard for Mac.
3. Where do I find Autorecover files in Word for Mac?
The AutoRecovery files are in a hidden folder on your Mac. Thus, it is impossible to find such files by simply navigating through Finder. To find the unsaved Word documents on your Mac, head to Go > Go to Folder and enter this folder path (replace username with your username):
Users > username > Library > Containers > com.Microsoft > Data > Library > Preferences > AutoRecovery
4. Can I recover an overwritten Word document on Mac?
Yes, there are multiple ways to recover an overwritten Word document on Mac:
- Use Time Machine backup
- Turn to iCloud backup
- Run data recovery software