
Сконвертируйте ваши doc-файлы в xls онлайн и бесплатно
Перетащите файлы сюда. 100 MB максимальный размер файла или Регистрация
Конвертировать в DOC
doc
Документ Microsoft Word
DOC ― это расширение файлов для документов текстового редактора. Оно связано преимущественно с приложением Microsoft Word. Файлы DOC также могут содержать графики, таблицы, видео, изображения, звуки и диаграммы. Этот формат поддерживается почти всеми операционными системами.
Конвертер XLS
xls
Лист Microsoft Excel (97-2003)
Формат XLS используется для описания документов программы Microsoft Excel. Этот файл представляет собой электронную таблицу. Все данные в документе распределены по ячейкам и хранятся в них. Каждая ячейка имеет уникальный адрес, обозначаемый буквами и арабскими цифрами. Ячейка может содержать неизменяемые данные и данные в виде формул, которые связывают несколько ячеек.
Как сконвертировать DOC в XLS
Шаг 1
Загрузите doc-файл(ы)
Выберите файлы с компьютера, Google Диска, Dropbox, по ссылке или перетащив их на страницу.
Шаг 2
Выберите «в xls»
Выберите xls или любой другой формат, который вам нужен (более 200 поддерживаемых форматов)
Шаг 3
Загрузите ваш xls-файл
Позвольте файлу сконвертироваться и вы сразу сможете скачать ваш xls-файл
Рейтинг DOC в XLS
3.8 (27,464 голосов)
Вам необходимо сконвертировать и скачать любой файл, чтобы оценить конвертацию!
Please report all problems and bugs in the Feedback-Section to improve the quality of the converter. Thank you! |


Copy a Word table into Excel
Excel for Microsoft 365 Word for Microsoft 365 Excel 2021 Word 2021 Excel 2019 Word 2019 Excel 2016 Word 2016 Excel 2013 Word 2013 Excel 2010 Word 2010 Excel 2007 Word 2007 More…Less
When you want to move data from a Word table to Excel, you can avoid having to retype that data by copying it from Word directly. When you copy data from a Word table into an Excel worksheet, the data in each Word table cell is pasted in an individual cell on the worksheet.
Important: After pasting the data, you may have to clean it up so that you can take advantage of the calculation features in Excel. For example, there may be unwanted extra spacing in cells, numbers may have been pasted as text rather than as numeric values that you can calculate, or dates are not displayed correctly. For help with formatting numbers as dates, currency, percentages, etc., see Format numbers. For help with formatting the style of your table, see Format an Excel table.
-
In a Word document, select the rows and columns of the table that you want to copy to an Excel worksheet. Make sure there aren’t any extra carriage returns in the cells of the table, otherwise this may cause extra rows in Excel.
-
To copy the selection, press CTRL+C.
-
In the Excel worksheet, select the upper-left corner of the worksheet area where you want to paste the Word table.
Note: Make sure that the paste area is empty before you paste the data. Data in Word table cells will replace any existing data in worksheet cells in the paste area. If necessary, review the table first in Word to verify its dimensions.
-
Press CRL+V.
-
To adjust the formatting, click Paste Options
 next to the data that you pasted, and then do the following:
-
To use the formatting that is applied to the worksheet cells, click Match Destination Formatting.
-
To use the formatting of the Word table, click Keep Source Formatting.
-
 next to the data that you pasted, and then do the following:
Note: Excel pastes the contents of each Word table cell into a single cell. After you paste the data, you can distribute the data across additional cells in a column (for example, to divide first and last names so that they appear in separate cells) by using the Text to Columns command. For more information, see Distribute the contents of a cell into adjacent columns.
Need more help?
This article is a detailed step-by-step guide to converting or exporting Word to Excel. We will look at different methods to export or convert a Word file to an Excel file in this article. So, read till the end to know multiple ways to convert your files.
Let’s get started!
Also read: How to Convert Excel to PDF?
Steps to export Word to Excel
Let’s get started with exporting an existing Word file on your system to Excel. Note that we’re not converting a Word file to an Excel spreadsheet here. We will discuss converting Word files later in this tutorial.
We already have unstructured data created in MS Word as an example.

Here are the steps to export an unstructured Word file to Excel.
- Go to the File tab.
- Click Save As.
- Click Browse.
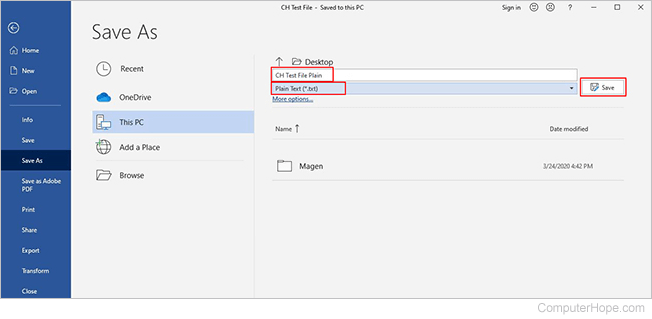
- Choose Plain Text in the Save As type field.

- Click OK when the File Conversion window appears.

Now, import this text file into Excel.
- Open a blank Excel workbook or worksheet.
- Go to the Data tab.
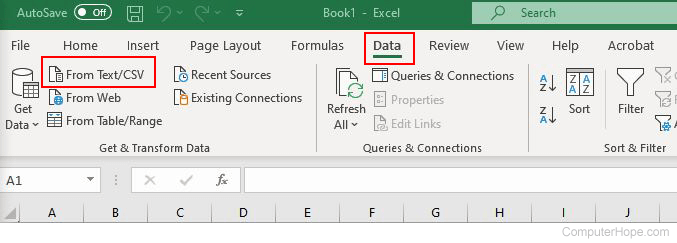
- Click on From Text/CSV in the Get &Transform Data section.

- Choose the saved text file from the file location.

- Click on the Word file saved as a text file.
- Click Import.

- Check if your data is properly formatted. If you’re satisfied with the results click Load.
- If you’re unsatisfied with the format, like this data above, click Transform Data.
- Notice that there are two empty columns that we do not need. So, we will click Transform Data to fix this.

- The Power Query editor opens to help you manage the imported data.
- Right-click on the columns you want to delete.
- Press Remove.
- Once you’re done, click Close & Load in the Home tab.


You can see that the unstructured data from Word is exported to Excel in a structured format.
Let’s learn how to export structured or tabular data from Word to Excel.

To convert the data into a table.
- Select the entire data in Word.
- Go to the Insert tab.
- Click on Table.
- Click Insert Table.
- Right-click on the columns you want to delete.
- Press Delete Columns.
Your table is ready. Let’s export it to Excel.
This step is best for you if you don’t have Power Query in Excel.
- Select the entire data table in Word. CTRL+A to Select All.
- Copy the table. CTRL+C
- Paste the table (CTRL+V) in Excel.
Your structured data is successfully exported.
If you’re on an older version of Office like 2007, 2010, 2013, or 2016, then follow these steps.
The initial step to export Word to Excel is the same in the older versions.
- Save the Word file as a text file.
- Go to the File tab.
- Click Save As.
- Click Browse.
- Choose Plain Text in the Save As type field.
- Click OK when the File Conversion window appears.
Now, import this text file into Excel.
- Open a blank Excel workbook or worksheet.
- Go to the Data tab.
- Click on From Text/CSV in the Get &Transform Data section.
- Choose the saved text file from the file location.
- Click Open.
The Text Import Wizard opens with a few options.

- Choose Delimited if you want to separate each field with existing commas, spaces, or tabs.
- Choose Fixed Width if your fields are aligned properly.
- Click Next.
You can see your data is separated with lines between them.
- Double-click on a line to add or remove it.

- Click Next.
- Click Finish in the next step.
- Click on a cell where you wish to export the data.
- Click OK.

Your data is exported successfully.
Steps to converting Word to Excel online
You can also convert a Word file to Excel by following the steps below.
- Go to Online2PDF.
- Choose the Word file.
- Choose the Excel version you want to convert.

- Click Convert.
Note that you cannot export to the Excel 365 version here.
Conclusion
This tutorial was a detailed step-by-step guide to converting and exporting Word files to Microsoft Excel. We walked through the different methods of exporting data from Word for both newer and older versions of Excel. Stay tuned for more interesting tutorials like these!
References- Computer Hope
Updated: 04/30/2020 by

If you have information in a Microsoft Word document that you need to import to a Microsoft Excel spreadsheet, Excel provides functionality to do the conversion. Select the version of Word and Excel you’re using and follow the steps to make a plain text version of your Word document and importing it into Excel.
Microsoft Office 365
- Open the Word document containing the information you want to convert to Excel.
- In the Ribbon, click the File tab, and click the Save As option.
- Choose the location on your computer where you want to save the plain text file, enter a name for the file, and change the file type to Plain Text. For this example, the Word file is named «CH Test File,» and the plain text file is named «CH Test File Plain.» Once you’ve chosen the location and named the file, click Save.
- A File Conversion pop-up window opens. Leave the Windows (default) checked, and click OK.
- You can now close the Word document and program.
- Open Microsoft Excel and click New > Blank workbook.
- In the Ribbon, click the Data tab, and click the From Text/CSV option.
- Find the location on the computer where you saved the plain text file in step 3. Click the file, and then click Import.
- Excel opens a blank pop-up box asking you to specify the File Origin, Delimiter, and Data Type detection. Verify the default information is correct and click Load. If any information isn’t correct, make any necessary changes and click Load. The imported information is now in the correct format in Excel.
- Save the Excel file.
Microsoft Office 2016 and earlier versions
- Open the Word document containing the information you want to convert to Excel.
- In the Ribbon, click the File tab, and click the Save As option.
- Choose the location on your computer where you want to save the plain text file, enter a name for the file, and change the file type to Plain Text. Once you’ve chosen the location and named the file, click Save.
- A File Conversion pop-up window opens. Leave the Windows (default) checked, and click OK.
- You can now close the Word document and program.
- Open Microsoft Excel and click New > Blank workbook.
- In the Ribbon, click the Data tab, and click the From Text option.
- Find the location on the computer where you saved the plain text file in step 3. Click the file name, and then click Import.
- In the Text Import Wizard, on step 1 of 3, click Delimited, then click Next.
- On step 2 of 3, check the box next to the desired delimiters (space, comma, tab, etc.), then click Next.
- On step 3 of 3, review all information is correct, make any necessary changes, then click Finish.
- If you checked Existing Worksheet, select a cell where you want to put the data. Click OK. The imported information is now in the correct format in Excel.
- Save the Excel file.