
All Microsoft Office programs can check spelling, and most can check grammar.
Using Microsoft 365? You may be interested in checking out the powerful new Editor feature in Word! See Editor — your writing assistant for more information.
Run the spelling and grammar checker
To start a check of the spelling and grammar in your document, just press F7.
Click a heading below for more information
Most Office programs automatically check for potential spelling and grammatical errors as you type, so you don’t need to do anything to show errors while you work.
Notes:
-
Automatic spelling and grammar checking is not available in Access, Excel, or Project. You can manually start a spell check by pressing F7.
-
Automatic grammar checking is available only in Outlook, Word, and PowerPoint 2013 (or newer).
Office marks potential spelling errors with a red squiggly line, and potential grammatical errors are marked with a blue squiggly line.
If spelling or grammatical errors aren’t marked, automatic checking might be turned off. You can turn on the automatic spelling and grammar checker.
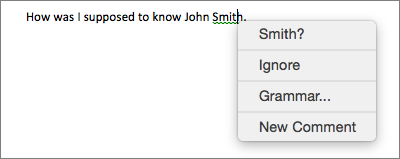
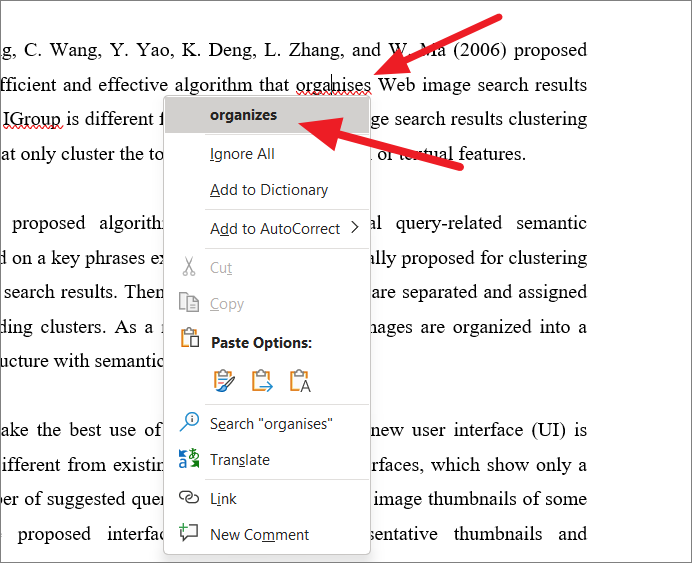
When you see a spelling or grammatical error that you want assistance fixing, right-click on the underlined word or phrase and choose one of the options to fix the error.
If Office is flagging words as misspelled but you have it spelled the way you want it, select Add to Dictionary to teach Office not to flag that word as misspelled in the future. For more information on this see: Add or edit words in a spell check dictionary.
If you don’t want Office to mark potential errors with squiggly lines while you are working, you can turn automatic spelling and grammar checking off:
-
Open the spelling and grammar options:
-
In OneNote, PowerPoint, Publisher, Visio, and Word: On the File menu, click Options, and then click Proofing.
-
In InfoPath: On the Home tab, click the arrow next to or under Spelling, and then click Spelling Options.
-
In Outlook: On the File menu, click Options, and click Mail, and then click Spelling and Autocorrect.
-
-
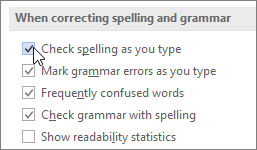
Select or clear the Check spelling as you type check box. In programs that have automatic grammar checking, you may also select or clear the Mark grammar errors as you type check box.

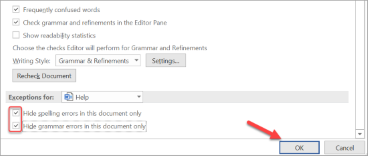
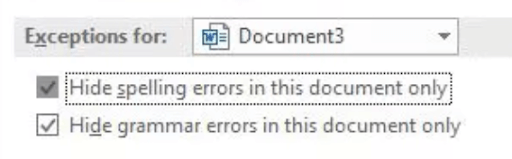
Note: In Word, you can turn the spelling checker on or off for only the document you’re currently working with or for all new documents. Select an option in the Exceptions for list, and then select or clear the Hide spelling errors in this document only and Hide grammar errors in this document only check boxes.
If you don’t want Office to check grammar at all (either when running a spell check or automatically as you type), you can turn it off:
-
Open the spelling and grammar options:
-
In OneNote, PowerPoint, Publisher, Visio, and Word: On the File menu, click Options, and then click Proofing.
-
In InfoPath: On the Home tab, click the arrow next to or under Spelling, and then click Spelling Options.
-
In Outlook: On the File menu, click Options, and click Mail, and then click Spelling and Autocorrect.
-
-
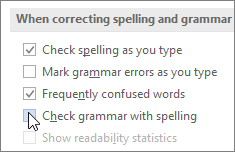
Clear the Mark grammar errors as you type and Check grammar with spelling check boxes.
Note: Not every Office program will have both of these options.
In Word, Outlook, PowerPoint 2013 (or newer), you can force a recheck of the words and grammar that you previously skipped by doing the following:
-
Open the document or item that you want to check.
-
On the File menu, click Options > Proofing> Recheck Document. In Outlook you’ll find this under File > Options > Mail > Spelling and Autocorrect
-
Click Yes when you see the warning message about resetting the spelling and grammar checker.
-
Click OK in the dialog box to get back to the document, and then run the spelling and grammar checker again.
See Also
Check spelling and grammar in a different language.
Test your document’s readability
The spelling and grammar checker isn’t working as expected
Select grammar and writing style options in Office 2013 and earlier
Add words to your spell check dictionary
The spelling or grammar checker isn’t checking words in a different language correctly
Choose AutoCorrect options for capitalization, spelling, and symbols
Check spelling before sending a message in Outlook
Learn how to get more from Editor with Microsoft 365
Office for Mac applications automatically check for potential spelling and grammatical errors as you type. If you’d rather wait to check spelling and grammar until you’re done writing, you can turn off automatic checking, or you can check spelling and grammar all at once.
Word
Check spelling and grammar automatically as you type
Word marks potential spelling errors with a red squiggly line, and potential grammatical errors are marked with a green squiggly line.
Tip: If spelling or grammatical errors aren’t marked, you might need to turn on automatic spelling and grammar checking, which is explained in the next procedure.
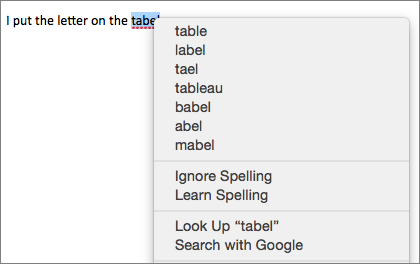
When you see a spelling or grammatical error, Control click the word or phrase and choose one of the options.
If Word has incorrectly flagged a word as misspelled and you want to add that word to your dictionary so that Word will properly recognize it in the future see Add or edit words in a spell check dictionary
-
On the Word menu, click Preferences > Spelling & Grammar.
-
In the Spelling & Grammar dialog box, under Spelling, check or clear the Check spelling as you type box.
-
Under Grammar, check or clear the Check grammar as you type box.
-
Close the dialog box to save your changes.
-
On the Review tab, click Spelling & Grammar.
-
If Word finds a potential error, the Spelling & Grammar dialog box will open, spelling errors will be shown as red text, and grammatical errors will be shown as green text.
-
To fix an error, do one of the following:
-
Type the correction in the box and then click Change.
-
Under Suggestions, click the word you want to use, and then click Change.
To skip the error, do one of the following:
-
Click Ignore to skip only that instance of the error.
-
Click Ignore All to skip all instances of the error.
-
For a grammatical error, click Next Sentence to skip that instance of the error and move to the next error.
To skip a misspelled word in all documents, click Add to add it to the dictionary. This only works for misspelled words. You can’t add custom grammar to the dictionary.
-
-
After you correct, ignore, or skip an error, Word moves to the next one. When Word finishes reviewing the document, you’ll see a message that the spelling and grammar check is complete.
-
Click OK to return to your document.
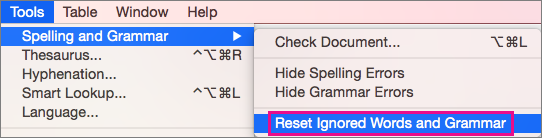
You can clear or reset the list of Ignored Words and Grammar so Word will check for spelling and grammar issues you previously told it to ignore.
Note: When you reset the list of Ignored Words and Grammar, the list is cleared only for the currently open document. Any spelling or grammar issues you told Word to ignore in other documents won’t be affected.
-
Open the document that needs to be checked.
-
On the Tools menu, point to Spelling and Grammar, and then click Reset Ignored Words and Grammar.
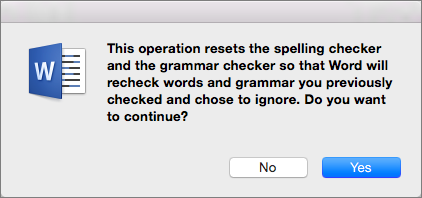
Word displays a warning about the operation resetting the spelling checker and the grammar checker.
-
Click Yes to proceed.
-
Click the Review tab, and then click Spelling & Grammar to check spelling and grammar.
Outlook
Check spelling and grammar automatically as you type
By default, Outlook checks for spelling errors as you type. Outlook uses a dashed red underline to indicate possible spelling errors and a dashed green line to indicate possible grammatical errors.
-
When you see a word with a dashed underline, Control click the word or phrase and choose one of the options.
-
On the shortcut menu, do one of the following:
-
Click one of the guesses at the top of the shortcut menu.
-
Click Ignore Spelling to ignore one instance of the word.
-
Click Learn Spelling to add the word to the spelling dictionary.
-
After opening an email message:
-
To have Outlook correct spelling mistakes automatically, on the Outlook menu, click Preferences. Click on Spelling and Grammar under Personal Settings. Click box next to Checkspelling as you type.
-
To turn automatic grammar checking on or off, on the Outlook menu, click Preferences. Click on Spelling and Grammar under Personal Settings. Click box next to Check grammar as you type.

You can correct all the spelling and grammar issues at the same time after you finish composing a message or other items.
-
On the Edit menu, point to Spelling and Grammar, and then click Spelling and Grammar…
-
Do any of the following:
-
In the list of suggestions, click the word that you want to use, or enter a new spelling in the box at the top, and then click Change.
-
Click Ignore to ignore this word and move on to the next misspelled word.
-
Click Add to add the word to the spelling dictionary.
-
Tip: The keyboard shortcut for skipping to the next spelling or grammar error is  + ; .
+ ; .
PowerPoint
You can check spelling in PowerPoint, but you can’t check grammar.
Check spelling automatically as you type
PowerPoint automatically checks for and marks potential spelling errors with a wavy, red underline.
Tip: If spelling errors aren’t marked, you might need to turn on automatic spell checking, which is explained in the next procedure.
When you see a spelling error, Ctrl+click or right-click the word or phrase and choose one of the suggested options.
-
On the PowerPoint menu, click Preferences > Spelling.
-
In the Spelling dialog box, select or clear the Check spelling as you type box.
-
On the Review tab, click Spelling.
-
If PowerPoint finds a potential error, the Spelling pane opens and spelling errors are shown.
-
To fix an error, do one of the following:
-
Correct the error on your slide.
-
Click one of the suggested words in the Spelling pane, and then click Change.
To skip the error, do one of the following:
-
Click Ignore to skip only that instance of the error.
-
Click Ignore All to skip all instances of the error.
-
click Add to skip a misspelled word in all documents and add it to the dictionary.
-
-
After you correct, ignore, or skip an error, PowerPoint moves to the next one. When PowerPoint finishes reviewing the presentation, you’ll see a message that the spelling check is complete.
-
Click OK to return to your presentation.
Excel
You can check spelling in Excel, but you can’t check grammar.
Check spelling all at once
-
On the Review tab, click Spelling.
Note: The Spelling dialog box will not open if no spelling errors are detected, or if the word you are trying to add already exists in the dictionary.
-
Do any of the following.
To
Do this
Change the word
Under Suggestions, click the word that you want to use, and then click Change.
Change every occurrence of this word in this document
Under Suggestions, click the word that you want to use, and then click Change All.
Ignore this word and move on to the next misspelled word
Click Ignore Once.
Ignore every occurrence of this word in this document and move on to the next misspelled word
Click Ignore All.
See also
Check spelling and grammar in a different language
Get your automatic editor back in action
Updated on April 20, 2022
While Word’s spell check works well most of the time, sometimes it can appear to stop operating. Some simple troubleshooting steps will quickly get Word’s spelling and grammar-checking tool back up and running. These solutions apply to Word for Microsoft 365, Word 2019, Word 2016, Word 2013, Word 2010, and Word for Mac.
Causes of Word’s Spell Check Not Working
There are several reasons Word’s spelling and grammar-checking tool might not be working. You might have changed a simple setting, or the language settings may be off. Exceptions may have been placed on the document or the spell-check tool, or the Word template may have an issue.
Whatever the reason, some easy fixes are likely to have Word back to pointing out mistakes in your documents soon.
The spelling and grammar checker may return an error message about the default language or say «Spelling and grammar check is complete» without flagging any errors. You may not receive any message but may notice the tool isn’t functioning.
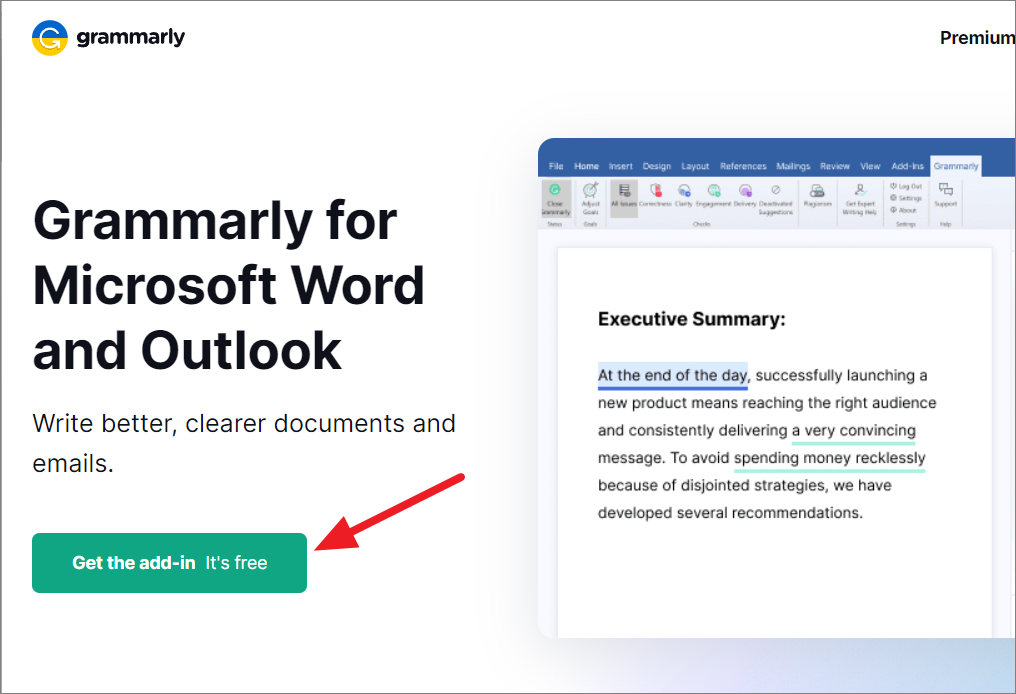
Add Grammarly to Word: Learn How Now
How to Fix Word’s Spell Checker Not Working
Follow these troubleshooting steps in the order we present, from the simplest solution to the most complex.
-
Make sure Word spell check is turned on, the most likely culprit and most straightforward solution. If you haven’t enabled automatic spell-checking, the tool won’t function as you expect. Also, select the Mark grammar errors as you type and Check grammar with spelling check boxes.
On a Mac, select Word > Preferences > Spelling & Grammar, and select the Check spelling as you type and Check grammar as you type check boxes.
-
Check Word’s proofing language. Word may be set to the wrong proofing language, causing it to miss errors. Make sure Word is proofing in the correct language, and see if this solves the problem.
-
Check for proofing exceptions. A setting for Hide proofing errors, or other exceptions, may have been enabled in the document. The spell-check tool might not work as expected if a user has made exceptions for checking the spelling or grammar.
-
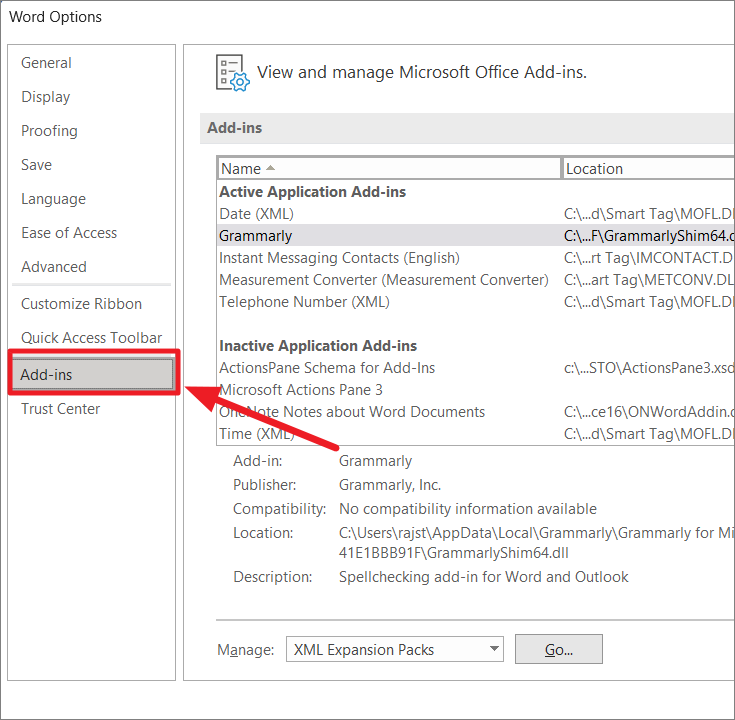
Open Word in Safe Mode. A Word add-in can interfere with the spelling and grammar-checking tool, causing it to work sporadically or not at all. If you start Word in Safe Mode, add-ins aren’t enabled. See if the spelling and grammar-checking tool works. If it does, move on to step 5.
-
Disable add-ins one at a time. An add-in might be the problem if the spelling and grammar-checking tool worked in Safe Mode. Disable add-ins one at a time to isolate the one causing the issue. When you find the culprit, permanently disable it.
-
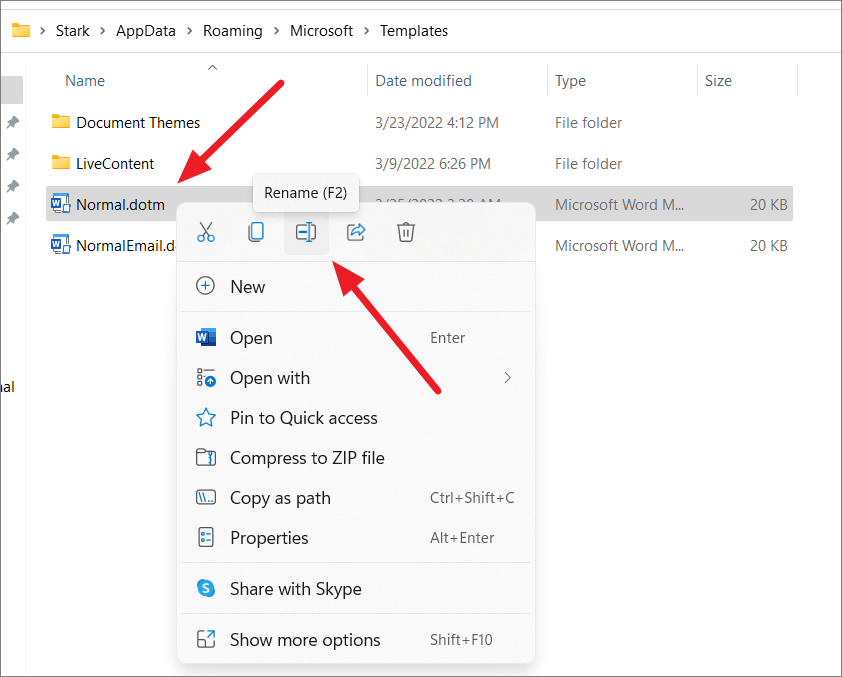
Rename the default template. If the issue still isn’t resolved, there could be something wrong with Word’s global template, which is called normal.dotm. Renaming the template could fix the problem. Word will generate a new default document without any customizations.
When you rename the normal.dotm template, you lose the default settings you established, including styles, toolbars, AutoText entries, and macros.
-
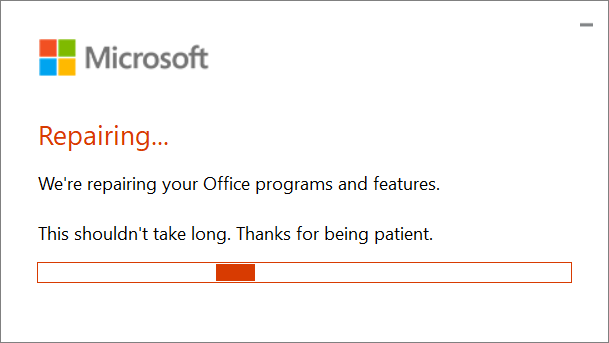
Repair Word. If all your efforts haven’t resolved the spell-check problem, use the built-in Office Repair utility to fix Word. This tool repairs the entire Office suite even if there’s only one application you want to fix.
This tool is only available for Windows versions of Office.
-
Contact Microsoft Word. If you still can’t fix the problem with Word’s spelling and grammar-checking tool not working, visit the Microsoft Word help page. With a searchable knowledge base, community forums, and contact information, you’ll find additional help.
FAQ
-
Why is Grammarly not working in Word?
If Grammarly in Word isn’t working, you may be working in a password-protected document, you may have opened the document in Protected View, or the document is stored on a network. To solve the problem, save your document to a local drive and open it from there.
-
How do I turn off spell check in Word?
To turn off spell check in Word on a PC, go to File > Options > Proofing. Uncheck the box next to Check spelling as you type. On a Mac, go to Tools > Spelling & Grammar and select Hide Spelling Errors.
-
How do I reset spell check in Word?
To reset Word’s spell check on a PC, go to the Tools menu and select Spelling & Grammar > Options. In the Proofing Tools section, select Recheck Document. On a Mac, go to Tools > Spelling & Grammar and select Reset Ignored Words and Grammar.
Thanks for letting us know!
Get the Latest Tech News Delivered Every Day
Subscribe
Have you ever had one of those days where you’re finishing an important document, but the spell check in Microsoft Word isn’t working correctly? Sometimes you can’t check one document, and other times you can’t spell-check any document. And sometimes, it’s several words. In this troubleshooting tutorial, I’ll show several fixes.
I’ve encountered this annoyance many times. Usually, I can solve the issue with the steps below unless it’s a protected Microsoft Word document. However, one reason you want to correct this issue is that it may interfere with calculating your Word readability statistics.
Spell Check Not Working – (1 Document)
Sometimes Word’s spell check will only work for one document. However, you can open other Microsoft Word documents, and spell check works. The problem is probably with the preferred languages or formatting settings.
Verify Your Language & Check Spelling Options
- Open the problem document.
- Press the Ctrl + A keys to select the entire text.
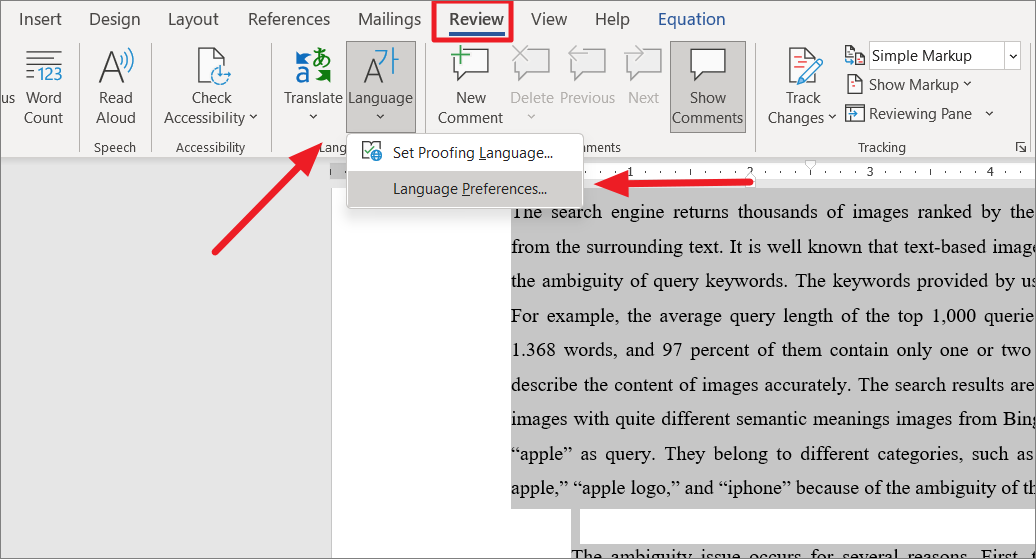
- From the Review tab, select Language then Set Proofing Language…
- In the Language dialog box make sure the correct default language is selected.
- Verify the checkbox Do not check spelling or grammar is unchecked.
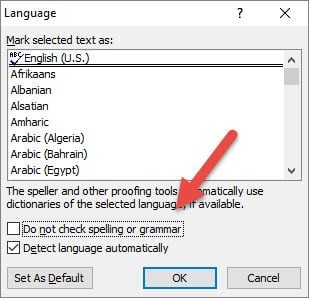
- Click OK.
- Recheck your document
I wish the above method were foolproof. Highlighting the entire document would overwrite all paragraph settings throughout. On older versions of Microsoft Word, I would get the following message as shown below. However, in Microsoft 365, I no longer get this alert even if I have spelling errors.
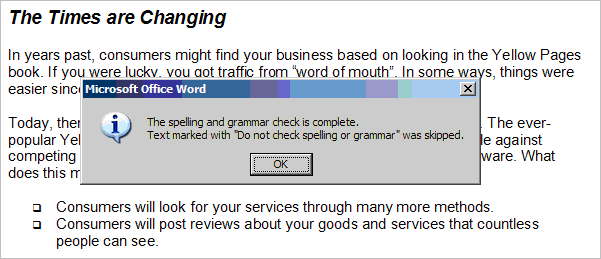
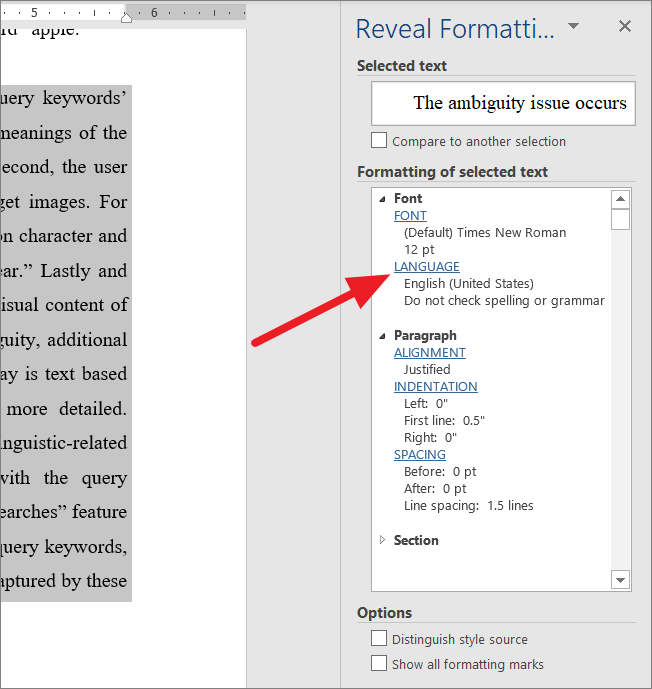
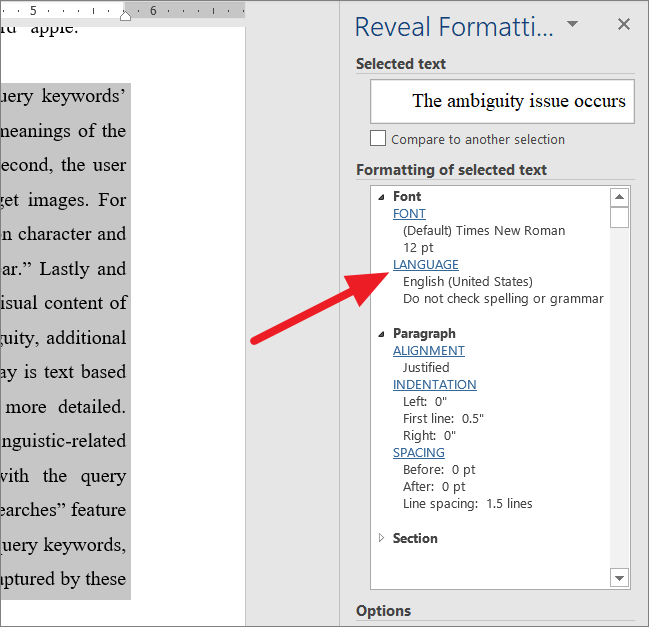
This alert message suggests that your document has a section marked “Do not check spelling or grammar.” Unfortunately, I don’t know any easy way to find these marks. So instead, I find a paragraph with a spelling mistake, highlight it, and press Shift + F1.
This opens the Reveal Formatting pane, where you can verify that your correct language is what you expect and if the paragraph has spell check turned off. In the example below, the highlighted paragraph is coded not to check for spelling.
Tip: If you don’t see the pane, you may have some sort of Function lock on your keyboard. Generally, these keyboards have an F Lock key on the top row because there are other functions mapped. Other keyboards may use an Fn key.

In the above example, I misspelled the word “government”. Word did not flag this instance because the paragraph was marked not to do spelling or grammar checks.
To fix the issue, highlight your paragraph and click the Language link in the Reveal Formatting dialog. This will open the Language dialog box, and you can deselect the check spelling or grammar option checkbox.
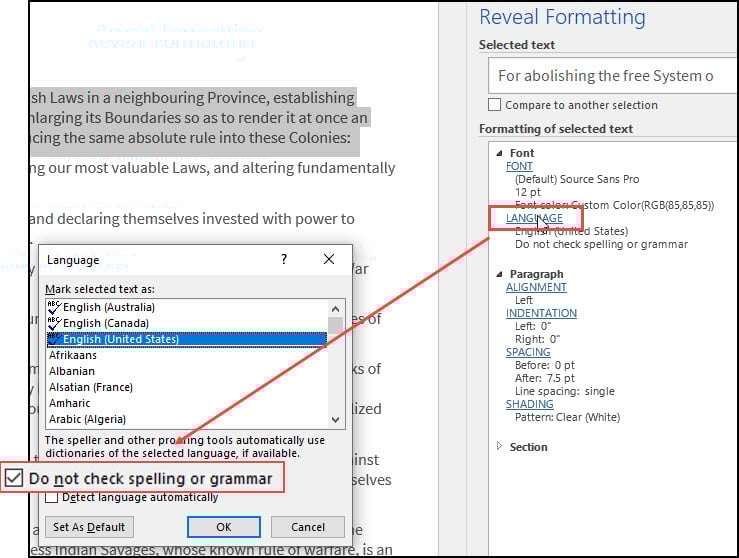
Are Multiple Proofing Languages Set
Looking at the screen print above, you’ll notice that I have three proofing languages above the double line. They are variations of English for Australia, Canada, United States. Word can get confused if you don’t enable “Detect language automatically“.
According to this support page, Microsoft noted several suggestions:
- Automatic language detection requires that a sentence of text be written in that language. Depending on the length of your sentences, you might need to type several sentences before Word has enough contextual information to automatically detect the language and apply the correct dictionary.
- Words that are spelled the same way in several languages, such as “centre” in English (United Kingdom) and French (France) might cause the Detect language automatically check box to incorrectly identify the language of text. To solve this problem, type more words in the language you want, or clear the Detect language automatically check box.
Review Your Proofing Exception Options
You should check another setting, as there is a Word option where you can elect to hide spelling errors. You can set this option on an individual file.
- Click the File tab.
- From the left panel, select Options.
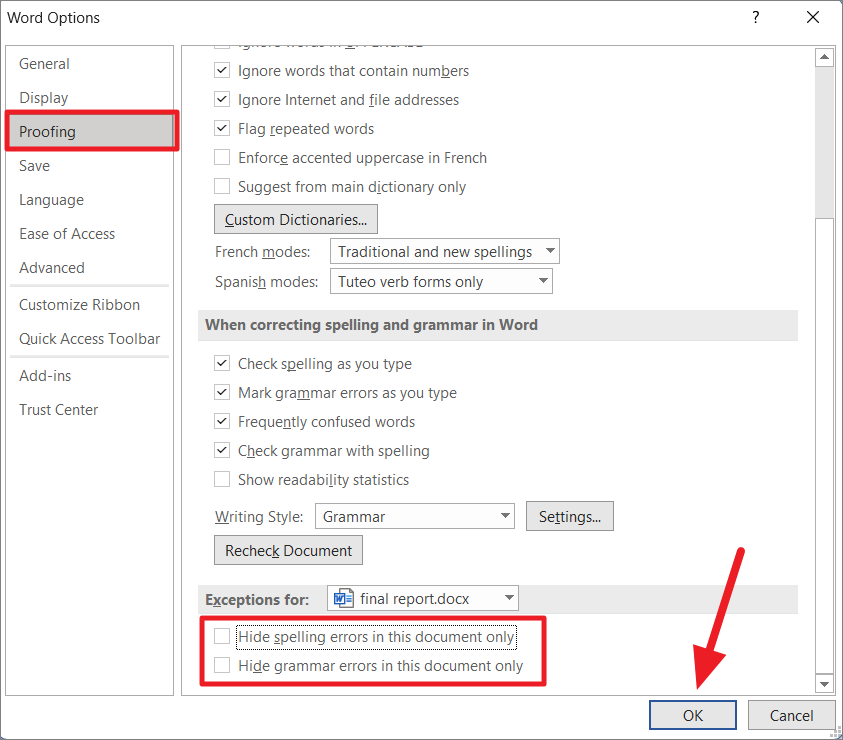
- In the Word Options dialog, click Proofing.
- Scroll to the bottom area called Exceptions for:
- Check to see if the Hide spelling errors in this document only check box is enabled.

Spell Check Not Working – (All Documents)
This second problem can be a real annoyance with many variations. The suggestions range from easy to a Microsoft Windows registry change.
Option 1: Verify the “check spelling as you type” Feature
This feature is an option to see your mistakes as they happen. In some cases, I’ve seen toggling this check box “on” and “off” fix the problem. Additionally, those red squiggly underlines might be from the Word Exclusion Dictionary.
To verify Spelling and Grammar Checkers are on,
- Click the File tab.
- From the left menu, select Options at the bottom.
- In the Word Options dialog, click Proofing.
- Check the boxes for Check spelling as you type and Mark grammar errors as you type. (See picture above.)
- Click OK.
![]() Note: For older versions of Word, use the Check Document feature on your Review tab.
Note: For older versions of Word, use the Check Document feature on your Review tab.
Option 2: Check for Conflicting Word Add-in
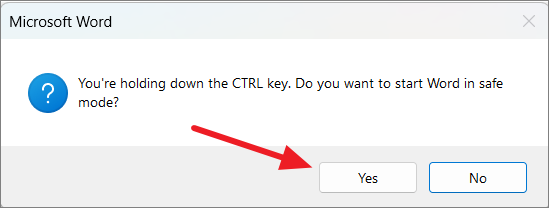
Still, your problem may be caused by a combination of factors such as another Word add-in. The way to verify this is to see if the spellchecker works in “safe mode”. Safe Mode is a reduced functionality state where Microsoft Word loads without add-ins.
- Hold down your Ctrl key and then press the icon or menu option for Microsoft Word.
- Click Yes when the Safe Mode dialog appears.

- Open up your document.
- Press F7 to run spell-check.
If the spellchecker works, you need to figure out which add-in is causing the problem. There are two areas where you may see these.
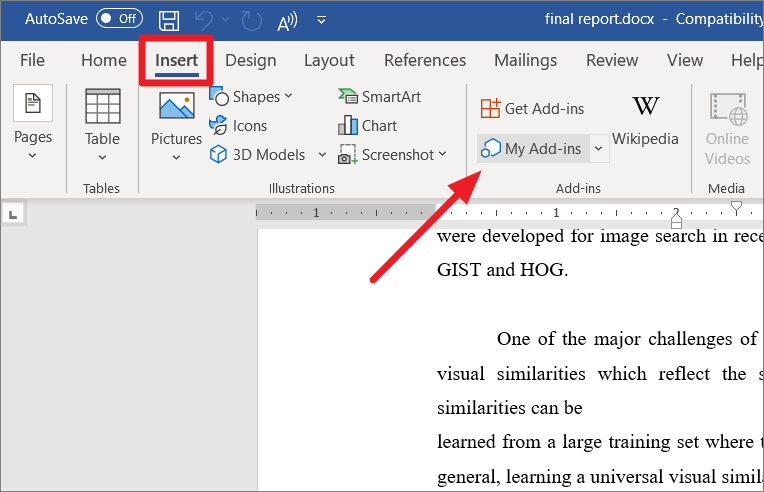
The first is from the Insert tab.

If you click My Add-ins, you will see your installed items. If you hover over an item, a 3-dot menu will appear where you can remove the item.

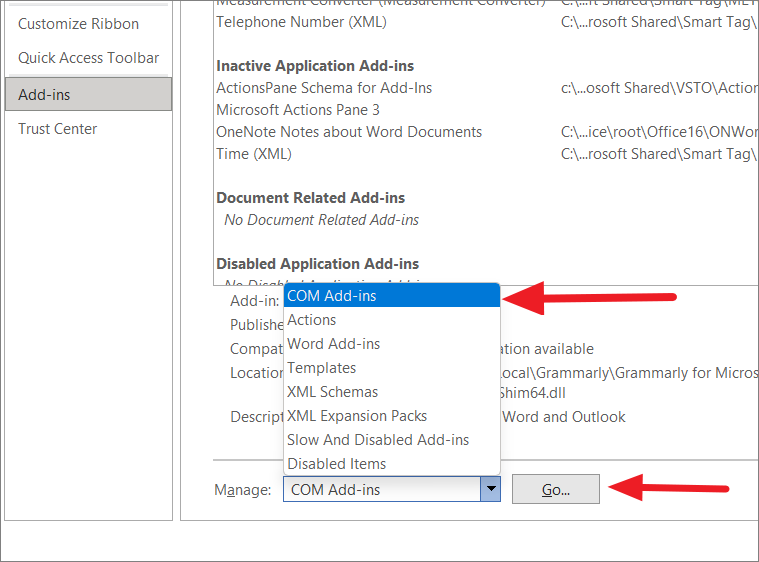
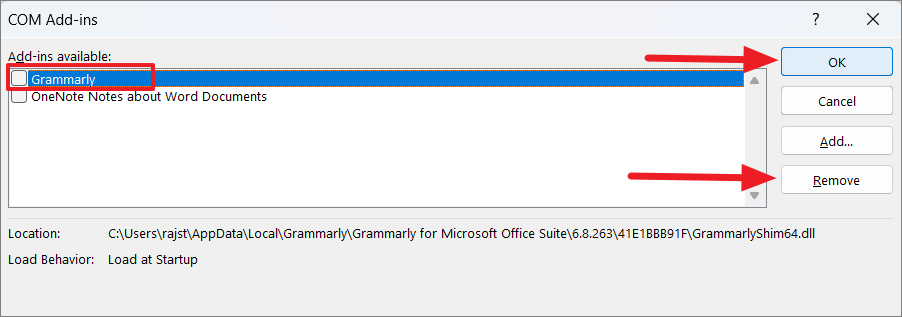
Additionally, you can access this area from the Word Options dialog box under Add-ins. Hopefully, you recognize an add-in name such as Grammarly. Then you can press the Go button.
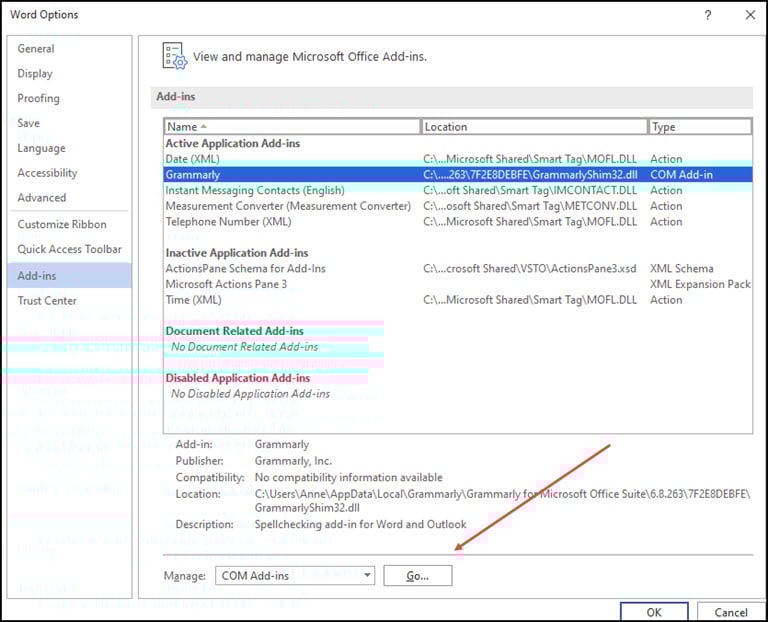
You’ll then get a COM Add-ins dialog where you can uncheck the box so it won’t load or remove it.

I’d suggest closing Word and reopening your document before checking again.
Option 3: Rename Your Word Template
Your Microsoft Word document template, which is either normal.dot or normal.dotm, might also be causing an issue. You can find these files in your Microsoft Templates folder. When you rename the template, Word will reset to the default settings.
Because your global template file has your settings, I would recommend renaming the file to something like normalPRV.dot or normalPRV.dotm so you can change the name if this suggestion doesn’t work.
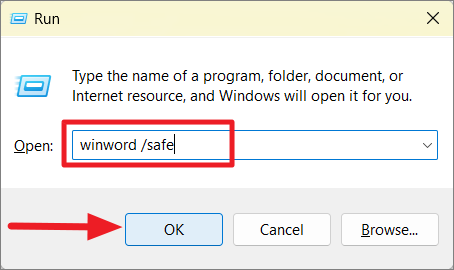
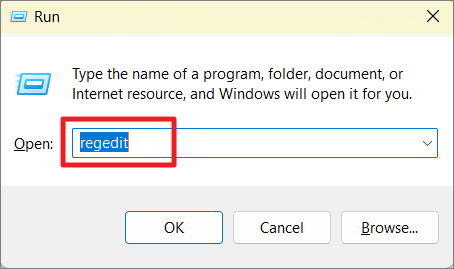
Tip: If you need to confirm the location of your template you can press your Windows key ![]() + r. This will open the Run dialog, where you can copy and paste the command below.
+ r. This will open the Run dialog, where you can copy and paste the command below.
%appdata%MicrosoftTemplates

Option 4: Try Detect and Repair
Now and then, I have the spell-check feature go wonky after some other software update or hardware change. For example, a registry entry has become corrupted. In these rare cases, you may have to repair your installation.
Option 5: Rename a Windows Registry Folder
I don’t like giving instructions on using the Windows registry. But sometimes, this online repair works. If you’re unfamiliar with this area, I strongly recommend reading Microsoft’s https://docs.microsoft.com/en-US/troubleshoot/windows-server/performance/windows-registry-advanced-users.
As with an earlier suggestion, I rename the folder rather than deleting it. Some people rely on third-party dictionaries that may use some of these entries. If you find after renaming the folder, your 3rd party dictionary doesn’t work; you can revert the changes.
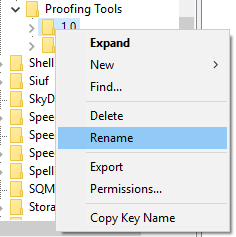
To rename the Proofing Tools folder,
- Close Word.
- Press the Windows key + R.
- In the Run dialog box type regedit.
- Click the OK button.
- Expand the left pane to HKEY_CURRENT_USER | Software | Microsoft | Shared Tools| Proofing Tools
- Right-click the folder named 1.0
- Select Rename from the menu.

- Rename folder to 1PRV.0
- Close regedit.
- Restart Microsoft Word.
Specific Word Isn’t Flagged as Misspelled
Sometimes, you’ve run through the steps above and Word still doesn’t flag an item that is misspelled. This can be frustrating, but sometimes the problem is us. Yes, I have misspelled words when adding them to Word’s custom spell check dictionary. That’s why I also created an exclude dictionary for Word.
Check Your Custom Dictionary
- Click the File tab.
- From the left menu, select Options at the bottom.
- In the Word Options dialog, click Proofing.
- Scroll down to When correcting spelling in Microsoft Office program section.
- Click the Custom Dictionaries… button.
- Click the Edit Word List… button.

- Find your misspelled word and delete it.
- Add correct variation if needed.
- Click OK.
Try Another Online Option & Then Fix
This isn’t a fix for the problem, but it buys you time if you’ve got a deliverable. In the interim, you can save your document and try to open or copy it to another online word processor such as Google Docs or Microsoft Word Online. You will need to have an online account. Once you’ve imported your document, use that system’s spell-checker.
Hopefully, these solutions helped you isolate why spell-check wasn’t working. Now, you can continue to write your great novel, business proposal, letter, or tutorial.
- How to Make Symbols with a Keyboard
- How to Make a Letterhead Template with Word
- How to Add Watermark in Word
- How to Compress a Word Document
- Video: How to Make a Letterhead in Word
How to Fix the Spell Check Not Working in Word
Spell check in Word is one of the features in Microsoft Word that make typing up documents an easy task. You can breeze through projects much more efficiently without worrying about your spelling and grammatical errors. This is why it’s a serious issue when the spell check feature in Word isn’t working.
We’re here to help you restore the spelling and grammatical check no matter what caused it to stop working in the first place. While the cause of the error can be different for everyone, it’s usually related to misconfigured settings or issues in Word itself.
Jump To Solution:
- How to manually check spelling and grammar in Word
- How to use the Spell Check in Word and Check Grammar in Office
- Show errors automatically while you work
- Why is Spell Check Not Working in Word?
- Problem a: How to Fix Spell check Not Working for a Specific Document
- Solution 1. Check your Language settings
- Solution 2. Check the Proofing Exception options
- Problem b: How to fix spell check not working in any Word document
- Solution 1. Verify the “Check spelling as you type” feature is on
- Solution 2. Repair Microsoft Word with the Office repair tool
- Solution 3. Rename a Windows Registry folder
- Solution 4. Verify that a Word add-in isn’t interfering with the spell checker
- Solution 5: Rename Your Word Template
Note: Please note that the methods below apply to Word 2019, Word 2016, Word 2013, Word 2010, and Word for Office 365.
How to manually check spelling and grammar in Word
- Click the «Review» tab in the ribbon at the top of the screen.
- In the ribbon, click «Spelling & Grammar.»
- If there are any spelling or grammar issues, the Spelling and Grammar dialog box will appear. You’ll see a list of suggestions for each potential error.
How to use the Spell Check in Word and Check Grammar in Office
Here are some tricks and tips to use spell check in Microsoft Word:
- Run the spelling and grammar checker. To start a check of the spelling and grammar in your document, just press F7.
Show errors automatically while you work
Most Office programs, including MS Word, automatically check for potential spelling and grammatical errors as you type, so you don’t need to do anything to show errors while you work.
Notes:
- Automatic spelling and grammar checking is unavailable in Access, Excel, or Project. You can manually start a spell check by pressing F7.
- Automatic grammar checking is available only in Outlook, Word, and PowerPoint 2013 (or newer).
The spell check in MS Office marks potential spelling errors with a red squiggly line and potential grammatical errors with a blue squiggly line.
If spelling or grammatical errors aren’t marked, automatic checking might be turned off. You may need to turn it on.
When you see a spelling or grammatical error you want assistance fixing, right-click on the underlined word or phrase and choose one of the options to fix the error.
If Office is flagging words as misspelled, but you have it spelled the way you want it, select Add to Dictionary to teach Office not to flag that word as misspelled in the future.
Spell check might not work in Word for several reasons, here’re the most common causes.
- The different language is set as default.
- The speller add-in is disabled.
- Proofing tools aren’t installed.
- HKEY_CURRENT_USERSoftwareMicrosoftShared ToolsProofingTools1.0Overrideen-US causing the error.
If you’ve noticed that spell check only seems to stop working in one specific document, you can use one of the methods below to fix this. The problem is usually related to language or formatting settings in cases like this.
Problem a: How to Fix Spell check Not Working for a Specific Document
If the spell check is not working for a specific document, the problem could be with formatting or language settings. Follow the solutions below to solve this problem for a specific document.
Solution 1. Check your Language settings
- Open the Word document you’ve been having spell-checking issues with.
- Press the Ctrl + A keys on your keyboard (Command + A on a Mac) to select the entire document.
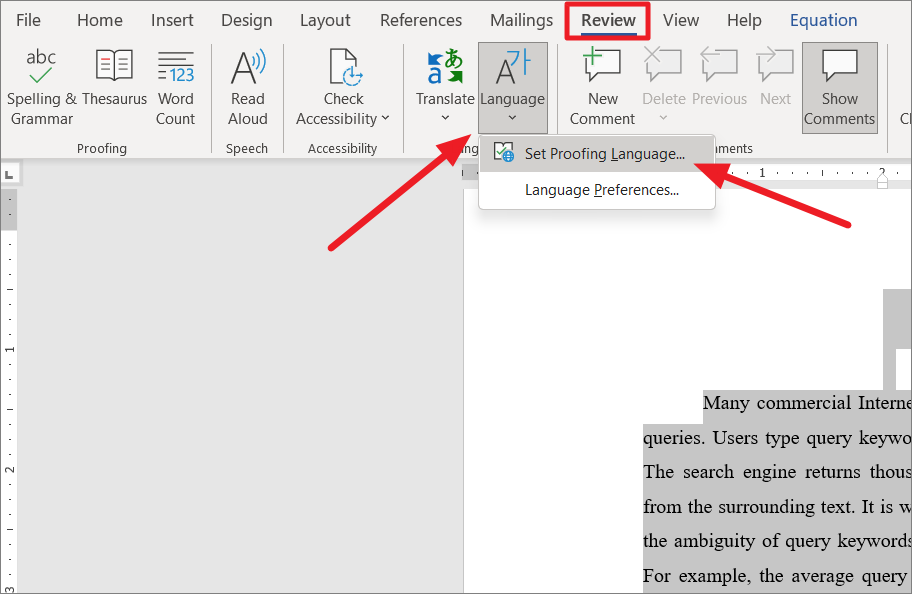
- Switch to the Review tab in your Ribbon, then select the Language button and choose Set Proofing Language… from the drop-down menu.

- The Language window will open up. Here, make sure that the «Do not check spelling or grammar» box is unchecked.
- Click the OK button.
- Check if your spell checker works after applying this fix.

Solution 2. Check the Proofing Exception options
- Open the Word document you’ve been having spell-checking issues with.
- Click on File from the Ribbon, then select Options. The Word Options window should open up.
- Go to the Proofing tab in the left-side panel.
- Look for the Exceptions for: (Document name) section in the right-side panel.
- Make sure that the Hide spelling errors in this document only and Hide grammar errors in this document only boxes are both unchecked.

- Click the OK button to save your changes.
- Check if the spell checker works.
Problem b: How to fix spell check not working in any Word document
If neither of the methods above seemed to fix your issue, you might have errors with Word. In the next section, we’ll discuss further solutions to fix the spell checker not working at all in various versions of Word.
Solution 1. Verify the “Check spelling as you type” feature is on
- From the menu click File tab > Options. This will open up the Word Options in a new window.
- Next, select Proofing.
- Make sure to select both the Check spelling as you type and the Mark grammar errors as you type options under the When correcting spelling and grammar in Word section.

- Click on the Recheck Document button to test if Word’s spell check works after turning these features on.
- Click the OK button to save your changes.

Solution 2. Repair Microsoft Word with the Office repair tool
These instructions apply only to Windows 10 operating systems. If you need instructions for other versions of Windows, please navigate to the Repair an Office application page on Microsoft’s website and select your operating system.
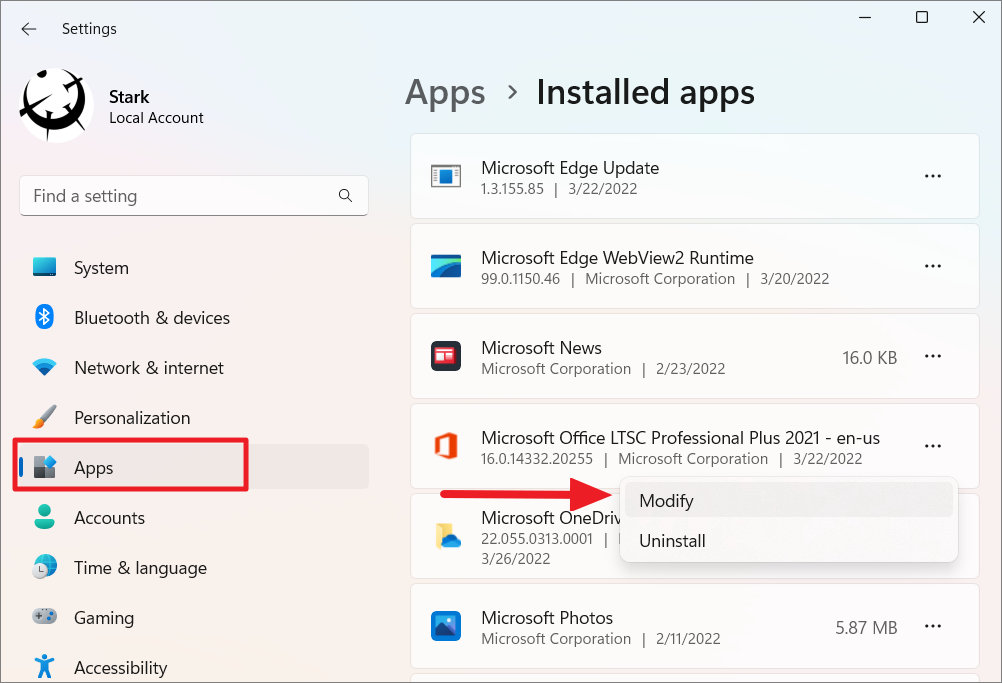
- Open the Settings window by using the Windows + S keyboard shortcut.
- Click on the Apps and Features button.
- Scroll down and select the version of Microsoft Word you want to repair.
- Click on the Modify button.
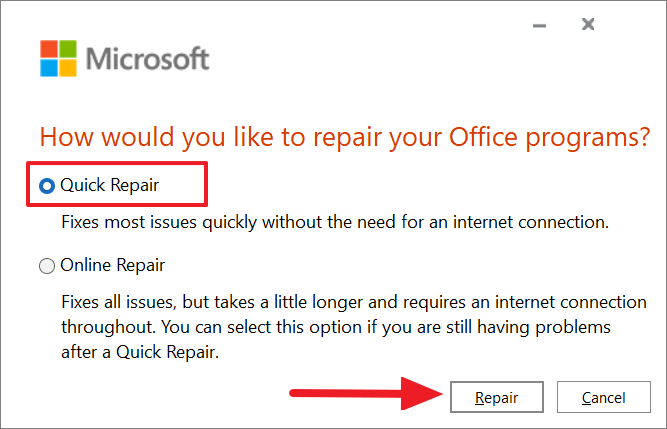
- Depending on your installation, follow the steps below:
- MSI-based: In the Change your installation section, select Repair then click Continue.
- Click-to-Run: In the How would you like to repair your Office Programs window, select Online Repair. Next, choose Repair.
- Follow any on-screen instructions to repair Word, then check if the spell checker works.
Solution 3. Rename a Windows Registry folder
- Completely exit out of Word.
- Press the Windows + R keys on your keyboard to open the Run utility.
- Type in “regedit” without the quotation marks and click the OK button. This will launch up the Registry Editor.
- Navigate to the following key using the panel on the left-hand side: HKEY_CURRENT_USERSoftwareMicrosoftShared ToolsProofing Tools
- Select the folder named 1.0 then right-click on it and choose Rename.

- Rename the folder to 1PRV.0 and click the OK button.
- Close the Registry Editor and re-launch Microsoft Word to check if your spell check works.
Solution 4. Verify that a Word add-in isn’t interfering with the spell checker
- Completely exit out of Word.
- Hold down the Ctrl key and double-click on the icon you use to launch Word. This will attempt starting Word in Safe mode.
- When prompted, click Yes to allow Word to run in Safe mode.
- Open up any document you’ve been having problems with and press the F7 key to perform a spell check.
- If the spell check works, you most likely have an add-in that interferes with the default spell checker in Word. Make sure to find and disable this add-in to be able to use the spell checker without having to launch in Safe mode.
Solution 5: Rename Your Word Template
If all the above solutions don’t work for you, then we recommend renaming your word template «normal.dotm.» Follow the procedure below.
- Press Windows key + R. This will open the Run utility dialog box
- Copy and Paste this text «%appdata%MicrosoftTemplates» on the dialog box without the quotes.
- Click Ok
Proceed and rename the normal.dotm to something like Fixednormal.dotm.
You May Also Like
> How to Check Your Spelling and Grammar in Word
> MS Word Features: 20 Secret Functions Revealed!
> How to Print Black and White on Word (With Images)
> How to Edit Your Word Documents Faster
Проверка орфографии в Word — это встроенная функция, помогающая обнаруживать орфографические и грамматические ошибки при наборе текста. Если инструмент обнаружит какие-либо ошибки или ошибки в вашем документе, он подчеркнет ошибки разными цветами, например, красным для орфографических ошибок, зеленым для грамматических ошибок и синим для контекстных орфографических ошибок.
Однако иногда функция проверки орфографии не работает в Word должным образом. Многие пользователи жаловались на то, что инструмент неправильно помечает орфографические ошибки и пропущенные слова или что программа полностью перестала работать.
Если вы столкнулись с какой-либо проблемой с инструментом проверки орфографии и грамматики Word, есть несколько способов исправить это, и мы рассмотрим каждый из них в этом посте.
Проверьте параметры языка и проверки орфографии
Если проверка орфографии и автокоррекция не работают для определенного документа, проблема может быть вызвана языковыми настройками. Поэтому следите за параметрами языковых настроек. Когда вы вводите документ, Microsoft Word автоматически определяет используемый вами язык и пытается его автоматически исправить. Эта функция может быть полезна во многих случаях, однако иногда она может быть причиной того, что проверка орфографии не работает должным образом. Вот как вы можете решить эту проблему:
Сначала откройте документ Word, в котором не работает проверка орфографии. Затем нажмите Ctrl+, Aчтобы выделить весь текст в документе.

Затем перейдите на вкладку «Обзор», нажмите кнопку «Язык» на ленте и выберите параметр «Установить язык проверки правописания».

Здесь, во-первых, убедитесь, что для текста выбран правильный язык. Например, если язык установлен как «испанский», но документ на «английском», Word будет выделять каждое английское слово как слово с ошибкой. Кроме того, если ваш язык установлен как английский (США) и вы используете британский английский (например, если вы используете слово «привкус» вместо «вкус»), это будет выделено как ошибка.
Итак, выберите правильный язык в разделе «Пометить выделенный текст как:».

Затем убедитесь, что флажок «Не проверять орфографию или грамматику» не установлен. Если нет, снимите этот флажок.

Вы также можете снять флажок «Определять язык автоматически», потому что автоматическое распознавание языка может иногда вызывать ошибки, если вы время от времени используете некоторые слова на другом языке (кроме установленного языка).

Когда вы закончите, нажмите «ОК».
После выполнения вышеуказанных шагов нажмите F7клавишу, чтобы запустить средство проверки орфографии и грамматики, и посмотрите, устранена ли проблема. Если нет, попробуйте следующий метод.
Проверка исключений проверки
В Word есть еще один параметр, который может помешать правильной работе проверки орфографии. Исключение проверки правописания — это параметр, который может освобождать определенные документы от всех проверок правописания и правописания. Убедитесь, что эта опция отключена для правильной работы проверки орфографии. Для этого выполните следующие действия:
Сначала откройте Microsoft Word или вы можете открыть любой документ Word на компьютере. После этого выберите весь контент, нажав Ctrl+ A, затем перейдите на вкладку «Обзор» и нажмите кнопку «Язык». Затем нажмите «Языковые настройки…».
Кроме того, вы можете перейти на вкладку «Файл» на ленте, затем выбрать «Параметры», чтобы открыть параметры Word.
В окне «Параметры Word» перейдите на вкладку «Правописание» на левой панели. На правой боковой панели прокрутите вниз до раздела «Исключения для» внизу. Затем убедитесь, что оба флажка «Скрыть орфографические ошибки только в этом документе» и «Скрыть грамматические ошибки только в этом документе» не отмечены флажками. Затем нажмите «ОК», чтобы сохранить настройки.
Включить проверку орфографии при вводе
Если проверка орфографии не работает в каком-либо документе, это может быть связано с тем, что параметр «Проверять орфографию при вводе» (который проверяет документ на наличие ошибок в режиме реального времени) не включен. Вот как вы можете включить его:
Перейдите на вкладку «Файл», выберите «Параметры» на правой боковой панели в нижней части меню.
Когда откроется диалоговое окно «Параметры Word», щелкните раздел «Правописание». На правой боковой панели перейдите к разделу «При исправлении орфографии и грамматики в Word». Затем обязательно выберите параметры «Проверять орфографию при вводе» и «Отмечать грамматические ошибки при вводе» в этом разделе.
Затем нажмите кнопку «Перепроверить документ», чтобы перепроверить документ.

Нажмите «Да» в окне подтверждения.

После этого нажмите «ОК», чтобы сохранить настройки и проверить документ.
Запустите Microsoft Word в безопасном режиме
Если какая-либо надстройка или другая программа мешает работе средства проверки орфографии и вызывает его сбой, вы можете запустить Microsoft Word в безопасном режиме (загружается без каких-либо надстроек) и выяснить, в чем причина проблемы. Вот как вы можете это сделать:
Нажмите и удерживайте Ctrl клавишу, а затем дважды щелкните любой документ Word на вашем компьютере, чтобы открыть его.

В приподнятом окне нажмите «Да».

Кроме того, вы можете запустить программу Word в безопасном режиме с помощью команды «Выполнить».
Для этого сначала откройте окно команды «Выполнить» с помощью сочетаний клавиш Ctrl+. RЗатем введите winword /safeкоманду «Выполнить» и нажмите Enterили щелкните «ОК».

Это откроет Word в безопасном режиме.
Теперь нажмите «Файл» и выберите «Создать» или нажмите Ctrl+ N , чтобы открыть новый черный документ. Затем введите текст и проверьте, работает ли проверка орфографии.
Если проверка орфографии работает в безопасном режиме, то проблема должна быть с одной из надстроек. Затем отключите ненужную надстройку, которая вызывает проблему.
В некоторых случаях сторонняя надстройка может работать со сбоями или вызывать конфликт со средством проверки орфографии и грамматики. Если проверка орфографии корректно работала в безопасном режиме с минимальным функционалом, то проблема могла быть в какой-либо из установленных надстроек. Поэтому вам нужно отключить сторонние надстройки одну за другой, чтобы найти, какая из них вызывает конфликт. Или вы можете отключить их все и переустановить их одну за другой, чтобы найти конфликтующую надстройку. Чтобы отключить надстройки, следуйте этим инструкциям:
Откройте вкладку «Файл» и выберите «Параметры» на левой панели.
В параметрах Word выберите «Надстройки» на левой панели.
Затем в нижней части экрана выберите параметр «Надстройки COM» в раскрывающемся меню «Управление» и нажмите кнопку «Перейти».
Во всплывающем окне «Надстройки COM» просто снимите флажок с надстройки, которая, по вашему мнению, вызывает проблему, чтобы отключить ее. Если вы хотите удалить надстройку, выберите надстройку и нажмите «Удалить». Затем нажмите «ОК», чтобы закрыть диалоговое окно.
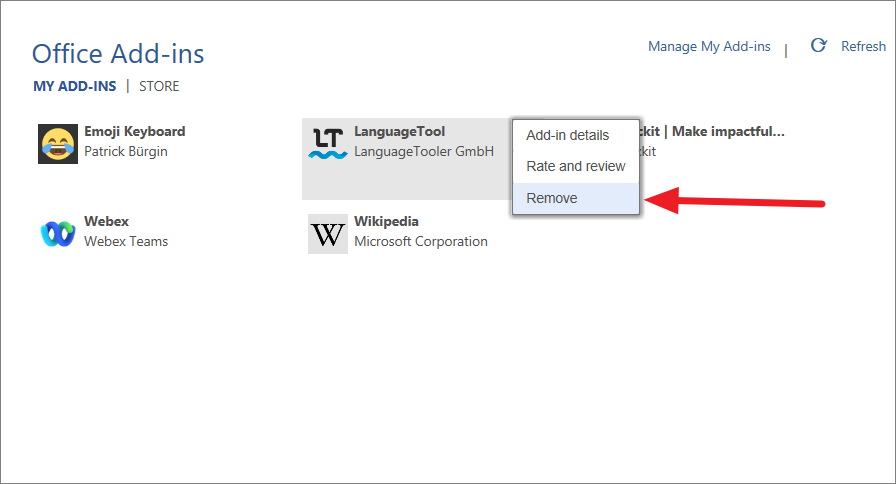
Иногда не все надстройки отображаются в диалоговом окне надстроек COM. Если установленная надстройка недоступна в поле Надстройки COM, сделайте следующее:
Перейдите на вкладку «Вставка» и нажмите кнопку «Мои надстройки» в группе надстроек.
В разделе «Надстройки Office» нажмите кнопку с тремя точками («Параметры») рядом с надстройкой, которую вы хотите удалить.

Затем нажмите «Удалить» в меню.

Теперь проверьте, работает ли проверка орфографии или нет.
Переименовать папку реестра Windows
Некоторые пользователи утверждают, что для решения проблемы необходимо переименовать папку инструментов проверки правописания в редакторе реестра. Следуйте этим инструкциям, чтобы переименовать папку проверки:
Сначала полностью закройте программу Word, затем запустите окно команды «Выполнить», нажав Win+ R. Введите regedit, чтобы открыть редактор реестра. И, если вы видите диалоговое окно «Контроль учетных записей», нажмите «Да».

В окнах реестра Windows перейдите по следующему пути, используя левую панель, или скопируйте и вставьте указанный ниже путь в адресную строку:
HKEY_CURRENT_USERSoftwareMicrosoftShared ToolsProofing Tools
В разделе «Инструменты проверки правописания» щелкните правой кнопкой мыши папку «1.0» и выберите параметр «Переименовать» в контекстном меню.

Переименуйте папку с «1.0» на «1PRV.0».

После этого закройте редактор реестра и перезагрузите компьютер, чтобы изменения вступили в силу. Теперь перезапустите Microsoft Word и еще раз проверьте, работает ли проверка орфографии.
Переименуйте свой шаблон Word
Также возможно, что проверка орфографии не работает из-за поврежденного глобального шаблона. Глобальный шаблон — это «normal.dot» или «normal.dotm» для Word 2007 и более поздних серий соответственно, которые обычно находятся в папке шаблонов Microsoft. Чтобы решить эту проблему, вам нужно переименовать файл глобального шаблона, который вернет MS Word к настройкам по умолчанию. Для этого выполните следующие действия:
Откройте команду «Выполнить» (Win+ R), введите следующее и нажмите Enter:
%appdata%MicrosoftTemplatesОткроется папка шаблонов Microsoft Word, в которой вы можете найти файл normal.dot или normal.dotm в зависимости от версии Word.

Теперь щелкните файл правой кнопкой мыши и выберите значок «Переименовать» или нажмите F2.
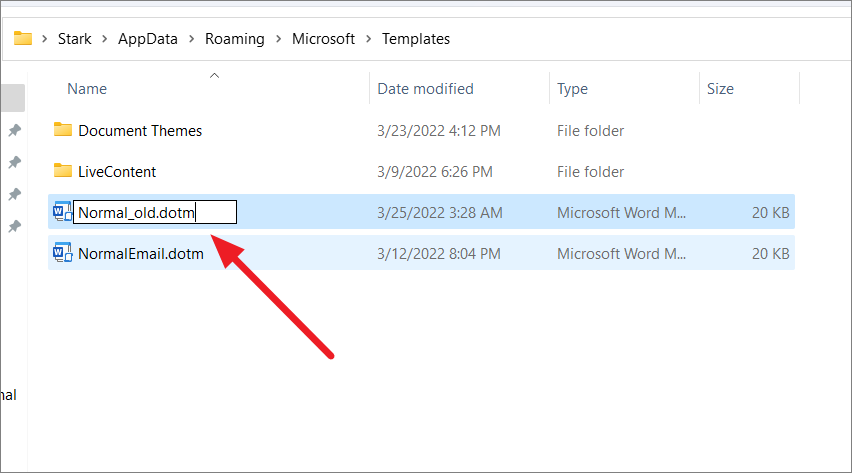
Затем переименуйте файл из Normal.dotm в «Normal_old.dotm».

Это сбросит настройки Word на значения по умолчанию и, надеюсь, решит вашу проблему.
Добавить язык проверки
Хотя вы можете писать или редактировать документ на английском языке, предпочитаемым языком авторства и проверки может быть выбран иностранный язык (например, немецкий). Если вы случайно установили другой язык проверки правописания или удалили английский из списка, проверка орфографии может не работать.
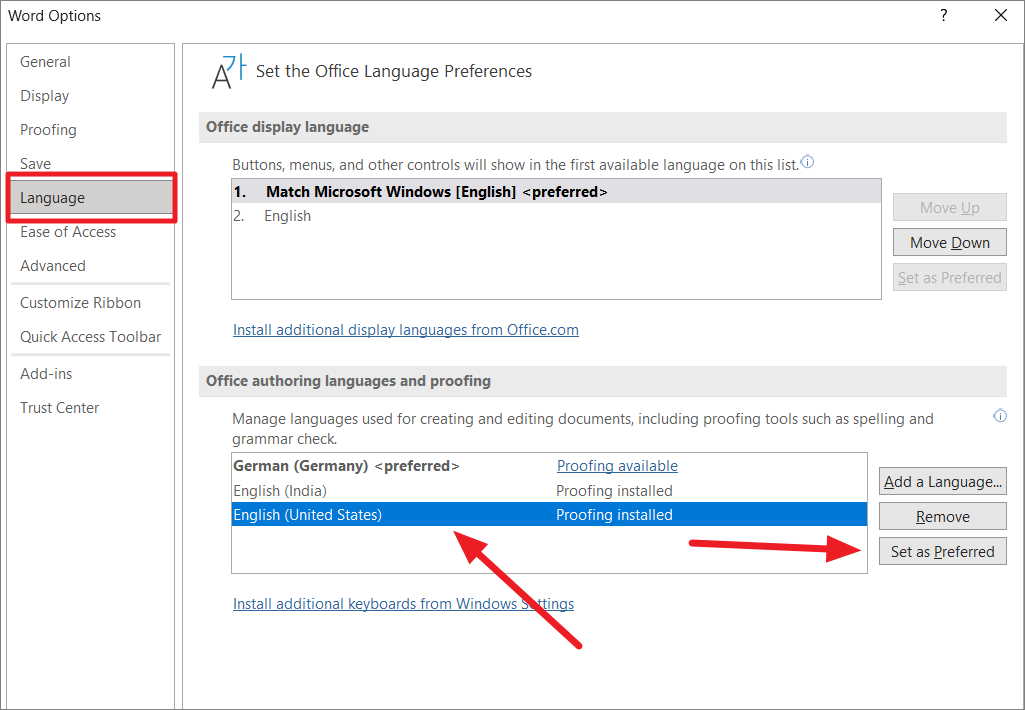
Чтобы исправить это, откройте меню «Файл» и перейдите в «Параметры» в представлении «За кулисами». Затем перейдите в раздел «Язык» слева и убедитесь, что правильный язык установлен и установлен в качестве предпочтительного в разделе «Языки разработки Office и проверка правописания».
Чтобы установить язык проверки, выберите язык и нажмите кнопку «Установить как предпочтительный». В приведенном ниже примере в качестве предпочтительного языка выбран немецкий.
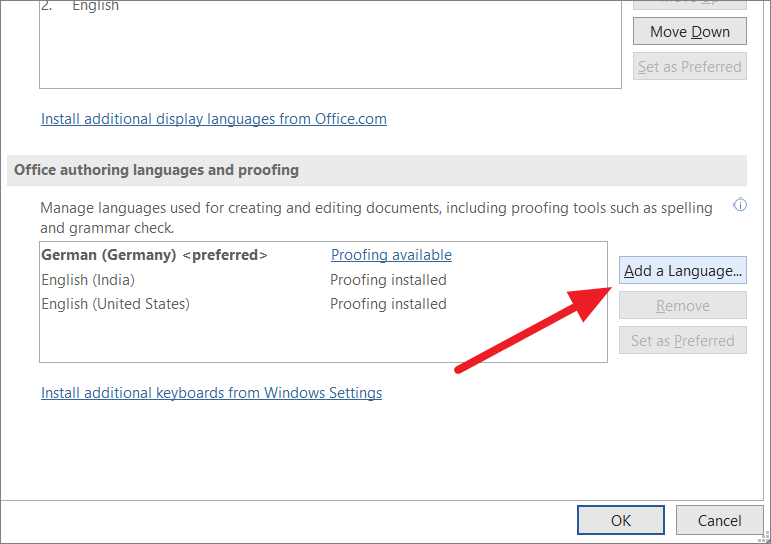
Если ваш язык недоступен в разделе «Языки разработки Office и проверка правописания», нажмите кнопку «Добавить язык», чтобы добавить язык проверки.
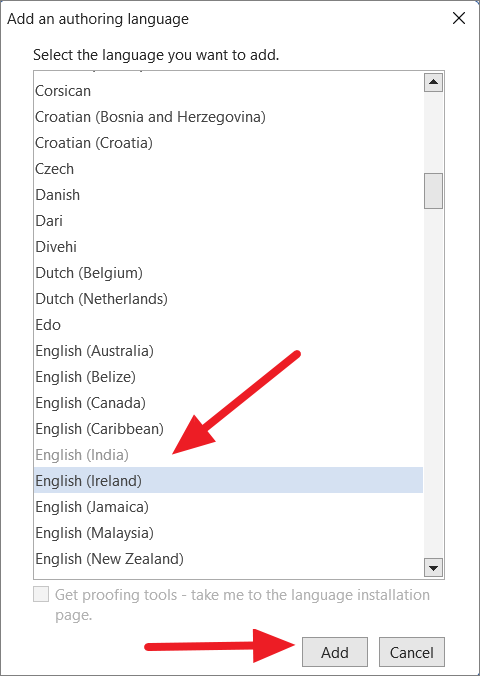
Во всплывающем окне выберите язык, который вы хотите добавить, из списка и нажмите кнопку «Добавить».
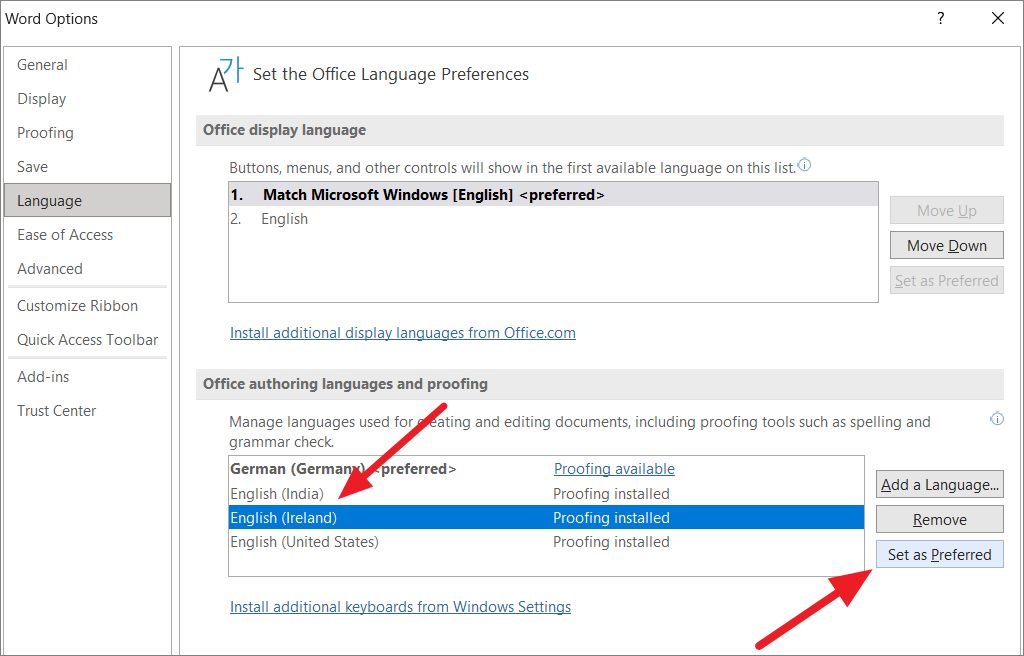
После этого выберите язык из списка и нажмите «Установить как предпочтительный».
Затем нажмите «Да» во всплывающем окне «Предпочтительный авторский язык Microsoft Office».

После выбора предпочтительного языка нажмите «ОК», чтобы закрыть параметры Word.

Теперь проверьте, работает ли инструмент проверки орфографии и грамматики.
Добавить в пользовательский словарь
Бывают случаи, когда Word не может распознать определенные слова, такие как ругательства, имена и т. д. И программа будет изо всех сил пытаться обнаружить орфографические и грамматические ошибки. В таких случаях вы можете добавить свои слова во встроенный словарь Word, и они не будут отображаться как ошибки в этом документе и во всех будущих документах.
Чтобы добавить слово в словарь, щелкните правой кнопкой мыши слово, которое хотите добавить, и выберите в контекстном меню пункт «Добавить в словарь».
Проверьте настройки стиля документа
Word использует разные языковые настройки для каждого абзаца документа. Если вы используете стиль, который отформатирован неправильно, то каждый новый абзац будет отформатирован на другом языке, даже если вы установите английский язык для всего документа. Следовательно, Word может выделить слова в новом абзаце как орфографические ошибки. Чтобы это исправить, вы должны установить правильный язык в Style.
На вкладке «Главная» перейдите в раздел «Стили», затем щелкните правой кнопкой мыши выбранный стиль и выберите «Изменить» в контекстном меню.
В диалоговом окне «Изменить стиль» нажмите кнопку «Формат» в левом нижнем углу и выберите «Язык» в меню.
Затем выберите правильный язык для выбранного стиля и убедитесь, что опция «Не проверять орфографию или грамматику» не отмечена. Затем нажмите «ОК».

Восстановить приложение MS Office
Приложение MS Word могло быть повреждено или, возможно, недавнее обновление повредило установку вашего программного обеспечения. В любом случае, поврежденное или испорченное приложение MS Word также может быть еще одной причиной того, что инструмент проверки орфографии и грамматики не работает. Поэтому восстановление приложения MS Office на вашем компьютере может решить вашу проблему.
Сначала щелкните правой кнопкой мыши меню «Пуск» Windows и выберите в меню пункт «Установленные приложения». или Перейдите в «Настройки Windows» (Win+ I) и перейдите в «Приложения», а затем «Приложения и функции».
В списке установленных приложений найдите установленную версию Microsoft Office. Затем нажмите кнопку с тремя точками и выберите «Изменить».

И нажмите «Да» для контроля учетных записей пользователей, если будет предложено. В окне восстановления Microsoft у вас будет два варианта. Сначала выберите опцию «Быстрое восстановление» и нажмите кнопку «Восстановить».

В следующем диалоговом окне снова нажмите кнопку «Восстановить».
Если указанный выше вариант не устраняет проблему, выберите вариант «Онлайн-восстановление» и нажмите кнопку «Восстановить».

Затем снова нажмите «Восстановить».
После завершения ремонта перезагрузите устройство и посмотрите, устранена ли проблема.

Отключите параметр « Не проверять орфографию или грамматику».
Иногда, когда вы пытаетесь проверить орфографию, появляется сообщение об ошибке «Текст, помеченный как «Не проверять орфографию или грамматику», был пропущен». Word обычно показывает это сообщение, когда вы используете параметр «Не проверять орфографию» в языковых настройках, чтобы игнорировать определенные слова из средства проверки орфографии. Однако, если этот параметр настроен неправильно, Word пропустит проверку орфографии для всех слов в документе. Вот как вы можете отключить эту опцию:
Откройте документ Word и выделите абзац или конкретное слово, которое не отображается в средстве проверки орфографии. Далее нажмите клавиши быстрого доступа Shift+.F1
Это покажет вам панель «Показать форматирование» в правой части окна Word.
На панели «Показать форматирование» щелкните параметр «Язык» в разделе «Форматирование выбранного текстового поля».

Когда появится диалоговое окно «Язык», обязательно снимите флажок «Не проверять орфографию или грамматику». После этого нажмите «ОК» и перезапустите программу Word.

Используйте плагин Grammarly
Если инструмент проверки орфографии и грамматики Word не работает, в качестве альтернативы можно использовать подключаемый модуль Grammarly. Grammarly — это облачный помощник по набору текста, который помогает обнаруживать и исправлять орфографические ошибки, несовершенную грамматику и пунктуационные ошибки. Кроме того, Grammarly легко интегрируется с Microsoft Word и Outlook.
Чтобы загрузить Grammarly для Word и Outlook, перейдите на этот веб- сайт и нажмите кнопку «Получить надстройку. Это бесплатно». После загрузки надстройки установите ее.
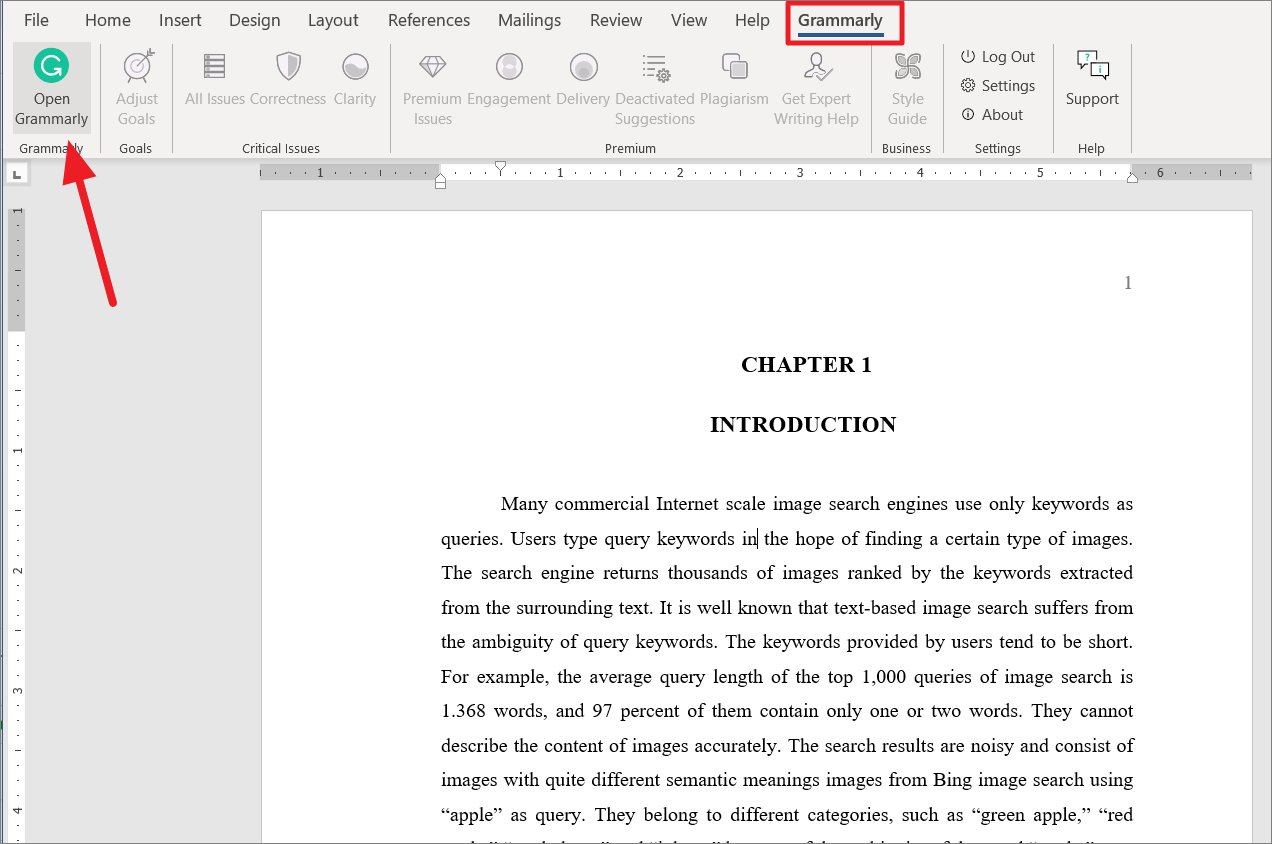
Затем перезапустите приложение Word, и вы увидите новую вкладку под названием «Грамматика» на ленте.
Теперь вы можете открыть любой документ, перейти на вкладку «Grammarly» и нажать «Открыть Grammarly».
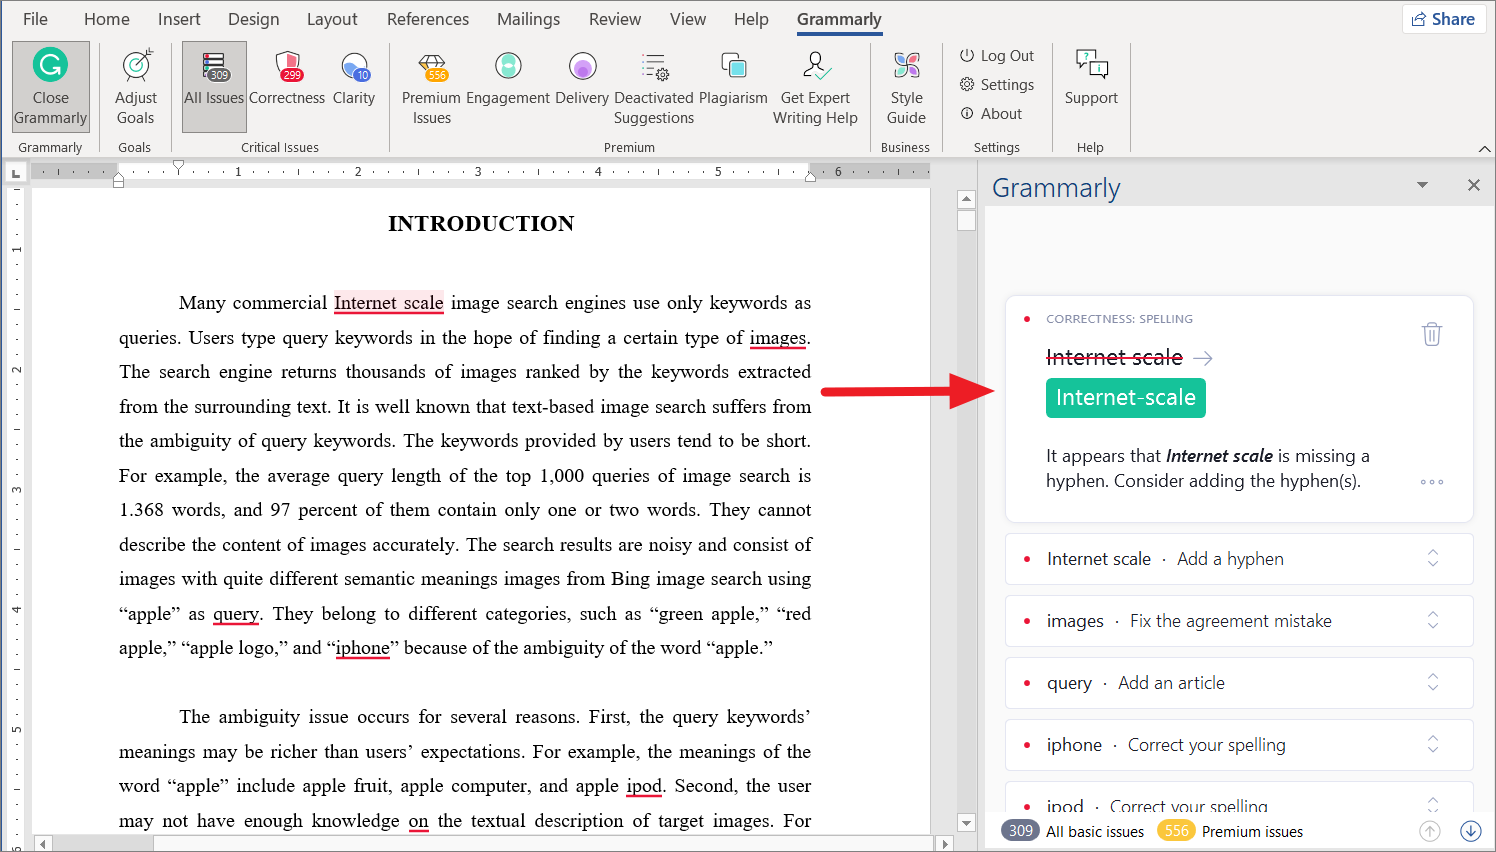
Откроется панель Grammarly справа, где будет отсканирован документ и показаны предложения по исправлению орфографических и грамматических ошибок.
Вы также можете использовать веб-приложение Microsoft Word для быстрой проверки орфографии в документе. Если у вас есть подписка на Microsoft 365, вы можете открыть тот же документ в веб-приложении и быстро проверить наличие орфографических и грамматических ошибок в Интернете.
Вот и все.
Word’s Spell check is a built-in feature that can help you detect spelling mistakes and grammatical errors while you’re typing. If the tool finds any mistakes or errors in your document, it will underline the errors with different colors, like red for spelling errors, green for grammar errors, and blue for contextual spelling errors.
However, sometimes, the Spell Check feature doesn’t work as expected in Word. Many users have complained that the tool is not flagging misspelled and missing words correctly or the program stopped working entirely.
If you are facing any issue with Word’s spelling and grammar-checking tool, there are several ways to fix it and we will go through each of them in this post.
Check the Language and Spell Check Options
If the Spell Check and auto-correct are not working for a specific document, the issue could be caused by language settings. So keep a check on the language settings options. When you type in a document, Microsoft Word auto-detects the language you are using and tries to auto-correct it. This feature may be useful in many cases, however, sometimes it may be the cause of why Spell Check is not working properly. Here’s how you can resolve this:
First, open the Word document where spell check is not working. Then, press Ctrl+A to select all the text in the document.

Next, go to the ‘Review’ tab, click the ‘Language’ button in the ribbon and select the ‘Set Proofing Language’ option.
Here, first, make sure the correct language is selected for the text. For example, if the language is set as ‘Spanish’ but the document is in ‘English’, Word will highlight every English word as misspelled words. Also, if your language is set as English (United States) and you’re using British English (for example, if you use the word flavour instead of flavor), it will highlight it as an error.
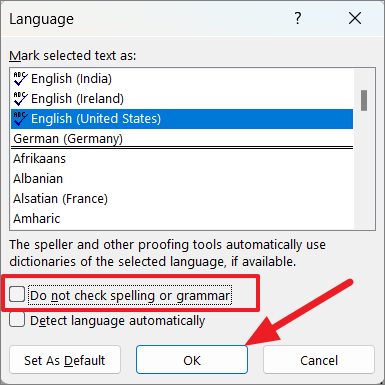
So, choose the correct language under the ‘Mark selected text as:’ section.
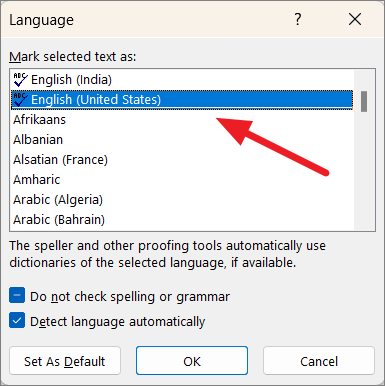
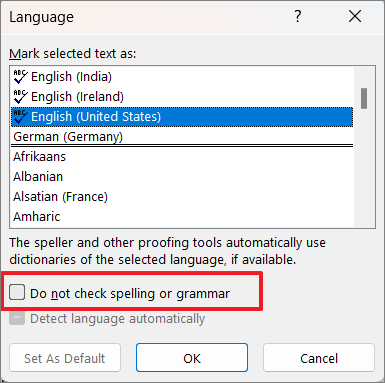
Then, verify that the ‘Do not check spelling or grammar’ option is unchecked. If not uncheck that checkbox.
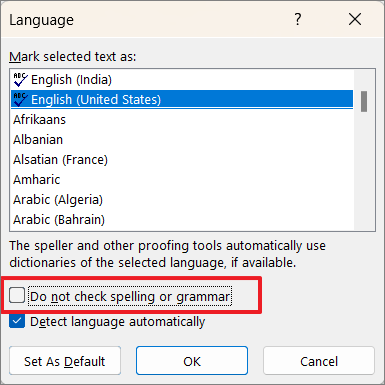
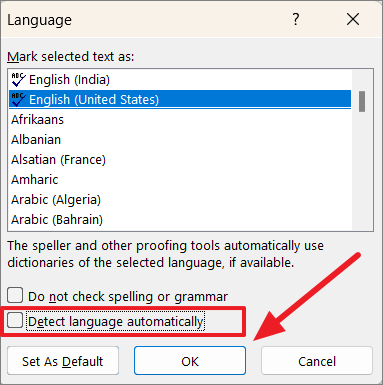
You can also uncheck the ‘Detect language automatically’ option because the auto-language recognition can sometimes throw errors if you occasionally use some other language words (other than the set language).
When you are done, click ‘OK’.
After doing the above steps, press the F7 key to run the spelling and grammar tool, and see if the problem is fixed. If not, try the next method.
Check for Proofing Exceptions
There’s another setting in Word that may prevent the spell checker from running properly. The proofing exception is a setting that can exempt certain documents from all proofing and spelling checks. Make sure this option is disabled for the proper functioning of the spell checker. To do this, follow these steps:
First, open Microsoft Word, or you can open any Word documents on the computer. After that, select all the content by pressing Ctrl+A, then go to the ‘Review’ tab and then click the ‘Language’ button. Then, click the ‘Language Preferences…’ option.

Alternatively, you can go to the ‘File’ tab from the Ribbon, then select ‘Options’ to open Word Options.
In the Word Options window, go to the ‘Proofing’ tab on the left panel. On the right-side panel, scroll down to the ‘Exceptions for’ section at the bottom. Then, make sure both ‘Hide spelling errors in this document only’ and ‘Hide grammar errors in this document only’ checkboxes are unchecked. Then, click ‘OK’ to save the settings.

Enable Check Spelling As You Type option
If the Spell Checking is not working in any document, then it might be due to the ‘Check spelling as you type’ setting (which checks the document in real-time for errors) is not turned on. Here is how you can turn it on:
Click the ‘File’ tab, select ‘Options’ in the right sidebar at the bottom of the menu.

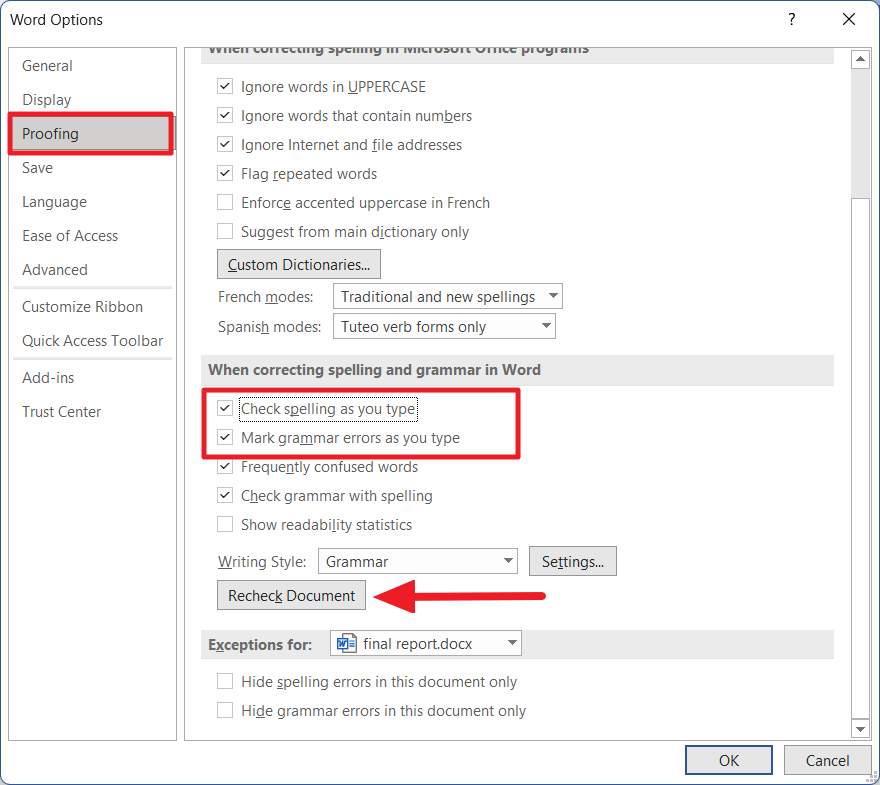
When the Word Options dialog opens up, click the ‘Proofing’ section. On the right-side panel, navigate to the ‘When correcting spelling and grammar in Word’ section. Then, make sure to select both ‘Check spelling as you type’ and the ‘Mark grammar errors as you type’ options under that section.
Then, click on the ‘Recheck Document’ button to recheck the document
Click ‘Yes’ to the confirmation box.

After that, click ‘OK’ to save the settings and check your document.
Start Microsoft Word in Safe Mode
If some add-in or other program interfering with Spell Checker functionality and causes it to malfunction, you can start Microsoft Word in safe mode (loads without any add-ins) and find out what is causing the issue. Here’s how you can do this:
Press and hold the Ctrl key and then double-click on any Word document on your computer to open it.

In the elevated window, click ‘Yes’.
Alternatively, you can launch the Word program in safe mode using the Run command.
To do this first, open the Run command box with Ctrl+R shortcut keys. Then, type winword /safe in the Run command and press Enter or click ‘OK’.
This will open Word in the safe mode.

Now, click ‘File’ and select ‘New’ or press Ctrl+N to open a new black document. Then type some text and check if the spell check is working or not.
If the spell check is working on the safe mode, then the problem must be with one of the add-ins. Then, disable the unnecessary add-in that causes the problem.
Disable the Conflicting Add-ins in Word
In some cases, a third-party add-in could be malfunctioning or causing conflict with the spelling and grammar-checking tool. If the spell checker worked properly in safe mode with minimal functionality, then the problem might be with any of the installed add-ins. So you need to disable the third-party add-ins one by one to find which one is causing the conflict. Or you could disable them all and re-install them one by one to find the conflicting add-in. To disable add-ins, follow these instructions:
Open the ‘File’ tab and select ‘Options’ from the left-side panel.

In Word Options, select ‘Add-ins’ on the left-hand pane.

Next, at the bottom of the screen, select the ‘COM Add-ins’ option from the ‘Manage’ drop-down menu and click the ‘Go’ button.

In the COM Add-ins pop-up, simply uncheck the add-in that you think is causing the problem to disable it. If you want to uninstall the add-in, select the add-in and click ‘Remove’. Then, click ‘OK’ to close the dialog.

Sometimes all the add-ins will not appear in the COM Add-ins dialog box. If the installed add-in is not available in the COM Add-ins box, do this instead:
Go to the ‘Insert’ tab and click the ‘My Add-ins’ button in the Add-ins group.

Under Office Add-ins, click the three-dots button (Options) next to the add-in you want to remove.
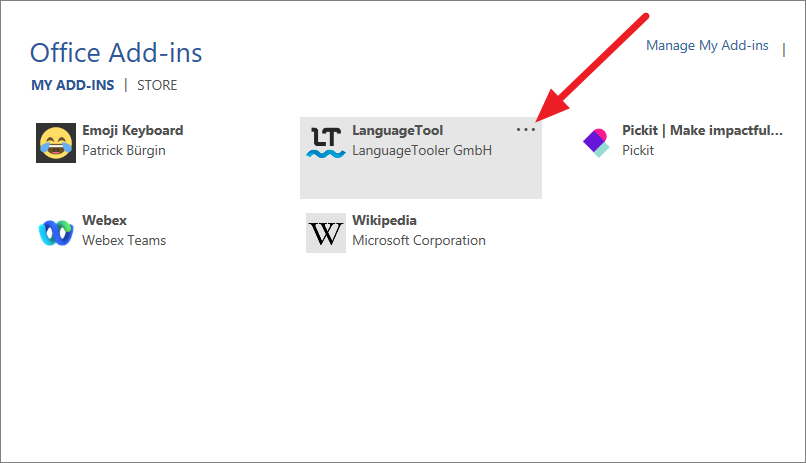
Then, click ‘Remove’ from the menu.
Now, check if the spell checker works or not.
Rename a Windows Registry Folder
Some users claim that renaming the Proofing tools folder in the Registry Editor to resolve the issue. Follow these instructions to rename the proofing folder:
First, completely close the Word program, then launch the Run command box by pressing Win+R. Type regedit to open Registry editor. And, if you see the User Account Control dialog box, click ‘Yes’.
In the Windows Registry windows, navigate to the following path using the left pane or copy-paste the below path in the address bar:
HKEY_CURRENT_USERSoftwareMicrosoftShared ToolsProofing Tools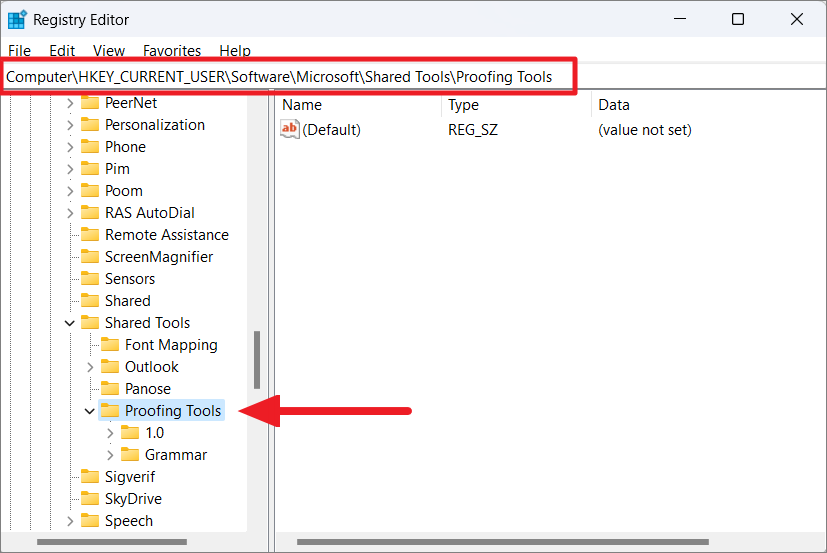
Under Proofing Tools, right-click on the ‘1.0’ folder and select the ‘Rename’ option from the context menu.
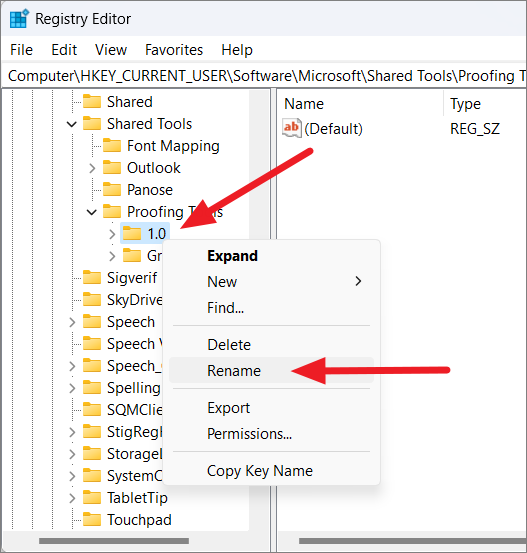
Rename the folder from ‘1.0’ to ‘1PRV.0’.

After that, close the Registry Editor and restart your PC to apply the changes. Now, relaunch Microsoft Word and recheck if the spell checker is working or not.
Rename Your Word Template
It is also possible that the spell checker is not working due to the corrupted global template. The Global Template is either the ‘normal.dot’ or ‘normal.dotm’ for Word 2007 and newer series respectively, which is usually located in the Microsoft Template folder. To resolve this issue, you need to rename the Global template file that will reset MS Word to the default settings. To do this, follow the below steps:
Open the Run command (Win+R), type the following, and press Enter:
%appdata%MicrosoftTemplatesThis will open the Microsoft Word Templates folder where you can find the ‘normal.dot’ or ‘normal.dotm’ file depending on the Word version.
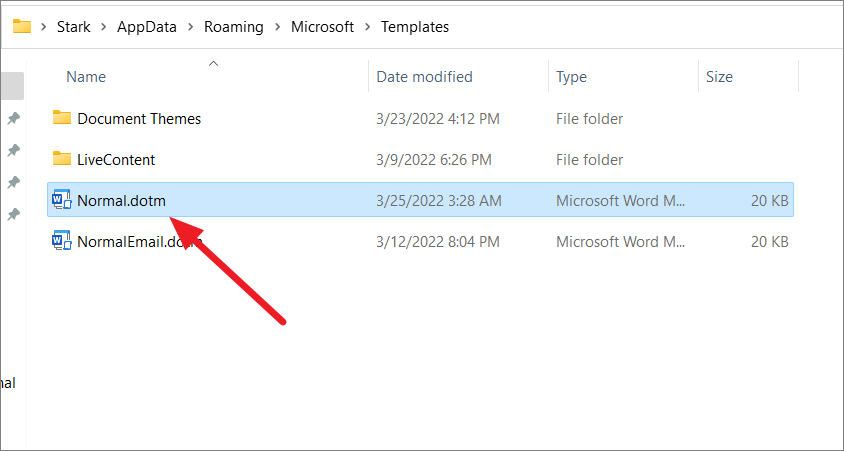
Now, right-click the file and select the ‘Rename’ icon or press F2.

Then, rename the file from Normal.dotm to ‘Normal_old.dotm’.
This will reset the Word settings to default and hopefully fix your problem.
Add Proofing Language
While you might be writing or editing a document in English, your preferred authoring and proofing language might be set to a foreign language (e.g German). If you accidentally set a different proofing language or uninstalled English from the list, then spell check might not work.
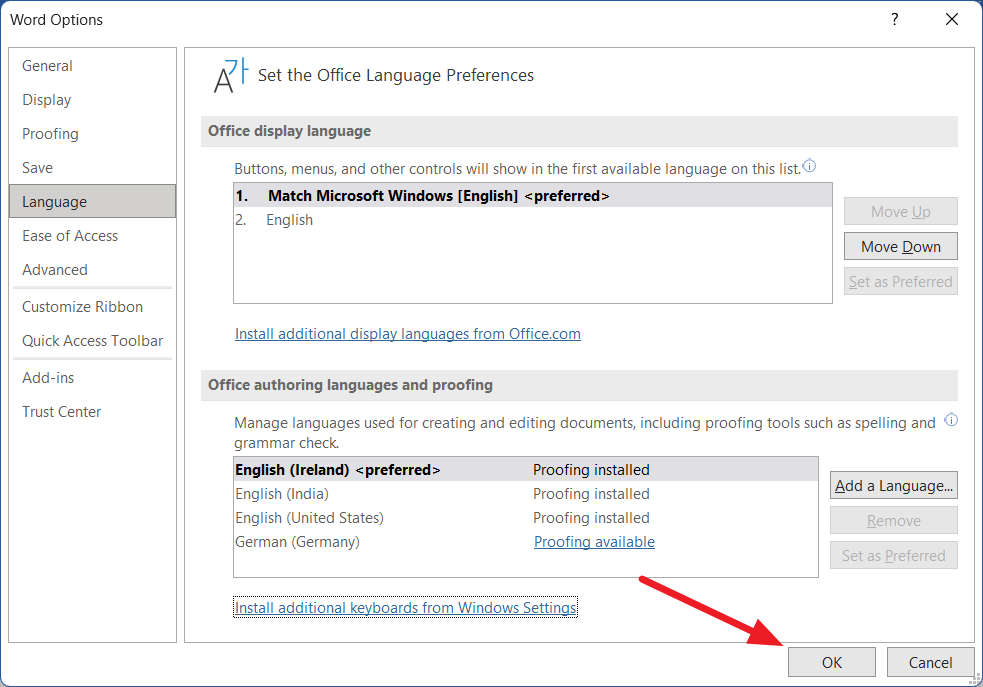
To fix this, open the ‘File’ menu and go to ‘Options’ in the backstage view. Next, go to the ‘Language’ section on the left and make sure that the correct language is installed and set as preferred under the ‘Office authoring languages and proofing’ section.
To set proofing language, select the language and click the ‘Set as Preferred’ button. In the below example, German is set as the preferred language.

If your language is not available under the ‘Office authoring languages and proofing’ section, click the ‘Add a Language’ button to add a proofing language.

From the pop-up window, choose the language you want to add from the list and click the ‘Add’ button

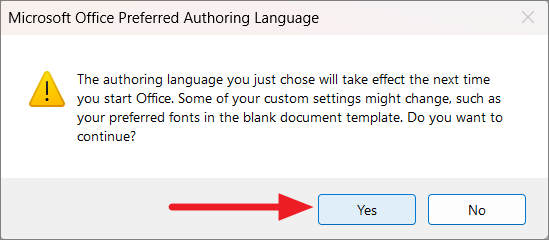
After that, select the language from the list and click ‘Set as preferred’.

Then, click ‘Yes’ in the Microsoft Office Preferred Authoring Language pop-up box.
After selecting the preferred language, click ‘OK’ to close Word Options.
Now, check if the spelling and grammar tool is working or not.
Add to Custom Dictionary
There are times when Word couldn’t recognize certain words such as slags, names, etc. And the program will struggle to detect spelling and grammar mistakes. In such cases, you can add your words to Word’s built-in dictionary and it will not show them as errors in this document and in all future documents.
To add a word to the dictionary, right-click on the word you want to add and select the ‘Add to Dictionary’ option in the context menu.

Check Document Style Settings
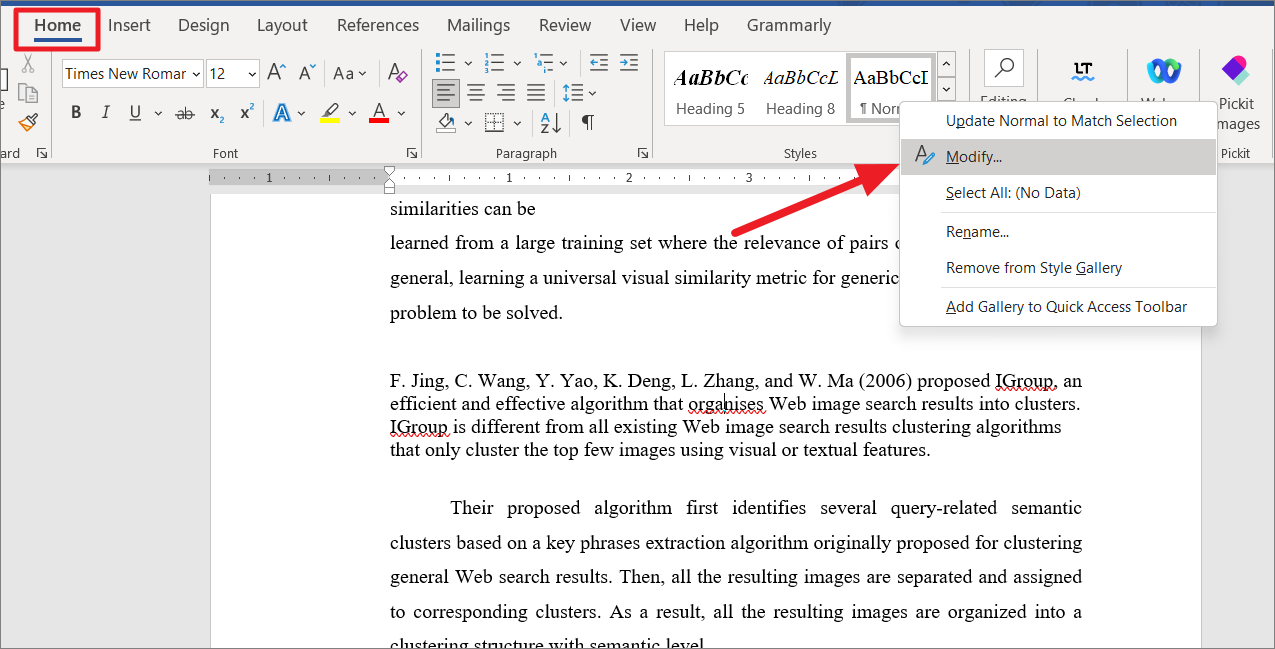
Word uses different language settings for each paragraph in your document. If you use a style that is formatted the wrong way, then each new paragraph will be formatted in a different language even if you set the entire document language to English. Consequently, Word may highlight the words in the new paragraph as spelling mistakes. To fix this, you must set the correct language in the Style.
On the ‘Home’ tab, head to the Styles section and then right-click on the chosen style and select ‘Modify’ from the context menu.

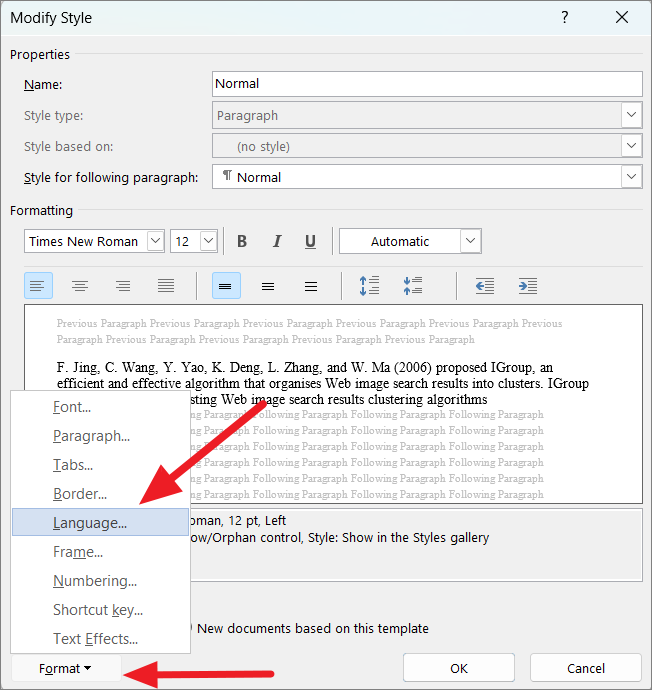
In the Modify Style dialog box, click the ‘Format’ button at the lower-left corner, and select ‘Language’ from the menu.

Then, select the correct language for the selected style and make sure the ‘Do not check spelling or grammar’ option is unchecked. Then, click ‘OK’.
Repair MS Office Application
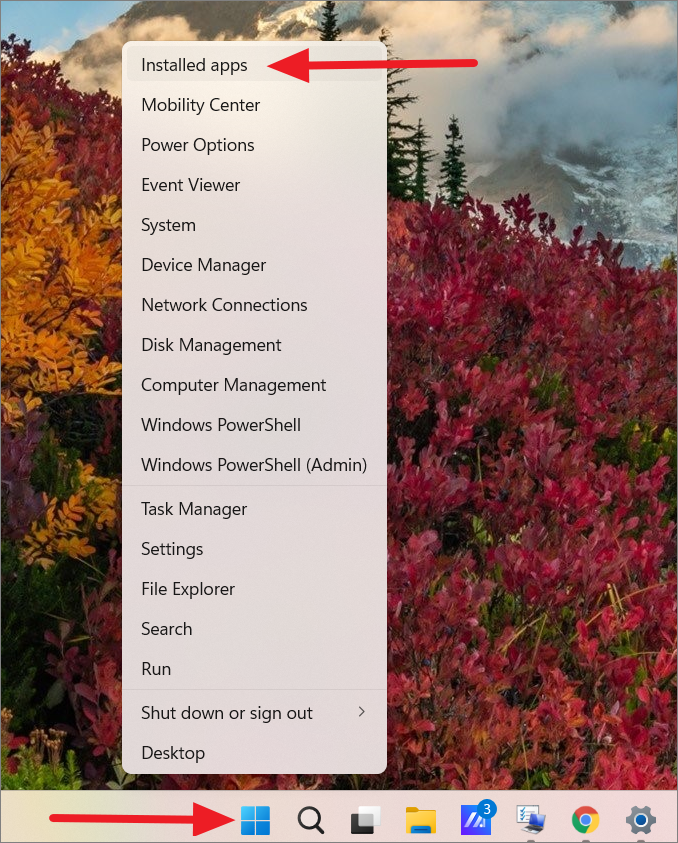
The MS Word app could be corrupted or maybe a recent update damaged your software’s installation. Either way, damaged or corrupted MS Word application could also be another cause for spelling and grammar checking tool not working. So repairing the MS Office application on your computer might resolve your issue.
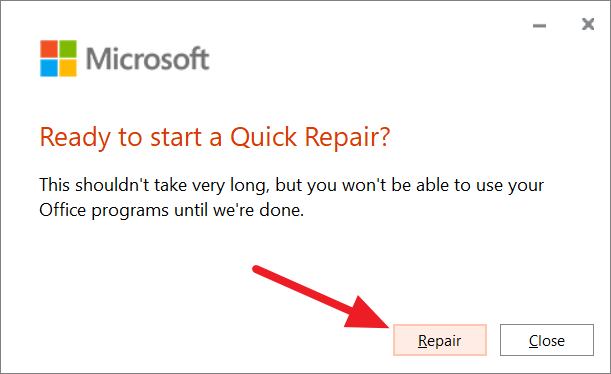
First, right-click on the Windows Start menu and select the ‘Installed apps’ option from the menu. or Go to Windows Settings (Win+I) and head to ‘Apps’ and then ‘Apps and features’.

Under the list of installed apps, locate the Microsoft Office version you have installed. Then, click the three-dots button and select ‘Modify’.
And, click ‘Yes’ to the User Account Control if prompted. In the Microsoft repair window, you will have two options. First, select the ‘Quick Repair’ option and click the ‘Repair’ button.
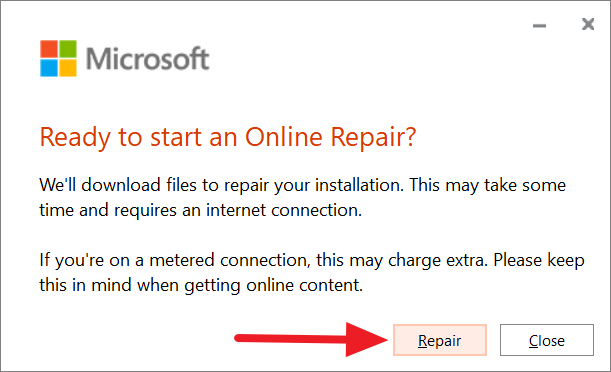
In the next dialog box, click the ‘Repair’ button again.

If the above option doesn’t fix the problem, select ‘Online Repair’ option and click the ‘Repair’ button.

Then, click ‘Repair’ again.

After the repair is finished, restart your device, and see if the issue is fixed or not.
Disable the Do Not Check Spelling Or Grammar option
Sometimes when you try to check the spelling, it will show you the “Text marked with ‘Do not check spelling or grammar’ was skipped” error message. Word usually shows this message when you use the ‘Do Not Check Spelling’ option in the language settings to ignore certain words from the spell checker. However, if this option is not configured right, Word will skip spell-checking for all the words in the document. Here’s how you can disable this option:
Open the Word document and highlight the paragraph or the specific word which is not being shown in the spell checker. Next, press the Shift+F1 shortcut keys.

This will show you the Reveal Formatting pane on the right side of the Word window.

In the Reveal Formatting pane, click on the ‘Language’ option under the Formatting of the selected text box.
When the Language dialog box appears, make sure to uncheck the ‘Do not check spelling or grammar’ option. After that, click ‘OK’ and restart the Word program.
Use Grammarly Plug-in
If Word’s Spelling and Grammer tool is not working for you, you can use Grammarly plug-in as an alternative. Grammarly is a cloud-based typing assistant that helps you detect and fix spelling mistakes, imperfect grammar, and punctuation mistakes. Also, Grammarly integrates seamlessly with Microsoft Word and Outlook.
To download Grammarly for Word and Outlook, go to this website and click the ‘Get the add-in It’s free’ button. After downloading the add-in, install it.

Then, restart the Word app and you will see a new tab called ‘Grammarly’ in the ribbon.
Now, you can open any document and go to the ‘Grammarly’ tab and click the ‘Open Grammarly’.

This will open the Grammarly pane on the right, where it will scan the document and show you suggestions to fix your spelling and grammar mistakes.

You can also use the Microsoft Word web app to quickly check the spelling of the document. If you have Microsoft 365 subscription, you can open the same document in the web app and quickly check for spelling and grammar mistakes online.
That’s it.
Встроенная программа проверки орфографии Microsoft Word гарантирует, что ваши документы не содержат орфографических или грамматических ошибок. Если эта функция когда-либо перестанет работать, ошибки в вашем документе не будут выделены. Таким образом, вы рискуете получить документы, содержащие проблемы с грамматикой.
Различные элементы могут привести к тому, что средство проверки орфографии Word не будет работать. Возможно, вы вручную отключили проверку орфографии, в настройках Word может быть указан неверный язык, или ваш текущий документ может быть исключением для проверки орфографии.
Как только вы устраните эти проблемы, программа проверки орфографии вернется к работе, чтобы выявить все ваши проблемы с орфографией и грамматикой.
Включить функцию проверки орфографии Microsoft Word
Когда вы заметите, что ваши проблемы с орфографией или грамматикой не выделены в ваших документах, первое, что нужно сделать, это проверить, включена ли проверка орфографии Word. Вы или кто-то другой мог отключить его, из-за чего Word не проверяет ваши документы на наличие проблем.
- Откройте Word на своем компьютере.
- Выберите « Параметры » на боковой панели слева.
- Выберите « Правописание » на левой боковой панели в окне « Параметры Word».

- Включите параметры Проверять орфографию при вводе и Отмечать грамматические ошибки при вводе на правой панели.

- Выберите OK внизу, чтобы сохранить изменения.
Отныне Word будет выделять в ваших документах как слова с ошибками, так и грамматические ошибки.
Выберите подходящий язык проверки правописания в Word
Вы должны выбрать соответствующий язык проверки в Word, если ваш документ содержит несколько языков. Word может не выделять ошибки на втором языке, если вы не выбрали этот язык в меню настроек проверки правописания.
К счастью, вы можете выбрать часть документа Word на другом языке и выбрать соответствующий язык при проверке правописания, чтобы выделить проблемы.
- Откройте документ в Word.
- Выберите часть документа, содержащую текст на другом языке.
- Откройте вкладку « Обзор » на ленте вверху. Затем выберите « Язык» > « Язык» > «Установить язык проверки правописания».

- Выберите язык, который использует ваш текст, в открывшемся диалоговом окне.
- Снимите флажки Не проверять орфографию или грамматику и Автоматически определять язык.

- Выберите ОК внизу.
Просмотрите исключения проверки правописания Word
Word предлагает функцию отключения проверки орфографии и грамматики в выбранных документах. Вы должны убедиться, что ваш текущий документ не является частью этого списка исключений. Если это так, вам придется удалить исключение, чтобы Word проверял и выделял как орфографические, так и грамматические ошибки в текущем документе.
- Запустите документ с помощью Word.
- Выберите «Файл» > «Дополнительно » > «Параметры » в Word.
- Выберите « Проверка » на боковой панели слева.
- Прокрутите правую панель вниз. Затем выберите текущий документ в раскрывающемся меню « Исключения для ».
- Отмените выбор параметров « Скрыть орфографические ошибки только в этом документе» и « Скрыть грамматические ошибки только в этом документе ».

- Выберите OK внизу, чтобы сохранить изменения.
Откройте Word в безопасном режиме и проверьте, не вызывают ли надстройки Word проблему
Word позволяет устанавливать в приложение сторонние надстройки. Иногда одна или несколько из этих надстроек вызывают проблемы. Неработающая проверка орфографии может быть результатом установленной надстройки.
В этом случае вы можете запустить Word в безопасном режиме и посмотреть, не виноваты ли ваши надстройки. Затем вы можете отключить все надстройки и включить одну надстройку за раз, чтобы увидеть, какая из них вызывает проблему.
- Запустите Word в безопасном режиме, найдя приложение в меню « Пуск », удерживая нажатой клавишу Ctrl на клавиатуре и выбрав приложение в результатах поиска.
- Выберите « Да » в приглашении, чтобы открыть Word в безопасном режиме.

- Откройте документ в Word и посмотрите, выделены ли ваши проблемы с орфографией и/или грамматикой. Ваши надстройки, вероятно, являются виновником, если встроенная проверка орфографии работает.
- Просмотрите список надстроек, сначала закрыв и снова открыв Word в обычном режиме, а затем выбрав « Файл» > « Дополнительно » > « Параметры ».
- Выберите Надстройки на боковой панели слева.
- Выберите « Надстройки COM » в раскрывающемся меню «Управление» справа . Затем выберите Перейти.

- Оставьте включенной только одну надстройку, отключив все остальные, и посмотрите, возникнет ли проблема. Таким образом, вы узнаете, какая надстройка заставляет проверку орфографии вашего Word не работать.

Заставьте Word создать новый шаблон документа по умолчанию
Word использует шаблон документа по умолчанию, на основе которого будут основываться все ваши будущие документы. Если этот шаблон содержит проблемы, ваша проверка орфографии может не работать. В этом случае вы можете заставить Word создать новый шаблон, переименовав старый шаблон.
Это заставит Word подумать, что вы удалили шаблон, и приложение создаст новый с нуля.
- Откройте диалоговое окно « Выполнить », одновременно нажав клавиши Windows + R.
- Введите следующее в поле «Выполнить» и нажмите Enter. Замените имя пользователя на имя пользователя, которое вы используете на своем ПК, по следующему пути:
C:UsersusernameAppDataRoamingMicrosoftTemplates.

- Щелкните правой кнопкой мыши файл Normal.dotm и выберите « Переименовать».
- Введите
BK-Normal.dotmв качестве нового имени и нажмите Enter.

- Запустите Word, и приложение создаст новый шаблон документа по умолчанию.
Восстановление Microsoft Office на вашем компьютере
Если средство проверки орфографии Word по-прежнему не работает, возможно, у вас возникла проблема с установкой Microsoft Office. В этом случае используйте средство восстановления Office, чтобы исправить проблемы со всеми приложениями Office, включая Word.
Средство восстановления встроено в Office, поэтому вам не нужно загружать или устанавливать его на свой компьютер.
- Запустите панель управления на своем ПК, открыв меню « Пуск », выполнив поиск « Панель управления » и выбрав утилиту в результатах поиска.
- Выберите Удалить программу в окне Панели управления. (Не волнуйтесь, вы ничего не удаляете.)

- Выберите Microsoft Office в списке и выберите Изменить вверху.

- Выберите « Да » в окне контроля учетных записей пользователей.
- Включите параметр « Быстрое восстановление » и выберите « Восстановить » внизу. Если быстрое восстановление не исправляет ваши приложения Office, вы можете использовать вариант онлайн-восстановления.

- Следуйте инструкциям на экране, чтобы решить проблемы с приложениями Office.
Многие способы исправить неработающую проверку орфографии в Word
Неработающая функция проверки орфографии в Microsoft Word может доставить огромное неудобство, если вы сильно полагаетесь на эту функцию для исправления ошибок в своих документах. К счастью, у вас есть несколько способов, описанных выше, чтобы обойти проблему и исправить неисправную проверку орфографии. Мы надеемся, что приведенное выше руководство поможет вам.
Fix Microsoft Word Spell Checker Not Working: Today, Computer plays a very crucial role in everyone’s life. Using computers you can perform so many tasks like using the Internet, editing documents, playing games, storing data & files and many more. Different tasks are performed using different software and in today’s guide, we would talk about Microsoft Word which we use to create or edit any document on Windows 10.
Microsoft Word: Microsoft Word is a word processor developed by Microsoft. It has been in use for many decades and it is the most used office application among other Microsoft applications available like Microsoft Excel, Microsoft PowerPoint, etc. around the world. Microsoft Word has many features which make it very easy for the users to create any document. And one of it’s most important feature is Spell Checker, which automatically checks the spelling of words in a text document. Spell Checker is a computer program which checks the spelling of the text by comparing it with a stored list of words.
Since nothing is perfect, the same is the case with Microsoft Word. Users are reporting that Microsoft Word is facing the issue where the spell checker is not working anymore. Now since spell checker is one of its main features, this is a very serious issue. If you try to write any text inside the Word document and by mistake, you have written something wrong then the Microsoft Word spell checker would automatically detect it and will immediately show you a red line below the incorrect text or sentence in order to warn you that you have written something wrong.

Since the Spell Check is not working in Microsoft Word then even if you write something wrong, you will not get any kind of warning about the same. So you won’t be able to correct your spellings or grammatical errors automatically. You need to manually go through the document word by word to find any issues. I hope by now you have realized the importance of Spell Checker in Microsoft Word as it increases the efficiency of article writing.
Why is my Word document is not showing spelling errors?
The Spell Checker does not recognize misspelled words in Microsoft Word because of the following reasons:
- Proofing tools are missing or not installed.
- Disabled EN-US Speller add-in.
- “Do not check spelling or grammar” box is checked.
- Another language is set as default.
- The following subkey exists in the registry:
HKEY_CURRENT_USERSoftwareMicrosoftShared ToolsProofingTools1.0Overrideen-US
So, if you are facing the problem of spell checker not working in Microsoft Word then don’t worry as in this article we will discuss several methods using which you can fix this issue.
Table of Contents
1
Make sure to create a restore point just in case something goes wrong.
Below are a few of the different methods using which you can fix the problem of Microsoft Word spell checker not working. This is not a very big issue and can be easily solved by adjusting some settings. Make sure to follow the methods in the hierarchical order.
Method 1: Uncheck “Do not check spelling or grammar” under Language
Microsoft word has special function where it automatically detects the language you are using to write the document and it tries to correct the text accordingly. Although this is a very useful feature but sometimes instead of fixing the issue, it creates more problems.
To Verify Your Language & Check Spelling Options follow the below-listed steps:
1.Open Microsoft Word or you can open any Word documents on your PC.
2.Select all the text by using the shortcut Windows key + A.
3.Click on the Review tab that is available at the top of the screen.
4.Now click on the Language under Review and then click on Set Proofing Language option.

4.Now in the dialog box that opens, make sure to select the correct Language.
6.Next, Uncheck the checkbox next to “Do not check spelling or grammar” and “Detect language automatically“.

7.Once done, click on the OK button to save the changes.
8.Restart Microsoft Word to apply changes.
After completing the above steps, now check if you’re able to fix Spell Check Not Working in Microsoft Word.
Method 2: Check Your Proofing Exceptions
There is feature in Microsoft Word using which you can add exceptions from all the proofing and spelling checks. This feature is utilized by users who do not wish to spell check their work while working with a custom language. Even so, if the above exceptions are added, then it can create problems and you may face Spell Check not working issue in Word.
To remove exceptions follow the below steps:
1.Open Microsoft Word or you can open any Word documents on your PC.
2.From the Word menu, click on File then select Options.

3.The Word Options dialog box will open up. Now click on Proofing from the left-hand side window.

4.Under Proofing option, scroll down to the bottom to reach Exceptions for.
5.From the “Exceptions for” drop-down select All Documents.

6.Now uncheck the check-box next to “Hide spelling errors in this document only” and “Hide grammar errors in this document only”.

7.Once done, click OK to save changes.
8.Restart Microsoft Word in order to apply the changes.
After your application is restarted, check if you’re able to fix Spell Checker not working in Word issue.
Method 3: Disable Do not check spelling or grammar
This is another option in Microsoft Word which can stop spelling or grammar check. This option is useful when you want to ignore certain words from spell checker. But if this option is incorrectly configured then it may lead to spell checker not working properly.
To revert this setting follow the below steps:
1.Open any saved Word document on your PC.
2.Select the particular word which is not being shown in spell checker.
3.After selecting that word, press Shift + F1 key.

4.Click on the Language option under Formatting of the selected text window.

5.Now make sure to uncheck “Do not check spelling or grammar” and “Detect language automatically“.

6.Click on OK button to save the changes and restart Microsoft Word.
After restarting the application, check if the Microsoft word spell checker is working fine or not.
Method 4: Rename the Proofing Tools Folder under Registry Editor
1.Press Windows Key + R then type regedit and hit Enter to open Registry.
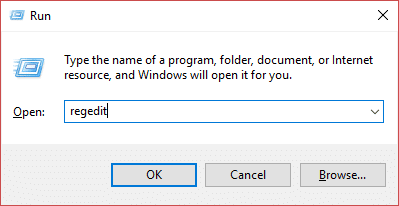
2.Click Yes button on the UAC dialog box and the Registry Editor window will open.

3.Navigate to the following path under Registry:
HKEY_CURRENT_USERSoftwareMicrosoftShared ToolsProofing Tools

4.Under Proofing Tools, right-click on the 1.0 folder.

5.Now from the right-click context menu select Rename option.

6.Rename the folder from 1.0 to 1PRV.0

7.After renaming the folder, close the Registry and restart your PC to save changes.
After completing the above steps, check if you’re able to fix Spell Check not working in Microsoft Word issue.
Method 5: Start Microsoft Word in Safe Mode
Safe mode is a reduced functionality state where Microsoft Word loads without any add-ins. Sometimes the Word Spell Checker might not work because of the conflict arising from the Word add-ins. So if you start the Microsoft Word in the safe mode then this might fix the issue.

To start Microsoft word in Safe mode, press & hold the CTRL key then double-click on any Word document to open. Click Yes to confirm that you want to open the Word document in Safe Mode. Alternatively, you can also press & hold the CTRL key then double-click on the Word shortcut on the desktop or single click if the Word shortcut is in your Start menu or on your Taskbar.

Once the document opens, press F7 to run the spell-check.

In this way, Microsoft Word Safe Mode can help you fixing the Spell Check not working issue.
Method 6: Rename Your Word Template
If the Global template either the normal.dot or normal.dotm is corrupted then you could face the Word Spell Check not working issue. The Global template is usually found in Microsoft Templates folder which is under the AppData folder. To fix this issue you will need to rename the Word Global template file. This will reset Microsoft Word to the default settings.
To rename the Word Template follow the below steps:
1.Press Windows Key + R then type the following & hit Enter:
%appdata%MicrosoftTemplates

2.This will open the Microsoft Word Templates folder, where you can see the normal.dot or normal.dotm file.

5.Right-click on the Normal.dotm file and select Rename from the context menu.

6.Change the file name from Normal.dotm to Normal_old.dotm.
After completing the above steps, the word template will be renamed and Word settings will be reset to default.
Recommended:
- 5 Ways to Open Local Group Policy Editor in Windows 10
- Fix The Diagnostics Policy Service Is Not Running Error
- Fix Access denied when editing hosts file in Windows 10
- 3 Ways to Forget a Wi-Fi network on Windows 10
Hopefully, using one of the above methods you will be able to fix your problem of Microsoft Word Spell Check not working. If you still have any questions regarding this tutorial then feel free to ask them in the comment’s section.
The spell-check function in Microsoft Word gives you the freedom to type freely. Word auto-corrects any misspelled word or red underlines words that appears to be incorrect. You can simply right-click and select the correct word that matches your intention.
However, in some instances, the word spell check does not work. If it happens, you can rename the word template, or adjust proofing settings. Likewise, you can also rename the sub-folder name from the registry editor.
So, without any delay, let’s explore the fixes and how you should carry them out to make the word spell check work again.
The first thing to consider is to turn on spell check in Microsoft Word. You can also select grammar and spell-checking. Likely, you can open the Word application in safe mode.
A detailed explanation of fixes is discussed below to guide you fix word spell check on Windows.
Check If the Word Spell Check is ON
One of the first things that you can check if the spell check is not working is to check whether you have turned on the Word Spell Check option or not.
- From the Word document, select the File option from the top-left corner.
- Choose Options.
- Click on Proofing.
- Under When correcting spelling and grammar in Word, check the Check spelling as you type option.
- Also, select Mark grammar errors as you type and Check grammar with spelling.

- Click OK.

Select the Language And Uncheck Spelling or Grammar Option
Another probable remedy is to uncheck Do not check spelling or grammar options.
- Open the Word document.
- Press CTRL + A keys. It will select the entire part of your document.
- Select the Review tab.
- Click Language. Then select Set Proofing Language.

- Choose the language that you used in your text.
- Uncheck Do not check spelling or grammar.

- Now, click OK.


Adjust Proofing Settings
If the application has enabled the option of Hide proofing errors, it can cause an interruption in grammar and spell checking. Here is how you can adjust the proofing setting in Word.
- Launch a word document.
- First, click File.
- Then select Options.
- Click the Proofing option from the left panel.
- On the Exception for: section, select your document.
- Now unselect Hide spelling errors in this document only and Hide grammar errors in this document only.

- Click OK.

Renaming Proofing Tools Sub-folder Name from Registry Editor
Another probable solution to fix the issue is to change the 1.0 folder to 1PRV.0 through the Registry Folder.
- On the keyboard, press Windows + R to launch the Run program.
- Type
regeditand click OK.
- Navigate to:
HKEY_CURRENT_USER > Software > Microsoft > Shared Tools > Proofing Tools - Now select 1.0 and right-click it.
- Select Rename and rename 1.0 to 1PRV.0.

Renaming Word Template
Changing the name of the Word Template also helps fix the problem. What it does is reset the Word to the default settings.
- Open the Start screen and type Run. Next, select the Run program, and left-click it to open.
- Type %appdata%MicrosoftTemplates and press OK.

- The Templates folder will open.
- Now, click the
Normal.dotmorNormal.dotfile, depending on the Word version, and press the F2 key. It will allow you to rename the file.
- Rename the file as Normal_old.dotm.


Open Word in Safe Mode
Add-ins can create issues for Word and lead to spell-check not working on the computer. Launching the word application in safe mode will disable the add-ins, and you can check whether the spell-check is working or not.
- Launch the Start screen and locate Microsoft Word.
- First, press and hold the CTRL key on the keyboard.
- Then double-click on the Word application.
- A pop-up message will appear on the screen asking for confirmation to open the file in safe mode. Click Yes.

- After this, open a new document: File> New, and check if the problem remains or not.

Deactivate Add-ins Options from Word
At times, the problem can emerge because of Add-ins. After running the Word in safe mode, if the problem resolves, Add-ins options might need to be turned off. Follow the steps below to know the process:
- Open the Word file.
- From the upper-left corner, click File.
- Choose Options from the list.
- From the left-side segment, click Add-ins.
- Ensure the Manage option is adjusted to COM Add-ins. Then select Go.

- To disable the desired add-ins, unselect them. Or, select the Remove options. It will uninstall the selected Add-ins.

Try Repairing Microsoft Office on the Computer
Likely, there is always an option to repair Microsoft Office. Doing so will also repair Word. And it can also fix the issue of spell-check within the Word application.
- Go to the Start screen section.
- Type Control Panel. When the app appears, click to open it.
- Just below Programs, click on Uninstall a program.
- Locate Microsoft Office and right-click it.
- Select the Change option.

- When prompted, choose Yes.
- Now hit the Quick Repair options and click the Repair option.
- If it doesn’t help, select Online Repair and follow the instructions on the screen.

How to Fix Word Spell Check Not Working On Mac?
The fixes on Mac are similar to those of Windows with some differences in steps and terminologies. Selecting grammar and spell checking, and unchecking spelling or grammar are some common fixes you can try. On Mac, you can also adjust the input source language.
Below is a step-by-step guide to help you fix the issue.
Select Grammar and Spell Checking
The primary option in Mac is to enable spell and grammar checking. If it is unselected in Microsoft Word, it disables the spell-check function. So, it is necessary to turn on spelling and grammar as you type.
- Click Word.
- First, choose Preferences.
- From the Authoring and Proofing Tools section, select Spelling and Grammar.
- Check both Check spelling as you type and Check grammar as you type options.

- Also, remember to unselect Hide spelling errors in this document and Hide grammatical errors in this document options.
- Then hit OK.

Select the Language And Uncheck Spelling or Grammar Option
The fix also includes unchecking spelling and grammar.
- Open a word document.
- Select Edit > Select All.
- Choose Tools > Language.
- Now, choose the language dictionary that you require the speller to use.
- Unselect Do not check spelling or grammar.

- Then select OK.

Setting the Default Normal.dotm Template’s Language
Sometimes putting the ‘Do not check spelling or grammar’ to default also resolves the issue for Mac users.
- In Word, open an empty document.
- Click Edit.
- Then choose Select All.
- Now click Tools, and then select Language.
- Choose the language dictionary that you desire the speller to utilize.
- Unselect Do not check spelling or grammar.
- And select Default.
- Select Yes. It will save the change, and the effect can be seen in all new documents that use the Normal template.
- Now, choose OK.
Adjust the Input Source Language
A probable solution also includes setting the Input Source language from the Apple menu.
- First, you need to close all Office applications.
- Click the Apple icon.
- From the Apple menu, select the System Preferences option.
- From the Personal segment, select Language & Text.
- Select Input Sources.
- Select the language you want to set as the Input Source language. The Word application will use that language.
- Reboot your Mac.
Relocate the Normal.dotm Template
Microsoft Word creates a new variation of the Normal.dotm file if it is moved or renamed. So, relocating the Normal.dotm template file can help fix the issue in some instances.
- First of all, close all the Office applications on your computer.
- Select the Go option from the panel at the top of the screen.
- A drop-down menu will appear. Select Home.
- Select Library. (Press the OPTION key on the keyboard while selecting the Go menu. In Mac OS X Lion, the Library folder is in a hidden state.)
- Click Application Support > Microsoft.
- Select Office > User Templates.
- Pull the
normal.dotmfile to the desktop screen. - Reboot your computer.
To remove Word preferences, after step 3, select Preferences and then drag com.microsoft.word.plist file and the Microsoft folder to your desktop screen. And reboot the computer.
Каждая версия Windows немного отличается. Вот как восстановить Microsoft Outlook в Windows 10:
-
Закройте все приложения Microsoft Office.
-
Введите Apps & Features в поле поиска Windows.
-
Выберите приложения и функции .
-
Найдите и выберите Microsoft Office в списке установленных приложений и функций.
-
Выберите Изменить .
-
Выберите Да, если появится окно управления учетной записью пользователя.
-
Выберите Online Repair , затем выберите Repair .
-
Перезапустите Word, когда процесс восстановления будет завершен.
Восстановление Word 2016, 2013 или 2010 в Windows 8
-
Закройте все приложения Microsoft Office.
-
Щелкните правой кнопкой мыши кнопку « Пуск» и выберите « Панель управления» .
Убедитесь, что Категория выбрана в списке Просмотр по.
-
Выберите Удалить программу в разделе Программы.
-
Щелкните правой кнопкой мыши Microsoft Office , затем выберите « Изменить» .
-
Выберите Online Repair, если он доступен (это зависит от типа установленного вами Microsoft Office).
-
Выберите Восстановить , затем выберите Да, если появится окно управления учетной записью пользователя.
-
Перезапустите Word, когда процесс восстановления будет завершен.
Восстановление Word 2016, 2013 или 2010 в Windows 7
-
Закройте все приложения Microsoft Office.
-
Нажмите кнопку Пуск .
-
Нажмите Панель управления .
Убедитесь, что Категория выбрана в списке Просмотр по .
-
Нажмите Удалить программу в разделе Программы.
-
Выберите Microsoft Office в списке программ, затем нажмите « Изменить» .
-
Нажмите Online Repair, если он доступен.
Это зависит от типа установленного вами Microsoft Office. Если он недоступен, перейдите к следующему шагу.
-
Нажмите Восстановить .
-
Нажмите Да, если появится окно управления учетной записью пользователя.
-
Перезапустите Word, когда процесс восстановления будет завершен.