
Word for Microsoft 365 Word for Microsoft 365 for Mac Word for the web Word 2021 Word 2021 for Mac Word 2019 Word 2019 for Mac Word 2016 Word 2016 for Mac Word 2013 Word 2010 Word for Mac 2011 More…Less
You can control the vertical space between the lines of text in your document by setting the line spacing. Or, you can change the vertical space between paragraphs in your document by setting the spacing before or spacing after paragraphs. You can also choose to keep lines of text together or keep paragraphs together on a page.
Change the line spacing in an entire document
-
Go to Design > Paragraph Spacing.
-
Choose an option. To single space your document, select No Paragraph Space.
To return to the original settings later, go to Design > Paragraph Spacing and choose the option under Style Set. This may be Default or the name of style you’re currently using.
Change the line spacing in a portion of the document
-
Select one or more paragraphs to update. Press Ctrl + A to select all.
-
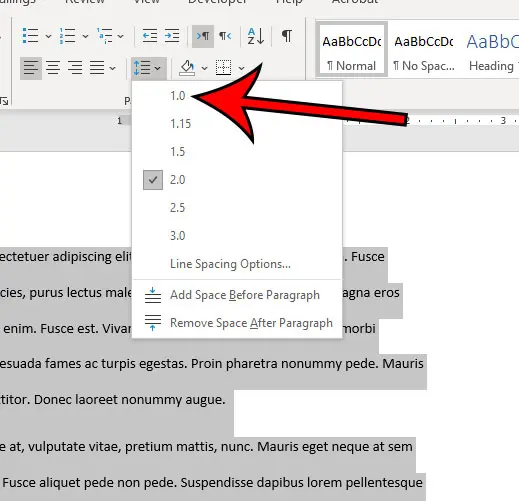
Go to Home > Line and Paragraph Spacing

-
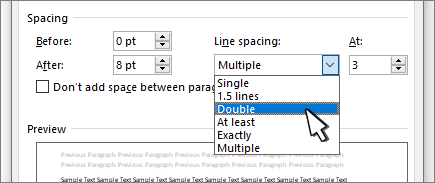
Select Line Spacing Options and choose an option in the Line spacing box.
-
Adjust the Before and After settings to change spacing between paragraphs.
-
Select OK.

For more info, see Adjust indents and spacing.
Change the line spacing in an entire document
-
Go to Design > Paragraph Spacing.
-
Choose the option you want. If you want to single space your document, choose No Paragraph Space.

This overrides the settings of the style you’re currently using. If you decide later to return to the original settings, go to Design > Paragraph Spacing and choose the option under Style Set. The option might be Default, as shown above, or it will show the name of style you’re currently using.
Change the line spacing in a portion of the document
-
Select the paragraphs you want to change.
-
Go to Home > Line and Paragraph Spacing.
-
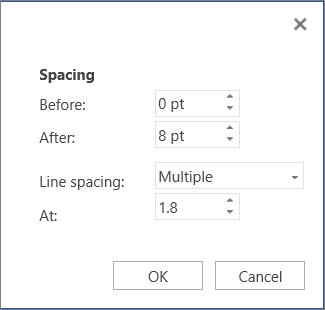
Choose the number of line spaces you want or select Line Spacing Options, and then select the options you want under Spacing.
-
To change the spacing before or after each of the paragraphs in the text you selected, click the arrow next to Before or After and enter the amount of space that you want.
-
Select OK.

-
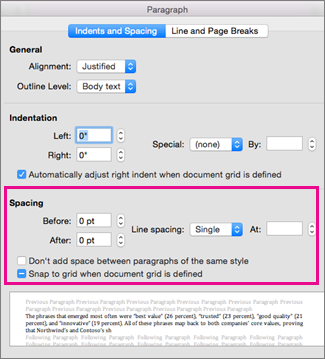
Select the paragraph whose lines you want to keep together.
-
Go to Format > Paragraph >Line and Page Breaks.
-
Select Keep lines together.
-
Select the first of the two paragraphs that you want to keep together.
Tip: If you want to keep more than two paragraphs together, select all but the last paragraph.
-
Go to Format > Paragraph.
-
Go to Line and Page Breaks.
-
Select Keep with next.
-
Select OK.
-
Select the paragraphs you want to change, or press Ctrl+A to select everything.
-
Go to Home > Line Spacing.
-
Choose the number of line spaces you want, or select Line Spacing Options and then select the options you want in the Paragraph dialog box under Spacing:
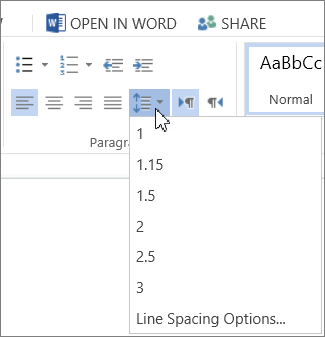
Tip: If you want to change the spacing before or after the selected paragraphs, select the arrows in the Before or After boxes, or type a number directly.
Need more help?
Want more options?
Explore subscription benefits, browse training courses, learn how to secure your device, and more.
Communities help you ask and answer questions, give feedback, and hear from experts with rich knowledge.
Word for Microsoft 365 Outlook for Microsoft 365 Word 2021 Outlook 2021 Word 2019 Outlook 2019 Word 2016 Outlook 2016 Word 2013 Outlook 2013 Word 2010 Outlook 2010 Word 2007 Outlook 2007 More…Less
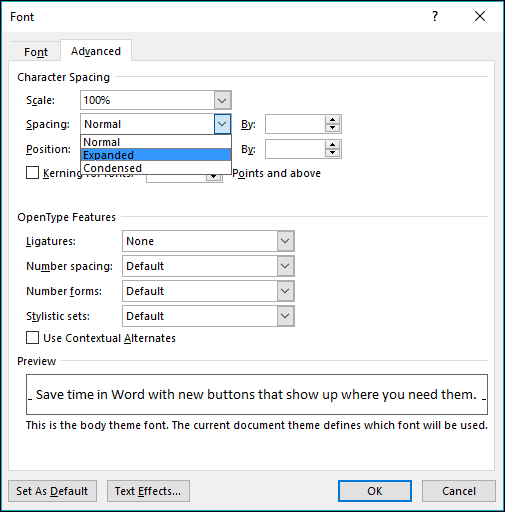
You can change the spacing between characters of text for selected text or for particular characters. In addition, you can stretch or compress an entire paragraph to make it fit and look the way that you want it to.
Change the spacing between characters
Selecting Expanded or Condensed alters the spacing between all selected letters by the same amount. Kerning alters the spacing between particular pairs of letters — in some cases reducing and in other cases expanding the space depending upon the letters.
Expand or condense the space evenly between all the selected characters
-
Select the text that you want to change.
-
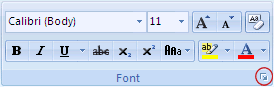
On the Home tab, click the Font Dialog Box Launcher, and then click the Advanced tab.
Note: If you’re using Word 2007 the tab is called Character Spacing.
-
In the Spacing box, click Expanded or Condensed, and then specify how much space you want in the By box.
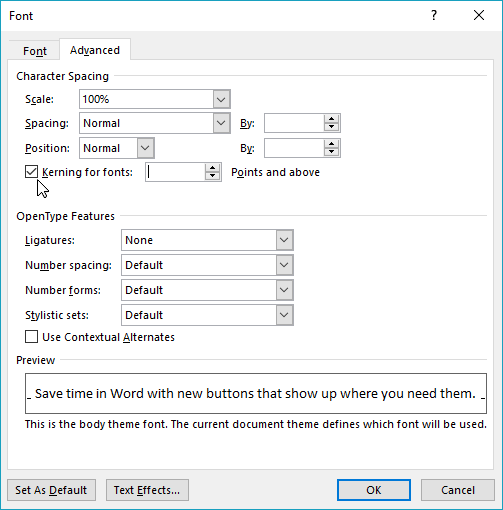
Kern the characters that are above a particular size
Kerning refers to the way spacing between two specific characters is adjusted. The idea is to give a better looking result by reducing the spacing between characters that fit together nicely (such as «A» and «V») and increasing the spacing between characters that don’t.
-
Select the text that you want to change.
-
On the Home tab, click the Font Dialog Box Launcher, and then click the Advanced tab.
Note: If you’re using Word 2007 the tab is called Character Spacing.
-
Select the Kerning for fonts check box, and then enter the point size in the Points and above box.
Stretch or scale the text horizontally
When you scale the text, you change the shapes of the characters by percentages. You can scale text by stretching it or by compressing it.
-
Select the text that you want to stretch or compress.
-
On the Home tab, click the Font Dialog Box Launcher, and then click the Advanced tab.
Note: If you’re using Word 2007 the tab is called Character Spacing.
-
In the Scale box, enter the percentage that you want.
Percentages above 100 percent stretch the text. Percentages below 100 percent compress the text.
Change the line spacing
To increase or decrease the amount of vertical space between lines of text within a paragraph, the best method is to modify the style the paragraph uses.
-
Find the style you’re using in the Styles gallery on the Home tab.
-
Right-click the style you want to change and select Modify.
-
Near the center of the dialog box you’ll find the line spacing buttons that let you select single, 1.5x or double spaced. Choose the spacing you want to apply and click OK.
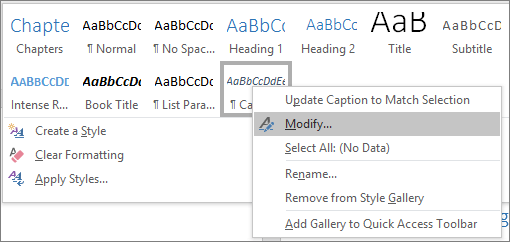
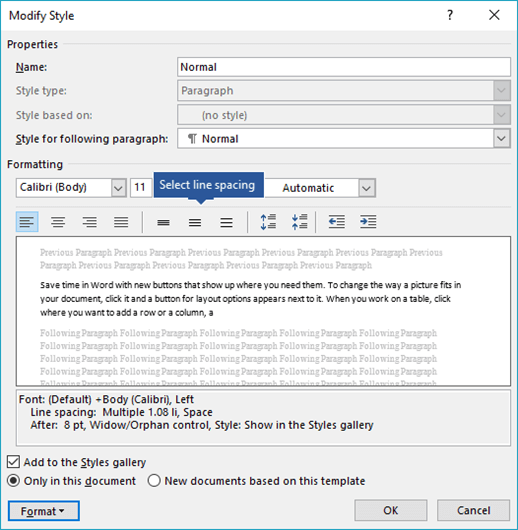
If you’d like to apply more specific line spacing to the style, clickthe Format button at the bottom left corner of the Modify Style dialog box and select Paragraph. The Line spacing drop-down lets you select or set more specific line spacing.
For more information on modifying styles in Word, see: Customize styles in Word.
See also
-
Using Styles in Word — a free, 10-minute video training course.
-
Change the font size
-
Set page margins
-
Align text left or right, center text, or justify text on a page
-
Change the line spacing in Word
Do you have a question about Word that we didn’t answer here?
Post a question in the Word Answers Community.
Help us improve Word
Do you have suggestions about how we can improve Word? Let us know by providing us feedback. See How do I give feedback on Microsoft 365? for more information.
Need more help?
Want more options?
Explore subscription benefits, browse training courses, learn how to secure your device, and more.
Communities help you ask and answer questions, give feedback, and hear from experts with rich knowledge.
Во время набора текста или при оформлении документа наряду с размером и типом шрифта важную роль играет межстрочный интервал в Ворде. От этого зависит удобочитаемость текста, междустрочный интервал относится к параметрам форматирования в Microsoft Word.
Расстояние между двумя строками, известное как междустрочный интервал в Ворде, влияет на визуальное восприятие текстовой информации. Например, если расстояние слишком маленькое, то такой текст будет затруднительно читать, а при большем интервале текст выглядит рассеянным, что также не способствует комфортному чтению.
Содержание:
- Как сделать межстрочный интервал в Ворде — 1 способ
- Как сделать междустрочный интервал в Word — 2 способ
- Как настроить междустрочный интервал в документе Microsoft Word — 3 способ
- Как изменить межстрочный интервал в Word — 4 способ
- Выводы статьи
- Как изменить межстрочный интервал в Word (видео)
Междустрочный интервал определяет расстояние между строками в тексте документа Word. Интервал между строк текста впрямую зависит от размера используемого шрифта. Расстояние учитывается между базовыми линиями каждой строки, проходящими строго по центру букв (с учетом верхних и нижних их элементов).
Во многих случаях при наборе текста используется одинарный междустрочный интервал, который равен размеру шрифта текста. Часто используется и полуторный междустрочный интервал, который применяется при оформлении рефератов, курсовых и дипломов.
Наряду с другими вариантами, для увеличения пространства между стоками текста применяют двойной интервал. Благодаря этому удваивается пространство между строками документа, потому что вы добавляете полную строку пробела между каждой строкой текста.

Какой межстрочный интервал выбрать зависит от решаемых задач и предъявляемых требований к оформлению документа Word.
В этом руководстве вы найдете инструкции о том, как сделать междустрочный интервал в Ворде, и как настроить межстрочный интервал, используя пользовательские параметры.
Как сделать межстрочный интервал в Ворде — 1 способ
Вы можете быстро увеличить межстрочный интервал Word с помощью встроенных параметров текстового редактора. Этот способ можно применить в версиях программы MS Word 2021, MS Word 2019, MS Word 2016, MS Word 2013.
Пройдите последовательные шаги:
- Откройте документ Word.
- Войдите во вкладку «Конструктор» («Дизайн»).
- В группе «Форматирование документа» найдите и щелкните по кнопке «Интервал между абзацами».

- В выпадающем меню предлагаются следующие варианты:
- По умолчанию — междустрочный интервал «1,08».
- Отсутствует — междустрочный интервал «1».
- Сжатый — междустрочный интервал «1».
- Узкий — междустрочный интервал «1,15».
- Неплотный — междустрочный интервал «1,15».
- Свободный — междустрочный интервал «1,5».
- Двойной — междустрочный интервал «2».

Перемещая курсор мыши между этими пунктами, вы можете визуально наблюдать за изменениями интервалов между строками текста.
- Выберите один из подходящих вариантов. При выборе любого из предложенных параметров изменения применяются ко всему документу Word.

Вы можете создать свой собственный стиль междустрочного интервала. Для этого выберите пункт «Пользовательский интервал между абзацами…».
В окне «Управление стилями», после открытия вкладки «По умолчанию» настраивается изменение междустрочного интервала. Укажите подходящие значения в группе «Интервал». В параметрах стилей, помимо интервала между строками абзаца, имеется возможность изменить интервал до или после абзаца.

Как сделать междустрочный интервал в Word — 2 способ
В случае необходимости, вы можете задать пользовательский размер междустрочного интервала в документе Word.
Чтобы изменить междустрочный интервал Word, выполните следующие действия:
- В окне открытого документа Word выделите нужные абзацы. Если вам необходимо применить изменения ко всему тексту, нажмите на клавиши «Ctrl» + «A» для его выделения.
- Щелкните правой кнопкой мыши по выделенному фрагменту.
- В контекстном меню выберите пункт «Абзац».

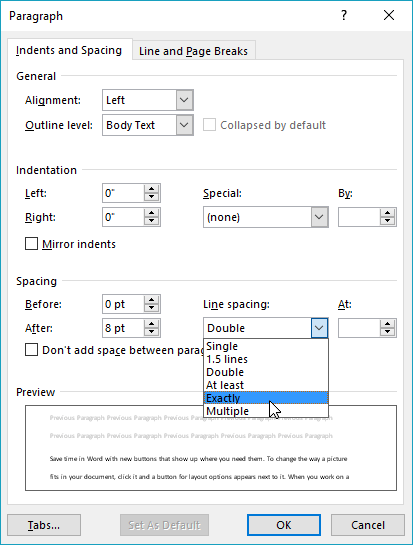
- В окне «Абзац» на вкладке «Отступы и интервалы» находятся параметры междустрочного интервала. В группе «Интервал» в графе «междустрочный:» выберите нужный интервал:
- Множитель — самостоятельная установка межстрочного интервала. Если вы не вносили изменений, в настройках отображается значение по умолчанию.
В версиях Word 2021-2013 по умолчанию используется интервал в 1,08 строки, что немного больше, чем при одинарном интервале. В версиях Word 2010-2007 по умолчанию используется значение «1,15».
- Одинарный — размер интервала равен размеру текущего шрифта текста абзаца.
- 1,5 строки — интервал равен полуторному размеру шрифта текста абзаца.
- Двойной — интервал равен двойному размеру шрифта текста абзаца.
- Минимум — интервал не меньше заданного в пунктах настроек размера.
- Точно — интервал точно соответствует заданному в пунктах размеру.

- Нажмите на кнопку «ОК», чтобы изменения вступили в силу.
Интервалы «Одинарный», «1,5 строки» и «Двойной» зависят от высоты текущего шрифта. Если вы увеличите размер шрифта, то соответственно пропорционально увеличится и размер интервала между строками абзаца.
В интервалах «Минимум» и «Точно» устанавливается точное значение междустрочного интервала в «пунктах» (типографских пунктах). В случае увеличения или уменьшения высоты шрифта, межстрочный интервал не изменяется.

Как настроить междустрочный интервал в документе Microsoft Word — 3 способ
Ознакомьтесь с другим способом установить интервал между строками абзаца самостоятельно, выбрав подходящий вариант.
Проделайте следующее:
- В открытом документе Word переходим во вкладку «Главная».
- Выделяем нужные абзацы.
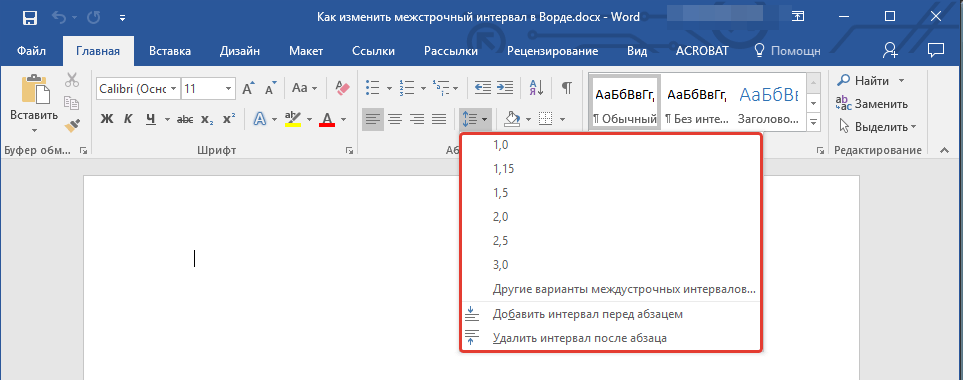
- В группе «Абзац» щелкаем по кнопке «Интервал» («Междустрочный интервал»).

- В открывшемся меню выбираем необходимый межстрочный интервал абзаца:
- 1,0;
- 1,15;
- 1,5;
- 2,0;
- 2,5;
- 3,0;
Здесь есть возможности для добавления интервала перед и после абзаца или можно выбрать другие варианты междустрочных интервалов. Затем вы можете применить выбранные настройки к текущему документу или к новым документам, использующим текущий шаблону.
Как изменить межстрочный интервал в Word — 4 способ
Существует простой способ для изменения интервалов между строк при редактировании документа MS Word. Этим методом вы можете задать одинарный (междустрочный интервал 1), полуторный (межстрочный интервал 1,5), и двойной (межстрочный интервал 2).
Чтобы изменить межстрочный интервал в тексте, выполните действия:
- В открытом окне текстового редактора Word установите указатель мыши в нужный абзац текста.
- Используйте следующие сочетания клавиш клавиатуры, чтобы задать необходимые параметры:
- «Ctrl» + «1» — одинарный интервал;
- «Ctrl» + «5» — полуторный интервал;
- «Ctrl» + «2» — двойной интервал.
Выводы статьи
Высота и тип шрифта, а также междустрочный интервал играют важную роль для визуального восприятия текста в документе Word. Интервал можно изменить, увеличивая или уменьшая расстояние между строками текста. В случае необходимости, пользователь может применить готовые параметры междустрочных интервалов в Word или самостоятельно настроить межстрочный интервал абзаца во время оформления документа.
Как изменить межстрочный интервал в Word (видео)
Похожие публикации:
- Режим чтения Word: как включить или как убрать
- Как объединить документы Ворд в один файл
- Как сделать обтекание текстом в Word — 3 способа
- Как сохранить картинки из Word
- Как убрать красные подчеркивания в Word — 3 способа
Spruce up the formatting in your Word docs
What to Know
- To fix spacing between words, go to Find and Replace. Enter a space in both fields, then go to More > Format > Font and choose a font size.
- To adjust spacing between characters, go to Home, select Expand (the down-arrow) next to Font, and select the Advanced tab.
- To change spacing between lines, go to Home and select Expand (the down-arrow) next to Paragraph and adjust the Spacing options.
This article explains how to fix spacing in Word 2021, 2019, 2016, and Word for Microsoft 365.
How to Fix Spacing Between Words in Word
Using different fonts or font sizes in your document can lead to inconsistent spacing between words. Follow these steps to adjust the spacing between words without affecting the space between letters:
To show paragraph breaks and spaces, go to the Home tab and select the Show/Hide icon (¶) in the Paragraph group.
-
Highlight the text you want to change and select the Home tab. Press Ctrl+A (Windows) or Cmd+A (Mac) to highlight the entire document.
-
Select Replace in the Editing group.
On Mac, go to Edit > Find > Advanced Find and Replace, then select the Replace tab.
-
Click in the Find what text field and press your spacebar to create a space.
-
Click in the Replace with field and press your spacebar to create a space.
-
Select More to expand the window.
-
Select Format and choose Font.
-
Under Size, choose the font size you use most consistently throughout the document, then select OK.
-
Select Replace All.
-
In a new window, Word will report the number of replacements. Select Yes to apply changes to the entire document, or select No to change only the highlighted text.
The spacing between words should now be consistent. You can now close the Find and Replace window.
Don’t add multiple spaces between words because it makes formatting the entire document more difficult.
You can justify text in Word if you want to expand word spacing so the right margin is always straight (like a newspaper column).
How Do I Fix Spacing Between Characters?
To adjust the spacing between characters (letters, numbers, symbols, etc.), follow these steps:
-
Highlight the text you want to change and select the Home tab.
-
Next to Font, select Expand (the down-arrow).
-
Go to the Advanced tab. To stretch or compress the text, increase or decrease Scaling. For Spacing, choose Expanded or Condensed to adjust the spacing between all characters.
Select Kerning for fonts to enable text kerning. This feature automatically adjusts the spacing between characters to be more aesthetically pleasing. You can choose to kern characters above a certain size.
How to Fix Line Spacing in Word
Follow these steps to change the amount of space between lines within a paragraph:
To adjust the spacing between paragraphs, go to the Design tab, select Paragraph Spacing and choose from the options. For single spacing, choose No Paragraph Space.
-
Highlight the text you want to change and select the Home tab.
-
Next to Paragraph, select Expand (the down-arrow).
-
In the Spacing section, manually set the amount of space before and after line breaks, or choose one of the options under Line spacing. Select the Line and Page Breaks tab for more advanced options like text wrapping and pagination settings.
When you’re done, select OK to save changes.
FAQ
-
How do I change the tab spacing in Word?
The quickest way to set tab stops is to click the ruler where you want a tab. Alternatively, go to the Home tab and select Paragraph Settings in the Paragraph group. Next, select the Tabs button. Finally, set the desired Tab stop position, click Set, and click OK.
-
How do I fix the spacing between bullet points in Word?
To change line spacing between bullets in a list, select the list and then click the Paragraph Dialog Box Launcher. On the Indents and Spacing tab, under Spacing, clear the Don’t add space between paragraphs of the same style check box.
Thanks for letting us know!
Get the Latest Tech News Delivered Every Day
Subscribe
![]()
Download Article
![]()
Download Article
This wikiHow teaches you how to customize a Word document’s layout design by changing line spacing and character spacing, using a computer.
-
1
Open a Word document on your computer. Find the Word document you want to edit on your computer, and open it.
-
2
Select the entire text in the document. You can click and drag your mouse from the beginning to the end, or use a keyboard combination to select all.
- The keyboard shortcut to select all is ⌘ Command+A on Mac, and Control+A on Windows.
- Alternatively, you can select a paragraph or only a few lines. In this case, you will be editing line spacing only for the selected part of your document.
Advertisement
-
3
Click the Home tab. This button is in the upper-left corner of the app window. It will open your Home toolbar at the top of the document.
-
4
Click the line spacing icon. This button looks like three horizontal lines with two blue arrows pointing up and down. You can find it at the middle of the Home toolbar. Clicking will open your line spacing options on a drop-down menu.
-
5
Select a line spacing value. Your options here include 1.0, 1.15, 1.5, 2.0, 2.5, and 3.0. Selecting a value here will change your line spacing, and apply it to the selected text.
- If you want to manually put in a number, you can select Line Spacing Options at the bottom of the drop-down menu. This will open advanced spacing options in a new pop-up window.


Advertisement
-
1
Open a Word document on your computer. Find the Word document you want to edit on your computer, and open it.
-
2
Select the entire text in the document. You can click and drag your mouse from the beginning to the end, or use a keyboard combination to select all.
- The keyboard shortcut to select all is ⌘ Command+A on Mac, and Control+A on Windows.
- Alternatively, you can select a paragraph or only a few lines. In this case, you will be editing character spacing only for the selected part of your document.
-
3
Press ⌘ Command+D on Mac or Control+D on Windows. This will open your Font options in a new pop-up window.
-
4
Click the Advanced tab. It’s next to Font at the top of the pop-up window.
-
5
Click the selector bar next to Spacing. This option is located under the Character Spacing heading. It will allow you to select one of Normal, Expanded or Condensed for character spacing.
-
6
Adjust the spacing value in the box next to the selector bar. You can click the up and down arrow buttons here to adjust character spacing to the precise amount.
-
7
Click the OK button. This will apply your new character spacing settings to the selected text.


Advertisement
Ask a Question
200 characters left
Include your email address to get a message when this question is answered.
Submit
Advertisement
Thanks for submitting a tip for review!
About This Article
Thanks to all authors for creating a page that has been read 12,335 times.
Is this article up to date?
Содержание
- Как изменить межстрочный интервал в Word в существующем документе?
- Как изменить интервал до и после абзацев в тексте?
- Как изменить междустрочные интервалы с помощью экспресс-стилей?
- Вопросы и ответы

Междустрочный интервал в программе Microsoft Word определяет расстояние между строками текста в документе. Интервал также есть или может быть и между абзацами, в этом случае он определяет размер пустого пространства до и после него.
В Ворде по умолчанию установлен определенный междустрочный интервал, размер которого в разных версиях программы может отличаться. Так, к примеру, в Microsoft Word 2003 это значение составляет составляет 1,0, а в более новых версиях уже 1,15. Сам же значок интервала можно найти во вкладке “Главная” в группе “Абзац” — там просто указаны числовые данные, но галочка не установлена ни возле одного из них. О том, как увеличить или уменьшить в Ворде расстояние между строками и пойдет речь ниже.
Как изменить межстрочный интервал в Word в существующем документе?
Почему мы начинаем именно с того, как изменить интервал именно в существующем документе? Дело в том, что в пустом документе, в котором еще не написано ни одной строки текста, вы можете просто установить желаемые или необходимые параметры и начать работу — интервал будет проставляется именно таким, каким вы его установили в настройках программы.
Изменить расстояние между строками во всем документе проще всего с помощью экспресс-стилей, в которых уже установлен необходимый интервал, разный для каждого стиля, но об этом позже. В случае, если вам необходимо изменить интервал в конкретной части документа — выделяете фрагмент текста и изменяете значения отступов на те, что вам нужны.
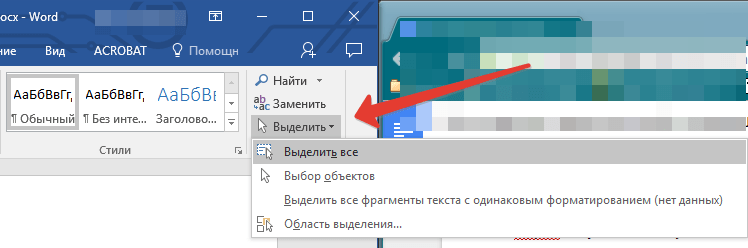
1. Выделите весь текст или необходимый фрагмент (используйте для этого комбинацию клавиш “Ctrl+A” или кнопку “Выделить”, расположенную в группе “Редактирование” (вкладка “Главная”).
2. Нажмите на кнопку “Интервал”, которая находится в группе “Абзац”, вкладка “Главная”.
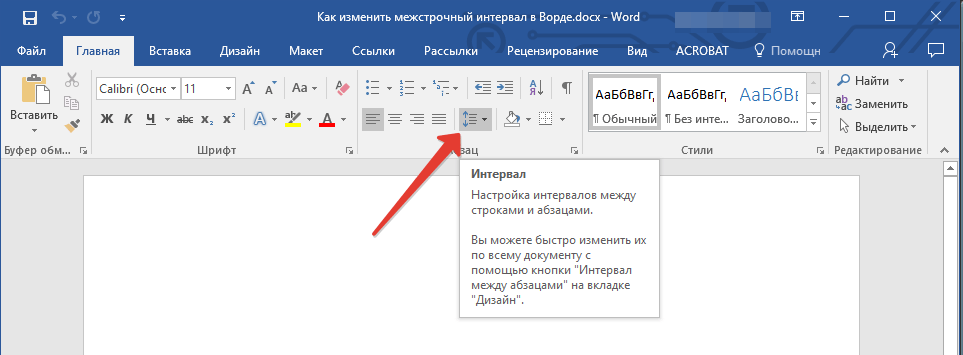
3. В развернувшемся меню выберите подходящий вариант.
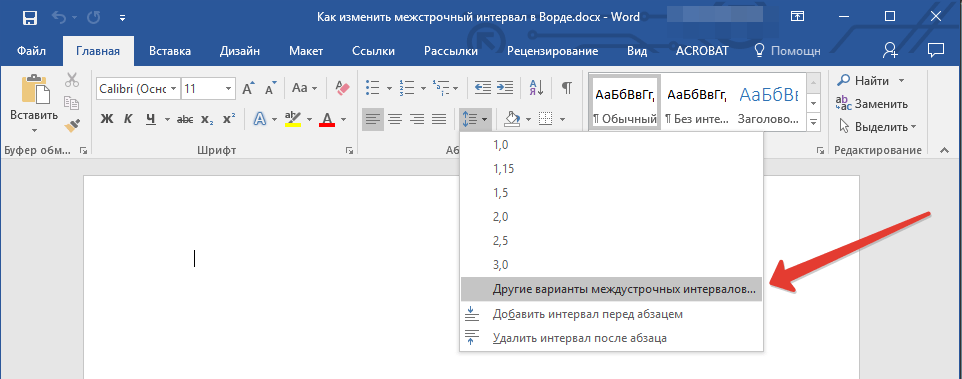
4. Если ни один из предложенных вариантов вам не подходит, выберите пункт “Другие варианты междустрочных интервалов”.
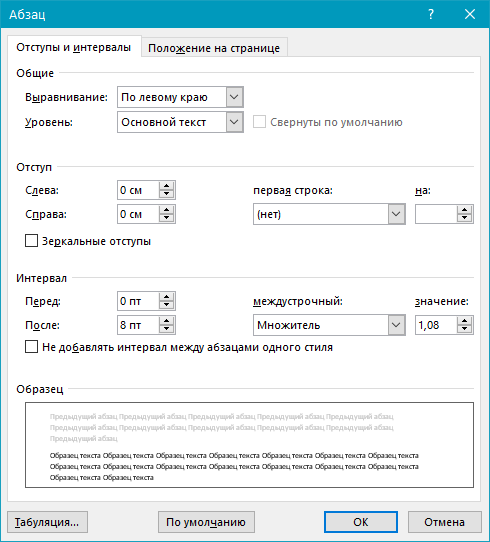
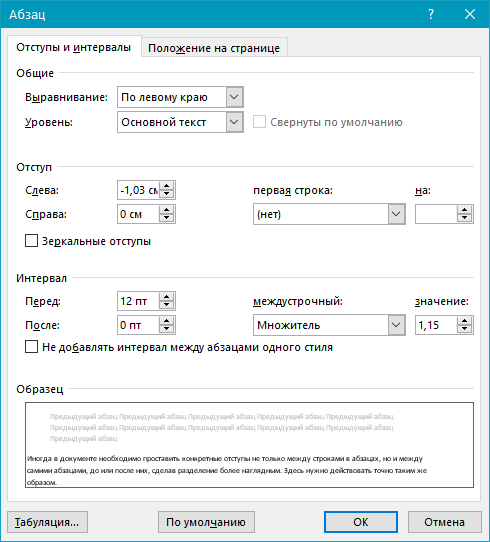
5. В появившемся окне (вкладка “Отступы и интервалы”) задайте необходимые параметры. В окне “Образец” вы можете видеть то, как меняется отображение текста в документе согласно внесенным вами значениям.

6. Нажмите кнопку “ОК”, чтобы применить изменения к тексту или его фрагменту.
Примечание: В окне настройки межстрочных интервалов вы можете изменять числовые значения на шаги, доступные по умолчанию, либо же вручную вводить те, что нужны вам.
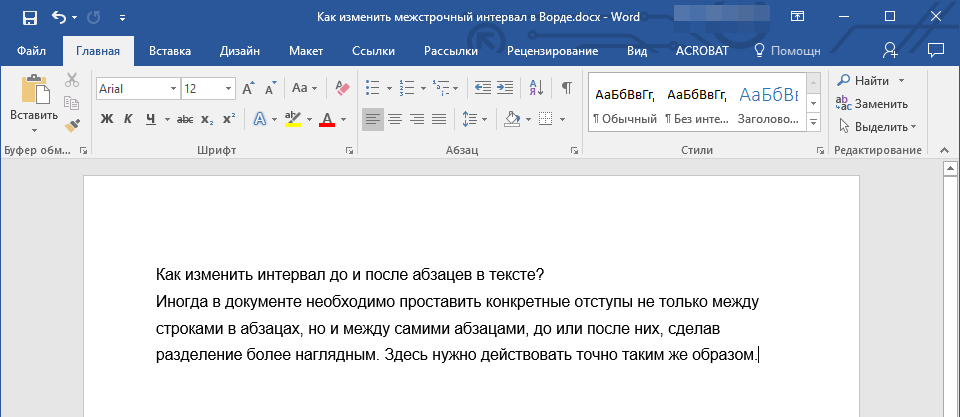
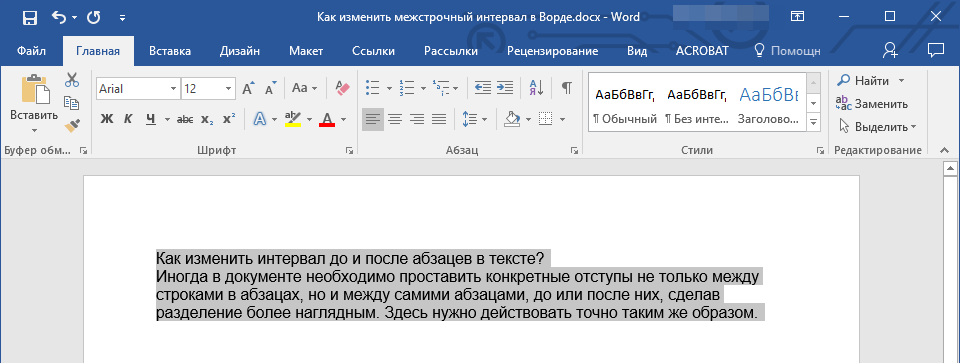
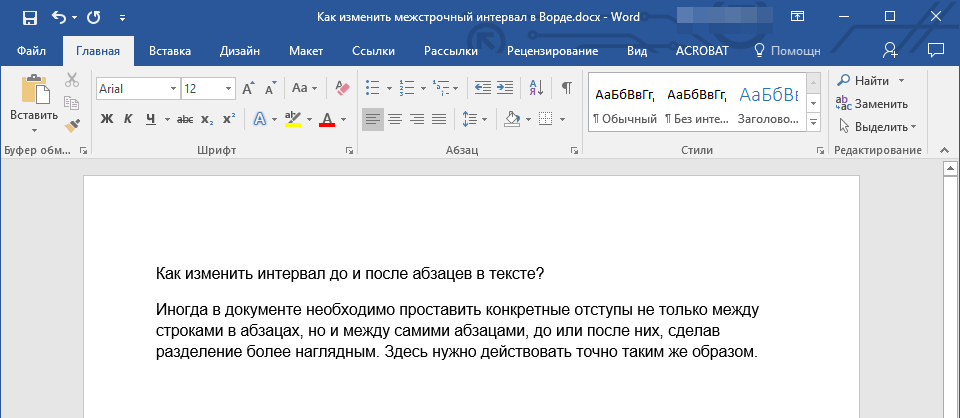
Как изменить интервал до и после абзацев в тексте?
Иногда в документе необходимо проставить конкретные отступы не только между строками в абзацах, но и между самими абзацами, до или после них, сделав разделение более наглядным. Здесь нужно действовать точно таким же образом.
1. Выделите весь текст или необходимый фрагмент.
2. Нажмите на кнопку “Интервал”, расположенную во вкладке “Главная”.
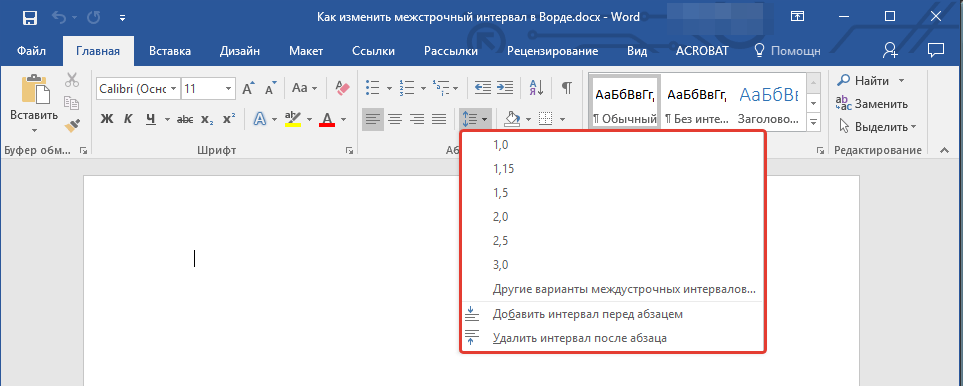
3. Выберите один из двух представленных вариантов в нижней части развернувшегося меню “Добавить интервал перед абзацем” либо же “Добавить интервал после абзаца”. Также можно выбрать оба варианта, установив оба отступа.
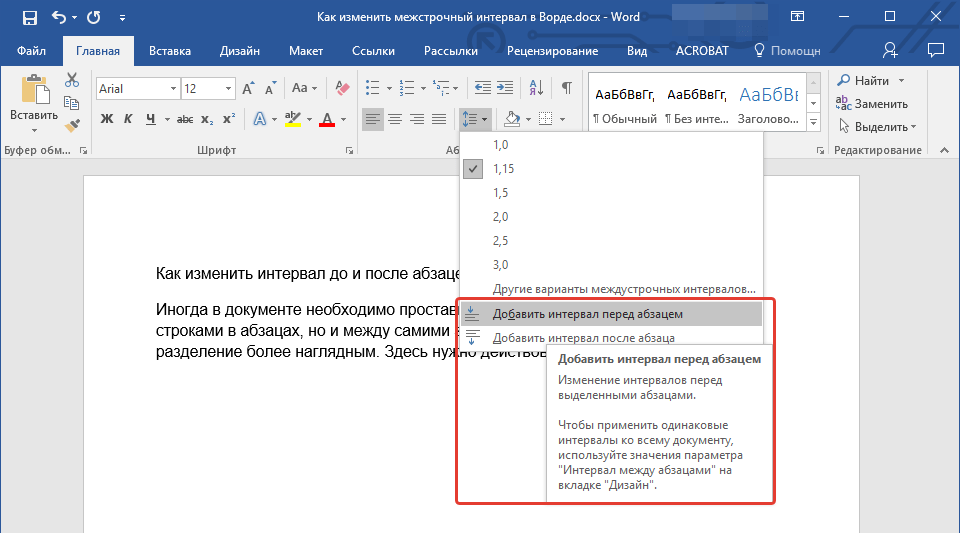
4. Более точные настройки интервалов до и/или после абзацев можно выполнить в окне “Другие варианты междустрочных интервалов”, расположенном в меню кнопки “Интервал”. Там же можно убрать отступ между абзацами одного стиля, что явно может быть необходимым в некоторых документах.
5. Внесенные вами изменения мгновенно отобразятся в документе.
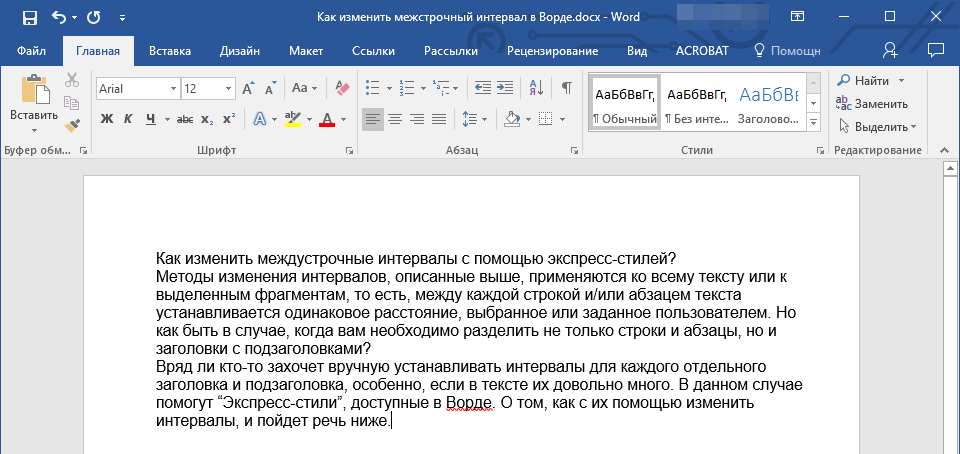
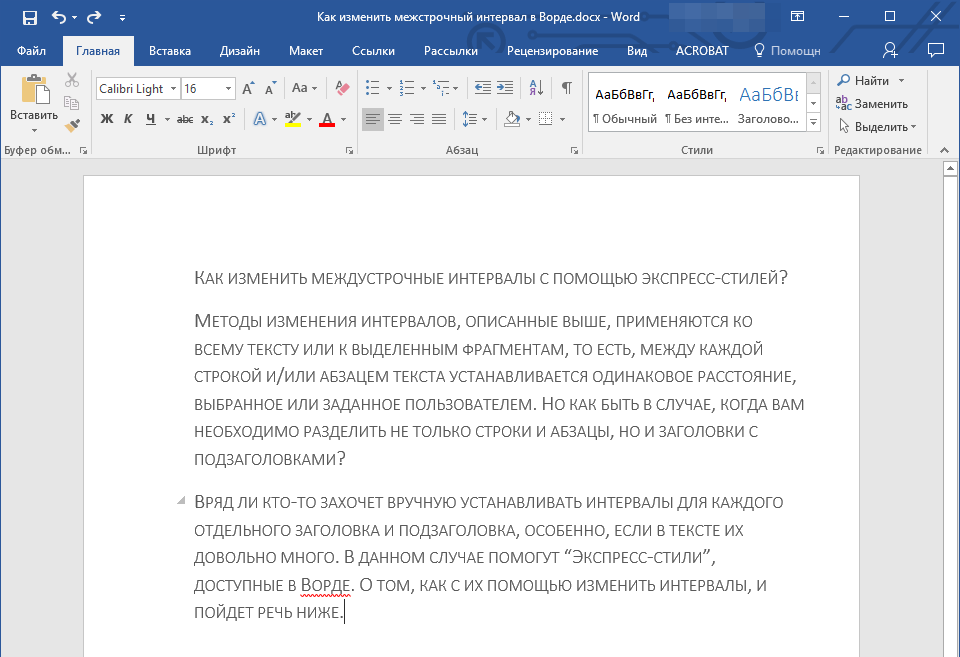
Как изменить междустрочные интервалы с помощью экспресс-стилей?
Методы изменения интервалов, описанные выше, применяются ко всему тексту или к выделенным фрагментам, то есть, между каждой строкой и/или абзацем текста устанавливается одинаковое расстояние, выбранное или заданное пользователем. Но как быть в случае, когда вам необходимо, что называется за один подход разделить строки, абзацы и заголовки с подзаголовками?
Вряд ли кто-то захочет вручную устанавливать интервалы для каждого отдельного заголовка, подзаголовка и абзаца особенно, если в тексте их довольно много. В данном случае помогут “Экспресс-стили”, доступные в Ворде. О том, как с их помощью изменить интервалы, и пойдет речь ниже.
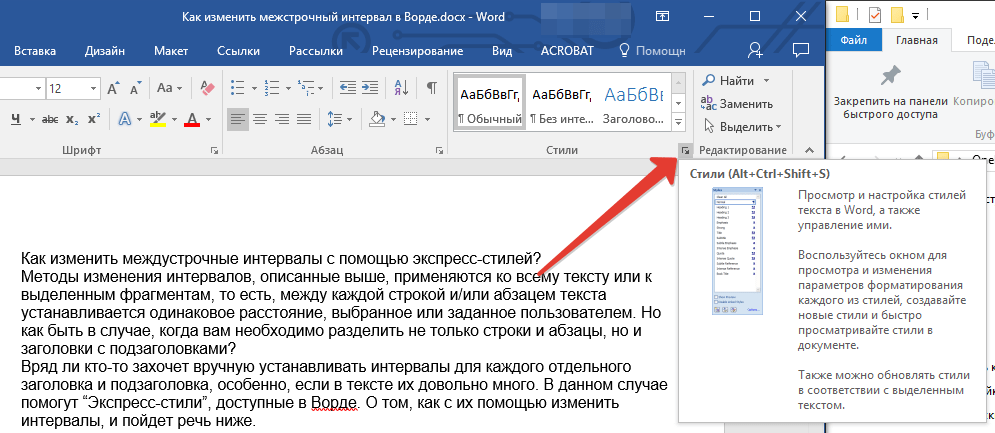
1. Выделите весь текст в документе или фрагмент, интервалы в котором вы хотите изменить.

2. Во вкладке “Главная” в группе “Стили” раскройте диалоговое окно, нажав на небольшую кнопочку в правом нижнем углу группы.
3. В появившемся окне выберите подходящий стиль (также стили можно изменять непосредственно в группе, путем наведением на них курсора, используя клик для подтверждения выбора). Нажав на стиль в этом коне, вы увидите, как изменяется текст.
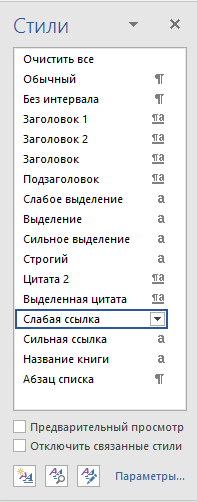
4. Выбрав подходящий стиль, закройте диалоговое окно.
Примечание: Изменение интервала с помощью экспресс-стилей — эффективное решение еще и в тех случаях, когда вы не знаете, какой интервал вам необходимы. Таким образом вы сможете сразу видеть изменения, оказанные тем или иным стилем.
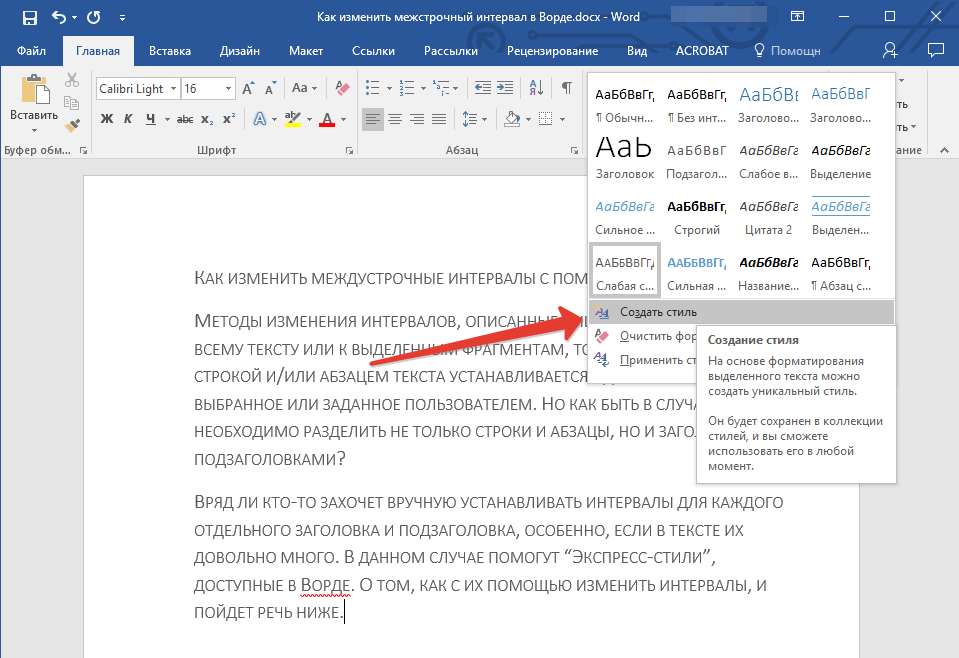
Совет: Чтобы сделать текст более привлекательным визуально, да и просто наглядным, используйте разные стили для заголовков и подзаголовков, а также для основного текста. Также, вы можете создать собственный стиль, а затем сохранить и использовать его в качестве шаблона. Для этого необходимо в группе “Стили” открыть пункт “Создать стиль” и в появившемся окне выбрать команду “Изменить”.

На этом все, теперь вы знаете, как сделать одинарный, полуторный, двойной или любой другой интервал в Ворде 2007 — 2016, а также в более старых версиях этой программы. Теперь ваши текстовые документы будут выглядеть более наглядно и привлекательно.
While you might have experience changing the formatting for your Word documents to meet the requirements for your school or job, you might encounter a situation where you need to use different settings.
Microsoft Word is full of different tools and menus that let you customize your document, and line spacing is something that you can adjust.
Our tutorial below will show you how to single space in Word, even if you have already written and edited the entire document.
How to Make a Word Single Space Document
- Open the document.
- Click inside the document and press Ctrl + A to select everything.
- Select the Home tab at the top of the window.
- Click the Line and Paragraph Spacing button.
- Choose the 1.0 option.
Our guide continues below with additional information on how to make a document single space instead of double space in Microsoft Word, including pictures of these steps.
Last update on 2023-04-13 / Affiliate links / Images from Amazon Product Advertising API
| As an Amazon Associate, I earn from qualifying purchases.
Document spacing can impact several things, including the number of pages in the document. Microsoft Word includes several different options from which you can select to control the amount of space between the lines in your document.
Many schools and organizations have their own rules and preferences when it comes to the amount of line spacing that you have in your documents. Often they want you to use double spacing, but it’s entirely possible that they might want single spacing to reduce the number of pages in documents.
A document in Microsoft Word can have a lot of different formatting options, including the amount of space between lines.
If your current document is double spaced, or if it appears to have more or less spacing than the single spacing you need, you may be looking for a way to adjust that.
You can make a Microsoft Word single space document by opening the document, selecting all of the text, choosing the Home tab, clicking the Line and Paragraph Spacing button, then choosing the 1.0 option from the drop down menu.
Our guide below will show you how to single space in Word by selecting all of the text in the document and adjusting the line spacing setting.
You can also check out our tutorial on how to select all in Word if you would like to know more about using that option.
How to Use Single Spacing in Word for Office 365 (Guide with Pictures)
The steps in this article were performed in the Microsoft Word for Office 365 version of the application but will work in most other versions as well.
Step 1: Open your document in Microsoft Word.
Step 2: Click inside the document, then press Ctrl + A on your keyboard to select everything.
If this is a new, blank document, you can skip this step.

Step 3: Select the Home tab at the top of the window.
Step 4: Click the Line & Paragraph Spacing button in the Paragraph section of the ribbon.
Step 5: Choose the 1.0 option from the dropdown menu to switch the document to single spacing.
Note that there is a Line Spacing Options button at the bottom of that dropdown menu.
If you select that option, you will be able to customize your document spacing further and set a new default spacing option if you would like.
Our tutorial continues below with additional discussion about how to make a document single spaced in Word.
You can also read our article on how to double space in Word for additional information about Microsoft Word line spacing.
How to Change Default Line Spacing in Microsoft Word
While you can change line spacing in every document that you create or edit in Microsoft Word, you might not want to adjust spacing every time.
But if your Word Normal template is defaulting to double spacing and you need to have single spacing more often, then constantly switching the line spaces can not only be tedious, it can be something that you forget to do.
Fortunately, among all of the different formatting adjustments that you can make for your document, there is a way to set the default line spacing.
- Open Microsoft Word.
- Select the Home tab.
- Click Line and Paragraph Spacing.
- Choose Line Spacing Options.
- Click the Line spacing drop down.
- Select your default line spacing preference.
- Click Set as Default.
- Choose All documents based on the Normal template.
- Click OK.
Now any new documents that you create in Microsoft Word that use the Normal template will have the line spacing that you just chose.
this will not affect the line spacing in any of your existing documents.
More Information on How to Apply Single Line Spacing in Word
While we have focused on changing the line spacing setting in an MS Word document, for the entire document, you can also format a document so that only some of it is single spaced.
Rather than selecting the whole document, simply use your mouse to select the part of the document for which you want to change the spacing, then follow the steps above to apply a new line spacing setting to that selection.
Another thing that you can adjust that relates to line spacing is the paragraph space setting. This affects the amount of line spacing that appears before and after your paragraphs.
You can find the paragraph spacing settings by clicking the Home tab, then clicking the small Paragraph Settings button at the bottom-right corner of the Paragraph group in the ribbon. This will open the Paragraph dialog box.
There you can select line spacing options in the “Spacing” section so that you can choose the amount of space before and after a paragraph, as well as determine the line spacing type.
Frequently Asked Questions About How to Make a Document Single Spaced in Word
How do I get to the paragraph spacing menu in Word?
While this document has focused on using the Line and Paragraph Spacing drop down menu to change document spacing, you might want to adjust some other spacing options, too.
if you select the Home tab, then click the Paragraph Spacing button at the bottom-right of the Paragraph group, it will open a Paragraph dialog box.
At the top of the Paragraph dialog box, you will see Indents and Spacing, as well as Line and Page Breaks tabs.
Here you can customize the spacing before and after your paragraphs, as well as select line spacing options.
What is the Set as Default button at the bottom of the Paragraph dialog box?
If you have made a lot of changes in this dialog box and want them to apply to new documents that you create in the future, you have the option of using these settings as the default for future documents.
Simply click the Set as Default button at the bottom of the Paragraph menu, then confirm that you want to make this change.
Can I have single spaced text in just part of my Microsoft Word document?
Yes, you can have a mixture of different types of spacing in a single document.
Simply follow the steps above, but rather than selecting the entire document, select only the part of the document that you want to single space.
Then when you click the Line and Paragraph Spacing button in the Paragraph group and choose the 1.0 option, it will only affect the part of the document that’s currently highlighted.

Matthew Burleigh has been writing tech tutorials since 2008. His writing has appeared on dozens of different websites and been read over 50 million times.
After receiving his Bachelor’s and Master’s degrees in Computer Science he spent several years working in IT management for small businesses. However, he now works full time writing content online and creating websites.
His main writing topics include iPhones, Microsoft Office, Google Apps, Android, and Photoshop, but he has also written about many other tech topics as well.
Read his full bio here.
Line Spacing refers to the amount of space between any two lines in the Word Document. The default size of Line Spacing is 1.08 in MS Word. However, we can add custom line spaces to different lines, paragraphs in our Word Document according to our requirements and ensure quite good readability of our content to others.
In MS Word there are multiple ways to adjust Line Spacing which are as follows:
Method 1: Using the Line Spacing button
One way of setting the Line Spacing is using directly the Line and Paragraph Spacing feature in MS Word, which comes under the Home menu.
There are multiple Line Spaces like: 1.0, 1.15, 1.5, 2.0, 2.5, 3.0, etc.
Steps to Apply:
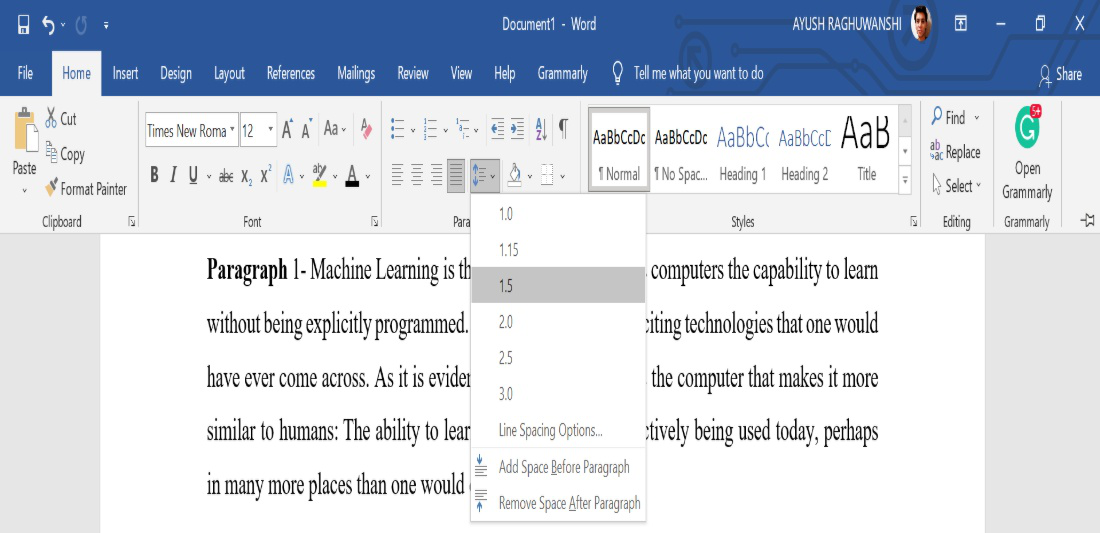
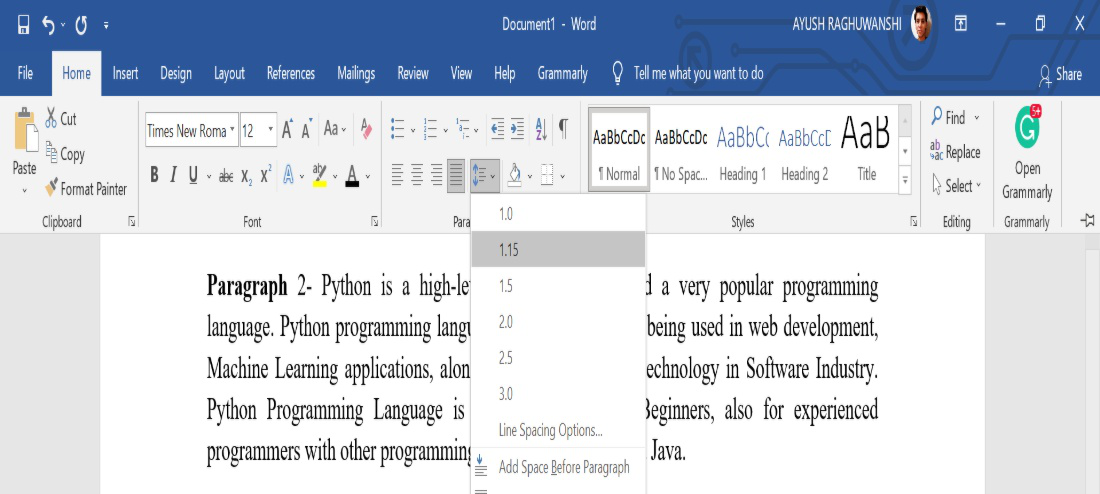
Step 1: Select the text/line/Paragraph you want to change the spacing.

Step 2: Now, select the Line and Paragraph Spacing tab from the Paragraph menu under the Home tab and select the line spacing of your choice.
Perform the same steps for different line spacing:
- Select the text/line/Paragraph you want to change the spacing.

- Now, select the Line and Paragraph Spacing tab from the Paragraph menu under the Home tab and select the line spacing of your choice.
- Select the text/line/Paragraph you want to change the spacing.

- Now, select the Line and Paragraph Spacing tab from the Paragraph menu under the Home tab and select the line spacing of your choice.

Results:
Final Result of the Complete Word Document.

Method 2: Using Paragraph Dialog Box
Another way of setting the Line Spaces is using the Paragraph dialog box feature in MS Word. The Paragraph dialog box provides a wide variety of features along with Line Spacing that we can use in our Word Document to modify beautifully and accurately.
There are multiple Line Spaces in the Paragraph dialog box like- Single, 1.5 lines, Double, At least, Exactly, Multiple, etc,
Steps to Apply:
Step 1: Select the text/line/Paragraph you want to change the spacing.

Step 2: Now, select the Show/Hide Paragraph tab from the Paragraph menu under the Home tab.

Step 3: Now, Select the dialog box launcher-Paragraph Setting from the Paragraph menu under the Home tab.
Step 4: Then select the Line Spacing from the dialog box under the Indents and Spacing tab- Single, 1.5 lines, Double, At least, Exactly, Multiple, etc, and then press the OK button.

Result:
As the whole Document was selected initially, so the Complete Word Document’s line spacing is changed to 1.5 lines.


There are several ways to adjust line spacing in Microsoft Word. Today’s tutorial explains the basic method using the ribbon and a more advanced method using the Paragraph dialog box.
See the Quick Tip at the bottom of this tutorial to learn how to single-space an entire document from the Paragraph dialog box.
This tutorial is available as a YouTube video showing all the steps in real time.
Watch more than 150 other document software tutorials on my YouTube channel.
The images below are from Word for Microsoft 365.The steps are the same in Word 2021, Word 2019, and Word 2016, and similar for Word 2013 and Word 2010. However, your interface may look slightly different in those older versions of the software.
Basic Method: Adjust Line Spacing from the Ribbon
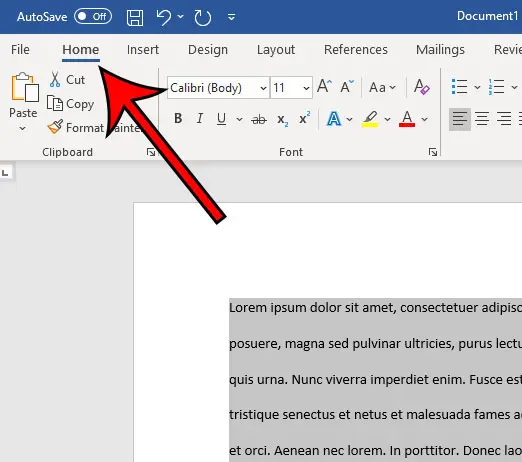
- Select the Home tab in the ribbon.

- (Optional Step) Select the Show/Hide button in the Paragraph group to show paragraph break symbols and other formatting that may affect line spacing.

- Select the text with the line spacing that needs to be changed.

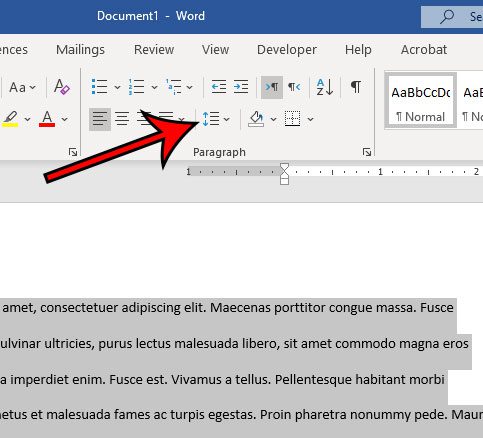
- Select the Line and Paragraph Spacing button in the Paragraph group.

- Select an option from the drop-down menu:
A. Numbers 1.0 through 3.0 add space between lines.
B. Add Space Before Paragraph adds space before paragraphs but not before the lines within them.
C. Remove Space After Paragraph removes space after paragraphs but not after the lines within them.
These three options are based on your current font size with 1.0 being the equivalent of single-spacing.

Your changes will be applied immediately.

Note that you can apply the individual line spacing (the numbers 1.0 through 3.0) and the paragraph spacing to the same text to further customize your results.
- (Optional Step) Select the Show/Hide button again to hide paragraph symbols and other formatting (see figure 2).
Now, let’s move on to an advanced method offering additional spacing options.
Advanced Method: Adjust Line Spacing from the Paragraph Dialog Box
- Select the Home tab in the ribbon (see figure 1).
- (Optional Step) Select the Show/Hide button in the Paragraph group to show paragraph break symbols and other formatting that may affect line spacing (see figure 2).
- Select the text with the line spacing that needs to be changed (see figure 3).
Pro Tip: PC users can press Ctrl + A to select the entire document if all the line spacing needs to be changed. However, this includes items you may not want to alter, including headings, tables, table titles, figure captions, tables of contents, footnotes, endnotes, and reference lists.
- Select the dialog box launcher in the Paragraph group.

- Make changes in the Spacing section of the Paragraph dialog box:
A. The Before and After boxes represent the spaces before and after paragraphs measured in points with one point being 1/72 of an inch tall. Use the increment arrows to choose a whole number or enter a number with a decimal (e.g., 2.75) directly into the box.
B. The Line spacing drop-down menu offers six options:
1. Single—Creates single-spacing based on your current font size.
2. 1.5 Lines—Creates a space and a half as large as your current font size.
3. Double—Creates double-spacing based on your current font size.
4. At Least—Determines the minimum amount of space between lines based on the number of points entered in the At box.
5. Exactly—Creates space between lines based on the number of points entered in the At box.
6. Multiple—Creates spacing multiplied by the number entered in the At box. For example, if you enter four in the At box, your spacing will be four times as large as your current single-spacing.
C. Don’t add space between paragraphs of the same style—For many users, this will remove spaces between all paragraphs because general documents commonly have only one paragraph style.

Note that the Preview box updates as you make adjustments in the Spacing section.
- Select the OK button to close the Paragraph dialog box.

- (Optional Step) Select the Show/Hide button again to hide paragraph symbols and other formatting (see figure 2).
Quick Tip: Single-Space an Entire Document from the Paragraph Dialog Box
- Select the Home tab in the ribbon (see figure 1).
- Select the entire document. (PC users can press Ctrl + A.)
- Select the dialog box launcher in the Paragraph group (see figure 7).
- Enter 0 in the Before box in the Paragraph dialog box (see figure 8).
- Enter 0 in the After box in the Paragraph dialog box (see figure 8).
- Select Single in the Line spacing drop-down menu (see figure 8).
- Select the OK button (see figure 9).
Related Resources
How to Adjust Letter Spacing in Microsoft Word (PC & Mac)
How to Adjust the Space between Words in Microsoft Word
How to Adjust Page Margins in Microsoft Word
Updated June 25, 2022