
![]()
Download Article
![]()
Download Article
This wikiHow teaches you how to embed a Word document in your website. On Google Sites, you can embed an image of the Word document directly into the page, while WordPress and self-hosted sites will require you to upload the Word document and then place a link to it in your webpage’s text.
-

1
Open Google Drive. Go to https://drive.google.com/ in your web browser. This will open your Google account’s Drive contents if you’re logged in.
- If you aren’t logged in, enter your email address and password first.
- You may need to click Go to Google Drive before proceeding.
-
2
Click NEW. It’s a blue button in the upper-left corner of the page. A drop-down menu will appear.
Advertisement
-
3
Click File upload. This is in the drop-down menu. Doing so will open a window.
-
4
Select your Word file. Double-click the Word file that you want to embed on your website. This will prompt it to upload into Google Drive.
- It shouldn’t take more than a few seconds for most Word documents to upload to Drive.
-
5
Open Google Sites. Go to https://sites.google.com/new in your web browser.
- If you aren’t logged into your Google account when you do this, you’ll be prompted to enter your email address and password before continuing.
-
6
Select your Google Site. Click on the Google Site on which you want to insert the Word document.
-
7
Go to the page that you want to use. Scroll down until you arrive on the page on which you want to insert the Word document.
-
8
Click the INSERT tab. It’s in the upper-left side of the Google Sites window.
-
9
Click From Drive. This option is below the «Google Drive» heading near the top of the page.
-
10
Select the document. In the right-hand column, click the document that you want to insert.
-
11
Click INSERT. It’s in the lower-right corner of the page. This will place the Word document on your website.
-
12
Resize the document. Click and drag the top or bottom of the document to adjust its vertical size, or click and drag one of its sides to adjust the overall size of the document on your site.
-
13
Click PUBLISH. It’s the purple button in the top-right corner of the page. This will update your website with your uploaded document; you should now be able to see your Word document embedded in your Google Site.


Advertisement
-
1
Open WordPress. Go to https://wordpress.com/ in your web browser. While you can’t embed an image of your document on a WordPress domain, you can embed a link that downloads the WordPress file when clicked.
- If you aren’t logged into your WordPress account, first click Log In in the top-right corner of the page, then enter your email address and password.
-
2
Click My Site. It’s in the upper-left corner of the WordPress page. Doing so will load your site’s page.
-
3
Click View Site. This option is in the upper-left side of the page.
-
4
Click Visit Site. It’s in the upper-right side of the page. This will take you to your site.
-
5
Go to the page that you want to use. Click the tab for the page on which you want to insert your Word document link; you’ll usually find these tabs at the top of the page.
-
6
Click Edit. You’ll find this option in the bottom-right side of the page.
-
7
Choose a place for your link. Click on the page the place in which you want to insert a link for your Word document.
-
8
Click + Add. This is a button on the left side of the page. A pop-up menu will appear.
-
9
Click Media. It’s an option near the top of the pop-up menu. Doing so opens a page with all of your website’s stored media.
-
10
Click Add New. This is in the upper-left side of the page that opens.
-
11
Select a Word document. Click the Word document that you want to use on your site, then click Open in the bottom-right corner of the window. This will upload the Word document to the storage section of WordPress.
-
12
Select the uploaded document. Click the Word document to do so.
-
13
Click Insert. It’s in the bottom-right side of the window. This will insert a link to your Word document.
-
14
Change the link text. If you want the link text to say something other than the Word document’s name, select the link once, click the pencil-shaped icon next to the link that appears, change the text in the «Link Text» field, and click Save.
-
15
Click Update. It’s a blue button in the top-right corner of the page. This will update your website with your uploaded document, allowing you to click the embedded link to download the Word document.


Advertisement
-
1
Upload the Word document to your website’s root folder. When hosting your own website, you should have a folder that contains the resources (e.g., pictures) that appear on your website. You’ll need to place your Microsoft Word document in this folder.
- This step will depend heavily upon the software that you use to host your website.
-
2
Copy the Word document’s address. Again, this step will depend on the software that you use to host your website, but you can usually find the address in a URL bar at the top of the page. Click and drag your mouse across the address to select it, then press Ctrl+C (Windows) or ⌘ Command+C (Mac).
-
3
Open your website’s code document. Open the text or HTML document in which your website’s code is stored.
-
4
Select a place for the link. Find the place in which you want to insert the link for your Word document, then click that place.
-
5
Create the HREF tag. Type in <a href= into your text editor.
-
6
Paste in the Word document’s address. Press Ctrl+V (Windows) or ⌘ Command+V (Mac).
-
7
Close the HREF tag. Type in > to close the tag. You should now have a line of text that reads<a href=link> here.
-
8
Enter the link text. Type in the text that you want to use as the link on which someone clicks. You’ll do this immediately after the closed HREF tag.
- For example, if you want people to click on a link that says «click here», you’d have <a href=link>click here written.
-
9
Add the closed link tag. On the right side of the link text that you want to use, type in </a> and press ↵ Enter. This completes the link.
- Your line of text should now look like this: <a href=link>click here</a>
-
10
Refresh your website. Once the website’s code is updated, you should be able to click the link that you just introduced to download the Word document.


Advertisement
Add New Question
-
Question
Can I have my website open a word document in a separate tab?

Try putting target=»_blank» as one of the attributes in your tag if you have one.
-
Question
How do I attach a medical certificate to a form?
It depends. If the form is online and has an «attach» option, you can scan a copy of the medical certificate and attach the file there. If the form is being submitted via email, you can attach a copy of the certificate like you would any other attachment. If the form is being submitted in person or by mail, you can just use a paperclip to attach the certificate to the form.
Ask a Question
200 characters left
Include your email address to get a message when this question is answered.
Submit
Advertisement
Thanks for submitting a tip for review!
About This Article
Thanks to all authors for creating a page that has been read 216,089 times.
Is this article up to date?
- Home
- HTML&CSS
- Embed Microsoft Word and Excel Documents in HTML Web Page
By: CodexWorld
|
In: HTML&CSS
|
Last Updated: Mar 28, 2022
In most cases, a hyperlink is used to link word or excel documents on the web page that allow users to download these files on the local drive. Word or Excel documents can’t be displayed directly on the browser like PDF. The HTML tag can be used to embed PDF documents on the web page. But MS Office files are required a third-party service to embed word documents on the web page. This tutorial will explain how to embed MS word and excel files on the web page using HTML.
The Office Web Viewer service is an easy and effective way to embed Word and Excel files in the HTML page and display word/excel documents on the browser. You can display word and excel documents in the HTML web page using the Office Web Viewer link.
Some advantages of the Office Web Viewer link:
- Embed word (doc/docx) files in HTML.
- Embed excel (xls/xlsx) files in HTML.
- Display .doc/.docx/.xls/.xlsx files on the web page.
- View the word and excel documents from the website.
Create Office Web Viewer Link:
To embed MS Office documents in the HTML page, specify the document URL (absolute URL) in the src parameter of the Office Web Viewer link.
https://view.officeapps.live.com/op/embed.aspx?src=<Document_URL>
Note: The <Document_URL> should be an absolute URL of the document that you want to embed. Also, the document must be accessible publicly on the internet.
Embed Word and Excel File in HTML
The HTML iframe tag is used to display a web page in HTML. We will use <iframe> tag to embed word/excel document in HTML web page using Office Web Viewer link.
Use the following code to embed Word file in the HTML web page:
<iframe src='https://view.officeapps.live.com/op/embed.aspx?src=https://www.codexworld.com/files/Brochure.docx' width='100%' height='650px' frameborder='0'></iframe>
Use the following code to embed Excel file in the HTML web page:
<iframe src='https://view.officeapps.live.com/op/embed.aspx?src=https://www.codexworld.com/files/assignment-tracker.xlsx' width='100%' height='650px' frameborder='0'></iframe>
You can use the above code to embed and display all types of the Microsoft Office documents (.doc, .docx, .xls, .xlsx, .ppt, .pptx) in HTML.
- Excel
- HTML
- Word
Are you want to get implementation help, or modify or enhance the functionality of this script? Click Here to Submit Service Request
If you have any questions about this script, submit it to our QA community — Ask Question
RELATED TUTORIALS
Leave a reply
No browsers currently have the code necessary to render Word Documents, and as far as I know, there are no client-side libraries that currently exist for rendering them either.
However, if you only need to display the Word Document, but don’t need to edit it, you can use Google Documents’ Viewer via an <iframe> to display a remotely hosted .doc/.docx.
<iframe src="https://docs.google.com/gview?url=http://remote.url.tld/path/to/document.doc&embedded=true"></iframe>
Solution adapted from «How to display a word document using fancybox».
Example:
JSFiddle
However, if you’d rather have native support, in most, if not all browsers, I’d recommend resaving the .doc/.docx as a PDF file Those can also be independently rendered using PDF.js by Mozilla.
Edit:
Huge thanks to cubeguerrero for posting the Microsoft Office 365 viewer in the comments.
<iframe src='https://view.officeapps.live.com/op/embed.aspx?src=http://remote.url.tld/path/to/document.doc' width='1366px' height='623px' frameborder='0'>This is an embedded <a target='_blank' href='http://office.com'>Microsoft Office</a> document, powered by <a target='_blank' href='http://office.com/webapps'>Office Online</a>.</iframe>
One more important caveat to keep in mind, as pointed out by lightswitch05, is that this will upload your document to a third-party server. If this is unacceptable, then this method of display isn’t the proper course of action.
Live Examples:
Google Docs Viewer
Microsoft Office Viewer
Writing a blog post and want to share a DOCX with a wider audience? Fortunately, you can embed office files on your website, including Word documents. Learn how in this article.

To embed DOCX in HTML is a perfect way of motivating users to interact with the file right on a webpage. It improves engagement and people don’t need to download a Word document for reading.
All website creating platforms support HTML whether you’re using HTML4 or HTML5. In this post, we’ll go through embedding DOCX files on WordPress.
Integrate WordPress with ONLYOFFICE Docs
With the recently added ONLYOFFICE add-on for WP, you can easily embed uploaded DOCX files just as any other content. To install it, you need to have WordPress 5.7 or newer version. Here are the steps:
- After logging in to your admin profile, hover on Plugins and click on Add New.
- Using the search bar, find ONLYOFFICE.
- Install and activate the plugin.
Now proceed to the article where you want to insert a text document.
Note: To enable the integration, you need to install ONLYOFFICE Docs and configure the plugin.
Embed a Word document as a block
In 2019, WordPress introduced a block editor Gutenberg, which replaced the classic visual editor and made article drafting faster and easier even for beginners.
Open your article and add a new block.
Choose ONLYOFFICE and upload a DOCX file.
Finally, preview the page to see the result and publish the article. Easy!
What else is good to know about embedding DOCX in HTML?
Here are some additional questions around DOCX embedding that could help you along the way.
Can visitors edit embedded Word files?
No. Documents will be opened in the article for viewing. While people can read the content, it remains non-editable for anyone but you.
Are there other benefits of ONLYOFFICE for WordPress?
Embedding is not the only action ONLYOFFICE can perform on WordPress. Additionally, you’re able to edit office files (Word documents, Excel spreadsheets, PowerPoint presentations) right from the admin dashboard.
Besides, there’s a plugin for ONLYOFFICE editors, which allows direct publishing articles to your site.
How to embed a Word file using HTML coding?
If you’re using ONLYOFFICE Workspace, you can easily generate an embedding code for a particular file:
- Open your Documents module and find the desired file.
- Click on Share → Add link.
- Press External link and select Embedding settings from the drop-down list.
- Adjust the settings, if needed. Then copypaste the code to your WP editor.
This way is a bit more complicated for beginners, but allows customization of the embedded window.
Why not just create a hyperlink to my DOCX file?
Hyperlinks are good to navigate people on the site, but only if you don’t have too many. There are other reasons to avoid them while distributing DOCX files, though.
- To open a text document in a new tab, you’ll need to store it somewhere and then create a link. When you delete this doc or change its path, the link in the blog post will become invalid as well. And monitoring each link is another pretty time-consuming task.
- The second scenario is a hyperlink to a direct download of a Word document. New visitors and digital security geeks who are always aware of everything that gets downloaded on their machines may think you’re distributing malicious content.
In contrast, embedded Word documents are stored on WordPress (or other CMS) and visitors have immediate access to the content without downloading files.

In this article, we show how to embed a microsoft word document on a web page using plain HTML.
Doing this on your own, using your own custom code, is difficult.
The best way to embed a microsoft word document on a web page is to use the API provided by
microsoft, which allows you to embed a microsoft word document right
on your website.
And the code is extremely simple. It is shown below.
So Microsoft makes it very easy to show Microsoft documents such as Microsoft Word online.
Using the API that they set up, you have a fully-featured microsoft word document that a user can search terms for and do many other advanced
functions.
Just as an example, I uploaded a Microsoft Word document to this website. It’s just an example file dealing with nurse practitioners being
granted autonomy in New York state after having reached 3600 hours of work as an NP.
The code to embed this document on this page is shown below.
Using Microsoft’s API, I am able to show the following Microsoft Word document seen below.
As you can see this Microsoft Word document views just like a Microsoft Word document would appear on the actual desktop software.
Of course it’s not fully featured because you’re not going to do things such as edit or change fonts. It’s only on the web for viewing, so none of those
other features are present. But you can resize it, you can search the document for specific terms, you can print the document,
you can download the document, as well as many other features that Microsoft provides.
So using the API is a very good idea. It allows the embedding of Microsoft Word files very easily online and gives many features.
It is not recommended to do it any other way.
So using plain HTML, an anchor tag, you can embed and display a Microsoft Word document on a web page.
Related Resources
Download PC Repair Tool to quickly find & fix Windows errors automatically
Microsoft keeps updating its Office products to present a better experience for its customers. Of the many new features it has introduced, one is to transform a Microsoft Word document into a webpage. While this feature existed earlier as well, the new method is way easier.

You can convert and display a Word document file in an HTML web page template using one of the following methods.
1] How to transform a Word document to a webpage using Transform option
- Once you have created your document, click on File on the top.
- In the File menu, select Transform.
- Immediately, a side window opens with the name transformed to the webpage.
- From the available Style templates, choose your favorite one.
- Now, click on Transform. If you are logged in to MS Office using your Microsoft account, it will use the same login. Else it will prompt for the same.
- You will be directed to the Microsoft Sway online page.
- You would have to log in on the browser as well if you are not already logged in there.
The webpage will appear. You can use it the way you please.
2] How to convert a Word document to HTML webpage using Save as option
You can also save your Microsoft Word document as an HTML webpage on your system. The procedure is as follows:
- Once you are done with creating the document, go to File.
- Now, select Save as.
- Click on Browse.
- Now in Save as type, choose Webpage and save the document to the appropriate location.
One major difference in these 2 methods of transforming an MS Word document into a webpage is that in the first case, you can choose the template and make appropriate modifications. Should you learn MS Sway, more customization is possible.
In the second case, which is also the more traditional method, you do not have the option of choosing the template. The document is saved as an HTML file.
Use of transforming a Microsoft Word document into a webpage
The best use of transforming a Microsoft Word document into a webpage is to be able to put your data in stored in the form of documents on your website. When you have a massive quantity of research, the best way to put it online is using the mentioned method.
How do I open the MS Word webpage?
When you save the MS Word document as a webpage, then it in saved with the extension .htm and the format is HTML. When you click on this HTML file, it will open with your default browser. The system need not be connected to the internet for the same.
However, if you need to add it to your website or use it practically, another system needs to be used. The new method to transform your document using Microsoft Sway is helpful.
What is Microsoft Sway?
Microsoft Sway is a software that converts text and videos to online presentations which in turn form web pages and could be used for creating websites.

Karan is a B.Tech, with several years of experience as an IT Analyst. He is a passionate Windows user who loves troubleshooting problems and writing about Microsoft technologies.
Microsoft Word can save its files as either documents or Web pages. If you want to embed a file’s content into a larger Web page on your company site, you can extract its HTML code and paste it into your page. If you’d rather people access the file exactly as it appears in the Word document, as would be the case when you share an extended company report, you can embed the document as a link so that users can download the original file.
Embed as HTML
-
Open your document in Microsoft Word and then press «Alt-F-A» to open the Save As dialog box.
-
Click the «Save as Type» drop-down box. Select «Single file Web page» and click «Save.»
-
Open the MHTML file you just created, using a text editor such as Notepad or an HTML editor such as Dreamweaver. Open your Web page code in a second window or tab.
-
Copy the code between the «<style>» and «</style>» tags in the MHTML document and paste the code into the corresponding style section of your Web page.
-
Copy the content that appears between the «<body>» and «</body>» tags in the MHTML file and paste it before the closing «</body>» tag in your Web page.
Embed As a Link
-
Upload the Word document to your website’s root folder using your FTP client.
-
Open the Web page in your text editor or HTML editor and insert the following code at the appropriate location in the page, replacing «Word.docx» with the name of your document:
<a href=»Word.docx»>Read the full file</a>.
-
Replace «Read the full file» in the example with the text you want the link to display.
Вставить документ Word в страницу сайта позволяют возможности платформ Microsoft Office Online и Google Документы. Файл внедряется через элемент <iframe>. Он создает плавающий контейнер и позволяет загружать в область заданных размеров любые независимые документы. Корректное отображение контейнера в <iframe> зависит от версии языка разметки вашей страницы — <!DOCTYPE>.
Внедрение документа Word через Office Online
Загрузите документ Word в OneDrive (требуется авторизация или регистрация). После загрузки файла, откройте его в Office Online.
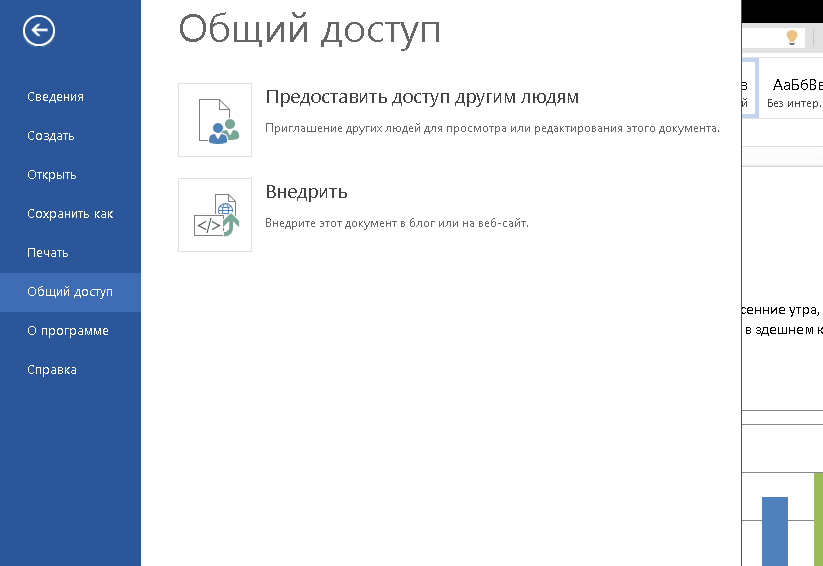
Далее, Файл → Общий доступ → Внедрить.
Установите размеры окна отображения файла для своей страницы. Обратите внимание на ссылку «Взаимодействие» — снимите лишние опции. Скопируйте код и вставьте его в нужное место страницы сайта.
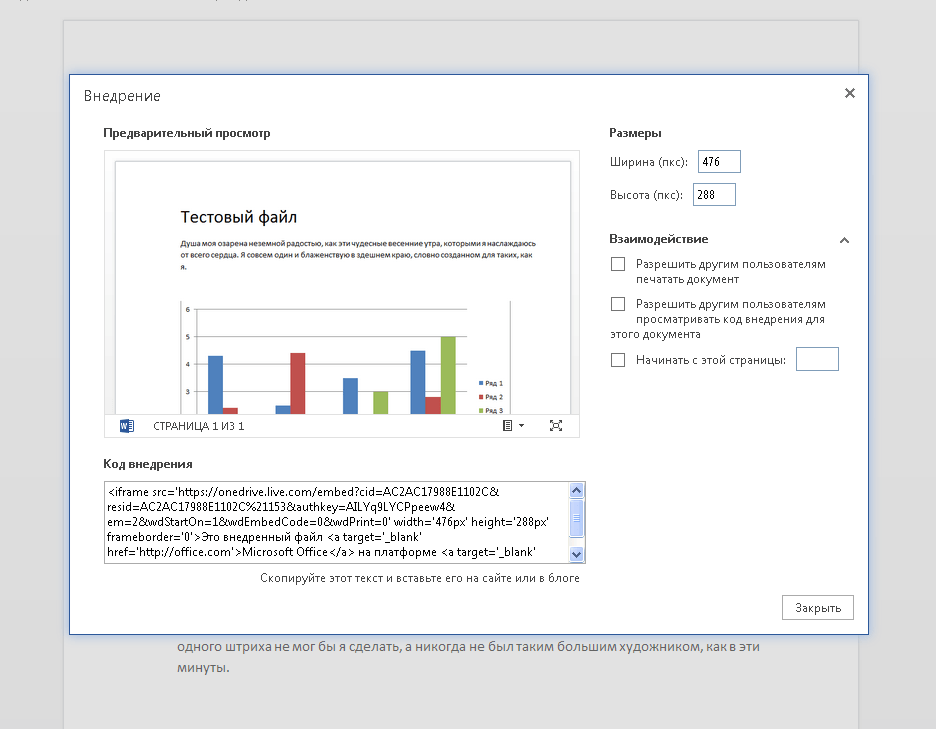
Пример.
Внедрение документа Word через Google Документы
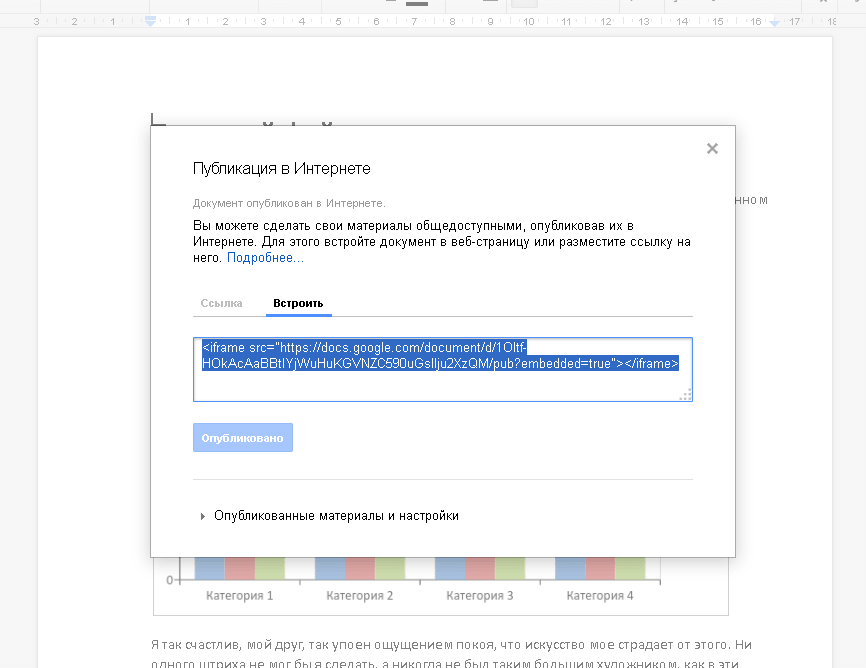
Загрузите документ Word в Google Диск (требуется авторизация или регистрация). После загрузки файла, откройте его в Google Документы.
Далее, Файл → Опубликовать в Интернете → Встроить.
Скопируйте код и вставьте его в нужное место страницы сайта.
Пример.