
You can save a file to a location on your computer, like a hard disk drive or a flash drive, or on an online service, like OneDrive. You can also export files to different file formats and save them to different file names.
Important: Even if you have AutoRecover enabled, you should save a file frequently while you are working on it to avoid losing data due to an unexpected power failure or some other problem. AutoRecover is described later in the topic «Save AutoRecover information automatically.»
When you save a file, you can usually change its name, storage location, and file format all at the same time, if you want to do so. However, you might not want to do all of those things, and the instructions in this topic describe each option individually.
Save a file
By default, Office saves a file in a default working folder.
-
On the File menu, click Save, or press
 + S.
+ S.Tip: Alternatively, you can click the Save icon
in the upper left corner of the window. -
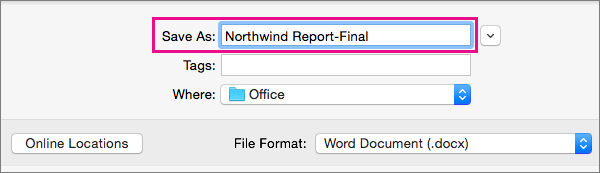
If you are saving the document for the first time, you must enter a file name.
 + S.
+ S. in the upper left corner of the window.
Related tasks
To save the document that you currently have open to a new or different file name than it currently has, use Save as.
-
On the File menu, click Save as, or press
+ Shift + S. -
If you want to save the file in a folder other than the current folder, navigate to that folder.
-
In the Save As box, enter a different file name.
-
Click Save.
If you want to save a file to a location on your computer other than the default folder, use Save as.
-
On the File menu, click Save as, or press
+ Shift + S. -
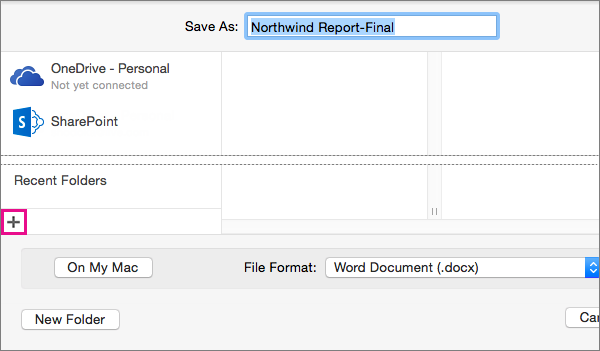
If the dialog box does not show a folder or folders on your computer, click On My Mac.
If you see the Online Locations button, the dialog box is currently displaying a folder on your computer.
-
Navigate to the folder on your computer where you want to save the file.
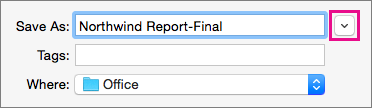
Tip: To show the favorites and display options for folders that are available in Finder, click the downward pointing arrow next to the Save As box.
-
If you want to create a new folder in the folder that you are currently viewing, click New Folder, and then enter a name for the folder.
-
In the Save As box, enter a different file name if you want.
-
Click Save.

Office allows you to save files in online folders provided by OneDrive and SharePoint. If you have accounts that give you access to these services, you can save and access files stored on these services much like files stored on your computer.
SharePoint services and OneDrive for work or school are typically offered by an employer or organization, but you can use OneDrive on your own. For more information about these services, see the related topics in See Also.
To save a file to an online location other than the default folder, use Save as. You can save files from Word, Excel, or PowerPoint directly to folders on OneDrive and SharePoint services.
-
On the File menu, click Save as, or press
+ Shift + S. -
If the dialog box shows a folder on your computer rather than on an online service, click Online Locations.
If you see the On My Mac button, the dialog box is currently displaying an online location.
-
Navigate to the folder where you want to save your file.
You might need to click the name of a service on the left before you can access the folder you want. If you do not see the service that you need to access, click the plus sign to add a service.
-
If you want to create a new folder in the folder that you are currently viewing, click New Folder, and then enter a name for the folder.
-
In the Save As box, enter a different file name if you want.
-
Click Save.

If you need to share a file with someone who does not have Office for Mac or who has an older version, you can save your document in a file format that a different or older application can read. You can also export a document as a PDF file or an HTML file, among other choices.
-
On the File menu, click Save As.
-
If you want to change the file name, change the name in the Save As box.
-
In the File Format list, click the file format that you want to use.
For example, click Word 97-2004 document (.doc) to create a file that is compatible with Word 97 and later versions of Word that do not use the XML-based file format (.docx).
-
Click Save.
AutoRecover can help you recover a file that you were editing after a power failure or other problem that interrupts you while you are editing the file. The more frequently that AutoRecover saves files information, the more complete recovery can be after a failure.
However, using AutoRecover does not replace saving your files at regular intervals or when you are done editing the file. You may also find it helpful to save multiple versions of a file to different file names (for example, after each significant change) so that you can review or return to an earlier version, if necessary.
If after a failure, you choose not to save the recovered version of a file after you open it, the file is deleted, and your unsaved changes are lost. If you save the recovery file, it replaces the original file, unless you specify a new file name.
-
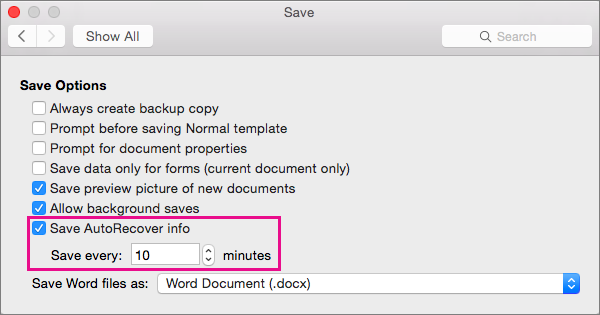
On the Word, PowerPoint, or Excel menu, click Preferences.
-
Under Output and Sharing, click Save.
-
Select Save AutoRecover info.
-
In the Save every box, enter the number of minutes you want as the interval between saving AutoRecover information.
Each time that the application saves AutoRecover information, it waits for the number of minutes that you specify here to pass before saving AutoRecover information again.
Save a file
By default, Office saves a file in a default working folder.
-
On the File menu, click Save, or press
+ S.Tip: Alternatively, you can click the Save icon in the upper left corner of the window.
-
If you are saving the document for the first time, you must enter a file name.
Related tasks
To save the document that you currently have open to a new or different file name than it currently has, use Save as.
-
On the File menu, click Save as.
-
If you want to save the file in a folder other than the current folder, navigate to that folder.
-
In the Save As box, enter a different file name.
-
Click Save.
Office allows you to save files in online folders provided by OneDrive and SharePoint. If you have accounts that give you access to these services, you can save and access files stored on these services much like files stored on your computer.
SharePoint services and OneDrive for work or school are typically offered by an employer or organization, but you can use OneDrive on your own. For more information about these services, see the related topics.
To save a file to an online location other than the default folder, use Share. You can save files from Word, Excel, or PowerPoint directly to folders on OneDrive and SharePoint services.
Note: If you’re having trouble saving to an online location, make sure you’re connected to the Internet and that you are signed in to either SharePoint or OneDrive. If you’re on a corporate network, verify that your network connection is working.
Save to OneDrive
-
From your computer, click File > Share > Save to OneDrive.
-
If this is the first time that you have tried to access OneDrive, type your Microsoft account and Password, and then click Sign In.
-
In the Save As box, enter the name of your document.
-
Under Personal Folders or Shared Folders, click the folder where you want to save the document, and then click Save.
Save to SharePoint
-
From your computer, click File > Share > Save to SharePoint.
-
To add a SharePoint site, click Add a location
, enter the URL to the SharePoint library, and then click Add. -
In the Save As box, enter the name of your document.
-
Under Recent Locations or Saved Locations, click the SharePoint library where you want to save the document, and then click Save.
 , enter the URL to the SharePoint library, and then click Add.
When you create and save a workbook, Word, Excel, and PowerPoint automatically save the file in the Open XML format. However, you can save the file in another format or change the default file format.
Save a file in the Open XML Format (default)
Save a file in the Office 2004 for Mac file format
Save a file as PDF
Change the default file format that files are saved in
Save a file as a webpage (Word and Excel only)
Save a file as plain text (Word only)
Save a file as JPEG (PowerPoint only)
Save a file as a movie (PowerPoint only)
Save a file in the Open XML Format (the default file format for Office for Mac 2011)
-
Create a file, or open the file that you want to save.
-
On the File menu, click Save As.
-
In the Save As box, type a name for the file.
-
On the Format pop-up menu, make sure Word Document (.docx), PowerPoint Presentation (.pptx), or Excel Workbook (.xlsx) is selected, depending on the Office program you’re using.
-
Click Save.
Save a file in the Office 2004 for Mac file format
Important: Some items that were created by using features in Office for Mac 2011 might behave differently when the document is saved in the file format that is used by Office 2004 for Mac or earlier. Use the Compatibility Report to avoid using new Office features that might behave differently with earlier versions of Office.
-
Create a file, or open the file that you want to save.
-
On the File menu, click Save As.
-
In the Save As box, type a name for the file.
-
On the Format pop-up menu, click Word 97-2004 Document (.doc), PowerPoint 97-2004 Presentation (.ppt), or Excel 97-2004 Workbook (.xls), depending on the Office program you’re using.
Note: If you open and then save a copy of a file that was created in Office 2004 for Mac or earlier, the application automatically saves the file in the correct file format.
-
Click Save.
Save a file as PDF
You can save your document as PDF, to preserve document formatting and make the document readable but not editable. You need to use Adobe Reader to view documents after you save them in this file format.
Note: PDF files created from Office 2011 are limited to printable content. In other words, if the content does not appear in print, it will not appear in the PDF.
-
Create a file, or open the file that you want to save.
-
On the File menu, click Save As.
-
In the Save As box, type a name for the file.
-
On the Format pop-up menu, click PDF.
-
Click Save.
Change the default file format that files are saved in
You can change the file format that Office for Mac always saves documents in. For example, if you usually share documents with other people who use an earlier version of Office for Mac, you might want to always save documents in the file format that is used in that version.
In Word and PowerPoint:
-
Open any file or create a new file.
-
On the File menu, click Save As.
-
Click Options, and then on the Save [Program] files as pop-up menu, click the file format that you want.
In Excel:
-
Open any file or create a new file.
-
On the Excel menu, click Preferences.
-
Under Sharing and Privacy, click Compatibility
. -
Under Transition, on the Save files in this format pop-up menu, click the file format that you want.
If you want to change the default file format to work with Office 2004 for Mac or earlier, click Excel 97-2004 Workbook (.xls).
 .
.Save a file as a webpage (Word and Excel only)
You can save a file as a webpage, which converts the file into a file format that’s readable by web browsers. However, the results of the conversion depend on the kind of content in your file. Office for Mac converts the file’s formatting to the closest equivalent web formatting. Therefore, the webpage might look very different from the original file. For example, many text effects, such as animated, embossed, or outlined text, become plain or shaded text.
Note: We recommend that you preview the file in a web browser to make sure that the results are what you want. To do this, on the File menu, click Web Page Preview.
-
Create a file, or open the file that you want to save.
-
On the File menu, click Save as Web Page.
-
In the Save As box, type a name for the file.
-
Click Save.
Save a file as plain text (Word only)
You can save a document as plain text so that the document can be opened by a number of text editing programs. However, saving a document in plain text does not reliably preserve the formatting, layout, or other features of the document.
-
Create a file, or open the file that you want to save.
-
On the File menu, click Save As.
-
In the Save As box, type a name for the file.
-
On the Format pop-up menu, click Plain Text (.txt).
-
Click Save.
Save a file as JPEG (PowerPoint only)
When you save a presentation as a JPEG, each slide becomes a picture. Then, if you post the presentation on a Web site, the presentation is easier to view.
-
Create a file, or open the file that you want to save.
-
On the File menu, click Save as Pictures.
-
In the Save As box, type a name for the file.
-
Click Save.
Save a file as a movie (PowerPoint only)
To run your presentation on a computer that doesn’t have PowerPoint installed, you can save your presentation as a movie (.mov) file. You can then play the movie in any application that supports QuickTime movies.
-
Create a file, or open the file that you want to save.
-
On the File menu, click Save as Movie.
-
In the Save As box, type a name for the file.
-
Click Save.
AutoRecover can help you recover a file that you were editing after a power failure or other problem that interrupts you while you are editing the file. The more frequently that AutoRecover saves files information, the more complete recovery can be after a failure.
However, using AutoRecover does not replace saving your files at regular intervals or when you are done editing the file. You may also find it helpful to save multiple versions of a file to different file names (for example, after each significant change) so that you can review or return to an earlier version, if necessary.
If after a failure, you choose not to save the recovered version of a file after you open it, the file is deleted, and your unsaved changes are lost. If you save the recovery file, it replaces the original file, unless you specify a new file name.
-
On the Word, PowerPoint, or Excel menu, click Preferences.
-
Click Save.
-
In the AutoRecover box, enter the number of minutes you want as the interval between saving AutoRecover information.
Each time that the application saves AutoRecover information, it waits for the number of minutes that you specify here to pass before saving AutoRecover information again.
When you open a document in Word for Mac 2011 that was created in an earlier version of Word, either Word for Mac or Word for Windows, compatibility mode is turned on. [Compatibility Mode] shows in the title bar of the document window. Compatibility mode indicates that the document was created in an earlier version of Word or was saved in an earlier file format. In compatibility mode, no new or improved features in Word 2011 are available. However, users can still edit the document by using features that are compatible with the earlier file format.
You can work in compatibility mode or you can convert your document to the Word 2011 file format. When you save in the Word 2011 format, the document layout appears as if it were created in Word 2011 and the file format changes from .doc to .docx. In this format, you can access the new and improved features in Word 2011. However, anyone who uses an earlier version of Word may be prevented from or have problems editing parts of the document that were created by using new or enhanced features.
Document elements that behave differently in compatibility mode
The elements listed in the following table might change permanently when you work in compatibility mode. You can’t convert them back to Word 2011 elements even if you convert your document to Word 2011 later.
|
Word 2011 element |
Behavior in compatibility mode |
|---|---|
|
Bibliography |
Converted to static text. |
|
Blocked authors |
Information about where other authors were editing the document will be lost permanently. |
|
Citations |
Converted to static text. |
|
Advanced typography features |
All font-supported advanced typography features, for example, ligatures, are removed when the document is saved in the .doc file format. |
|
Open XML embedded objects |
Permanently converted to static content. |
|
Placeholder text in content controls |
Converted to static text. |
|
Relative text box positioning |
Converted to absolute positions. |
|
Text box text alignment |
All text that is not already top-aligned is converted to top-aligned text. |
|
Text effects |
Text effects such as Reflection, Glow, 3-D Format, and 3-D Rotation are lost. |
|
Alternative text on tables |
Alternative text on tables is permanently removed. |
|
Themes, theme colors, theme fonts, and theme effects |
Permanently converted to styles. If the file is later opened in Word 2011, you can’t automatically change the style by using themes. |
|
Tracked moves |
Converted to deletions and insertions. |
|
WordArt |
Converted to static text. |
The document elements listed in the following table change when you work in compatibility mode. However, you can convert them to Word 2011 elements if you convert your document to Word 2011 later.
|
Word 2011 element |
Behavior in compatibility mode |
|---|---|
|
SmartArt graphics |
Converted to images and cannot be edited. |
|
Diagrams and charts |
Converted to images and cannot be edited. |
|
Shapes and text boxes |
Converted to effects that are available in the .doc file format. |
|
Equations |
For documents in compatibility mode, presented as images that cannot be edited. Equations can be edited when the document is saved in a Word 2011 file format. |
Turn on compatibility mode
You can create new documents that are compatible with earlier versions of Word by using compatibility mode.
-
Open a new document.
-
On the File menu, click Save As.
-
In the Save As box, type a name for the document.
-
In the Format pop-up menu, select Word 97-2004 Document (.doc), and then click Save.
[Compatibility Mode] appears in the title bar after the document name.
Convert a document from compatibility mode
The Convert Document command clears the compatibility options so that the document layout appears as if it were created in Word 2011. If the file is in .doc format, the Convert Document command also upgrades the file to the .docx format. After you convert the document, you can access the new and enhanced features in Word 2011. However, people who are using earlier versions of Word may be prevented from or have problems editing certain parts of the document that were created by using new or enhanced features in Word 2011.
-
On the File menu, click Convert Document.
See also
What is OneDrive?
What is OneDrive for Business?
What is SharePoint?
Как открывать и редактировать Doc и Docx-файлы на Mac без Microsoft Word (Office)
Даже после того, как вы переберётесь на платформу macOS, вас будут преследовать те или иные форматы, родные для Windows PC. До сих пор корпоративный сегмент предпочитает редмондовский Word как основной инструмент для работы с текстом. В этом материале мы расскажем как открыть DOCX-документы на Mac без дополнительного софта.

Под macOS уже давно имеется полнофункциональная версия Microsoft Office, ничем не отличающаяся от той, что используется на Windows. Более того, существуют и другие, в том числе и бесплатные текстовые процессоры, включая OpenOffice или Pages от Apple, способный открывать и редактировать DOCX-файлы. А что, если не хочется занимать место на диске ради программ, которые используются в лучшем случае раз в месяц?
Для укрощения DOCX-файлов воспользуемся услугами штатного macOS-редактора TextEdit, а также бесплатного приложения Pages в десктопной и браузерной версиях.
Как запускать DOCX-файлы на Mac в TextEdit?
1. Откройте проводник Finder и выделите файл .doc (.docx), который необходимо отредактировать.
2. Нажмите правую кнопку мыши и выберите Открыть в программе → TextEdit.

TextEdit позволяет не только просматривать DOCX-документы, но и редактировать их и сохранять все изменения. Правда, есть и недостатки — изображения не отображаются да и ни о какой вёрстке в аналоге «Блокнота» говорить не приходится.

А если нужно большее, то мы настоятельно рекомендуем установить программу Pages из Mac App Store, тем более этот вариант предлагает сама Apple.
Как запускать .doc (.docx)-файлы на Mac при помощи Pages?
1. Скачайте (бесплатно), установите и запустите Pages, если программа не установлена на вашем Mac.
Программа будет бесплатна для тех, кто приобрёл и активировал любой компьютер Mac после 1 сентября 2013 года.

3. Выберите в проводнике Finder интересующий вас документ и нажмите «Открыть».
В последующем формат .DOCX ассоциируется с Pages и открывать документы можно будет сразу из проводника. С Pages у вас будет возможность поработать и с изображениями, и с вёрсткой.

Как экспортировать отредактированный .doc (.docx) файл снова формат .doc (.docx) в Pages
Для экспорта файла из Pages в первоначальный Doc или Docx воспользуйтесь меню Файл → Экспортировать в → Word (подробно).


Как открывать и редактировать .doc (.docx)-файлы в браузере
Стоит отметить, что Pages существует и в браузерной версии, которая не требует установки приложения из App Store.
Для того чтобы работать с файлами Word (Doc и Docx) перейдите на сайт icloud.com с компьютера и введите данные учетной записи Apple ID.

Откройте web-приложение Pages.

Перетяните необходимые файлы Docx, Doc или .pages на рабочую панель. После чего они будут доступны для редактирования.
Как установить Ворд на МакБук, чтобы он правильно работал?

Владельцы MacBook от Apple несмотря на современный полноценный функционал встроенной операционной системы MacOS периодически испытывают нехватку стандартного и привычного Word от Майкрософт.
В такой ситуации есть два выхода: либо подстроиться и привыкнуть к MacOS, либо дополнительно провести самостоятельную установку необходимой программы.
В связи с этим у пользователя возникает вопрос: как установить Ворд на МакБук?
В отдельной статье мы говорим как установить Excel для Mac на ваш ноутбук или стационарный iMac.
Как бесплатно установить Microsoft Word на Mac?
Работа с текстовыми документами принуждает постоянно пользоваться удобными редакторами, среди которых первенство занимает Microsoft Word. Однако, Office является платным программным обеспечением, которое нужно приобрести целиком или оплатить подписку. Если не хочется тратить деньги, можно ли бесплатно установить Word на Mac? С технической точки зрения, да, но не без нюансов. Многим стоит предпочесть достойную альтернативу. Все доступные способы использовать текстовые редакторы бесплатно описаны ниже.
Может использовать видео с YouTube «Как получить Word для бесплатных видео»?
Если зайти в YouTube, не составит большого труда найти ролики, в которых показаны возможности бесплатно скачать, установить и запустить весь программный пакет MS Office на Mac. Предложение очень заманчивое, но как часто бывает, бесплатный сыр в мышеловке. Для использования описанных методов на исследованных видео требуется приобрести код для взлома текстового редактора. Часть пользователей думают, что это преступление без жертв, ведь у Microsoft много миллиардов доходов. На самом деле реальным пострадавшим может оказаться пользователь.
Действительно есть доброжелательные хакеры, которые делают информацию и ПО общедоступными. Не все водимы альтруистическими побуждениями. Загрузка и установка подобного ПО на Mac влечет за собой высокий риск добавления в систему вредоносного или шпионского кода. Оно часто наносит непоправимый ущерб данным. Это, не говоря о том, что пользователь нарушает авторские права.
Совет дня – лучше держаться подальше от инструментов взлома Word.
Может перейти к Microsoft Office Online?
Для людей с простыми потребностями существует бесплатная версия Microsoft Word, которая доступна в онлайн через любой браузер. Это лучшая бесплатная альтернатива настольному ПО. Для использования сервиса достаточно создать учетную запись (бесплатно). Да, онлайн-версия обладает урезанными функциями, но большая часть средств форматирования документов все же присутствует.

Одно из ключевых ограничений вытекает из названия Word Online. Доступ к приложению присутствует только через браузер при наличии подключения к интернету. Решение не является самым удачным для тяжеловесных документов. Однако, его возможностей достаточно для создания небольших текстов, документов, отчетов, проектов, резюме и прочего.
Бесплатный месяц использования Office365
Части пользователей Word нужен только для работы над одноразовым проектом, к примеру, дипломом или курсовой. Вполне официально можно загрузить и использовать весь офис от Microsoft в течение одного месяца. Пробная версия включает доступ к Word, Excel, PowerPoint, Outlook, OneNote и OneDrive.

В комплект входят все самые актуальные версии ПО. Полная их цена составляет £79,99, $99,99 или 6999 рублей за год использования. Стоимость указана за версию Home, которая позволяет подключать к приложению до 6 человек. За персональную модификацию редактора придется отдать 3499 рублей в год, но он поддерживает только 1 пользователя. Если это слишком высокая цена, можно оплачивать подписку ежемесячно по 350 рублей.
Бесплатные альтернативы Microsoft Word
Если задача получения Microsoft Word не принципиальна, можно воспользоваться множеством других редакторов. Они включают массу полезных функций и распространяются абсолютно бесплатно. К примеру, новый Mac по умолчанию поставляется с фри-версией Apple Pages. Это очень мощный инструмент по разработке документов, который хорошо интегрирован во все ОС от Apple, в том числе в мобильные.
Google Docs – неизменный фаворит. Сетевое ПО от Гугла является бесплатным аналогом Word, который легко использовать для совместной работы. Пусть в нем нет самых продвинутых функций, но большинству пользователей их предостаточно.

LibreOffice Writer – хорошее ПО с открытым исходным кодом, которое распространяется бесплатно. Оно предлагает комплексное решение, которое практически не уступает по мощности MS Word. Пусть его дизайн не самый эстетически приятный, но комфортно работать приложение позволит.

Бесплатная версия Microsoft Word для iPad и iPhone
Стоит отметить, что без какой-либо платы MS Word можно загрузить на iPad или iPhone. Работать на смартфоне не слишком удобно из-за маленького экрана, но размера дисплея iPad вполне достаточно. Особенно в сочетании с Bluetooth-клавиатурой.
Бесплатно установить можно не только Word, но и некоторые другие компоненты офиса – Excel, PowerPoint и OneNote. Все приложения доступны на App Store. Единственное ограничение заключается в том, что они ничего не стоят на устройствах с диагональю экрана до 10,1 дюйма. Таким образом самые свежие iPad Pro и iPad 10.2 не проходят в эту категорию. На меньших моделях все еще можно работать бесплатно.
Это все альтернативы и способы бесплатного использования Word. Все они связаны с определенными ограничениями. Читателю остается только выбрать наиболее подходящее решение из списка.
Широкое использование файлов DOCX делает нас очень зависимыми от экосистемы Microsoft. Но не так много, как вы думаете. К счастью, вам не обязательно устанавливать пакет Microsoft Office, чтобы открывать такие файлы.
Вот несколько простых и бесплатных способов просмотра и редактирования документов Word на вашем Mac.
Открывайте файлы Word без проблем
При открытии файлов DOCX на вашем Mac с помощью любого текстового редактора, кроме Microsoft Word, могут возникнуть проблемы с отображением сложных графических элементов или правильным форматированием. Однако перечисленные здесь инструменты обычно без проблем отображают такие файлы.
1. Страницы
Один из самых простых способов открывать и редактировать файлы DOCX на вашем Mac – использовать встроенное приложение Pages. Он отлично справляется с отображением специального форматирования, чтобы документ был максимально приближен к исходной версии Word.
Чтобы открыть такой документ в Pages, локализуйте нужный файл и щелкните его правой кнопкой мыши. Затем переместите курсор мыши на « Открыть с помощью» и выберите « Страницы» из списка доступных приложений.

Если вы хотите не только просмотреть документ, но и внести некоторые изменения, а затем поделиться им с другими, вам необходимо правильно экспортировать его, чтобы у пользователей Windows не было проблем с его открытием.
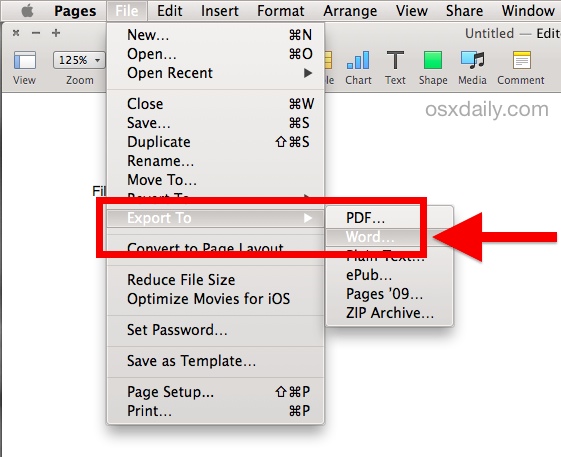
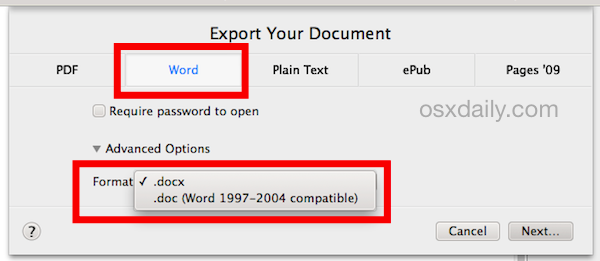
Перейдите в Файл> Экспорт в> Word . В Pages откроется новое окно, в котором вы можете выбрать, хотите ли вы сохранить документ в формате DOCX или DOC (совместимом с Word 1997-2004).

Формат DOCX выбран по умолчанию, поэтому, если вам нужно сохранить файл как DOC, нажмите « Дополнительные параметры», выберите другой формат и нажмите « Далее» .

Можно установить Pages в качестве приложения по умолчанию для открытия файлов DOCX, чтобы вы могли открывать такие файлы еще быстрее. Вот как это сделать:
- Щелкните правой кнопкой мыши любой файл DOCX на вашем Mac.
- Выберите Получить информацию из списка.
- Найдите Открыть с помощью в новом всплывающем окне и щелкните по нему.
- Из доступных приложений выберите Pages . Затем нажмите « Заменить все» .
- Появится новое окно с просьбой подтвердить изменения, нажмите « Продолжить» .

Теперь, когда вы открываете документ Word, он автоматически открывается в Pages.
2. LibreOffice
LibreOffice – это бесплатный инструмент, который может открывать различные типы файлов Microsoft, включая DOCX. Он может обрабатывать все форматы файлов и является отличной альтернативой как Microsoft Office, так и встроенным приложениям Apple.
Поскольку это стороннее приложение, вам необходимо сначала загрузить и установить его. Для этого посетите официальный веб-сайт LibreOffice , выберите macOS в качестве операционной системы и нажмите « Загрузить» . Затем следуйте инструкциям по его установке.

Когда все настроено, вы можете использовать это приложение для просмотра файлов любого формата. Для этого найдите нужный файл и щелкните его правой кнопкой мыши. Выберите « Открыть с помощью» и в списке нажмите « LibreOffice» .

Если вы решите, что хотите установить этот пакет по умолчанию для всех ваших файлов DOCX, вы можете настроить его за пару шагов. Просто щелкните правой кнопкой мыши любой документ этого формата и выберите « Получить информацию» . В списке настроек выберите « Открыть» и щелкните LibreOffice в списке доступных приложений. Затем выберите « Заменить все» и подтвердите свое решение, нажав « Продолжить» во всплывающем окне.
3. Документы Google
Если вы не являетесь поклонником Pages и не хотите устанавливать что-либо новое на свой Mac, вы можете попробовать текстовый процессор в Интернете – Google Docs. Этот инструмент совершенно бесплатный и отлично справляется с обработкой файлов различных типов.
Чтобы открыть документ Word с помощью Google Docs, вам потребуются две вещи: подключение к Интернету и учетная запись Google. Хотя подключение к Wi-Fi может и не быть проблемой, отсутствие адреса Gmail может немного усложнить задачу. Поэтому, прежде чем использовать эту службу, вам необходимо зарегистрироваться в Gmail . Затем вы можете использовать те же данные для входа в Google Docs.
Вот как просмотреть файл DOCX в Документах Google:
- Откройте веб- сайт Документов Google и войдите в свою учетную запись.
- Щелкните значок плюса, чтобы начать новый документ.
- Перейдите в Файл> Открыть> Загрузить .
- Перетащите файл прямо в окно или нажмите « Выбрать файл на своем устройстве», чтобы открыть файл Mac, и дважды щелкните нужный файл.

Если вы внесли некоторые изменения в документ и вам нужно поделиться им с кем-то еще, вы можете либо экспортировать файл, либо получить ссылку на документ, чтобы поделиться им в Интернете, не загружая его.
Итак, чтобы скачать файл, зайдите в Файл> Скачать и щелкните нужный формат.

Если вместо этого вы хотите поделиться онлайн-версией документа, нажмите « Поделиться» в правом верхнем углу экрана и добавьте адрес Gmail нужного человека в пустое поле. Вы также можете получить ссылку, которой можно поделиться, нажав Изменить для всех, у кого есть ссылка . Затем скопируйте ссылку и нажмите Готово .

4. Word Online
Word Online – это бесплатная веб-версия Microsoft Word и прямой конкурент службы Google Docs. Это отличный способ просматривать и вносить простые изменения в файлы DOCX. Одним из его преимуществ является то, что вы можете сохранять документы в OneDrive, делиться ими с кем угодно и даже работать вместе над документом в Интернете одновременно.
Однако, как и в случае с любым другим онлайн-инструментом для обработки текста, вам потребуется подключение к Интернету, чтобы использовать его. Вам также придется создать учетную запись Microsoft, если у вас ее еще нет.
Чтобы просмотреть и отредактировать файл DOCX с помощью онлайн-версии Word, перейдите на onedrive.live.com и используйте свою учетную запись Microsoft для входа в систему. Нажмите « Загрузить»> «Файлы» и выберите необходимый документ на своем Mac. Затем щелкните загруженный файл, чтобы открыть его в веб-версии Word.

Если вы предпочитаете просматривать файлы DOCX на своем Mac с помощью встроенного приложения, стороннего приложения или онлайн-инструмента для обработки текста, вы можете быть уверены, что он не менее хуже, чем пакет Microsoft Office. Вы можете использовать их не только для открытия таких файлов, но также для их редактирования и обмена с другими.
The Microsoft Word document format is widely used in many corporate and educational environments, particularly where the Windows platform is dominant. For Mac users who work with the Pages app for word processing, a simple option to improve cross-platform document readability and compatibility is to save (or export) a Pages file as a Word .doc or .docx file. Fortunately, the Pages app makes saving as Word files very easy, and there are several compatibility choices available during the export process.
This process covers exporting a file as a Word document using the latest version of Pages. Prior versions of Pages also support saving as Word .doc format, but they handle the process slightly differently – for the most part it’s similar enough that this walkthrough will continue to make sense, even if the Mac is running a fairly ancient version of Pages app. With that said, Pages is now offered as a free Mac app from Apple, so if you have an older version, you can update to the newest version with the latest features from the Mac App Store. Having the newest version of Pages is also recommended for improved compatibility when saving the Word documents, particularly as .docx format.
Exporting a Pages File as Word Format from the Mac with Pages App
Here’s how you can save a Pages file as a Word document from Mac Pages:
- Open the Pages file you want to convert / save to Word format into the Pages app for Mac OS X
- Go to the “File” menu and choose “Export To”, then select “Word” from the submenu list
- At the “Export Your Document” screen and under the ‘Word’ tab, click the triangle next to ‘Advanced Options’
- Select the appropriate Word file format to use: “.docx” for compatibility with the newest versions of Microsoft Office and Word, or “.doc” for greater compatibility with older versions of Word – then click “Next”
- Give the new Word file a name as usual, select a destination to save the file to, and choose “Export”
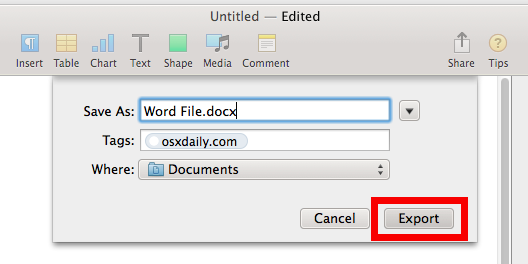
Your newly created Word file, either in .doc or .docx format, will be saved wherever you specified.
For the most part, Pages app will produce very compatible word files without any effort, and the resulting .doc or .docx file will open without incident in Microsoft Word and look basically identical as it started.
If something doesn’t look right with the saved file, it’s usually due to complex formatting, an unique font, or the usage of stylized ascii, Emoji, and special characters that are unique to Mac OS X and the Pages app. With that in mind, it’s good practice to keep the saved/exported files fairly simple and using standardized fonts that are available across-platforms, and avoiding any unusually complex document formatting whenever possible. That’s typically not an issue for a text-heavy document or a simple report, and the converted file should open flawlessly in Microsoft Office whether on another Mac or a Windows PC.
Finally, if you or the recipient is using a Windows PC and is unable to access Pages to re-save the file into a Word compatible format, another option is to open a .pages format file in Windows using this renaming trick, but while that method works in a pinch, it’s not necessarily ideal, as it sometimes strips unique formatting or leads to odd formatting issues within the Pages file that gets loaded into Word on the PC. For that reason, if you (or the document recipient) do have access to a Mac, it’s best to just re-save the file as Word to begin with.
Do you know of any other helpful tricks or tips to save or export Pages files as Microsoft Office / Word document formats? Share with us in the comments below!
Даже после того, как вы переберётесь на платформу macOS, вас будут преследовать те или иные форматы, родные для Windows PC. До сих пор корпоративный сегмент предпочитает редмондовский Word как основной инструмент для работы с текстом. В этом материале мы расскажем как открыть DOCX-документы на Mac без дополнительного софта.

♥ ПО ТЕМЕ: Как отправить ссылку на файл, хранящийся в iCloud Drive на iPhone, iPad или Mac.
Под macOS уже давно имеется полнофункциональная версия Microsoft Office, ничем не отличающаяся от той, что используется на Windows. Более того, существуют и другие, в том числе и бесплатные текстовые процессоры, включая OpenOffice или Pages от Apple, способный открывать и редактировать DOCX-файлы. А что, если не хочется занимать место на диске ради программ, которые используются в лучшем случае раз в месяц?
Для укрощения DOCX-файлов воспользуемся услугами штатного macOS-редактора TextEdit, а также бесплатного приложения Pages в десктопной и браузерной версиях.
♥ ПО ТЕМЕ: Смарт-папки Finder на Mac: как создавать, настраивать и пользоваться.
Как запускать DOCX-файлы на Mac в TextEdit?
1. Откройте проводник Finder и выделите файл .doc (.docx), который необходимо отредактировать.
2. Нажмите правую кнопку мыши и выберите Открыть в программе → TextEdit.

TextEdit позволяет не только просматривать DOCX-документы, но и редактировать их и сохранять все изменения. Правда, есть и недостатки — изображения не отображаются да и ни о какой вёрстке в аналоге «Блокнота» говорить не приходится.

А если нужно большее, то мы настоятельно рекомендуем установить программу Pages из Mac App Store, тем более этот вариант предлагает сама Apple.
♥ ПО ТЕМЕ: Как конвертировать файл Numbers в формат Excel на Mac.
Как запускать .doc (.docx)-файлы на Mac при помощи Pages?
1. Скачайте (бесплатно), установите и запустите Pages, если программа не установлена на вашем Mac.
Скачать Pages для Mac (Mac App Store).
Программа будет бесплатна для тех, кто приобрёл и активировал любой компьютер Mac после 1 сентября 2013 года.
2. Нажмите меню Файл → Открыть.

3. Выберите в проводнике Finder интересующий вас документ и нажмите «Открыть».
В последующем формат .DOCX ассоциируется с Pages и открывать документы можно будет сразу из проводника. С Pages у вас будет возможность поработать и с изображениями, и с вёрсткой.

♥ ПО ТЕМЕ: Как создать расписание режимов сна и автоматического включения Mac.
Для экспорта файла из Pages в первоначальный Doc или Docx воспользуйтесь меню Файл → Экспортировать в → Word (подробно).


♥ ПО ТЕМЕ: Как поставить пароль на папку в macOS (Mac) без установки сторонних приложений.
Как открывать и редактировать .doc (.docx)-файлы в браузере
Стоит отметить, что Pages существует и в браузерной версии, которая не требует установки приложения из App Store.
Для того чтобы работать с файлами Word (Doc и Docx) перейдите на сайт icloud.com с компьютера и введите данные учетной записи Apple ID.

Откройте web-приложение Pages.

Перетяните необходимые файлы Docx, Doc или .pages на рабочую панель. После чего они будут доступны для редактирования.


Смотрите также:
- 10 горячих клавиш (клавиатурных сокращений) Finder в macOS, которые должен знать каждый.
- Активные углы на macOS: что это, как настроить и пользоваться.
- Mac для чайников: 30 полезных советов по macOS для новичков.