
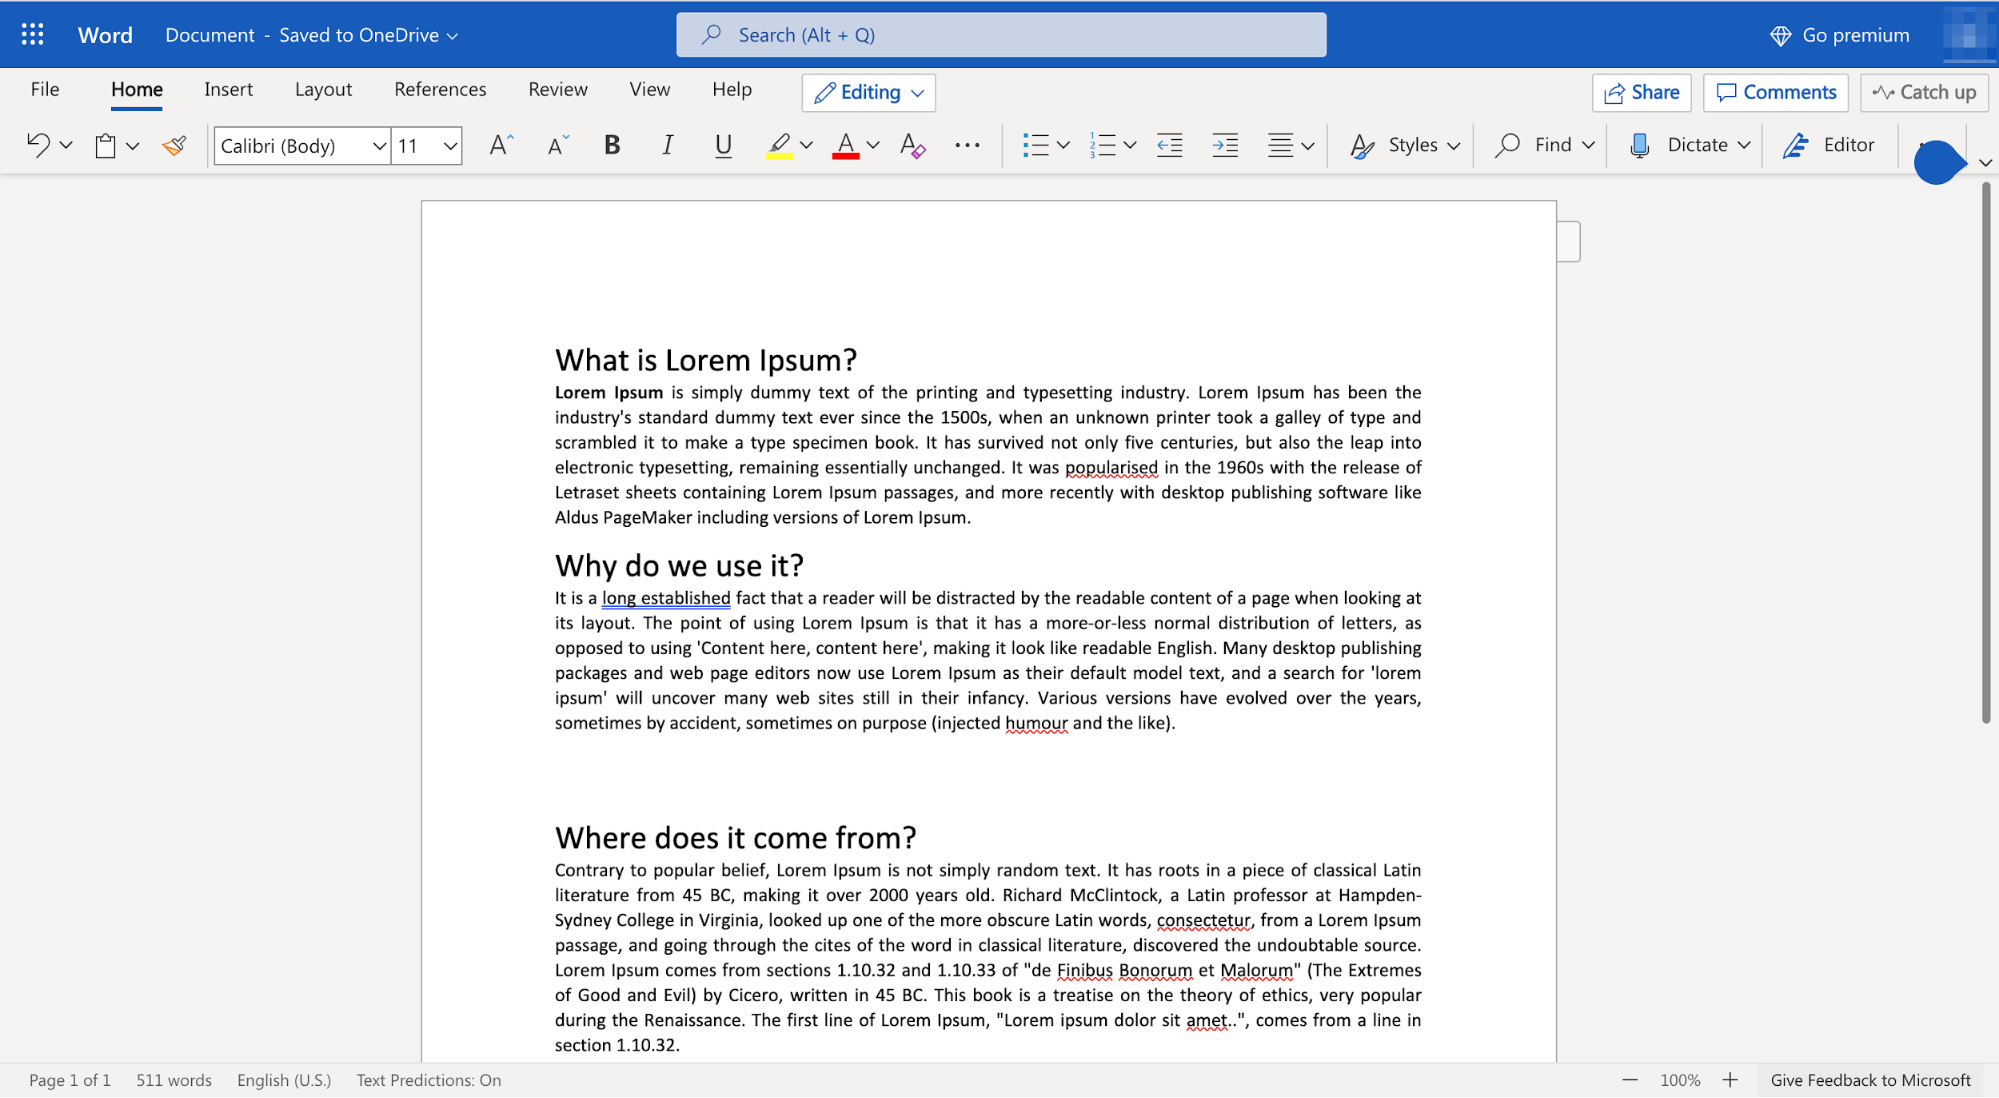
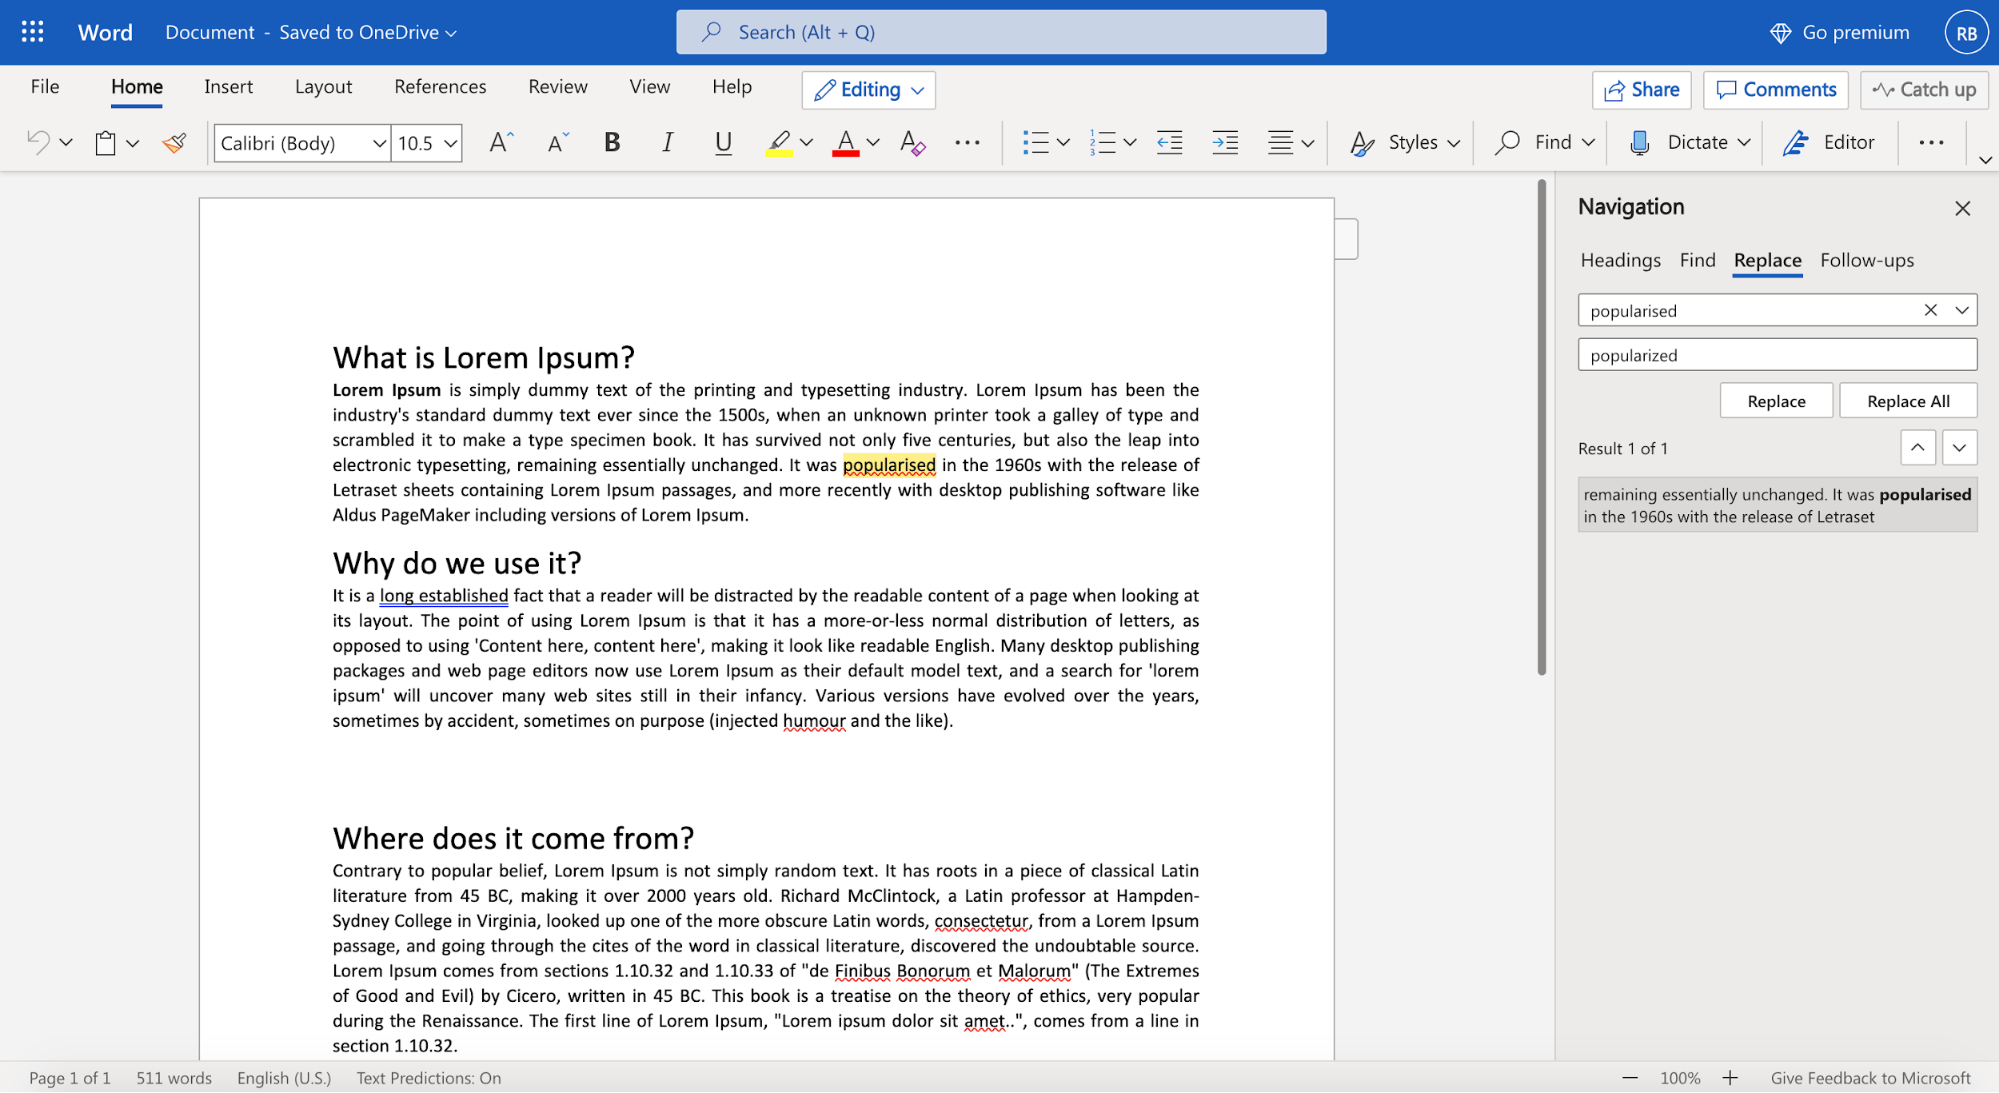
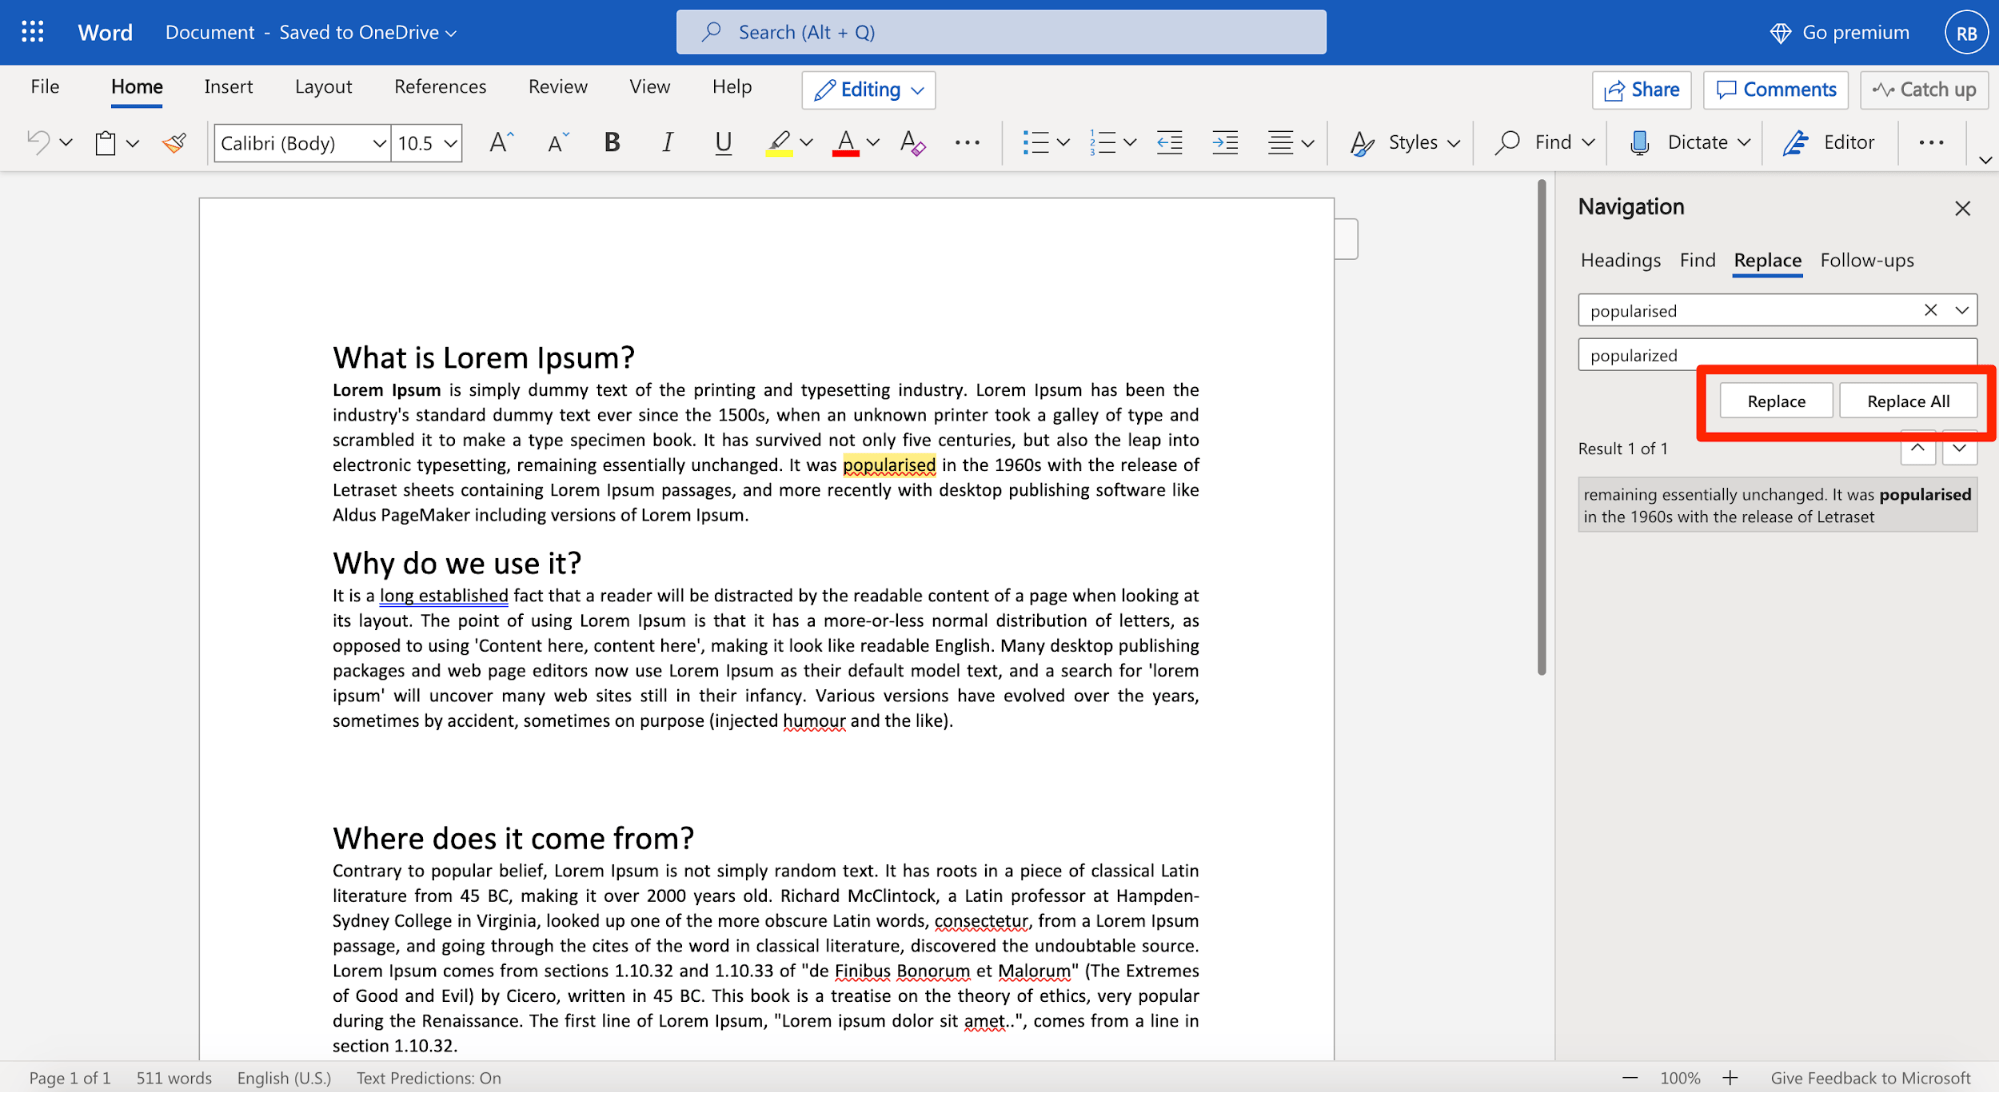
Find and replace text

-
Go to Home > Replace.
-
Enter the word or phrase you want to replace in Find what.
-
Enter your new text in Replace with.
-
Choose Replace All to change all occurrences of the word or phrase. Or, select Find Next until you find the one you want to update, and then choose Replace.
-
To specify only upper or lowercase in your search, select More > Match case. There are several other ways to search in this menu.
For other options, see Find and replace text
Find and replace basic text
In the upper-right corner of the document, in the search box  , type the word or phrase that you want to find, and Word will highlight all instances of the word or phrase throughout the document.
To replace found text:
-
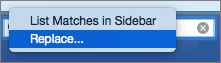
Select the magnifying glass, and then select Replace.

-
In the Replace With box, type the replacement text.
-
Select Replace All or Replace.
Tips:
-
You can also open the basic Find and Replace pane with the keyboard shortcut CONTROL + H.
-
When you replace text, it’s a good idea to select Replace instead of Replace All. That way you can review each item before replacing it.
-
You can find text with special formatting, such as bold or highlight, by using the Format menu.
-
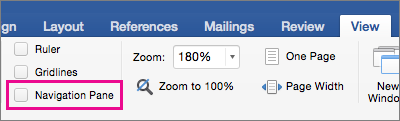
Select View > Navigation Pane.
-
In the Navigation Pane, select the magnifying glass.
-
Select Settings
, and then select Advanced Find & Replace.
Notes:
-
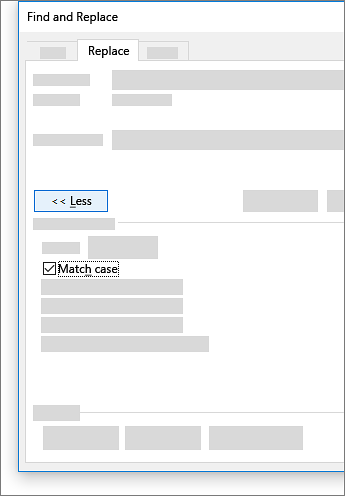
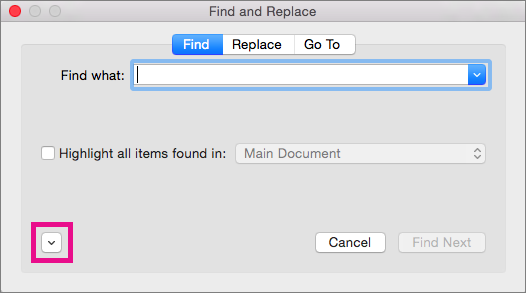
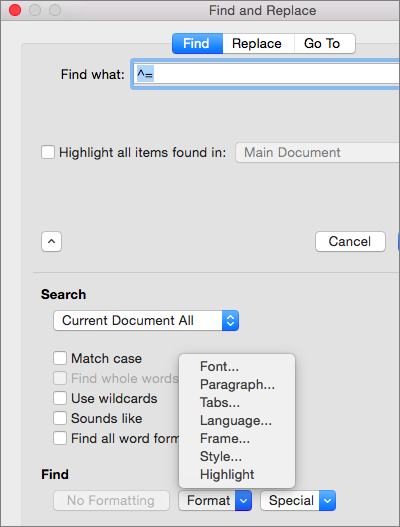
Select the arrow at the bottom of the Find and Replace dialog box to show all options.
-
-
-
On the Format menu, select the option that you want.
If a second dialog box opens, select the options that you want, and then select OK.
-
In the Find and Replace dialog box, select Find Next or Find All.
 , and then select Advanced Find & Replace.
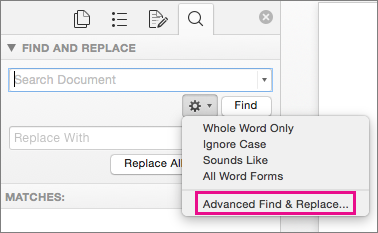
You can find and replace text with special formatting, such as bold or highlight, by using the Format menu.
-
Select View > Navigation Pane.
-
In the Navigation Pane, select the magnifying glass.
-
Select Settings
, and then select Advanced Find & Replace.
-
At the top of the dialog box, select Replace.
Notes:
-
Select the arrow at the bottom of the Find and Replace dialog box to show all options.
-
-
-
On the Find what box, type the text that you want to find.
-
On the Format menu, select the formatting that you want to find.
If a second dialog box opens, select the options that you want, and then select OK.
-
Select in the box next to Replace with.
-
On the Format menu, select the replacement formatting. If a second dialog box appears, select the formats that you want, and then select OK.
-
Select Replace, Replace All, or Find Next.
-
Select View > Navigation Pane.
-
In the Navigation Pane, select the magnifying glass.
-
Select Settings
, and then select Advanced Find & Replace.
Notes:
-
Select the arrow at the bottom of the Find and Replace dialog box to show all options.
-
-
-
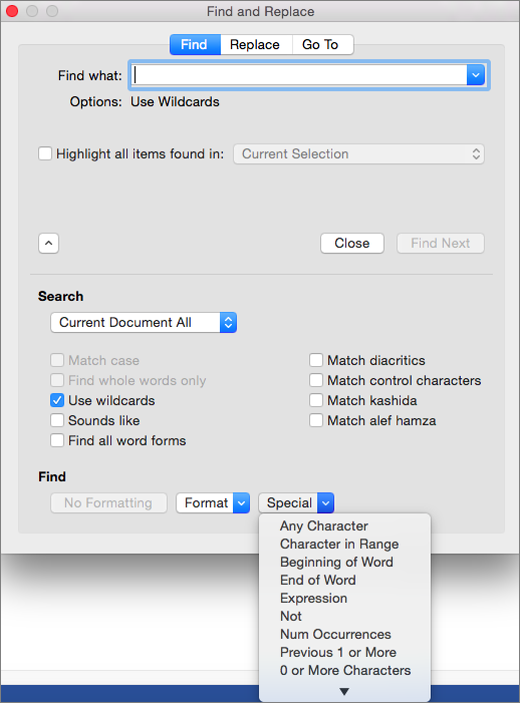
On the Special menu, select the special character that you want to find.
-
Select Find Next.

-
Select View > Navigation Pane.
-
In the Navigation Pane, select the magnifying glass.
-
Select Settings
, and then select Advanced Find & Replace.
Notes:
-
Select the arrow at the bottom of the Find and Replace dialog box to show all options.
-
-
-
At the top of the Find and Replace dialog box, select Replace and then select in the Find What box, but don’t type anything there. Later, when you select a special character, Word will automatically put the character code in the box for you.
Note: Select the arrow at the bottom of the Find and Replace dialog box to show all options.
-
On the Special menu, select the special character that you want to find.
-
Select in the Replace with box.
-
On the Special menu, select the special character that you want to use as a replacement.
-
Select Replace or Find Next.
-
Select View > Navigation Pane.
-
In the Navigation Pane, select the magnifying glass.
-
Select Settings
, and then select Advanced Find & Replace.
-
Select the Use wildcards check box.
If you don’t see the Use wildcards check box, select
. -
Select the Special menu, select a wildcard character, and then type any additional text in the Find what box.
-
Select Find Next.
Tips:
-
To cancel a search in progress, press
+ PERIOD. -
You can also enter a wildcard character directly in the Find what box instead of selecting an item from the Special pop-up menu.
-
To search for a character that’s defined as a wildcard character, type a backslash () before the character. For example, type ? to find a question mark.
-
You can use parentheses to group the wildcard characters and text and to indicate the order of evaluation. For example, search for <(pre)*(ed)> to find «presorted» and «prevented.»
-
You can search for an expression and use the n wildcard character to replace the search string with the rearranged expression. For example, type (Newman) (Belinda) in the Find what box and 2 1 in the Replace with box. Word will find «Newman Belinda» and replace it with «Belinda Newman.»
-
-
To replace found text:
-
Select the Replace tab, and then select the Replace with box.
-
Select Special, select a wildcard character, and then type any additional text in the Replace with box.
-
Select Replace All, Replace, or Find Next.
Tip: When you replace text, it’s a good idea to select Replace instead of Replace All. That way you can confirm each replacement to make sure that it’s correct.
-
 .
.
 + PERIOD.
You can refine a search by using any of the following wildcard characters.
|
To find |
Use this |
For example |
|---|---|---|
|
Any single character |
? |
s?t finds «sat» and «set.» |
|
Any string of characters |
* |
s*d finds «sad» and «started.» |
|
One of the specified characters |
[ ] |
w[io]n finds «win» and «won.» |
|
Any single character in this range |
[-] |
[r-t]ight finds «right» and «sight» and «tight.» Ranges must be in ascending order. |
|
Any single character except the characters inside the brackets |
[!] |
m[!a]st finds «mist» and «most» but not «mast.» |
|
Any single character except characters in the range inside the brackets |
[!x-z] |
t[!a-m]ck finds «tock» and «tuck» but not «tack» or «tick.» Ranges must be in ascending order. |
|
Exactly n occurrences of a character or expression |
{ n} |
fe{2}d finds «feed» but not «fed.» |
|
At least n occurrences of a character or expression |
{ n,} |
fe{1,}d finds «fed» and «feed.» |
|
A range of occurrences of a character or expression |
{ n, n} |
10{1,3} finds «10,» «100,» and «1000.» |
|
One or more occurrences of a character or expression |
@ |
lo@t finds «lot» and «loot.» |
|
The beginning of a word |
< |
<(inter) finds «interesting» and «intercept» but not «splintered.» |
|
The end of a word |
> |
(in)> finds «in» and «within,» but not «interesting.» |
Word for the web lets you find and replace basic text. You can match case or fine whole words only. For more varied options, open your document in Word for the desktop.
Need more help?
Want more options?
Explore subscription benefits, browse training courses, learn how to secure your device, and more.
Communities help you ask and answer questions, give feedback, and hear from experts with rich knowledge.
Поиск и замена текста

Совет. Видео не на вашем языке? Попробуйте выбрать Скрытые субтитры  .
.
-
Выберите Главная > Заменить.
-
Введите в поле Найти слово или фразу, которую нужно заменить.
-
В поле Заменить на введите новый текст.
-
Нажмите кнопку Заменить все, чтобы изменить все вхождения слова или фразы. Или нажимайте кнопку Найти далее, пока не перейдете к нужному вхождению, а затем нажмите кнопку Заменить.
-
Чтобы найти только вхождения в верхнем или нижнем регистре, нажмите кнопку Больше и установите флажок Учитывать регистр. В этом меню есть несколько других способов поиска.
Дополнительные параметры см. в статье Поиск и замена текста.
Поиск и замена обычного текста
В правом верхнем углу документа в поле поиска  введите слово или фразу, которые вы хотите найти, и Word выделит все вхождения этого слова или фразы в документе.
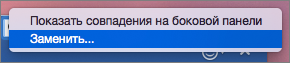
Чтобы заменить найденный текст:
-
Щелкните значок увеличительного стекла и нажмите кнопку Заменить.
-
Введите замещающий текст в поле Заменить на.
-
Нажмите Заменить все или Заменить.
Советы:
-
Вы также можете открыть область Найти и заменить, нажав клавиши CONTROL+H.
-
При замене текста рекомендуется нажимать Заменить, а не Заменить все. Таким образом можно проверить каждый элемент перед заменой.
-
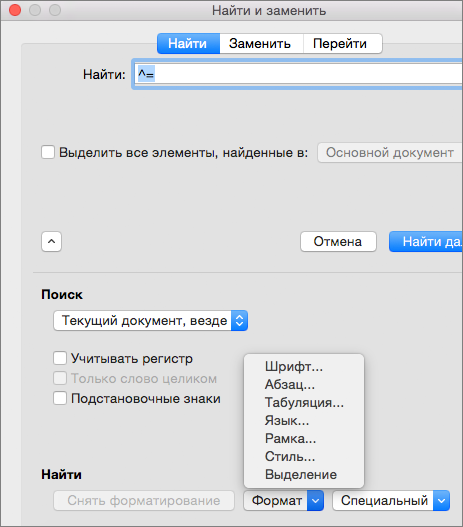
С помощью меню Формат вы можете найти текст с определенным форматированием, таким как полужирный шрифт или выделение.
-
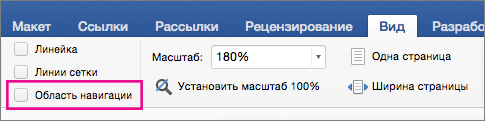
Выберите Вид > Область навигации.
-
В области навигации щелкните значок увеличительного стекла.
-
Нажмите кнопку параметров
и выберите Расширенный поиск и замена.
Примечания:
-
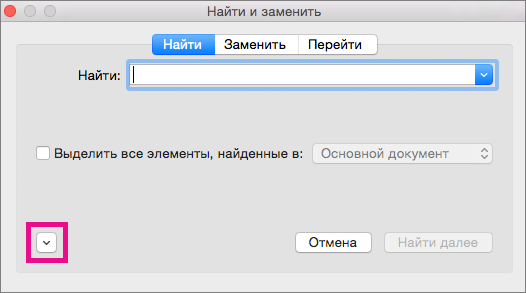
Щелкните стрелку в нижней части диалогового окна Найти и заменить, чтобы отобразить все параметры.
-
-
-
В меню Формат выберите нужный параметр.
Если откроется второе диалоговое окно, выберите нужные параметры и нажмите кнопку ОК.
-
В диалоговом окне Поиск и замена нажмите кнопку Найти далее или Найти все.
 и выберите Расширенный поиск и замена.
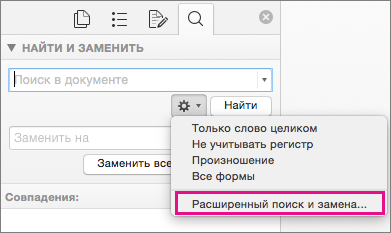
С помощью меню Формат вы можете найти и заменить текст с определенным форматированием, таким как полужирный шрифт или выделение.
-
Выберите Вид > Область навигации.
-
В области навигации щелкните значок увеличительного стекла.
-
Нажмите кнопку параметров
и выберите Расширенный поиск и замена.
-
В верхней части диалогового окна нажмите кнопку Заменить.
Примечания:
-
Щелкните стрелку в нижней части диалогового окна Найти и заменить, чтобы отобразить все параметры.
-
-
-
В поле Найти введите текст, который хотите найти.
-
В меню Формат выберите нужный вариант форматирования.
Если откроется второе диалоговое окно, выберите нужные параметры и нажмите кнопку ОК.
-
Щелкните в поле Заменить на.
-
В меню Формат выберите замещающее форматирование. Если появится второе диалоговое окно, выберите нужные форматы и нажмите кнопку ОК.
-
Нажмите Заменить, Заменить все или Найти далее.
-
Выберите Вид > Область навигации.
-
В области навигации щелкните значок увеличительного стекла.
-
Нажмите кнопку параметров
и выберите Расширенный поиск и замена.
Примечания:
-
Щелкните стрелку в нижней части диалогового окна Найти и заменить, чтобы отобразить все параметры.
-
-
-
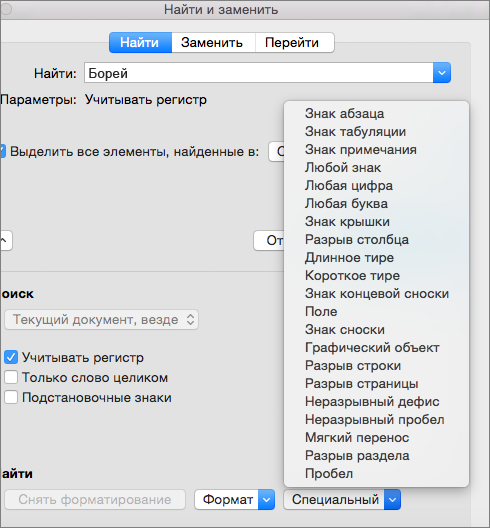
В меню Специальный выберите нужный специальный знак.
-
Нажмите кнопку Найти далее.
-
Выберите Вид > Область навигации.
-
В области навигации щелкните значок увеличительного стекла.
-
Нажмите кнопку параметров
и выберите Расширенный поиск и замена.
Примечания:
-
Щелкните стрелку в нижней части диалогового окна Найти и заменить, чтобы отобразить все параметры.
-
-
-
В верхней части диалогового окна Найти и заменить нажмите кнопку Заменить, а затем щелкните в поле Найти, но не вводите текст. После этого при выборе специального знака Word автоматически поместит код знака в соответствующее поле.
Примечание: Щелкните стрелку в нижней части диалогового окна Найти и заменить, чтобы отобразить все параметры.
-
В меню Специальный выберите нужный специальный знак.
-
Щелкните в поле Заменить на.
-
В меню Специальный выберите специальный знак, который нужно использовать для замены.
-
Нажмите кнопку Заменить или Найти далее.
-
Выберите Вид > Область навигации.
-
В области навигации щелкните значок увеличительного стекла.
-
Нажмите кнопку параметров
и выберите Расширенный поиск и замена.
-
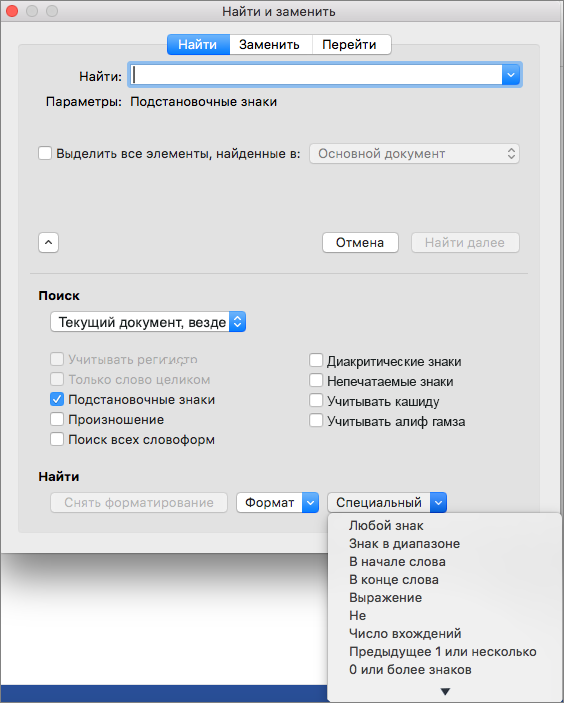
Установите флажок Подстановочные знаки.
Если флажок Подстановочные знаки недоступен, нажмите
. -
В меню Специальный выберите подстановочный знак и введите любой дополнительный текст в поле Найти.
-
Нажмите кнопку Найти далее.
Советы:
-
Чтобы остановить поиск, нажмите клавиши
+ТОЧКА. -
Вы также можете ввести подстановочный знак непосредственно в поле Найти поле, вместо выбора элемента из всплывающего меню Специальные.
-
Чтобы найти символ, который определен как подстановочный знак, введите косую черту () перед искомым символом. Например, введите ?, чтобы найти вопросительный знак.
-
Для группировки подстановочных знаков и текста, а также для указания порядка обработки знаков следует использовать круглые скобки. Например, чтобы найти слова «призвание» и «приключение», введите <(при)*(ние)>.
-
Для поиска выражения и последующего изменения порядка его компонентов используйте подстановочный знак n. Например, введите (Селезнев) (Глеб) в поле Найти и 2 1 в поле Заменить на, чтобы найти словосочетание «Селезнев Глеб» и заменить его на «Глеб Селезнев».
-
-
Чтобы заменить найденный текст:
-
Откройте вкладку Заменить и выберите поле Заменить на.
-
Во всплывающем меню Специальный выберите подстановочный знак и введите любой дополнительный текст в поле Заменить на.
-
Нажмите Заменить все, Заменить или Найти далее.
Совет: При замене текста рекомендуется нажимать Заменить, а не Заменить все. Это позволить проверить каждый из элементов и убедиться в правильности замены.
-
 .
.
 +ТОЧКА.
Поиск можно уточнить с помощью любого из следующих подстановочных знаков.
|
Чтобы найти |
Используйте |
Пример |
|---|---|---|
|
Любой символ |
? |
Выражение к?т позволяет найти слова «кот» и «кит». |
|
Любая строка символов |
* |
Выражение п?л позволяет найти слова «пол» и «пошел». |
|
Один из указанных символов |
[ ] |
Выражение кр[еа]н позволяет найти слова «крен» и «кран». |
|
Любой символ из указанного диапазона |
[-] |
Выражение [б-м]ой позволяет найти слова «бой», «вой» и «мой». Диапазон должен быть в алфавитном порядке. |
|
Любой символ, кроме символов, указанных в скобках |
[!] |
Выражение по[!р]ол позволяет найти слова «посол» и «помол», но не «порол». |
|
Любой символ, кроме символов, которые находятся в диапазоне, указанном в скобках |
[!э-я] |
Выражение к[!е-р]а позволяет найти слова «кода» и «коса», но не слова «кожа» и «кора». Диапазон должен быть в алфавитном порядке. |
|
Ровно n появлений символа или выражения подряд в тексте |
{ n} |
Выражение жарен{2}ый позволяет найти слово «жаренный», но не слово «жареный». |
|
Как минимум n появлений символа или выражения подряд в тексте |
{ n,} |
Выражение жарен{1,}ый позволяет найти слова «жареный» и «жаренный». |
|
Диапазон появлений символа или выражения подряд в тексте |
{ n, n} |
Выражение 10{1,3} позволяет найти числа «10,» «100,» и «1000». |
|
Любое, однократное или повторяющееся, появление символа или выражения в тексте |
@ |
Выражение больше@ позволяет найти слова «больше» и «большее». |
|
Начало слова |
< |
Выражение <(сол) позволяет найти слова «солнце» и «солист», но не слово «фасоль». |
|
Конец слова |
> |
Выражение (ель)> позволяет найти слова «ель» и «шрапнель», но не слово «ельник». |
Word в Интернете позволяет искать и заменять обычный текст. Вы можете использовать параметры «Учитывать регистр» или «Только слово целиком». Чтобы использовать другие параметры, откройте документ в классическом приложении Word.
Нужна дополнительная помощь?
You’ve just finished typing a presentation that’s due in about 15 minutes. But before you can celebrate your moment of victory, you realize that you’ve spelled your client‘s name wrong and have missed the double Rs in their company name multiple times throughout your document.
Cue: An aggravated scream.
The good news is that changing these small errors is an easy fix on Office 365. You can replace as many words as you want within seconds on Microsoft Word using its super helpful Find and Replace functionality.
This article will guide you through the necessary steps to help you find and replace text in MS Word.
Ready? Let’s begin.
How to Use Microsoft Word’s Find and Replace Feature
Microsoft is one of the leading companies in the world. It’s because it prioritizes its customers and comes up with innovations that can make their lives easier and more convenient.
The Find and Replace feature on MS Word is a shining example of this effort.
You can use this feature to find specific words in your file and then replace them in case there are some last-minute changes. This can even be useful when you make mistakes in the doc while typing or want to accommodate those last-minute client changes.
We’ll show you how to replace text in Microsoft Word, depending on the computer device you use.
How to Change and Replace Text in MS Word on Windows
It’s no wonder that all Windows devices have built-in Microsoft programs considering it’s a product developed by the Microsoft company themselves. If you find yourself using the word processor often for making notes or presentations, you’ll be especially thankful for the Find and Replace functionality.
Here’s a short step-by-step guide to using the feature in MS Word on Windows devices:
Step #1 Open Microsoft Word on your Windows device.
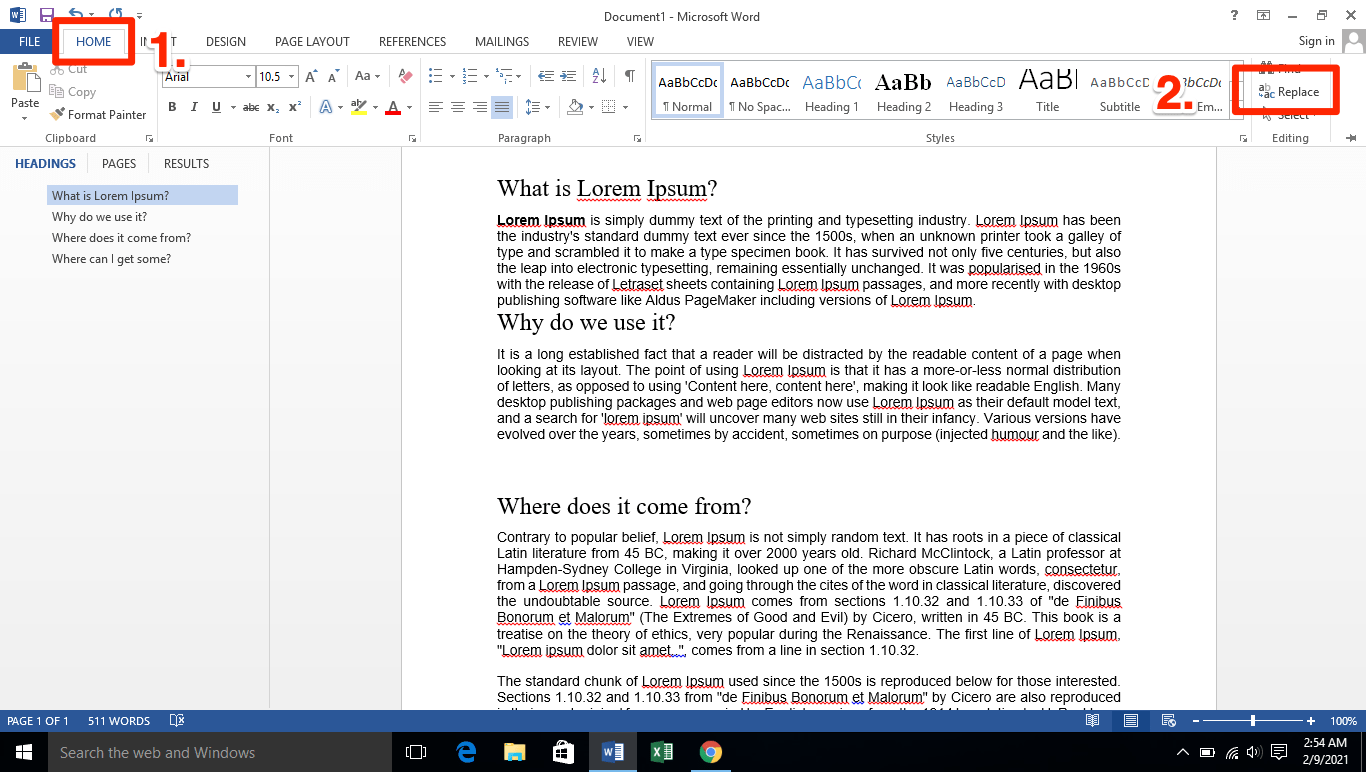
Step #2 Click on the Home tab on your top menu bar. A secondary menu will appear on your screen.
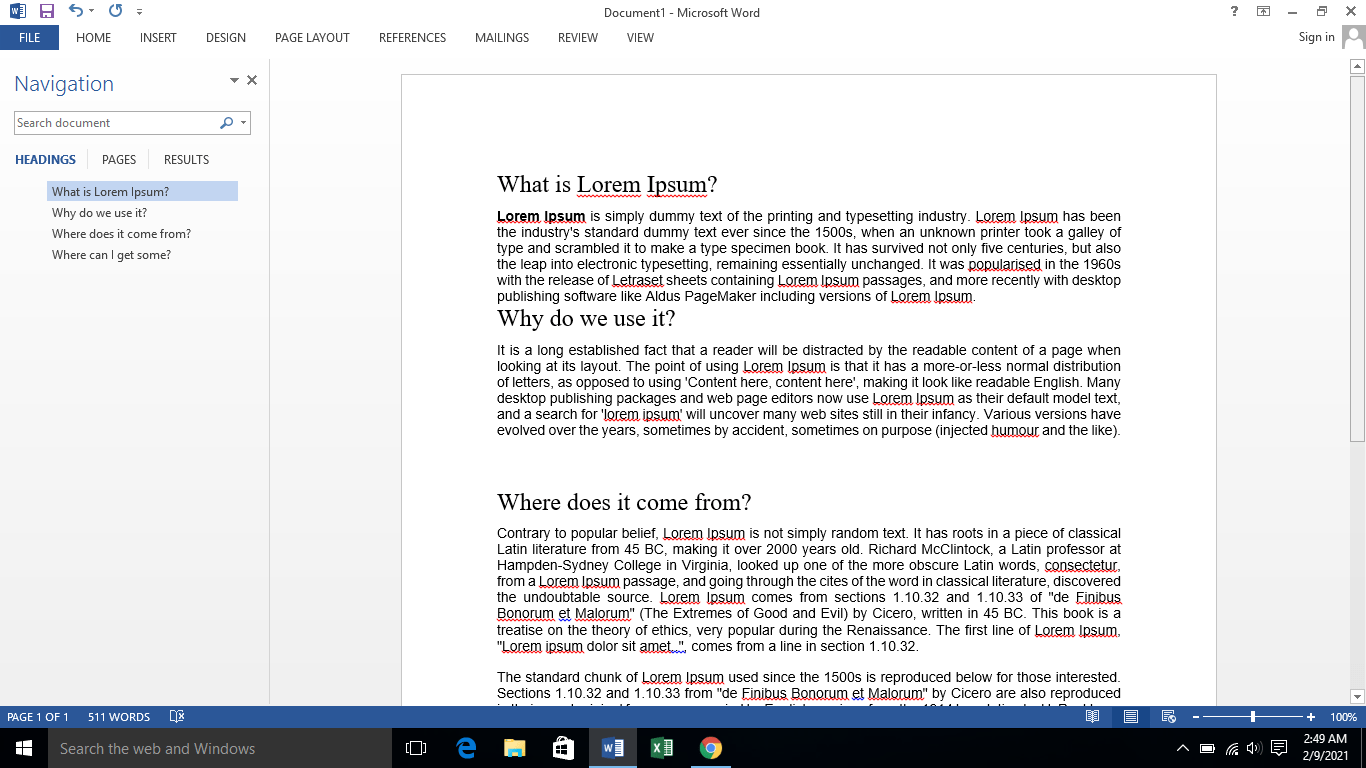
Step #3 Select the Replace option located on the top-right-hand side of your screen. Alternatively, you can also press Ctrl + H. The Find and Replace pop-up box will appear immediately.
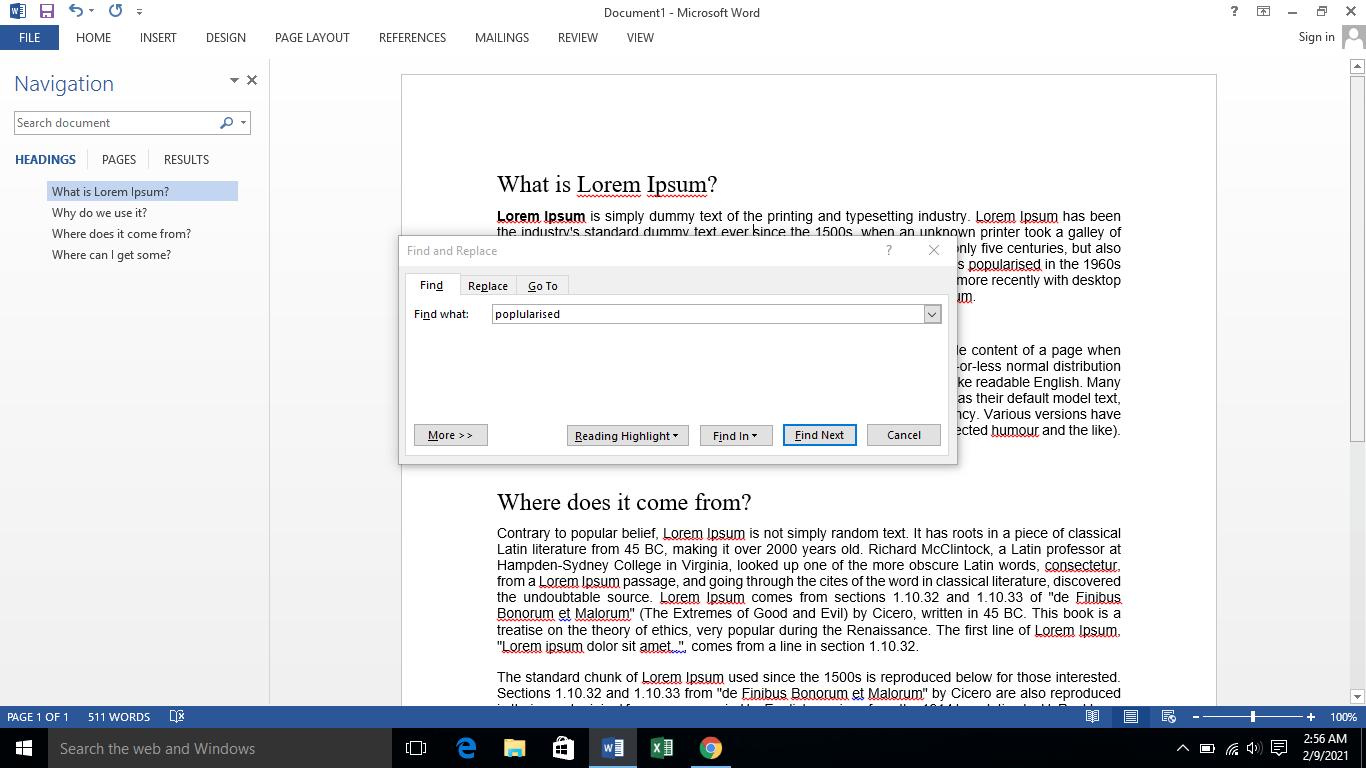
Step #4 Type in the phrase or word you want to locate in your Word doc in the Find what field under the Find tab.
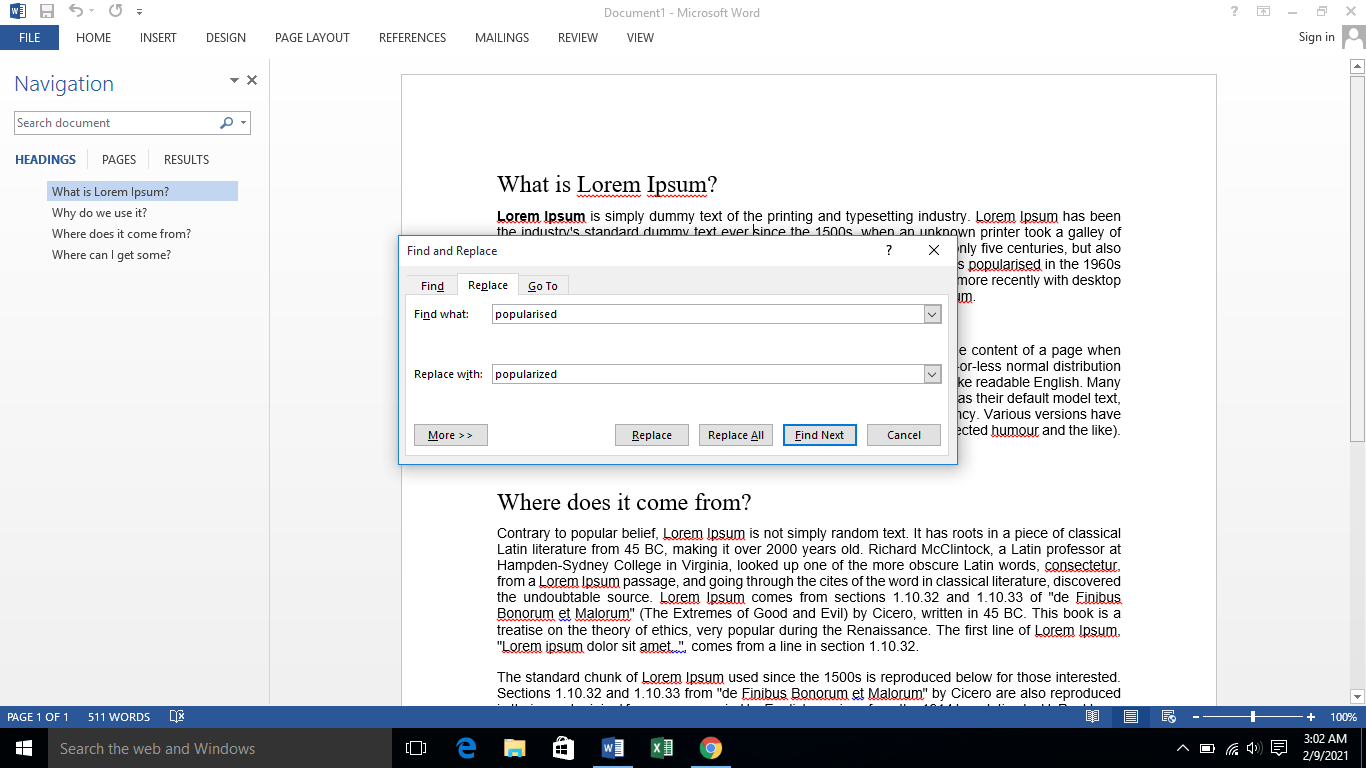
Step #5 Click on the Replace tab on the top menu bar. Type in the word you want to update in the Replace with field.
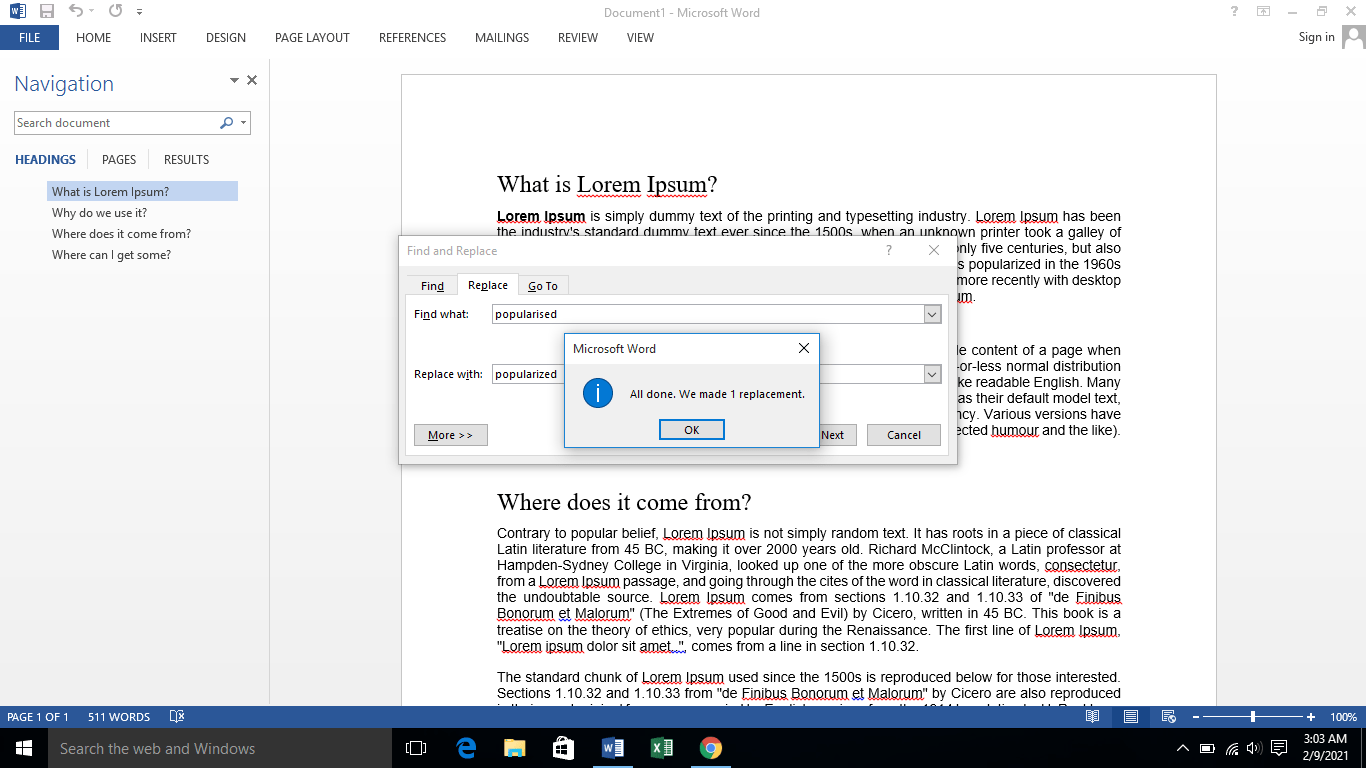
On clicking on the Replace button, the changes you want will be made one by one in the Word doc. However, if you want to update all fitting instances at once, you can click on Replace All instead.
Microsoft Word will give you a confirmation of the replacements made in your Word doc. It’ll look something like this:
How to Change and Replace Text in MS Word on Mac
Now that we’ve covered Windows, let’s see how you can use the Find and Replace feature on a MacBook. Here’s how to proceed in MS Word when you’re using an iOS device:
Step #1 Open the Microsoft Word document on your Mac.
Step #2 Take your cursor towards the top of your screen until you see your Mac’s top toolbar. Click on the Edit tab. A dropdown menu will appear.
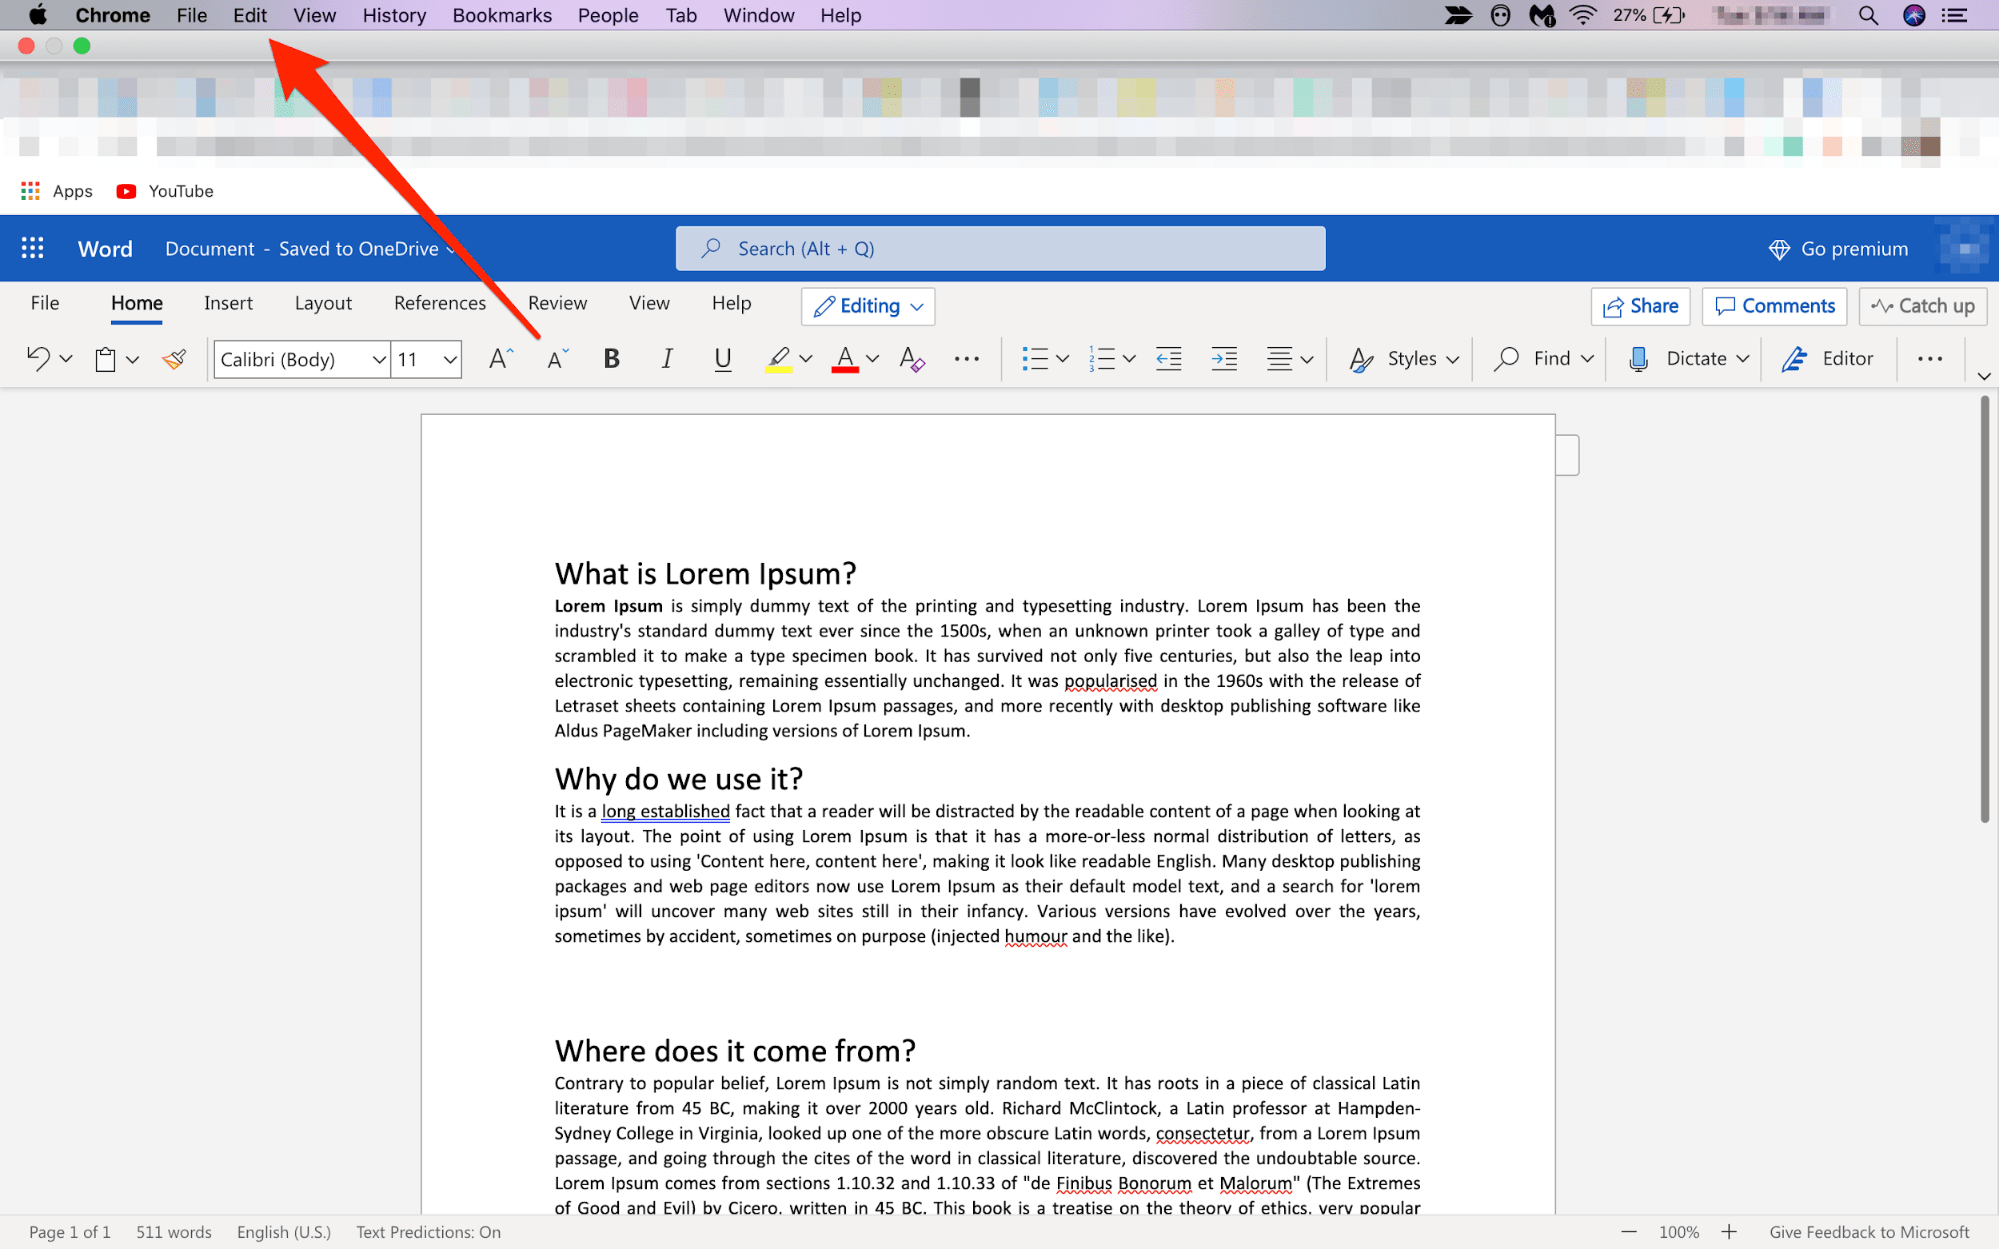
Step #3 Click on Find from the displayed menu options. You’ll typically see a Replace… option on your screen.
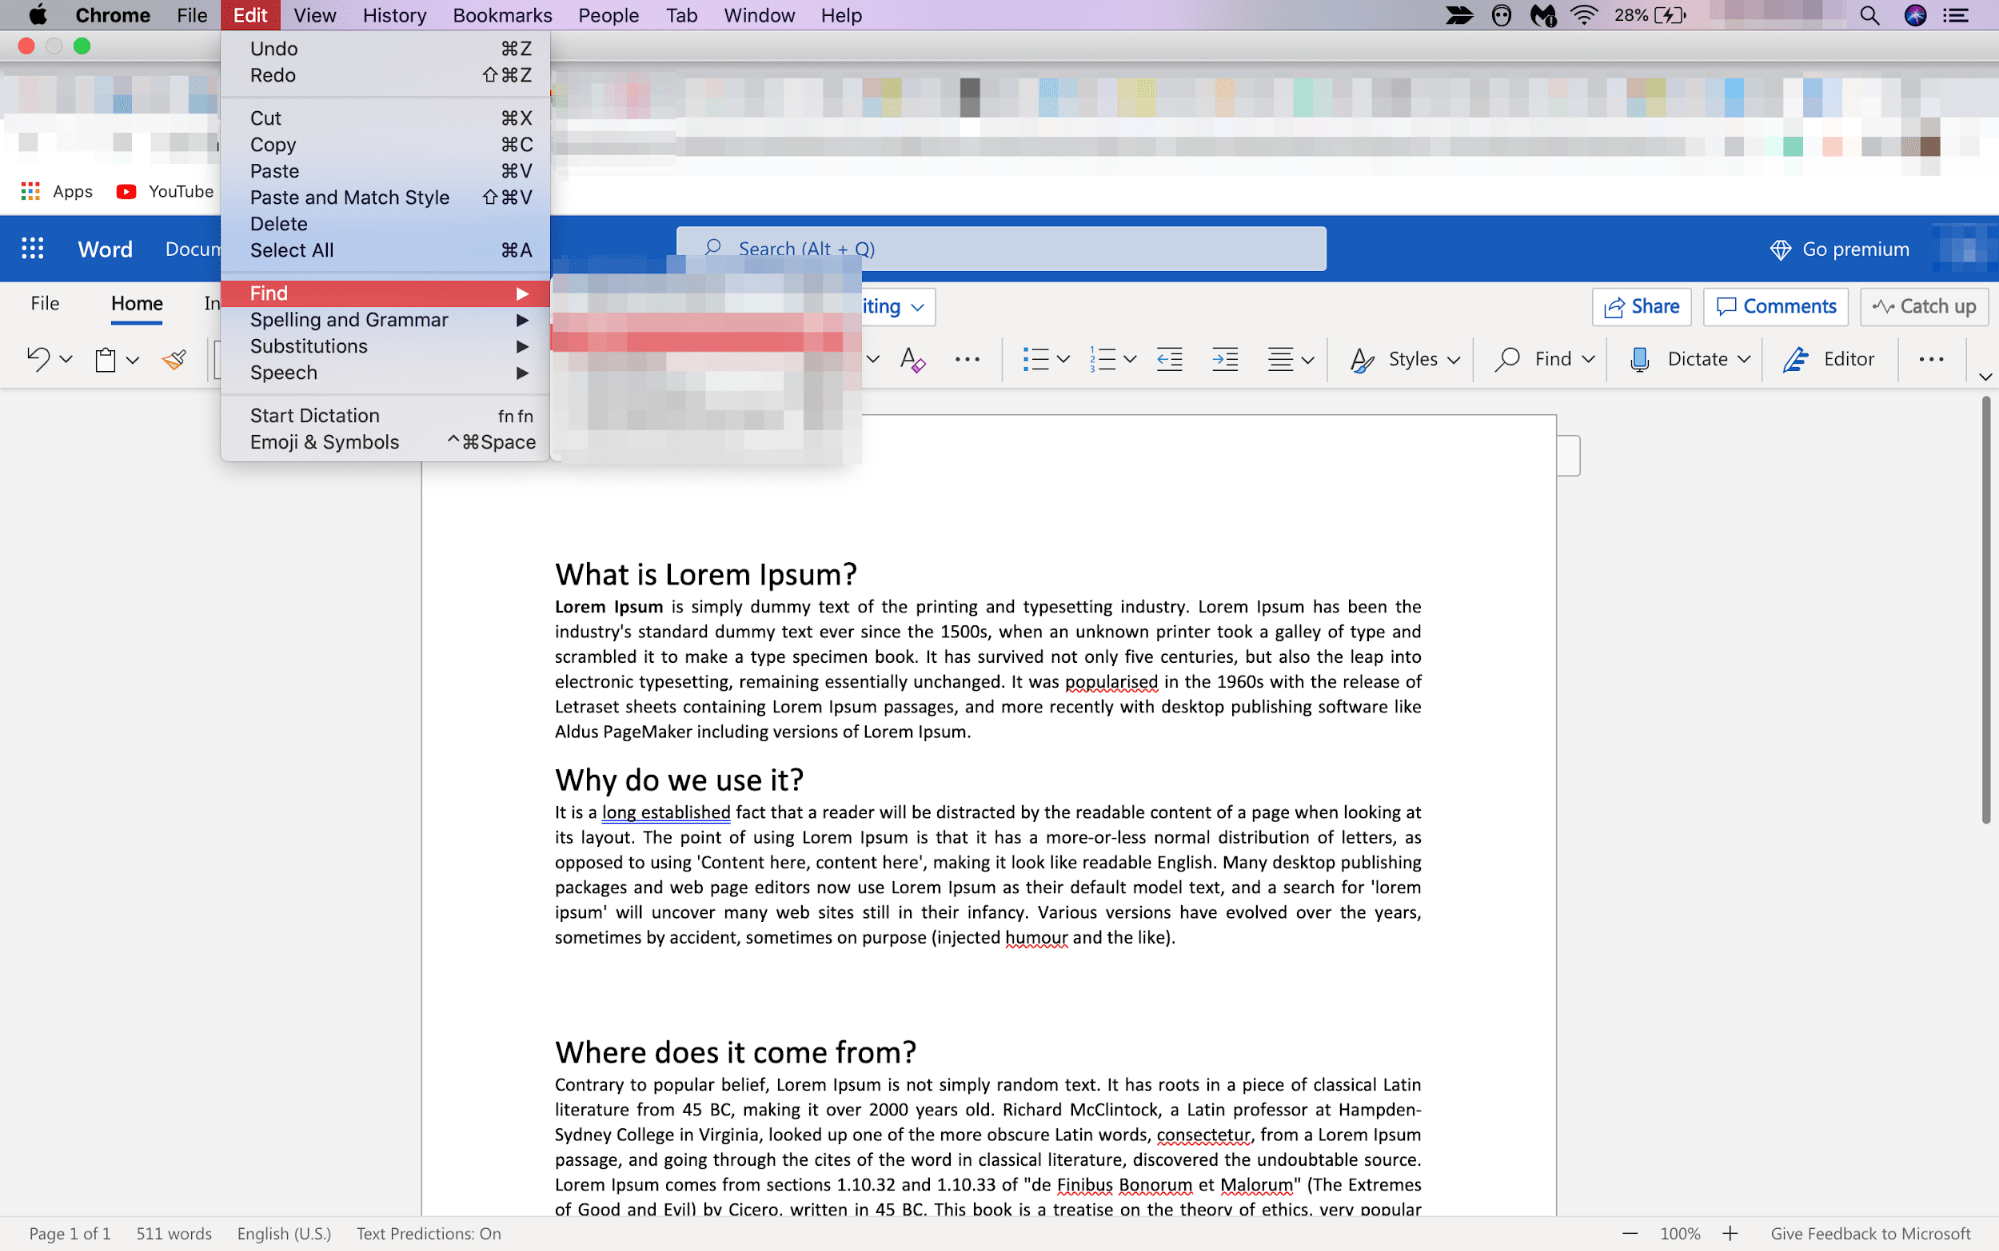
But if you don’t, simply press Shift + Command + H on your keyboard. A side navigation bar will appear on the left-hand side of your computer screen.
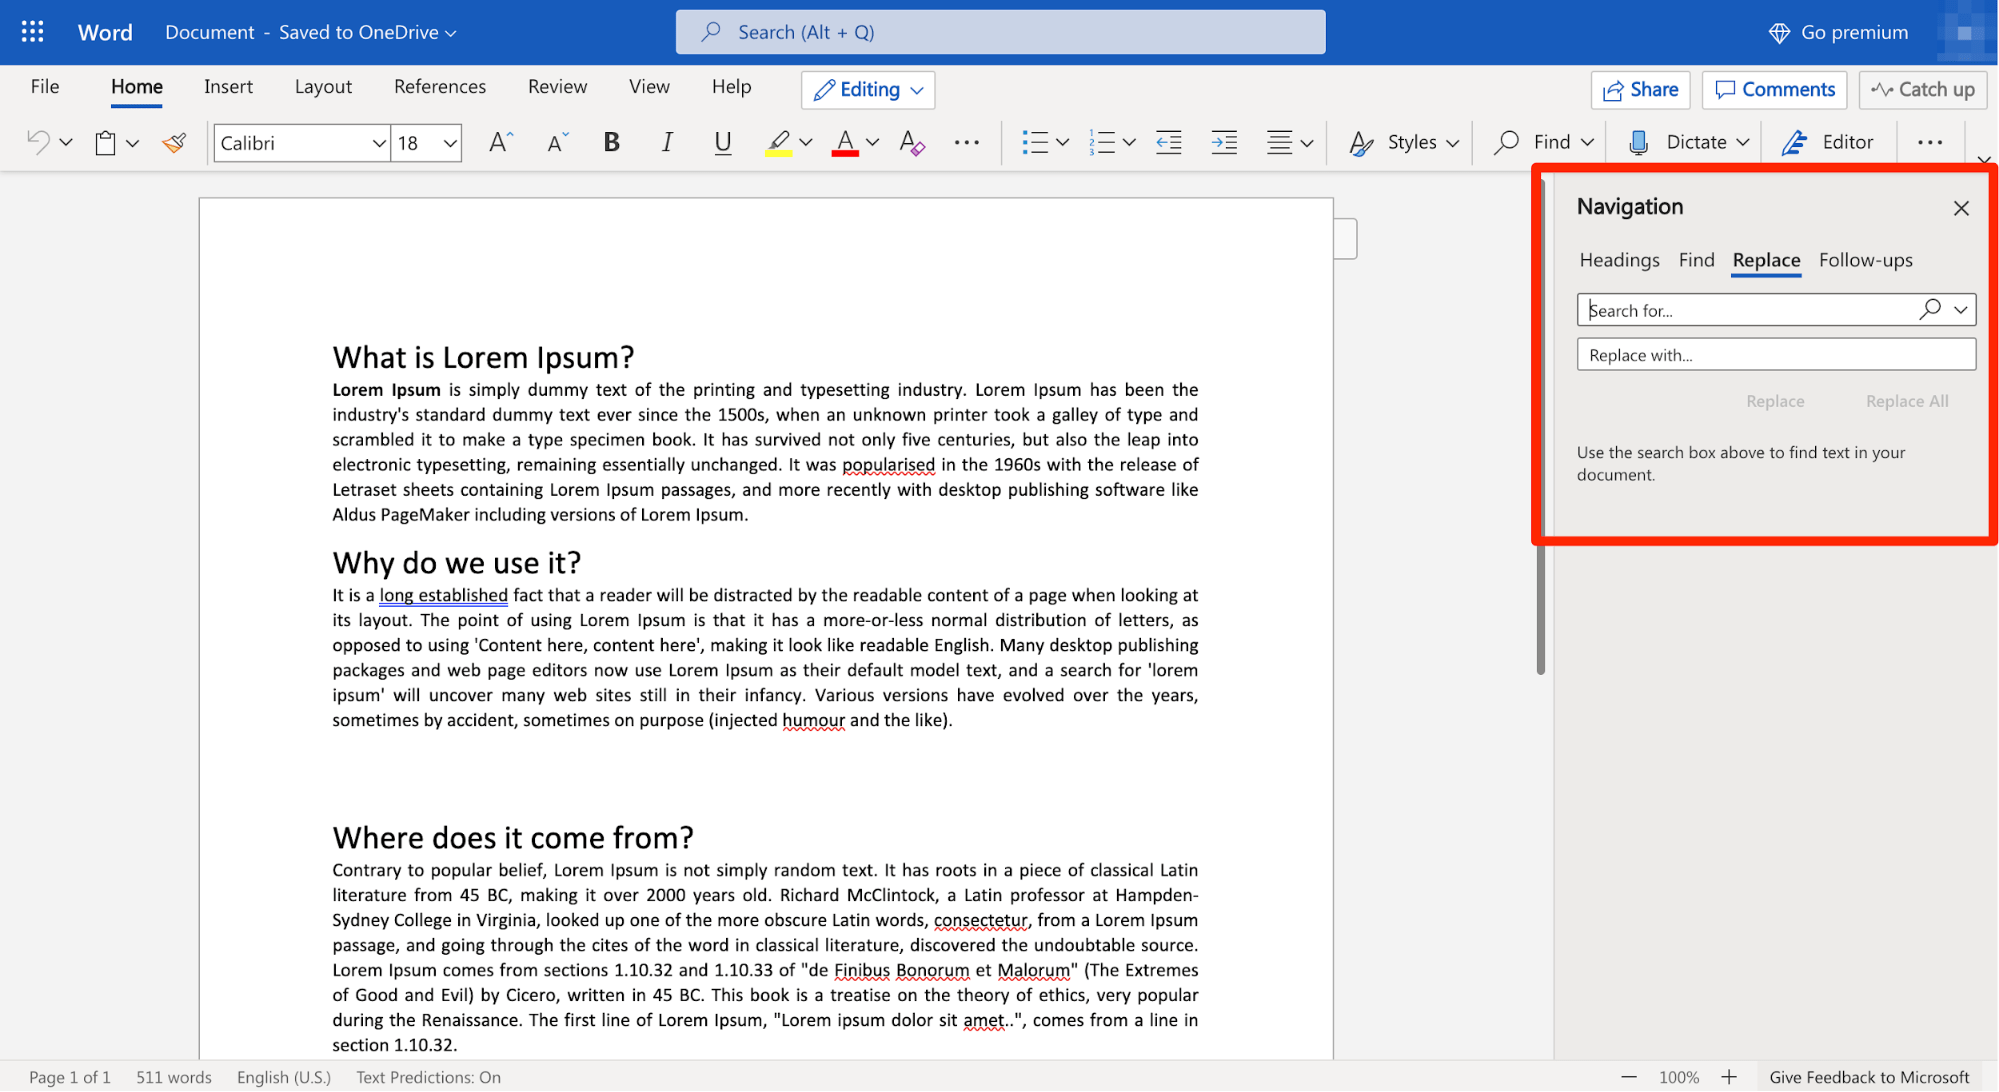
Step #4 Enter the word or phrase you want to replace in the doc in the Search for… field.
Once you’ve finished typing the incorrect word or phrase, type in the right word or phrase that you want to replace the incorrect one with in the Replace with… field.
Step #5 Click on the Find tab to locate the matches. Once you’re sure the match is right and highlighting the words you want to change, select Replace. This will replace every individual match one by one.
Again, if you click on the Replace All button, all the matching words and phrases will be changed at once.
After the changes are made, you’ll see an “All Done” message just below the Replace and Replace All buttons that indicate the replacement of the intended word or phrase.
Advanced Find and Replace Features: Everything You Need to Know
You can take this whole shebang of replacing words and phrases to the next level thanks to Microsoft Word’s Advanced Find and Replace option. In other words, you can use the Advanced settings to simplify the process further and make the results even more accurate.
Follow the previously stated steps to open the Find and Replace pop-up box. On it appears on your screen, click on More.
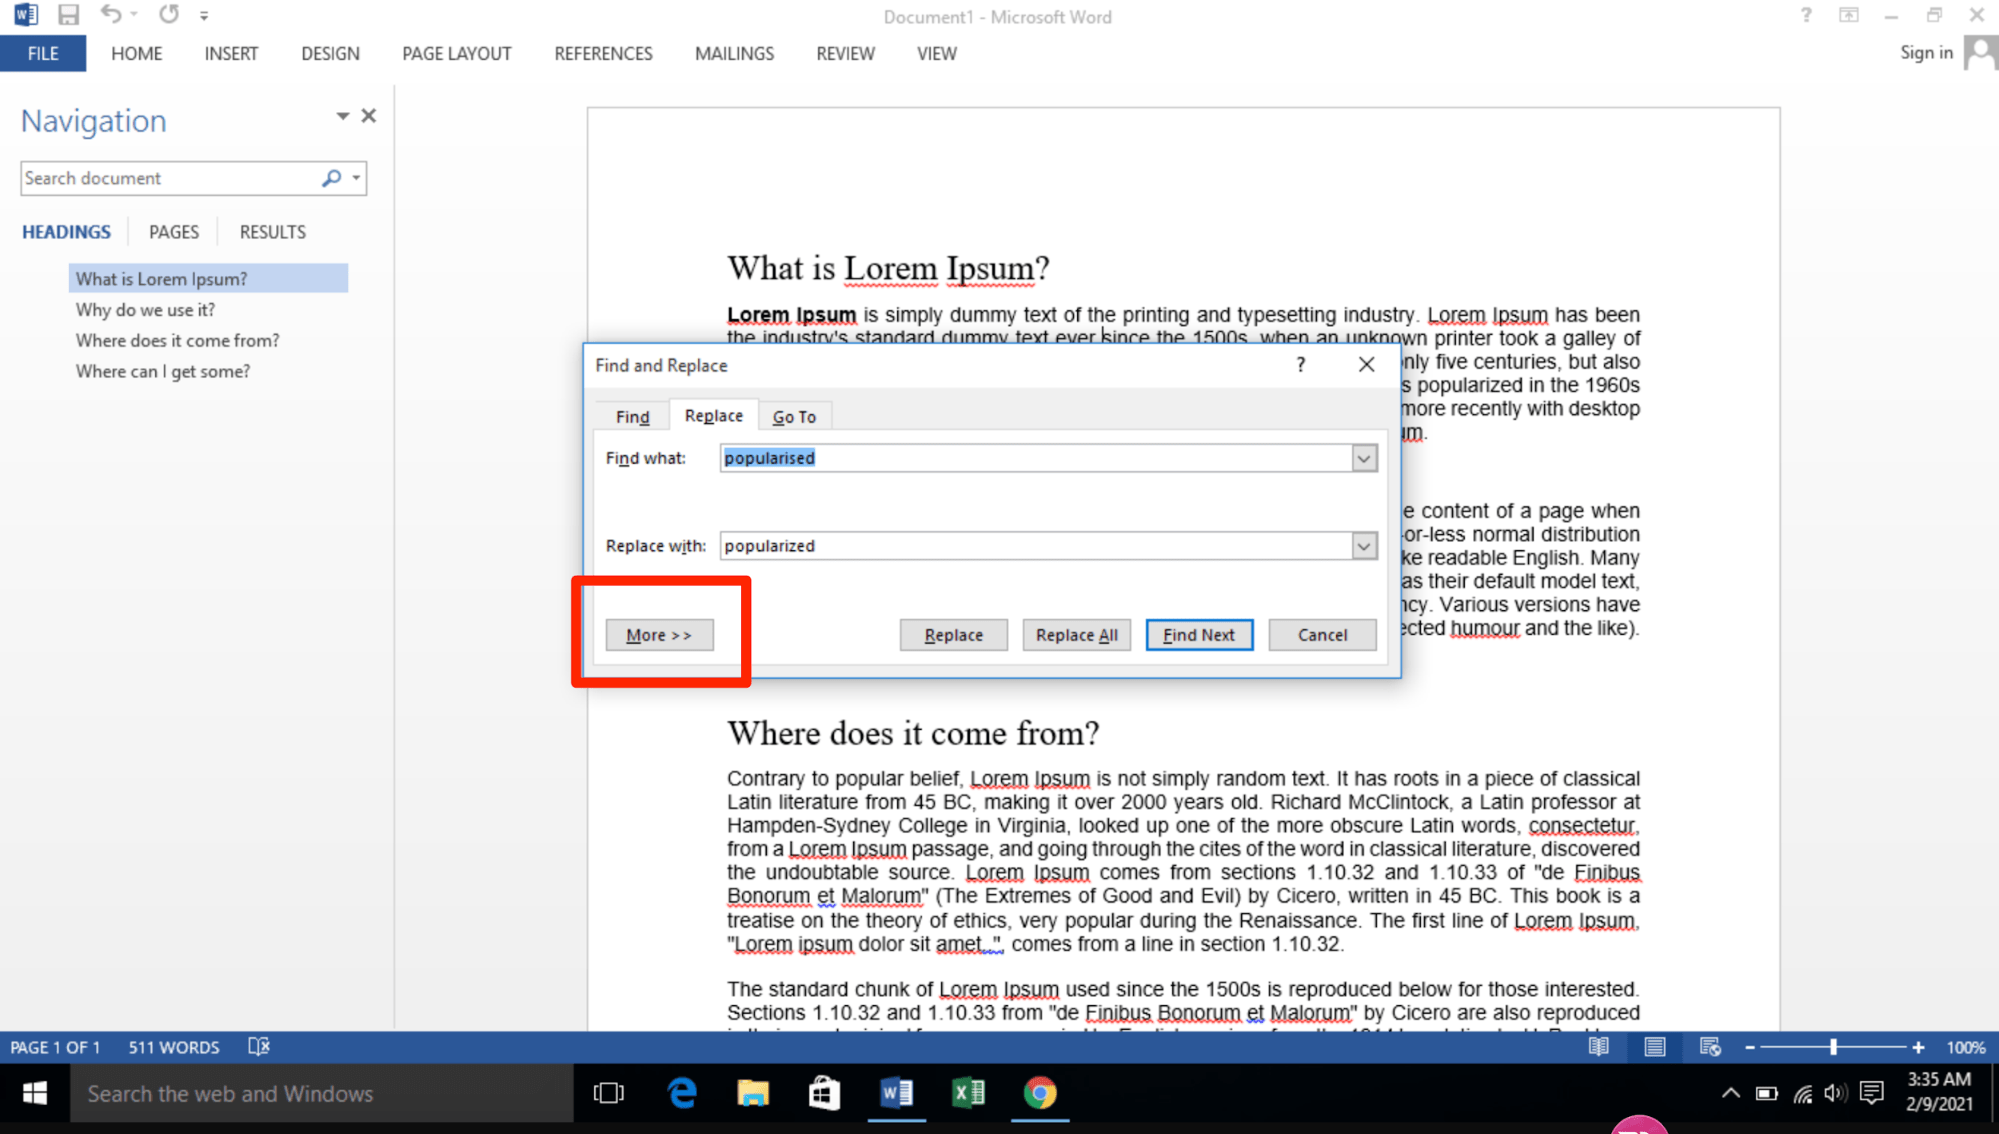
You’ll immediately see a slew of additional options like Match case, Use wildcards, Match prefix, Match suffix, and so on. Here’s how the Advanced Find and Replace settings look like:
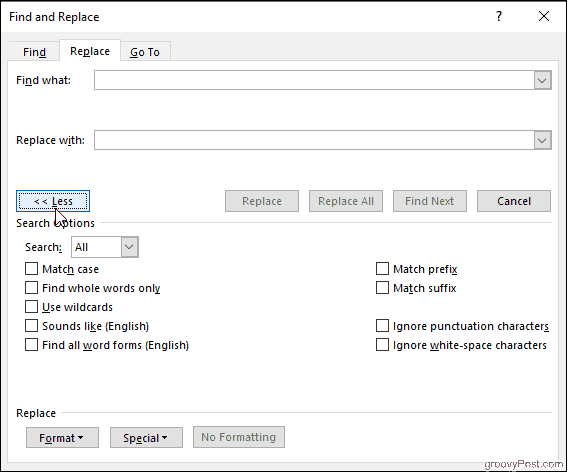
Each one of these has its own unique functions. Let’s discuss them in more detail below:
Find whole words only
If you check on the Find whole words only box, MS Word will treat your search term as an entire word and won’t look for your search term within other words.
Example: If you’re searching for the word “stand,“ the search feature won’t show you the word “standard.”
Use wildcards
Use wildcards is one of the more advanced search options that allows you to use question marks, brackets, asterisks, and other similar symbols to modify your search.
You see, a wildcat is a short string of characters – or a character – that represents multiple characters in a search.
Example: <(int)*(net)>
Sounds like (English)
As the name suggests, the Sounds like option finds similar-sounding words to your search term. This is best for finding homonyms and words that have varying spellings.
Example: This is common for words that have both UK and US variants. For instance, you can have both “colours” and “colors” on a document.
Find all word forms (English)
This option allows you to look for the word you searched for, along with other instances that are either plural or in a different tense.
Example: If you search for the word “be” after enabling the Find all word forms option, you’ll also find the words “are“ and “is“ highlighted as they are the different tense forms of “be.”
Match prefix and Match suffix
Checking off the Match prefix or Match suffix fields will limit your search to words that have the same beginning or the same ending, respectively.
Example: Suppose you enable Match prefix. When you search for the word “love,” Microsoft Word will find the words “love“ and “lovely.“ However, you won’t find the word “beloved“ highlighted in the search results as it’s a suffix of love.
Ignore punctuation characters and Ignore white-space characters
Again, this search option is self-explanatory. It tells Microsoft Word not to take up spaces, periods, hyphens, and similar attitudes into consideration.
Example: After clicking on the search options, when you type in “color block”, you’ll also see “color-block.”
When to Use the Find and Replace Feature of Microsoft Word
The whole point of the Find and Replace function in Microsoft Word is to allow MS Word users to search for target text – whether it’s a specific word, a type of formatting, or a string of wildcard characters – and replace them with whatever you want.
Typically, here’s why you should use this feature:
- When you want to maintain absolute consistency in your document
- When you want to speed up typing and formatting tasks
- When you realize last-minute mistakes and want to find and then replace your errors
- When you’re writing a document that includes words with varying spellings. For instance, if you typically follow US English, and are typing a doc according to the rules of UK English, the Find and Replace feature would be super helpful to identify and change spelling errors.
- Adding special characters to words
- editing partial words and phrases
- Correcting words that you may have misspelled in a hurry. For instance, if you type “h?t” instead of “hat” and enable Use wildcards, you’ll find it highlighted in your search.
- Eliminating extra spaces
- Changing the separator character in numerals
- Reversing currency symbols
Concluding Thoughts
As you may have realized, the Find and Replace feature of Microsoft is a lifesaver, to say the least.
It can help you save tons of time, which would otherwise have been wasted in looking for errors and then replacing them. Whether you are a student, an intern, or the CEO of a company, this is a functionality that we all can be very thankful for.

Have you ever finishing typing a letter, report or presentation only to discover that you misspelled a person’s name or had the wrong company listed multiple times throughout your document? No worries—it’s an easy fix. Using Word’s Find and Replace feature, you can quickly locate and replace text. Let’s see how it works.
Switch over to the “Home” tab on Word’s Ribbon and then click the “Replace” button.

This opens Word’s Find and Replace window. In the “Find What” box, type the word or phrase you want to locate. If you only want to find text in your document, you can go ahead and click the “Find Next” button to have Word jump to the next occurrence of that word. Keep clicking it to browse through all the results.
If you want to replace the text you find with something else, type the replacement text into the “Replace With” box. You can enter up to 255 characters in the both the “Find What” and “Replace With” boxes, by the way.
In this example, let’s say we want to replace the name “Williams” with the name “Billingsly”, so we’ve typed that text into the respective boxes. Next, we’d click the “Find Next” button to have Word locate the first instance of the text in the “Find What” box.
Word jumps the document to that point and highlights the result in gray, still keeping the Find and Replace window on top for you. Click the “Replace” button to replace the currently selected result with whatever text is in the “Replace With” box.
To replace all instances at once without stopping and reviewing each one, you can click the “Replace All” button.
Be careful when using “Replace All” because it will automatically replace all instances, including those you might not want to replace. In the example below, there are three more instances of “Williams,” but we only want to replace the next two. In this case, we would only click “Replace” for the second and third instance.
If there is a particular instance where you don’t want to replace the text, click “Find Next” as many times as needed until you come to an example where you need to replace text.
To exit from Find and Replace, click the “Cancel” button.
Of course, since it is Word we’re talking about here, there are also lots of other things you can do to make your searches more sophisticated:
- Use wildcards in your searches to narrow them down to more specific results.
- Search directly within Word’s Navigation pane to have Word show you which headings have your search terms included under them.
- Replace double spaces between sentences with single spaces.
- Search for specific formatting or special characters.
The basic of searching and replacing text in Word are pretty straightforward, but there’s a lot you can do with it once you start digging.
READ NEXT
- › How to Replace Any Character with Newlines in Notepad++
- › How to Search in Google Docs
- › How to Use Find and Replace in Google Docs
- › What Your Function Keys Do in Microsoft Word
- › How to Search for Text in Word
- › How to Find and Replace Formatting in Microsoft Word
- › How to Delete a Page in Microsoft Word
- › Spotify Is Shutting Down Its Free Online Game
How-To Geek is where you turn when you want experts to explain technology. Since we launched in 2006, our articles have been read billions of times. Want to know more?
Exchange one text string for another in any version of Word
Updated on October 29, 2021
What to Know
- Open the Find and Replace tool in Word with the keyboard shortcut CTRL+H.
- Find and Replace doesn’t take capitalization into account unless you specifically tell it to.
- To replace capitalization, select More in the Find and Replace box, then Match Case > Replace or Replace All > OK.
All editions of Microsoft Word offer a feature called Find and Replace. Use this tool to search for a specific word, number, or phrase in a document and replace it with something else. You can also make several replacements at once—like changing a name or fixing something you’ve consistently misspelled. Use it, also, to replace numbers or punctuation and cap or uncap words.
If you turn on Track Changes before you begin, you can reject the replacement or deletion of any unintended word.
Find and Replace a Word
The Microsoft Word Find and Replace dialog box, in its simplest form, prompts you to type the word you’re looking for and the word you want to replace it with. Then, click Replace, and either allow Word to change every entry for you or, go through them one at a time.
To open the tool, press Ctrl+H (Cmd+H on Mac).
Change Capitalization in Microsoft Word
The Find and Replace feature doesn’t take into account anything about capitalization unless you specifically tell it to. To get to that option you’ll need to click the More option in the Find and Replace dialog box:
- Open the Find and Replace dialog box using your favorite method. We prefer Ctrl+H.
- Click More.
- Type the appropriate entry in the Find What and Replace With lines.
- Click Match Case.
- Click Replace and Replace again, or, click Replace All.
- Click OK.
Advanced Options
When you select the More expander in the Search and Replace dialog box, you’ll encounter several customizations. The list of items varies according to which version of Word you’re running.
Search Options
Select the check boxes to include or exclude things like punctuation, white-space characters, or substrings. Plus, apply tools like word-form matching (i.e., walked also matches walking) and Soundex matching (Karin matches Karen).
Replace Options
Word supports more advanced substitutions, too. Use special characters to substitute text markup with symbols. For example, replace a character code like & with an ampersand. This approach is useful for de-cluttering pasted HTML text that uses HTML codes to render certain symbols.
Thanks for letting us know!
Get the Latest Tech News Delivered Every Day
Subscribe