
Symptoms
When you type the letter «i» followed by a mathematical symbol, the letter is not automatically capitalized.
You expect the letter «i» to be automatically capitalized as it is in earlier versions of Microsoft Word.
Cause
Microsoft Word 2002 and later versions of Word do not automatically capitalize the letter «i» when the letter is placed before mathematical symbols or certain punctuation marks.
More Information
Word automatically capitalizes the letter «i» in the following situations:
-
When it is placed before a comma
-
When it is placed before a blank space
-
When it is placed before a single quotation mark
For example, «i’ve» is changed to «I’ve.»
-
When it is placed before a double quotation mark
For example, «i»m» is changed to «I’m.»
-
When it is placed before a semicolon
For example, «i;d» is changed to «I’d.»
Word no longer automatically capitalizes the letter «i» when it appears before a mathematical symbol. For example, «i=2» is no longer changed to «I=2».
This is changed from previous versions in order to accurately display mathematical equations.
Word no longer automatically capitalizes the letter «i» when it appears before a colon. For example, «i:2» is no longer changed to «I:2».
This is changed from previous versions in order to accurately display worksheet cell entries.
To view the Word capitalization options, follow these steps:
-
Start Word.
-
On the Tools menu, click AutoCorrect Options.
-
On the AutoCorrect tab, select or clear the check boxes that you want.
For more information, click the following article number to view the article in the Microsoft Knowledge Base:
291538 Word does not capitalize the first letter of a sentence
Need more help?

Microsoft Word defaults to automatically capitalizing the first letter of a word in a sentence when it is typed. This can be convenient, or very annoying, depending on how you type, and thus first letter auto-capitalization is one of those Word features that is either loved or hated. If you fall into the latter camp and want to stop Word from automatically capitalizing the first letter of a word in a sentence, then you’re in the right place.
This article will show you how to disable first letter capitalization in the Word app of the Microsoft Office suite.
How to Disable Automatic Letter Capitalization in Word
This tutorial demonstrates turning off automatic first letter capitalization on Word for Mac, but the steps should be the same for Microsoft Word on a Windows PC or Mac:
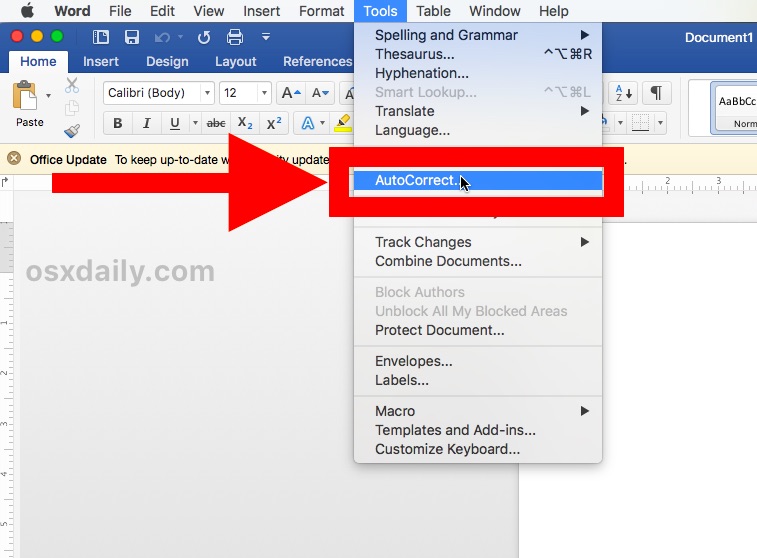
- Open Word if you have not done so already and create a new document or open any Word doc
- Pull down the “Tools” menu and choose “Autocorrect”
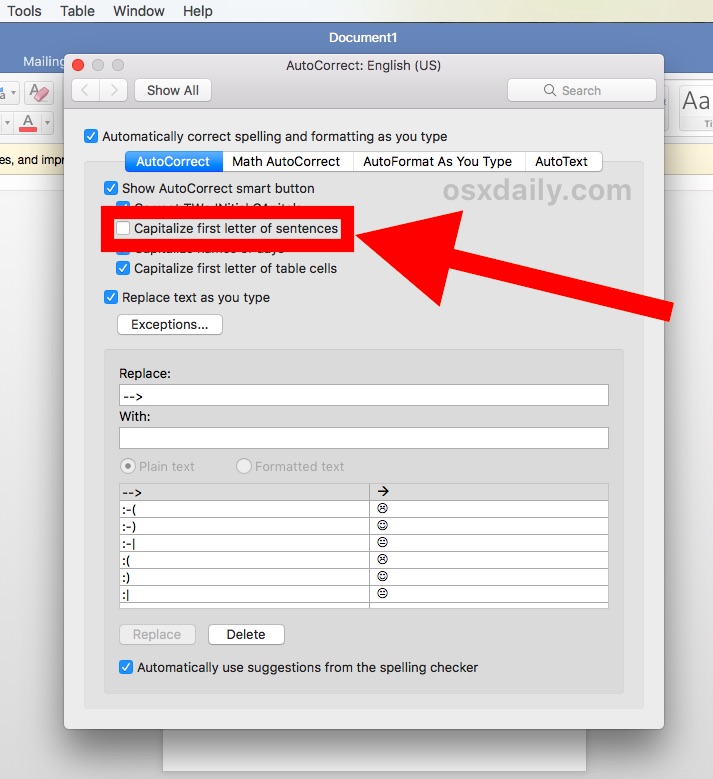
- Locate the setting for “Capitalize first letter of sentences” and uncheck the box next to it
- Close out of Autocorrect settings and use Word as usual, the first letter of a new sentence will no longer automatically capitalize
Now you can type a new sentence or any word after a period and it will no longer automatically capitalize the first letter of a word after a period. Instead you’ll be using the Shift key to capitalize words yourself, as is the case with most other apps and typing experiences.
Some people really enjoy this feature because they feel it makes their typing a bit quicker or less prone to typographical errors, whereas some other people absolutely hate it because it’s not always appropriate to capitalize the first letter of a word at the start of a new sentence or after a period. Auto-capitalization can be particularly annoying if you’re comparing versions of Word documents side-by-side and you’re editing or rewording sentences and the auto-capitalization feature can kick in during that editing process, leaving you with more corrections necessary. Another situation where some people really don’t like the feature is if you frequently switch between multiple word processing apps (Word, Pages, LibreOffice, etc) and want the same general behavior to exist across all apps, particularly in regards to capitalizing words and using the Shift key.
Note this is an Office and Word specific setting, so changing this here will have no impact on other apps or the computer in general.
You’ll find that Office apps and Word have many other autocorrect options and settings available, each of which is separate from the universal Mac OS autocorrect setting that can be disabled systemwide but will not apply to app-specific autocorrect settings like those found in Word or even Pages and TextEdit, and the Mail app, which also have unique app-specific autocorrect options.
Did you find this helpful? Do you know any other particularly great Word tips or tricks? Share them in the comments! And you can find more helpful Microsoft Word tips here too.
Well, I didn’t think it was possible, but it is! You CAN stop Word from auto capitalizing the first word in a bullet list item, but there’s a trick to doing it.
By default, Word has the settings for Capitalize the first letter of sentences and Format the beginning of list item like the one before it turned on (in Word 2010, both settings are under File > Options > Proofing > AutoCorrect Options, on the AutoCorrect and AutoFormat As You Type tabs, respectively). Make sure these settings are both turned on. Yes, it seems strange to keep the Capitalize the first letter of sentences turned on, but you need this on for all you normal sentences. Unfortunately, Word considers any bullet list item to be a ‘sentence’ even if it’s not, and so it automatically capitalizes the initial letter of the first word. This is a real pain if your style guide says NOT to capitalize list items that are sentence fragments, single words etc.
So, how do you stop Word from auto capitalizing the first letter in each bullet item? You have to tell Word to undo what it’s just done, and then it will ‘remember’ that choice for subsequent items in the same bullet list. Bottom line: Ctrl+Z.
Here’s how:
- Type a lead-in sentence to a bullet list as normal (the first letter of the first word will automatically capitalize). Press Enter to go to the next line.
- Type the first word of the first bullet item in lower case and press the spacebar.
- Immediately after pressing the spacebar, press Ctrl+Z. This will undo the previous action (i.e. convert the automatically capitalized first letter back to a lower case letter).
- Continue adding words to the first list item, as required. Press Enter for the next item.
- Continue adding other bullet list items — each one should now start with a lower case letter.
- Apply the bullet style to your list, as required.
- Start typing the next paragraph. Notice that the first letter of the word is in lower case — you will have to manually change this one to upper case. It’s in lower case as it’s following the ‘follow formatting’ rule (and not 100% either!). But changing one lower case letter here is easier than changing many in a long list.
Unfortunately, this trick works for a single list sequence. Once you’ve switched back to the upper case letter for the start of the next paragraph, that setting will hold for the rest of the document unless you change it again. So, you’ll have to repeat the Ctrl+Z trick after the first word in any later bullet lists. However, once you’ve got into the habit of doing it, it shouldn’t be hard to remember.
Other tips:
- To quickly change case, select the letter/word/paragraph, then press Shift+F3 (see https://cybertext.wordpress.com/2010/09/02/word-change-case/ for more details)
- To change the case of the first letter in a bulleted list, see https://cybertext.wordpress.com/2011/07/14/word-change-the-case-of-the-first-letter-of-each-bullet-list-item/ (note: this doesn’t work very well in Word 2007 and later, though it worked really well in Word 2003)
[Links last checked February 2013]
Word offers you a few ways to change and control capitalization in a document when you’re trying to get stuff done.
Managing uppercase and lowercase text in Word can be a challenge. Sometimes Word automatically tries to correct a word based on capitalization but makes the wrong assumption. Other times you might have an entire word or phrase in lowercase that you want to convert to uppercase, or vice versa. Word provides several options and shortcuts that can help you more easily change and control the capitalization of text. Here’s how they work.
SEE: 83 Excel tips every user should master (TechRepublic)
For this article, I’m working with the version of Word from Microsoft 365. But the tips here apply to any desktop version of Word from the past few years though not to the free online edition.
By default, Word automatically capitalizes words in a certain context, such as those at the beginning of a sentence or the days of the week. If you’d prefer to handle the capitalization yourself, you can control these options. From Word, click the File menu and select Options. At the Word Options window, select the Proofing category and click the button for AutoCorrect Options (Figure A).
Figure A

Make sure the AutoCorrect tab is selected. Here, you can check or uncheck several options for capitalization. The first option automatically changes the second letter in a word from uppercase to lowercase if you type two uppercase characters in a row.
The next three options control capitalization for the first letter in a sentence, the first letter in a table cell, and the first letter in a day of the week.
The fifth option changes the appropriate letters in a word from uppercase to lowercase if you accidentally press the Caps Lock key and then turn it off in the middle of typing the word.
Experiment with some of these settings turned on and off to see whether the autocorrect feature helps you or gets in your way (Figure B).
Figure B

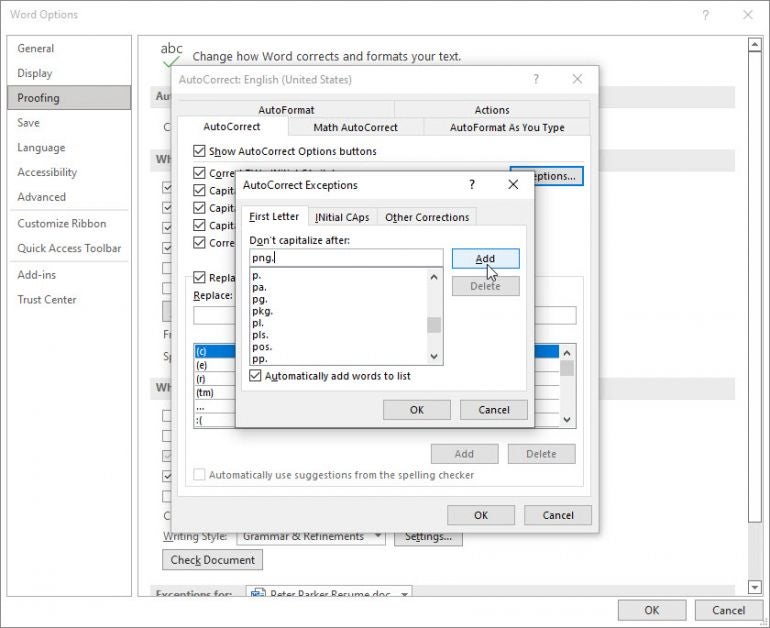
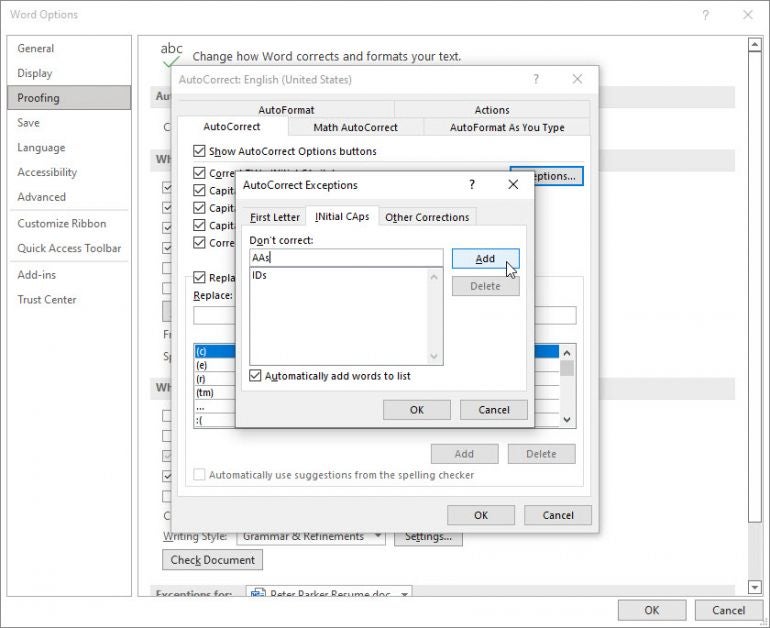
If you wish to keep all or most of these autocorrect settings enabled but don’t want certain words automatically changed, just add them as exceptions. To do this, click the Exceptions button.
The first section for First Letter will not change the first letter from lowercase to uppercase for any entries. Scroll down the list to see the existing entries. Select any you want to delete and click Remove. Type a new word or term that you want to include in the list and click Add (Figure C).
Figure C
The second section for Initial Caps will not change the second letter in a word from uppercase to lowercase if the first two letters are uppercase. Again, select any existing entries you want to remove. Type any words or terms you want to include and click Add (Figure D).
Figure D
The third section for Other Corrections applies to any words that don’t fit the first two sections. Type a word or words you wish to include and click Add (Figure E).
Figure E

When finished, keep clicking OK until you’ve closed all the Word Options windows and are back at your document.
Next, you can quickly change a word from lowercase to uppercase or vice versa. Place your cursor anywhere in a word whose case you want to change. If you need to change the case for multiple words, select them all. Click the Home menu and then click the Change Case button on the Ribbon (the one with the Aa symbol).
The button displays a menu with five options: Sentence case changes the word’s capitalization to match that of the overall sentence. Lowercase changes all the letters in the word to lowercase. Uppercase changes all the letters in the word to uppercase. Capitalize each word capitalizes only the first letter of the word or words. Toggle Case changes each individual letter in the word from uppercase to lowercase, or vice versa (Figure F).
Figure F

Finally, you can more quickly change the case of a word or words through a keyboard shortcut. Place your cursor in the word you want to change or select multiple words. Hold down the Shift key and press F3. Press F3 again and then again. As you press F3, Word cycles through three different capitalization modes: all uppercase, all lowercase, and first letters uppercase. Release the key when you’ve applied your desired capitalization (Figure G).
Figure G

Download PC Repair Tool to quickly find & fix Windows errors automatically
Capitalization is known as the action of writing or printing a word in capital letters, the first letter is a capital and the remaining letters are lowercase. Sometimes when typing in Microsoft Word, it will auto-capitalize your text, but what if you do not want Word to auto-capitalize your text, or in some cases you want auto-capitalization to be enabled.
Word settings will allow you to enable and disable AutoCorrect Auto-capitalization in your Word document.
How to enable auto-capitalization in Word
Click the File tab.
Click Options on the backstage view.

A Word Options dialog box will open.
Click Proofing on the left pane.
Click the AutoCorrect Options button under the AutoCorrect section on the right.
An AutoCorrect dialog box will appear.
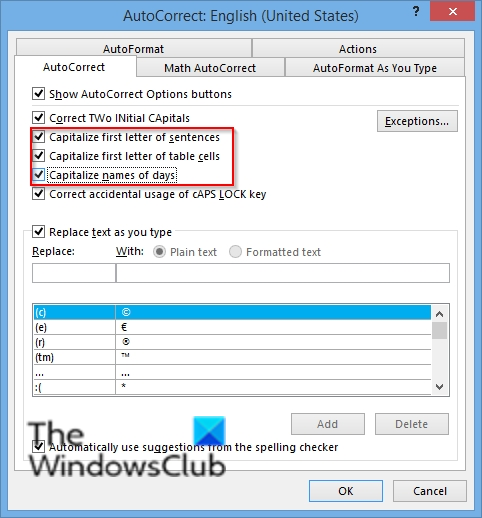
On the Auto-correct tab, check the checkboxes for Capitalize the letter of sentences, Capitalize the first letter of table cells and Capitalize names of days.
Then click OK.
Try to type a text into your document and the first letter will capitalize.
How to disable auto-capitalization in Word
Click the File tab.
Click Options on the backstage view.
A Word Options dialog box will open.
Click Proofing on the left pane.
Click the AutoCorrect Options button under the AutoCorrect section on the right.
An AutoCorrect dialog box will appear.
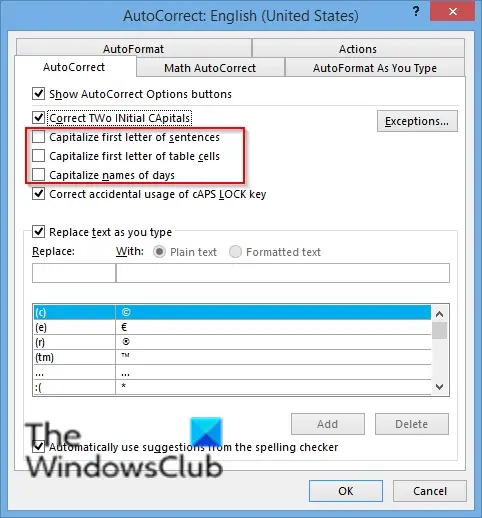
On the Auto-correct tab, uncheck the checkboxes for Capitalize the letter of sentences, Capitalize the first letter of table cells and Capitalize names of days.
Then click OK.
The Auto-capitalization of your text will be disabled.
Why is Microsoft Word capitalizing everything?
The shortcut Ctrl + Shift + A in Word activates the All Caps property. If this property is activated, Word writes everything in capital letters, even if your Caps lock key is turned off. It is possible that you have pressed this shortcut Word mistakenly while typing. Press the same shortcut again to fix the problem.
Why is Shift F3 not working?
Shift F3 shortcut is used in Microsoft Word to change the letter case. In laptops, the function keys are assigned with two different operations. Hence, if you are on a laptop, use this shortcut with the Fn key. Other possible causes of this issue include conflicting applications, outdated Office application, corrupted Office files, etc.
We hope this tutorial helps you understand how to enable and disable auto-capitalization in Word; if you have questions about the tutorial, let us know in the comments

Shantel has studied Data Operations, Records Management, and Computer Information Systems. She is quite proficient in using Office software. Her goal is to become a Database Administrator or a System Administrator.