
Call them “doodles,” “sketchnotes,” or “visual notetaking.” Whatever the name, simple hand drawings have become more popular than ever. They’re as welcome in the classroom as they are in the boardroom.


Why? Maybe it’s because they’re quick to create. You don’t have to be an artist to draw stick figures. Yet they communicate everything from how viruses replicate to how a manufacturing supply chain works. They’re a good and unique way to enhance your Word documents.
Hand drawings also allow you to express your personality and stand out from your competition. And because you’re creating your own drawings, you don’t have to worry about using copyrighted materials.


Freeform Word drawings also help you better understand and assimilate the concepts you’re trying to convey. That’s because you’re forced to simplify the concepts and come up with visual metaphors for them.
You may be wondering «How do I draw on Microsoft Word?» While Word might not be the first drawing tool that comes to mind, there are drawing tools in Word that you can learn to use.
This article shows you, step-by-step, how to draw in Word so that you, too, can harness the power of simplified drawings in your projects. As you’ll see, you don’t have to be a professional artist or to use expensive tools and software because you can draw right within Word.
Let’s get started!
(Note: In the examples below, I’m using Microsoft Word for Mac version 16. If you’re using a different version, then the interface may be different.)
How to Draw in Word: Freehand With the Shapes Freeform Tool
There are several ways for you to draw by hand on your Word document. These include the Freeform and Scribble tools in the Shape tab. Both these two tools are very similar because they let you draw in Word using your mouse or trackpad.
1. Use the Freeform or Scribble Tool
You can draw objects and handwritten lines with either one. One difference is that the Freeform tool lets you draw perfectly straight lines, while the Scribble tool draws exactly what you draw.
To draw with Freeform, click on the Insert tab.


Click Shapes > Freeform.


To draw, click, hold, and drag the cursor on the page. Word stops drawing when you either bring the cursor back to your point of origin or double-click on the page. In this example, I’ll draw a check mark.


To draw perfectly straight lines with the Freeform tool, click on your starting point. Then, release the mouse, move the cursor to the end of the line, click there, and repeat until you finish your drawing. Double-click at your end-point. Using this technique, my check mark looks like this:


Notice that the lines are perfectly straight, even though my hands were unsteady. That’s because the Freeform tool draws straight lines between two consecutive points where you click on your mouse.
Don’t worry that the text runs straight through the drawing. We can fix this with text wrap because Word treats the drawing as an image.
2. Format the Text Wrapping Around Your Drawing
Click on the Shape Format tab. Then click Arrange > Wrap Text. Select one of the text wrapping options. In this case, let’s select Square.


Now the text wraps around the drawing.


Microsoft Word also lets you wrap text around an irregularly shaped drawing. Go to Shape Format > Arrange > Wrap Text > Edit Wrap Boundary.


Click and drag the boundary points to change the boundary.


By doing this, you’ve got more granular control over how text wraps around your drawing.


3. Refine Your Drawing
Refine the drawing you’ve made. Click on your drawing to select it. Under the Shape Format tab, click Edit Shape > Edit Points.


Click and drag any of the points to change the drawing as you wish.
.jpeg)
.jpeg)
.jpeg)
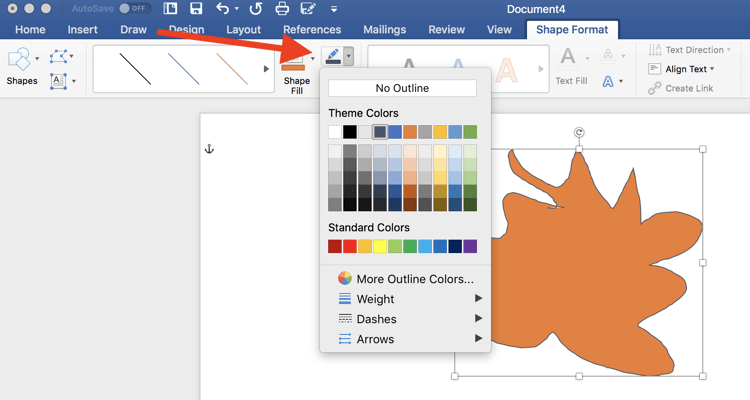
You can also use the Shape Format tab to edit other aspects of your drawing. Change its color, weight, and in the case of closed shapes, add a filling color.
To change the look of your drawing, from the Shape Format tab, expand the Theme Styles and Presets selection. Choose one of the styles you want to use.


You’ll have more choices by going to Shape Outline. From there, select a color.
To change the weight or thickness of your drawing, go to Shape Format > Shape Outline > Weight.


You can also apply special effects to your drawing. On the Shape Format tab, go to Shape Effects, then choose the effect you want to apply.
-A.jpeg)
-A.jpeg)
-A.jpeg)
Here’s the check mark now, after I added a shadow.


How to Draw in Word: Using the Scribble Tool
The Scribble tool is like the Freeform tool. The only difference I’ve seen is that the Scribble tool doesn’t draw straight lines between clicks. To draw, you’ve got to click, hold, and drag the mouse. If you release the mouse button, Word will stop drawing.
To draw using the Scribble tool, click Insert > Shapes > Scribble.


Click, hold, and drag the mouse to draw the shape. If you bring the cursor back to your point of origin, Word closes and fills the shape. In this case, let’s draw a cloud.


Now the drawing can be edited by using the tools in the Shape Format ribbon.
1. Change the Fill Color of Your Drawing
For example, to change the fill color, click on the drawing then on the Shape Fill button. Choose the color you wish to use.


2. Change the Outline Color of Your Drawing in Word
To change the shape’s outline color, click on the drawing, click Shape Outline, then choose the outline color or style you desire.


For this example, I selected No Outline.


3. Fill Your Drawing with a Picture
You could even fill the drawing with an image. Go to Shape Fill > Picture.


Find the image in your computer. Select the image file, then click Insert.


The resulting shape is pretty neat!


Follow the steps described earlier to change the text wrapping around your drawing, as well as its other attributes.
How to Draw With Microsoft Word Pen Tools
Either Freeform or Scribble are adequate tools for creating simple Word drawings that have only a single element, such as a single line or shape.
But what if you want to draw something slightly more complicated, such as a stick figure? It’s made up of a circle for the head and several lines for the arms, body, and legs.
1. Draw With the Microsoft Word Pen
In this case, it would be better to use Word’s Draw tools. To access them, click on the Draw tab.


As you can see, the Draw tab gives you some ink types:
- Pen
- Pencil
- Highlighter
Each ink type gives your drawing a different look. To select an ink, click the Draw button on the ribbon, and select either a Pen, Pencil, or Highlighter.
Click, hold, and drag to draw with your mouse. Notice that even when you release the mouse, Word stays in drawing mode. This means you can keep adding elements to your drawing. When you’re done, click the Draw button again.


To change the color and thickness of any tool, click on the drop-down menu, and make your selections. A total of 16 standard colors are available, and you can access many more by clicking on More Colors….
.jpeg)
.jpeg)
.jpeg)
Plus, for the pen ink, there are eight special effects:
- Rainbow
- Galaxy
- Lava
- Ocean
- Rose Gold
- Gold
- Silver
- Bronze


If your drawing has several parts, you’ll have to group them so that Word will treat them as one object. Click, press, and hold the Shift key as you click all the elements of your drawing. When you’re done, click Shape Format > Arrange > Group > Group.


Now you can treat the drawing as a single object. (Note: Once drawing elements are grouped, they can’t be ungrouped anymore.)
Click on the drawing, Shape Format. Then use the tools in the Shape Format tab. (Note that not all the features on the Shape Format ribbon can be applied to your drawing.) From here, we’ll change the text wrap setting of the drawing.
Go to the Shape Format tab. Click Wrap Text. then select a wrap setting.


I chose the Top and Bottom text wrap.


2. Erase Your Drawing
The Draw tab provides an Eraser tool so you can erase mistakes. First, format the tool by clicking on the drop-down arrow. You’ve got three choices:
- Stroke Eraser. Erases an entire stroke when you click on it.
- Small Eraser. Erases a small area when you click, hold, and drag your mouse.
- Medium Eraser. Erases a larger area when you click, hold, and drag your mouse.


If you selected the Stroke Eraser, click on any line to delete it. If you selected either the Small or Medium Eraser, click, hold, and drag your mouse over any areas you want to delete.
3. Draw With the Trackpad
Draw in Microsoft Word without a mouse by using the Draw with Trackpad tool.
First, choose the ink type you want to use. Then click the toggle to switch on Draw with Trackpad.


A window appears on top of your document. Use two fingers on your trackpad to move it anywhere on your document.
Pressing the Command key, move one finger on your trackpad to where you wish to draw. Pause, then draw with your finger. You don’t have to press down on the trackpad to draw.


How to Draw … Without Drawing!
So far, you’ve learned how to create your own images in Word by hand-drawing with either the mouse or the trackpad.
But what if you really can’t draw? Not even stick figures?
You can still “draw” by using the pre-made lines and shapes in Word. If you think about it, most objects can be broken down into shapes and lines. By putting these together, you can create your very own sketches — without drawing by hand.
Read on to see what I mean.
1. Draw With Lines in Microsoft Word
The simplest images are made up of lines. In this example, we’ll make a trellis, which is a grid like what you’d use to play Tic-Tac-Toe.
Go to Insert > Shapes > Line. This tool makes a simple straight line with a starting point and an endpoint.


Click on the page. That’s the starting point of your line. Drag your mouse to where you want the line to end, then click again.
Go to the Shape Format tab and use the buttons to edit the line. For this example, I changed the color and the weight of the line. I also added a shadow.


When you’re happy with how the line looks, copy and paste it as many times as needed to create your image. Click on the line, then go to Edit > Copy, then Edit > Paste. Or, use the shortcuts Command + C to copy and Command + V to paste.


Click, hold, and drag the lines into place. It may be helpful to display gridlines. To do so, click on the View tab, then check the box for Gridlines. This will help you to properly align the different elements of your drawing.


To change the angle of a line, click on the line, then go to Shape Format > Arrange > Rotate. Choose from one of the available rotation options or set your own. You can also click on one end of the line, hold, and drag it in place.


If you want the elements to line up precisely, select the lines, then go to Shape Format > Arrange > Align. Select an alignment option.


In this example, I’ll use Distribute Horizontally for the vertical lines, and Distribute Vertically for the horizontal lines.


These same steps apply to block arrows and other shapes, too.
2. Draw on Microsoft Word Using Shapes and Block Arrows
Now we’re ready to make more complicated pictures!
Let’s draw a bicycle by combining circles and triangles. Go to Insert > Shapes > Oval. Hold the Shift key as you click, hold, and drag your mouse to make a perfect circle. (But, if you want to draw an oval, then don’t use the Shift key.)


With the shape selected, go to Shape Format, and use the buttons on that tab to edit the shape you made.


To make the bicycle wheels, I’ll remove the Shape Fill and change the outline of the circle.


Next, copy and paste the circle. And then follow the same steps to add the triangles.
Use the triangle’s turning handle to change its orientation. Click on the turning handle, hold, and drag the mouse to the desired angle.


Add and edit more lines and shapes to make the image look just like a bicycle. The bike below is made up of circles, triangles, lines, an oval, and a half-circle (for the handlebar).
Remember, you can make your drawing as simple or as detailed as you like. It’s all up to you!
Find Professional Graphics for Your Microsoft Word Project
Now you know how to draw on a picture in Word. But perhaps you don’t have time to create your own Word drawings from scratch. And you still would rather not use stock photos.
What to do?
You can use premium graphic images from Envato Elements.


An Elements subscription brings thousands of creative tools at your fingertips. This includes print templates for Word, graphics, fonts, photos, and a lot more. And you get unlimited downloads for one flat monthly subscription.
Another great source of premium graphics is GraphicRiver. As with Elements, this marketplace gives you access to thousands of Word templates and other creative tools. These are also professionally designed for maximum impact. The difference is, at GraphicRiver, you pay for each use of every item.
Use each premium graphic on its own in your Word document. Or better yet, incorporate them with your own or other graphics to create something original.
Learn More About Working In Word
As you can see, Microsoft Word has many robust features. Some of them are little-known functionalities such as the various drawing tools in Word that I showed you in this article. It pays to learn how to use Microsoft Word so you can maximize its potential. Not only will you be able to realize the vision you’ve got for your Word documents, but you’ll also optimize your workflow.
If you aim to produce the most visually compelling materials using Word, then you may find these articles helpful:
You Can Draw in Microsoft Word
Even though Microsoft Word wasn’t built for graphic design, it’s got some tools to help you draw right inside your Word document.
You can make anything from simple line and stick drawings, to more detailed freehand drawings and line illustrations. Use the Freeform, Scribble, or Draw tools to draw by hand. Or combine lines and shapes to create original Word drawings without drawing from scratch.
You can also find hand-drawn graphics and Word templates in Envato Elements and GraphicRiver. If you want unlimited downloads of premium graphics and other design components, then Elements is the place for you. For one-off projects, GraphicRiver is the place to go to access top-quality templates for Microsoft Word and graphics on a pay-per-use basis.
You’ve just learned how to draw on Microsoft Word. Now, it you’re turn to create your best Word drawings.

While Microsoft Word isn’t the best drawing tool, you can create basic drawings or scribbles in Word directly. Here’s how.
Microsoft Word isn’t essential software for graphics designers, and for a good reason. It’s true—Microsoft Word isn’t best suited for drawing, but it does have some built-in drawing tools you can use, should you need to.
For simple drawings, you can draw in Word directly using shapes, lines, or pen tools. If you want to draw in Microsoft Word, here’s what you’ll need to do.
These instructions have been designed with Microsoft Office 2019 in mind. Note that Microsoft 365 (formerly O365) is the Office suite with 1 TB of OneDrive per user. While the steps may work for older versions of Word, there may be some variations or missing features.
Using Microsoft Word Drawing Tools
There are two sets of drawing tools available to Microsoft Word users. If you want to draw basic, block-like images, you can insert shapes or lines into your Word document and group them together. You might want to do this if you’re creating a diagram or flow chart, for instance.
Alternatively, you can turn Word into your own personal canvas using pen drawing tools. If you have a touchscreen device or a graphics tablet, you can create freehand drawings.
To insert shapes, you’ll need to press the Insert tab on the ribbon bar. For freehand drawings, press the Draw tab instead.

Inserting Shapes into Microsoft Word
If you’re not confident of your freehand drawing ability, or you want to create diagrams in Word, you can insert shapes.
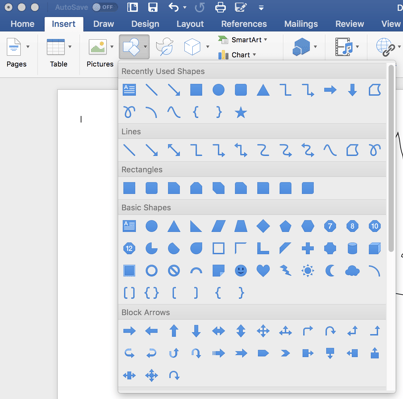
There are hundreds of pre-set shapes available. You can draw typical shapes like squares or circles or insert arrows, stars, speech bubbles, and more. To insert a shape, press the Insert tab on the ribbon bar, then press the Shapes button.
This will list the various shape options in a drop-down menu for you to choose from.

Press on one of the pre-set shapes or line options to select it—your cursor will change at this point.
Once this happens, draw onto your Word document directly to insert the shape or line you selected. This allows you to select the appropriate size for your shape.
With the shape inserted and selected, Word will switch to the Format tab on the ribbon bar. From here, you can format your shape.

For instance, add text to your shape and begin typing with the shape selected–the text will be inserted inside the shape.

You can also change the color and style of your shape, as well as the position and alignment of any inserted text, using the options listed in the Format tab.

Creating Freehand Drawings in Word
If you want to create more original Word drawings, you can use various pen drawing tools to draw onto a Word document. You can do this using a mouse or trackpad, or more precisely, using a touchscreen device or graphics tablet.
To start, press the Draw tab on the ribbon bar. This will display the pen drawing tool options for you to use.

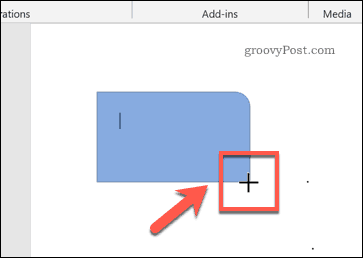
Three drawing options are available under the Tools section. Press Draw with Touch to begin drawing with one of the pen tools, Eraser to switch to the eraser tool, or Select to select your drawings as objects to move, copy, or delete them.
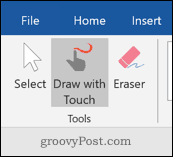
A list of available pens to draw with is shown under the Pens category. There are three drawing pens available—Pencil, Pen, and Highlighter.
As you’d expect, using the Pencil tool inserts a finer, less precise drawing line to your document. The Pen tool is the opposite—lines are clearer, thicker, and more defined. The Highlighter tool can be used for emphasis, adding color to your drawings.
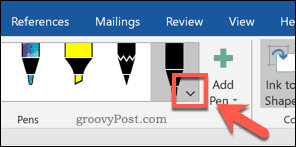
Several pre-set colors and designs are available already in the Pens category—select one of these to begin drawing. Alternatively, you can create your own by pressing the Add Pen button and selecting one of the tools listed in the drop-down menu.

This will add a new pen design to the Pens category, with a settings drop-down menu. From here, you can set the thickness and color of the pen tool, with a preview of the pen design at the top.
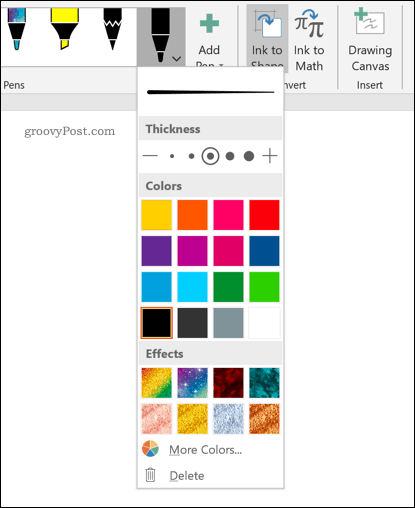
You can edit these in the future by hovering over a pen design and press the arrow icon in the bottom-left corner.
With your drawing pen tool selected and configured, you can begin drawing onto your Word document directly.
Creating a Drawing Canvas in Word
Word allows you to draw onto a Word document without constraints. If you’d prefer to draw onto a much smaller area of your Word document, however, you can insert a drawing canvas.
A drawing canvas groups your drawing into a single object which can then be moved, resized, or copied elsewhere. To do this, press the Drawing Canvas button in the Insert section of the Draw tab.

This will insert the canvas into your Word document. You will only be able to draw inside the canvas object’s borders– anything drawn outside of this will be ignored.

Designing Microsoft Word Documents
While it hasn’t been designed with drawing in mind, you can still use shapes, lines, and freehand pen drawings to create simplistic images in Microsoft Word. You can use shapes to create a flow chart or diagram or use free-hand drawings to show your artistic drawing skills.
You can insert and edit images in Microsoft Word too, but don’t forget Word’s main purpose. If you’re designing new documents, you may prefer to use building blocks to help you create them more quickly.
![]()
While Microsoft Word is traditionally used as a way to create text documents, it has a number of different tools that allow you to add other objects, too. This includes things like pictures, text boxes and tables, but you may be wondering how to draw in Word if you want to insert your own designs.
Fortunately there are a set of tools that you can use to draw shapes, or even draw freehand objects.
These drawings that you make can be customized in a variety of ways using the various formatting options that appear after you have added a drawn object to your document.
Our article below will show you how to use the drawing tools in Microsoft Word for Office 365 so that you can add the designs or elements that your document requires.
- Open your document.
- Click the Insert tab.
- Select the Shapes button, then choose a shape from the drop down menu.
- Click and hold at a spot in the document, then draw your shape.
- Release the mouse button when you are finished.
Our article continues below with additional information on sharing in Word for Office 365, including pictures of these steps.
How to Draw Shapes or Freehand in Microsoft Word for Office 365 (Guide with Pictures)
The steps in this article were performed in the Microsoft Word for Office 365 version of the application, but will also work in most other versions of Word.
Step 1: Open your document in Microsoft Word.
Step 2: Select the Insert tab at the top of the window.
Step 3: Click the Shapes button in the Illustrations section of the ribbon, then choose one of the shapes form the drop down menu.
If you want to draw a freehand shape, then select the Scribble option in the Lines section of the menu.
Step 4: Click and hold your mouse button down at the point in the document where you want the shape, then draw it.
Step 5: Release the mouse button when you are finished.
This is going to create an outline of a shape, so you will need to use the formatting options if you would like to change its color, outline, or add some effects.
How to Format a Drawing in Microsoft Word
Now that you have a drawing in your document, you will likely want to make some additional changes to the way that it looks.
Step 1: Double click the shape to select it.
Step 2: Select the Shape Format tab at the top of the window.
Step 3: Choose one of the options in the ribbon to format the shape.
Some popular formatting options for drawings include the Shape Fill, Shape Outline, and Shape Effects options found in the Shape Styles section of the ribbon.
You can also elect to resize the drawing by using the controls located around the drawing when it is selected. If you want to add text on top of the drawing then you can continue to the section below.
How to Put Text on Top of a Drawing in Word for Office 365
A common use of the drawing tool is to add a drawing to your document, then place text on top of it. Fortunately there is an option to place a text box on the drawing as well.
Step 1: Select the drawing.
Step 2: Click the Shape Format tab.
Step 3: Select the Draw Text Box option in the Insert Shapes section of the ribbon.
Step 4: Type your text into the text box.
Depending on the color of your shape and your needs for how the text looks, you may not like the white background of the text box. Fortunately this can be changed in the same manner as you edit the drawing. Simply click inside the text box to select it, choose the Shape Format tab, then click the Shape Fill button and choose the No Fill option.
How to Apply Additional Formatting Options to Your Word Drawing
If the formatting options in the ribbon don’t seem like they have enough options for you, there is another menu that you can open which provides additional settings.
Right-click on the drawing, then choose the Format Shape option from the bottom of this right click menu.
You should now see the Format Shape column at the right side of the window. There you can find settings that let you change the appearance of the shape’s line, as well as additional options for formatting the shape fill.
For example, you could choose to increase the transparency of the shape if there is something underneath it that you want to be able to see.
More Information on How to Draw in Microsoft Word with Drawing Tools
If you just went directly for the Scribble option on the Shapes drop down menu, it can be useful to go back to it and see all of the different shapes that are available. There are things like ovals, arrows and mathematical symbols, as well as some various line options. If you wanted to draw a straight line, for example, you could choose one of the options in the Lines section.
If you are having trouble drawing a straight horizontal line, try holding down the Shift key on your keyboard before you click in the document. This will force the line to stay horizontal.
If you tried out the right click option discussed previously to open the Format Shape column, then take a look at that menu again. There are also options on that menu that let you add a caption to your image, add a hyperlink, or add alt text.
Depending on your drawing skills, particularly when it comes to freehanding with a mouse, learning how to draw in Word can be pretty difficult. Even with all of the drawing tools in Word that are available in the application, you are still limited by your own skill and dexterity. I am a terrible artist (as indicated by the terrible “M” that I drew in the guide above), so I tend to avoid using any of the options that require me to draw freehand on the drawing canvas.
If you are a skilled artist by struggle with the drawing tools in Microsoft Word, then you may want to consider getting a drawing tablet. These connect to your computer via the USB port, and are compatible with a lot of different image editing applications. So, for example, you could draw as you normally would with a drawing tablet in an application like Microsoft Paint or Adobe Photoshop, then save that drawing as an image. That image can then be inserted into a Word document in the same way that you would add any other image.

Matthew Burleigh has been a freelance writer since the early 2000s. You can find his writing all over the Web, where his content has collectively been read millions of times.
Matthew received his Master’s degree in Computer Science, then spent over a decade as an IT consultant for small businesses before focusing on writing and website creation.
The topics he covers for MasterYourTech.com include iPhones, Microsoft Office, and Google Apps.
You can read his full bio here.
Sometimes, you can’t express yourself in words and numbers alone.
Sometimes, you need to express yourself through art. Luckily, Microsoft Word recognizes this need and gives users the option to draw on a document.
If you want a new way to showcase your ideas, give drawing a try! It’s easy, adds some flair to your document and might be a more effective way to communicate your thoughts.
- In the ‘Insert tab,’ click the ‘Shapes’ button, and in the drop-down menu select ‘Scribble’
- Click and hold down your mouse to draw the shape you want
- Release the mouse when you’ve finished drawing
- Go to the ‘Shape Format’ tab to edit your shape

How to draw in Word
For all my visual learners in the house, follow along as I go through the drawing process step-by-step. I also include some formatting and editing tips and tricks to consider.
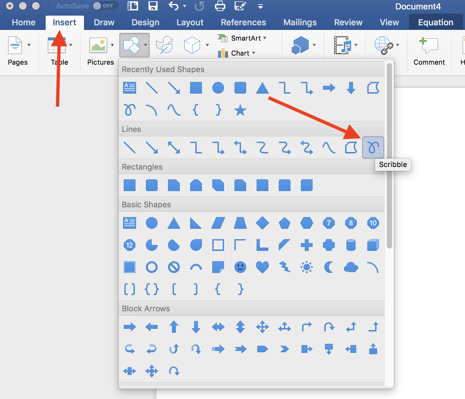
1. Click the ‘Shapes’ button and select ‘Scribble’
Open up your Microsoft Word document. It can be an empty document or it can be filled with an essay — you can draw over words if you want.
Navigate to the ‘Insert’ tab. From there, select ‘Shapes.’ A drop-down menu will appear. Under the ‘Lines’ options, select the very last button. It looks like a scribble and is aptly named ‘Scribble.’
2. Hold down your mouse to draw
Click and hold down your mouse to draw. Admittedly, this isn’t the most intuitive thing in the world and your drawings probably won’t look like they do on paper. That’s okay, you do get a chance to tweak and sculpt your drawing later — as well as adjust the line coloring, width, fill color, and more.
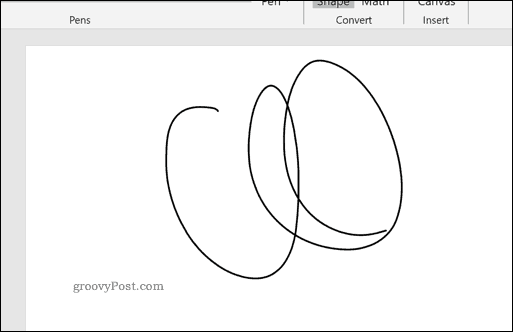
Here’s the strange shape I chose to draw (don’t ask me what it is):
3. Release the mouse
As soon as you release your mouse, the drawing will be finished. You’ll no longer be able to continue drawing, like you would if it were pen and paper.
If you released the mouse too early, you can delete the shape and start over. If you want to add another shape to complement the one you just drew, go ahead and click the ‘Scribble’ button and go through the drawing process once more.
If you have the basic idea of the drawing done but it’s not exactly what you wanted, you can tweak the lines a bit. Double-click on the drawing. Click on the small ‘Edit Shape’ button in the top left corner. Then, select ‘Edit Points.’

A bunch of, you guessed it, points will appear on your drawing. Dragging a point out, in, or sideways effectively drags the line of the drawing with it. When you click off of the point, the drawing will be altered accordingly.
4. Edit your drawing
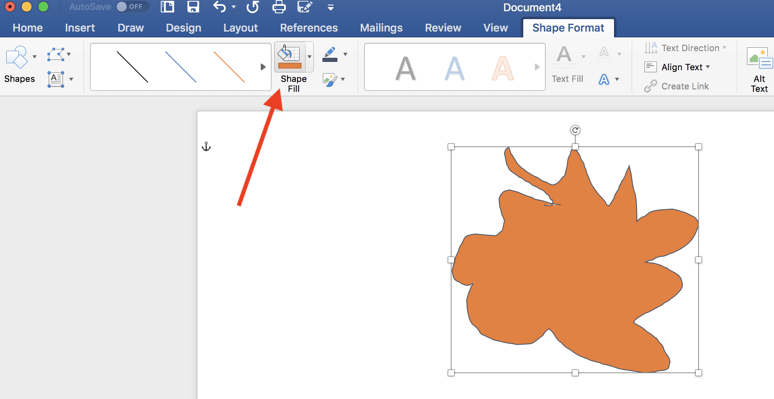
Double-click your drawing. A new tab will appear in the menu banner called ‘Shape Format.’ Now you can resize your shape by dragging the corners of the box around it. You can use the ‘Shape Fill’ button to add color inside your shape.
You can change the color of the outline by clicking the pencil button, located next to the ‘Shape Fill’ button. You can also choose to have ‘No Outline’ if you want.
Another way to make your drawing stand out is by adding text to it. Click on the ‘Draw a Text Box’ icon located next to the ‘Shapes’ button.
Drag your mouse over where you want the text box to live inside your shape. You can play with all the text editing options and include hanging indents, if you want.
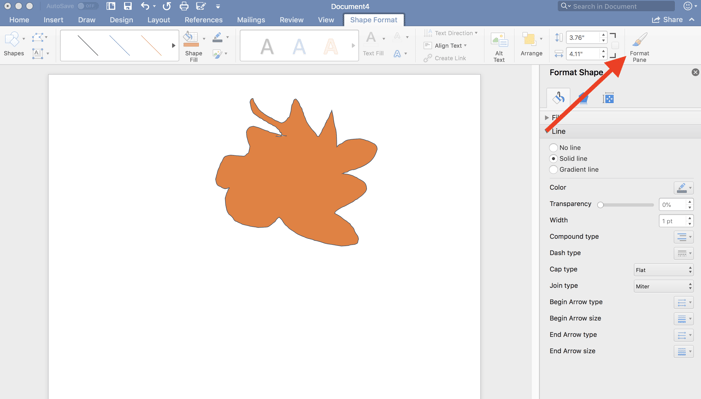
To unlock more editing options, select the ‘Format Pane’ on the far right. This will open a sidebar where you can edit the line type of the outline, play with color effects for the fill color, and more!
Once you’ve manipulated your shape into a final product that you’re happy with, go ahead and ‘Save As.’ Now you’re ready to share your creativity with the world!

Other things to know about drawing in Word
It will be very difficult for you to draw straight lines in Word. That’s simply due to the impossibility of dragging a mouse precisely. If that’s frustrating you to no end, there are work arounds.
How to draw a line in Word
If you want to have a very straight line, maybe the ‘Scribble’ tool is not the right one for you. Go back to the ‘Shapes’ drop-down menu under the ‘Insert’ tab and go through the different line options available to you. Select what’s best for your vision and go from there!
You’ll also notice that Word offers a variety of pre-made shapes to choose from. If you’re struggling to draw a star that doesn’t look like a sad blob, maybe try select the pre-made star shape. You can still play with the coloring, size, lines and more.
TIP: If you are dead-set on drawing freehand but Word isn’t working out for you, try drawing in Microsoft Paint. You can always insert that image into Word later on.
Want to put your artistry to the test in other ways? Discover how to make a brochure in Word.

Holly is the director of content marketing at G2. An avid reader and writer, Holly graduated from the University of Missouri with a dual major in Journalism and English. She firmly believes in the power of content and is constantly seeking ways to better engage and delight readers.
Here presented 55+ Words Drawing images for free to download, print or share. Learn how to draw Words pictures using these outlines or print just for coloring. You can edit any of drawings via our online image editor before downloading.
Full color drawing pics

640×320 To Draw With Words

1024×1024 How To Draw 3d Words How To Draw Words In 3d

1280×720 How To Turn Words Unicorn Into A Cartoon For Kids

1935×2591 Felt Like Drawing Words Pics

1280×720 Garden Of Words Drawing

1300×1300 Hand Drawing Inscriptions Polite Words. Design In Vintage Style

1280×720 How To Turn Words Into Cartoons

1280×720 Learning English Words With Doodle Words For Kids

1330×1716 The Images Collection Of Feigenbaumus Life In Words Lee Simple

650×592 Word Cards, Round 3

320×240 Word Family Drawing By Danika Heath

640×533 Words Coloring Book

1300×1300 World Travel Concept Made With Words Drawing A Airplane On Vintage

768×1024 Iosteacher Typedrawing

500×625 Whale By Sheryl Craft Ideas Whale Drawing
Line drawing pics

1993×1142 Graffiti Drawings Of Words Graffiti Drawings Of Words

3508×2552 Graffiti Drawing Words Graffiti Words To Draw

653×459 Graffiti Words

600×463 Graffiti Drawings

468×605 Circle The Words That Begin With D Coloring Page

468×605 Circle The Words That Begin With H Coloring Page

1870×2420 Coloring Pages Of Words

1300×1170 Hand Lettering Words Thank You With Hand Drawn Floral Wreath

1024×810 Heart Sketches Love Roses Heart I Love U Drawing Quotes
 For Kids")
1483×2079 Letter Y Coloring Pages Of Alphabet (Y Letter Words) For Kids

723×367 Photos Cool Word Drawings,

3508×2552 Bubble Words Graffiti Facts About Graffiti Art Graffiti Drawing

3508×2552 Cool Graffiti Art Draw Graffiti Words Draw Cool Words

1024×740 Digame Con Colores Spanish To English Free Coloring Pages

736×568 Dirty Coloring Pages Twat Coloring Page By Colorful Language Ac

768×1024 Drawing With Words Ps77 Brooklyn Art News

6549×5092 Drink My Words Everything Is Funny After A Couple Of Drinks.

3508×2552 Graffiti Art Words Drawings How To Draw Graffiti Letters

963×959 Graffiti Drawing Words

1300×1300 Hand Drawing Cartoon Happy Words For Valentine Illustration

800×800 Hand Draw Business Doodlesline Course Icons And Words Set

800×800 Hand Draw Business Doodles Viral Marketing Icons And Words Set

1366×941 Hidden Words By Zhenya Karcha

600×857 Image Result For Pictures Made From Words Art Therapy

768×1024 Ing Kids On Letters Numbers Nd Words Pin How To Draw A Cat Face
1480×1850 Letter A Words Coloring Pages Printable In Good Draw Abc 01
1483×2079 Letter L Coloring Pages Of Alphabet (L Letter Words) For Kids
1483×2079 Letter O Coloring Pages Of Alphabet (O Letter Words) For Kids

600×776 Preschool Kids Learn Words From Letter U Coloring Page Bulk Color

1024×837 Rose Of The Words Stock Vector Trofimich81

2725×3475 Swear Word Pictures Coloring Lovers

1024×600 The Images Collection Of Ofcoloringcom Easy Heart Drawinfo Easy

2480×3508 Winter Word Match

300×293 Words Drawings Fine Art America

640×855 Alisaburke Drawing Words With Megan Wells

1359×1760 Astonishing Paris Drawings Eiffel Tower Words With Eiffel Tower

2397×2800 Drawings Disney Drawings

2247×1545 Learn To Draw Graffiti Angel Art

2550×3300 Line Drawing Words With No Names

1754×1275 Your Words Hurt Me By Foreverlostinmyworld
All rights to the published drawing images, silhouettes, cliparts, pictures and other materials on GetDrawings.com belong to their respective owners (authors), and the Website Administration does not bear responsibility for their use. All the materials are for personal use only. If you find any inappropriate content or any content that infringes your rights, and you do not want your material to be shown on this website, please contact the administration and we will immediately remove that material protected by copyright.