
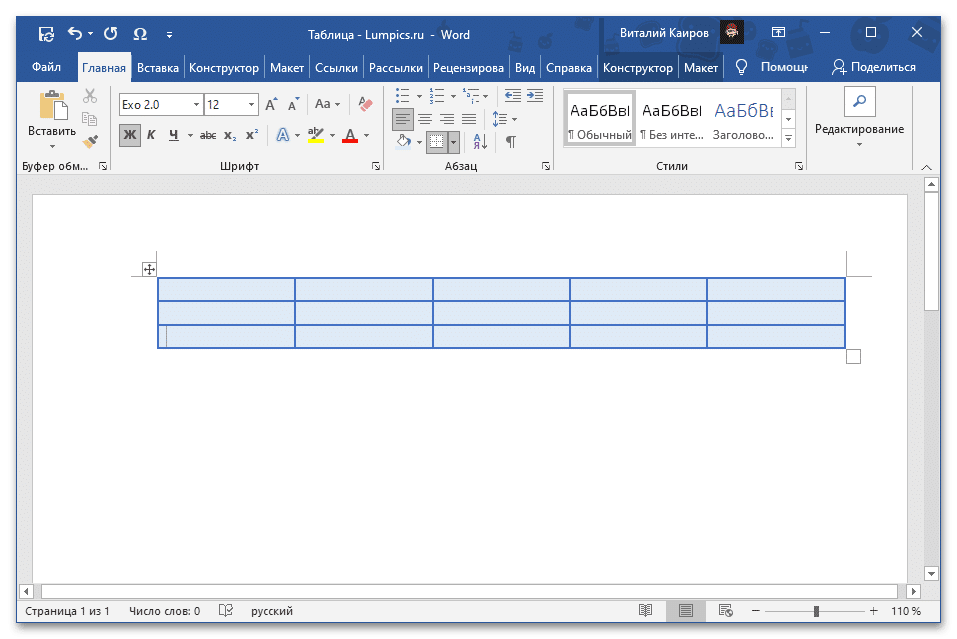
-
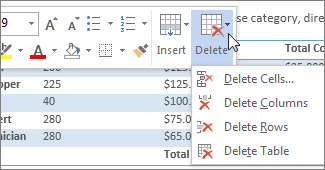
Right-click in a table cell, row, or column you want to delete.
-
On the Mini toolbar, click Delete.

-
Choose Delete Cells, Delete Columns, or Delete Rows.
Tip: You can delete the contents of a table row or column without deleting the table structure. To do this, select the row or column and then press the Delete key.
-
Right-click in a table cell, row, or column you want to delete.
-
On the menu, click Delete Cells.
-
To delete one cell, choose Shift cells left or Shift cells up.
To delete the row, click Delete entire row.
To delete the column, click Delete entire column.
Tip: You can delete the contents of a row or column without deleting the table structure. To do this, select the row or column and then press the Delete key.
When creating a new table in MS Word, you can specify the number of rows and columns that the table must contain. But the table that appears has internal and external lines or borders. Borders make it easy to enter data in the cells. But you may want to print or display the table without some or any border showing up.
Word has many options that allow customizing the appearance of your table. You can change the styling of the borders. One of the styles includes suppressing the display of borders.
Removing the table borders or lines in MS Word does not disturb the data or the layout of the data. You only remove the lines that identify the rows and columns.
- Using the Borders Menu
- Using the Borders and Shading Dialog Box
We will show you in steps how to remove the table lines in your MS Word document.
Let us begin.
Method #1: Using the Borders Menu
Step #1: Open Word document.
Open the Word document that has a table with borders.

Step #2: Select the entire table
Hover the mouse pointer over the table.
A square icon appears in the top left-hand corner of the table.
Click on the square icon to select the entire table.

Step #3: Remove table lines
Click on the Design tab under Table Tools on the top menu bar to change the ribbon.

In the section Borders, click on the icon Borders.

A new menu will open.

Hover the mouse pointer on the appropriate button in the menu to:
- Remove the Bottom Border only
- Remove the Top Border only
- Remove the Left Border only
- Remove the Right Border only
- To show No Borders
- Remove All Borders
- Remove Outside Borders only
- Remove Inside Borders only
- Remove Inside Horizontal Borders only
- Remove Inside Vertical Borders only
Click on the one suitable for your table.
For instance, click on All Borders to remove all lines.

Method #2: Using the Borders and Shading Dialog Box
Step #1: Open Word document.
Open the Word document that has a table with borders.

Step #2: Select the entire table
Hover the mouse pointer over the table.
A square icon appears in the top left-hand corner of the table.
Click on the square icon to select the entire table.

Step #3: Remove table lines
Right-click anywhere inside the table.
In the menu that opens, click on Table Properties.

The Table Properties dialog will open.
Click on the Borders and Shading button.

The Borders and Shading dialog will open.
Under Borders, click on All.

Under Preview on the right-hand side, click and remove the lines you do not want.

Click on OK to exit the dialog.
Word will remove all the lines you have selected.

Conclusion
Use any one of the two methods above to remove table lines in your MS Word document. You can remove all lines or display some of them.

Способ 1: Контекстное меню
Наиболее быстрым методом удаления ненужной строки из таблицы в Word будет использование контекстного меню, где предусмотрена соответствующая опция, точнее даже опции, так как для одного и того же действия доступно два варианта реализации.
Читайте также: Как создать таблицу в Ворде
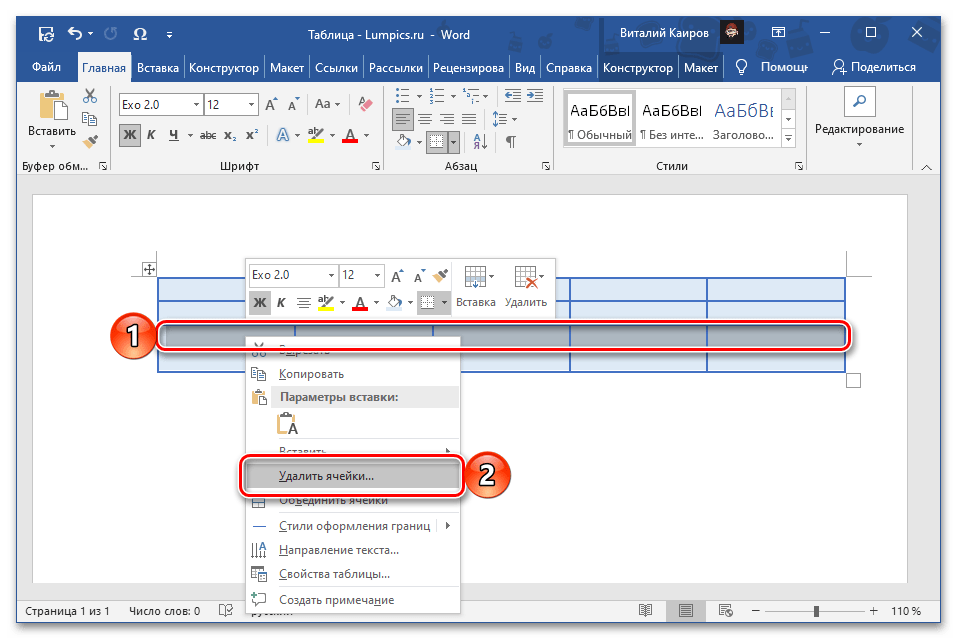
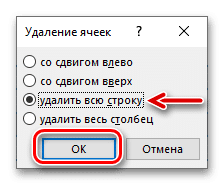
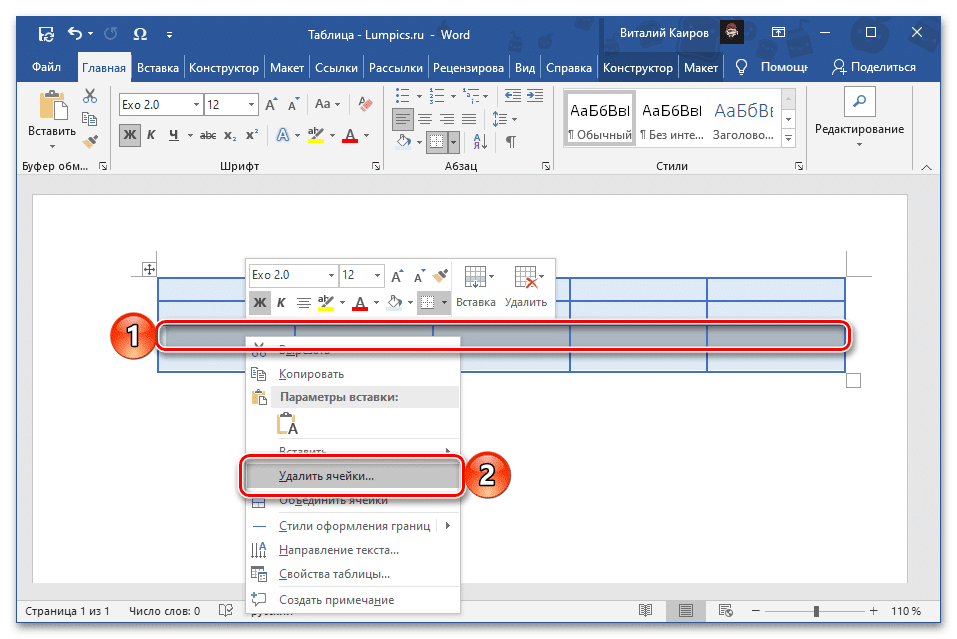
- Используя мышку, полностью выделите ту строку, от которой нужно избавиться. Кликните по любому ее месту правой кнопкой мышки (ПКМ), чтобы вызвать меню, и выберите в нем «Удалить ячейки».

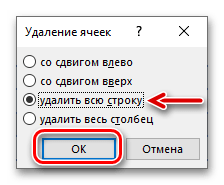
В появившемся диалоговом окне установите маркер напротив пункта «Удалить всю строку» и подтвердите свое намерение нажатием «ОК».
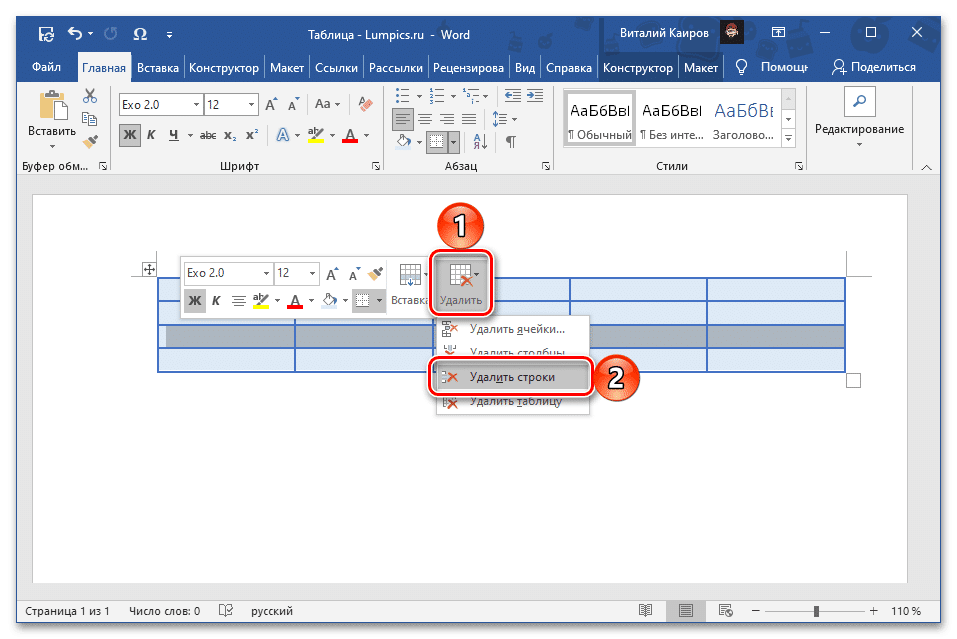
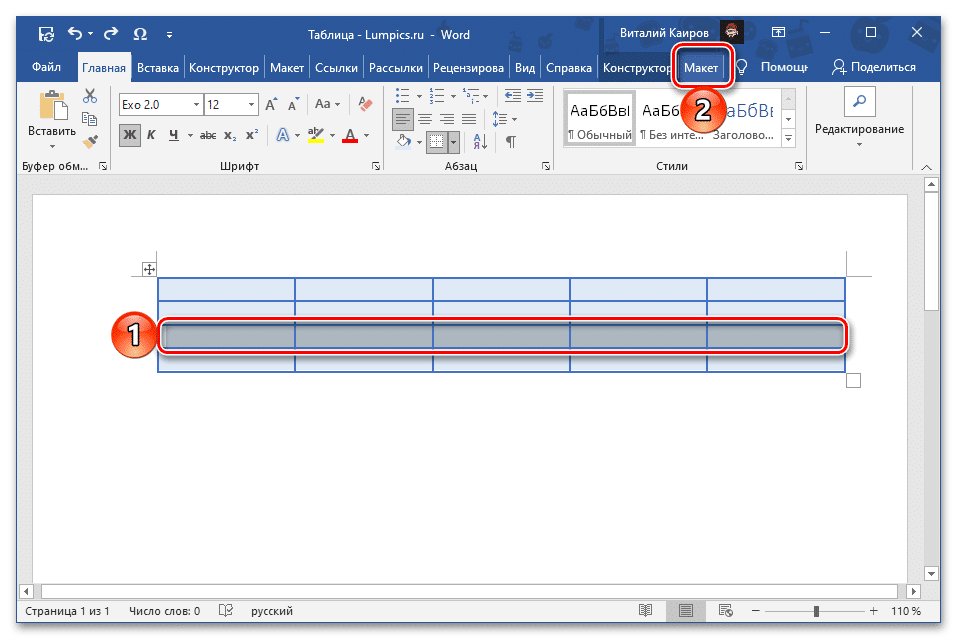
- Установите указатель курсора (каретку) в любой ячейке более ненужной строки и нажмите ПКМ для вызова контекстного меню. Нажмите по расположенной справа на верхней панели кнопке «Удалить» и выберите в открывшемся списке опций «Удалить строки».

Каким бы из двух вариантов, по сути, одного и того же решения вы не воспользовались, желаемый результат в виде удаления строки из таблицы будет достигнут.
Читайте также: Как объединить ячейки таблицы в Word
Способ 2: Инструменты «Строки и столбцы»
После вставки таблицы в документ и ее выделения на ленте появляется дополнительная вкладка «Работа с таблицами», одним из инструментов которой также можно воспользоваться для удаления строки.
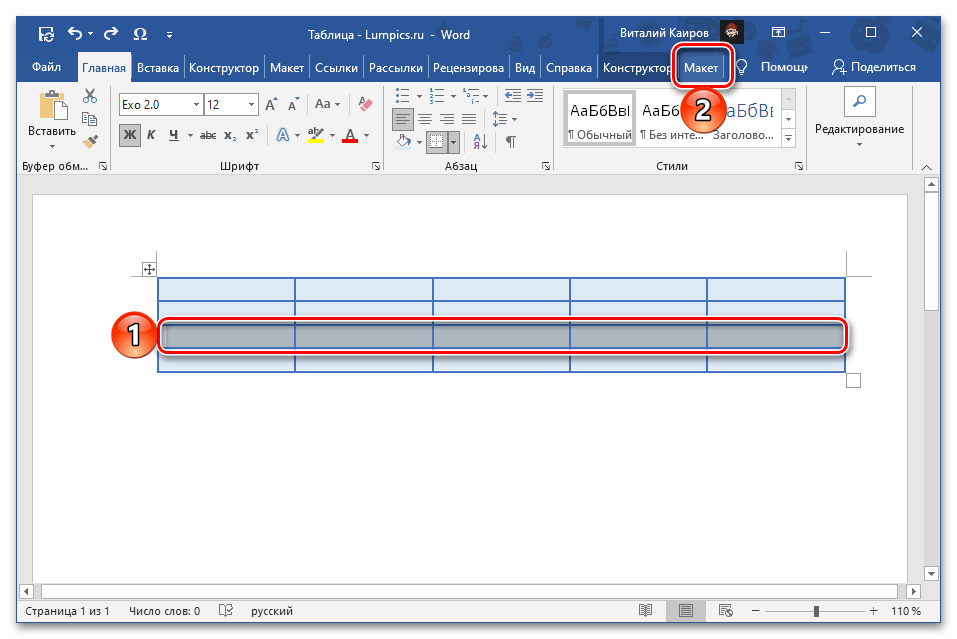
- Установите указатель курсора в любую ячейку той строки, которую требуется удалить, или полностью выделите ее, после чего перейдите во вкладку «Макет» группы «Работа с таблицами».
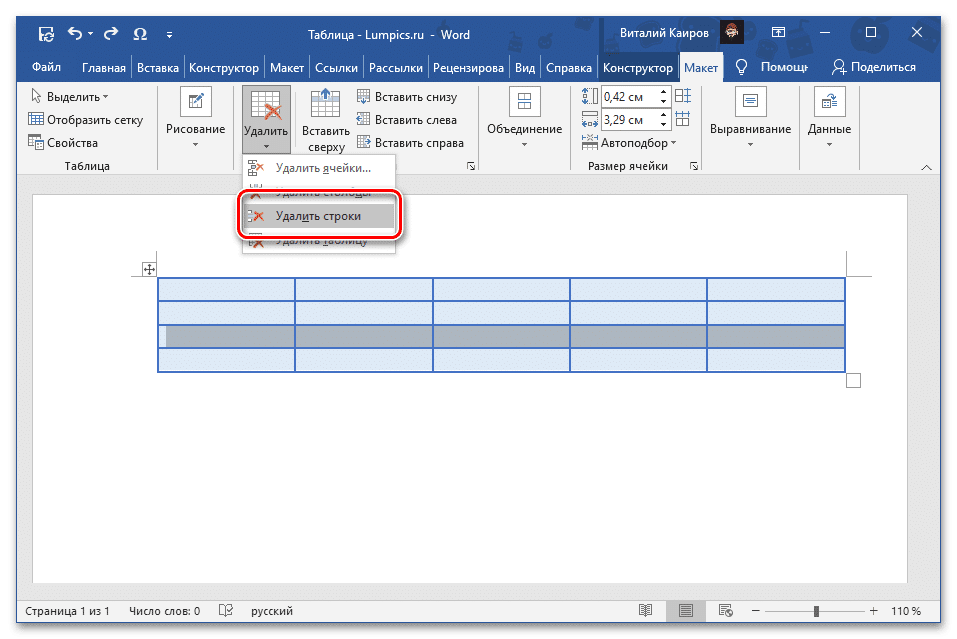
- Нажмите на кнопку «Удалить», расположенную в блоке «Строки и столбцы».
- Выберите пункт «Удалить строки».
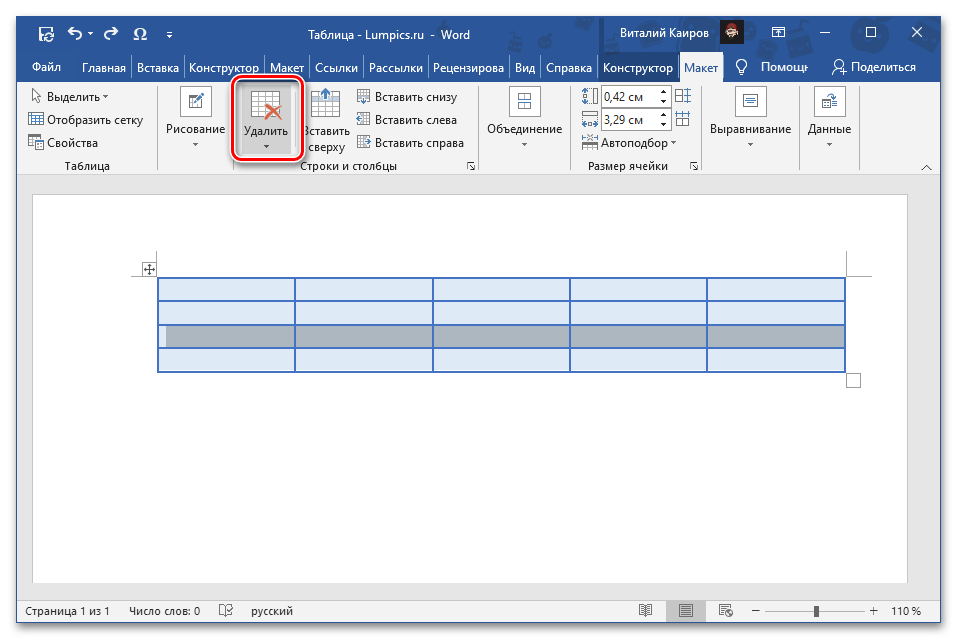

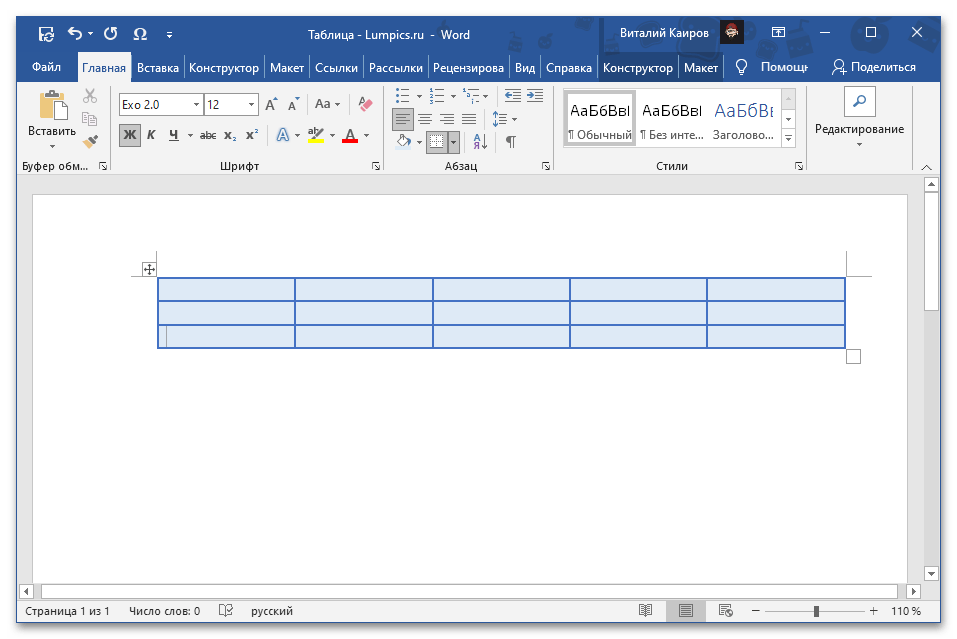
Обозначенная вами строка будет сразу же удалена из таблицы.

Читайте также:
Как добавить строку в таблицу в Ворде
Как удалить столбец из таблицы в Ворде

Еще статьи по данной теме:
Помогла ли Вам статья?

Способ 1: Контекстное меню
Самый быстрый способ удалить ненужную строку из таблицы в Word — использовать контекстное меню, в котором предоставляется соответствующая опция, а точнее, опции тоже, поскольку есть два варианта реализации одного и того же действия.
Какой бы из двух вариантов, по сути, использовалось одно и то же решение, вы получите желаемый результат в виде удаления строки из таблицы.
- С помощью мыши полностью выделите линию, от которой хотите избавиться. Щелкните по одной из его точек правой кнопкой мыши (ПКМ), чтобы открыть меню, и выберите в нем «Удалить ячейки».
В появившемся диалоговом окне установите маркер напротив «Удалить всю строку» и подтвердите свое намерение, нажав «ОК».
- Поместите указатель курсора (каретку) в любую ячейку строки, которая больше не нужна, и нажмите ПКМ, чтобы открыть контекстное меню. Нажмите кнопку «Удалить», расположенную в правой части верхней панели, и выберите «Удалить строки» из открывшегося списка опций».
Способ 2: Инструменты «Строки и столбцы»
После того, как вы вставите таблицу в документ и выберете ее, на ленте появится дополнительная вкладка «Работа с таблицами», один из инструментов которой также можно использовать для удаления строки.

Указанная строка будет немедленно удалена из таблицы.

- Поместите курсор в любую ячейку строки, которую вы хотите удалить, или полностью выделите ее, затем перейдите на вкладку «Макет» в группе «Инструменты для таблиц».
- Нажмите кнопку «Удалить», расположенную в блоке «Строки и столбцы».
- Выберите Удалить строки».
 Please Note:
This article is written for users of the following Microsoft Word versions: 97, 2000, 2002, and 2003. If you are using a later version (Word 2007 or later), this tip may not work for you. For a version of this tip written specifically for later versions of Word, click here: Erasing Table Lines.
![]()
Written by Allen Wyatt (last updated July 10, 2021)
This tip applies to Word 97, 2000, 2002, and 2003
One of the neat things you can do with Word is to draw tables using the tools provided by the program. With you table created, you can easily erase any of the lines that make up your table. The result is a table that looks just the way you want it. To erase table lines, follow these steps:
- Create your table as you normally would.
- Choose the Toolbars option from the View menu, and make sure Tables and Borders is selected from the resulting submenu.
- Click on the Eraser tool on the toolbar. This is the one just to the right of the tool that looks like a pencil.
- Click and drag to select the table lines you want to erase.
- Click on the Eraser tool again (on the toolbar) or press the Esc key. This turns off the Eraser tool.
- Close the Tables and Borders toolbar when finished.
You should note that when you erase a line that is a common border between two cells, the two cells are merged. If you try to erase an exterior line from a cell (one that does not border another cell), then the visible table border is removed, but the cell still remains.
WordTips is your source for cost-effective Microsoft Word training.
(Microsoft Word is the most popular word processing software in the world.)
This tip (868) applies to Microsoft Word 97, 2000, 2002, and 2003. You can find a version of this tip for the ribbon interface of Word (Word 2007 and later) here: Erasing Table Lines.
Author Bio
With more than 50 non-fiction books and numerous magazine articles to his credit, Allen Wyatt is an internationally recognized author. He is president of Sharon Parq Associates, a computer and publishing services company. Learn more about Allen…
MORE FROM ALLEN
Shortcut for Show/Hide
Hate to take your hands off the keyboard? Here’s a handy keyboard shortcut you can use to display (or not display) the …
Discover More
Extending a Paragraph into the Left Margin
Word allows you to format a paragraph so that it extends into the left margin of the document. This is done by setting a …
Discover More
Getting Rid of Empty Rows after Importing
Import data into a worksheet (or paste it there) and you may find that you end up with a group of blank cells you need to …
Discover More
More WordTips (menu)
Moving Table Rows Quickly
One of the most esoteric shortcuts available in Word is one that allows you to move table rows, either within a table or …
Discover More
Inserting Cells in a Table
You can enlarge a table by adding cells where they are needed. Just pick where you want the cells inserted, then use the …
Discover More
Adding Table Columns to Columns with Merged Cells
Word’s table editor allows you to modify the structure of tables in a wide variety of ways. If you want to add columns to …
Discover More