
Word for Microsoft 365 Word for Microsoft 365 for Mac Word 2021 Word 2021 for Mac Word 2019 Word 2019 for Mac Word 2016 Word 2016 for Mac Word 2013 Word 2010 Word for Mac 2011 More…Less
To create a form in Word that others can fill out, start with a template or document and add content controls. Content controls include things like check boxes, text boxes, date pickers, and drop-down lists. If you’re familiar with databases, these content controls can even be linked to data.
Show the Developer tab
If the developer tab isn’t displayed in the ribbon, see Show the Developer tab.
Open a template or a blank document on which to base the form
To save time, start with a form template or start from scratch with a blank template.
-
Go to File > New.
-
In Search online templates, type Forms or the type of form you want and press ENTER.
-
Choose a form template, and then select Create or Download.
-
Go to File > New.
-
Select Blank document.
Add content to the form
Go to Developer, and then choose the controls that you want to add to the document or form. To remove a content control, select the control and press Delete. You can set properties on controls once inserted.
Note: You can print a form that was created using content controls, but the boxes around the content controls will not print.
In a rich text content control, users can format text as bold or italic, and they can type multiple paragraphs. If you want to limit what users add, insert the plain text content control.
-
Click or tap where you want to insert the control.
-
Select Developer > Rich Text Content Control
 or Plain Text Content Control .
 or Plain Text Content Control
  .
.To set specific properties on the control, see Set or change properties for content controls.
A picture control is often used for templates, but you can also add a picture control to a form.
-
Click or tap where you want to insert the control.
-
Select Developer > Picture Content Control
.
 .
.To set specific properties on the control, see Set or change properties for content controls.
Use building block controls when you want people to choose a specific block of text. For example, building block controls are helpful when you need to add different boilerplate text depending on the contract’s specific requirements. You can create rich text content controls for each version of the boilerplate text, and then you can use a building block control as the container for the rich text content controls.
-
Click or tap where you want to insert the control.
-
Go to DeveloperBuilding Block Gallery Content Control
(or Building Block Content Control). -
Select Developer and content controls for the building block.
 (or Building Block Content Control).
-
Click or tap where you want to insert the control.
To set specific properties on the control, see Set or change properties for content controls.
In a combo box, users can select from a list of choices that you provide or they can type in their own information. In a drop-down list, users can only select from the list of choices.
-
Go to Developer > Combo Box Content Control
or Drop-Down List Content Control . -
Select the content control, and then select Properties.
-
To create a list of choices, select Add under Drop-Down List Properties.
-
Type a choice in Display Name, such as Yes, No, or Maybe.
Repeat this step until all of the choices are in the drop-down list.
-
Fill in any other properties that you want.
Note: If you select the Contents cannot be edited check box, users won’t be able to click a choice.
 or Drop-Down List Content Control
  .
.-
Click or tap where you want to insert the date picker control.
-
Select Developer > Date Picker Content Control
.
 .
.To set specific properties on the control, see Set or change properties for content controls.
-
Click or tap where you want to insert the check box control.
-
Select Developer > Check Box Content Control
.
 .
.To set specific properties on the control, see Set or change properties for content controls.
Legacy form controls are for compatibility with older versions of Word and consist of legacy form and Active X controls.
-
Click or tap where you want to insert a legacy control.
-
Go to Developer > Legacy Forms
drop-down. -
Select the Legacy Form control or Active X Control that you want to include.
 drop-down.
Set or change properties for content controls
Each content control has properties that you can set or change. For example, the Date Picker control offers options for the format you want to use to display the date.
-
Select the content control that you want to change.
-
Go to Developer > Properties.
-
Change the properties that you want.

Add protection to a form
If you want to limit how much others can edit or format a form, use the Restrict Editing command:
-
Open the form that you want to lock or protect.
-
Select Developer > Restrict Editing.
-
After selecting restrictions, select Yes, Start Enforcing Protection.


Advanced Tip:
If you want to protect only parts of the document, separate the document into sections and only protect the sections you want.
To do this, choose Select Sections in the Restrict Editing panel. For more info on sections, see Insert a section break.

Show the Developer tab
If the developer tab isn’t displayed in the ribbon, see Show the Developer tab.
Open a template or use a blank document
To create a form in Word that others can fill out, start with a template or document and add content controls. Content controls include things like check boxes, text boxes, and drop-down lists. If you’re familiar with databases, these content controls can even be linked to data.
-
Go to File > New from Template.
-
In Search, type form.
-
Double-click the template you want to use.
-
Select File > Save As, and pick a location to save the form.
-
In Save As, type a file name and then select Save.

-
Go to File > New Document.
-
Go to File > Save As.
-
In Save As, type a file name and then select Save.

Add content to the form
Go to Developer, and then choose the controls that you want to add to the document or form. To remove a content control, select the control and press Delete. You can set Options on controls once inserted. From Options, you can add entry and exit macros to run when users interact with the controls, as well as list items for combo boxes, .
-
In the document, click or tap where you want to add a content control.
-
On Developer, select Text Box, Check Box, or Combo Box.
-
To set specific properties for the control, select Options, and set .
-
Repeat steps 1 through 3 for each control that you want to add.

Options let you set common settings, as well as control specific settings. Select a control and then select Options to set up or make changes.
-
Set common properties.
-
Select Macro to Run on lets you choose a recorded or custom macro to run on Entry or Exit from the field.
-
Bookmark Set a unique name or bookmark for each control.
-
Calculate on exit This forces Word to run or refresh any calculations, such as total price when the user exits the field.
-
Add Help Text Give hints or instructions for each field.
-
OK Saves settings and exits the panel.
-
Cancel Forgets changes and exits the panel.
-
-
Set specific properties for a Text box
-
Type Select form Regular text, Number, Date, Current Date, Current Time, or Calculation.
-
Default text sets optional instructional text that’s displayed in the text box before the user types in the field. Set Text box enabled to allow the user to enter text into the field.
-
Maximum length sets the length of text that a user can enter. The default is Unlimited.
-
Text format can set whether text automatically formats to Uppercase, Lowercase, First capital, or Title case.
-
Text box enabled Lets the user enter text into a field. If there is default text, user text replaces it.
-
-
Set specific properties for a Check box.
-
Default Value Choose between Not checked or checked as default.
-
Checkbox size Set a size Exactly or Auto to change size as needed.
-
Check box enabled Lets the user check or clear the text box.
-
-
Set specific properties for a Combo box
-
Drop-down item Type in strings for the list box items. Press + or Enter to add an item to the list.
-
Items in drop-down list Shows your current list. Select an item and use the up or down arrows to change the order, Press — to remove a selected item.
-
Drop-down enabled Lets the user open the combo box and make selections.
-
-
Go to Developer > Protect Form.
Note: To unprotect the form and continue editing, select Protect Form again.
-
Save and close the form.

If you want, you can test the form before you distribute it.
-
Protect the form.
-
Reopen the form, fill it out as the user would, and then save a copy.
Show the Developer tab
-
On the right side of the ribbon, select
, and then select Ribbon Preferences. -
Under Customize, select Developer .
 , and then select Ribbon Preferences.
Open a template or a document on which to base the form
You can start with a blank document and create your own form. Or, to save time, you can start with a form template.
-
Go to File > New from Template.
-
In the left pane, expand Online Templates, and then select Forms.
-
Double-click the form template that you want to use.
Add content controls to the form
-
In the document, click where you want to add the control.
-
On the Developer tab, under Form Controls, select Text Box, Check Box, or Combo Box.
-
To set specific properties for the control, select Options, and then configure the properties that you want.
Note: To create a list of drop-down items in a combo box, select the combo box placeholder, click Options, and then add the items that you want to appear in the drop-down list.
-
Repeat steps 1 through 3 for each control that you want to add.
Add instructional text (optional)
Instructional text (for example, «Type First Name») in a text box can make your form easier to use. By default, no text appears in a text box, but you can add it.
-
Select the text box control that you want to add instructional text to.
-
On the Developer tab, under Form Controls, select Options.
-
In Default Text, type the instructional text.
-
Make sure that Fill-in enabled is selected, and then select OK.
Protect the form
-
On the Developer tab, under Form Controls, select Protect Form.
Note: To unprotect the form and continue editing, click Protect Form again.
-
Save and close the form.
Test the form (optional)
If you want, you can test the form before you distribute it.
-
Protect the form.
-
Reopen the form, fill it out as the user would, and then save a copy.
Creating fillable forms isn’t available in Word for the web.
You can create the form with the desktop version of Word with the instructions in Create a fillable form.
When you save the document and reopen it in Word for the web, you’ll see the changes you made.
Need more help?
Показана пошаговая методика создания форм документов в MS Word. С помощью статьи вы создадите любой шаблон документа, определив, какие части его текста пользователь потом сможет править, заполнять, а какие – нет. Кроме того, для подлежащих редактированию фрагментов можно заложить формат их представления: обычный текст или дата, «галочка», выбор из заранее настроенного списка и т.п. Вы научитесь устанавливать защиту частей формы от редактирования другими пользователями.
Всем известно, что работать с шаблонами документов или форм намного удобнее, чем постоянно разрабатывать новый, особенно если это касается документов, типовых для деятельности конкретного предприятия или подразделения. Поэтому многие предпочитают один раз подготовить шаблон часто используемого документа и больше не тратить на это времени. Тогда при оформлении конкретного документа вам останется только заполнить его индивидуальные (изменяемые) данные. Создавая шаблон в MS Word, можно включить в документ общий текст, а также элементы управления содержимым, которые впоследствии будут отображаться пользователям в виде полей для ввода данных.
Мы хотели бы подробнее рассмотреть данный функционал на примере работы с Microsoft Office Word 2010. Стоит отметить, что Microsoft Office Word 2010 предлагает много готовых шаблонов документов и форм, также большое разнообразие шаблонов доступно и на веб-узле Microsoft Office Online. Но не всегда предлагаемые формы подходят для работы, поэтому в данной статье мы покажем, как разработать собственный шаблон документа.
Панель инструментов для разработки формы
Чтобы активировать панель инструментов с необходимым набором элементов управления, наведите курсор «мыши» на наименование любой закладки или на свободную область правее всех наименований закладок и щелкните правой кнопкой «мыши», выберите из открывшегося меню команду Настройка ленты (Рисунок 1). Перед вами откроется окно настройки панели закладок (Рисунок 2). Выберите слева в списке команд Настройка ленты, далее в окне справа в списке закладок поставьте «галочку» напротив Разработчик. После этого нажмите кнопку Ок.
Обратите внимание: теперь в ленте закладок у вас появилась новая закладка Разработчик. Откройте ее.
Рисунок 1. Переход в область настройки закладок

Рисунок 2. Включение закладки «Разработчик»

This article offers advanced Microsoft Word (2010-2013) techniques for creating a protected template with fillable fields (or «Content Controls» in Microsoft terminology) for data that cannot be completed by Clio’s merge field tags. These techniques would be useful for creating protected trust receipts with Document Automation.
Related article: Tutorial — Using Document Automation to Create a Trust Receipt
If you are not familiar with Document Automation, please see the following support articles:
Using Clio’s Document Automation
How to Create a Document Template
Contents
Showing the Developer Tab
Adding Form Controls
Control Properties
Formatting Form Controls
Adding Editing Restrictions/Protection to your Template
Advanced Document Automation Webinar
Showing the Developer Tab
The tools that you will need to add form controls to your template can be found in the Developer tab which is hidden by default.
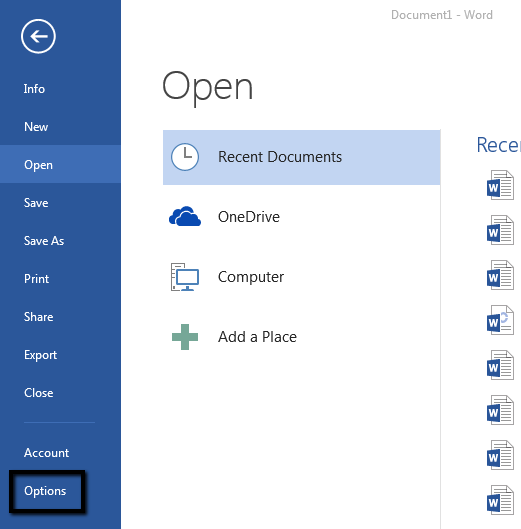
To show the Developer tab, click «File».

Then click «Options».
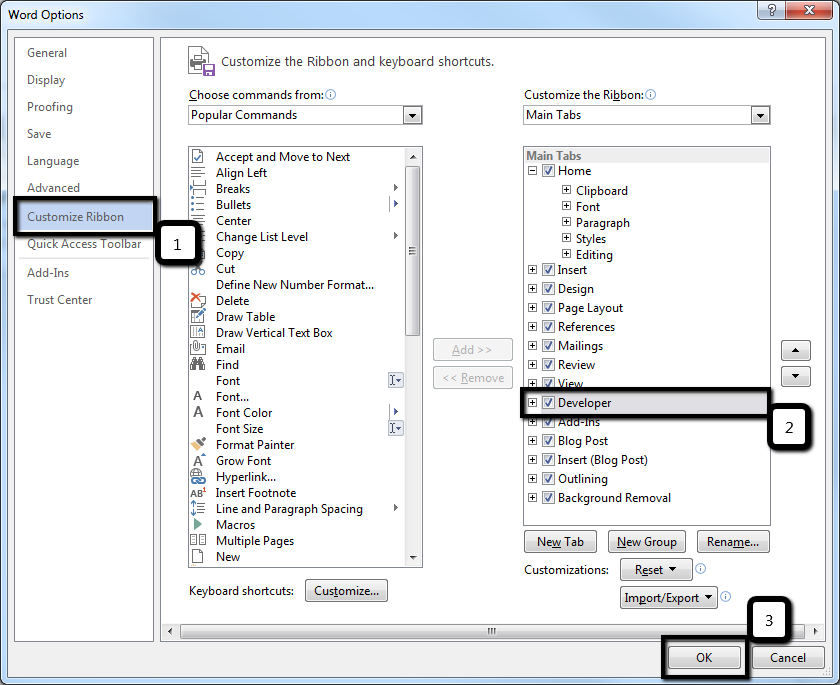
In the Word Options window,
- Click on «Customize Ribbon» in the left-hand sidebar.
- In the Tabs area on the right, check the box beside «Developer».
- Click OK.
Adding Form Controls
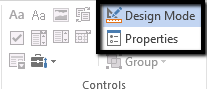
On the «Developer» tab 1 , in the «Controls» group 2 are a number of available form control fields.

Some useful form controls are:
To add a form control to your template, click in the document where you want the control to go, then click on the icon for the control that you want to add.

To change the default placeholder text on the control («Click here to enter text» in the above example) click «Design Mode».
To change the Properties of the control, click «Properties».
Control Properties
Each control has options that can be accessed by clicking «Properties» with the control you want to modify selected.
For example, this is how you will add options to a Dropdown Selection Control or specify the date format displayed when using the Date Picker Control.
Example #1 — Rich Text Content Control Properties
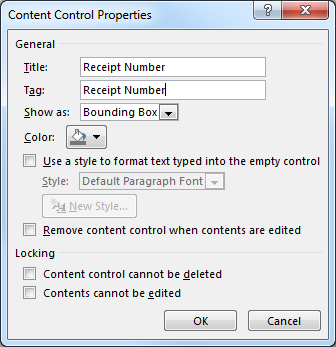 |
The example to the left shows the basic Property options available to form content controls.
|
Example #2 — Combo/Dropdown Selection Control Properties
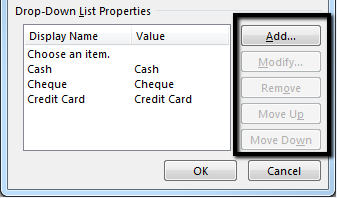 |
In addition to the properties detailed above, the Dropdown List Control Properties gives you the ability to add options for the user to select from when completing the form. To add a new option to the dropdown control, click the «Add» button. To edit an existing option, click on it then click the «Modify» button. To delete an option, click on it then click «Remove». |
Example #3 — Date Picker Control Properties
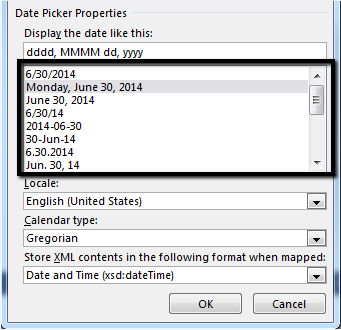 |
The Date Picker Control Properties allow you to select the format of the date that is displayed when the user selects a day from the mini calendar. Click on a date format in the selection area to select it, then click OK. |
Formatting Form Controls
By default, the text that is input into a control will have the same formatting as the line that it was added to. To change the formatting of the text that is input into the control, highlight the control with «Design Mode» OFF and make formatting adjustments as you would to any other text.
To change the wording or formatting of the control’s placeholder text:
- Turn on «Design Mode».
- Highlight the placeholder text and make formatting adjustments as desired.
- Turn OFF «Design Mode».
When formatting control placeholder text, keep in mind that the default styling of that placeholder may not make it easy to immediately identify as a form control. Adding a highlight or some distinctive styling to the placeholder will make it more visible in your document. When the end user types or selects content in the control, the placeholder formatting will disappear and the content will take the styling of that line in your document.
Adding Editing Restrictions/Protection to Your Template
Protecting your template can ensure that any user or Contact who may be completing your merged documents will only be able to modify information that is in the form controls that you add to your template.
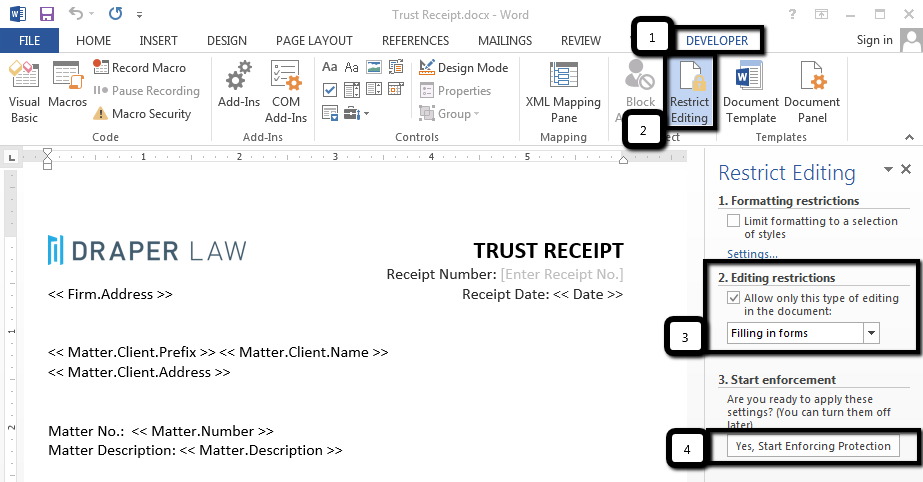
To restrict editing on your template:
- Go to the Developer tab.
- Click on «Restrict Editing»
- In the Restrict Editing sidebar on the right, check the box under step «2. Editing restrictions» and change the dropdown to «Filling in Forms».
- Click «Yes, Start Enforcing Protection» under step «3. Start enforcement«.

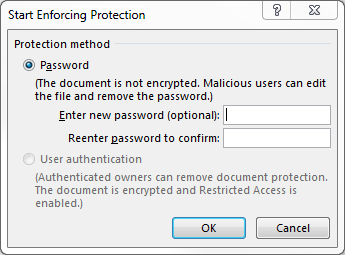
- In the Start Enforcing Protection pop-up, enter in an optional password if you want the document to be password protected, or click OK if you do not want to add password protection.
- Save the protected template as a new version to ensure that you don’t overwrite your original document.
Once uploaded to Clio, the protected template will create new protected Word documents while still pulling information from Clio.
More information is available on Microsoft.com
Имеется
возможность защитить отдельные элементы
управления содержимым в шаблоне, чтобы
предотвратить удаление или редактирование
определенного элемента управления или
группы элементов управления, либо можно
защитить все содержимое шаблона паролем.
2.1 Защита частей формы
-
Откройте
форму, которую необходимо защитить. -
Выделите
элемент управления содержимым или
группу элементов управления, изменения
которой необходимо ограничить.
Для
группировки нескольких элементов
управления, выделите их, нажав клавишу
SHIFT и щелкая по каждому элементу, который
нужно сгруппировать. На вкладке
Разработчик,
в группе Элементы
управления
нажмите Группировать.
-
На
вкладке Разработка
в группе Элементы
управления
выберите пункт Свойства. -
В
диалоговом окне Свойства
элемента управления содержимым
в группе Блокировка
выполните любое из следующих действий.
-
Установите
флажок Элемент
управления содержимым нельзя удалить,
который разрешает редактирование
элемента управления содержимым, но
запрещает удаление элемента управления
содержимым из шаблона или документа,
основанного на шаблоне. -
Установите
флажок Содержимое
нельзя редактировать,
который разрешает удаление элемента
управления, но запрещает редактирование
содержимого в элементе управления.
2.2 Защита всего содержимого формы
-
Откройте
форму, которую необходимо защитить. -
На
вкладке Разработка
в группе Защитить
выберите команду Защитить
документ
и затем щелкните Ограничения
на форматирование и
выберите нужные стили через ссылку
Настройки…
. -
В
группе Включить
защиту
нажмите кнопку Да,
включить защиту. -
Для
назначения для документа пароля, чтобы
только знающие его пользователи могли
удалить защиту, введите пароль в окне
Новый
пароль (необязательно),
а затем подтвердите его.
Если
пароль не используется, изменить
ограничения редактирования может любой
пользователь.
Используйте
надежные пароли, представляющие собой
сочетание прописных и строчных букв,
цифр и символов. Пароли, не содержащие
набор таких элементов, являются
ненадежными. Надежный пароль: Y6dh!et5.
Ненадежный пароль: House27. Пароли должны
состоять не менее чем из 8 символов.
Рекомендуется использовать фразу-пароль,
состоящую из 14 или более символов.
Примечание.
С помощью элементов управления
содержимым можно распечатать форму, но
поля вокруг элементов управления
содержимым видны не будут.
Контрольные
вопросы
-
Что
называется формой документа. Состав
формы. Чем она отличается от шаблона
или мастера? -
Как
создать форму? -
Назначение
кнопок панели инструментов Элементы
управления.
Как вывести её на экран? -
Как
добавить текстовое поле? Виды текстовых
полей? -
Как
добавить флажок? Что можно вводить в
поле флажок? -
Как
добавить поле со списком? Как добавлять,
перемещать и удалять элементы в списке? -
Как
изменить типоразмер и цвет шрифта в
поле, очистить, копировать и удалить
поле? -
Способы
защиты
формы.
Задание
-
Создать
форму согласно варианту. Она должна
содержать таблицу размером 10 строк
и 5 столбцов с текстовыми полями всех
видов:
-
Обычный
текст – три поля, -
Число,
Текущая дата — по одному полю, -
поле
Флажок и поле со списком — по одному
или два поля.
2
Изменить шрифт в двух полях, ввести дату
заполнения формы.
3
На одно текстовое поле установить защиту
от внесения изменений, ввести текст
пояснительной справки.
4
Установить защиту на всю форму с
разрешением только ввода данных в поля
форм.
5
Под таблицей ввести неизменяемый текст
«Дата и время заполнения» и поля
«Текущее время» и «Текущая дата».
Варианты
заданий
Вариант
1. Форма Продажа автомобилей. Названия
столбцов: Марка,Цвет (список),
ЛегковойГрузовой (флажок),Страна-изготовитель
(список), Стоимость.
Вариант
2. Форма Сессия. Названия столбцов:
Фамилия И.О. студента, Предмет (список),
Оценка (список), ЭкзаменЗачёт (флажок),
Дата сдачи.
Вариант
3. Форма Аэропорт. Названия столбцов: №
рейса, Тип самолёта (список), Класс
–ЭкономБизнес (флажок), Дата вылета,
Времы вылета, Аэропорт назначения
(список), Стоимость билета.
Вариант
5. Форма Больничный лист. Названия
столбцов: Фамилия больного, Заболевание
(список), Пол (флажок),Фамилия врача(список),
Дата выдачи.
Вариант
6. Форма Железнодорожный вокзал. Названия
столбцов: Марка,локомотива (список),
ПассажирскийГрузовой (флажок), Пункт
прибытия (список), Дата отправления
(текущая), Время отправления, Стоимость
билета.
Вариант
7. Форма Библиотека. Названия столбцов:
Автор и Название книги (список),
ВыданаСдана (флажок), Издательство
(список), Дата выдачисдачи, Стоимость
книги.
Вариант
8. Форма Почта. Названия столбцов: Почтовое
отправление (список – письмо, посылка,
бандероль), АвиаОбычное (флажок), Вес
отправления, Дата и время отправления,
Фамилия оператора (список), Стоимость
отправления
Вариант
9. Форма Продажа компьютеров. Названия
столбцов: Тип процессора (список), Монитор
цветнойчернобелый (флажок),
Страна-изготовитель (список), Стоимость
компьютера.
Вариант
10. Форма Автовокзал. Названия столбцов:
Марка,автобуса (список), АвтобусМаршрутное
такси (флажок),Город назначения (список),
Стоимость билета.
Содержание
отчета
1
Название, цель, содержание работы
2
Задание.
3
Результаты выполнения работы (сохранить
на своём носителе)
4
Письменные ответы на контрольные
вопросы.
5
Выводы по работе
Лабораторная
работа №11
Составные
документы в Word
Цель
работы: научиться
создавать интегрированные
документы
в Word.
Содержание
работы:
1
Создание интегрированного документа
с помощью мыши
2
Установка параметров полей.
3
Защита полей формы.
Составной
(или интегрированный) документ
используется, когда нужно скомпоновать
его из нескольких разных документов
(текст, рисунок, таблица, формула,
программа на языке программирования,
документ Интернет и др.) Он особенно
удобен тем, что составные части документа
могут отдельно разрабатываться в
различных приложениях Windows,
причём различными пользователями.
Составным
(интегрированным) документом
называется документ, содержащий
фрагменты документов различных
типов.
Фрагменты могут быть созданы в разных
приложениях Windows
или MS
Office
и интегрированы (объединены) в одном
документе Word.
Поскольку приложения МS
Office
совместимы друг с другом, то вставка в
документ Word
таких объектов, как текст WordPad,
таблица Excel,
звуковой фрагмент, отчёт Access,
рисунка Paint,
видеоклип и т.д. не является сложной
задачей.
Существует
3 способа создания интегрированного
документа:
-
С
помощью мыши. -
Через
буфер обмена. -
Через
буфер обмена по технологии OLE.
Соседние файлы в предмете [НЕСОРТИРОВАННОЕ]
- #
- #
- #
- #
- #
- #
- #
- #
- #
- #
- #
We have our
form almost ready and now we just need to enter a field that the person can
fill. This can be done under the Developer tab. By default this tab is hidden
and you might have to enable it in Word options. When you have enabled the
Developer tab then go to Controls section and click Text. Now you have a field
and we can protect the rest of the document from changes. In the Developer tab
go to the Protect section and click on Restrict Editing. Put the checks in and under the second option
choose Filling forms from the drop down menu and press „Yes, Start Enforcing
Protection”. Enter a password to protect it and starting from there
someone using the document can only fill in the forms.