
Insert a table of contents
A table of contents in Word is based on the headings in your document.

Create the table of contents
-
Put your cursor where you want to add the table of contents.
-
Go to References > Table of Contents. and choose an automatic style.

-
If you make changes to your document that affect the table of contents, update the table of contents by right-clicking the table of contents and choosing Update Field.
To update your table of contents manually, see Update a table of contents.
If you have missing entries
Missing entries often happen because headings aren’t formatted as headings.
-
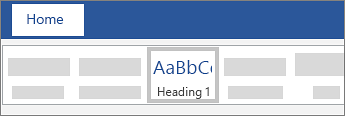
For each heading that you want in the table of contents, select the heading text.
-
Go to Home > Styles, and then choose Heading 1.
-
Update your table of contents.
To update your table of contents manually, see Update a table of contents.
Create the table of contents
Word uses the headings in your document to build an automatic table of contents that can be updated when you change the heading text, sequence, or level.
-
Click where you want to insert the table of contents – usually near the beginning of a document.
-
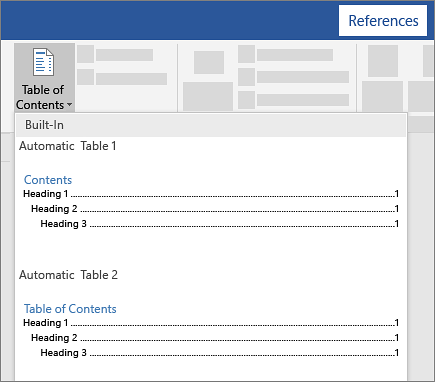
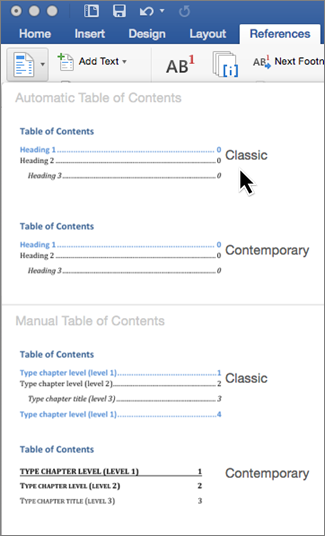
Click References > Table of Contents and then choose an Automatic Table of Contents style from the list.
Note: If you use a Manual Table of Contents style, Word won’t use your headings to create a table of contents and won’t be able to update it automatically. Instead, Word will use placeholder text to create the look of a table of contents so you can manually type each entry into the table of contents. To update your manual table of contents, see Update a table of contents.
If you want to Format or customize your table of contents, you can. For example, you can change the font, the number of heading levels, and whether to show dotted lines between entries and page numbers.
If you have missing entries
Missing entries often happen because headings aren’t formatted as headings.
-
For each heading that you want in the table of contents, select the heading text.
-
Go to Home > Styles, and then choose Heading 1.
-
Update your table of contents.
To update your table of contents manually, see Update a table of contents.
Word uses the headings in your document to build an automatic table of contents that can be updated when you change the heading text, sequence, or level.
-
Click where you want to insert the table of contents—usually near the beginning of the document.
-
On the toolbar ribbon, select References.
-
Near the left end, select Insert Table of Contents. (Or select Table of Contents > Insert Table of Contents.
The table of contents is inserted, showing the headings and page numbering in your document.
If you make changes to your document that affect the table of contents, you can update it by right-clicking the table and selecting Update Table of Contents.
Get the learning guide
For a hands-on guide that steps you through the process of creating a table of contents, download our Table of Contents tutorial. Or, in desktop Word, go to File > New, and search for table of contents.
See Also
Update a table of contents
Need more help?
Want more options?
Explore subscription benefits, browse training courses, learn how to secure your device, and more.
Communities help you ask and answer questions, give feedback, and hear from experts with rich knowledge.
When you’re creating or editing a long document, you’ll
probably have to create a table of contents. That might sound like a chore, but
fortunately, you can do it in just a few clicks. Then, if you change the document, Word can update the table of content instantly.
Best of all, Word includes hyperlinks to the various sections in your table of contents, so it isn’t just a visual aid for
printed documents, but it’s also perfect to make easy-to-browse online documents and PDFs with.
Creating the table of contents in Word itself is simple, but the tricky part is getting it to work the way you want. In this tutorial, I’ll show you everything you need to make a simple, auto-generated table of contents, and then get it to look the way you want in every version of Microsoft Word.
How to Make a Table of Contents in Microsoft Word (Screencast)
You can follow along using your own document, or if you prefer, download the zip file included for this tutorial. It contains a document called The Age of Einstein.docx, which is a public domain physics textbook (credit to the author, Professor Frank W.K. Firk).
Watch the video screencast above or follow the written tutorial instructions below for more detail on how to make a table of contents in Word.
Creating Your Table of Contents in Word
There are a few ways of creating a table of contents in Word, but only two that you’ll
ever use
- Create them automatically from built-in styles
- Create them from your custom styles
These methods work mostly the same in Windows and Mac versions of Microsoft Word.
Using MS Word built-in styles is the fastest and most common
technique, and using custom styles takes only a little more work. Sometimes,
you’ll want to use both techniques in the same document. Once you have a table of contents (TOC) in
a document, you can format it with its own styles. You don’t want to format the
TOC like regular text, because the formatting can easily get wiped out.
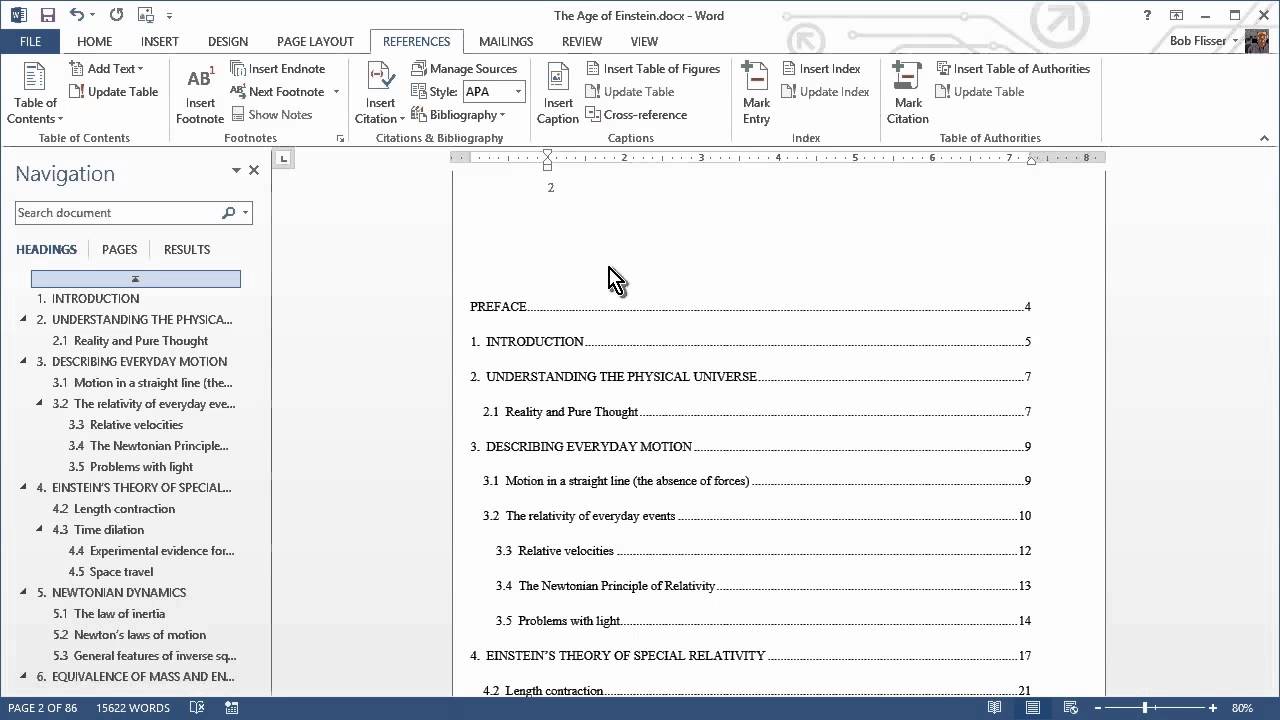
How the Textbook is Organized
Before doing anything to the document, let’s see how it’s
organized. Page 1 is the title, page 2 is blank and will hold the table of contents, page 3
is the preface, and after that comes the text. As you scroll down, notice that headings
and subheadings are formatted.
.jpg)
.jpg)
.jpg)
The best way to see the structure of the document is with
the Navigation Pane. (In some versions of Word for Mac, it may be called the Document Map Pane.)
In Windows, go to the View
tab, then click the check box to enable the Navigation Pane.
.jpg)
.jpg)
.jpg)
On the Mac, click the Sidebar option to show the drop-down menu. Click the arrow next to the option and click Navigation. (On older versions of the Mac software, the option is called Document Map Pane.)
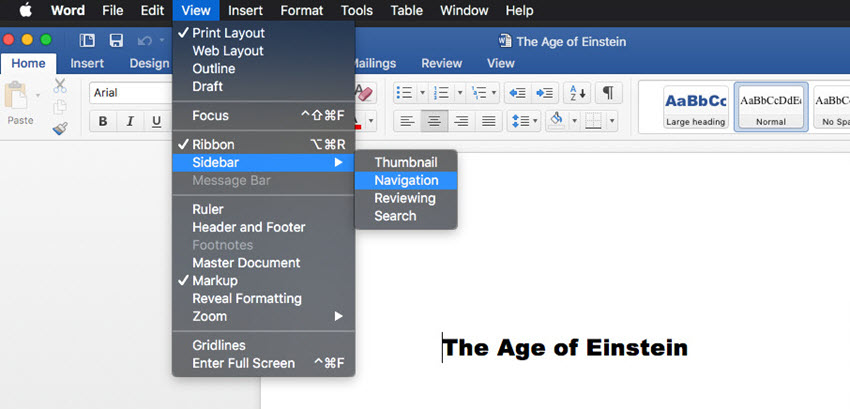


On your Mac or PC, go back to the Home
tab if you’re not already there. Keep your eye on the Styles box on the ribbon,
and click the items in the pane to navigate through the book.
Notice that the
items with whole numbers – like 2.
Understanding the Physical Universe – are formatted as Heading 1, and items
with decimals – like 2.1 Reality and Pure
Thought – are formatted as Heading 2. There are also a few decimal items –
like 4.5 Space Travel – that are
formatted as Heading 3.
Tip: when
creating a document, the shortcuts for applying the Heading 1, 2 and 3 styles
are Ctrl-Alt-1, Ctrl-Alt-2, and Ctrl-Alt-3
(and Command-Opt-1, Command-Opt -2, and Command-Opt-3 on the Mac).
Generating a Table of Contents Using Built-In Header Styles in Word
Word can now turn those Heading styles into table of contents
entries. Click at the top of page 2. (Tip: in Windows, press Ctrl-G,
type 2, then press Enter. On the Mac, press Command-Opt-G, type 2, then press Return.)
In Windows, go to the References
tab on the ribbon, click the Table of
Contents button on the left, then choose one of the two built-in tables
from the list. Note that the thumbnails show that Headings 1, 2 and 3 will be
included.
It’s almost the same on the Mac. Go to the Insert menu, choose Index and Tables, then pick one of the
formats on the left and click OK.
This dialog box also shows that Headings 1-3 will be included.
.jpg)
.jpg)
.jpg)
As soon as you choose one, the table of contents gets inserted starting on
page 2, and Word automatically inserts a couple of more pages, so it all fits. In Windows, you can Ctrl-click one of the items, and it will hyperlink to the item in the document.
.jpg)
.jpg)
.jpg)
This works great, but there’s one problem. Before the
Introduction, there is a Preface that
should be included in the table of contents. And just before Appendix A1 is the heading for
the Appendix, and that should also be
included. But they weren’t, because they’re both formatted with a custom style
called Large heading, and custom
styles don’t get included in the default table of contents. The second method of creating table of contents in Word will fix that.
Creating a Table of Contents From Custom Styles in Word
Word can include any styles in a table of contents. We just
have to tell it which ones to choose. And we can update the table, rather than having
to delete it and start over.
In Windows, go back to the References tab, click the Table
of Contents button, then near the bottom of the menu, choose Custom Table of Contents. Click the Options button near the bottom of the dialog box to display the Table of Contents Options dialog box.
On the Mac, go to back to the Insert menu and choose Index
and Tables. In the Table of Contents section, click the Options button.
On the Mac or PC the Table of Contents Options dialog box shows that the Heading 1 style will have TOC level 1,
the Heading 2 style will have TOC level 2, and the Heading 3 style will have
TOC level 3.
.jpg)
.jpg)
.jpg)
Scroll down to the bottom of the list (on the Mac, you’ll use the down slider). Then, in the box for Large heading, type a 1 to make it level 1. Table of Content levels can
come from more than one style.
.jpg)
.jpg)
.jpg)
Click OK in the
Table of Contents Options dialog, then OK again in the Table of Contents dialog box. When Word displays a message asking if you want to replace the
table, choose Yes. The Preface and Appendix are now both included in the table
of contents.
.jpg)
.jpg)
.jpg)
Manually Updating the Table of Contents in Word
There are other times when you’ll want to update the table
manually. This is handy when you change the text of one of the headings and
want the change reflected in the table of contents.
Scroll down to the page with the preface. At the top of the page replace
PREFACE with FORWARD. Make sure it still uses the Large heading style.
Go back to the top of the table of contents and click in it. Note that it
has a gray background; that means it’s a field, and fields can usually be
updated.
Click the Update Table
button either on the TOC itself (that button doesn’t always appear) or on the References tab, and the first entry changes to FORWARD. (On the Mac, right-click the table and choose Update Field from the pop-up menu. Choose the Update entire table option and click OK.)
.jpg)
.jpg)
.jpg)
Now that the table of contents displays the correct text, we
can apply nicer formatting though.
How to Modify Table of Contents Styles in Word
Each heading level of the table of contents has its own
style that’s automatically applied. All we have to do is change the formatting
of the styles to change the table’s appearance, here’s how:
- In Windows, in the References tab of the ribbon, click again on the Table of Contents button and choose Custom Table of Contents, near the
bottom. In the Table of Contents dialog box, click Modify. - On the Mac, click Insert > Index
and Tables. On the left side, choose From Template, then
click Modify. Everything else works
the same way as in Windows. - In the Table of Contents dialog box, click Modify, and another dialog box appears,
showing style names and formatting for the TOC heading levels. Select TOC
1. - Click the Modify
button just below it, and the Style dialog box appears. (On the Mac, it’s called the Properties dialog box.)
.jpg)
.jpg)
.jpg)
Format the style with Arial or Helvetica, 12 points, bold.
Then click OK.
.jpg)
.jpg)
.jpg)
- Repeat for the TOC 2 style, and set it to Arial
or Helvetica, 12 points, normal. - Repeat for the TOC 3 style, and set it to Arial
or Helvetica, 11 points, normal.
The table of contents should now look like this:
.jpg)
.jpg)
.jpg)
Conclusion
When you have a long document, you don’t have to fear
creating a table of contents. Whether you’re using Windows or a Mac, you can
insert one in just a few clicks, then use the same dialog box to change the
formatting.
As you learned in this table of contents tutorial, remember not to apply formatting directly to the table, because it
can get wiped out if you replace it. If you make any changes to the Word document itself, remember to click the top of the TOC and update it. Leave a comment below if you have any trouble making or tweaking your table of contents.
To learn more about working with Microsoft Word, study the following tutorials:
Editorial Note: This post was
originally published in 2014. It has been comprehensively revised to make it
current, accurate, and up to date by our staff—with special assistance from Laura Spencer.
Did you find this post useful?

Bob Flisser has authored many videos and books about Microsoft and Adobe products, and has been a computer trainer since the 1980s. He is also a web and multimedia developer. Bob is a graduate of The George Washington University with a degree in financial economics.
![]()
Download Article
![]()
Download Article
- Adding a Table of Contents
- Updating the Table of Contents
- Stylizing the Table of Contents
- Video
|
|
|
This wikiHow teaches you how to customize and update the table of contents in your Word document. When you create a table of contents in Word, page numbers are added automatically based on the headings you’ve added to each section. Word makes it easy to customize the way the page numbers and section titles appear on the table. If you make changes to your document that affects your section headers or page numbers, you’ll need to choose the Update Table option so the table of contents remains correct.
-
1
Format the headings of each section of your document. Word’s table of contents builder automatically generates a table of contents based on the headings in your document.[1]
This means each section that you want represented in your table of contents must have a properly-formatted heading.- If a section should appear as a primary section in the table of contents, select its heading, click the Home tab, and then select Heading 1 on the «Styles» panel.
- To add a sub-section to the primary section in the table of contents, give that section a Heading 2 header: Select its heading and choose Heading 2 from the Styles section.
- You can can also use Heading 3, Heading 4, etc., to add even more pages to your table of contents.
- Make sure any page you want to include in the table of contents has a heading.
-
2
Click the location where you want to insert the table of contents. Typically this will be at the beginning of your document.
Advertisement
-
3
Click the References tab. It’s at the top of Word.
-
4
Click Table of Contents on the toolbar. It’s at the upper-left corner of Word. A list of Table of Contents styles will expand.
-
5
Select an automatic style template. Several style options appear for your table of contents—choose one of the suggested styles to get started. Once selected, this will add a table of contents that lists the page numbers for each of your formatted sections.


Advertisement
-
1
Click the References tab. It’s at the top of Word.[2]
- Use this method if you’ve made a change (changing a heading, adding/removing pages) to your document and need to update the table of contents to reflect that change.
- The only way to change the name of a section on the table of contents is to change the name of the corresponding header in the document.
-
2
Click Update Table on the «Table of Contents» panel. It’s in the upper-left corner. Two options will appear.
-
3
Select an update option.
- Select Update page numbers only if you want to refresh the page numbers without applying any changes you’ve made to the headings.
- Select Update entire table to apply all heading and page number changes.
-
4
Click OK. The table of contents is now up-to-date.


Advertisement
-
1
Click the References tab. It’s at the top of Word.
-
2
Click Table of Contents on the toolbar. It’s at the upper-left corner of Word. A list of Table of Contents styles will expand.
-
3
Click Custom table of contents on the menu. This opens the Table of Contents dialog box.
-
4
Adjust your general preferences. The «Print Preview» box at the upper-left corner shows you how the printed table of contents will appear, while the «Web preview» box displays how it will look on the web.[3]
- Use the checkbox next to «Show page numbers» to show or hide page numbers. If you just want to hide page numbers on the web version of the table of contents, check the box next to «Use hyperlinks instead of page numbers.»
- Use the checkbox next to «Right align pages numbers» top adjust the alignment.
- To change the style of the line or pattern that separates the heading title and the page number, make your selection from the «Tab leader» menu.
- To choose another theme, select something from the «Format» menu.
- To adjust how many heading levels are displayed in the table, select an option from the «Show levels» menu (the default is 3).
-
5
Click the Modify button. It’s in the lower-right corner of the window. This is where you can change the properties of the text on the table of contents page.
- If you don’t see this button, click the «Formats» menu and select From template. It should appear then.
-
6
Select a style and click Modify. The styles you can change appear in the «Styles» box on the left side of the window. When you click a style (e.g., TOC 1), you’ll see the font size, spacing, and other details—clicking Modify allows you to change these details.
-
7
Make your changes and click OK. You can choose different fonts, alignments, colors, and numerous other details for each selected style. Alternatively, you can keep the defaults, which come from the table of contents template you selected.
-
8
Click OK. The style changes you’ve made will apply to your table of contents immediately.


Advertisement
Ask a Question
200 characters left
Include your email address to get a message when this question is answered.
Submit
Advertisement
Video
Thanks for submitting a tip for review!
About This Article
Article SummaryX
1. Click the References tab.
2. Click Update Table.
3. Select an update option.
4. Click OK.
Did this summary help you?
Thanks to all authors for creating a page that has been read 60,117 times.
Is this article up to date?
When you work with a long Word document that includes headings, you may want or need to meet the requirements for creating a Table of Contents or several Tables of Contents. The Table of Contents lists the headings in a document, along with the numbers of the pages where the headings appear.
By default, adding a Table of Contents can make it easy for the reader to locate document content quickly. The Table of Contents allows jumping from one location to another.
Word offers several ways to create a Table of Contents. Some of the common ways:
1. Create a pre-defined Table of Contents (simplest way).
By default, Word creates a Table of Contents from the text formatted with sequential heading styles: Heading 1, Heading 2, Heading 3:

2. Create a custom Table of Contents.
You can include or exclude in a Table of Contents any of the used styles such as custom styles:

3. Create a Table of Content from parts of texts:

A Table of Contents created by the appropriate functionality has hyperlinks to navigate the document quickly. To use a hyperlink, hover the mouse over the appropriate entry in the table and Ctrl+Click to follow the link (see how open hyperlinks without holding Ctrl).
Notes:
- Some requirements recommend creating a Table of Contents if the document has more than 10 pages.
- You can also download templates and use them to fulfill the requirements.
Preparing a document for creating a Table of Contents
Before creating a Table of Contents in Word, ensure that all needed headings are formatted with Word’s heading styles. These allow Word to recognize and include them in the appropriate list.
You can create a Table of Contents, then apply a heading style to some paragraphs and update created Table of Contents to fulfill it.
Don’t forget to update headings and any related items in the document!
Create a Table of Contents – simplest way
To create a Table of Contents in a Word document, do the following:
1. Position the cursor in the document where you want to insert the Table of Contents.
2. On the Reference tab, in the Table of Contents group, click the Table of Contents button:

3. From the Table of Contents dropdown list, select one of the built-in Tables:

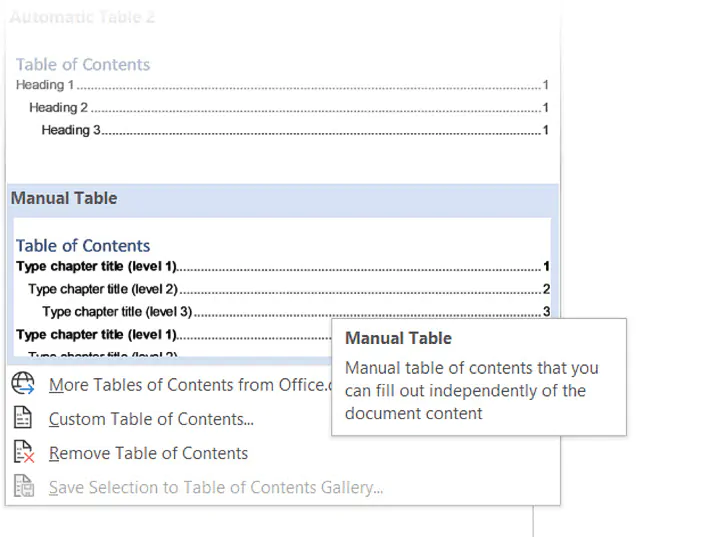
- Automatic Table 1 inserts a Table of Contents with the title Contents and includes all text styled as Heading 1, Heading 2, or Heading 3.
- Automatic Table 2 inserts a Table of Contents with the title Table of Contents and includes all text styled as Heading 1, Heading 2, or Heading 3.
- Manual Table inserts a Table of Contents with the title Table of Contents and includes placeholders that are not linked to the document content (see an example):

Note: See how to modify a style of Table of Contents.
After selecting any of the built-in tables, Word creates a Table of Contents using the selected template. E.g.:
Create a custom Table of Contents
To create a Table of Contents that contains not only Heading 1 – Heading 3 styles, do the following:
1. Position the cursor in the document where you want to insert the Table of Contents.
Note: The custom Table of Contents does not automatically create a title (e.g., Table of Contents or Contents).
2. On the Reference tab, in the Table of Contents group, click the Table of Contents button:
3. From the Table of Contents dropdown list, select Custom Table of Contents…:

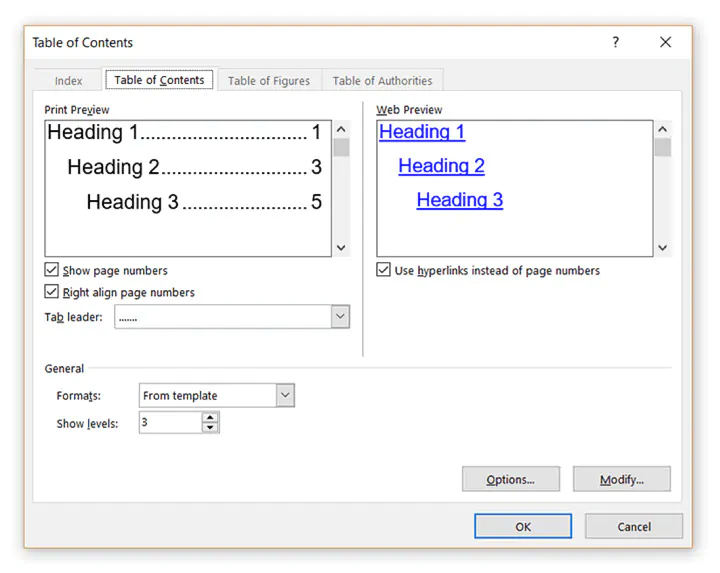
In the Table of Contents dialog box, on the Table of Contents tab (is displayed by default, all other tabs are grayed):

- In the General section (we recommend starting from this section because its options can change the selected parameters in other sections):
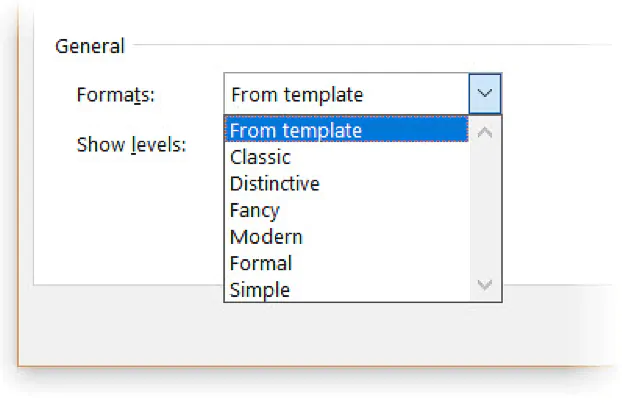
- From the Format dropdown list, select a visual format:

- From template is based on the styles established in the current template
- Classic
- Distinctive
- Centered
- Formal
- Simple
Note: Choose any proposed formats and see how the new list will look in the Print Preview section. E.g., the Formal format:

- In the Show levels field, type or select the number of levels you want to include in the Table of Contents. Word will display headings starting from Heading 1 to the selected level (see how to customize which heading or styles should be displayed). E.g., 5 levels:
- From the Format dropdown list, select a visual format:


See all the changes and choices in the Print Preview and Web Preview sections:
- In the Print Preview section (the selected Format in the General section can change all options in that section):
- Clear the Show page numbers check box if you prefer to hide page numbers (see how to hide page numbers for some headings):
If you deselect this option, all other options in the Print Preview section will disappear.
- Clear the Right align page numbers check box to display page numbers right after items text:
If you deselect this option, you can’t choose the tab leader for page numbers.
- From the Tab leader dropdown list, select the tab leader you need. You can select dots, dashes, or lines that appear before the page numbers (see how to customize tab leaders for different headings):
- Clear the Show page numbers check box if you prefer to hide page numbers (see how to hide page numbers for some headings):
- In the Web Preview section of the Table of Contents dialog box (shows how your Table of Contents will look if you convert your Word file to a web page):
- Clear the Use hyperlinks instead of page numbers check box if you prefer to see the same view as in Print Preview:
- Clear the Use hyperlinks instead of page numbers check box if you prefer to see the same view as in Print Preview:
- Click the Options… button to customize which styles and in which order should be included in the Table of Contents. See Create a Table of Contents of non-predefined styles and Table entry fields for more details.


Customize a Table of Contents styles
- Click the Modify… button to modify pre-defined styles for a Table for Contents.
In the Style dialog box, select the style you want to modify:

- In the Preview field, see how the selected style looks,
- Under the Preview field, see the main options of the selected style,
- If you need to change the selected style, click the Modify… button.
In the Modify Style dialog box, make changes you need, then click the OK button:


See how to customize Table of Contents styles for more details.
Add a title to the custom Table of Contents
After inserting a new Table of Contents, manually type a title above the list. E.g.:

To see the proposed field and have all the features of the standard Table of Contents, do the following:
1. Add the pre-defined Table of Contents in the simplest way (see above).
2. Edit the Table of Contents to apply any customization you need.
Attention! We highly recommend checking the formatting requirements, accepted by your college, university, company, or established on the project, etc.
Notes: See also how to customize a Table of Contents for more details.
Empty the Table of Contents
After creating a Table of Contents, it can be created with the message “No table of contents entries found”:
![]()
The main cause for this message is that Word could not find the text with style Heading 1, Heading 2, or Heading 3 in the document (by default, a Table of Contents contains only these three styles, see how to customize it to choose styles you need).
To solve that problem, for each heading that you want to be displayed in the Table of Contents, select the heading text (paragraph or block of text). Then do one of the following:
- On the Home tab, in the Styles group, choose any of the Headings:

- Right-click on the selection, click the Styles button in the Mini toolbar, then select a Heading style you want:

- Position the cursor in a paragraph with the text you want to change to the Heading. Then on the Reference tab, in the Table of Contents group, click the Add Text button, then choose the level you need:

- Use the shortcuts for Headings:
- Alt+Ctrl+1 to apply Heading 1,
- Alt+Ctrl+2 to apply Heading 2,
- Alt+Ctrl+3 to apply Heading 3.


Don’t forget to update headings and any related items in a document!
Update a Table of Contents
Word will not automatically update any Table of Contents after adding, deleting, or modifying included headings and pages. You need manually update them, follow the next steps:
1. Click on the Table of Contents and do one of the following:
- On the References tab, in the Table of Contents group, click the Update Table button:

Note: If Word doesn’t recognize any Table or List in the document as a Table of Content, it shows the appropriate message (to solve that, fix or recreate a Table of Contents):

- Right-click the list and select Update Field from the shortcut menu:

- Click anywhere in the Table of Contents to show the field options. At the top of the field borders, click the Update Table… button:


See also how to lock and unlock updating for fields.
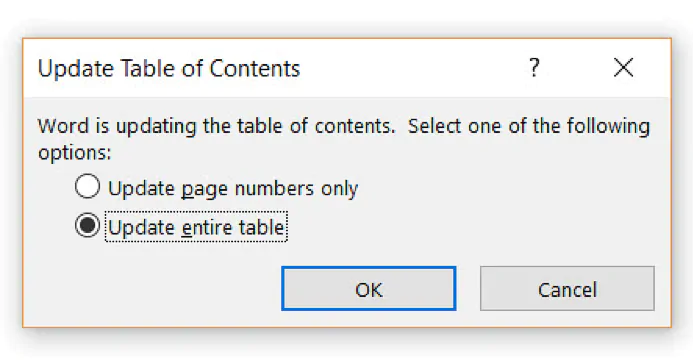
2. In the Update Table of Contents dialog box, select what you need to update:

We recommend selecting the Update entire table option always.
3. Click the OK button to start updating.
Select a Table of Contents
To make any changes, such as modifying the Table of Contents, you need to select the total Table of Contents lines, including the last, empty line right after the Table of Contents entries:

To select all the Table of Contents, you can also click the Field button:

Edit an existing Table of Contents
If you need to modify an existing Table of Contents, you can:
- Delete existing Table of Contents and create a new one,
- Edit an existing field.
To edit the existing Table of Contents, follow the next steps:
1. Do one of the following:
- Click anywhere on the Table of Contents, then on the References tab, in the Table of Contents group, click the Table of Contents button, then select Custom Table of Contents… from the dropdown list.
- Select all the lines of the Table of Contents (see how to select it above), then right-click on the selection and choose Edit Field… in the popup menu:

In the Field dialog box, click the Table of Contents… button:

Note: You can see that button only if you have selected all the existing Table of Contents lines.
2. In the Table of Contents dialog box, on the Table of Contents tab, select the options you need.
Be careful! Some options selected for the existing Table of Contents can be lost.
Delete a Table of Contents
To delete a Table of Contents, do one of the following:
- On the References tab, in the Table of Contents group, click the Table of Contents button, then choose Remove Table of Contents from the dropdown list:

- Click inside the Table of Contents to show the field options. At the top of the field borders, click the Table of Contents button, then choose Remove Table of Contents:


Look at the nearest Microsoft Word document you have. There’s a good chance that it’s a document that’s just a few pages long. And without a Word table of contents.
But pick up software documentation or a research report. It wouldn’t be called a “professional document” without a pretty well-formatted Table of Contents.
You shouldn’t look at the job of making a Table of Contents (we will occasionally call it a TOC also) as a chore. Making a TOC isn’t only for dense reports or your next bestseller. It can be for something as simple as a daily journal or a school assignment. You should create a Table of Contents whenever appropriate.
Microsoft Word makes it easy. We will look into a few ways to create a Table of Contents in Word.
But first, let’s go into the benefits of a Table of Contents for a Word document.
Get your free Word shortcuts cheatsheet!
Download the print-ready shortcut cheatsheet for Word.
Why is a Table of Contents so essential?
Are TOCs relevant when we have bookmarks and advanced search features on digital devices? The short answer is — Yes. A Table of Contents isn’t just for navigating long documents.
Here are five benefits you should immediately look at:
- It gives the reader a bird’s eye view of the document. A TOC is like an outline. At a glance, you can see how a document will flow from one topic to the next.
- It makes a document look professional. A document with a TOC looks more organized and professional than a document that lacks one.
- It is a key organizational aid for the author. Think of it like a roadmap and the first draft for a TOC can help you arrange your thoughts (and even brainstorm).
- It makes a document easier to discuss. A TOC can signal the quality of the document. Your teacher or your book agent can tell at a glance if the material is worth a read by just glancing at the table of contents.
- It gives you a learning path. A TOC is a well-ordered series of steps. Steal them from an instructional book to understand the learning path on any subject of your choice.
Check out this quick video on how to create a table of contents in Word:
How to Create a Table of Contents in Word
Microsoft Word can automatically build a Table of Contents for you. You need to only outline the content and then specify the heading styles with basic formatting. Let’s take this step by step.
1. Format your document using heading styles. Select each chapter in your document and apply Heading Styles to them. Here, you are marking up the section headers so that Word can recognize them.
Go to Ribbon > Home > Styles. Select the text and apply headings for all the text you want to include in the table of contents.
 You can create a hierarchy within the main chapters with the help of the heading styles. For instance, use Heading 1 for new sections or chapters. Heading 2 for subsections within the section, and Heading 3 for smaller units or topics inside them.
Word scans the document for any text formatted as either Heading 1, 2, or 3 and then uses these to create the format for the TOC.
2. Position the Table of Contents on the page. Place the cursor on the specific position where you want the TOC to appear in your document. This is commonly somewhere at the beginning of the document.
4. Click the Table of Contents command. Go to Ribbon > References > Table of Contents. Choose from one of the two automatic types available. The only difference between the two is the heading of «Contents» or «Table of Contents» at the top.
 5. The Table of Contents is inserted automatically. Word scans the document and uses the heading styles to construct the order of the sections and subsections and their page numbers. This is a barebones TOC and you can continue to work with this and make it more stylish.
6. Update the Table of Contents anytime. You can always update a Table of Contents that has been created automatically. Update the table if you change the heading styles, rearrange the contents, or change the text. Also, update it if you make any changes to the content that affects the page numbers.
To update a table of contents that was created automatically, click References > Update Table.
 Choose to Update page numbers only or Update entire table if you want to update the page numbers and the text.
 7. Create a Table of Contents manually. When the automatic method is so effortless, why would you feel the need to make one manually? There could be two reasons:
- The document is without any styles which Word can recognize.
- The document has too much of variety makes an automatic TOC difficult.
To create a manual table, go to References > Table of Contents > Click the dropdown to reveal the option for Manual Table.
Microsoft Word inserts a TOC with placeholders which you can now edit. You can modify this with your own fonts and colors. Do remember that you also have to insert the page numbers manually too.
A TOC created manually cannot be updated automatically.
You do not have to settle for the basic Table of Contents that Microsoft Word creates for you. You can modify any TOC and even create a custom Table of Contents of your own.
How to customize the Table of Contents
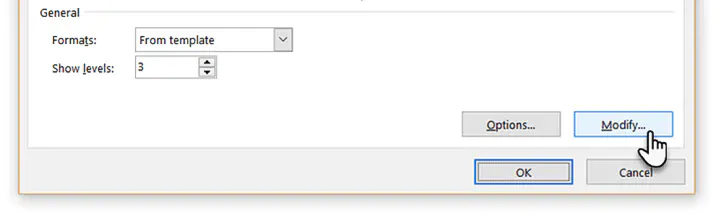
You can easily customize a TOC with the Table of Contents dialog box. Go to References > Table of Contents > Custom Table of Contents to launch the dialog.
Any changes you make here will be visible in the Print Preview and Web Preview windows.
Seven advanced techniques to customize the TOC
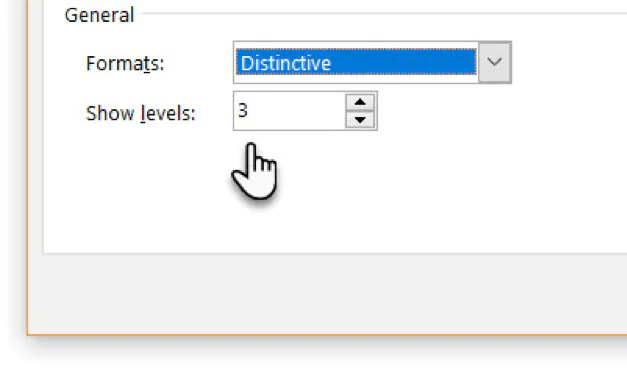
1. Choose a different format for the TOC
You can change an entire table by choosing a different format. In the General section, expand the dropdown for Formats and choose an appearance.
2. Change the appearance of the items in the TOC
Remember, the appearance of your TOC is ultimately controlled by style definitions. You may want to tweak the overall look of the TOC by creating your own styles for the headings. These modified styles can be saved alongside the in-built ones and applied across the document for a consistent look. Follow these steps.
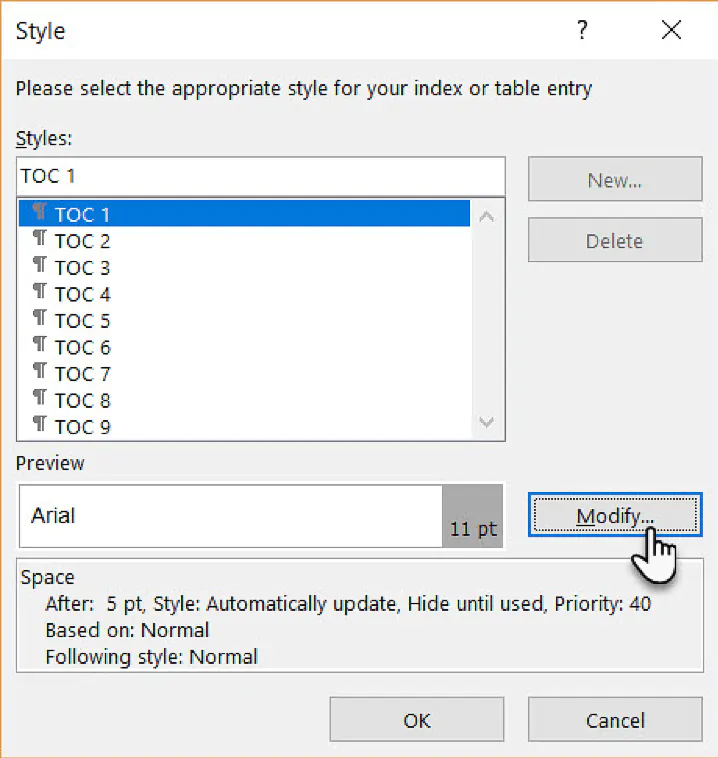
1. Click Modify. If the Modify button is grayed out, change Formats to From template.
 2. In the Styles list, click the level that you want to change and then click Modify. Here, TOC 1 corresponds to heading level 1 in your document, TOC 2 to heading level 2, TOC 3 to heading 3 and so on.
 3. In the Modify Style dialog box, you can change the font or its color. Make any other formatting change like text indentation and then click OK.
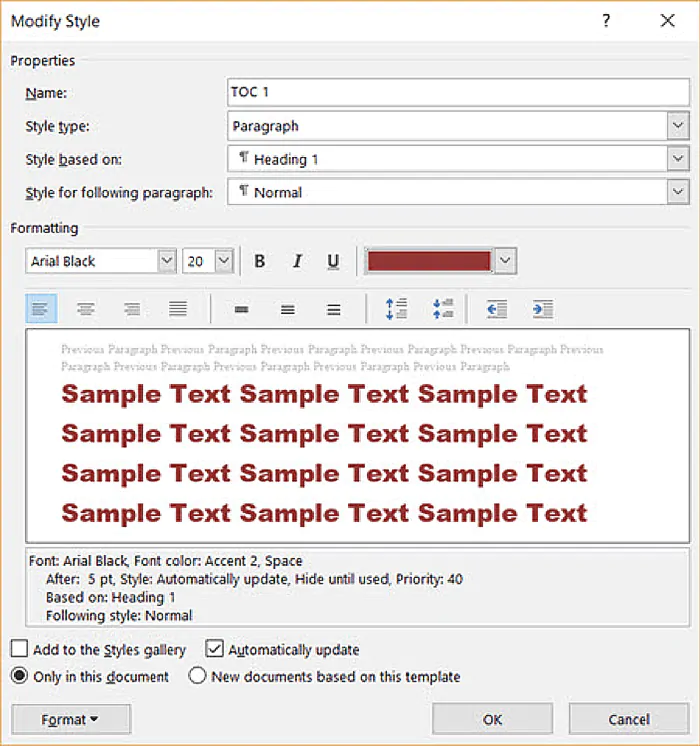
4. Before you click OK, you can choose whether the style change applies to the current document or to all future documents. To save it for future use, click the checkbox for Add to the Styles gallery.
3. Change the levels of the style headings shown
A TOC can be itemized, or you can just include the major sections. The Show levels number allows you to change the number of levels displayed in your table of contents. The “Levels” here refers to the style headings you have applied to your sections.
For instance: H1, H2, H3… etc. If you set it on 2, then all text with the Heading 1 style or the Heading 2 style is displayed.
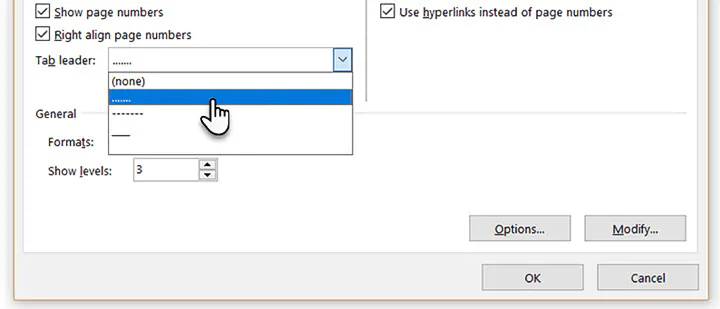
4. Change or add dot leaders in the TOC
Dot leaders are the lines or dots that connect the items in the index to page numbers. These leader lines are mentioned in many style guides as a necessary part of thesis documents.
In the Table of Contents dialog box, click the dropdown for the Tab leader list and select the dotted line option. Alternatively, choose the leader line you want or select “none” to remove it from the TOC.
5. Add a non-heading style
Word won’t include a non-heading style when it inserts an automatic TOC. By default, Word only includes headings 1 through 9. But it gives you a method to include any other style you create in the index. Let’s say you want to add another heading called “A Brief Guide” at the top of the content and the TOC.
In the Table of Contents dialog box, click the Options button to open this screen:
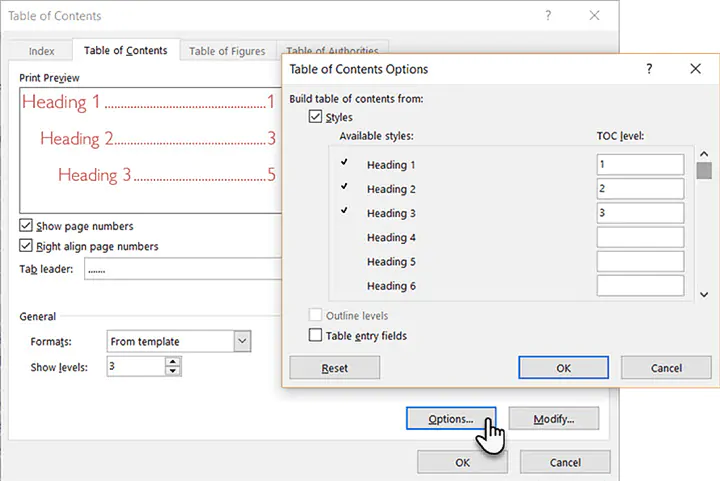
Right now, it maps the styles in use only to the TOC levels. As you can see, the three styles, Heading 1, Heading 2, and Heading 3 are mapped as levels 1. 2, and 3.
Go down the boxes until you find Title, which has no mapped TOC level. Enter 1 to map Title to the TOC top level.
Click OK twice to exit the dialogs. Word will prompt you to replace the contents. Click Yes to replace the TOC.
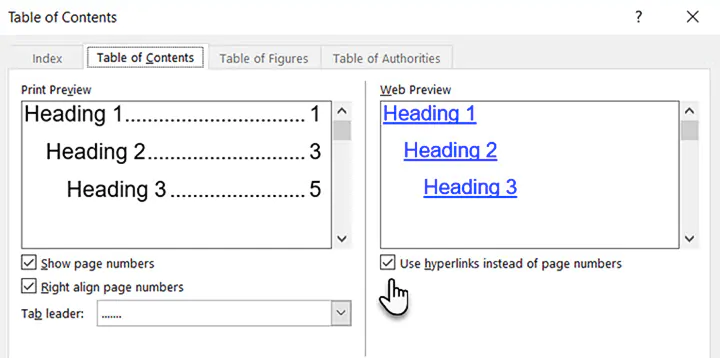
6. Create a clickable Table of Contents
Creating a hyperlinked Table of Contents is expected in the digital age. Navigation is faster. It is also another condition to submit a thesis or dissertation.
Click the Use hyperlinks instead of page numbers checkbox.
Also, uncheck the Show page numbers box if you just want to use the hyperlinks.
7. Place a simple border around the Table of Contents
You can use Word’s Shapes feature to insert a border around the TOC. Set Shape Fill to “No Fill” and then add Shape Styles or use Format Shape to design the look of the pseudo-border around the table.
Remember to add Table of Contents to your documents
The automatic Table of Contents feature is a time saver. But to catch the eye, you need to dive into different styles and custom tables. To sum up:
- Structure your document.
- Decide the levels you want to display.
- Change the style attributes to match your needs.
As you begin making your own, you will have your own questions. Hopefully, this guide has illustrated the basic process well enough for you to take the plunge. Are you more comfortable with Table of Contents now?
If you are looking to sharpen your Microsoft Office skills, check out our Microsoft Word course to learn time-saving tips and tricks for formatting your documents.
Ready to master Microsoft Office?
Start learning for free with GoSkills courses
Start free trial