
Word for Microsoft 365 Outlook for Microsoft 365 Word 2021 Outlook 2021 Word 2019 Outlook 2019 Word 2016 Outlook 2016 Word 2013 Outlook 2013 Word 2010 Word 2007 More…Less
You can use styles to quickly apply a set of formatting choices consistently throughout your document. If you want formatting choices that are not available from the built-in styles and themes available in Word, you can modify an existing style and customize it to suit your needs. You can change the formatting (such as font size, color, and text indentation) in styles applied to titles, headings, paragraphs, lists, and so on. You can also select formatted text in your document to create a new style in the Styles gallery.
The styles covered in this article are located in the Styles gallery, a visual menu located on the Home tab. To apply a style, simply select the text you want to format, and then click the style you want in the Styles gallery. To learn more, see Apply a style to text in Word.

Modify an existing style
You can modify an existing style in the Styles gallery in two ways:
-
Modify a style by updating it to match formatting in your document
-
Modify a style manually in the Modify Style dialog box
Modify a style by updating it to match formatting in your document
If you have text in your document that already has a style applied, you can change the formatting of that text and apply it to the style in the Styles gallery.
-
Select text in your document that has the style applied, such as Heading 1.
When you select text that has a style applied, that style is highlighted in the Styles gallery.

-
Format the selected text with the new attributes that you want.
For example, you might want to change the point size for the Heading 1 style from 16 points to 14 points.
-
On the Home tab, in the Styles group, right-click the style that you want to change, and then click Update [Style Name] to Match Selection.
Note: All text with the style that you changed will automatically change to match the new style that you defined.
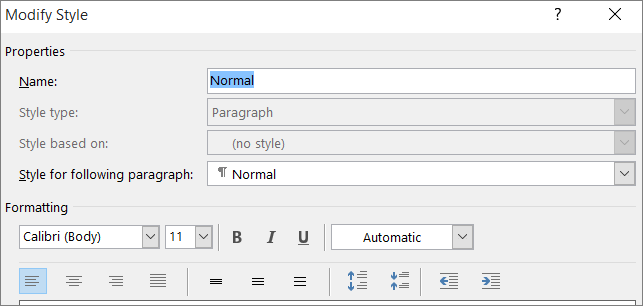
Modify a style manually in the Modify Style dialog box
You can modify a style directly in the Styles gallery, without using the text in your document.
-
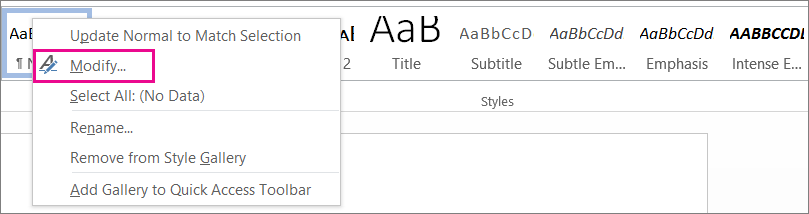
On the Home tab, right-click any style in the Styles gallery and click Modify.
-
In the Formatting section, make any formatting changes you want, such as font style, size, or color, alignment, line spacing, or indentation.
-
Choose whether the style change applies to the current document or to all future documents.

Create a new style based on document formatting
You can select formatted text in your document to create a new style that you add to the Styles gallery.
-
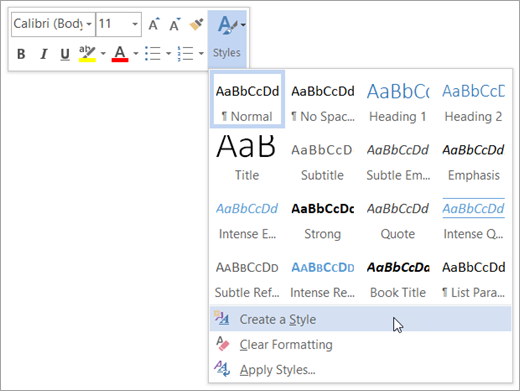
Right-click the text on which you want to base a new style.
-
In the mini toolbar that appears, click Styles, and then click Create a Style.
-
In the Create New Style from Formatting dialog box, give your style a name and click OK.
Your new style will now appear in the Styles gallery.
Note: If you want your new style to appear in all new Word documents, right-click it in the Styles gallery, click Modify, and then select New documents based on this template at the bottom of the dialog box.
-
Right-click the text on which you want to base a new style, point to Styles, and then click Save Selection as a New Quick Style.
-
In the Create New Style from Formatting dialog box, give your style a name and click OK.
Your new style will now appear in the Styles gallery.
Note: If you want your new style to appear in all new Word documents, right-click it in the Styles gallery, click Modify, and then select New documents based on this template at the bottom of the dialog box.
See also
Apply a style to text in Word
Need more help?

Для большего удобства использования Microsoft Word, разработчики этого текстового редактора предусмотрели большой набор встроенных шаблонов документов и набор стилей для их оформления. Пользователи, которым обилия средств по умолчанию будет недостаточно, могут с легкостью создать не только свой шаблон, но и собственный стиль. Как раз о последнем мы и поговорим в данной статье.
Урок: Как в Ворде сделать шаблон
Все доступные стили, представленные в Word, можно просмотреть на вкладке «Главная», в группе инструментов с лаконичным названием «Стили». Здесь можно выбрать различные стили оформления заголовков, подзаголовков и обычного текста. Здесь же можно создать и новый стиль, используя в качестве его основы уже имеющийся или же, начиная с нуля.
Урок: Как в Ворде сделать заголовок
Создание стиля вручную
Это хорошая возможность настроить абсолютно все параметры написания и оформления текста под себя или под требования, которые перед вами выдвигают.
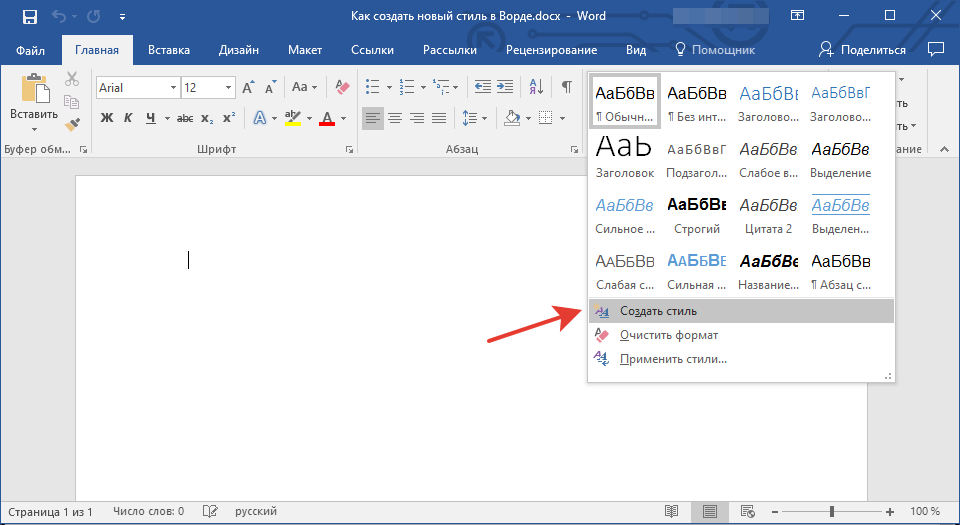
1. Откройте Word, во вкладке «Главная» в группе инструментов «Стили», непосредственно в окне с доступными стилями, нажмите кнопку «Больше», чтобы отобразить весь список.

2. Выберите в открывшемся окне пункт «Создать стиль».
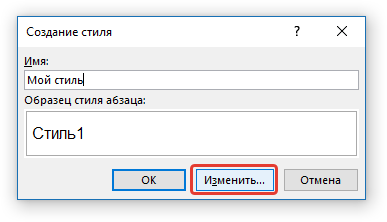
3. В окне «Создание стиля» придумайте название для вашего стиля.
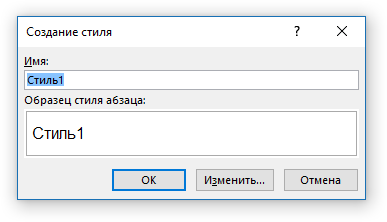
4. На окно «Образец стиля и абзаца» пока можно не обращать внимание, так как нам только предстоит приступить к созданию стиля. Нажмите кнопку «Изменить».
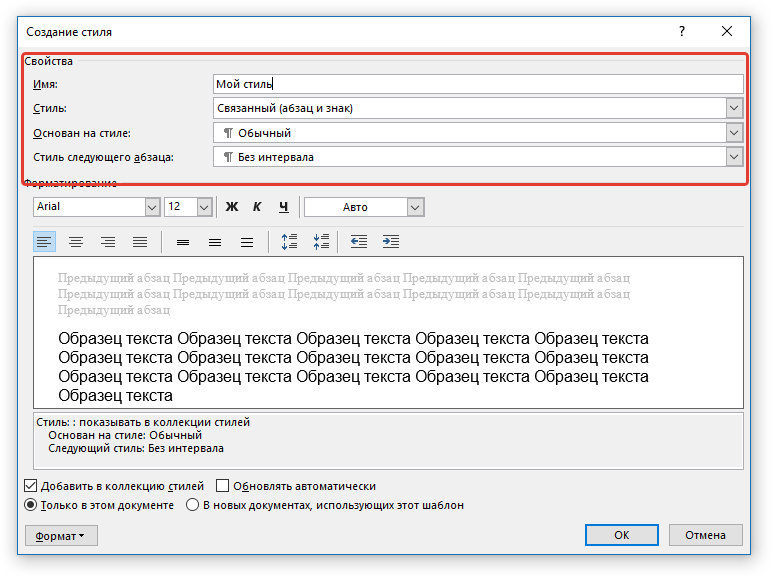
5. Откроется окно, в котором как раз-таки и можно выполнить все необходимые настройки свойств и форматирования стиля.


В разделе «Свойства» можно изменить следующие параметры:
- Имя;
- Стиль (для какого элемента он будет применен) — Абзац, Знак, Связанный (абзац и знак), Таблица, Список;
- Основан на стиле — здесь можно выбрать один из стилей, который будет лежать в основе вашего стиля;
- Стиль следующего абзаца — название параметра вполне лаконично говорит о том, за что он отвечает.
Полезные уроки по работе в Ворд:
Создание абзацев
Создание списков
Создание таблиц
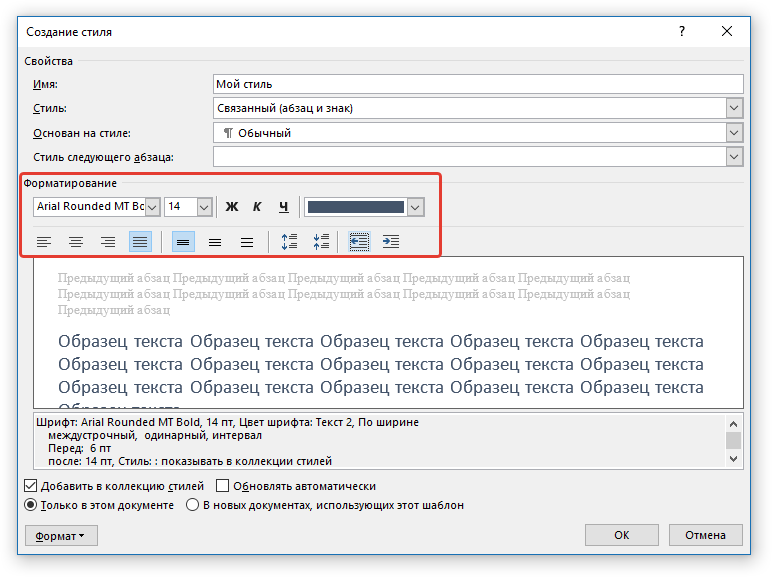
В разделе «Форматирование» можно настроить следующие параметры:
- Выбрать шрифт;
- Указать его размер;
- Установить тип написания (жирный, курсив, подчеркнутый);
- Задать цвет текста;
- Выбрать тип выравнивания текста (по левому краю, по центру, по правому краю, по всей ширине);
- Задать шаблонный интервал между строк;
- Указать интервал перед или после абзаца, уменьшив или увеличив его на необходимое число единиц;
- Установить параметры табуляции.
Полезные уроки по работе в Word
Изменение шрифта
Изменение интервалов
Параметры табуляции
Форматирование текста
Примечание: Все изменения, которые вы вносите, отображаются в окне с надписью «Образец текста». Непосредственно под этим окном указаны все параметры шрифта, которые вы задали.
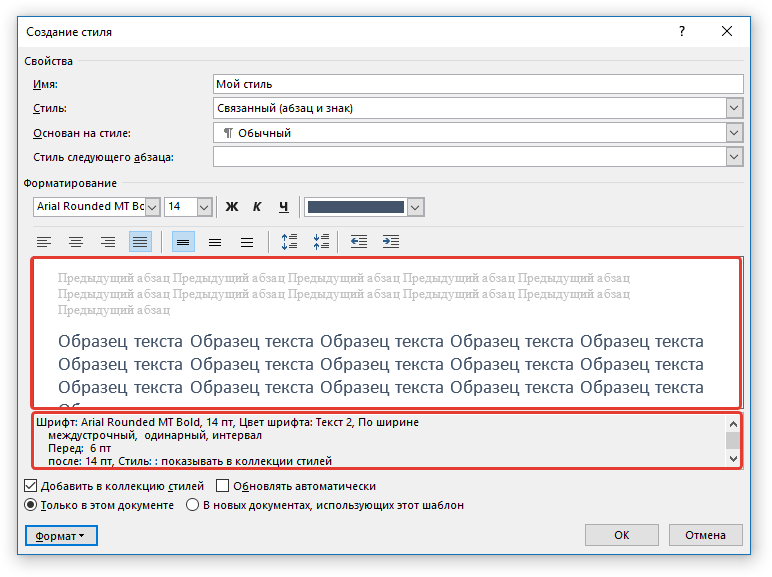
6. После того, как вы внесете необходимые изменения, выберите, для каких документов будет применяться этот стиль, установив маркер напротив необходимого параметра:
- Только в этом документе;
- В новых документах, использующих этот шаблон.
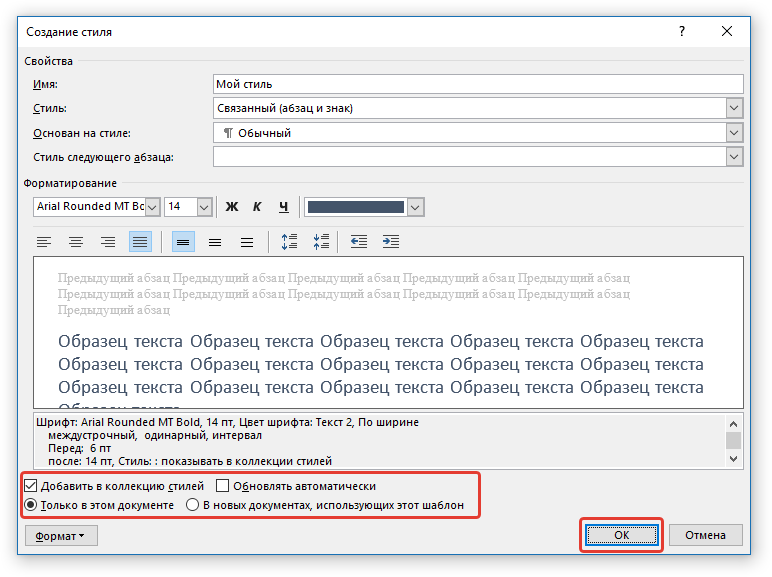
7. Нажмите «ОК» для того, чтобы сохранить созданный вами стиль и добавить его в коллекцию стилей, которая отображается на панели быстрого доступа.
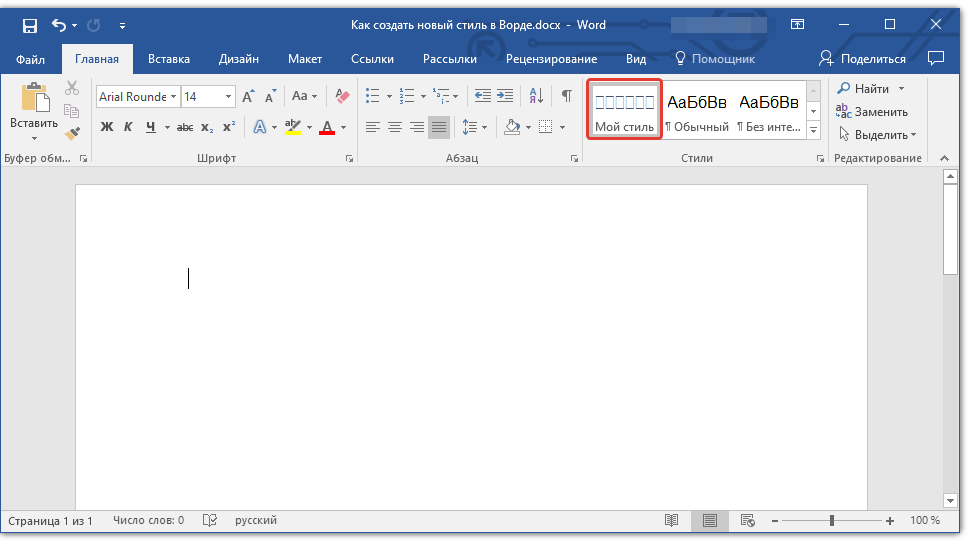
На этом все, как видите, создать собственный стиль в Ворде, который можно будет использовать для оформления своих текстов, совсем несложно. Желаем вам успехов в дальнейшем изучении возможностей этого текстового процессора.
Еще статьи по данной теме:
Помогла ли Вам статья?
Microsoft Word Styles are the most basic building blocks in Word. One of the first things you’ll need to learn after you master the interface and basic formatting is using the Quick Styles listed on the Home tab. Often, though, the Quick Styles don’t contain a particular Style your document needs.
If the default Microsoft Word Styles don’t fully meet your needs (for example, you need one for block quotes), you can create a new one. There are a couple of different ways to do this. I’ll start with what I think is the easiest one first.
Creating a new Style from an example
If you’ve already got some text formatted just the way you want it (going back to the previous example, a block quotation that’s already nicely indented with all the right paragraph settings), you can use it to create a new Style. The easiest way is to select the text you want the Style to emulate, right-click and select Styles, then select Create a Style:
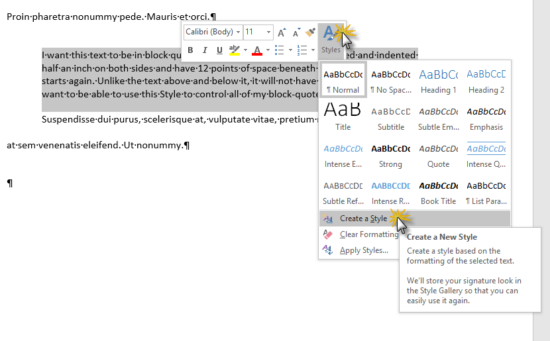

You’ll get this dialog box:
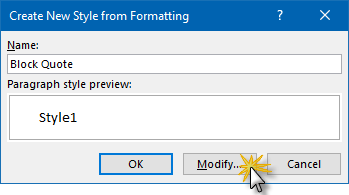
You could simply click OK here, but I want you to see what your options are in case you want something other than the defaults Word will choose for you:
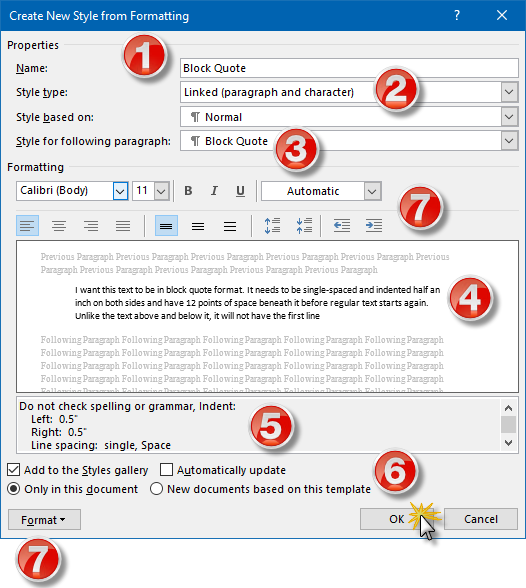
- Word will automatically name this Style1; you’ll want to rename it here if you did not already do it in the previous dialog box as I did.
- Word has several Style types: Paragraph, Character, Linked (which combines Paragraph and Character), Table and List. Since this is really intended to be a collection of paragraph settings, Linked isn’t really the best choice, because if I change the font style or size elsewhere in the document and apply Block Quote as a Linked Style, it’s going to change the text back to Calibri 11. The Style type Paragraph is a better choice in this instance.
- If I’m typing a Block Quote paragraph and I press the Enter key, what Style do I want the following paragraph to default to? That’s the question answered here. It’s a matter of personal convenience and obviously depends on what sort of document you’re working on.
- Any changes you make in formatting (see 7) will show up in this Preview window …
- … and you can review the settings themselves in this window.
- These settings control three things: (a) whether you can access this Style in the Styles Gallery on the Home tab (if you want to keep this one handy, leave that box checked); (b) whether you want any Styles to automatically update themselves based on manual formatting you do in your document (for example, if you altered the indentation on one paragraph that had the Block Quote Style applied to it, checking this box means that the Style itself reflects those changes, and all the paragraphs with Block Quote applied will change, not just the one you edited). I recommend leaving this one unchecked—it tends to wreak havoc in documents; (c) whether you want this Style to be available only within this document or any documents you create in the future in this template.
- You can make further format changes to your Style settings in both these places. The area at the top will let you make some font and spacing changes, but Format button will take you to various dialog boxes (Paragraph, Numbering, etc.) for more advanced formatting.
Once you’ve configured everything to your liking, click OK.
Creating a new Style from scratch
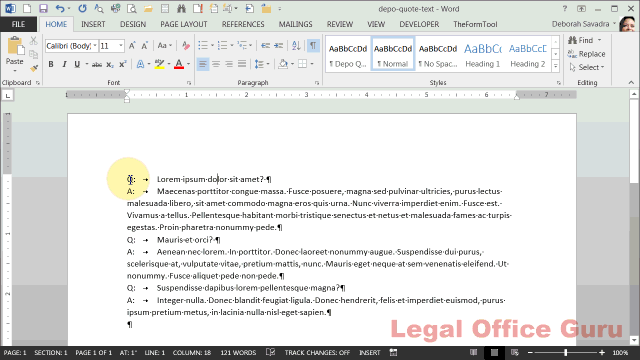
If you’ve got a specific set of requirements and are fairly adept with character and paragraph formatting, though, you can simply create a new Style from scratch. For this example, I’m going to create one for quoted deposition text.
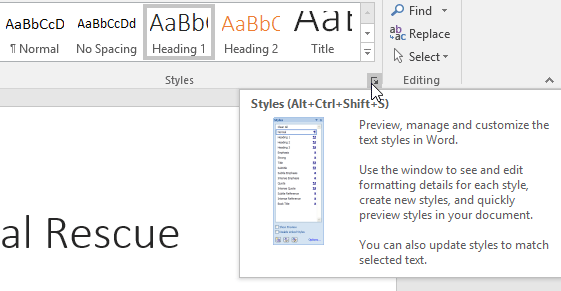
To start, click the drop-down arrow at the bottom right-hand corner of the Quick Styles area to open the Styles pane:
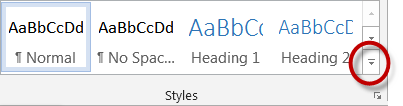
Then click Create a Style:

You’ll get the now-familiar dialog box:
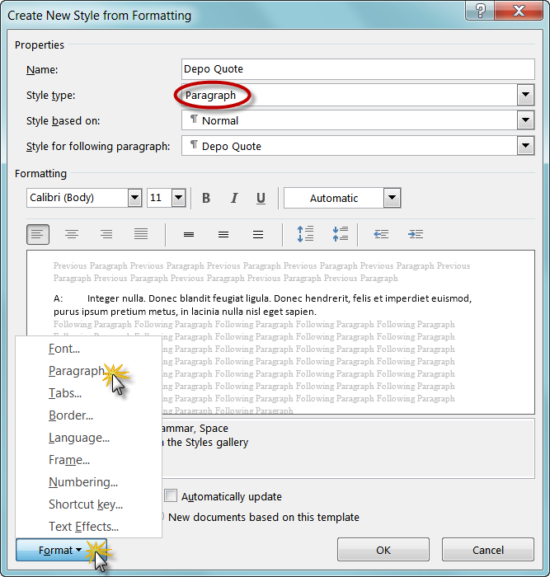
You’ll notice that I designated this to be a Paragraph Style. Since this Style is intended to control how the text indents and spaces, I want it to be independent of font settings, etc., so I can use it with any font settings in any document.
To get those indents and spacing, click on the Format button at the bottom and choose Paragraph to go to the Paragraph dialog box:
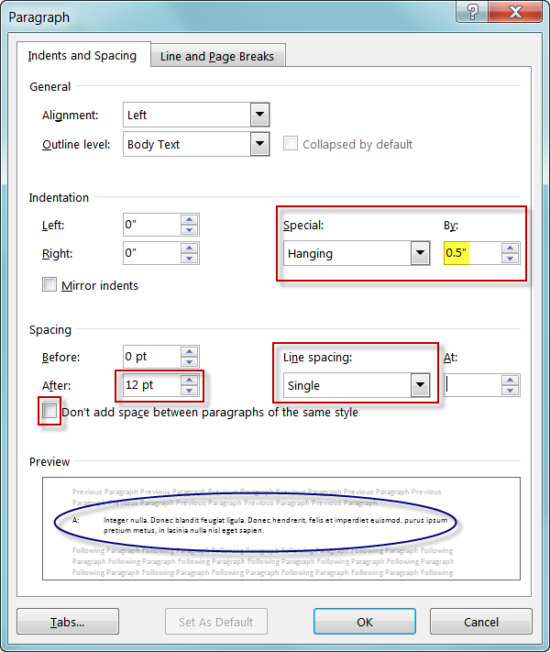
I did three things here (circled in red):
- I chose a half-inch hanging indent
- I selected Single spacing
- I inserted 12 points of space between the paragraphs and made a point of instructing Word to insert that space even between paragraphs of this same Style.
You can preview the results in the Preview pane (circled in blue above).
Once I click OK in both the Paragraph and New Style dialog boxes (making sure to check the settings at the bottom) and return to my document, applying the Style to the text is a matter of two clicks:
This content is part of a course
What you’ve learned here is just a small part of my Lawyer’s Guide to Microsoft Word Styles course, where you can learn how to leverage the power of Styles to control document formatting and structure and to make global document changes with just a few clicks. Click here for more information.
Lesson 29: Applying and Modifying Styles
/en/word2016/smartart-graphics/content/
Introduction
A style is a predefined combination of font style, color, and size that can be applied to any text in your document. Styles can help your documents achieve a more professional look and feel. You can also use styles to quickly change several things in your document at the same time.
Optional: Download our practice document.
Watch the video below to learn more about using styles in Word.
To apply a style:
- Select the text you want to format, or place your cursor at the beginning of the line.
- In the Styles group on the Home tab, click the More drop-down arrow.
- Select the desired style from the drop-down menu.
- The text will appear in the selected style.


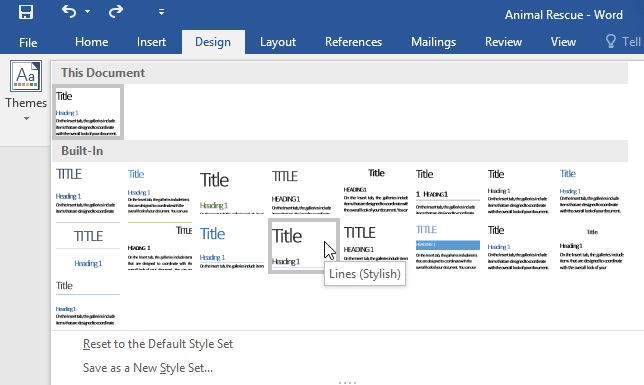
To apply a style set:
Style sets include a combination of title, heading, and paragraph styles. Style sets allow you to format all elements in your document at once instead of modifying each element separately.
- From the Design tab, click the More drop-down arrow in the Document Formatting group.
- Choose the desired style set from the drop-down menu.
- The selected style set will be applied to your entire document.


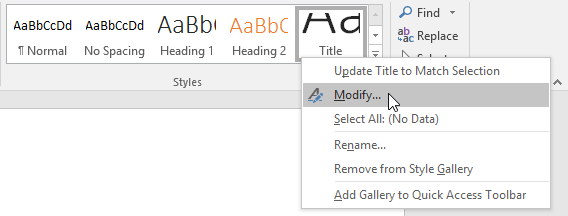
To modify a style:
- In the Styles group on the Home tab, right-click the style you want to change and select Modify from the drop-down menu.
- A dialog box will appear. Make the desired formatting changes, such as font style, size, and color. If you want, you can also change the name of the style. Click OK to save your changes.
- The style will be modified.
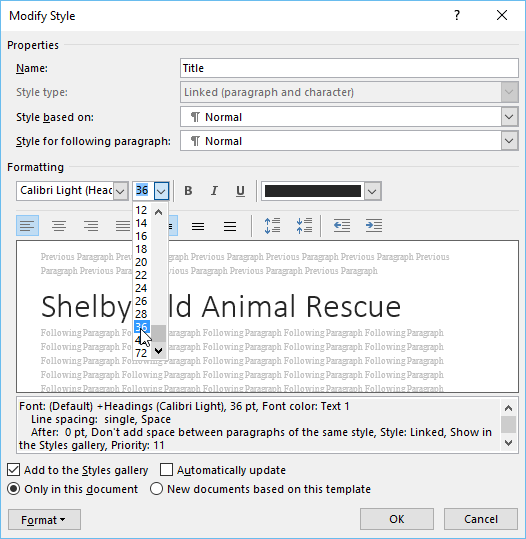

When you modify a style, you’re changing every instance of that style in the document. In the example below, we’ve modified the Normal style to use a larger font size. Because both paragraphs use the Normal style, they’ve been updated automatically to use the new size.
To create a new style:
- Click the arrow in the bottom-right corner of the Styles group.
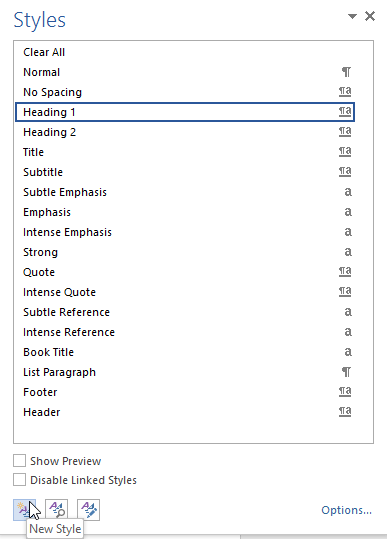
- The Styles task pane will appear. Select the New Style button at the bottom of the task pane.
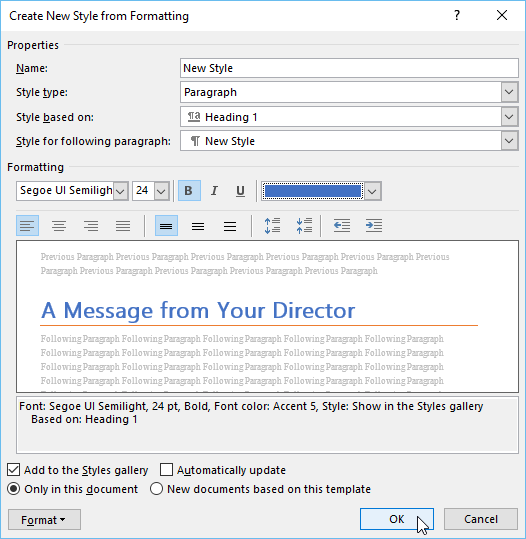
- A dialog box will appear. Enter a name for the style, choose the desired text formatting, then click OK.
- The new style will be applied to the currently selected text. It will also appear in the Styles group.

You can also use styles to create a table of contents for your document. To learn how, review our article on How to Create a Table of Contents in Microsoft Word.
Challenge!
- Open our practice document. If you already downloaded our practice document, be sure to download a fresh copy by clicking the link again.
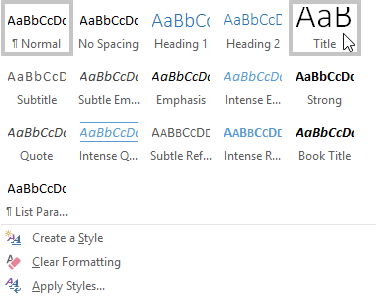
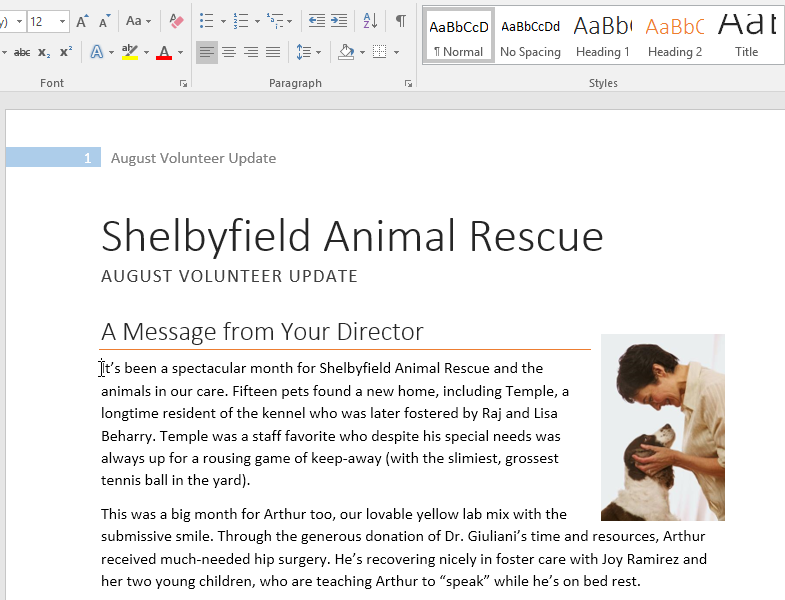
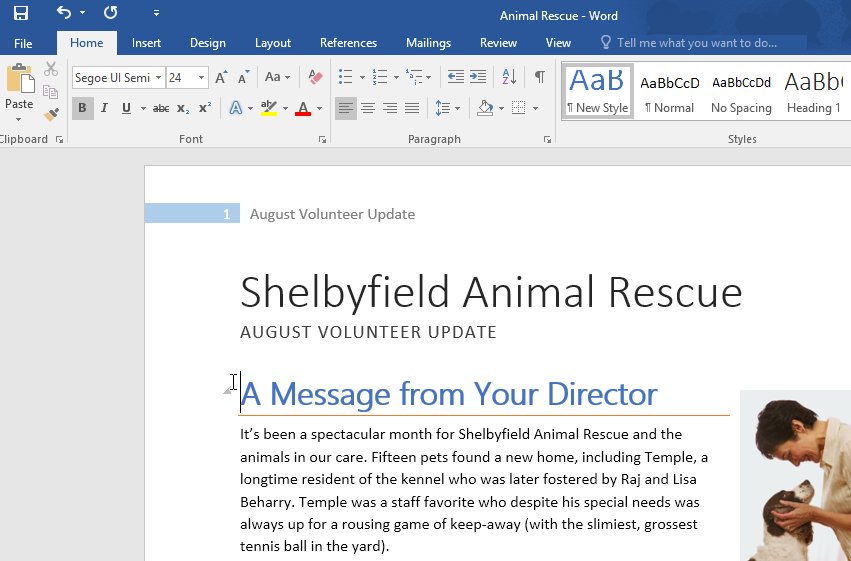
- On page 1, select the first line of text Shelbyfield Animal Rescue and change the style to Title.
- Select the second line that says August Volunteer Update and change the style to Heading 1.
- Select the third line that says A Message From Your Director and change the style to Heading 2.
- In the Design tab, change the style set to Casual.
- Modify the Normal style so the font is Cambria and the font size is 14 pt.
- When you’re finished, the first page of your document should look like this:

- Optional: Modify the Heading 3 style any way you want. You can change the font, font size, color, and more. This heading appears throughout the document, so try to choose formatting that complements the body text.

/en/word2016/mail-merge/content/
Download PC Repair Tool to quickly find & fix Windows errors automatically
In Microsoft Word, styles are a combination of predefined font style, color, and size that you can apply to text to change its appearance. If you do not want the built-in styles offered in Word, you can modify an existing built-in or create a new style.
What are the advantages of using styles in Word?
Built-in styles in Microsoft Word help users to format a document with a consistent and professional look quickly. Using custom new styles, you can create a combination of font style, color, and size to change the appearance of a Word document.
Follow the methods below to customize and create a new style in Word.
- Modifying an existing style by updating it to match formatting in your document
- Modifying a style manually in the Modify Style dialog box
- Create a new style
- Remove new style from Style gallery
1] Modifying an existing style by updating it to match formatting your document
Select a text that has a style applied for example Heading 1.
The text selected style is highlighted in the Styles gallery.
Then format the styled text, for instance, changing the size for Heading 1 from 16 to 26.
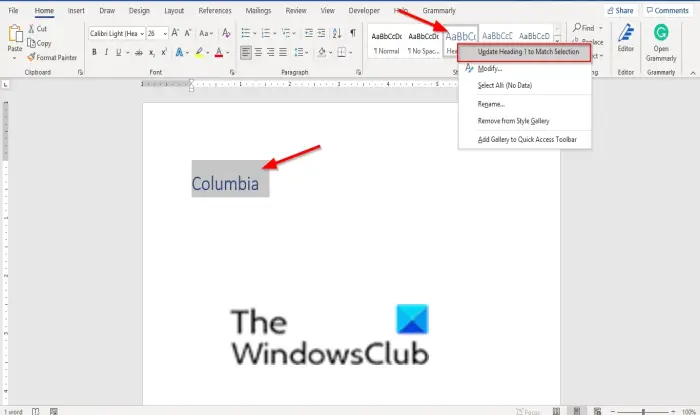
On the Home tab, in the Styles group, right-click the style that you want to change, then click Update (Style Name) to Match Selection.
2] Modifying a style manually in the Modify Style dialog box
You can modify a style in the Styles gallery without using the text in your document.
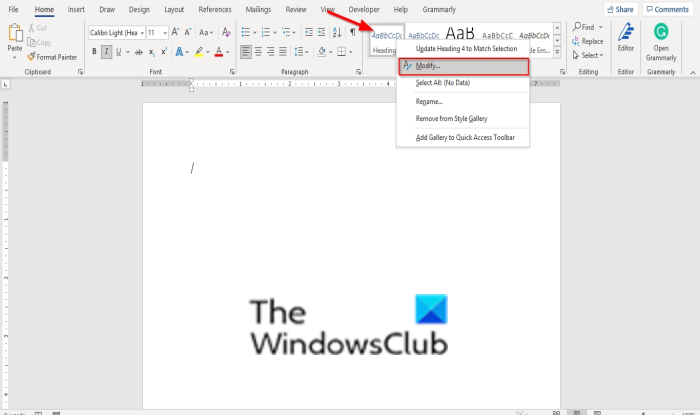
On the Home tab in the Styles gallery, right-click any style in the Styles gallery and select Modify.
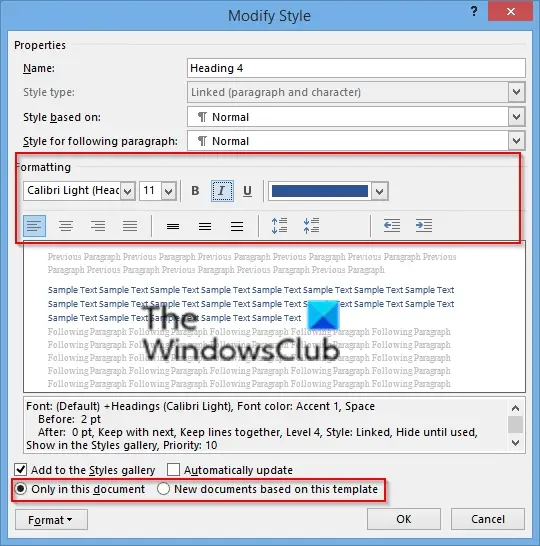
A Modify Style dialog box will open.
In the Formatting section, you can make any formatting changes you want such as font style, size, color, alignment, line spacing, or indentation.
You can choose if the style change applies to the current document or to all future documents.
Then click OK.
3] Create a new style
You can select a formatted text in your document to create a new style to add to your Styles gallery.
Right-click the text that you want to add as a new style to the Styles gallery.
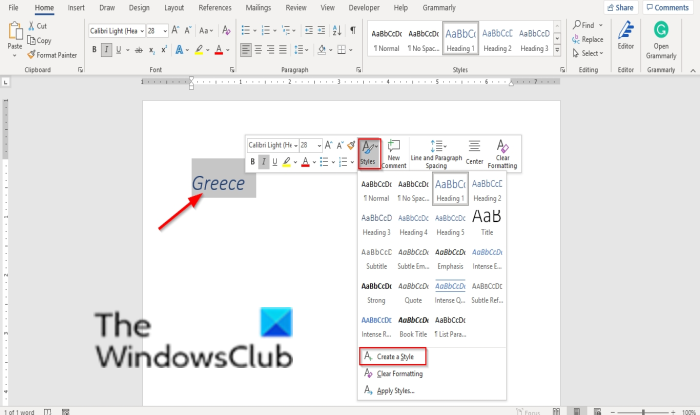
In the mini toolbar that appears, click Styles and then click Create a Style.
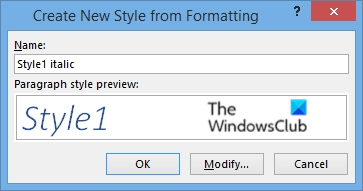
A Create new style from Formatting dialog box will open.
Give your style a name and click OK.
The new style will appear in the Styles gallery.
4] Remove new style from Style gallery
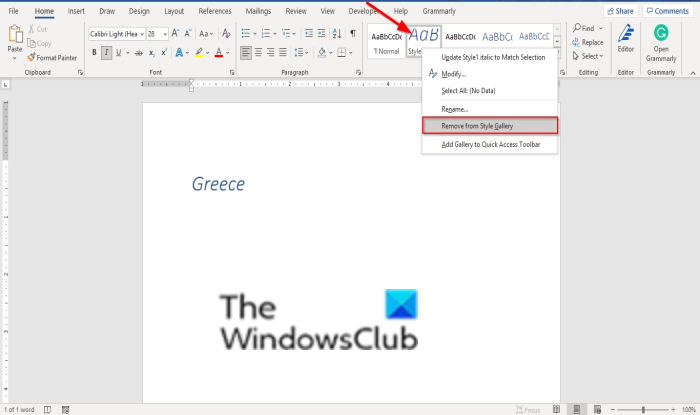
Right-click the style you have just created in the Styles gallery and select Remove from Styles gallery.
We hope this tutorial helps you understand how to customize and create a new style in Word; if you have questions about the tutorial, let us know in the comments.
How do you modify a style?
In order to modify a style in Microsoft Word, you need to choose the style first in the Styles section. Then, right-click on the style and choose the Modify option. Next, you can change or customize things as per your requirements. No matter which style you choose, the process of modifying it is the same.
That’s all! Hope it helped.

Shantel has studied Data Operations, Records Management, and Computer Information Systems. She is quite proficient in using Office software. Her goal is to become a Database Administrator or a System Administrator.