
Microsoft Word’s status bar shows the word count for users to view it quickly. As you type in the document, it automatically updates the word count, which proves extremely useful when you need to stay below a particular word count.
There may be times when the status bar does not display a word count, lags too much, or does not update. When this occurs, you should perform some quick checks to get the word count on the status bar working again. And, when the issue persists, let’s explore some other ways to check the word count in Microsoft Word.
Getting Started With Fixing Word Count Not Showing in Microsoft Word
First, you should ensure that the word count option is enabled in the status bar customizations. It might have been disabled by accident during customizing, so this has to be ruled out.
Open a Microsoft Word document where the word count doesn’t appear on the status bar. Right-click on the status bar and look for a tick mark beside Word Count. A checkmark before Word Count indicates that it is active. When it is disabled, enabling it is as simple as clicking on the Word Count option.
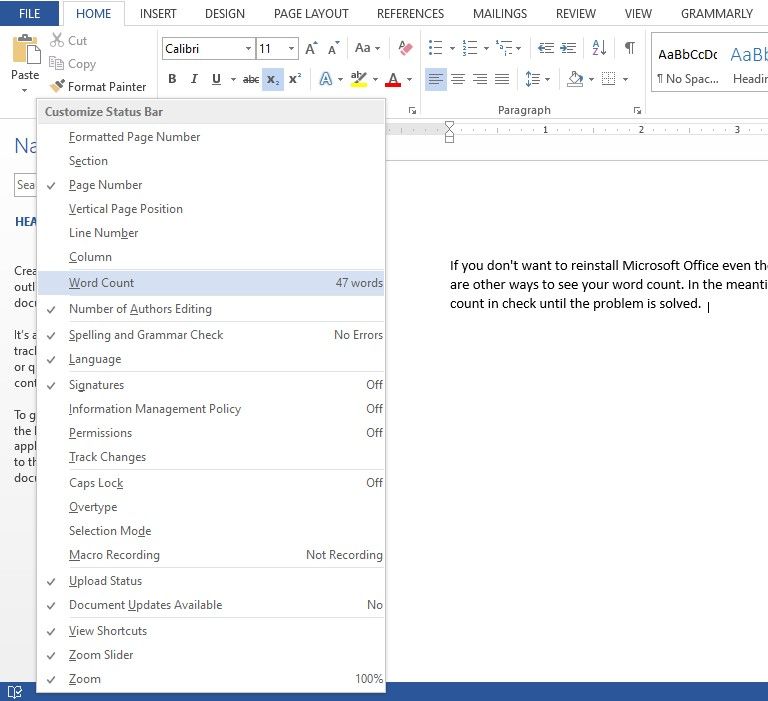
Verify that enabling Word Count in the status bar customization has returned the word count option to the status bar. If it hasn’t or was already enabled there without being shown on the status bar, the issue might be more severe and needs further investigation. If so, follow the below fixes.
1. Sign-in/Restart Microsoft Word Document
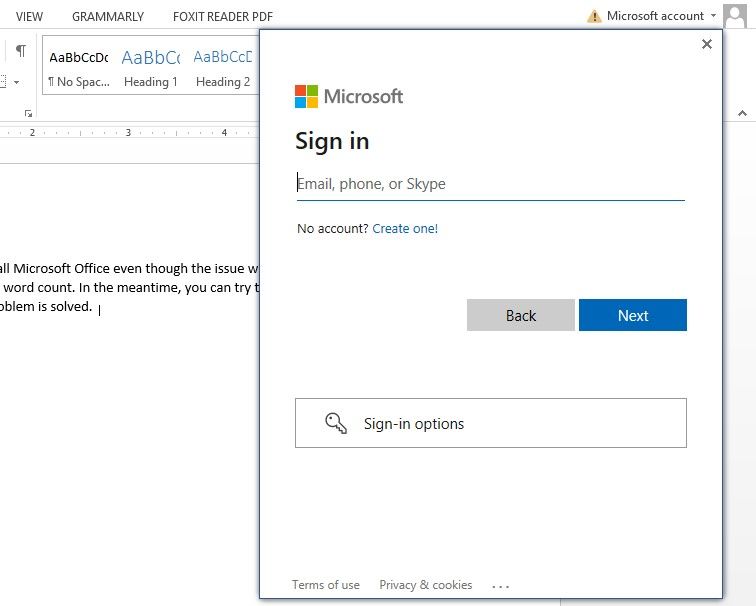
The general solution of restarting something when it doesn’t work may also apply here. Therefore, save the document, close it and give it a fresh start. Besides restarting the Microsoft Word document, consider logging out and logging back into your account to fix the issue.
If restarting and re-signing in does not work, try accessing the document with administrator privileges.
2. Access Document With Administrative Privileges
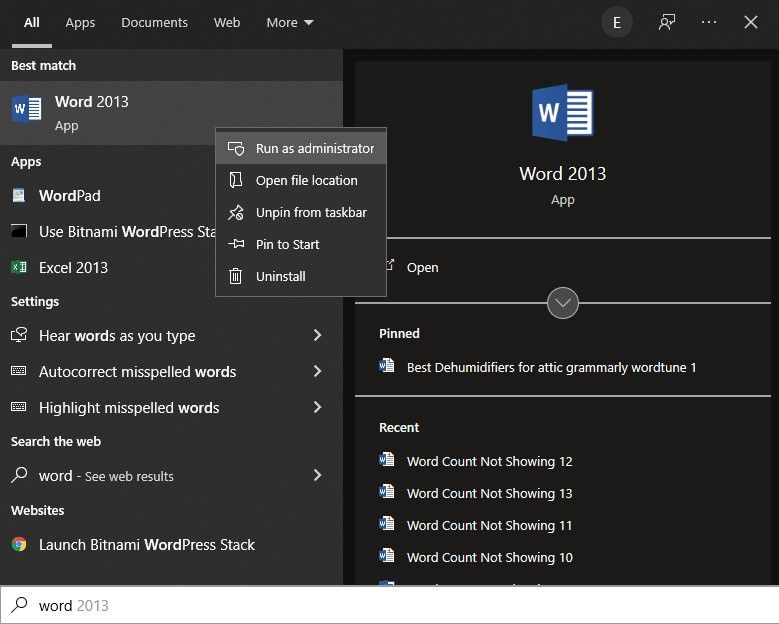
The ability to access documents with administrative privileges negates the possibility of any OS-side restrictions. Running a document as an administrator gives the program access to all Windows files that would otherwise be restricted.
To run Microsoft Word as an administrator, right-click on the Word shortcut and click on Run as administrator.
If giving administrative access does not work, try launching a Microsoft Word document in safe mode.
3. Launch Microsoft Word in Safe Mode
Microsoft Word runs with the necessary files in safe mode without loading any add-ins. This eliminates interference from all add-ins you are currently using. Therefore, it holds a good chance of resolving most Microsoft Word issues.
To run a Microsoft Word document in safe mode, follow these steps:
- Type «Run» in the Windows search bar and open the Run app.
- Type winword /safe in the Run app and hit OK. (Remember, there is a space between «winword» and «/safe»)

- Open the same document where the word count isn’t showing.

By doing so, the document will open directly in safe mode, which may restore the word count on the status bar. If this results in word count showing again on the status bar, it’s time to disable add-ins, since the problem lies with them.
If the status bar does not show the word count even in safe mode, uninstall the latest Microsoft Office updates you recently installed.
4. Uninstall Office Updates
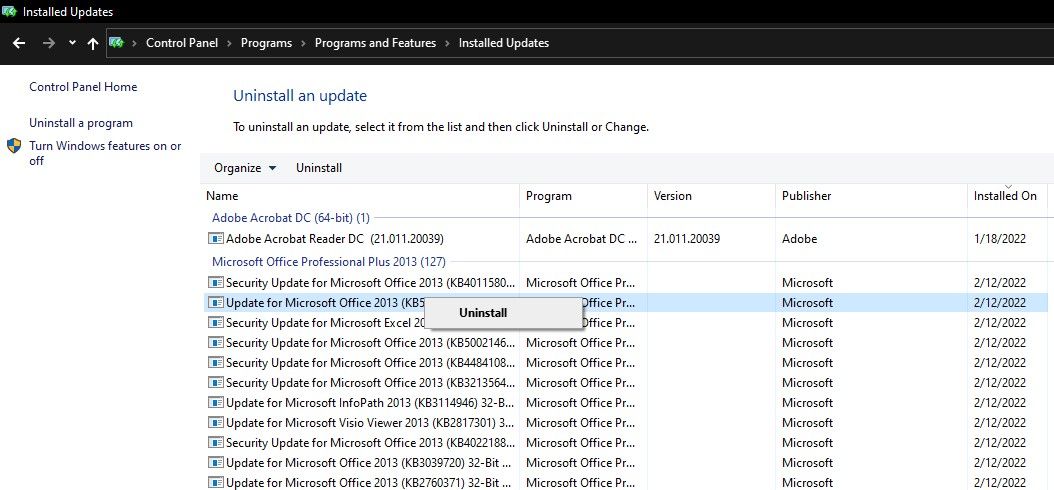
Follow these steps to uninstall Office updates:
- Open the Control Panel.
- Go to the Programs and Features section.
- In the left sidebar, click on View installed updates.
- Right-click on the most recent updates and click Uninstall.

When reverting the Office updates does not resolve the issue, uninstall Microsoft Word completely and reinstall it.
5. Reinstall Microsoft Office
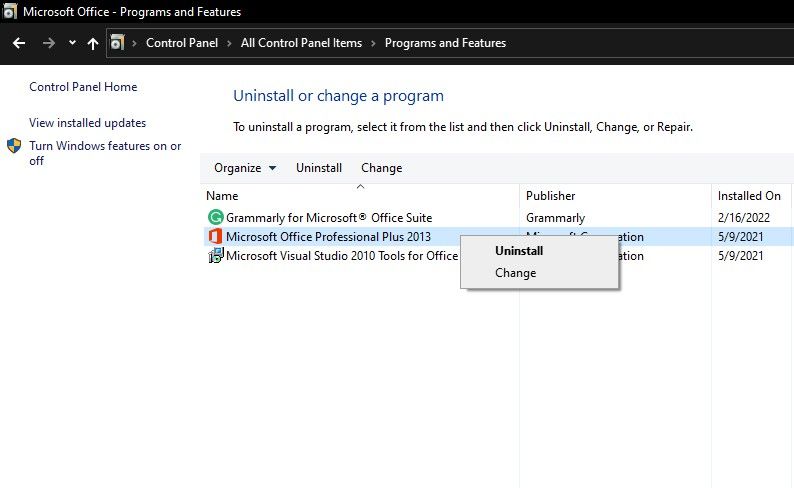
You should uninstall Microsoft Office before reinstalling it. To uninstall Microsoft Office, follow these steps:
- Open the Control Panel.
- Go to Programs and Features.
- In the search field located in the top right corner, enter «Microsoft Office.»
- Right-click on the Office app and select Uninstall.

After uninstalling, take a fresh copy of Microsoft Word and install it on your computer. Hopefully, it will resolve the issue with the status bar not showing the word count. But, keep in mind that any customizations you have made to your Office app will be lost this way.
If you don’t want to reinstall Microsoft Office even though the issue with the status bar isn’t fixed, there are other ways to see your word count. In the meantime, you can try these methods to keep the word count in check until the problem is solved.
Alternatives to Check Word Count in Microsoft Word Document
If none of the above fixes work, try the following methods to check the word count of your document other than the status bar:
1. Checking the Word Count Using Word Count Box
Microsoft Word allows users to check the word count through the Word Count option in the Review tab. In addition to the word count, it also displays information on the number of pages, characters, paragraphs, and lines in the document.
Here’s how to get there:
- Open the Microsoft Word document.
- Go to the Review tab.
- To find out the word count, click the Word Count box.

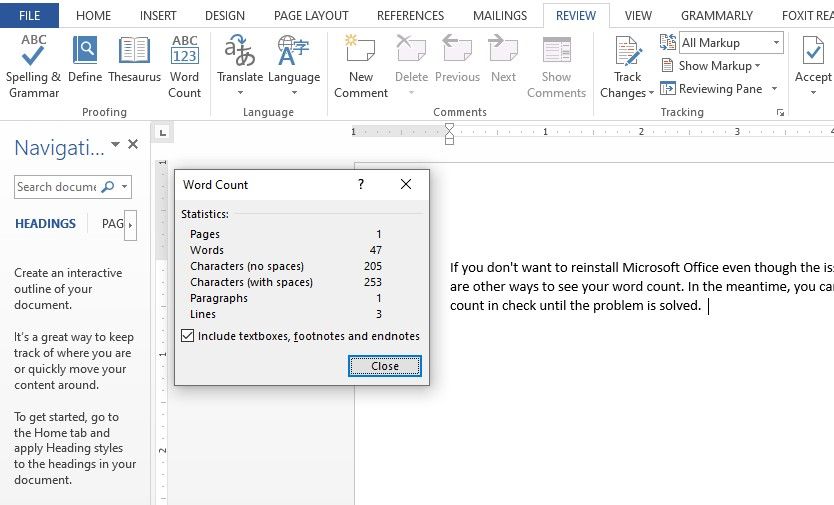
With this preview, you can see how many words you have in the document and the related information. If you don’t want to go through the tabs repeatedly, there is another way out, i.e., adding a word count field directly into your document with custom fields.
2. Adding Word Count Field in the Document
A word count field directly adds the word count in a document in textual form, making it easier to track. To add one, follow these steps:
- Open the document where the word count does not appear in the status bar.
- Place your cursor anywhere in the document where you would like to add the new word count field.
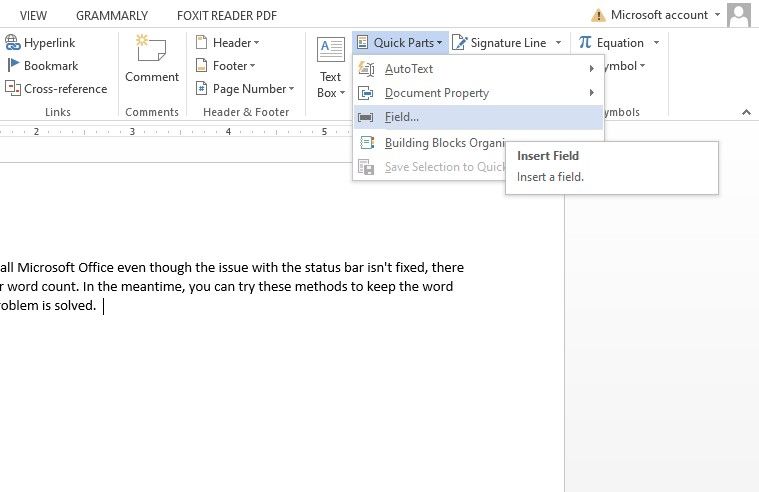
- Navigate to the Text section of the Insert tab.
- Choose the Field option from the Quick Parts dropdown.

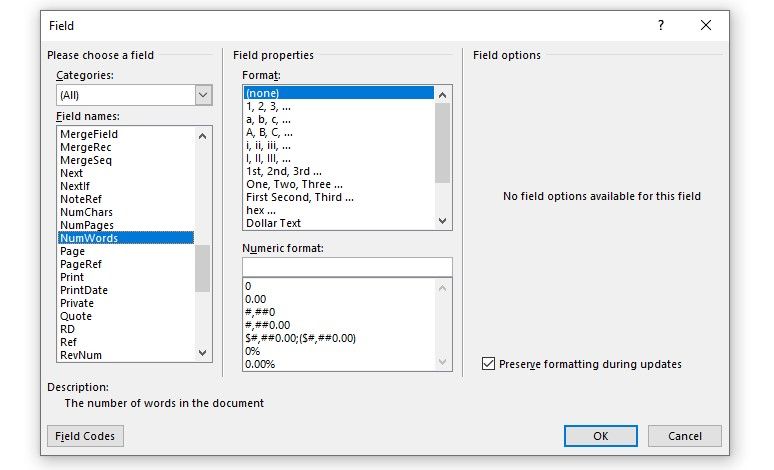
- Locate NumWords under the field names on the left-hand side of the Field window.
- Select NumWords and hit OK.

By following the above steps, you will add the word count field where your cursor was located in the document. In contrast to the status bar, where the word count updates as you type, the count must be updated manually in this case.
Here is how to update the word count field:
- Go to the place where you added the word count field.
- Right-click on the word count.
- Click on the Update field in the dropdown.

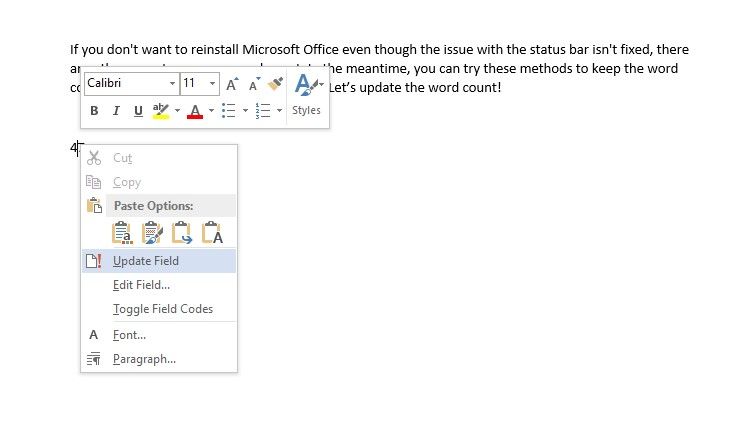
By following the above steps, your document’s word count will be updated, and next time you add more information to the document, you’ll have to follow the same steps to update the word count to the most recent one.
Keep Word Count in Check With Ease
Applying the fixes mentioned in the list should restore the status bar. However, in some cases, the problem lies not with Microsoft Word but with the OS. Thus, ruling out OS issues is also imperative.
If the problem persists after trying everything you can, you might want to run a malware scan, update your OS, or reinstall it from scratch less favorably. In the meantime, continue to check the word count with the other two methods.
Wondering why the word count is not working or showing on Microsoft Word?
Microsoft Word is a powerful word processing tool with tons of features. It is the go-to app for most people, and it works with all major operating systems. It has been around for years and is part of the Microsoft Office Suite.
Despite being the industry standard, this doesn’t mean that Microsoft Word is flawless. Like any software, you can encounter issues with Word from time to time.
If you are using Microsoft Word for freelancing or writing work, knowing the word count of your document is crucial. With the word count indicator, you’ll know if you’ve reached the requirement for your project and easily determine the pricing for each work.
Unfortunately, the word count indicator is not working all the time on Microsoft Word.
Depending on the situation, the word count indicator might show a wrong number, or it might not work at all.
Luckily, you have come to the right place.
In this guide, we’ll show you the most effective ways for fixing the word count indicator if it’s not working on Microsoft Word.
1. Restart Your Computer.
While this might appear to be very simple, restarting your system does a lot of things. For one, it allows your computer to reload resources and eliminate temporary errors. This also flushes your system cache, giving your OS a fresh start.
If you encounter issues with MS Word or any app, try restarting your system first. Here’s what you need to do:
- First, press the Windows key on your keyboard to open the Start Menu.
- After that, access the Power Options tab.
- Lastly, choose Restart and wait for your system to reboot.
Go back to Microsoft Word and check if the word count indicator works.
2. Run Microsoft Word As Admin.
One of the quickest ways to address this issue with Microsoft Word is to run the software as an administrator. This should bypass any restrictions and give MS Word full access to your operating system and its resources.
See the guide below to run Word as an administrator:
- Locate Microsoft Word on your desktop.
- Next, right-click on the app and choose Properties.
- After that, go to the Compatibility tab.
- Finally, enable the ‘Run this Program as an Administrator’ option and save the changes.
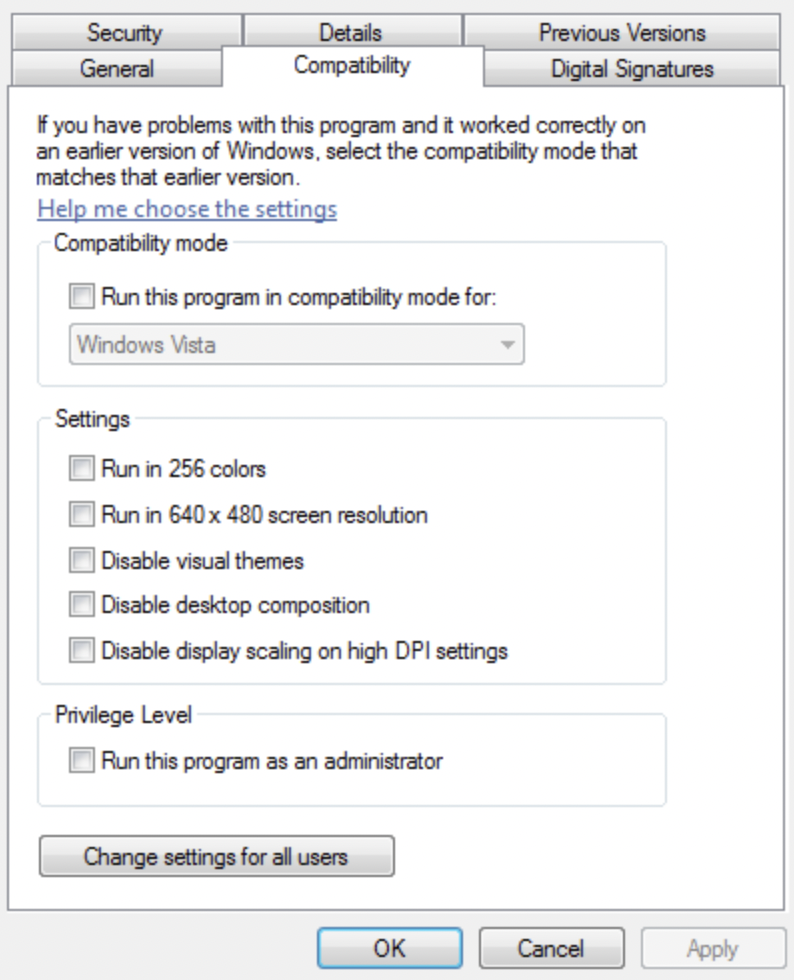
Relaunch Microsoft Word and see if the word count indicator works.
3. Update Microsoft Word.
The version of Microsoft Word you are using might have an issue that is related to the word count indicator. To rule this out, update your software to the latest version to patch bugs and glitches.
Follow the steps below to update Microsoft Word:
- First, go to File > Accounts.
- After that, click on Update Options.
- Lastly, choose Update Now and follow the prompts.
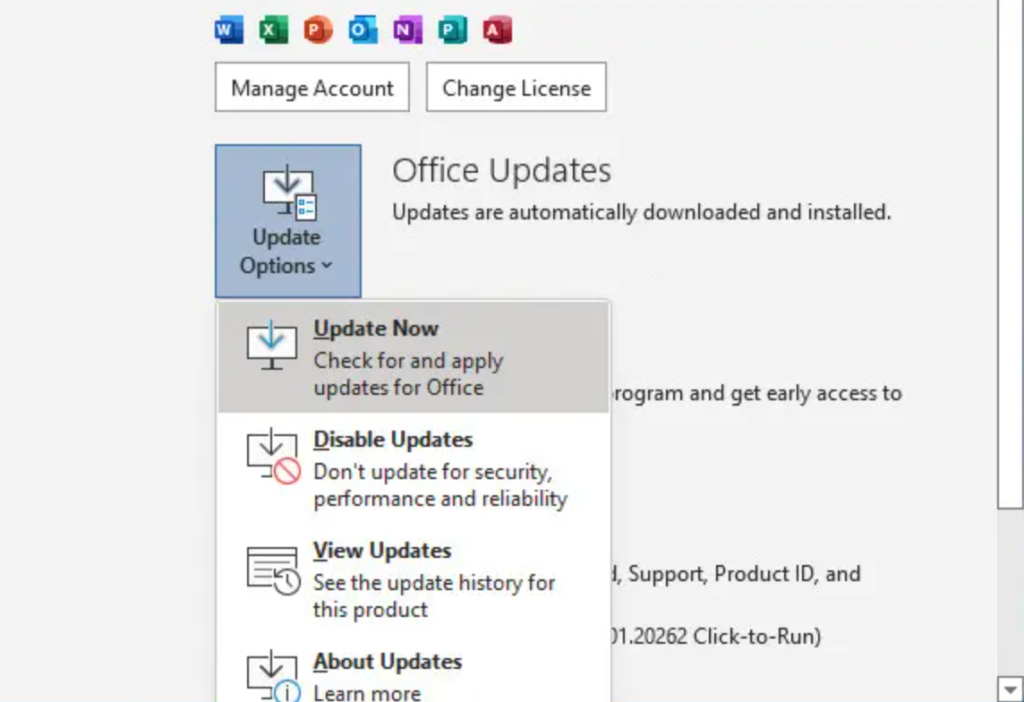
Go back to your document and check if the word count indicator is working correctly.
4. Disable Add-Ins.
Disabling add-ins on Microsoft Word might also fix the issue with the word count indicator. Some of your third-party add-ins might be interfering with the built-in word counter function of MS Word.
Here’s how you can turn off add-ins:
- On MS Word, go to the File tab and click on Options.
- Now, access the Add-Ins tab.
- Finally, turn off all your add-ins or the ones you are not using.
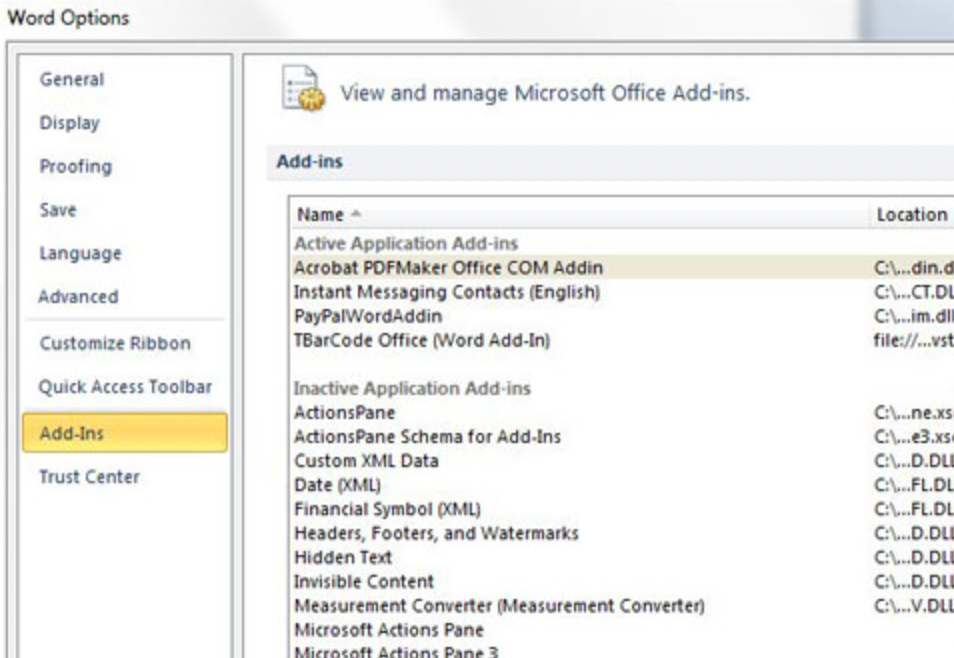
Restart Microsoft Word and check if the problem is solved.
5. Reinstall Microsoft Word.
If none of the solutions above worked, the last thing you can do is reinstall Microsoft Word. This should ensure that there are no missing or corrupted files on your system and the app is installed correctly.
Check out the steps below to delete MS Word:
- Launch the Control Panel on your computer.
- Next, click on Uninstall a Program and locate Microsoft Word.
- Finally, right-click on the app and choose Uninstall. Follow the prompts to remove the app from your system.
Reinstall Microsoft Word and check if the word count indicator works.
That brings us to the end of our guide for fixing the word count indicator if it’s not working on Microsoft Word. If you have other concerns, voice them out in the comment section, and we’ll get back to you as soon as possible.
If this guide helped you, please share it. 🙂
Join 50,000+ subscribers
Stay updated on the latest discounts, exclusive promos, and news articles from Saint.
Let’s make some changes step by step, starting with your error.
file2.write(i+count((i)in list1))
#             ^^^^^^^^^^^^^^^^^^
# NameError: name 'count' is not defined
The problem is you’re accessing the count incorrectly. A Counter works like a dict; the key is what’s being counted and the value is the count (int). You gave your Counter the name counter, so to access the count of line i, change it to this, which will give an error for other reasons:
file2.write(i+counter[i])
#             ^^^^^^^^^^
# TypeError: must be str, not int
Even though we’re successfully getting the count, we cannot add it to the line, i, like this. The line and the count are two different types; one is text (str) and the other a number (int). We need to turn that number into its textual representation. If that confuses you, think of it like this: 2 + 2 == 4 whereas "2" + "2" == "22". Here’s how to do it:
file2.write(i+str(counter[i]))
No more errors, but depending on how you’re testing, the file opened as file2 might still be empty. The changes will only be written to disk once you close it when finished. To never forget doing that, you can leave the bookkeeping to Python by using the with statement. At the end of the indented block, the file is closed automatically. Below is the full code with a few more commented changes:
# imports at the top
import collections

list1=[]
with open(textfile1,"r") as file1:
    for line in file1:
        list1.append(line)
# file1 automatically closed here
counter=collections.Counter(list1)
list2=list(set(list1))
list3=sorted(list2)
with open(textfile2,"w") as file2:
    # i implies index which it isn't; let's call it line too
    for line in list3:
        file2.write(line+str(counter[line]))
# file2 automatically closed here
After running it, the file opened as file2 will look like this:
21street
1Train
2
The number ends up on the next line. The reason this happens, is that the lines you stored in your lists aren’t just "21street" and "Train" but "21streetn" and "Trainn". The "n" at the end is the newline character which serves as a line separator. If you add any text after that, it will end up on a new line—that’s the point. In a list, such separator isn’t needed anymore, so let’s remove it:
        list1.append(line.rstrip("n"))
        #                ^^^^^^^^^^^^^
Now your output wil be like this:
21street1Train2
You need to add the separators back, in the right place, when writing to a file again. What’s the right place? At the end of a line. Also, a space between the line and the count would be nice:
        file2.write(line+" "+str(counter[line])+"n")
        #               ^^^^                   ^^^^^
Finally, the output is as desired:
21street 1
Train 2
Hello there, createdoc.
It sounds like the word count feature of Pages isn’t functioning as expected in your Pages document. The first thing I would recommend is testing the feature in a new document and verifying if it does not function there. Feel free to use this link from the online Pages Help Guide as a guideline to the feature:
Show word count and other document statistics — Pages Help Guide
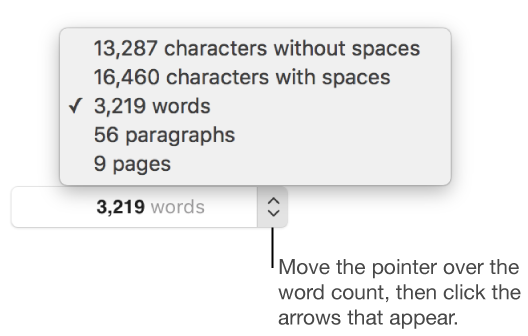
You can show the word count, character count (with or without spaces), number of paragraphs, and number of pages in a document.
Show word, character, and paragraph count
- Click
in the toolbar, then choose Show Word Count.The word count appears near the bottom of the page.
- Move the pointer over the right side of the word count, then click the arrows that appear to choose what you want to display at the bottom of the page.
- Drag the counter anywhere in the document.
To see word count and other statistics for only part of a document, select the text that you want to check—the count updates to reflect only the selected text.
If you find it still does not function as expected, you will want to test in a new user by reviewing the information in this Knowledge Base article:
How to test an issue in another user account on your Mac
Before trying another user account
If you’re seeing unexpected behavior on your Mac try these steps first:
Try searching Apple’s knowledge base for the specific symptom or alert message you’re seeing. There might be simpler steps you can take to resolve the issue.
Try starting your Mac in Safe Mode. Restart your computer. Hold the Shift key when you hear the startup sound. Release the Shift key when you see the Apple logo appear. This starts your Mac in Safe Mode. Safe mode performs a directory check of your startup disk, and removes some cache data. After your Mac finishes starting up, restart your Mac normally (without holding the Shift key) and see if the issue is resolved.
Make sure your software is up to date. The issue you’re seeing might be addressed by installing available updates.
Check to see where the issue happens. If an issue appears before you see your desktop, it’s less likely that it’s related to a user account or setting. If an issue happens with a website, see if pages from other websites load correctly first. There might be an issue with the site and not your Mac.
How to test with another user account
You can figure out if unexpected behavior is related to user file or setting by trying to reproduce the issue from another user account. This process includes creating a new user account, logging in to it, and testing for the issue.
Create a test user account
- From the Apple menu, choose System Preferences.
- Click the Users & Groups icon in the System Preferences window.
- Click the lock icon, then enter an administrator name and password.
- Click the Add button ➕ below the list of users.
- Choose a type of user from the New Account pop-up menu.
- Give the user a full name, account name, and password.
- Click OK.
- Close the System Preferences window.
If there are documents from your original user account that you want to test with, place a copy of these items in the Shared folder in the Users folder. Press the Option key while dragging a file to this folder to create a copy.
Log in to the test user account
Log out of your current user account by choosing Log Out from the Apple menu, then log in to the new account you created. If you’re prompted to sign in with your iCloud account or Apple ID when you log in, skip this step.
Try reproducing the issue
Try the same steps that caused the unexpected behavior to appear before. For example, if you were unable to print, try printing from this user account. If you were unable to connect to the Internet, try browsing a website from this user account.
If you were using any specific settings that testing depends on (such as using a specific email account or iCloud account) set up the same account in the test user. For email and most other settings you can use the Internet Accounts pane in System Preferences to set up these kinds of accounts. If files from your home folder are needed for testing, copy them to Shared folder in the Users folder (/Users/Shared). After logging in as the test user, copy these items to the same location in the test user’s home folder to test with.If an issue happens in only one user account
If performing the same steps in a test user account doesn’t result in the same unexpected behavior, you most likely don’t need to reinstall any apps or OS X.
- If an issue only happens in one app, check the app’s documentation or support website for instructions on troubleshooting specific preference or setting files.
- If you need help with a specific alert message or issue, search the Apple Support website for the text of the alert message you’re seeing.
If an issue happens in more than one user account
If the same unexpected behavior happens in more than one user account on your Mac, try checking for software or hardware issues.
After you’re done
After you’ve finished testing, log out of the test account by choosing Log Out from the Apple menu. Then log in to your original user account.
You can remove the test user account you created when you’re done. Make sure you’re completely finished testing, and that you don’t need any of the files or settings you created or copied there before you remove it.
Get help
If you need more help with a software or hardware issue, contact Apple Support. If you work with an Advisor, Genius, or service provider to resolve an issue, be sure to mention any steps you’ve already tried and the results. Also mention any alert messages you’ve seen as part of the issue. You can take a screenshot of any messages that appear so you can refer to them later.
Thanks for reaching out to Apple Support Communities.
Kind Regards.
Idea
-
- Share
Hi, anyone has a problem with the word count on windows? I have to do the procedure twice each time in order to have the right informations…
Link to comment
Recommended Posts
- 0
![]()
- 0
- Level 5*

- Level 5*
-
- Share
On 19/12/2017 at 9:12 PM, Sergeadg said:
I have to do the procedure twice
Hi — What procedure is this? My word count shows in the note status bar and increments / decrements as I add words. Haven’t checked the counts, but they seem to be updated instantly…
Link to comment
- 0

-
- Share
Procedure is — go to a note, type some text, then click the «Word and Resource counts» option in the «Note» menu on Windows.
Here’s a photo of what happens with me if I create a new note. The second time I run it, the count comes out correct.

Link to comment
- 0
- Level 5*
- Level 5*
-
- Share
Hmmn. If you go to the View menu and choose ‘view status bar’, you’ll get this at the bottom of your notes —
If I follow your route I get the same results no matter how many times I try…
Full disclosure — I’m on the beta, which may mean this is a valid bug they killed already…
Link to comment
- 0
![]()
-
- Share
That works. Thanks, I hadn’t seen that before.
And strangely, if I have the status bar, the word and resource count works, if I don’t, it doesn’t.
Anyway, the status bar is now on and all is well
-

1

Link to comment
- 0
- Level 5
- Level 5
-
- Share
16 hours ago, dbvirago said:
That works. Thanks, I hadn’t seen that before.
And strangely, if I have the status bar, the word and resource count works, if I don’t, it doesn’t.
Anyway, the status bar is now on and all is well
Yes, it works ONLY if the status bar is turned on.
I am using Using Evernote for Windows 6.8.6.6350 (306350) Public
http://www.evernote.com/l/AAL5_cBypYFHkoWU32SC7gFmkjU_SHWbhU0/
-
1
Link to comment
- 0
- Level 5*
- Level 5*
-
- Share
Hmmn. I did not know that…
Link to comment
- 0
![]()
-
- Share
Well, it’s new. Only started happening for me a few weeks ago. But the status bar thing fixes it.
Link to comment
- 0
- Author
-
- Share
Same here! Thanks guys!
-
1
Link to comment
- 0
- Evernote Staff*
(1).thumb.png.4665856b219b60e0293939834307f47a.png)
- Evernote Staff*
-
- Share
Thanks for these reports. Writing to confirm that it’s in our backlog.
Link to comment
Create an account or sign in to comment
You need to be a member in order to leave a comment
Sign in
Already have an account? Sign in here.
Sign In Now