
Word for Microsoft 365 Word 2021 Word 2019 Word 2016 Word 2013 Word 2010 Word 2007 More…Less
Word can automatically count the lines in a document and display the appropriate number beside each line of text. This is useful when you need to refer to specific lines in a document, such as a script or a legal contract.
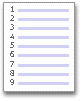
By default, Word numbers every line in a document (except those in tables, footnotes, endnotes, text boxes, and headers and footers). However, you can choose which line numbers to display. For example, you can display line numbers in all or part of the document. Or you can display line numbers at intervals, such as every tenth line (10, 20, 30, and so on).
What do you want to do?
-
Add line numbers
-
Remove line numbers
Add line numbers
You can add line numbers to all or part of a document. To view line numbers, you must be in Print Layout view (click the View tab to check).
Notes:
-
A table is counted as one line.
-
A figure is counted as one line.
-
A text box is counted as one line if it is positioned inline with the text on the page. If text on the page wraps around the text box, the lines of text on the page are counted. Lines of text inside a text box are not counted.
Add line numbers to an entire document
-
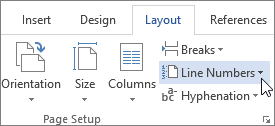
On the Layout tab, in the Page Setup group, click Line Numbers.

Note: If your document is divided into sections and you want to add line numbers to the entire document, you first need to select the document. Click Select in the Editing group on the Home tab, and then click Select All. Or press CTRL+A.
-
Do one of the following:
-
To number consecutively throughout the document, click Continuous.
-
To start with number 1 on each page, click Restart Each Page.
-
To start with number 1 after each section break, click Restart Each Section.
-
For more advanced line numbering options, such as numbering at different intervals, click Line Numbering Options, and then click Line Numbers on the Layout tab.
-
Add line numbers to a section or to multiple sections
-
Click in a section or select multiple sections.
-
On the Layout tab, in the Page Setup group, click Line Numbers.
-
Click Line Numbering Options, and then click the Layout tab.
-
In the Apply to list, click Selected sections.
-
Click Line Numbers.
-
Select the Add line numbering check box, and then select the options that you want.
Top of Page
Remove line numbers
You can remove line numbers from the entire document, from a section, or from a paragraph.
-
Click in the document, or click in the section or paragraph from which you want to remove line numbers. If you want to remove line numbers from multiple sections, select the sections.
-
On the Layout tab, in the Page Setup group, click Line Numbers.
-
Do one of the following:
-
To remove line numbers from the entire document or section, click None.
-
To remove line numbers from a single paragraph, click Suppress for Current Paragraph.
-
Top of Page
What do you want to do?
-
Add line numbers
-
Remove line numbers
Add line numbers
You can add line numbers to all or part of a document. To view line numbers, you must be in Print Layout view (click the View tab to check).
Notes:
-
A table is counted as one line.
-
A figure is counted as one line.
-
A text box is counted as one line if it is positioned inline with the text on the page. If text on the page wraps around the text box, the lines of text on the page are counted. Lines of text inside a text box are not counted.
Add line numbers to an entire document
-
On the Page Layout tab, in the Page Setup group, click Line Numbers.
Note: If your document is divided into sections and you want to add line numbers to the entire document, you first need to select the document. Click Select in the Editing group on the Home tab, and then click Select All. Or press CTRL+A.
-
Do one of the following:
-
To number consecutively throughout the document, click Continuous.
-
To start with number 1 on each page, click Restart Each Page.
-
To start with number 1 after each section break, click Restart Each Section.
-
For more advanced line numbering options, such as numbering at different intervals, click Line Numbering Options, and then click Line Numbers on the Layout tab.
-

Add line numbers to a section or to multiple sections
-
Click in a section or select multiple sections.
-
On the Page Layout tab, in the Page Setup group, click Line Numbers.
-
Click Line Numbering Options, and then click the Layout tab.
-
In the Apply to list, click Selected sections.
-
Click Line Numbers.
-
Select the Add line numbering check box, and then select the options that you want.
Top of Page
Remove line numbers
You can remove line numbers from the entire document, from a section, or from a paragraph.
-
Click in the document, or click in the section or paragraph from which you want to remove line numbers. If you want to remove line numbers from multiple sections, select the sections.
-
On the Page Layout tab, in the Page Setup group, click Line Numbers.
-
Do one of the following:
-
To remove line numbers from the entire document or section, click None.
-
To remove line numbers from a single paragraph, click Suppress for Current Paragraph.
-
Top of Page
Need more help?

When reviewing documents with others or creating a contract, you can enable line numbers in Word for handy reference points.
Using line numbers, you have handy reference points within your document. For things like contracts and scripts, or documents that you are reviewing with others, you can easily insert line numbers in Microsoft Word. And like many Office features, you have flexibility. You can decide how and where your line numbers appear.
To prepare you for using line numbers, we’ll show you how to insert them, your numbering options, and how to remove them if needed.
To use line numbers in Word, you must be in Print Layout view. Go to the View tab and click Print Layout in the Views section of the ribbon.
Next, insert the numbers by heading to the Layout tab. Click the Line Numbers button in the Page Setup section of the ribbon. Then, select the line numbering option you’d like to use from the following:
- Continuous: Numbers lines consecutively throughout the document.
- Restart Each Page: Begins with number 1 on each page.
- Restart Each Section: Begins with number 1 after each section break.

After making your selection, you’ll see the page numbers along the left side of your document.

Notes for Line Numbers
Here are a few notes for using line numbers in Word to keep in mind.
- A table counts as one line.
- A figure counts as one line.
- A text box counts as one line. If lines of text wrap around the box, those lines of text are counted. Lines of text inside the text box are not counted.
Customize Your Line Numbers
You have a few settings that you can adjust for your line numbers, such as spacing from text and the starting number.
To access these settings, click Line Numbers on the Layout tab and select Line Number Options. Click the Line Numbers button on the Layout tab of the pop-up window.

When the tiny Line Numbers window displays, start by checking the box at the top for Add line numbering. You cannot adjust the other options in the window if the box is unchecked.

Start at: Select a number if you want something other than number 1.
From text: The default setting is Auto, but you can use the arrows to select a specific spacing for the line numbers in relation to your text.
Count by: Rather than numbering each and every line, you can set a Count By number. For example, if you select 2, your line numbers will count by two, as in the screenshot below.

Numbering: Like the options in the Line Numbers drop-down box on the Layout tab, you can select Restart each page, Restart each section, or Continuous here as well.
After making your adjustments, click OK and then OK once more to apply them.
Remove Line Numbers in Word
If you want to turn off the line numbers, you can do this for the entire document or your current paragraph.
Click Line Numbers on the Layout tab. Then do one of the following:
- Select None to remove the line numbers from the entire document.
- Select Suppress for Current Paragraph to remove the numbering for a particular paragraph (where your cursor is located).

Get on the Same Page With Line Numbers in Word
Make sure everyone is on the same page, line, or paragraph with line numbers in Word. Whether you use them for a short time or keep them on the document forever, they come in handy!
For related how-tos, take a look at how to add page numbers to your documents and how to work with page and section breaks in Word.
Be sure to keep up with what’s new on groovyPost, follow us on Twitter!
![]()
Add line numbers to a section or to multiple sections
- Click in a section or select multiple sections.
- On the Layout tab, in the Page Setup group, click Line Numbers.
- Click Line Numbering Options, and then click the Layout tab.
- In the Apply to list, click Selected sections.
- Click Line Numbers.
Contents
- 1 How do I add line numbers in Word for Mac?
- 2 How do I number every 5th line in Word?
- 3 How do you get line numbers on every 5 lines?
- 4 How do we show line numbers next to the code?
- 5 How many lines are in a Word document page?
- 6 How do I change line number in Word?
- 7 How do you display line numbers in VS?
- 8 How do I find line numbers?
- 9 How do I count the number of rows in word?
- 10 Does Word Count Count Lines?
- 11 How do you insert a line across the page in word?
- 12 Why can’t I see line numbers in Word?
- 13 How do I move line numbers to the right?
- 14 How do I change line number font?
- 15 How do I show line numbers in IntelliJ?
- 16 How do I show line numbers in vim?
- 17 How do you number lines in a text file?
- 18 How do I show line numbers in less command?
- 19 How do I show line numbers in nano?
- 20 How do I copy line numbers in Word?
How do I add line numbers in Word for Mac?
In your Word document, click the “Layout” tab in the ribbon bar and then click on the “Line Numbers” button. Select “Restart Each Section” from the drop-down menu. If you want to add a new section break, click the “Breaks” button. This is just above the “Line Numbers” button in the “Layout” tab.
How do I number every 5th line in Word?
How to number every nth line in Word 2013
- On Page Layout tab, click on Line Numbers and click Line Numbering Options…
- Page Setup opens.
- Line Numbers windows opens.
- You can start numbering at a specific number (Start at), control number position (From text) and number every nth line (Count by).
How do you get line numbers on every 5 lines?
Add line numbers to a section or to multiple sections
- Click in a section or select multiple sections.
- On the Page Layout tab, in the Page Setup group, click Line Numbers.
- Click Line Numbering Options, and then click the Layout tab.
- In the Apply to list, click Selected sections.
- Click Line Numbers.
How do we show line numbers next to the code?
Display line numbers in code
- On the menu bar, choose Tools > Options. Expand the Text Editor node, and then select either the language you’re using or All Languages to turn on line numbers in all languages.
- Select the Line numbers checkbox.
How many lines are in a Word document page?
The standard number of lines per page tends to be 46.
How do I change line number in Word?
Simply follow these steps:
- Display the Home tab of the ribbon.
- Click the small icon at the bottom-right of the Styles group.
- Hover the mouse pointer over the Line Number style.
- Click on the drop-down arrow and choose the Modify option from the resulting menu.
How do you display line numbers in VS?
1 Answer. On the menu bar, choose Tools, Options. Expand the Text Editor node, and then select either the node for the language you are using, or All Languages to turn on line numbers in all languages.
How do I find line numbers?
You can find out the phone number for your local phone company by looking at your monthly bill or dialing “411” from your phone line. Verify your identity.
How do I count the number of rows in word?
Right-click on the selected table and select Table Properties from the shortcut menu. Click on the Row tab — the number of rows selected is listed at the top of the dialog box.
Does Word Count Count Lines?
Word counts the number of words in a document while you type. Word also counts pages, paragraphs, lines, and characters.
How do you insert a line across the page in word?
Press Ctrl+A to select all the text in your document. Click Home > Shrink Font one or more times. As you click Shrink Font, Word decreases the size of every font in your document.
Why can’t I see line numbers in Word?
To use line numbers in Word, you must be in Print Layout view. Go to the View tab and click Print Layout in the Views section of the ribbon. Next, insert the numbers by heading to the Layout tab. Click the Line Numbers button in the Page Setup section of the ribbon.
How do I move line numbers to the right?
Remember though, it is not section alignment alone. For line numbers to appear in the right margin you must set the section alignment to right to left “and” have a right to left script language enabled.
How do I change line number font?
Process
- Go to the Home tab of the Ribbon after enabling line numbering.
- Under Styles, click the Dialog Box Launcher arrow to open the Styles pane.
- In the Styles pane, click Options.
- Under “Select styles to show” in the Options window, select “All styles”.
- Click OK to exit out of the Options window.
How do I show line numbers in IntelliJ?
IntelliJ IDEA 15
- File > Settings… > Editor > General > Appearance > Show line numbers.
- Hit Shift twice > write “line numbers” > Show Line Numbers (that one that has the toggle) > change the toggle to ON.
How do I show line numbers in vim?
How to display line number in vim
- Press the ESC key.
- At the : prompt type the following command to run on line numbers: set number.
- To turn off line numbering, type the following command at the : prompt again: set nonumber.
- One can set relative line numbers by typing: :set relativenumber.
How do you number lines in a text file?
4 Answers. In notepad , you can type Ctrl + g to view current line number. It also at bottom-right corner of status-bar.
How do I show line numbers in less command?
All you have to do is pass either -N or –LINE-NUMBERS option to the less command. This option forces less to show a line number at the beginning of each line in the screen.
How do I show line numbers in nano?
You can ask nano to temporarily turn on line numbers by pressing Alt-C (meaning “Hold down the Alt key and the C key simultaneously”). This will show line and column numbers near the bottom of nano’s window.
How do I copy line numbers in Word?
Assuming there is a consistent amount of space between the margin and the first desired word on each line, what you could do after pasting is to use a block cut (Shift-Alt and drag the cursor over the desired area, followed by Ctrl-X), then select all the lines, delete what’s left, then paste again – voila! the numbers
Count number of lines, sentences, words, and characters with an accurate line counter text tool.
Words
0
Sentences
0
Characters
0
Reading Time
0
Lines Counter Tool
Benefits of Line Counter
Line Counter is an essential tool for writers. It would not be wrong to say that every writer needs this kind of tool at one point or another. Whether you are trying to meet a specific word or lines limit in your content, you can use this tool.
Website content writers also often get specific demands from the clients that they need a certain number of lines in an article or an e-book. Manually counting the number of lines is an exhausting task and has a higher chance of errors. In such cases, the line counter can prove to be a highly beneficial tool that you can use to count the lines of even massive books and lengthy articles.
How to Use Line Counter?
A significant advantage of the line counter is that it is entirely free, and you can use it on any smart device with an internet connection. You only have to write or copy the text in the given box, and the tool will automatically count the number of lines, words, sentences, characters, and the average reading time.
Uses of Line Counter
Anyone can use the line counter for a variety of purposes. Programmers and developers can use this tool to determine the size of their codes. This counter tool can also be useful for coders who often have to analyze the effort needed to develop a program by counting the number of lines.
Moreover, as a writer, you can use the line counter to count the number of lines you can write a blog post or any other kind of content. This tool is also beneficial for students in academic assignments, research papers, journal articles, and many different writing types. Overall, it is helpful to verify the quality of the content and make sure it is within the required limits.
We will explain in the following practice tip on how you view it in Microsoft Office Word, line, numbers and counting. If you need to keep for a document to a specific line number, you can check whether you have written too many or too few rows.
MS Office: line numbers in Word
In the default setting, Word will not display the line number. Use the following steps to turn on the display:
- You open a document in Microsoft Office Word.
- Click the toolbar in Word down the right mouse button in the status.
- In the menu choose «line number».
Word: show rows

Line number in the Word count
- In the bottom status bar you will now find the entry «line». The number shows you in which line your Cursor is currently located. You want to count how many rows in your document, click in the last line of the document. Now Word shows you how many lines you have already written.
- Alternatively, you can find under «file» > «information» > «properties» > «Advanced properties» statistics of the line numbers. How to get to these statistics, you can also see on the Screenshot.
Word: count rows

The article applies to Microsoft Word 2013. We will show you in another practical tip on how you Excel a numbered insert.