
Microsoft Word Could Not Create the Work File Check the Temp Environment Variable Windows PC is an error message that many Microsoft Users have received while trying to use Microsoft Word or Microsoft Outlook. Some users experienced this problem with even other applications that are included in the Microsoft Office Pack. With more and more advancement of the Word, there also came new errors that were not seen by us before. The first instances of this particular error started while Windows Vista was the latest Windows Operating System for us. People also said that they could not insert images into the Word documents, and some could not see any pictures in the Outlook emails.
This shows an error code message like,
Through various research, it has been found that the leading cause of this Error Word Could Not Create the Work File Check the Temp Environment Variable error is the corruption or missing files from the Temporary Internet Files folders. We know that Microsoft Outlook and almost all the other applications under the Microsoft Office Package is associated with the Internet Explorer for communicating with the Internet. This is the apparent reason for storing the temporary internet files of both the Internet Explorer and Microsoft Office in the same place and even slight corruption of a file, or if even a single file is missing here, then the following error will appear.
Again when Word is opened, it creates a lot of hidden files temporarily in different locations inside the hard drive. Generally, these files get deleted when no longer required, but in case the Word crashes and unable to recover, then these files are left behind, and this can cause havoc. In the worst-case scenario, it will prevent you from reopening the document.
Causes of Error Word Could Not Create the Work File Windows Issue:
- Microsoft Office Word Error Issue
- Windows PC problem
- Temp environment variable error
- Word access denied
- Temporary internet files folder missing
- Opened with read-only access
Again Microsoft Office is the most widely used application currently present in the world, and that is why this Error Word Could Not Create the Work File Check the Temp Environment Variable issue is very significant and need to be solved.
How to Fix & Solve Error Word Could Not Create the Work File Check the Temp Environment Variable
The following few solutions have effectively solved the Microsoft Office Word Could Not Create the Work File Check the Temp Environment Variable problem for many users. Hopefully, this will work correctly for you too.
1. Deleting Temporary Internet Files –
Firstly, we would be looking into a solution that is quite easy and does not involve messing with the registry either. You will have to try to fix the Error Word Could Not Create the Work File Check the temp environment variable issue by deleting the Temporary Internet files by using Internet Explorer. First, as a part of the safety precaution, you should close all the open programs.
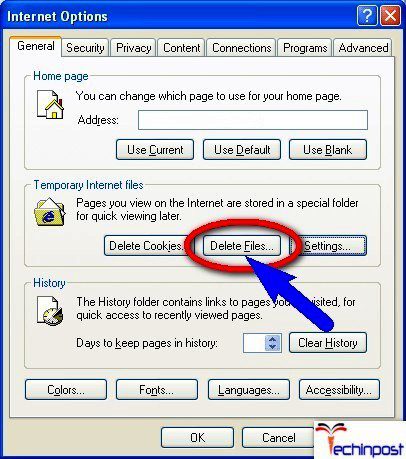
Follow the steps below to fix the Error Word Could Not Create the Work File Check the temp environment variable problem.
- Open Internet Explorer.
- Now, click on the Tools from the top right corner.
- Then click on the Internet Options from the contextual drop-down menu.
- Click on the Delete which is under your Browsing history
- Uncheck the Preserve Favourite website data.
- You only need to check the Temporary Internet Files, but just to be more accurate, check all the other options too.
- Click on the Delete option.
- Now close the Internet Explorer and restart your system.
- Once your system boots up, check whether the problem still exists are is it solved.
2. Deleting %TEMP% Files –
First, make sure to shut down all the office applications before following the Error Word Could Not Create the Work File Check the Temp Environment Variable steps.
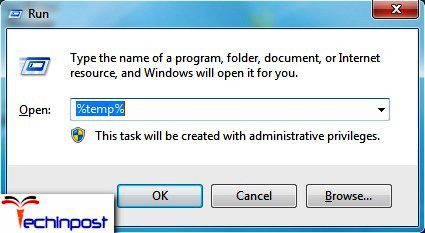
- First, Click on Start and type %TEMP% inside the text field.
- Now select all the files and folders in the temp folder by pressing Ctrl+A and then press the SHIFT key and the DELETE key together. A prompt will appear with a warning of permanently deleting all these files. Click on yes to confirm.
- Finally, launch it once again and check whether the Error Word Could Not Create the Work File Windows 10 PC problem persists.
3. Moving Temporary Internet Files –
Moving the temporary internet files or the folder in Internet Explorer can also fix this Error Word Could Not Create the Work File Check the temp environment variable windows 10 issue. Follow the steps below to solve the problem.
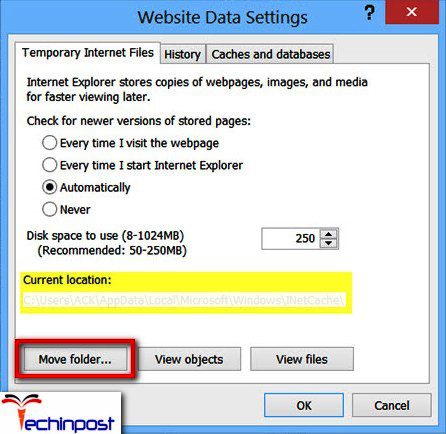
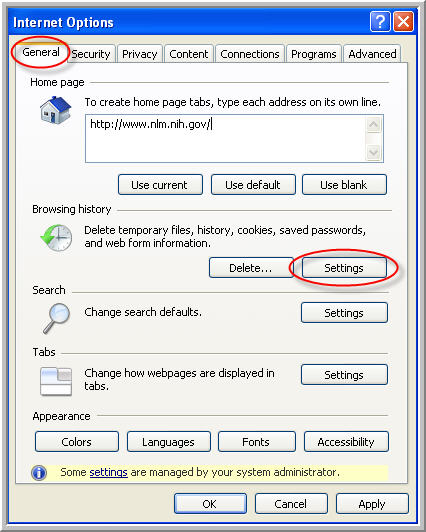
- Open Internet Explorer and go to the Tools and then Internet Options.
- Hereunder the General Tab, go to the browsing history section, and click on Settings.
- Now check the current location. Windows Vista/7 should have the following location: C:usersusernameAppDataLocalMicrosoftWindowsTemporary Internet Files.
- If the location is different from the above, then click on Move Folder and then change the location to the one above.
- This will ask you to log off, and this is normal. Finally, Log back in, and the problem should be solved.
4. Creating a New Folder –
You can also resolve this Preview pane Error Word Could Not Create the Work File Windows 10 issue by creating a new folder on your system.

- First, start the Windows Explorer
- Now locate the following folder location C:Users<userprofile>AppDataLocalMicrosoftWindows
- Here create a new folder and name it as INetCacheContent.Word.
*Note: It can be necessary for you to turn on the Hidden Items from the View Ribbon of the Windows Explorer.
5. Edit Computer Registry –
The above methods should solve your Error Word Could Not Create the Work File Check the temp environment variable issue without any problem. Still, in case it was unable to help you, then there is also a good chance for you to resolve this problem by editing your system’s registry.
*Note: You should follow this Error Word Could Not Create the Work File Check the Temp Environment Variable step very carefully as doing this step incorrectly will lead to some other problem. Thus it is advisable to create a backup of the registry in case you face issues after using this solution.
You need to follow the following steps to get rid of Error Word Could Not Create the Work File Check the Temp Environment Variable error:
Close all the open programs first, especially the Office Applications.
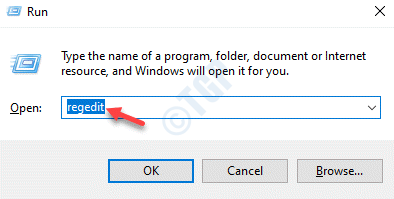
Press the Windows logo + R keys to open the Run dialog box. Type here regedit inside the Run dialog box and then press Enter in order to open the Registry Editor.
Inside the left pane of Registry Editor, go to the following directory:
HKEY_CURRENT_USER > Software > Microsoft > Windows > Current Version > Explorer
Click on the User Shell Folders from the left pane to display its contents in the right pane.
Now inside the right pane, look for the registry value Cache and double-click on it to modify it.
The Value data field can have anything written on it, but you need to delete it and paste the following line in it:
%USERPROFILE%Local SettingsTemporary Internet Files
Now close the Registry Editor and Restart your system.
When your system restarts, check to see whether the Error Word Could Not Create the Work File Check the Temp Environment Variable problem is solved.
So these are the solutions and guides for getting rid out of this Microsoft Office Word Could Not Create the Work File Check the Temp Environment Variable Windows PC Error Problem. I hope these Word Could Not Create the Work File Check the Temp Environment Variable helpful methods will work for you.
If you are facing are getting this Microsoft Office Word Could Not Create the Work File Check the Temp Environment Variable Windows PC Error Issue, then comment down that error here below in the comment section or directly mail us.
If you get Word could not create the work file, check the temp environment variable error while connecting Word to another program; here are a couple of fixes that you can use to eliminate this problem. This error can occur with any version of Microsoft Office products like Word, Excel or PowerPoint on Windows 11/10/8/7. Although in this post, we have taken the example of Word, a similar procedure was applied to fix the error in Excel & PowerPoint too.
With lots of features, Word is one of the most used Office components for me. Today, I was trying to use SharePoint as a collaboration tool along with Microsoft Word, so that I could connect with my team, but Word didn’t let me do so. I was being forced by Word to use my local documents in it, as evident from this error prompt I received.

What causes the Could not create the work file error in Office applications?
There can be several causes that may trigger the error at hand. Here are some of the possible reasons for this error:
- This error can be a result of malware present on your system that might be interfering with the regular working of your Office application. You can try scanning and removing the malware to fix the error.
- Another reason for the same error can be system file corruption or file system errors present on your computer. If the scenario applies, you can try running an SFC scan followed by the CHKDSK command to fix the error.
- If the Temporary Internet Files folder location is not set correctly, this error may occur. In that, you can try changing the location of the Temporary Internet Files folder in Internet Properties.
As you can see in the image, there was nothing to help me to fix up this issue except the error message itself. I tried Microsoft Support, but their solutions did not work for me – I guess they were for previous Word editions. Then I came to the conclusion that this is due to incorrect registry entries. So, finally, I got two fixes to troubleshoot this issue and would like to share with you all.
To fix Word could not create the work file, check the temp environment variable error, follow these steps:
- Run an SFC scan and check for disk errors.
- Add an Environment Variable.
- Disable Preview pane.
- Create a Temporary Internet Files folder.
- Change the Temporary Internet Files location from Internet Properties.
- Reregister Word files.
- Use the Registry fix.
Let’s check out these steps in detail.
1] Run an SFC scan and check for disk errors
This error can be a result of system file corruption or disk errors on your PC. So, the first thing you should do to get rid of the error is to run an SFC scan and then check & repair disk errors. SFC or System File Checker is an inbuilt utility in Windows that allows users to scan and fix corrupted system files via Command Prompt. On the other hand, you can repair disk errors using another Windows built-in tool called Check Disk Utility (CHKDSK).
Before that, you can try scanning for malware on your system using your antivirus suite. If it doesn’t find any malware on your computer, go ahead with the below steps.
Here are the steps to fix system file corruption and disk error to resolve error:
- Firstly, open the Command Prompt with elevated privilege.
- Now, type the below command and press Enter to execute it:
sfc.exe /scannow
- When the command is fully executed and system file errors are fixed, you can go ahead with tunning disk error check.
- In the elevated Command Prompt, enter the below command:
chkdsk /r /f
- When the file system errors are repaired, reboot your PC, open Word, and try attempting the same action which gave you the error.
Hopefully, this method fixes the error for you. However, in case it doesn’t, you can move on to the next potential fix.
2] Add an Environment Variable
Another fix that you can try is adding a new environment variable. It has fixed the error for many affected users and might work for you as well. Here are the steps to do that:
- Firstly, open the Settings app using Windows + I hotkey and navigate to System > About.
- Now, locate the Related links section and click the Advanced system settings option.
- In the new System Properties window, make sure you are on the Advanced tab.
- Next, press the Environment Variables button.
- After that, under User variables for <username> (<username> is your user name), click on the New button.
- Then, enter the following values in respective fields:
-Inside the Variable name field, enter %userprofile%.
-Inside the Variable value field, enter C:Users<username> (type your username in place of <username>). - Finally, select the OK button to create a new environment variable.
After doing so, restart your device and attempt the same action in Word and see if the error is now fixed. In case you don’t find luck in this method, we have some more fixes; so move to the next potential method now.
3] Disable Preview pane
You can also try disabling the Preview pane in File Explorer to fix the error. It is a kind of workaround and might work for you. To do that, you can open File Explorer using Win+E hotkey and then click on the View drop-down option. Then, go to the Show > preview pane option and make sure it is unchecked. See if this fixes the issue for you.
In case you don’t want to completely disable the Preview pane, you can disable preview for Word and other Office files by editing certain registry subkeys. But, make sure to back up the registry as an incorrect modification to the Registry can lead to serious problems.
Here are the steps to disable preview for Word, Excel, and Powerpoint files in File Explorer:
- Firstly, press the Win+R hotkey to evoke Run dialog and then enter regedit in it to open up the Registry Editor app.
- Now, in Registry Editor, look for the following keys:
Word Preview:HKCRCLSID{84F66100-FF7C-4fb4-B0C0-02CD7FB668FE}
PowerPoint Preview:HKCRCLSID{65235197-874B-4A07-BDC5-E65EA825B718}
Excel Preview:HKCRCLSID{00020827-0000-0000-C000-000000000046} - Next, delete the above keys one by one.
- After that, reboot Windows and see if the error is now fixed.
4] Create a Temporary Internet Files folder
You can also try creating a Temporary Internet Files folder to resolve the error. To do that, you can follow the below steps:
- Firstly, open the Run dialog box using Win+R hotkey and then enter the below address in the Open box:
C:UsersusernameAppDataLocalMicrosoftWindowsINetCache
You might need to enable the View > Show > Hidden items option in File Explorer to view the location.
- Now, in the opened location, right-click on the empty space and then select the New > Folder option to create a new folder
- Next, name the newly created folder as Content.Word.
- After that, reboot your PC and see if the error is fixed now.
There is another method to create a Temporary Internet Files folder using Command Prompt. Here are the steps to do that:
- Firstly, launch Command Prompt as an administrator.
- Now, enter the below commands one by one:
cd /d %USERPROFILE%AppDataLocalMicrosoftWindowsINetCache
MD Content.Word
If this fixes the issue for you, well and good. If not, go ahead with the next solution.
5] Change the Temporary Internet Files location from Internet Properties
In case you have not selected the correct Temporary Internet Files location, you might experience this error in Word and other Office applications. So, make sure you have chosen the correct location, and if not, you can try modifying the Temporary Internet Files location from Internet Properties. Here is how to do that:
- Firstly, open the Run dialog box using Win+R and then enter inetcpl.cpl in it to launch the Internet Properties window.
- Now, in the General tab, under the Browsing history section, tap on Settings which will open up the Website Data Settings window.
- In the new dialog window, make sure you are in the Temporary Internet Files tab. Here, you will see the current location for the folder. Simply click on the Move folder button present at the bottom of the window.
- After that, inside the Browse for Folder window, go to the following path:
C:Users<username>AppDataLocalMicrosoftWindows
Note: In the above path, replace the <username> with your username. That means, after Users, navigate to the username you have logged on to.
- Next, at the above location, you will see a folder named INetCache; simply select it. and press the OK button.
- Finally, close all the dialog windows and reboot your PC. On the next startup, you should not see the same error in Word or other Office apps.
6] Reregister Word files
To fix this problem, simply press Windows Key + R combination to bring up Run dialog. Type following and hit Enter:
winword.exe /r

In the above command, the /r part forces a re-register of Word in Windows Registry configuration and thus eventually fixes up the issue. If this fix does not work, you can try the alternative:
7] Registry Fix
1. Press Windows Key + R combination, type put Regedt32.exe in Run dialog box and hit Enter to open the Registry Editor.
2. Navigate to the following location:
HKEY_CURRENT_USERSoftwareMicrosoftWindowsCurrentVersionExplorerUser Shell Folders

3. In the right pane of this location, look for the AppData named string and carefully observe its Value data. The Value data for this string, if it has been changed, it is enough capable to generate the issues regarding the environment variable. So restore its default Value data to this:
%USERPROFILE%AppDataRoaming
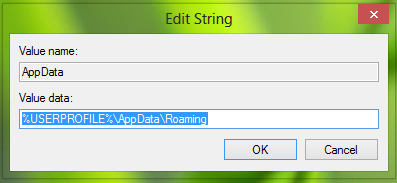
Click OK after inputting the Value data. You may now close the Registry Editor and reboot the machine. After reboot, start using Word again, and you observe that the issue has been fixed already.
Related: Outlook could not create the work file, Check the temp environment variable.
How do I fix Word cannot create work file?
There are two things you can do to fix this issue. First, you can reregister all the Word files on your computer. Second, you can use the Registry Editor method mentioned in the aforementioned guide. Whether you get this error in an older or the newest version of Office, you can use these fixes to get rid of this problem.
How do you fix Word cannot save or create this file?
If Word cannot save or create a file in Windows 11/10, you must check the permission of your account. If your account doesn’t have the permission to create a new file or save an existing one, you might get this error with Word.
Hope this helps!
NOTE: Also read bella’s comment below.

Microsoft Word is the most widely accepted word processing application which is used by numerous users all over the world. You can create documents of projects, stories, and can make notes using the Word tool provided by Microsoft. At certain times, you may encounter several errors while trying to access your word documents. And these errors hinder you to view data stored in your word file and work with it properly. Likewise, here in this tutorial, I am going to discuss one of the common errors “Word could not create the work file check the temp environment variable Windows 10” along with its best fixes.
so, let’s get started…
Well, you may receive the below-stated error message when you try to use or create the MS Word document.
“Word could not create the work file. Check the Temp environment variable”.

What Causes This Error?
The cause of this error has been recognized as the corruption in the Temporary Internet Files folder for Windows Internet Explorer which is set to be in a location where you don’t hold permission to create new temporary files.
But, you need not worry about as in the below section of this post you’ll get the possible fixes to repair word unable to create new documents error effectively.
How to Fix “Word Could Not Create the Work File. Check the Temp Environment Variable?
Below are the six best workarounds that can be used to solve ‘Word could not create the work file’ error. So, let’s find out the solutions…
- Fix #1: Change A Location of the Temp Files
- Fix #2: Create Your Word Temp Folder By Using The CMD Command
- Fix #3: Check the permission
- Fix #4: Edit the Registry Values
- Fix #5: Configure The Microsoft Word Once More
- Fix #6: Create Inetcachecontent.Word Folder
Fix #1: Change A Location of the Temp Files
Sometimes, the above-mentioned error can be caused because of the temp files. To get rid of this issue you need to change the location of the Temporary Internet Files. Follow the below steps, how to do so:
Step 1: Open the internet explorer, and go to the Tools >> Internet Options.

Step 2: In the internet options Dialog Box, you have to click the General
Step 3: After that make a tap on settings in a browsing history section
Step 4: Now, in the History settings dialog, just click on “Move Folder”.

Step 5: Next, select the following location:
Drive:>Users<user name>AppDataLocalMicrosoftWindowsTemporary Internet Files.
Step 6: At last, you need to click on OK & then need to restart your PC.
If, this solution won’t work, then go with the next one.
Fix #2: Create Your Word Temp Folder By Using The CMD Command
Another option that you can try to resolve the error message “check the temp environment variable word 2016” is creating the temp folder using the CMD command. To fix with CMD, simply try these steps:
- First of all, press the Win key, and then type the command cmd.exe

- Choose the “Run as administrator” option

- After that, you need to type the below-given syntax & then hit the Enter
cd /d %USERPROFILE%AppDataLocalMicrosoftWindowsINetCache
MD Content.Word
Fix #3: Check the permission
Insufficient permission to the INetCache can also cause the word couldn’t create the work file, Check the Temp environment variable error. Hence, check the permission once & take the ownership of a folder by following the below steps –
- Firstly, get access to the command prompt by trying the previous solution & type the below text –
icacls %USERPROFILE%AppDataLocalMicrosoftWindowsINetCache
- Ensure the permission displayed in the output is like
“NT AUTHORITYSYSTEM:(I)(OI)(CI)(F)
BUILTINAdministrators:(I)(OI)(CI)(F)
DESKTOP-31MDJSDuser_name:(I)(OI)(CI)(F)”.
Fix #4: Edit the Registry Values
Well, if the error “Word could not create the work file check the temp environment variable” occurs because of the incorrect registry value in a key, just change a registry with an accurate value.
Follow the below instructions to alter the registry
Step 1: Go to the Start
Step 2: Then, type the Regedit in a Run box & hit the ‘enter’ button.

Step 3: Find & click on below registry subkey:
HKEY_CURRENT_USER >> Software >> Microsoft >> Windows >> CurrentVersion >> Explorer >> User Shell Folders
Step 4: Now, make double-click on Cache registry entry, then type the below command in a Value data box:
%USERPROFILE%AppDataLocalMicrosoftWindowsTemporary Internet Files
Step 5: At this time, you need to click on OK
Note: Make sure that you’ve done this properly or not. Because if you’ve changed with any of the incorrect value then it will be very risky.
Fix #5: Configure The Microsoft Word Once More
This solution will again register & configure office files which are useful to fix word could not create the work file Windows 7 issue. To do so, you need to follow the below steps:
- Just press the Win + R keys together to invoke a Run dialog.
- Next, type the winword.exe /rand and hit the enter button.

Note: The configuration method will take a few minutes to fix this error.
Fix #6: Create Inetcachecontent.Word Folder
The INetCacheContent.Word folder supports to easily open & save your word documents on the Windows and corruption or absence of the same might throw an error message. Therefore, create folder trying the below steps –
- First, you need to press the Win + R keys.
- Type path C:Usersyour_user_nameAppDataLocalMicrosoftWindows
- Now, hit the enter button (but do not forget to change user profile).
- When finding the location, then right-click & select the New => Folder.
- Rename a folder INetCacheContent.Word.
Automatic Way To Word Could Not Create The Work File. Check The Temp Environment Variable Office 2019
After performing all the above workarounds, try to open your word file, if you are able to open it without any error then it’s great. However, if still you’re unable to open your file that clearly means your word file actually got damaged & you need an excellent third party tool to repair the corrupt Word document.
You can use the professional Word File Repair Tool to fix Word could not create the work file check the temp environment variable Windows 7/10. It is specially designed to repair and recover corrupt or inaccessible .doc files. I am suggesting this excellent tool because it resolves the MS word file issues in minimum consumption of time and effort.
It repairs and recovers document text along with its important stuff like indentation, formatting, charts, hyperlinks, images, tables, etc. So, just download and install this tool from the below-given buttons respectively.


Hence, try its easy steps to troubleshoot the Word could not create the work file check the temp environment variable preview pane error with ease.
Steps To Repair The Error “Temp Environment Variable Windows 10”
Step 1: User needs to just select a single file by clicking on a ‘Select File’ option or simply on a folder that contains all word files. They need to click on the ‘Select Folder’ or need to find the file clicking on the ‘Find File’ option.

Step 2: As a list of the selected files is displayed, the user needs to thus make the selection of the Word file by using a checkbox that they want to repair. They need to select all files by marking the ‘Select All’ checkbox. After that, they need to click on the ‘Scan’ button.

Step 3: He/she could easily saw the preview of the scanned file just by clicking on the file in both ‘Full document, and ‘Filtered text’ formats by clicking the tab given on the middle pane of the Window.

Step 4: If the scanned word file sis a*.doc file, then there will an available preview in the “Raw text” format along with the ‘Filtered Text’ formats and ‘Full Document’ and ‘Filtered Text’ formats.

Step 5: For repairing, the user needs to simply click on the click on the ‘Start Repair’ option. Then they need to make the selection of the option for saving their file from the ‘Save Document’ dialog box and thus click the ‘Ok’ button.

Bottom Line
Undoubtedly, you can fix “Word could not create the work file. Check the temp environment variable error by trying the manuals. But if in case it fails then you have another option to try as well.
Yes, you can use the best and most reliable Word File Repair Tool to repair word could not create the work file. Check the temp environment variable office 365 and also recover your word file.
Hope this works. All the very best to you!!!

Steven Telfer is a senior writer at filerepairtool.net. He is a technology expert having over 4 years of experience and loves to write in different subjects like Video Repair, Microsoft Excel, QuickBooks, Word & others. He has a Master’s degree in Computer Application and has solve many technical problems. In free time, he loves to read books and do research work to grow in his field.
- Remove From My Forums
-
Question
-
I have searched all over online for a resolution for this issue. After a client of mine enables preview pane she receives an error every time she tries to open a word document from file explorer. The error states «Word could not create the work file.
Check the temp environment variable.»This is a brand new computer with new install of windows 10 pro. x64
I have rebuilt the users domain profile, repaired office 365 both quick and full repairs, re-installed office, reinstalled office with the 32 bit version, ran sfc /scannow, checked the HKEY_Current_userSoftwareMicrosoftWindowsCurrentVersionExplorerusershell
folders and verified the path is correct for the INeCache, and installed updates both to office and windows. Nothing seems to resolve the issue. Can someone please point me in the right direction?
Answers
-
It has taken me weeks of revisiting this issue to find a solution buried deep on a page.
Preview pane does not work with 32 bit office.
Open regedit.
browse to HKEY_LOCAL_MACHINESOFTWAREClassesCLSIDBackup the CLSID
Delete keys:
HKEY_LOCAL_MACHINESOFTWAREClassesCLSID{00020827-0000-0000-C000-000000000046}
HKEY_LOCAL_MACHINESOFTWAREClassesCLSID{65235197-874B-4A07-BDC5-E65EA825B718}
HKEY_LOCAL_MACHINESOFTWAREClassesCLSID{84F66100-FF7C-4fb4-B0C0-02CD7FB668FE}
Reboot.
Test.-
Edited by
Tuesday, November 26, 2019 3:31 PM
-
Proposed as answer by
Esotrik
Monday, December 2, 2019 5:50 PM -
Marked as answer by
Carey FrischMVP
Saturday, February 29, 2020 7:35 AM
-
Edited by
При открытии документа MS Office Word вы можете столкнуться с сообщением об ошибке » Word не может создать рабочий файл. Проверьте переменную среды Temp.“. Вы также можете увидеть это сообщение об ошибке при попытке предварительного просмотра документа Word с расширением файла .docx или .xlsx с помощью проводника. Фактически, вы также можете столкнуться с этой ошибкой при запуске других приложений Microsoft Office, таких как Excel, Outlook и т. д. Хотя существуют разные причины, которые могут вызвать эту ошибку, есть несколько способов решить эту проблему. Посмотрим, как.
Способ 1: путем редактирования параметров реестра
Шаг 1: Нажмите сочетание клавиш Win + R, чтобы открыть командное окно «Выполнить».
Шаг 2. В поле поиска «Выполнить команду» введите regedit и нажмите Enter, чтобы открыть окно редактора реестра.
Шаг 3: Скопируйте и вставьте указанный ниже путь в адресную строку редактора реестра и нажмите Enter:
HKEY_CURRENT_USERSOFTWAREMicrosoftWindowsCurrentVersionExplorerUser Shell Folders
Теперь перейдите в правую часть панели и дважды щелкните строку Cache.
Шаг 4. В открывшемся диалоговом окне «Редактировать строку» замените поле «Значение» на путь, указанный ниже.
%USERPROFILE%AppDataLocalMicrosoftWindowsTemporary Internet Files
Нажмите OK, чтобы сохранить изменения и выйти.
Теперь закройте все приложения и перезагрузите компьютер. Попробуйте открыть документ Word сейчас, и вы больше не увидите ошибку.
Способ 2. Удалите 64-разрядный ключ предварительного просмотра Office из редактора реестра.
Шаг 1: Перейдите в меню «Пуск» и введите Regedit в строке поиска Windows.
Шаг 2: Щелкните левой кнопкой мыши результат, чтобы открыть окно редактора реестра.
Шаг 3. Когда реестр откроется, нажмите CTRL + F, скопируйте и вставьте ключ, указанный ниже. Теперь нажмите «Найти рядом», чтобы найти ключ.
{84F66100-FF7C-4fb4-B0C0-02CD7FB668FE}
Шаг 4 — Если вы найдете ключ, щелкните правой кнопкой мыши и удалите его.
Закройте редактор реестра и перезагрузите компьютер. Теперь попробуйте открыть документ Word, и он должен открыться нормально.
*Примечание. Прежде чем вносить какие-либо изменения в настройки реестра, создайте резервную копию данных реестра.
Это теперь применит настройки к реестру.
Способ 2: изменить расположение временных файлов Интернета для Internet Explorer
Шаг 1: Щелкните правой кнопкой мыши меню «Пуск» и выберите «Выполнить» из команды «Выполнить».
Шаг 2: В командном окне «Выполнить» введите inetcpl.cpl и нажмите OK, чтобы открыть диалоговое окно «Свойства Интернета».
Шаг 3: На вкладке «Общие» перейдите в раздел «История просмотра» и нажмите «Настройки».
Шаг 4: Откроется окно настроек данных веб-сайта. Здесь, на вкладке «Временные файлы Интернета», перейдите вниз и нажмите кнопку «Переместить папку».
Шаг 5: В окне «Обзор папок» перейдите по указанному ниже пути:
C:Users<имя пользователя>AppDataLocalMicrosoftWindows
Здесь замените выделенную выше часть на папку с вашим именем пользователя, то есть после папки «Пользователи» выберите папку с вашим именем пользователя.
Шаг 6: В папке Windows вы найдете папку INetCache.
Теперь просто закройте окно «Обзор папок».
Шаг 7: Закройте диалоговое окно «Настройки данных веб-сайта».
Нажмите OK, чтобы закрыть окно свойств Интернета.
Перезагрузите компьютер, и ошибка MS Word должна быть устранена.
Способ 3. Создайте временные папки приложения Office с помощью командной строки.
Шаг 1: Нажмите одновременно клавиши Win + X на клавиатуре и выберите «Выполнить», чтобы запустить команду «Выполнить».
Шаг 2: Введите cmd в поле поиска «Выполнить команду» и нажмите сочетание клавиш Ctrl + Shift + Enter, чтобы открыть командную строку в режиме с повышенными привилегиями.
Шаг 3: В окне командной строки (администратора) введите приведенную ниже команду и нажмите Enter:
cd /d %USERPROFILE%AppDataLocalMicrosoftWindowsINetCache
md Content.Word
md Content.Outlook
Теперь закройте окно командной строки и перезагрузите компьютер. Теперь вы можете нормально открывать документ Word.
Способ 4: проверьте права доступа к папке INetCache
Шаг 1. Перейдите в «Пуск» и введите «Командная строка» в строке поиска Windows.
Шаг 2: Щелкните правой кнопкой мыши результат и выберите «Запуск от имени администратора», чтобы открыть командную строку с правами администратора.
Шаг 3: Теперь запустите приведенную ниже команду в окне командной строки (администратора) и нажмите Enter:
icacls %USERPROFILE%AppDataLocalMicrosoftWindowsINetCache
* Примечание. Убедитесь, что разрешение отображается в командной строке, как показано ниже:
“NT AUTHORITYSYSTEM:(I)(OI)(CI)(F)
BUILTINAdministrators:(I)(OI)(CI)(F)
DESKTOP-31MDJSDuser_name:(I)(OI)(CI)(F)”.
Теперь выйдите из командной строки и перезагрузите компьютер. MS Word или любое из приложений MS Office больше не должно показывать ошибку.
Способ 5: через проводник Windows
Шаг 1: Нажмите горячие клавиши Win + E на клавиатуре, чтобы открыть проводник.
Шаг 2: В окне проводника перейдите на вкладку «Вид» на вкладке, нажмите «Показать/скрыть», чтобы развернуть раздел, и выберите «Скрытые элементы».
Это откроет все скрытые элементы в проводнике.
Шаг 3: Теперь перейдите в указанное ниже место:
C:Users%userprofile%AppDataLocalMicrosoftWindows
Нажмите на папку InetCache.
Шаг 4: Найдите папку Content.Word.
Выберите его и нажмите «Удалить».
Способ 6: еще раз настроить Microsoft Word
Шаг 1: Наведите часы на «Пуск» и выберите «Выполнить» в меню.
Это откроет окно команды «Выполнить».
Шаг 2: Теперь введите приведенную ниже команду в поле поиска и нажмите Enter:
winword.exe /r
Подождите некоторое время, так как для завершения процесса требуется несколько минут.
Это перерегистрирует приложение Office и даже настроит файлы Office, необходимые для исправления ошибки. После завершения проверьте, открывается ли документ Word или приложения MS Office работают нормально.