
Word for Microsoft 365 Outlook for Microsoft 365 Word 2021 Outlook 2021 Word 2019 Outlook 2019 Word 2016 Outlook 2016 Word 2013 Outlook 2013 Word 2010 Outlook 2010 Word 2007 Outlook 2007 More…Less
To convert text to a table or a table to text, start by clicking the  Show/Hide paragraph mark on the Home tab. This lets you see how text is separated in your document.

Convert text to a table
-
Insert separator characters—such as commas or tabs—to indicate where to divide the text into table columns.
Note: If you have commas in your text, use tabs for your separator characters.
-
Use paragraph marks to indicate where you want to begin a new table row.
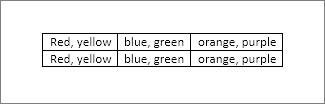
In this example, the tabs and paragraph marks will produce a table with 3 columns and 2 rows:

-
Select the text that you want to convert, and then click Insert > Table > Convert Text to Table.
-
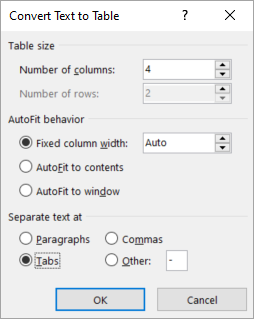
In the Convert Text to Table box, choose the options you want.
Under Table size, make sure the numbers match the numbers of columns and rows you want.
Under AutoFit behavior, choose how you want your table to look. Word automatically chooses a width for the table columns. If you want a different column width, choose one of these options:
To do this
Choose this option
Specify a width for all the columns
In the Fixed column width box, type or select a value.
Resize the columns to fit the width of the text in each column
AutoFit to contents
Resize the table automatically in case the width of the available space changes (for example, web layout or landscape orientation)
AutoFit to window
Under Separate text at, choose the separator character you used in the text.
-
Click OK. The text converted to a table should look something like this:


Convert a table to text
-
Select the rows or table you want to convert to text.
-
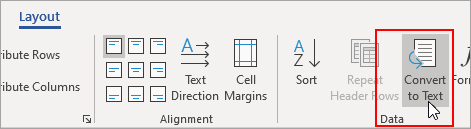
On the Layout tab, in the Data section, click Convert to Text.
-
In the Convert to Text box, under Separate text with, click the separator character you want to use in place of the column boundaries. Rows will be separated by paragraph marks.
-
Click OK.
Need more help?
Want more options?
Explore subscription benefits, browse training courses, learn how to secure your device, and more.
Communities help you ask and answer questions, give feedback, and hear from experts with rich knowledge.
 Please Note:
This article is written for users of the following Microsoft Word versions: 2007, 2010, 2013, and 2016. If you are using an earlier version (Word 2003 or earlier), this tip may not work for you. For a version of this tip written specifically for earlier versions of Word, click here: Fitting Text Into Cells.
![]()
Written by Allen Wyatt (last updated May 5, 2020)
This tip applies to Word 2007, 2010, 2013, and 2016
You have worked long and hard on your page design, including a couple of tables that are just right. Then, along comes a need to add a bit more text into one of the tables. The result is that the text in a cell wraps and pushes everything else down a bit. Now your whole design is thrown off. You long for a way to automatically adjust the size of the text in a cell so you won’t have the wrapping and pushing occur.
Word provides a built-in option that may do the trick. Simply follow these steps:
- Select the cell or cells that you want to format.
- Make sure the Layout tab of the ribbon is displayed. (This tab is only visible if you first do step 1.)
- Click the Properties tool in the Table group. Word displays the Table Properties dialog box.
- Select the Cell tab. (See Figure 1.)
- Click on the Options button. Word displays the Cell Options dialog box. (See Figure 2.)
- Make sure the Fit Text check box is selected.
- Click on OK to close the Cell Options dialog box.
- Click on OK to close the Table Properties dialog box.
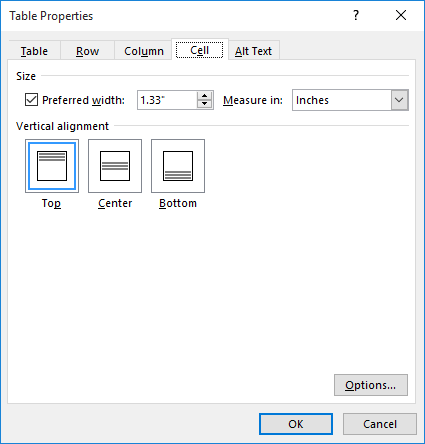
Figure 1. The Cell tab of the Table Properties dialog box.
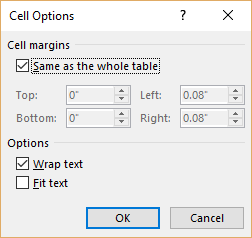
Figure 2. The Cell Options dialog box.
What Word does is to decrease the apparent size of the text so that everything fits. Word decreases the width of the text by «scrunching» (a highly technical term) the text together horizontally, without adjusting it vertically.
If you would like to know how to use the macros described on this page (or on any other page on the WordTips sites), I’ve prepared a special page that includes helpful information. Click here to open that special page in a new browser tab.
WordTips is your source for cost-effective Microsoft Word training.
(Microsoft Word is the most popular word processing software in the world.)
This tip (6081) applies to Microsoft Word 2007, 2010, 2013, and 2016. You can find a version of this tip for the older menu interface of Word here: Fitting Text Into Cells.
Author Bio
With more than 50 non-fiction books and numerous magazine articles to his credit, Allen Wyatt is an internationally recognized author. He is president of Sharon Parq Associates, a computer and publishing services company. Learn more about Allen…
MORE FROM ALLEN
Meaningless Text
The quick brown fox jumps over the lazy dog, or so the story goes. Here’s how to put this type of meaningless text into a …
Discover More
Days Left in the Year
Sometimes it is handy to know how many days are left in the current year. This tip provides a quick formula that …
Discover More
Calculating the Day of the Year
Need to know what day of the year a certain date is? You can figure it out easily using the formulas in this tip.
Discover More
More WordTips (ribbon)
Fitting Your Text In a Table Cell
Got some text you absolutely must fit on a single line in a table cell? Then you’ll appreciate this rather esoteric …
Discover More
Headings On Your Printout
If you’ve got a table that spans multiple printed pages, you probably want to repeat a row or two of that table as a …
Discover More
Last-Row Border Formatting
When the last row displayed on a page doesn’t show the borders you want, it can be confusing to figure out how to get …
Discover More
Adjust Table Columns in Word (Auto Fit)
- Click anywhere in the table.
- In “Table Tools” click the [Layout] tab > locate the “Cell Size” group and choose from of the following options: To fit the columns to the text (or page margins if cells are empty), click [AutoFit] > select “AutoFit Contents.”
Contents
- 1 How do you AutoFit a table in Word on a Mac?
- 2 How do I fit a table to one page in Word?
- 3 Where is the AutoFit command?
- 4 Why is my table going off the page in Word?
- 5 How do you AutoFit a table in Word 2020?
- 6 How do I fit a table to one page in Word 2016?
- 7 How do you AutoFit text?
- 8 How do you apply AutoFit?
- 9 How do I get my table back to normal?
- 10 How do you AutoFit a table in Word 2007?
- 11 How do you align a table in Word?
- 12 How do I fix the position of text in Word?
- 13 How do I anchor text in Word?
- 14 How do I fit a table to one page in Word 2010?
- 15 What are AutoFit options?
- 16 How do you AutoFit a table in access?
- 17 How do you AutoFit in pages?
- 18 How do you fix a table layout?
- 19 How do I stabilize my end table?
- 20 How do you get rid of heavy tables?
How do you AutoFit a table in Word on a Mac?
On the Tables tab, under Table Options, click New, and then click Insert Table. Under Table size, specify the number of rows and columns that you want. Under AutoFit behavior, specify how the table should fit to the text you insert into it, and then click OK.
How do I fit a table to one page in Word?
Keeping Tables on One Page
- Select all the rows in the table.
- Display the Home tab of the ribbon.
- Click the small icon at the bottom-right of the Paragraph group.
- Make sure the Line and Page Breaks tab is selected.
- Make sure the Keep Lines Together check box is selected.
- Click on OK.
Where is the AutoFit command?
Automatically adjust your table or columns to fit the size of your content by using the AutoFit button. Select your table. On the Layout tab, in the Cell Size group, click AutoFit.
Why is my table going off the page in Word?
There are three main reasons for a table row to start on a new page: Table setting for ‘Allow row to break across pages’: Select the table row, right-click and select Table properties. Go to the Row tab, and see if Allow row to break across pages is checked or not.
How do you AutoFit a table in Word 2020?
Adjust Table Columns in Word (Auto Fit)
- Click anywhere in the table.
- In “Table Tools” click the [Layout] tab > locate the “Cell Size” group and choose from of the following options: To fit the columns to the text (or page margins if cells are empty), click [AutoFit] > select “AutoFit Contents.”
How do I fit a table to one page in Word 2016?
Word 2016 – How to keep whole table together on one page
- Select all rows in the table – but clicking inside the table then the cross-arrow at the top left of the table.
- In the ‘Home’ menu, click on the ‘Paragraph’ settings icon.
- Open the ‘Line and Page Breaks’ tab.
- Tick ‘Keep with next’
- Click ‘OK’ to close the window.
How do you AutoFit text?
Fit text automatically
- Click anywhere in the text.
- On the Format menu, point to AutoFit Text, and do one of the following: To reduce the point size of text until there is no text in overflow, click Shrink Text On Overflow. To shrink or expand text to fit in the text box when you resize the box, click Best Fit.
How do you apply AutoFit?
Change the column width to automatically fit the contents (AutoFit)
- Select the column or columns that you want to change.
- On the Home tab, in the Cells group, click Format.
- Under Cell Size, click AutoFit Column Width.
How do I get my table back to normal?
Click anywhere in the table and then click the Table tab. Click Convert to Range. Click Yes to confirm the action. Note: Table features are no longer available after you convert the table back to a range.
How do you AutoFit a table in Word 2007?
Word 2007:
- Click inside the table.
- Go to the Table Tools > Layout tab.
- Click the large AutoFit icon, then click AutoFit Window.
How do you align a table in Word?
Right-click anywhere inside the table and then choose the “Table Properties” command from the context menu that appears. In the Table Properties window that opens, you can choose left, center, or right alignment by clicking those options in the “Alignment” section.
How do I fix the position of text in Word?
1 Answer
- Select the text box and right click the edge to open “More Layout Options”.
- Choose “Position” tab, the vertical position would be the desired distance below Paragraph by default, you may change it to Margin. Then the box of “Move object with text check box” would be clear.
How do I anchor text in Word?
Step-by-step guide: How to insert anchors
- Place your cursor in the text editor where you’d like to insert the anchor. You can click a word or place your cursor immediately before it.
- Click Insert / Remove anchor in the Links section of the Insert ribbon tab.
- After you assign a name to the anchor, click OK.
How do I fit a table to one page in Word 2010?
How to Make a Table Fit on One Page in Word 2010
- Click inside the table.
- Choose the Layout tab under Table Tools tab at the top of the window.
- Click the Autofit button.
- Select Autofit Contents.
What are AutoFit options?
The AutoFit Options include choices to stop fitting the text, splitting the text between two slides, continuing on a new slide, or changing to two columns. Before you choose an option on how you want AutoFit to format slides, this is a good time to pause and decide if you actually need that much content.
How do you AutoFit a table in access?
To use AutoFit, simply double-click the right edge of the column or field you wish to adjust. Scroll to the right until the Address field is displayed. Double-click the right edge of the Address field name to automatically adjust its width.
How do you AutoFit in pages?
Move the pointer to the right of the row number or column letter, click the arrow, then choose Fit Height to Content or Fit Width to Content from the menu that appears.
How do you fix a table layout?
If you click the “Toggle table-layout: fixed” button, you’ll see what the table layout looks like when the “fixed” algorithm is used. When table-layout: fixed is applied, the content no longer dictates the layout, but instead, the browser uses any defined widths from the table’s first row to define column widths.
How do I stabilize my end table?
The best way to stabilize almost any table is to add corner blocks to the legs. Look under almost any custom or expensive table. You’ll see angular blocks spanning across the top of leg diagonally from side to side, encasing the leg under the table apron, which is an overhang that goes around the table.
How do you get rid of heavy tables?
Instead of dumping your old table, try recycling or donating it. You can also have it professionally removed by a trusted, full-service junk removal company like LoadUp, which will cost significantly less than any fines you may incur by throwing your old table in a dumpster.
Adjust Table Columns in Word (Auto Fit)
You can manually adjust the width of any table; however, the following tips may allow you to fine-tune your tables with less effort.
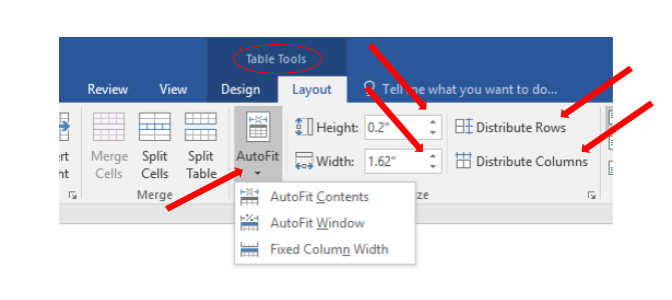
To adjust table row and column size in Word:
- Click anywhere in the table.
- In «Table Tools» click the [Layout] tab > locate the «Cell Size» group and choose from of the following options:
- To fit the columns to the text (or page margins if cells are empty), click [AutoFit] > select «AutoFit Contents.»
- To fit the table to the text, click [AutoFit] > select «AutoFit Window.»
- To keep Word from automatically adjusting your column size, click [AutoFit] > select «Fixed Column Width.»
- To adjust the row height, click the up and down arrows within the «Height» field. Highlight multiple cells to adjust more than 1 row.
- To adjust the column width, click the up and down arrows within the «Width» field.
- To make all columns the same width, click [Distribute Columns].
- To make each row the same height, click [Distribute Rows].
Keywords: Microsoft Word, tables, format columns, resize, even, adjust columns
Share This Post
-
Facebook
-
Twitter
-
LinkedIn
Adjust Table Columns in Word (Auto Fit)
- Click anywhere in the table.
- In “Table Tools” click the [Layout] tab > locate the “Cell Size” group and choose from of the following options: To fit the columns to the text (or page margins if cells are empty), click [AutoFit] > select “AutoFit Contents.”
How do you make all columns expand to fit text automatically?
Change the column width to automatically fit the contents (AutoFit)
- Select the column or columns that you want to change.
- On the Home tab, in the Cells group, click Format.
- Under Cell Size, click AutoFit Column Width.
How do I make columns longer in Word?
On the Page Layout or Layout tab, click Columns. At the bottom of the list, choose More Columns. In the Columns dialog box, adjust the settings under Width and spacing to choose your column width and the spacing between columns.
How do I change the size of cells without changing the whole column?
Generally, every cell in a row or column has the same size, so you can’t adjust the size of a cell individually without affecting the others in its same row or column. You can merge adjacent cells to create larger compound cells, however, and you can set rows and columns to automatically adjust to fit text.
How do you AutoFit one column in Word?
Resize a column or table automatically with AutoFit
- Select your table.
- On the Layout tab, in the Cell Size group, click AutoFit.
- Do one of the following. To adjust column width automatically, click AutoFit Contents. To adjust table width automatically, click AutoFit Window.
How do you AutoFit in Word for Mac?
Click anywhere in the table (Figure 83). 2. Choose Table > AutoFit > AutoFit to Window (Figure 84). The table’s width adjusts to fill the space between the margins (Figure 86).
How do you change the width and height of a column in Word?
Resize rows, columns, or cells
- Select the table. The contextual tabs, Table Design and Layout, appear in the ribbon.
- On the Layout tab, you can specify the custom height and width. To resize specific rows or column, click on a cell and then adjust the row/column.
How do I remove first column formatting in Word?
To remove column formatting, place the insertion point anywhere in the columns, then click the Columns command on the Layout tab. Select One from the drop-down menu that appears.
Where is the formatting button in Word?
Open one word document, in the group of the “Menus” tab at the far left of the Ribbon of word you can view the “Format” menu and execute many commands from the drop-down menu of Format.
How do you reveal formatting marks in Word?
If you always want to see the formatting marks in your Word documents, there’s a setting for that.
- Click File.
- Click Options.
- Click Display.
- Check the formatting marks you want always shown.
- Click OK.
Is there a Reveal Codes in Microsoft Word?
The closest you can get to the reveal codes is to display the complete formatting information that Word is applying to a character or paragraph. You can do this by following these steps: Press Shift+F1. (You can also choose What’s This? from the Help menu.)
How do you hide codes in Word?
Press Alt+F9 to turn off field codes currently on the page. To turn off a field code for a specific field, click on the field and press Shift+F9 instead. Click the Office button and select “Word Options” to turn off field codes by default.
Where is the show Hide button in Word?
The Show/Hide Go to File > Options > Display. button is turned on or off.
Why is word showing field codes?
If your document is displaying field codes for example instead of page numbering you now see { PAGE *MERGEFORMAT } this means that you have field codes turned on in MS Word. Open the document where the field codes are displayed. Simply press the shortcut key combination ALT + F9.
How do I remove field codes in Word 2010?
Right-click, then click Toggle Field Codes. Press CTRL+SHIFT+F9 on your keyboard. This will remove the field codes, replacing them with the text they contained.
What is Field Code Changed in Word?
Most of the dynamic content in a Word document (such as links and many embedded. objects, Tocs, indexes, etc.) is maintained by field codes. When they’re. updated, you’ll get this notation when change tracking is active.
How do I get rid of the GREY fields in Word?
They’ve been set up in their Properties dialogs with default text and with the “Fill-in enabled” box unchecked. Finally, the Form Field Shading button in the Developer ribbon has been turned on, which is why the grey shading appears. You can remove the shading simply by clicking that button to turn it off.
How do you enter field codes in Word?
Insert Field Codes The quick way to add a Word field code is from Insert | Text, click on the Quick Parts icon and choose ‘Fields …’ in Word for Windows or Mac. Then choose the field code you want from the list on left. The options in the center and right sections will change, depending on the field code selected.
What is a field code?
: a codebook for use in combat areas.
What is a field in Microsoft Word?
Word fields are placeholders that store and display data. They perform simple tasks, such as returning the current date or current page number, but they’re much more than that. You can use them to ask questions, make decisions based on specific conditions, and perform calculations.
How do you automate a field in Word?
Inserting a field using the Field dialog box
- Navigate to the location in the Word document where you want to insert a field.
- Click the Insert tab in the Ribbon.
- Click Quick Parts.
- Select Field.
- In the list of Field names, select a field.
- Under Field properties, select any properties or options you want.