
In this article, we plan to provide you 8 ways to set different background colors for header, footer, and main document in Word.
By default, to set a page color will make all parts of the document in the same background color, including the header, footer and main document. What if we want to set different background colors for these 3 parts?
To achieve so, we will have to deploy some workarounds, such as follows:
Method 1: Insert a Shape into Header or Footer
Let’s take the example of header first.
- Double click on header to enter its editing mode.
- Then click “Insert” and click “Shapes”.
- Next choose “Rectangle” on the drop-down menu.

- Wait until your cursor turns into a plus sign. Then drag it to draw a rectangle as large as the header area.
- Now right click on the shape. And choose “Format Shape” to open the same name box.
- Then click “Fill” and choose a fill color.
- Next click “Line Color” and select “No line”. Close the box.

- Right click on the shape again and choose “Wrap Text” this time.
- Click “Behind Text” on the submenu.

- Lastly, double click on main document to exit header.


The step to format footer is very much the same.
Here is the possible result:
Method 2: Insert a Text Box into Header or Footer
Similarly, we will describe how to do it in header as a demonstration.
- Firstly, double click on header to enter editing mode.
- Next click “Insert”, “Text Box” and “Draw Text Box” in consecutive.

- See your cursor turns into a plus sign. And click to draw a text box as large as the header area.
- Repeat step 5 to 10 in method 1 to format the text box and set background color for header.

Method 3: Insert a Picture into Header or Footer
- First of all, double click on header to enter editing mode.
- Then insert a picture into header by clicking “Insert” tab then the “Picture”.

- Choose a picture from your folder.
- Next right click on the picture and click “Wrap Text”.
- Choose “Behind Text”.
- Then adjust the picture size to fill the header area.

See the effect:
Method 4: Insert a Table into Footer
We can employ this method to just footer.
- Firstly double click on footer to enter the editing mode.
- Next click “Insert” and “Table” to insert a 1×1 table.
- Then select the table and right click.
- Choose “Table Properties”.
- In the box open, click “Table” tab then click the “Borders and Shading”.
- In the second box, click “Borders” and choose “None”.
- Then click “Shading” and choose a fill color.
- Click “OK” in the second box.
- Now back to the first box and click “Around” for text wrapping.
- Click “OK”.

- Finally, enlarge the table and fill the footer area.

Method 5: Insert a Shape into the Main Document
- To begin with, click “Page Layout”, then click “Page Color” and choose a color as the background color.

- Next enter header mode.
- Insert a shape following step 2 and 3 in method 1.
- Then enlarge the shape size to cover the main document area.
- Repeat step 5 to 9 in method.
- At last, click “Close Header and Footer”.


Method 6: Insert a Text Box into the Main Document
- Repeat step 1 in method 5 to format the background color for the entire document.
- Next enter header. And insert a text box as large as the main document part.
- Repeat step 5 to 9 in method 1.
- Exit header by clicking “Close Header and Footer”.
Method 7: Insert a Picture into the Main Document
- Similarly, repeat step 1 in method 5 to format the background color for the entire document.
- Next enter header and insert a picture to cover the main document.
- Then set the picture wrapping style as “Behind Text”.
- lastly exit the header.
Method 8: Insert a Table into the Main Document
If you decide to use this method, you have to format the document before enter any content.
- Likely, format the background color for the entire document.
- Insert a table to cover the main document part. And use step 3 to 10 in method 4 to set the table properties.
- Lastly, exit the header mode.
Solve Word Problems
We can realize many achievements in Word. But there is no guarantee for perfect performance all the time. Sooner or later, we are likely to run into some hard issues. If so, we need to utilize a doc fix tool to address such issues.
Author Introduction:
Vera Chen is a data recovery expert in DataNumen, Inc., which is the world leader in data recovery technologies, including fix Excel and pdf repair software products. For more information visit www.datanumen.com
![]()
Written by Allen Wyatt (last updated October 21, 2021)
This tip applies to Word 97, 2000, 2002, and 2003
Word provides a highlighter tool that allows you to…well, «highlight» text, much as you would do with a highlighter pen on a printed document. The default color for highlighting is yellow, but you can change the color if you click the down-arrow to the right of the Highlight tool on the Formatting toolbar. Word allows you to pick any of fifteen different colors.
The colors used for highlighting cannot be changed beyond what is offered in the fifteen colors. (The colors appear to be hard-wired into Word.) You can, however, highlight text in a different way, if you prefer: by using shading. Follow these steps:
- Select the text you want to highlight.
- Choose Borders and Shading from the Format menu. Word displays the Borders and Shading dialog box.
- Make sure the Shading tab is displayed. (See Figure 1.)
- From the colors displayed, select the one you want to use. (If you’d like to choose from more colors, click the More Colors button.)
- Click OK.
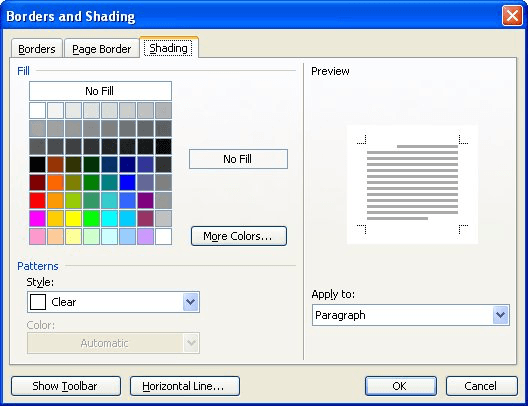
Figure 1. The Shading tab of the Borders and Shading dialog box.
Word then applies the selected color to the selected text, and it looks exactly like what you apply using the Highlight tool. If you find a color you like to use a lot, you can create a macro that applies the shading to the selected text. The following macro applies pale yellow shading to the selected text.
Sub HighlightPaleYellow()
    With Selection.Font
        With .Shading
            .Texture = wdTextureNone
            .ForegroundPatternColor = wdColorAutomatic
            .BackgroundPatternColor = wdColorLightYellow
        End With
    End With
End Sub
With the macro in place, you can assign it to a shortcut key or to a toolbar button so you can apply your own «highlighting» whenever you want. Or, if you prefer, you can bypass macros altogether and simply create a character style that applies the desired shading to selected text.
There is only one downside that I can find to using shading to highlight text, and that has to do with Find and Replace. One of the formatting attributes that you can search for is if the text is highlighted, but you cannot search for shading applied to text. If this is a big concern for you, then I’d suggest defining styles for your shading, since you can always search for specific styles.
If you would like to know how to use the macros described on this page (or on any other page on the WordTips sites), I’ve prepared a special page that includes helpful information. Click here to open that special page in a new browser tab.
WordTips is your source for cost-effective Microsoft Word training.
(Microsoft Word is the most popular word processing software in the world.)
This tip (105) applies to Microsoft Word 97, 2000, 2002, and 2003.
Author Bio
With more than 50 non-fiction books and numerous magazine articles to his credit, Allen Wyatt is an internationally recognized author. He is president of Sharon Parq Associates, a computer and publishing services company. Learn more about Allen…
MORE FROM ALLEN
Problems with TOC Styles
If you generate a table of contents for your document, there may be some unexpected surprises in the way the TOC appears. …
Discover More
Section Breaks Changing On Their Own
Sometimes Word does things that just don’t make sense. For instance, have you ever inserted a section break into your …
Discover More
Setting Cell Width and Height Using the Keyboard
Hate to take your hands off the keyboard? Here are a couple of ways you can reject the mouse and still adjust the height …
Discover More
I have a document with text and borders in a fuchsia type colour. The RGB colour was determined using a ColorPicker tool in Gimp, and then those RGB values used for a custom text colour in the Word document.
There are many separate items with this custom colour. Is there a way to make the custom colour darker for all items in the document, or simply to make the fuchsia colour print darker or more intense when I print it?
![]()
asked Feb 5, 2013 at 8:39
![]()
1
Yes, you can, maybe. I did this with Word 2010. Here are the steps:
- Press Ctrl-H, and click the More button in the Find and Replace dialog. Click the find tab.
- Click the Format button, and select Font.
- Select the color to be changed—leaving all else blank—and click OK.
- Click the Replace tab, and repeat steps 2 and 3 to select the new color.
- Click Replace All.
![]()
bummi
1,6934 gold badges16 silver badges28 bronze badges
answered Jan 28, 2015 at 17:18
![]()
As far as I know it’s not possible to simply change a color so that every item that has that color assigned is changed.
I would assign styles to the different items in your document and assign the color in the style. That way you don’t always have to go to look for every item and change it, but change the color in the styles.
To get an idea of how to work with styles, see here:
http://office.microsoft.com/en-us/word-help/style-basics-in-word-HA010230882.aspx#BM4
http://office.microsoft.com/en-us/word-help/make-changes-to-a-quick-style-set-HA010201147.aspx
Unfortunately the colors that you set in Word are mostly not the same that you get printed out. That’s because your monitor uses RGB color space (additive color mixing) and your printer uses CMYK color space (subtractive color mixing).

Not all the colors that you can see on your screen can be printed, because your screen mixes the color with light and your printer with ink.
So to make the fuchsia color more intense in the sense of brighter or more luminous will not be possible to that extent that you would have on your screen. To make it darker is no problem.
It depends on the printer how well it can replicate a color. Cheaper printers often produce desaturated colors.
answered Feb 5, 2013 at 10:25
![]()
GchtrGchtr
1888 bronze badges
Given the requirements:
1) A User inserts some text in a RichTextBox Control.
2) If the word entered is part of a pre-defined list of words, that word should change color (so, define a relation between a word and a color).
3) When a mouse Click event is generated on a colored word, an event is raised, to notify which word was clicked.
Possible result (to replicate what’s in the visual example):
Define a custom EventHandler with custom EventArgs:
public class WordsEventArgs : EventArgs
{
    private string m_word;
    public WordsEventArgs(string word) { m_word = word; }
    public string Word { get { return m_word; } set { m_word = value; } }
}

public delegate void WordsEventHandler(object sender, WordsEventArgs e);
public event WordsEventHandler WordClicked;

protected void OnWordClicked(WordsEventArgs e) => WordClicked?.Invoke(this, e);
Subscribe to the event:
this.WordClicked += new WordsEventHandler(this.Word_Click);
Simple Class for the list of words:
public class ColoredWord
{
    public string Word { get; set; }
    public Color WordColor { get; set; }
}

public List<ColoredWord> ColoredWords = new List<ColoredWord>();
Fill the list with some words an related color, then bind it to a ListBox, calling the FillColoredWords() method (in other words, handle a collection of objects that relate pieces of text with Color values):
public void FillColoredWords()
{
    ColoredWords.Add(new ColoredWord { Word = "SIMPLE", WordColor = Color.Goldenrod });
    ColoredWords.Add(new ColoredWord { Word = "COLORED", WordColor = Color.Salmon });
    ColoredWords.Add(new ColoredWord { Word = "TEXT", WordColor = Color.DarkCyan });
    this.listBox1.DisplayMember = "Word";
    this.listBox1.DataSource = ColoredWords;
}
In the KeyPress event, evaluate whether the last entered word is part of the list of words to color:
private void richTextBox1_KeyPress(object sender, KeyPressEventArgs e)
{
    int currentPosition = richTextBox1.SelectionStart;

    if (e.KeyChar == (char)Keys.Space && currentPosition > 0 && richTextBox1.Text.Length > 1) {
        int lastSpacePos = richTextBox1.Text.LastIndexOf((char)Keys.Space, currentPosition - 1);
        lastSpacePos = lastSpacePos > -1 ? lastSpacePos + 1 : 0;

        string lastWord = richTextBox1.Text.Substring(lastSpacePos, currentPosition - (lastSpacePos));
        ColoredWord result = ColoredWords.FirstOrDefault(s => s.Word == lastWord.ToUpper());

        richTextBox1.Select(lastSpacePos, currentPosition - lastSpacePos);
        if (result != null) {
            if (richTextBox1.SelectionColor != result.WordColor) {
                richTextBox1.SelectionColor = result.WordColor;
            }
        }
        else {
            if (richTextBox1.SelectionColor != richTextBox1.ForeColor) {
                richTextBox1.SelectionColor = richTextBox1.ForeColor;
            }
        }
        richTextBox1.SelectionStart = currentPosition;
        richTextBox1.SelectionLength = 0;
        richTextBox1.SelectionColor = richTextBox1.ForeColor;
    }
}
In the MouseClick event, verify whether the event is generated on a colored word.
In that case, raise the custom OnWordClicked() event:
private void richTextBox1_MouseClick(object sender, MouseEventArgs e)
{
    if (richTextBox1.SelectionColor.ToArgb() != richTextBox1.ForeColor.ToArgb()) {
        try {
            int wordInit = richTextBox1.Text.LastIndexOf((char)32, richTextBox1.SelectionStart);
            wordInit = wordInit > -1 ? wordInit : 0;
            int wordEnd = richTextBox1.Text.IndexOf((char)32, richTextBox1.SelectionStart);
            string wordClicked = richTextBox1.Text.Substring(wordInit, wordEnd - wordInit) + Environment.NewLine;
            OnWordClicked(new WordsEventArgs(wordClicked));
        }
        catch (Exception) {
            //Handle a fast DoubleClick: RTB is a bit dumb.
            //Handle a word auto-selection that changes the `.SelectionStart` value
        }
    }
}
In the custom event, you can append the clicked word to a TextBox (or do whatever else you want to do with it):
private void Word_Click(object sender, WordsEventArgs e)
{
    textBox1.AppendText(e.Word);
}
I have one word and would like to write it in two different colors. Usually, there will be a space between the two textcolo sections
textcolor{sectcol}{la}textcolor{white}{tex}
I can «remove» the space with a negative hspace.
textcolor{sectcol}{la}hspace{-1mm}textcolor{white}{tex}
Is there a better way to do this?
asked Aug 17, 2020 at 9:36
![]()
1
color inserts so-called whatits, and this will prevent kerning:
documentclass{article}
usepackage{color}

begin{document}
VA

textcolor{red}{V}textcolor{blue}{A}
end{document}

There is not much you can do about it (apart inserting negative space). The only way to really avoid it, is to use the lualatex engine and the luacolor package:
documentclass{article}
usepackage{luacolor}

begin{document}
VA

textcolor{red}{V}textcolor{blue}{A}
end{document}

answered Aug 17, 2020 at 9:54
![]()
Ulrike FischerUlrike Fischer
310k18 gold badges469 silver badges944 bronze badges
Your example is not good, because there is no kerning between “a” and “t” in the standard fonts.
If you’re stuck with pdflatex and can’t use LuaTeX, you can manually compute the needed kerning.
documentclass{article}
usepackage{xcolor,xparse}

ExplSyntaxOn

NewDocumentCommand{twocolors}{mmmm}
 {% #1 = color for the first part
  % #2 = first part
  % #3 = color for the second part
  % #4 = second part
  egreg_twocolors:nnnn { #1 } { #2 } { #3 } { #4 }
 }

box_new:N l__egreg_twocolors_kern_box
box_new:N l__egreg_twocolors_nokern_box

cs_new_protected:Nn egreg_twocolors:nnnn
 {
  hbox_set:Nn l__egreg_twocolors_kern_box
   {
    tl_item:nn { #2 } { -1 }
    tl_item:nn { #4 } { 1 } % could just be tl_head:n
   }
  hbox_set:Nn l__egreg_twocolors_nokern_box
   {
    hbox:n { tl_item:nn { #2 } { -1 } }
    hbox:n { tl_item:nn { #4 } { 1 } } % could just be tl_head:n
   }
  textcolor{#1}{#2}
  skip_horizontal:n
   {
    box_wd:N l__egreg_twocolors_kern_box - box_wd:N l__egreg_twocolors_nokern_box
   }
  textcolor{#3}{#4}
 }

ExplSyntaxOff

begin{document}

twocolors{green!50!blue}{two}{red!30}{color}

twocolor

makebox[0pt][l]{twocolor}twocolors{green!50!blue}{two}{red!30}{color}
makebox[0pt][l]{twocolors{green!50!blue}{two}{red!30}{color}}twocolor

twocolors{green!50!blue}{la}{red!30}{tex}

latex

makebox[0pt][l]{latex}twocolors{green!50!blue}{la}{red!30}{tex}
makebox[0pt][l]{twocolors{green!50!blue}{la}{red!30}{tex}}latex

twocolors{green!50!blue}{V}{red!30}{A}

VA

makebox[0pt][l]{VA}twocolors{green!50!blue}{V}{red!30}{A}
makebox[0pt][l]{twocolors{green!50!blue}{V}{red!30}{A}}VA

end{document}
Each example has the check that colors don’t leak. However, at small resolutions, the rasterer might show artifacts. The image below has been taken at quite high resolution.
Limitation: if the last item in the first part or the first item in the second part is an accented letter, brace it (or them).

answered Aug 17, 2020 at 10:13
![]()
egregegreg
1.1m129 gold badges2560 silver badges4116 bronze badges
1
You must log in to answer this question.
Not the answer you’re looking for? Browse other questions tagged
.
Not the answer you’re looking for? Browse other questions tagged
.