
We all know that a picture says a thousand words, but what if you could have a picture and a thousand words? That’s real insight! Check out now the Free Word Cloud with Images.
AhaSlides Live Word Cloud Generator can help you to create a word cloud with images, which can not only say so much more, but it can ask so much more of your audience and can do so much more in keeping them entertained.
Here’s your practical guide to creating a word cloud with images.
- Can you add images to word clouds?
- 3 types of word cloud with images
- #1 – Image Prompt
- #2 – Word Art
- #3 – Background Image
- Word Cloud templates
Start in seconds.
Learn how to set up a proper online word cloud, ready to share with your crowd!
🚀 Grab Free Quiz
More Inspiration with AhaSlides
- AhaSlides Live Word Cloud Generator
- Zoom Word Cloud
- Random Noun Generator
Can You Add Images to Word Clouds?
While it’s possible to add images around a word cloud, for example as a prompt or background, there are currently no tools for creating a word cloud made from images. It’s also unlikely there ever will be a tool, as it would be very hard to submit images to normal word cloud rules.
Learn how to use live word cloud generator allows you to pose a question to participants using an image or GIF as a prompt or background. With most such tools, participants can answer this question in real-time with their phones, then see their responses in one word cloud showing the popularity of all words in order of size.
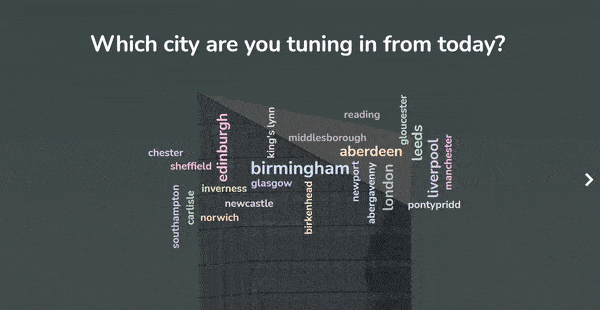
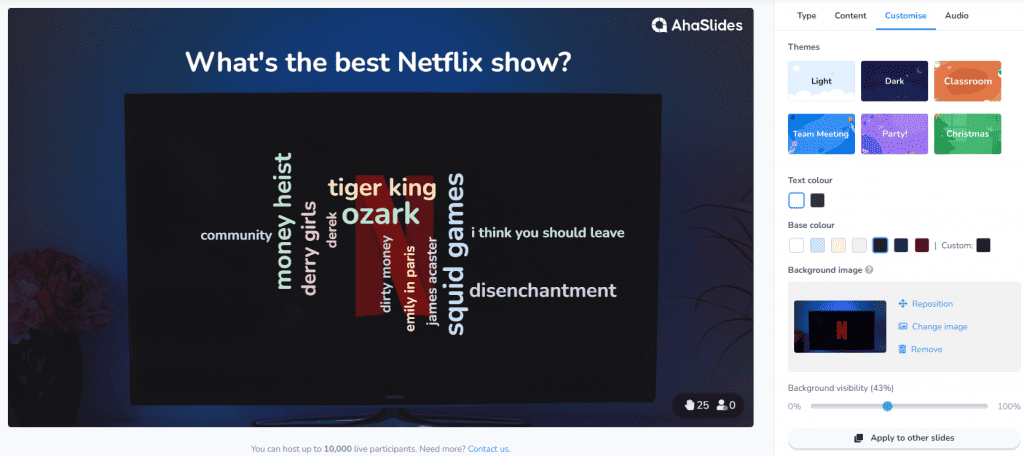
A bit like this…
☝ This is what it looks like when participants of your meeting, webinar, lesson etc. enters their words live to your cloud. Sign up to AhaSlides to create free word clouds like this.
Though a word cloud made of images may not be possible, that’s not to say that pictures don’t have a place in this super versatile tool.
Here are 3 ways you can get real engagement with images and word clouds.
#1 – Image Prompt
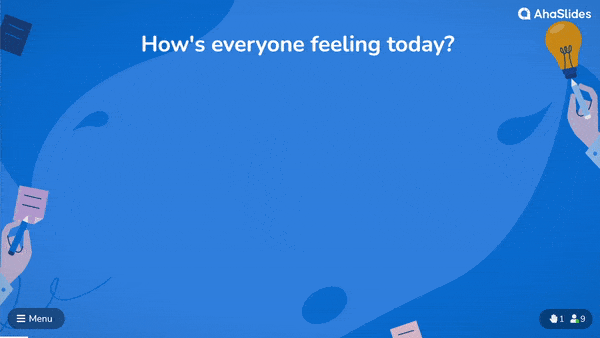
A word cloud with image prompt is a great way to get your participants submitting ideas based on an image. Just ask a question, choose an image to show, then allow your participants to respond with their thoughts and feelings of that image.
Using their phones, participants can see the image and submit their responses to the word cloud. On your laptop you can simply hide the image to reveal all of your participants’ words.
This example is kind of like one of those old-timey ink blot tests you may have gotten at a visit to the psychiatrist in the 1950s. The most popular use for this type of image word cloud is exactly that – word association.
Here are a few example questions that this type of word cloud is best for…
- What comes to mind when you see this image?
- How does this image make you feel?
- Summarise this image in 1 – 3 words.
💡 On many tools, you can also use GIFs as your image prompt. AhaSlides has a full library of image and GIF prompts for you to use for free!
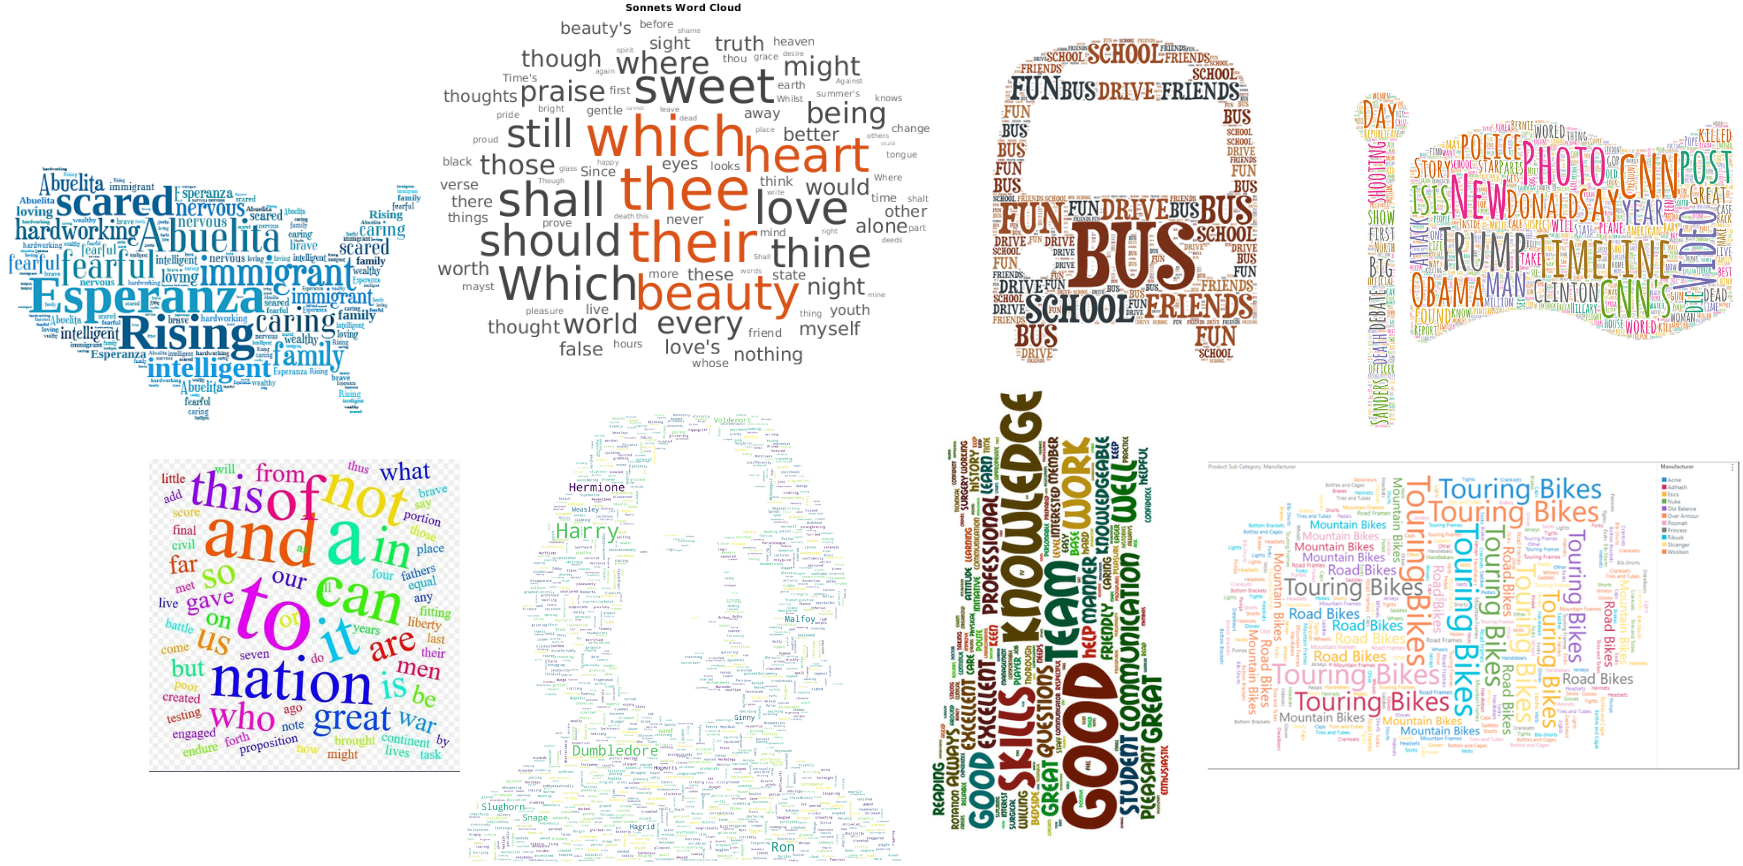
#2 – Word Art
With some non-collaborative word cloud tools, you can create a word cloud that takes the shape of an image. Usually, the image represents something related to the content of the word cloud itself.
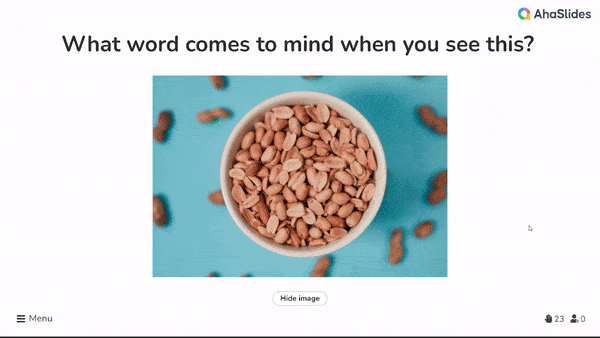
Here’s a simple word cloud image of a Vespa made up of text relating to scooters…
These types of word clouds certainly look great, but they’re not so clear when it comes to determining the popularity of the words within it. In this example, the word ‘motorbike’ appears as wildly different font sizes, so it’s impossible to know how many times it was submitted.
Because of this, word art word clouds are basically just that – art. If you want to create a cool, static image like this, there are several tools to choose from…
- Word Art – The prime tool for creating word clouds with images. It’s got the best selection of images to choose from (including an option to add your own), but is certainly not the easiest to use. There are dozens of settings to create a cloud but pretty much zero guidance in how to use the tool.
- Word Clouds – An easier-to-use tool with a staggering array of shapes to choose from. However, like Word Art, repeating words in different font sizes kind of defeats the whole point of a word cloud.
- Tagxedo – A nice tool to make great-looking static word art in a variety of fonts. Bear in mind that if you’re going with this option, you’ll have to download Silverlight first.
💡 Want to see the 7 best collaborative word cloud tools around? Check them out here!
#3 – Background Image
The final way in which you can use a word cloud with images is super simple.
Adding a background image to a word cloud may not feel like much, but having imagery and colour in any presentation or lesson is a sure fire way to get more engagement from those in front of you.
With AhaSlides, you can also create a PowerPoint word cloud, even a zoom word cloud, within a small number of steps! Many other collaborative word cloud tools let you choose a background image for your word cloud, but only the best give you these customisation options…
- Themes – Background images with decorations around the side and preset colours.
- Base colour – Choose primary colour for your background.
- Background visibility – How much of your background will show against the base colour.
Variety and novelty in English lessons encourage learners to be more engaged. On the contrary, monotonous tasks, no matter how useful they are, cause boredom. How to bring variety without too many changes in the process of learning vocabulary? Use word clouds.
Word clouds are a graphical representation of words and words combinations. They can be used for:
- vocabulary revision
- presenting lexis
- practicing new words
- student’s projects.
It is just a more visually appealing way to teach vocabulary. Instead of using lists, which students are probably fed up with, make clouds. You can utilize them for word searches, making monologues and dialogues, word games, writing tasks, etc.
Here are some examples of the tasks.
Task 1
Make a story about a detective investigating a case using all the words and tell your partner (the teacher).

Task 2
Work in pairs. Ask and answer five questions using the words.
Task 3
Give a definition of one of the words. Can your partner guess the word? Swap roles.
There are some services for creating word clouds:
Word Art
Wordle
Word clouds
I personally prefer to use Word art because it’s possible to create clouds containing collocations. As we know teaching collocations is more effective for learners. Other services just break the word pairs into single words.
Let’s see how to create word clouds using Word art. It’s quick and easy, no registration is required. So click ‘Create’ and make your cloud.
Step 1
Fill in the words or word combinations. You can type as many words as you need, even 30 or even 50. It’s possible to Capitalize letters, use the UPPER or lower case. Click ‘Options’ and opt for repetition of the words as you see in one of the pictures above or choose no repetition.

Step 2
Choose the shape of your cloud: animals, nature, people or some holidays themes. If you want to see the changes, click the red button ‘Visualize’.
For example, this charming ladybird will definitely catch kids’ interest.
 Step 3

Choose a font which you like. There are more than 50 fonts to select.
Step 4
Pick out a layout: horizontal, vertical, crossing words, dancing words, slopes and random. The layout will depend on the task and the learners. Teens prefer something less ordinal and more creative. For adults, I usually make more conservative things like a horizontal layout.
Step 5
Choose a style: colours of the words and the background. If you want to change a colour of the words, click ‘Words colours’ and ‘Custom’ and add more colours to the pallette.

Step 6
To apply all the changes, press ‘Print’ or ‘Download’ your cloud and enjoy it in your lessons.
#статьи
- 4 май 2021
-

15
Создаём простую и красивую инфографику из странички на «Википедии».

Кандидат философских наук, специалист по математическому моделированию. Пишет про Data Science, AI и программирование на Python.
В любой непонятной ситуации дата-сайентист визуализирует данные: это, среди прочего, облегчает поиск инсайтов и формулирование гипотез для проверки.
«Облако слов» — визуализация текстовых данных на стыке исследовательского анализа, инфографики и дата-дизайна. Это самый первый и быстрый взгляд на большие и слабо структурированные тексты: художественные, научные, информационные.
Главные причины использовать облако слов:
- Во-первых, это красиво — удачная визуализация украшает портфолио.
- Во-вторых, облако показывает самые популярные слова текста, что полезно для быстрой его оценки.
Например, для школьного сочинения или текста в разговорном стиле это могут оказаться слова-паразиты (от таких неплохо бы избавляться), а для научных или «инфостильных» текстов — слова, больше относящиеся к содержанию.
- В-третьих, сделать такую визуализацию совсем не сложно — и сейчас вы сами в этом убедитесь.
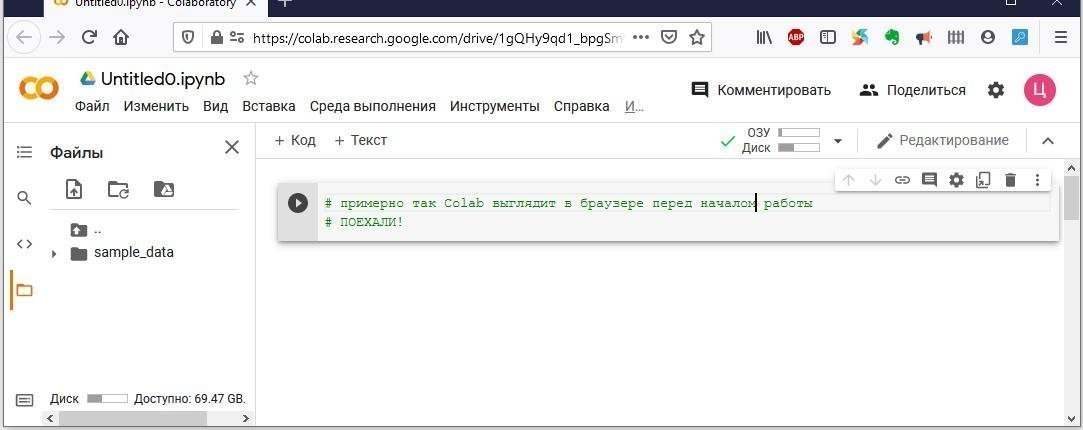
Мы будем работать в блокноте Google Colab — то есть прямо в браузере, код напишем на языке Python, а текст возьмём из «Википедии». Если что-то пойдёт не так — всегда можно свериться с нашим блокнотом: все ссылки есть в конце статьи.
Для начала работы в Colab достаточно войти в свой Gmail и запустить приветственный блокнот в браузере. Не помешает и прочитать пару наших статей: про Colab и про Python-минимум для дата-сайентиста.
После запуска колаба нужно установить библиотеку для работы с «Википедией» и библиотеку stop-words, в которой содержатся списки стоп-слов для анализа текстов на разных языках.
!pip install wikipedia
!pip install stop-words
Запустите каждую команду в отдельной кодовой ячейке: так проще отследить результат выполнения.
Сперва подготовим входной текст:
# Импортируем нужные библиотеки
import wikipedia
import re

# Выбираем язык Википедии и интересующую нас страницу
wikipedia.set_lang("ru")
wiki = wikipedia.page('Гарри Поттер')

# Извлекаем текст из полученной страницы
text = wiki.content

# Очищаем текст с помощью регулярных выражений
text = re.sub(r'==.*?==+', '', text) # удаляем лишние символы
text = text.replace('n', '') # удаляем знаки разделения на абзацы
Мы импортировали в проект только что установленную библиотеку wikipedia и библиотеку re для работы с регулярными выражениями. Затем указали язык «Википедии» и имя интересующей нас страницы (сохранили её в переменную wiki). Разумеется, вы можете взять любую другую страницу.

Текстовое содержимое страницы ушло в переменную text, после чего с помощью регулярных выражений мы удалили из него ненужные символы (знаки препинания, перевода абзацев, лишние разделители).
Теперь нам нужны библиотека и функция для визуализации текста. Библиотеку мы импортируем, а функцию напишем сами — она нам ещё пригодится.
# Импортируем библиотеку для визуализации
import matplotlib.pyplot as plt
%matplotlib inline

# Функция для визуализации облака слов
def plot_cloud(wordcloud):
    # Устанавливаем размер картинки
    plt.figure(figsize=(40, 30))
    # Показать изображение
    plt.imshow(wordcloud)
    # Без подписей на осях
    plt.axis("off")
Команда %matplotlib inline указывает, что графики будут отрисованы прямо в блокноте колаба, а не где-то в отдельном окне.
Что касается функции plot_cloud, то она принимает параметром облако слов (мы создадим его ниже), устанавливает размер картинки в дюймах и выводит её, а метод axis c аргументом «off» отключает подписи внизу и слева.
Всё почти готово, осталось главное.
# Импортируем инструменты для облака слов и списки стоп-слов
from wordcloud import WordCloud
from stop_words import get_stop_words

# Записываем в переменную стоп-слова русского языка
STOPWORDS_RU = get_stop_words('russian')

# Генерируем облако слов
wordcloud = WordCloud(width = 2000,
                      height = 1500,
                      random_state=1,
                      background_color='black',
                      margin=20,
                      colormap='Pastel1',
                      collocations=False,
                      stopwords = STOPWORDS_RU).generate(text)

# Рисуем картинку
plot_cloud(wordcloud)
Вы можете добавить свои стоп-слова в переменную STOPWORDS_RU с помощью метода .add (‘новое стоп-слово’).
Параметр random_state=1 — если не указать, то при каждом запуске функции облако слов будет отличаться от предыдущего.
Параметр collocations определяет, включать ли в итоговую картинку сочетания из двух слов (так называемые биграммы). У нас он отключён, поэтому фраз в облаке не будет.
Сохраним получившуюся картинку в файл:
wordcloud.to_file('hp_cloud_simple.png')
Её можно будет найти в меню «Файлы» слева и скачать.
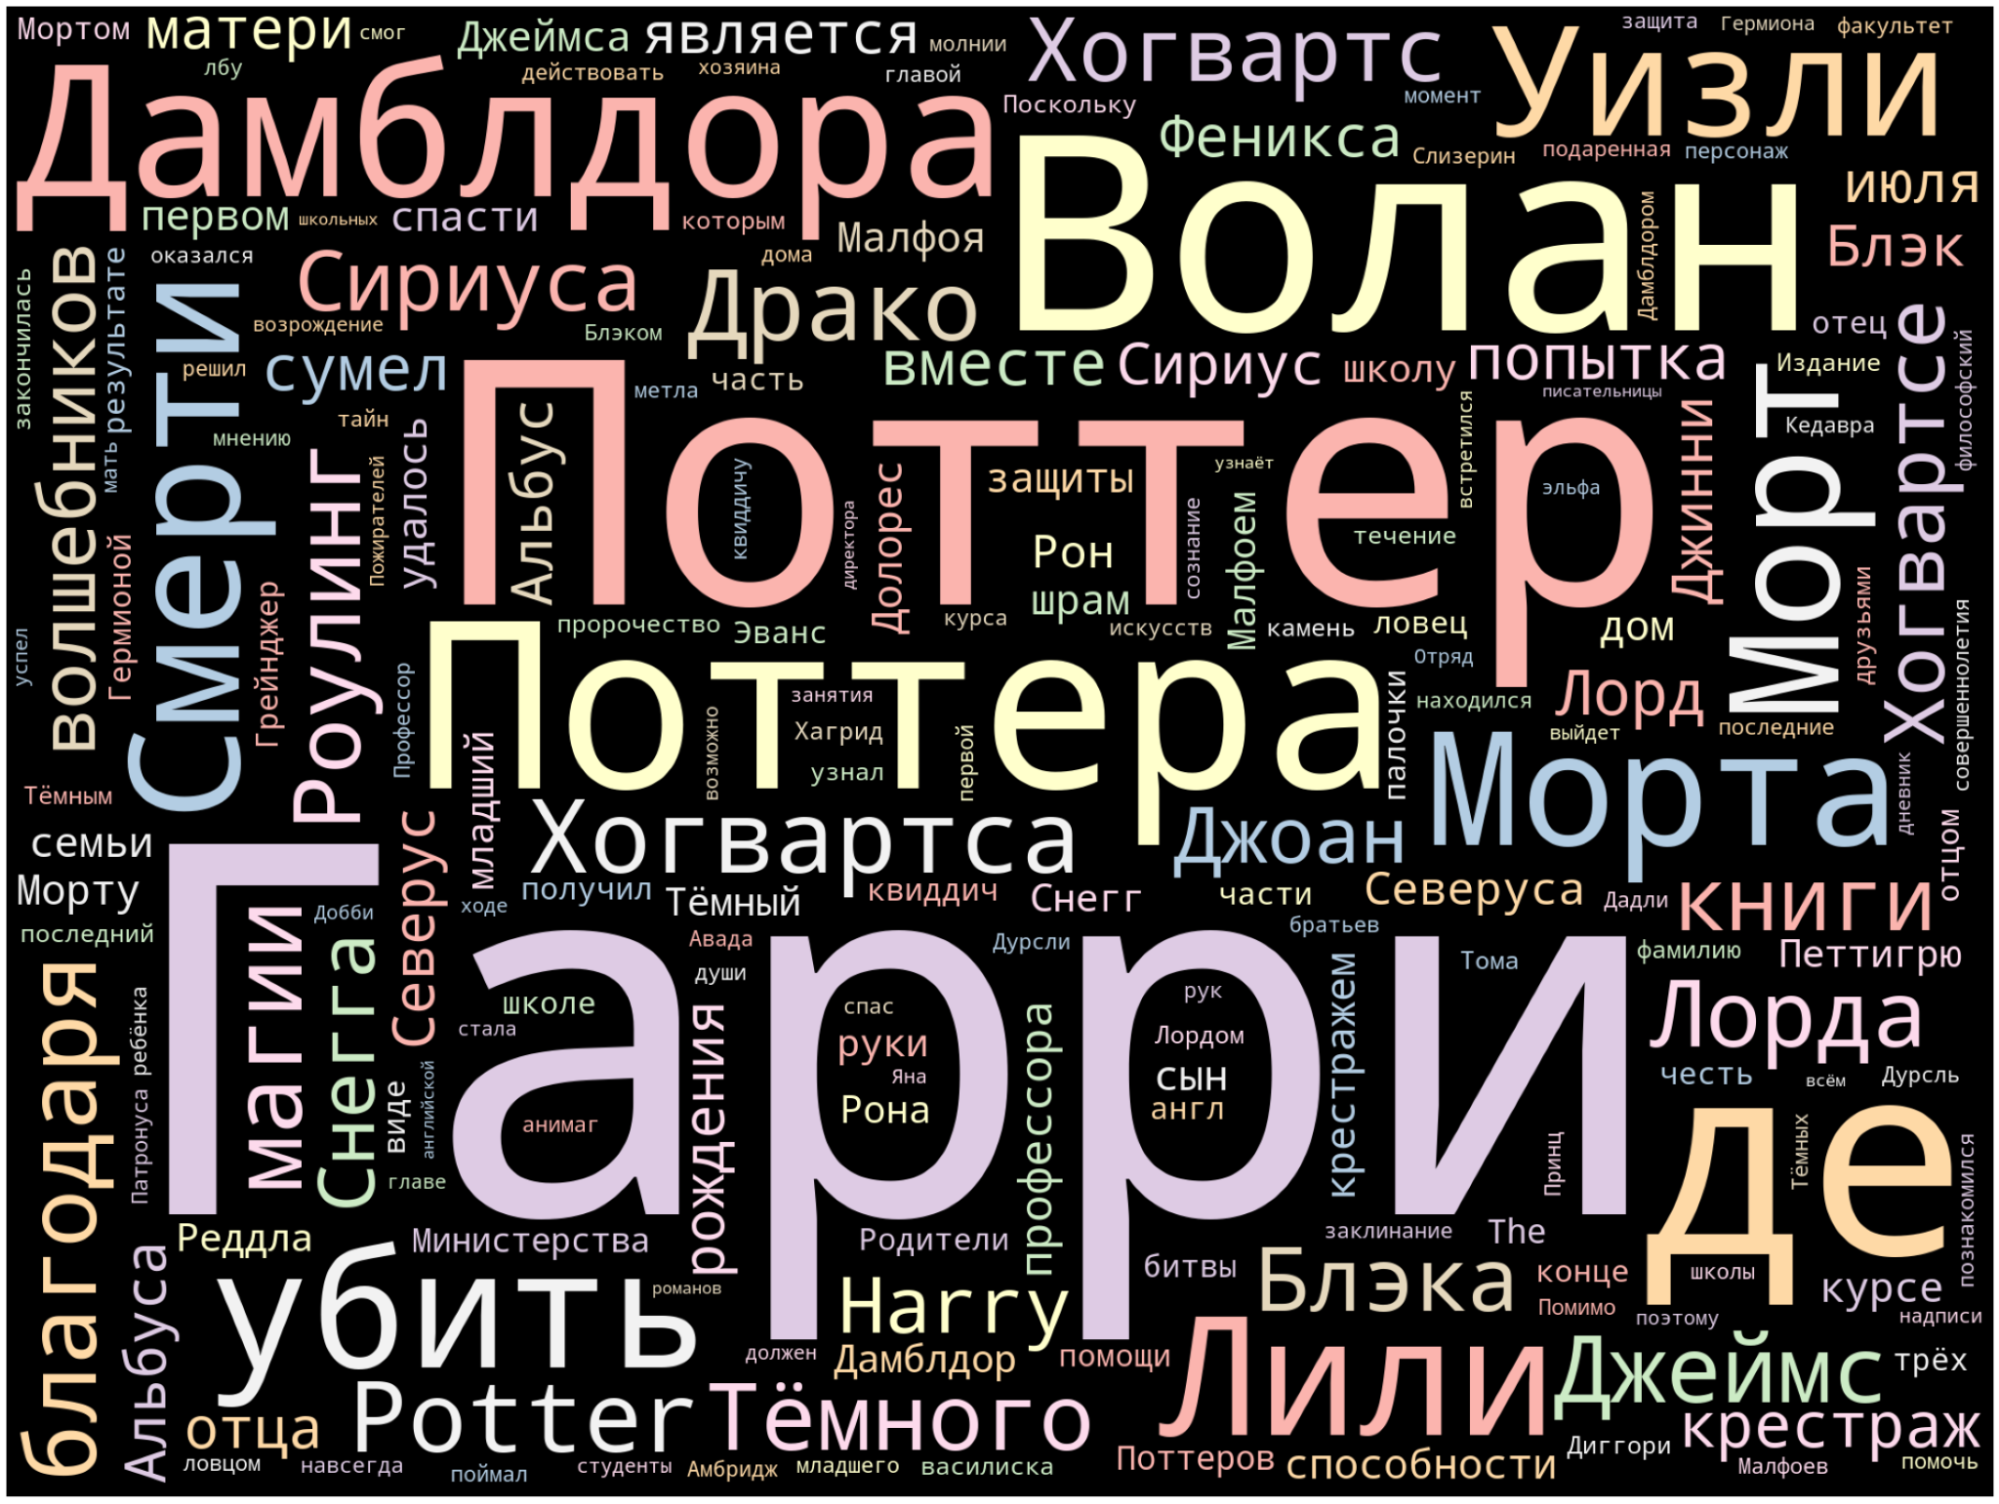
Чтобы сделать облако более замысловатой формы, чем прямоугольник, нам понадобится картинка. Она должна быть достаточно контрастной, лучше всего чёрно-белой, и без мелких деталей.
Я скачал картинку под названием upvote.png отсюда. Вы можете поступить так же. После этого перетащите её в список файлов и папок в левой части блокнота.
# Импортируем необходимое
import numpy as np
from PIL import Image

# Превращаем картинку в маску
mask = np.array(Image.open('/content/upvote.png'))

# Генерируем облако слов
wordcloud = WordCloud(width = 2000,
                      height = 1500,
                      random_state=1,
                      background_color='white',
                      colormap='Set2',
                      collocations=False,
                      stopwords = STOPWORDS_RU,
                      mask=mask).generate(text)

# Выводим его на экран
plot_cloud(wordcloud)
Импортировали библиотеку NumPy и нужную нам функцию Image из библиотеки PIL (Python Imaging Library). С их помощью мы считаем картинку из файла и превратим её в маску (переменная mask), по которой и будет отрисовываться облако слов.
Обратите внимание, что mask появилась и в параметрах функции WordCloud ().
Вот что у нас вышло на этот раз:
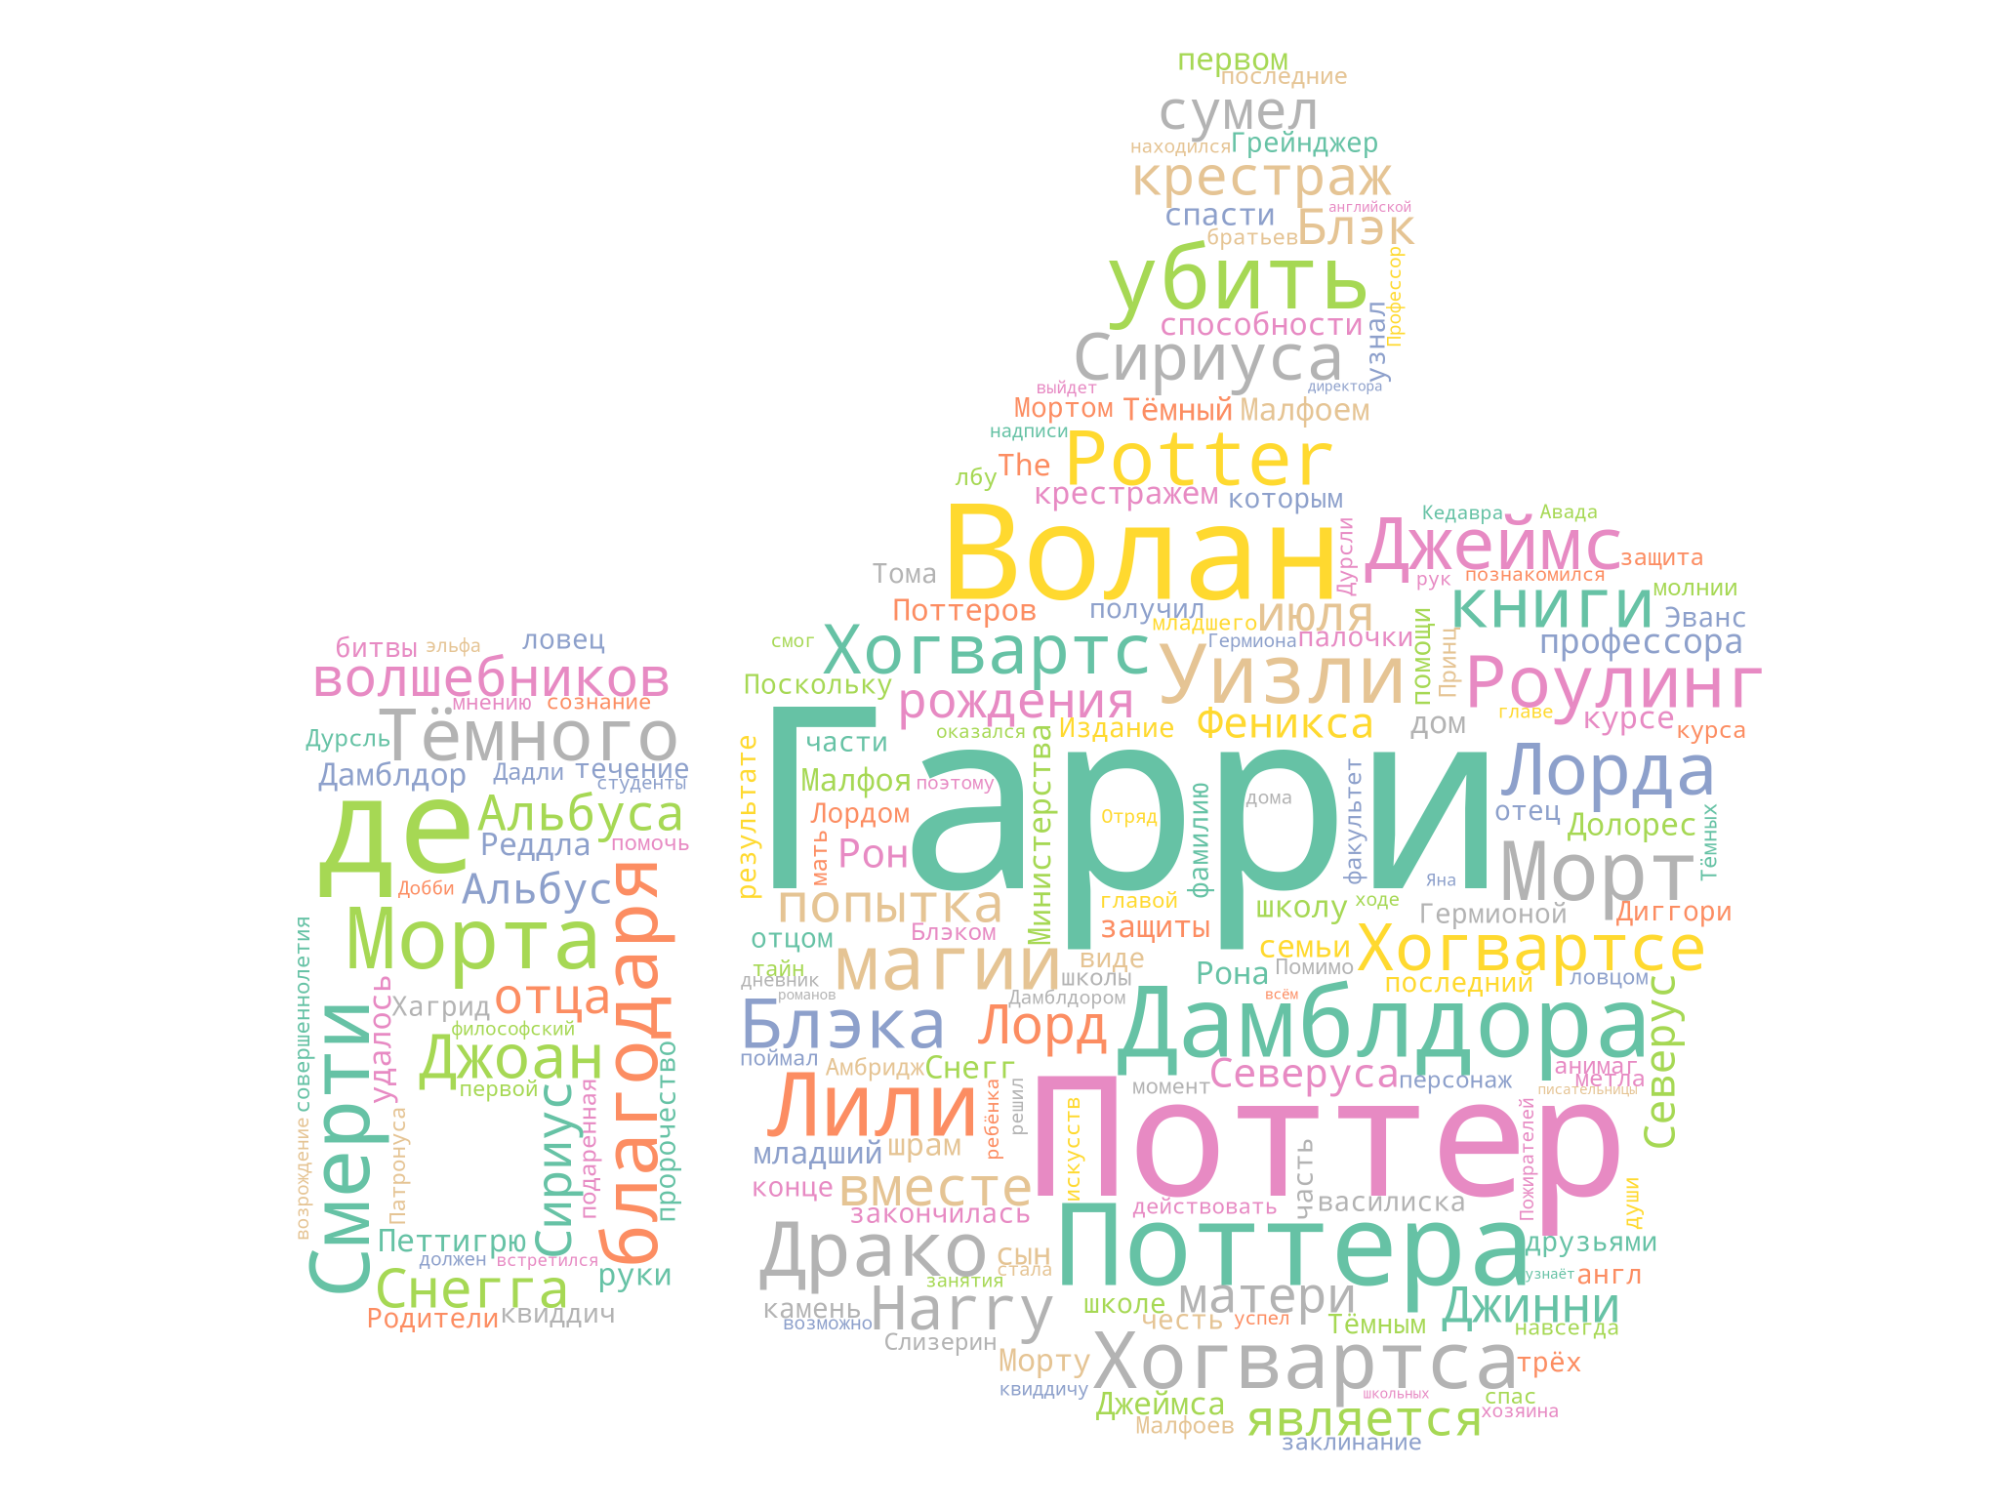
Ссылка на наш ноутбук здесь. Скопируйте его на свой Google-диск через пункт меню «Файл» и начинайте экспериментировать: поиграйтесь с размерами и форматами картинки-маски и самого облака; выясните, как на него влияют параметры random_state, colormap и collocations.
Опирайтесь на документацию библиотеки, и да пребудут с вами Сила Питона и Дух Данных!
На курсе «Профессия Data Scientist» учат делать гораздо более продвинутые визуализации и обрабатывать самые запутанные данные. Опытные преподаватели и заряженные единомышленники ждут вас.

Научитесь: Профессия Data Scientist
Узнать больше