


Creating a word cloud in Google Docs is a creative way to visualize the text you’re working on. It allows you to see what words are being used the most, so you can get a quick sense of your themes emerging in your writing.
- In a Google Doc, navigate to the top your screen. Click Add-ons > Get add-ons.
- Search for Word Cloud Generator.
- Once you find it, click on the “+ Free” button to install the add-on. You’ll get a notification in Google Docs that Word Cloud Generator has been added to your add-ons menu.
- To create your word cloud, click on Add-ons > Word Cloud Generator > Create Word Cloud.
- The word cloud will form on the right side of your page, and it’ll be based on the words that are most commonly used in your document. The larger words indicate that they’re used more frequently. If you click on Append top word counts, it’ll create a table in your document that lists how many times each of your top words appears in your document.
Click here to watch this video on YouTube.
Categories
Sign up for our newsletter
Word cloud visualizations can be used to highlight popular values or show the frequency of text data using font size and color.
Word cloud charts require exactly one dimension and one measure. More dimensions or measures prevent the visualization from rendering.
To create a word cloud visualization, click the ellipsis (…) in the Visualization bar and choose Word Cloud. Click the gear in the upper right corner of the visualization tab to format your visualization.
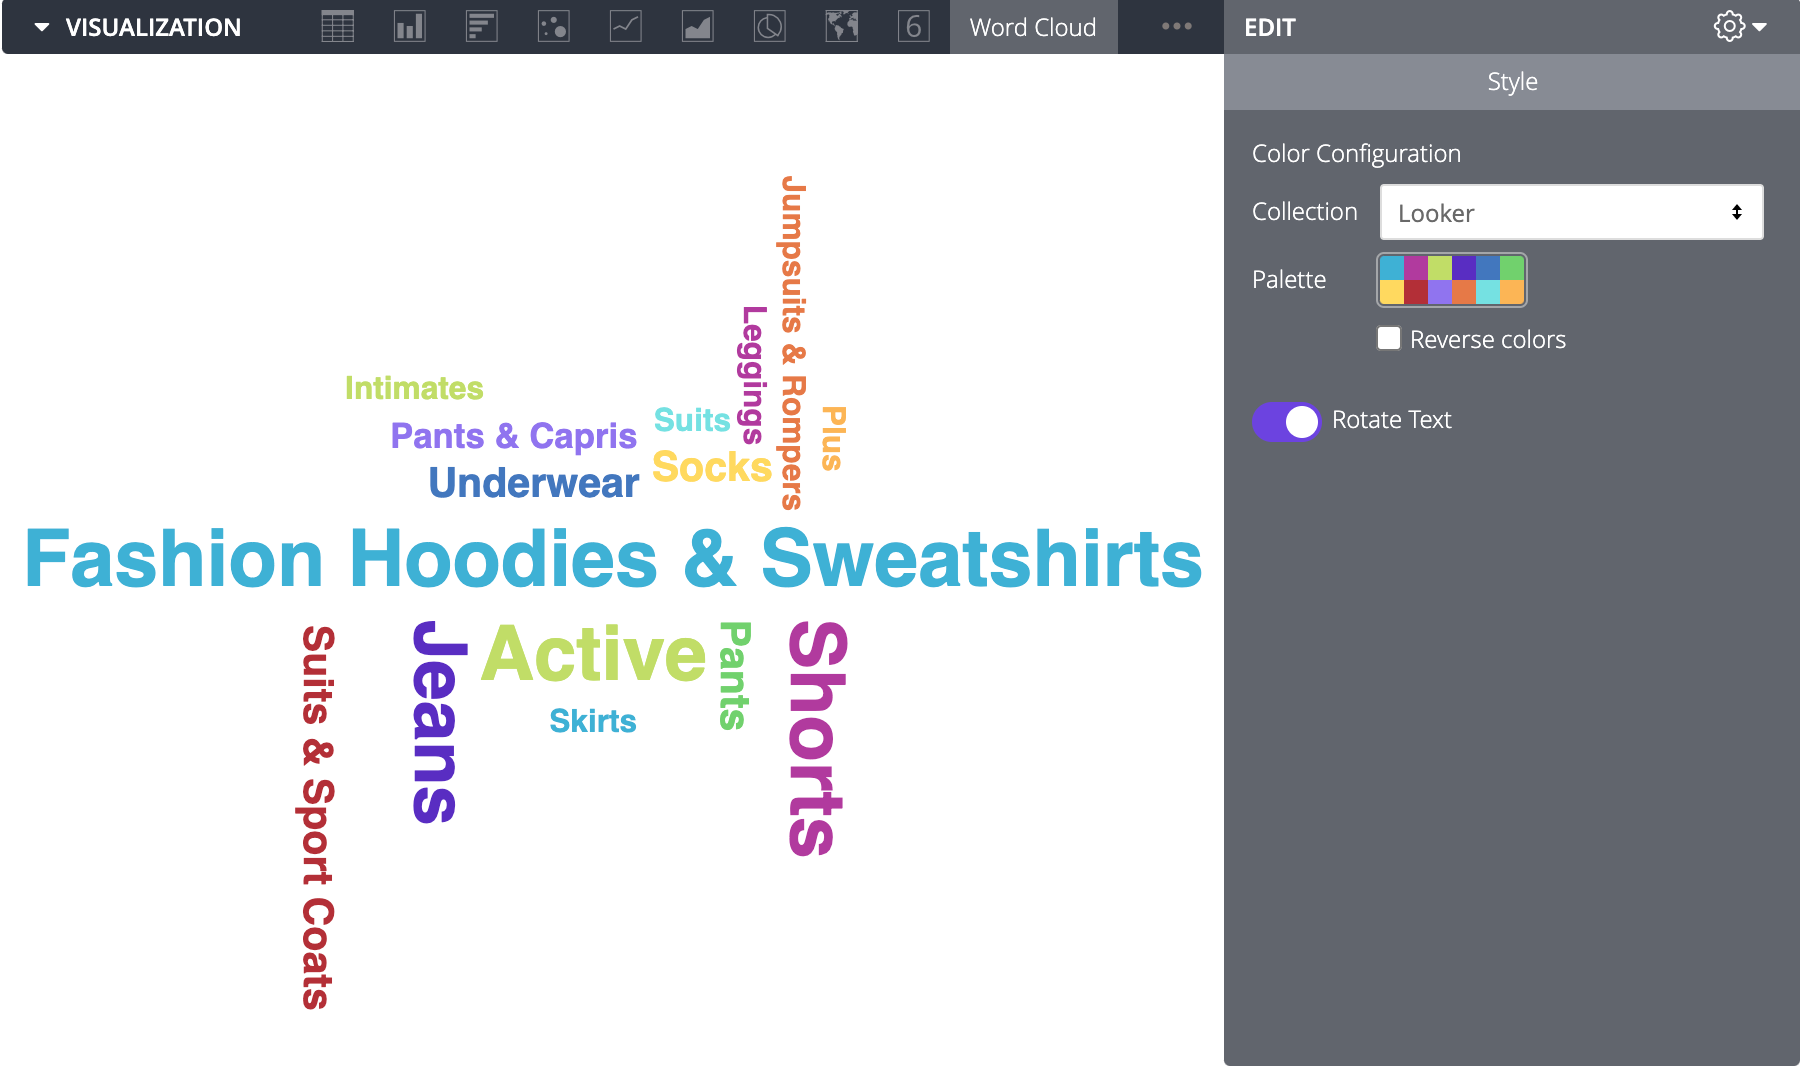
This example shows the popularity of clothing categories based on the amount of clothing sold in each category, using the Category dimension and the Order Count measure from the Order Items Explore:
The Fashion Hoodies & Sweatshirts category is the most popular value; it is assigned the first color in the palette and displays with a larger font size than the other values in the chart. The Shorts and Active categories are the second and third most popular categories; they take on the second and third colors in the palette and display with larger font sizes than less popular values.

Colors
You can define the color palette for a chart in the Color Configuration section.
Collection
A collection lets you create themed visualizations and dashboards that look good together. All of Looker’s built-in color collections appear on the Color collections documentation page. Your Looker admin may also create a custom color collection for your organization.
You can choose a color collection from the Collection drop-down menu. The Palette section will update with a palette from your chosen color collection.
Palette
Once you’ve selected a color collection, you can choose a different palette from the collection, or customize your palette, by clicking the color palette itself. This opens the palette picker and displays all of the palettes from the collection.
Colors are assigned to each series in order. For a categorical palette, the first color in the palette is assigned to the first series, and so on. For a sequential or diverging palette, the color at the left end of the palette is assigned to the first series and the colors for each remaining series move to the right on the palette. If your query returns more data series than colors listed, the colors repeat from the beginning of the palette, first as a lighter version of each color, then as a darker version of each color.
Creating a custom color palette
To create a custom color palette, select the Custom tab on the palette picker. You can edit your palette in several ways:
- Click on one of the colors present to edit it.
- Click the + or — buttons below the color palette to add a color to the end of the palette or remove a selected color.
- Click EDIT ALL at the bottom right of the menu to use a comma-separated list of color values.
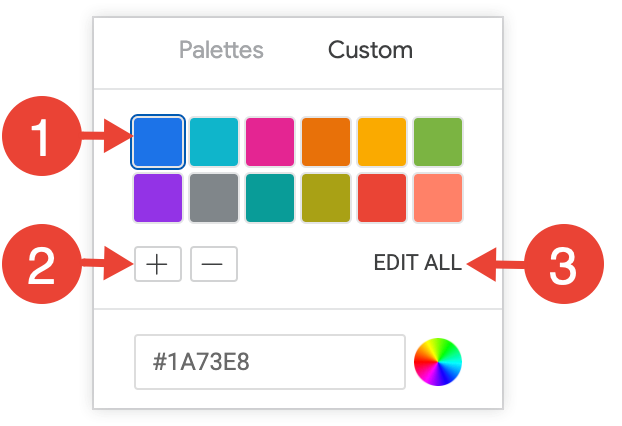
To change a selected color, or edit all colors at once, input hex strings, such as #2ca6cd, or CSS color names, such as mediumblue, into the color value box at the bottom of the picker.
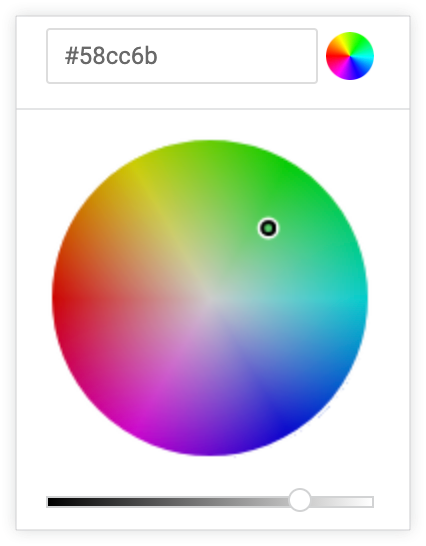
To bring up a color picker to select a color, click the color wheel to the right of the color value box. The corresponding hex value for that color appears in the color value box:
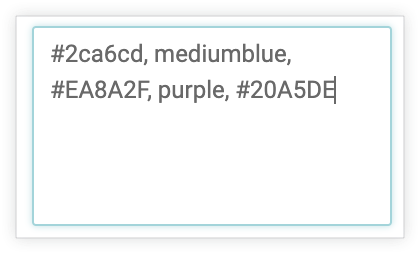
If you click EDIT ALL, the color value box populates with the hex codes of the color palette you’ve chosen or customized. Copying and pasting this list is the best way to copy custom color palettes from one chart to another.
Reverse colors
You can reverse the colors used on a palette. For a categorical palette, this applies the last color in the palette to the first series, the second-to-last color in the palette to the second series, and so on. For a sequential or diverging palette, this applies the color at the right end of the palette to the first series and move left on the palette for the remaining series.
Rotate Text
By default, the words in a word cloud visualization display both horizontally and vertically (see the introductory section for an example). To display all text horizontally, disable the Rotate Text option in the Style menu for the visualization.
Word cloud, also known as text clouds or tag clouds. They are generally used to visualise text data, such as product reviews, comments, tweets, news articles and many more!
So if you’re interested in building a word cloud using a free data visualisation tool like Google Data Studio, you are in the right place!
What is Wordcloud ?
Word cloud is a collection of words displayed in different sizes and weights. Usually the bigger and the bolder the word appears, the more frequently the text is being mentioned in the text data; hence the more important the subject is.
From a business perspective, word cloud can be useful in:
- Visualising and understanding customers review or feedback
- Identifying new keywords to target in your blog articles to rank higher in search engines
- Share fun facts in a visually appealing way
There are other interesting applications using wordclouds technology, see below example.

Creative Wordcloud Presented by My Poetic Side

Wordcloud that shows common keywords that bring in traffic to my website: www.danalyser.com.
Wordcloud in Google Data Studio
As of the day this article was written, there’s no native chart that supports wordcloud visualisation in Data Studio. Hence, I am going to introduce you to two community visualisation components that you could use to create a word cloud without no/less coding required:
- Simple Word Cloud, and
- Vega / Vega Lite.
Community Visualisation in Looker Studio
Community visualisation, also known as partner visualisation in GDS. These are the visualisation add-ons developed by third party vendors or the volunteers.While some of the visualisations are being reviewed by Google, you should always add visualisations from trusted providers, especially if you are dealing with sensitive data.
How to Use a Wordcloud Community Visualisation Add-Ons in GDS
Check out the full video tutorial below to learn how to add a beautiful and interactive wordcloud in Data Studio Dashboards!
Option 1: Simple Word Cloud by Meliorum
Step 1: Set Up Data Studio Report
So first of all, you’ll need to create a new data studio report if you don’t have one yet. Then import a dataset of your choice or download the sample dataset I found online. This dataset contains Amazon UK Shoes reviews and some of the product information, it’ll be used as the data source in this tutorial.
If you are new to Data Studio and not sure how to get started in Data Studio, check out my Complete Data Studio Course which I have covered how to import a Google Sheets dataset and build an interactive and branded report from start to finish, so be sure to watch that video first!
Step 2: Enable Community Visualisation Access
Once we have created the data source, you’ll have to turn on the community visualisation access to your data source(s), in other words, installing the visualisation add-on, otherwise you can’t insert any word cloud charts that we are going to use today. To enable access, go to Resources > Managed Added Data Source and make sure the Community Visualisation Access is turned on here. Then, close the window.
Step 3: Import & Use Wordcloud Add-On
Now we are ready to import our first word cloud add-on: Simple Word Cloud, which is built by Meliorum.

Figure: Wordcloud generated by Meliorum in Looker Studio
Before we import, it’s worth noting that this component is still under development and it is not yet reviewed by Google, so install at your own risk. The other downside of using this add-on is that it’s a little buggy so it might not be the best choice if you want to add it to a production report.
Now I’m going to guide you on how to search and import this visualisation add-on into your data studio report.
First, you’ll need to click on one of the menus in the toolbar, the icon has a combination of four different shapes, so it should be easy to spot it. Otherwise, you can hover on the icons and look for “Community Visualisations and Components”. Once you have found it, you’ll have to click “Explore More” at the bottom of the window. Here you’ll see all the available add-ons for Data Studio..
If you want to use Simple Word Cloud, simply click on “Build your own visualisation”, then enter the manifest path: gs://meliorum-visualisations/wordcloud/
You can copy and paste it to your report. Next, we are going to click submit and allow access to add the component.
After we installed the add-on, we can now add a word cloud to our report using Simple Word Cloud by clicking on the report canvas to add the chart.
Moving on, we’ll want to define a text field to generate the word cloud, which is review_text. As for the size and weight of the wordings, it’s computed based on the metric field. So based on your use case, you’ll want to define the metric field as well. For our example, we are going to use record count as the metric.
Now we have a word cloud generated just from a few clicks thanks to the visualisation developed by Melorium.
However, I do notice there’s a bug here when I am trying to interact with the filter. For instance, whenever I filter the report or changing the colour or styling of the wordclouds, it would create a duplicated chart under the previous word cloud (which you have to scroll down in order to see the updated wordcloud), instead of replacing the existing one, which could be quite confused to the users and report editors.
Option 2: Wordcloud by Vega / Vega Lite
Personally I would prefer to generate word clouds using a slightly more advanced component called Vega / Vega Lite, especially if you would like to build an interactive report. It’s built by Jeremy Chen and has successfully passed the review by Google Data Studio team. This component is very interesting as not only it supports word cloud, it also offers other different charts like Sunburst, Heatmap, Calendar View, Tree layout and many more beautiful charts.

Figure: Word cloud generated using Looker Studio
So now, to import this component, it is very similar to how we did it for Simple Word Cloud earlier, except that now we do not need the manifest path since it has already been reviewed and approved.
Remember to follow step 1 and step 2 above to use this component in your Data Studio report if you have not used any community visualisation add-on in your dashboard.
Step 3: Import & Use Wordcloud Add-On
To install this add-on, you need to go to the Community Visualisation menu on top and click Explore more. From there, scroll down and look for Vega/Vega Lite (for simplicity I’m gonna call it Vega from now onwards). Select the component and click Allow, then it’ll be added to the report.
Now, click on the canvas to add the word cloud.
Once you add the chart, you’ll notice some random data being selected, so make sure you drag the correct text field to the Dimension field.
If you follow our example (using the Amazon Shoes Review dataset): As the seller, we want to know what the customer talked about the most in their reviews to understand their preference as well as their pain points. Therefore, we’ll choose the “review_text” column as the dimension. Then, for the metrics, we can add the record count, this will make sure we count the individual word correctly.
After we have defined what data goes into the wordcloud, you notice we have a beautiful word cloud generated. You can resize the chart if the text is too small, the words would adjust accordingly based on the size of the chart.
Step 4: Customising Vega Wordcloud
But it’s not quite what we want. You may notice the text is super long and the individual words are kinda repetitive. For example, from the word cloud we can see there are multiple reviews mentioned that the shoe is hard. But it’s being scattered around and it’s really difficult to get insights from there, hence it really defeats the purpose of a word cloud.
So what we could do here is to process the text and break them into individual words, and then count the frequency of each term. To do that, we’ll need to customise the Javascript code that helped us generate this wordcloud using Vega. In Vegga, we can do data transformation that helps us separate the text into individual words using a Transform function called CountPattern. I won’t go into detail how it works, but if you go to Style, you’ll see a chunk of code that helps us create wordcloud. Basically, the idea is modifying this code to help us achieve a better outcome for text representation of the review comments.
Disclaimer: I am not very familiar with coding in Javascript, but I managed to get it done after a few attempts and I am so excited to share this solution with you all because I don’t see people sharing this solution publicly and I can foresee many people are struggling with this as the documentation provided by Vega isn’t very clear on how to use it in Data Studio. Besides, when I’m doing research about word clouds in a data studio, I don’t find many articles or resources online as well.
So what you need to do is to copy the chunk of code below. Then go to STYLE tab and paste the code under Configuration spec.
Note: If you want to add a second chart, unfortunately we can’t use the usual shortcuts Cmd + C and V to copy-paste the chart when using this add-on. Alternatively, you can go to the community viz menu again and under the added report resources, you’ll see the new component being added here. Just select Vega and click on the canvas again to add the word cloud.
Visualize audience feedback with a live word cloud in Google Slides

Word clouds are one of Poll Everywhere’s most versatile tools. I’m always discovering creative uses for them.
A recent favorite comes from a teacher who uses word clouds to help her students analyze personality traits. She creates a word cloud with someone’s name as the title, then asks each student to submit five words they’d use to describe that person’s personality.
I gave this a shot using everyone’s favorite Star Wars rogue with a heart of gold, Han Solo. I presented this poll to the office and collected everyone’s responses online.
The size of each word in the cloud is based on how many duplicate entries it received. As you can see, rogue and scoundrel received the most entries – no surprises there – making them the largest words in the cloud.
In this post, I cover two ways you can use Poll Everywhere’s word cloud generator with Google Docs and Google Slides. Whether you’re creating a word cloud manually, or collaborating on one with your audience, the creative possibilities are boundless. Here are just a few:
How to create a word cloud from any text
Creating a word cloud using text from Google Docs is a snap with Poll Everywhere.
Say you’re writing an essay or preparing a presentation and you want a quick snapshot of frequently used words. Pop over to Poll Everywhere, create a new word cloud, and paste in your text.
Poll Everywhere automatically creates a word cloud from the text you provided. This shows you which words you’re using most often. Once you have your word cloud, you can tweak its visual settings to give it an extra splash of color, or save it as a screenshot to embed back in Google Docs or elsewhere.
Here’s a step-by-step breakdown of creating a word cloud from a Google Doc:
1. Go to My Polls, select ‘Create’, and ‘Word cloud’
2. Hit ‘Create’ and navigate to the ‘Test’ tab on the next screen
3. Activate your poll, then copy and paste your text into the text box
4. Click ‘Submit’ and Poll Everywhere handles the rest

Collaborate on word clouds with your audience in Google Slides
The real magic of a Poll Everywhere word cloud happens with a live audience. Instead of manually adding words to your cloud, you can collaborate on one together with your audience in real time.
Poll Everywhere for Google Slides lets you create and present word clouds directly within your presentation. People respond online using their phones or other web-enabled devices, and the results appear live for all to see.
Seeing each word in the cloud grow and shrink as the responses pour in is a real treat. It’s interesting to map how popular opinion changes as new words appear in the cloud. Presenters and educators across the globe have used live audience word clouds in all sorts of interesting ways – from icebreakers to election feedback.
Here are some choice examples I’ve recreated from the Poll Everywhere community:
If you want to try your hand at making word clouds using Poll Everywhere, I suggest starting with a free account.
There’s no limit to the number of word clouds you can create, and all the visual setting options are available right out of the gate. However, there is one key restriction to consider on a free account: responses. Free educator accounts are limited to 40 responses per question (25 per question for free business accounts). That means if you’re presenting your word cloud to a live class, only the first 40 entries will appear.
Tip: Make the most of your responses by limiting the number of times each person can respond to one. This prevents any overzealous audiences members from using up all the responses.

Poll Everywhere
The hybrid work solution that enables audience engagement through live, inclusive conversations across organizations. Whether it’s remote meetings, in-person events, or hybrid workspaces, Poll Everywhere gives your audience a voice and delivers authentic feedback at scale.

on
January 24, 2018, 10:13 AM PST
How to generate a Word Cloud image in Google Docs
A picture can be worth a thousand words, but with Word Cloud, one hundred words may suffice. Learn how to use this tool and portray your company’s mission statement in one image.
We may be compensated by vendors who appear on this page through methods such as affiliate links or sponsored partnerships. This may influence how and where their products appear on our site, but vendors cannot pay to influence the content of our reviews. For more info, visit our Terms of Use page.

You’ve seen them everywhere. Word Clouds. They make for very interesting copy images that do a great job of telegraphing, in a single picture, any number of ideas that could help promote your business or product. These word clouds are great, but if you’re trying to create them in an image editor such as Photoshop or GIMP, they can be very cumbersome to work with. If you happen to be a Google Docs user, there’s a handy add-on that makes creating these clouds incredibly easy. The add-on is called Word Cloud Generator and is free to use within Google Docs.
Let’s install Word Cloud Generator and see how it’s used.
Installation
To install this add-on, open a Google Document (it can be empty) and click Add-ons | get add-ons. In the resulting window, search for Word Cloud Generator and then click the FREE button. You will be prompted to select the Google account to use for the add-on, and then give the add-on the necessary permissions it needs to function. Once the installation completes, refresh the document page, and you’re ready to go.
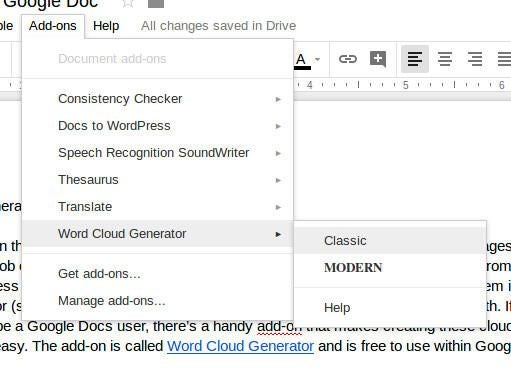
Usage
Using Word Cloud Generator is simple. Open a Google doc that contains a list of the words you want to use in the word cloud, such as your company mission statement. From within that document, click Add-ons | Word Cloud Generator, and then select either the Classic or Modern font (Figure A).
Figure A
The word cloud will be generated and appear in the right sidebar (Figure B).
Figure B

If you click Advanced Options, you can then define such options as number of words, words to remove, and color palette. You can also click either the Append Large or Append Small buttons to add the word cloud image the current working document. Once you have the word cloud to your liking, click the download button, name the file (the default is chart.png), and save it. Your new word cloud image is ready to use (Figure C).
Figure C

Once you have your word cloud, you can add it to your promo copy to help get your company ideals or messages across with an effective image.
Pictures of words
They say a picture is worth a thousand words. But when that image consists of a hundred or so words, the graphic can be even more effective. If you’re looking for an incredibly easy way to create these words clouds and you’re a Google Docs user, you cannot go wrong with Word Cloud Generator.
Also See
-
How to install Nextcloud Talk for private communication on your cloud server
(TechRepublic) -
How to re-enable quick access to Google Photos in Google Drive
(TechRepublic) -
How to integrate Google Keep with Google Docs
(TechRepublic) -
How to gain access to your Google Drive files from Linux
(TechRepublic Video) -
Google Drive: Tips and tricks for business professionals
(TechPro Research)
-
Cloud
-
Google

Introduction
Displaying information containing text data has always been a challenge, but that can be beaten by word clouds – a favorite to visualize textual data for years as its an all-in-one viz. A word cloud (or tag cloud) is a visual representation of text data, it contains metadata about a text field like the frequency of a word; the more frequently a word appears in the data, the larger it is going to be displayed in a word cloud. They are simple, visually aesthetic, fun to use and communicate results very conveniently to users.
Community Visualization in Looker Studio
This awesome viz is available in Looker Studio and this visualization was created using the newly introduced custom visualization feature in Looker Studio. More details of it can be found here.
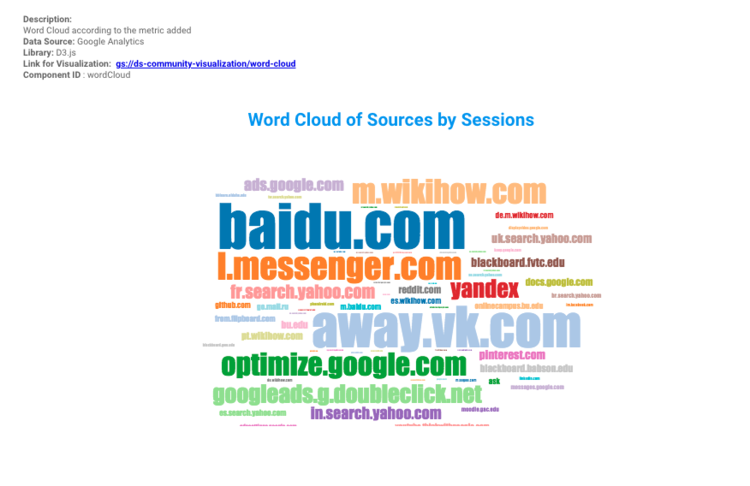
Using the same feature a word cloud was created of popular sources by sessions using the Google Merchandise Store Data. It is built on d3.js getting the top 250 popular sources that can be explored in the word cloud in this report.
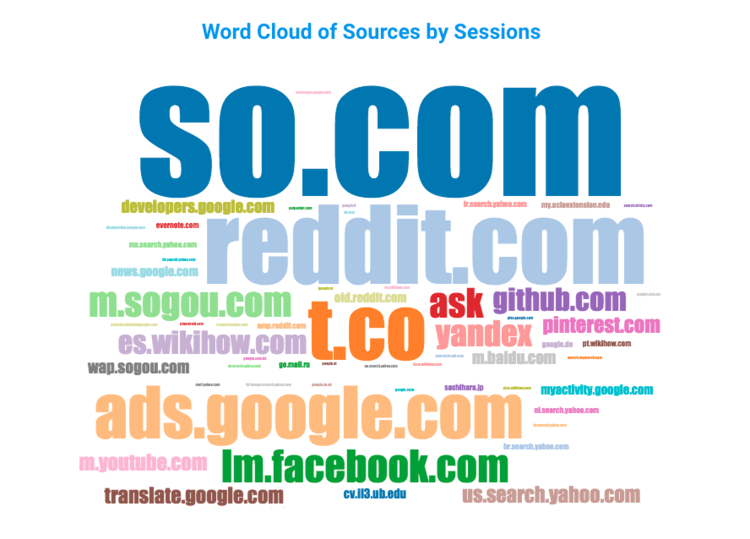
Data Requirement: This graph takes a dimension preferably text which contains text and a metric to measure the frequency of the dimension.
Try It Out!
You can add this word cloud in your own Looker Studio Report and play with it, to do that here is a step-by-step guide:
- Step #1 – Make a new Blank Looker Studio Report
- Step #2 – Add your Data Source to it
- Step #3 – Enable Owners Credentials and the Community Visualization Access
- Step #4 – Add a Community Visualization Chart and add the link and Component ID wordCloud
- Step #5 – Add your desired text dimension and metric that you want to do the analysis for.
- Step #6 – Here you go! Your own word cloud is ready!

Why Word Clouds?
Word clouds are very easy to understand and informative, trends and patterns in the data can easily be identified just by looking at prominent words in the word cloud. For instance; the sentiment analysis of product reviews, can easily find out if customers were happy or unsatisfied with a product just by checking if the highlighted words in word cloud represents a negative or positive sentiment.
Things to keep in mind
Word clouds can be fun and informative but they still need a lot of work to provide the right results. The most important step before using any data to communicate results is to clean up that data. Same is the case for using textual data before using it in the word cloud. Applying a number of Text Mining techniques to clean up the clutter, can make word clouds more informative.
Removing Stop Words
There may be words in the data which appear frequently but carry no meaning or information on their own, such words are known as Stop Words. Some of the common stop words can be: the, is, are, at, you, etc. These words are usually a part of the common list of stop words in most of the NLP libraries. However, a personalized list of stop words can be made to include words that have no value in a specific scenario, but may be important for others.
Stemming
Stemming is a popular NLP technique that involves removing the end of words to get only the root of the words. This can be really helpful to declutter the text mining data when one single word is being frequently used in different ways. For example, a popular list of words may contain lag, lagged and lagging. Using a stemming algorithm on such words will reduce them to lag and sum up their frequencies. This will give more accurate information and will make room for more highlighted words in the data.