
Создаем облако слов в Python
Облако слов в Python представляет собой визуализированный набор слов с наибольшей частотой использования в тексте или базе данных. Чем чаще встречается слово в источнике, тем большим размером шрифта оно написано в облаке слов. Таким образом, благодаря визуальным эффектам, читатель с первого взгляда на, казалось бы, мило перемешанную кашу из слов, способен сформировать общее представление о сути текста или содержимого базы данных. Выходит, эта «каша» — весьма полезное блюдо для анализа данных, поэтому самое время взглянуть на рецепт приготовления и сформировать облако слов в Python!
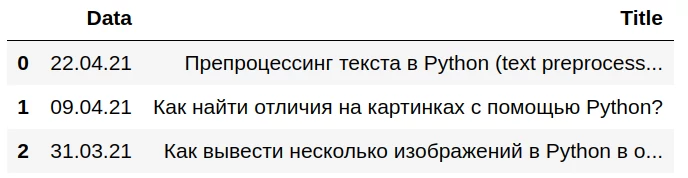
В качестве примера мы рассмотрим датасет с информацией о статьях текущего сайта. Сформируем облако слов в Python на основе текстовой информации из колонки «Title». Действовать будем поэтапно:
- Сначала мы загрузим датасет
- После этого познакомимся с основным принципом создания облака слов и сформируем стандартное прямоугольное облако на неочищенных данных.
- Затем, используя функции препроцессинга текста, преобразуем наши данные и выведем прямоугольное облако на подготовленных данных.
- И в заключение, сформируем облако слов в виде фигуры, загруженной в качестве маски из jpg-изображения. В нашем случае это будет фигура самолета.
Итак, открываем редактор, потому как пришло время покодить!
1. Загружаем датасет
Скачать файл с данными можно по ссылке: «articles.csv». Для загрузки датасета нам необходимо импортировать библиотеку pandas, после чего можно загружать данные из файла в переменную data с помощью функции open(). Так как у меня датасет находится в одной папке со скриптом, то относительный путь, передаваемый в качестве аргумента функции open(), совпадает с названием файла:
import pandas as pd
import matplotlib.pyplot as plt

data = pd.read_csv("articles.csv")
data.head()
Отлично, данные загружены, можно приступать к созданию облака слов!
2. Создаем первое облако слов в Python — знакомимся с основным принципом на сырых данных:
Сейчас мы намеренно пропустим процесс подготовки данных, чтобы посмотреть, какое облако слов сформируется из сырого текста. Единственное, что нам потребуется сделать — это объединить данные из колонки «Title» в один текст. Это легко сделать с помощью функции «join» — добавленная строка выделена подсветкой:
import pandas as pd

# Считываем содержимое файла в переменную data
data = pd.read_csv("articles.csv")
data.head()

# Объединяем данные из колонки 'Title'
text = ' '.join(data['Title'])
А теперь загрузим класс WordCloud из библиотеки wordcloud и сгенерируем облако слов с помощью функции generate(). В качестве аргумента функции generate() передадим наш текст. После этого выведем сгенерированное облако с помощью библиотеки matplotlib. Добавленные на этом этапе строки выделены в коде подсветкой:
import pandas as pd
import matplotlib.pyplot as plt
# загружаем класс WordCloud из библиотеки wordcloud
from wordcloud import WordCloud

data = pd.read_csv("articles.csv")
text = ' '.join(data['Title'])

# Генерируем облако слов и сохраняем в переменной cloud
cloud = WordCloud().generate(text)
# Выводим облако слов на экран
plt.imshow(cloud)
# Отключаем отображение осей
plt.axis('off')
В результате исполнения кода, получим:

3. Осуществляем предобработку текста
3.1. Удаляем стоп-слова
На первый взгляд, получилось довольно приятное облако. Однако, после второго взгляда хочется воскликнуть: «Обманули! Подменили!..» и так далее. Ведь мы на самом деле ожидали, что крупным шрифтом будут написаны основные значащие слова, а вместо этого на переднем плане оказались теряющие смысл без контекста предлоги: «как, в, на, и». Эти предлоги называются стоп-словами, и они действительно чаще всего используются в нашей речи, однако в большинстве случаев при анализе текста, являются лишним шумом. Этот фактор был учтен создателями библиотеки wordcloud, и для объекта облака слова WordCloud() был добавлен параметр stopwords. По умолчанию, значение этого параметра «None», это значит, что функция использует встроенный список стоп-слов, среди которых присутствуют английские слова, но нет русских. Поэтому при выводе облака слов на основе английского текста, не нужно менять значение параметра stopwords — предлоги, союзы и прочие артикли будут исключены автоматически. В нашем же случае, необходимо передать параметру stopwords список со стоп-словами русского языка. Этот список есть в библиотеке nltk. Давайте это сделаем! (добавленные строки выделены подсветкой):
import pandas as pd
from wordcloud import WordCloud
import matplotlib.pyplot as plt

# подгружаем библиотеку nltk со стоп-словами
from nltk.corpus import stopwords
# сохраняем список с русскими стоп-cловами в переменную stop_words
stop_words = stopwords.words('russian')

data = pd.read_csv("articles.csv")
text = ' '.join(data['Title'])

# Определяем параметр stopwords при создании объекта облака слов
cloud = WordCloud(stopwords=stop_words).generate(text)

plt.imshow(cloud)
plt.axis('off')
3.2. Разбиваем текст на токены и получаем леммы
Отлично! Теперь предлоги исчезли из облака слов! Однако, выводятся слова с разными склонениями, такие как «помощи», «изображений», «файла» и т. д. Конечно, можно оставить оставить эти слова в покое, однако я предлагаю добавить немного строк кода, чтобы привести их все к основной форме до загрузки текста в функцию generate(). Для этого мы будем использовать библиотеку созданную для лемматизации русского и украинского языков под названием pymorphy2. Однако, предварительно, нам потребуется разбить текст на слова, другими словами, токенизировать текст:
import pandas as pd
from wordcloud import WordCloud
import matplotlib.pyplot as plt

# Импортируем библиотеку для лемматизации русских и украинских слов
import pymorphy2
# Импортируем метод word_tokenize из библиотеки nltk
from nltk.tokenize import word_tokenize

from nltk.corpus import stopwords
stop_words = stopwords.words('russian')

data = pd.read_csv("articles.csv")
text = ' '.join(data['Title'])

# разбиваем текст на токены
# в результате получаем переменную типа list со списком токенов
text = word_tokenize(text)

# инициализируем лемматайзер MorphAnalyzer()
lemmatizer = pymorphy2.MorphAnalyzer()

# функция для лемматизации текста, на вхд принимает список токенов
def lemmatize_text(tokens):
    # создаем переменную для хранения преобразованного текста
    text_new=''
    # для каждого токена в тексте
    for word in tokens:
        # с помощью лемматайзера получаем основную форму
        word = lemmatizer.parse(word)
        # добавляем полученную лемму в переменную с преобразованным текстом
        text_new = text_new + ' ' + word[0].normal_form
    # возвращаем преобразованный текст
    return text_new

# вызываем функцию лемматизации для списка токенов исходного текста
text = lemmatize_text(text)

# генерируем облако слов
cloud = WordCloud(stopwords=stop_words).generate(text)
plt.imshow(cloud)
plt.axis('off')
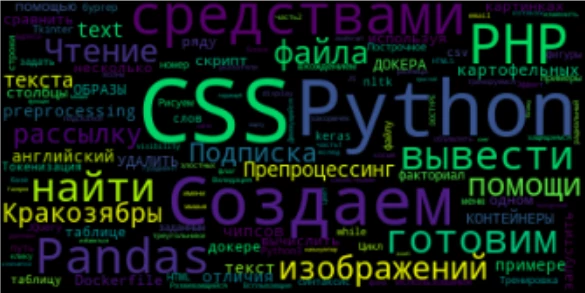
В код была добавлена токенизация исходного текста, а также функция для лемматизации полученного списка токенов <strong>lemmatize_text()</strong>. По завершению цикла <strong>for</strong> функция <strong>lemmatize_text()</strong> возвращает строку с преобразованным текстом, прошедшим через токенизацию и лемматизацию! Посмотрим на результат:
Отлично! Теперь содержание нашего облака на высоте, а значит, пришло время побаловаться с параметрами WordCloud и поправить обертку! Для начала я предлагаю изменить форму облака слов!
4. Меняем форму облака слов
Чтобы изменить форму облака слов, нужно:
- Загрузить изображение, которое будет использоваться в качестве маски при формировании облака, и преобразовать его в матрицу
- Передать параметру mask в качестве значения полученную матрицу
- По желанию добавить параметры обводки полученной фигуры: contour_width и contour_color
Реализуем задуманное: загрузим изображение «plane.jpg» и определим параметры в WordCloud():
import pandas as pd
from wordcloud import WordCloud
import matplotlib.pyplot as plt
import pymorphy2
import nltk
from PIL import Image
# импортируем библиотеку numpy для преобразования изображения в массив
import numpy as np
from nltk.tokenize import word_tokenize
from nltk.corpus import stopwords
stop_words = stopwords.words('russian')

data = pd.read_csv("articles.csv")
text = ' '.join(data['Title'])

text = word_tokenize(text)
lemmatizer = pymorphy2.MorphAnalyzer()

def lemmatize_text(tokens):
    text_new=''
    for word in tokens:
        word = lemmatizer.parse(word)
        text_new = text_new + ' ' + word[0].normal_form
    return text_new
text = lemmatize_text(text)

# загружаем изображение с самолетом и преобразуем в матрицу
cake_mask = np.array(Image.open('plane.jpg'))

# генерируем облако слов
cloud = WordCloud(stopwords=stop_words, mask=cake_mask, contour_width=10, contour_color='#2e3043').generate(text)
# увеличим размер выводимой фигуры
plt.figure(figsize=(9,5))
plt.imshow(cloud)
plt.axis('off')
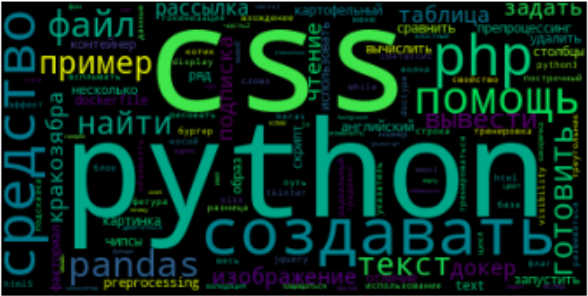
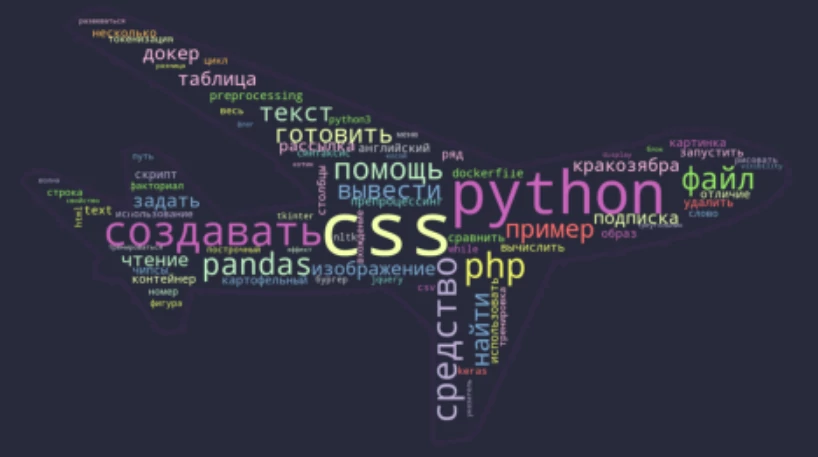
Посмотрим на результат:
Неплохо, однако, не мешало бы поиграться с параметрами WordCloud, изменить размеры изображения и цвета на свой вкус.

У нас появился Telegram-канал для изучающих Python! Подписывайтесь по ссылке: «Кодим на Python! Вместе «питонить» веселее! 😉
Редактируем облако слов в Python: меняем фон, цветовую схему и максимальное количество слов
У объекта WordCloud довольно много настраиваемых параметров. Описание всех параметров можно найти по ссылке в документации. Сейчас мы изменим значения лишь некоторых из них:
- background_color — цвет фона, заданный по умолчанию черный цвет фона я хочу поменять на background-color=’#272d3b’
- colormap — цветовая схема — это набор цветов, которыми будут раскрашены буквы в облаке слов. Полный набор цветовых схем можно посмотреть по ссылке: Цветовые схемы matplotlib. Я установлю значение colormap=’Set3′
- Максимальное количество слов в облаке — параметр max_words. Уменьшу количество слов до 80, max_words=80
Таким образом, после внесенных изменений итоговый код имеет вид:
import pandas as pd
from wordcloud import WordCloud
import matplotlib.pyplot as plt
import pymorphy2
import nltk
from PIL import Image
# импортируем библиотеку numpy для преобразования изображения в массив
import numpy as np
from nltk.tokenize import word_tokenize
from nltk.corpus import stopwords
stop_words = stopwords.words('russian')

data = pd.read_csv("articles.csv")
text = ' '.join(data['Title'])

text = word_tokenize(text)
lemmatizer = pymorphy2.MorphAnalyzer()

def lemmatize_text(tokens):
    text_new=''
    for word in tokens:
        word = lemmatizer.parse(word)
        text_new = text_new + ' ' + word[0].normal_form
    return text_new
text = lemmatize_text(text)

# загружаем изображение с самолетом и преобразуем в матрицу
cake_mask = np.array(Image.open('plane.jpg'))

# генерируем облако слов
cloud = WordCloud(stopwords=stop_words, mask=cake_mask, contour_width=10, contour_color='#2e3043', background_color='#272d3b', colormap='Set3', max_words=80).generate(text)

# увеличим размер выводимой фигуры
plt.figure(figsize=(9,5))
plt.imshow(cloud)
plt.axis('off')
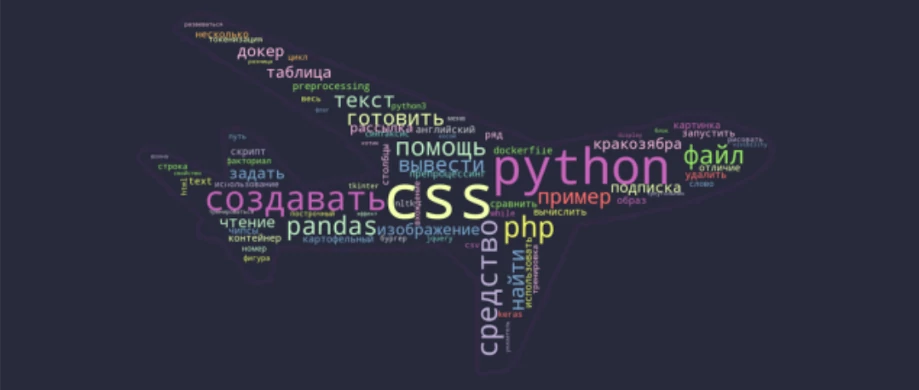
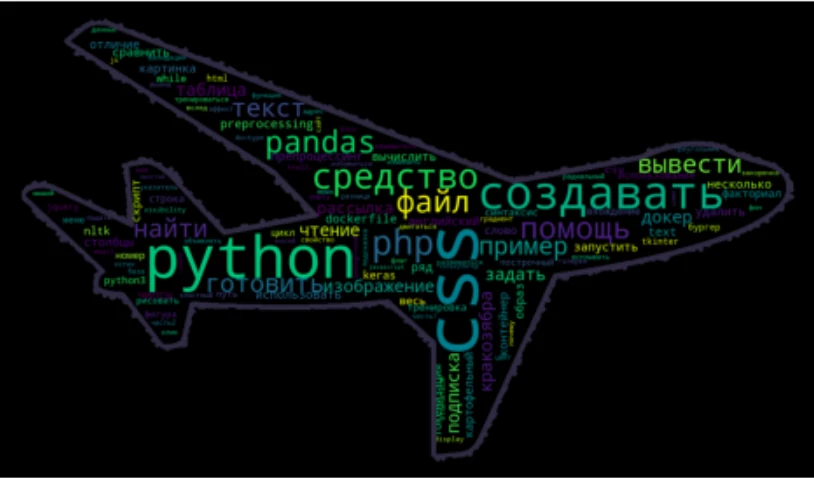
Отлично! Теперь полученное облако слов выводится в виде симпатичного самолета:
Заключение:
Поздравляю вас с успешно проделанной работой! Мы изучили основной принцип формирования облака слов в Python, подготовили русский текст для формирования корректного облака, а также научились менять цвет и форму облака слов. В итоге у нас получилось 2 вида облаков: стандартное облако в виде прямоугольника, и облако в форме самолета!
Время на прочтение
4 мин
Количество просмотров 3.4K

Всем привет! Хочу продемонстрировать вам, как я использовал библиотеку WordCloud для создания подарка для друга/подруги. Я решил составить облако слов по переписке с человеком, чтобы выделить основные темы, которые мы обсуждаем.
Выгружаем переписку
Для начала нам нужно будет выгрузить переписку из ВК. Как это сделать? Очень просто! Я пользовался расширением для браузера «VkOpt». Скачиваем его и устанавливаем. Теперь заходим в диалог с человеком, переписку с которым хотим скачать.

Наводим на три точки и выбираем «сохранить переписку». Далее будет окно с выбором типа файла. Я предпочитаю json.
Обработка переписки
Импортируем json и открываем наш файл с перепиской.
import json
vk = open('vk2.json', 'r', encoding='utf8')
vk = json.load(vk)
Теперь давайте выведем его и посмотрим как он выглядит.

Ну в общем всё ясно, массив таких вот сообщений. Каждый элемент соответствует одному облако-сообщению.
Давайте теперь вытащим из каждого сообщения его текст и разделим этот текст на слова.
mas = []
for i in range(len(vk)):
    mas.append(vk[i]['body'].split())

data = []
for i in mas:
    for j in range(len(i)):
        data.append(i[j].lower())
Теперь у нас есть массив data, в котором каждый элемент — это одно слово. Далее создадим большую строку, в которую просто запишем через пробел все наши слова.
big_string=''
for i in range(len(data)):
    big_string+=(data[i]+' ')
WordCloud
Почти всё готово, теперь давайте воспользуемся библиотекой WordCloud и построим наше облако слов.
pip install wordcloud

import matplotlib.pyplot as plt
%matplotlib inline

from wordcloud import WordCloud, STOPWORDS
wordCloud = WordCloud(width = 10000, height = 10000, random_state=1, background_color='black', colormap='Set2', collocations=False).generate(big_string)

plt.figure(figsize=(5,5))
plt.imshow(wordCloud)
Убираем стоп-слова
Так, и что же это? Не очень похоже на оригинальный подарок. Естественно всё не так просто. Дело в том, что в нашей речи и сообщениях встречается куча стоп-слов. Собственно, эти слова вы и видите на картинке. Они встречались в диалоге чаще всего, поэтому алгоритм выделил их крупным шрифтом.
Теперь наша задача: почистить строку от ненужный слов. Для этого скачаем словарик стоп-слов русского языка(https://snipp.ru/seo/stop-ru-words). Он представлен как обычный txt-шник, а значит прочитаем его и разделим по переносу строки.
stop_words = open('stop-ru.txt', 'r', encoding='utf8')
stop_words = stop_words.read()
stop_words = stop_words.split('n')
Далее создадим массив clear_data, куда будем заносить слова из массива data, которые не содержатся в списке стоп-слов(т. е. нормальные слова).
clear_data=[]
for i in data:
    if(i not in stop_words):
        clear_data.append(i)
А теперь формируем нашу большую строку, только теперь из нового массива и заново строим WordCloud.
big_string=''
for i in range(len(clear_data)):
    big_string+=(clear_data[i]+' ')

wordCloud = WordCloud(width = 10000, height = 10000, random_state=1, background_color='black', colormap='Set2', collocations=False).generate(big_string)
plt.figure(figsize=(5,5))
plt.imshow(wordCloud)
Результат на лицо. Начинает проявляться оттенок переписки с тем или иным человеком. Ну и, естественно, куда же мы русского могучего, он тоже начинает проявляться на изображении, приходится его замазывать 
Переходим на ручное управление
Так, вроде стоп-слова убрали, но картинка всё равно не выглядит привлекательной. В выборке остались различные выражения, которые мы часто используем в переписке. Например, мои слова паразиты: «ок», «ща», «крч». Что делать? Все просто. Открываем наш текстовик с русскими стоп-слова и просто вписываем туда слова, которые не должны присутствовать в новом облаке слов(не забудьте сохранить текстовик, перед повторным чтением).
P.S. На самом деле есть и второй вариант удалить слова паразиты. Создадим массив, который заполним словами паразитами, и подадим его как параметр в WordCloud. Тоже хороший вариант, но мне больше нравится с текстовиком.
stopw = ['а', 'ок', 'крч'] #массив слов, которые хотим удалить
#подадим массив stopw в WordCloud как параметр stopwords
wordCloud = WordCloud(width = 1000, height = 1000, random_state=1,
                      background_color='black', colormap='Set2',
                      collocations=False, stopwords=stopw).generate(big_string)
Таким образом, мы всё глубже и глубже погружаемся в чертоги нашей переписки. Обычно появляются слова, соответствующие темам, которые вы и ваш друг часто обсуждаете.
Форма облака слов
Теперь давайте воспользуемся одной фишкой WordCloud. Оформим наше облако слов в виде какой-то картинки. Я выберу банальное сердечко)
from PIL import Image
original_image = Image.open('путь до картинки')
image = original_image.resize([2000,2000], Image.ANTIALIAS)
image = np.array(image)
Подадим в функцию нашу картинку как параметр mask.
wordCloud = WordCloud(width = 1000, height = 1000, random_state=1,
                      background_color='black', colormap='Set2',
                      collocations=False, stopwords=stopw, mask=image).generate(big_string)
Вот такая штука у меня получилась.
По-хорошему, нужно удалить ещё около десятка слов, для более-менее приятной картины, но я уверен ту вы справитесь сами)
P.S. Выбирайте черно-белые изображения предметов. Лучше всего, если они выглядят как силуэты. С .png у меня не прошло, поэтому я сохранял в .jpg, может быть у вас получится.
Итог
Я нарисовал облако слов, которое отражает тональность переписки с тем или иным человеком. Дополнительно, в облаке содержатся слова, которые соответствуют тем темам, которые вы часто обсуждали в диалоге. Как вариант, можно сохранить эту картинку, распечатать, поставить в рамочку и вручить как подарок вашему собеседнику. Ему будет очень приятно, ведь всегда интересно посмотреть на то, как оценивает вашу переписку алгоритм)
-
All forum topics -
Previous Topic -
Next Topic

- Mark as New
- Bookmark
- Subscribe
- Mute
- Subscribe to RSS Feed
- Permalink
- Report Inappropriate Content
03-14-2017
08:24 AM
Seeking a way to display a multiple word phrase in a word cloud. The ~ works to join words but looks a bit odd in the word cloud. Is there another character that can be used as a connector?
Message 1 of 5
21,475 Views
1 ACCEPTED SOLUTION

- Mark as New
- Bookmark
- Subscribe
- Mute
- Subscribe to RSS Feed
- Permalink
- Report Inappropriate Content
03-14-2017
10:50 AM
Hi @aabrams5,
Are you wanting the word cloud to treat the two words as a single object (E.g. a phrase, proper noun, first/last name, etc…)? There is a feature to allow for this in the formatting settings of the word cloud (screenshot below).

Message 2 of 5
23,531 Views
-
All forum topics -
Previous Topic -
Next Topic
4 REPLIES 4
- Mark as New
- Bookmark
- Subscribe
- Mute
- Subscribe to RSS Feed
- Permalink
- Report Inappropriate Content
03-14-2017
10:50 AM
Hi @aabrams5,
Are you wanting the word cloud to treat the two words as a single object (E.g. a phrase, proper noun, first/last name, etc…)? There is a feature to allow for this in the formatting settings of the word cloud (screenshot below).
Message 2 of 5
23,532 Views
![]()
Helpful resources

Power BI April 2023 Update
Find out more about the April 2023 update.

M365 Conference — Las Vegas
The largest, in-person gathering of Microsoft engineers and community in the world is happening April 30-May 5.

Power BI Community Blog
Find out about what’s going on in Power BI by reading blogs written by community members and product staff.
Variety and novelty in English lessons encourage learners to be more engaged. On the contrary, monotonous tasks, no matter how useful they are, cause boredom. How to bring variety without too many changes in the process of learning vocabulary? Use word clouds.
Word clouds are a graphical representation of words and words combinations. They can be used for:
- vocabulary revision
- presenting lexis
- practicing new words
- student’s projects.
It is just a more visually appealing way to teach vocabulary. Instead of using lists, which students are probably fed up with, make clouds. You can utilize them for word searches, making monologues and dialogues, word games, writing tasks, etc.
Here are some examples of the tasks.
Task 1
Make a story about a detective investigating a case using all the words and tell your partner (the teacher).

Task 2
Work in pairs. Ask and answer five questions using the words.
Task 3
Give a definition of one of the words. Can your partner guess the word? Swap roles.
There are some services for creating word clouds:
Word Art
Wordle
Word clouds
I personally prefer to use Word art because it’s possible to create clouds containing collocations. As we know teaching collocations is more effective for learners. Other services just break the word pairs into single words.
Let’s see how to create word clouds using Word art. It’s quick and easy, no registration is required. So click ‘Create’ and make your cloud.
Step 1
Fill in the words or word combinations. You can type as many words as you need, even 30 or even 50. It’s possible to Capitalize letters, use the UPPER or lower case. Click ‘Options’ and opt for repetition of the words as you see in one of the pictures above or choose no repetition.

Step 2
Choose the shape of your cloud: animals, nature, people or some holidays themes. If you want to see the changes, click the red button ‘Visualize’.
For example, this charming ladybird will definitely catch kids’ interest.
 Step 3

Choose a font which you like. There are more than 50 fonts to select.
Step 4
Pick out a layout: horizontal, vertical, crossing words, dancing words, slopes and random. The layout will depend on the task and the learners. Teens prefer something less ordinal and more creative. For adults, I usually make more conservative things like a horizontal layout.
Step 5
Choose a style: colours of the words and the background. If you want to change a colour of the words, click ‘Words colours’ and ‘Custom’ and add more colours to the pallette.

Step 6
To apply all the changes, press ‘Print’ or ‘Download’ your cloud and enjoy it in your lessons.
Word cloud is a beautiful visualization of your audience’s thoughts. You simply ask your participants a question, they submit a one or two-question answer into an app, and all their submissions gather in a word collage – a “cloud” made of words.
Word clouds are great icebreakers and presentation openers. They’re awesome for checking the mood in the room, re-engaging people during meetings or events, and crowdsourcing what’s on their minds.
They look impressive when displayed on the screen and they’re very versatile tools in your arsenal if you want to create your presentation or speech more interesting and interactive.
Get inspired by these 52 word cloud questions examples. Pick your favorite ones for your next meeting or event.
- Openers & Icebreaking word clouds
- ‘Get to know your audience’ word clouds
- Word clouds to spark a discussion
- Team building and people celebrating word clouds
- Just for fun word clouds
Openers & Icebreaking word clouds
These word clouds are great for breaking the ice at the start and setting the tone for your meeting or event. Collect your audience’s thoughts in a nice word collage and use their insights as a springboard for your main presentation.
#1. Where are you joining us from?
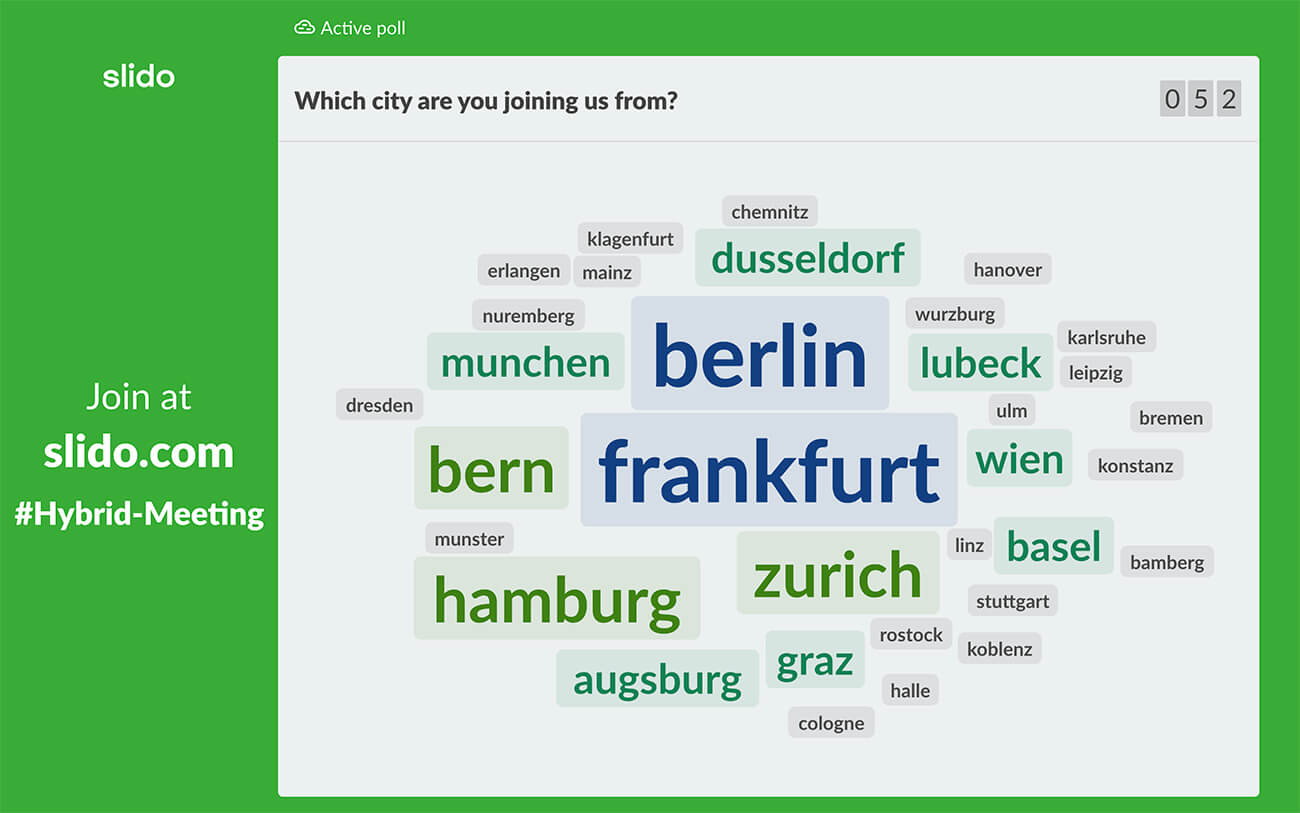
Tip: This word cloud is suitable for larger meetings or events. At Slido, we use it often as an opener during our user education webinars.
It’s a great way for us to kick off our webinars with a little interactive activity and welcome our attendees in a more personalized way. Plus, it looks great seeing all the locations and places where our participants are tuning in from!
#2. Which emoji best describes your current state of mind?
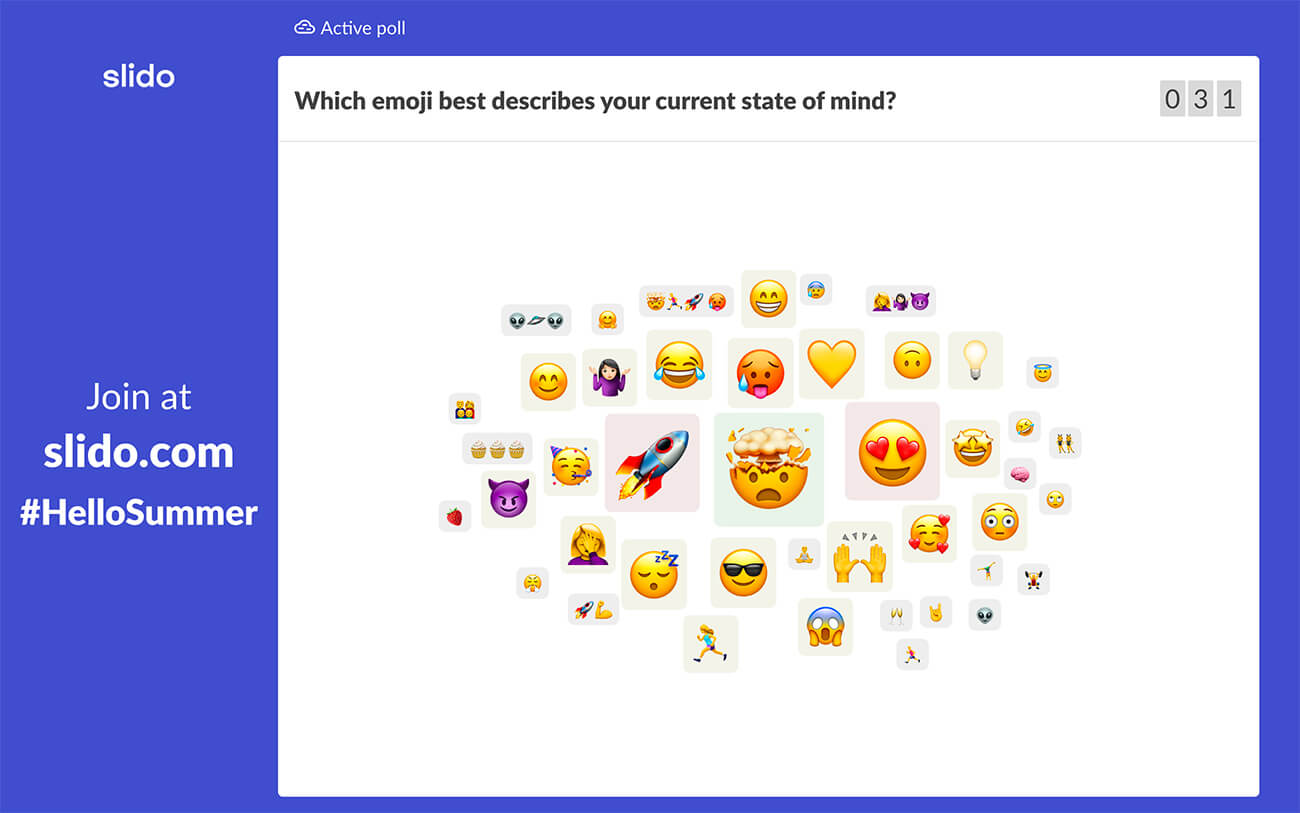
Tip: Have your word cloud open as your participants are joining in. It’s great for filling the waiting time with an interactive activity. On top of that, you’ll get your participants into Slido right at the start so it will be easier for them to use it later.
For example, this word cloud is a great example of such activity. Submitting emojis is simple and doesn’t require any hard thinking, but will get your participants interacting with you straight away.
Create your own word cloud in Slido.
Sign up below and try it for yourself.
Try Slido word cloud
#3. In one word, how would you describe your past week/month?
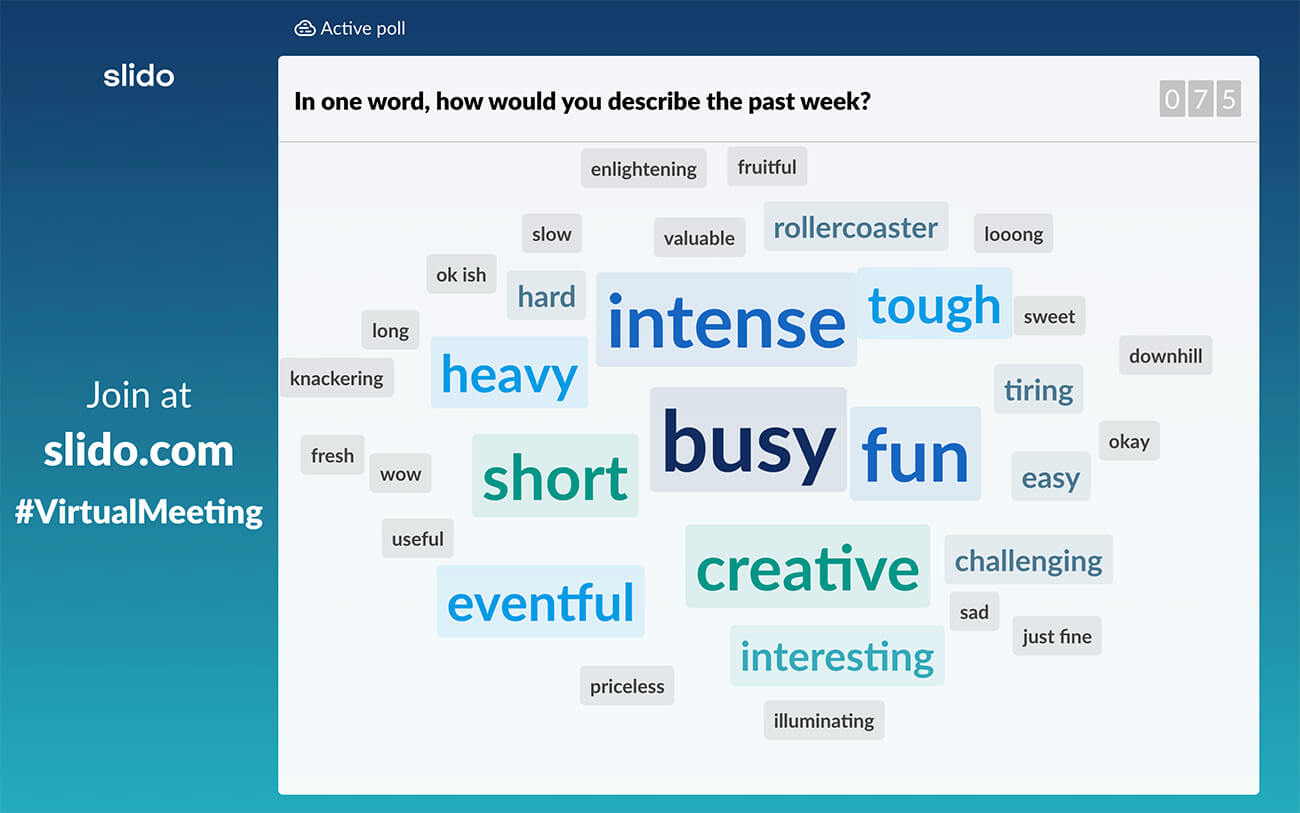
Tip: Word clouds look best with one-word or two-word answers. To make your participants submit such short answers, consider starting the word cloud question with “In one word, what do you …” or “Using just one word, which is your…”
More word cloud ideas:
#4. Using one word, how are you feeling right now?
#5. Use one word to describe how 2022 has been for you so far.
#6. What’s your favorite country to visit?
#7. What is your next dream holiday destination?
#8. Where are you planning to go for the summer vacation?
#9. Describe your ideal vacation using one emoji.
#10. If you weren’t at work, where would you be right now?
#11. If our company were an animal, what would it be?
Read also: 35 Virtual Icebreakers for Your Online Meetings
‘Get to know your audience’ word clouds
Learn something more about your audience at the start. What are their expectations? What topics interest them the most? It will help you understand them better and make your presentation more tailored to their needs.
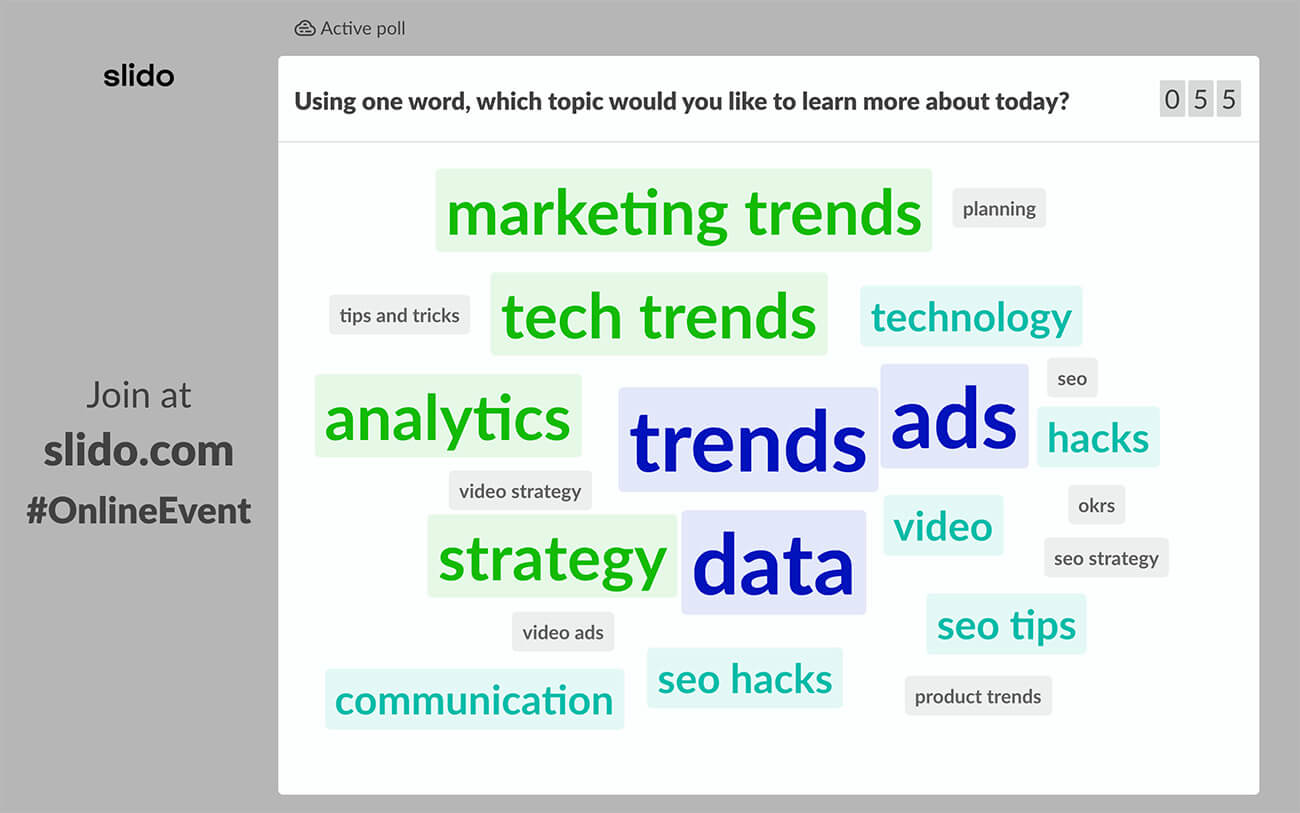
#12. Which topic would you like to learn more about today?
#13. Using one word, what do you expect from this event?
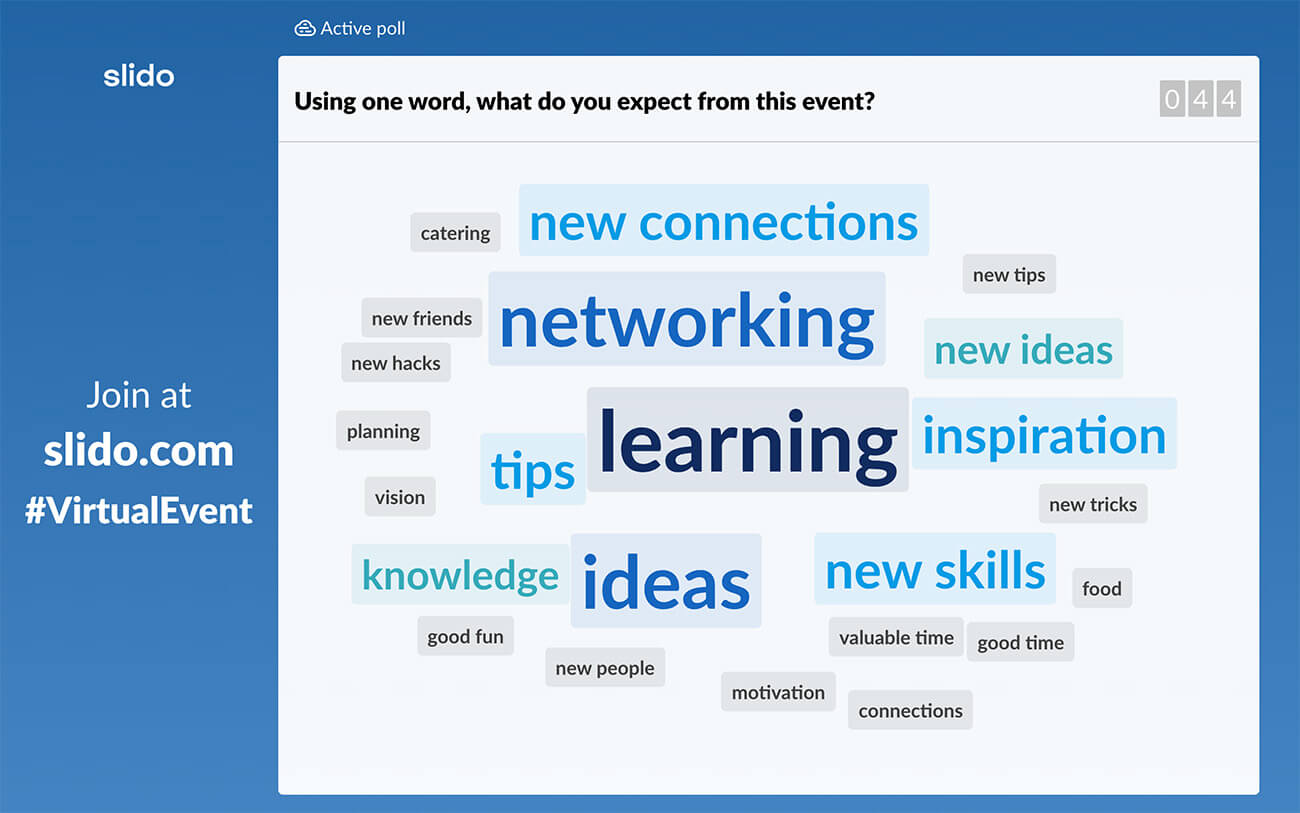
Tip: Once the word cloud starts to fill in with words, comment on the individual entries and use them as a bridge to your main content.
More word cloud ideas:
#14. In one word, how would you describe yourself?
#15. What’s your favorite way of travel?
#16. What is your favorite book?
#17. What was your first job?
#18. What is currently the biggest challenge in your work?
#19. What’s your biggest strength?
#20. What’s your biggest weakness?
#21. Which global brand do you admire?
#22. What helps you to be more successful in your job?
#23. What are your expectations from today’s event/meeting?
Word clouds to spark a discussion
As a speaker, you can use a word cloud to crowdsource insights from your audience that you can use to kick off a discussion with your audience. Use one of these thought-provoking word clouds to make your presentation more conversational.
#24. In one word, what’s the biggest challenge you’re facing when working from home?
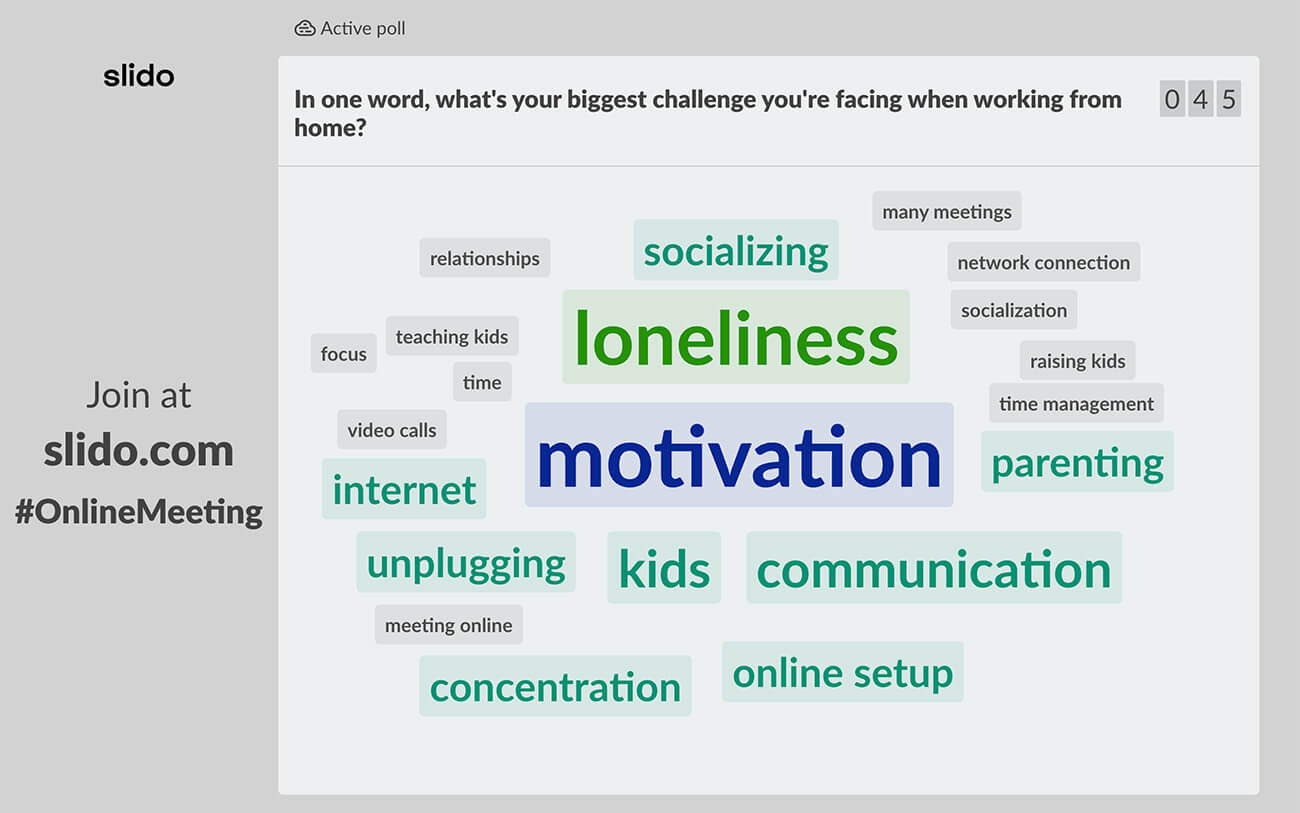
Tip: Running a word cloud is a great interactive activity for virtual or hybrid meetings and events because it allows everyone – remote or on-site – to join and chip in with their idea.
More word cloud ideas:
#25. What’s the first thing that comes to your mind when you hear the word ‘leader’?
#26. What personality traits should a great leader have?
#27. Which skills or qualities make one a good manager?
#28. What’s the best tech invention of the 21st Century?
#29. What makes a great webinar/event/meeting?
#30. What one word would you use to describe our new logo?
#31. What’s the first thing that comes to your mind when you hear “hybrid meetings?”
#32. In your view, what is the key factor contributing to good business cases?
#33. What is the #1 business book that everyone should read?
#34. In one word, what’s the future of work?
Team building and people celebrating word clouds
These word clouds will give your meeting or event a bit of a personal touch. And we mean that literally – some of these word clouds are really quite touching.
#35. Who was your silent hero last week/month?
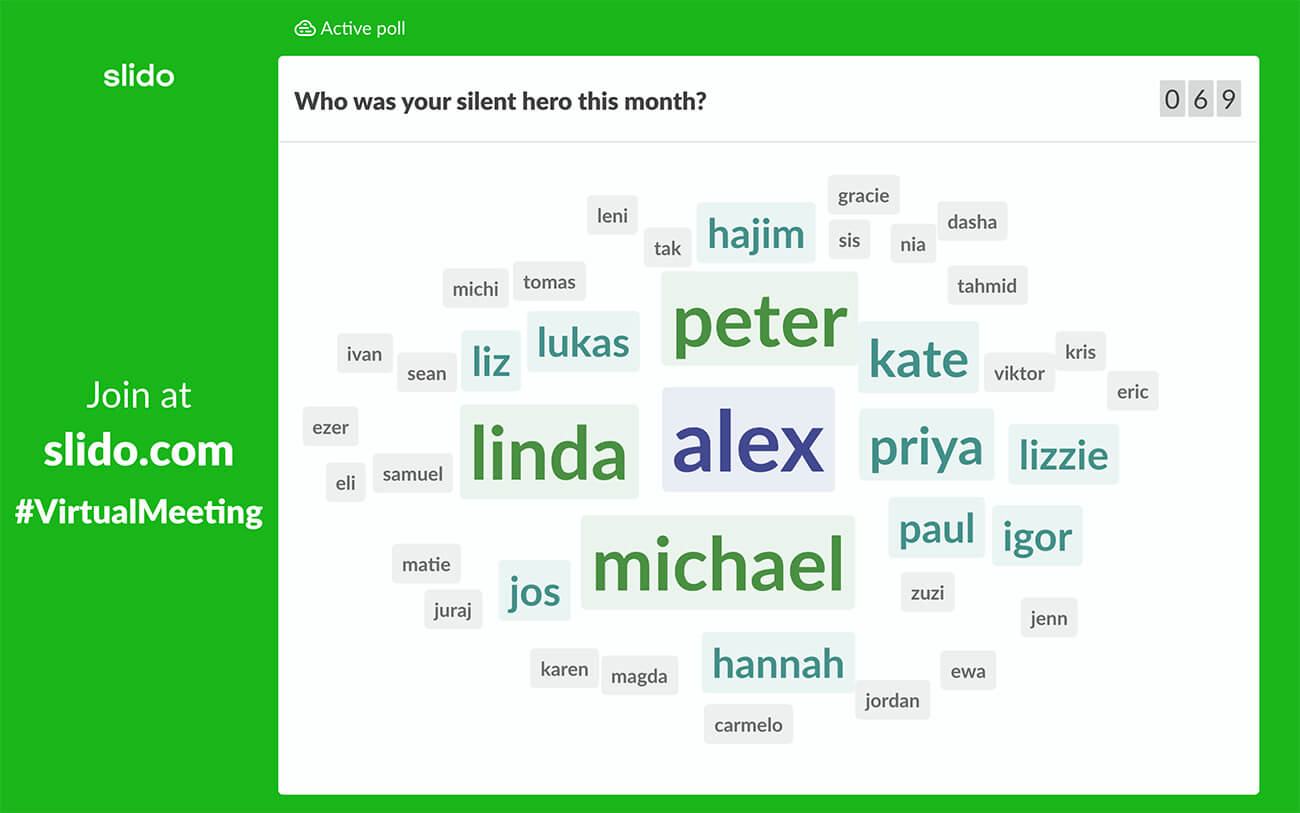
Tip: This word cloud is perfect for large all-company meetings such as all-hands and town halls. We use the silent hero activity at each of our all-hands meetings to give a shoutout to our colleagues who went the extra mile.
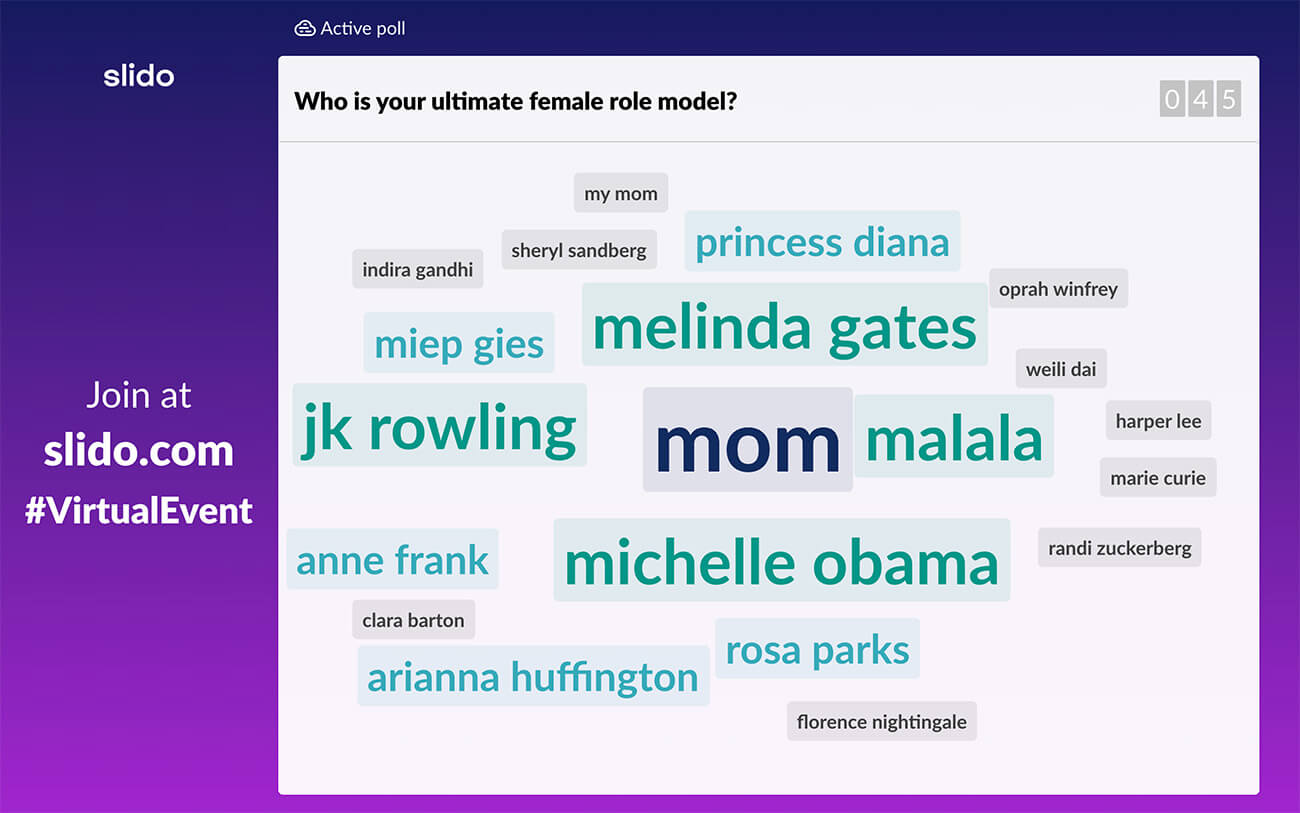
#36. Who is your ultimate female role model?
More word cloud ideas:
#37. In one or two words, what are you most grateful for?
#38. If you’d like to say thanks to someone, you can do it here.
#39. Which industry figure is your personal hero?
#40. If you could go for a coffee with one historical figure, who would it be?
#41. What do you value most about our company culture?
#42. Describe our company in one word.
#43. Name a colleague whose job you can’t imagine doing.
#44. Name a colleague with whom you’d switch jobs for a week.
#45. What word should describe our team culture?
Read also: 80+ Best Poll Questions To Ask Your Online Audience
Just for fun word clouds
The purpose of these word clouds is to help your event attendees or colleagues loosen up, exchange some funny ideas, and have a little laugh. We all need that sometimes, don’t we?
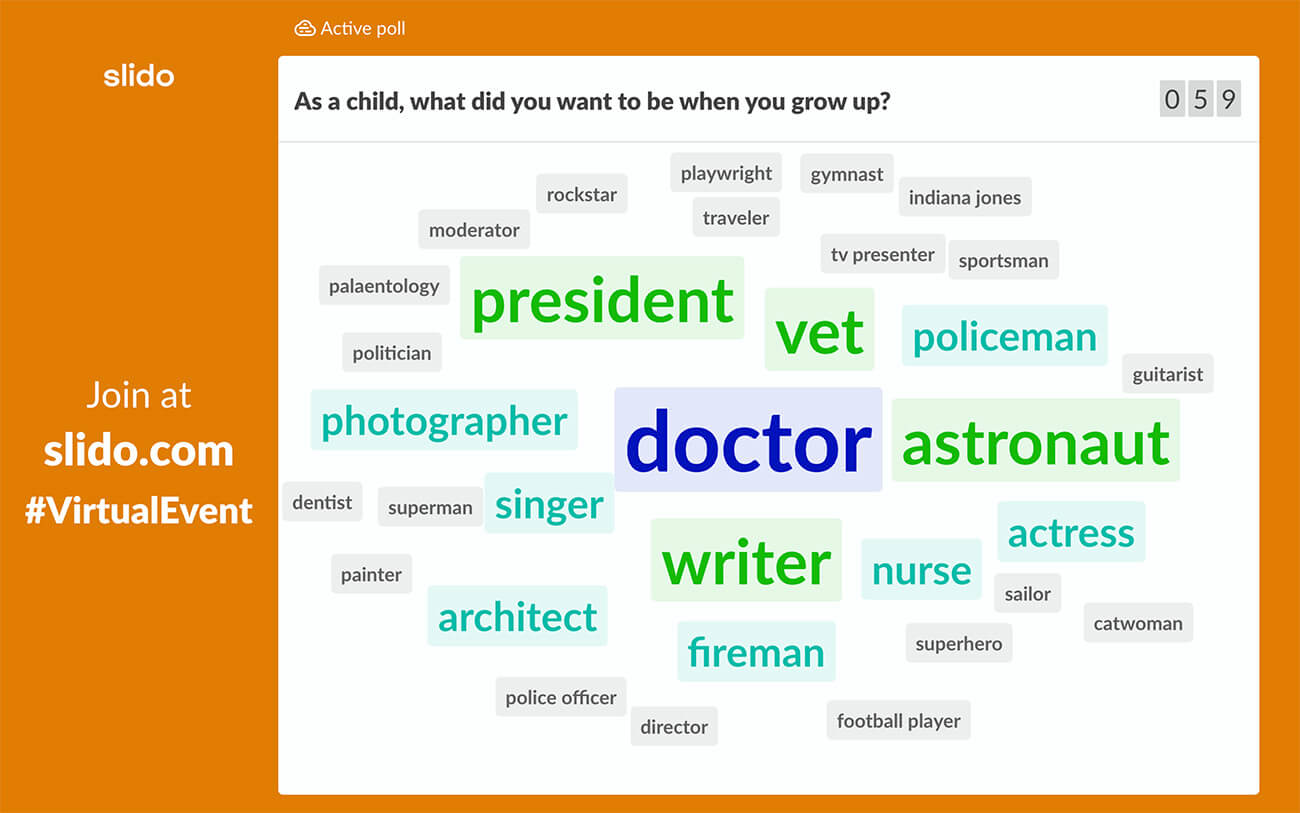
#46. As a child, what did you want to be when you grow up?
#47. Which color would best describe your current state of mind?
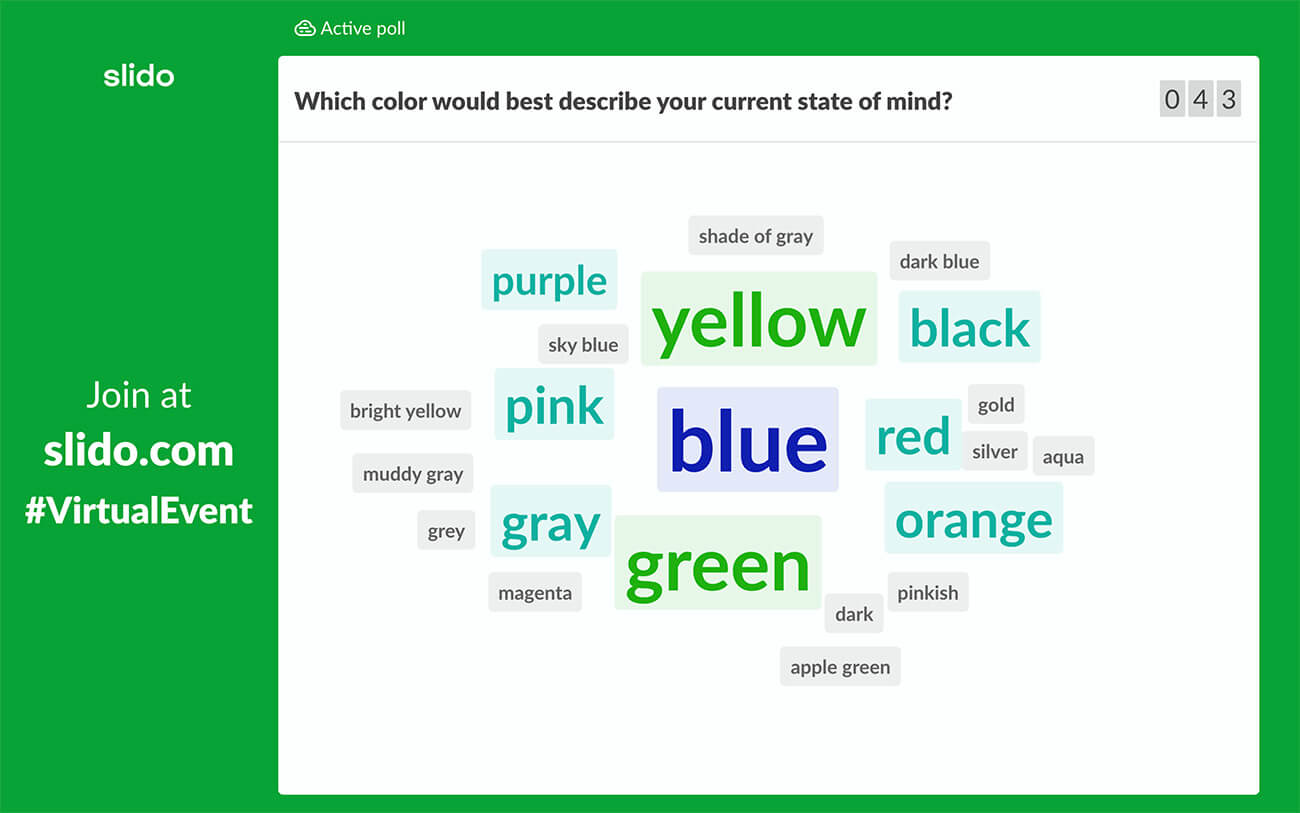
Tip: In Slido, the word cloud poll has a profanity filter on by default which means that swear words won’t go through at all.
More word cloud ideas:
#48. Which sport would you like to be an Olympic champion in?
#49. Who was your childhood celebrity crush?
#50. If you had to eat only one food for the rest of your life, which one would it be?
#51. Which superpower would you like to have?
#52. What’s your favorite animal/food/flower/ice cream flavor?
Over to you
So, which one of these word clouds is your favorite?
In Slido, creating a word cloud and running it during an online meeting or event is as easy as 1-2-3.
If you don’t have a Slido account yet, create one below and you can try it for yourself. It’s free. Just like all good things in life.
Create your word cloud
Here’s a solution using a different text package, that allows you to form multi-word expressions from either statistically detected collocations, or just by forming all bi-grams. The package is called quanteda.
library(quanteda)
packageVersion("quanteda")
## [1] ‘0.9.5.14’
First, the method for detecting the top 1,500 bigram collocations, and replacing these collocations in the texts with their single-token versions (concatenated by the "_" character). Here I am using the package’s built-in corpus of the US presidential inaugural address texts.
### for just the top 1500 collocations
# detect the collocations
colls <- collocations(inaugCorpus, n = 1500, size = 2)

# remove collocations containing stopwords
colls <- removeFeatures(colls, stopwords("SMART"))
## Removed 1,224 (81.6%) of 1,500 collocations containing one of 570 stopwords.

# replace the phrases with single-token versions
inaugCorpusColl2 <- phrasetotoken(inaugCorpus, colls)

# create the document-feature matrix
inaugColl2dfm <- dfm(inaugCorpusColl2, ignoredFeatures = stopwords("SMART"))
## Creating a dfm from a corpus ...
## ... lowercasing
## ... tokenizing
## ... indexing documents: 57 documents
## ... indexing features: 9,741 feature types
## ... removed 430 features, from 570 supplied (glob) feature types
## ... complete.
## ... created a 57 x 9311 sparse dfm
## Elapsed time: 0.163 seconds.

# plot the wordcloud
set.seed(1000)
png("~/Desktop/wcloud1.png", width = 800, height = 800)
plot(inaugColl2dfm["2013-Obama", ], min.freq = 2, random.order = FALSE,
     colors = sample(colors()[2:128]))
dev.off()
This results in the following plot. Note the collocations, such as «generation’s_task» and «fellow_americans».

The version formed with all bigrams is easier, but results in a huge number of low frequency bigram features. For the word cloud, I selected a larger set of texts, not just the 2013 Obama address.
### version with all bi-grams
inaugbigramsDfm <- dfm(inaugCorpusColl2, ngrams = 2, ignoredFeatures = stopwords("SMART"))
## Creating a dfm from a corpus ...
## ... lowercasing
## ... tokenizing
## ... indexing documents: 57 documents
## ... removed 54,200 features, from 570 supplied (glob) feature types
## ... indexing features: 64,108 feature types
## ... created a 57 x 9908 sparse dfm
## ... complete.
## Elapsed time: 3.254 seconds.

# plot the bigram wordcloud - more texts because for a single speech,
# almost none occur more than once
png("~/Desktop/wcloud2.png", width = 800, height = 800)
plot(inaugbigramsDfm[40:57, ], min.freq = 2, random.order = FALSE,
     colors = sample(colors()[2:128]))
dev.off()
This produces:
