

In this module, you will learn how to use the Word Cloud Power BI Custom Visual. The Word Cloud is often used for mining large amounts of text data to determine the number of times certain words are used.
Module 20 – Word Cloud
Downloads
- Power BI Custom Visual – Word Cloud
- Dataset – Shakespeare Plays.csv
- Completed Example – Module 20 – Word Cloud.pbix
Key Takeaways
- Great for parsing unstructured data
- Utilize stop words to remove commonly used filler words like a, the, an, etc…
- You can use the default stop word setting that is provided and/or add your own stop words that you would like the visual to eliminate.
- The size of the words in the visual tell you how frequently the word is used.

This Word Cloud shows the most commonly used words in Shakespeare plays.
- Under the Format paintbrush there are quite a few customizations that can be made to the appearance of the Word Cloud.
- First under the General section of the Word Cloud you will find properties to adjust the position of the visual and the maximum number of words that can be displayed. Here you can also control the font sizes used.

- Under Data colors you have the ability to change which colors are used for the words that are visualized in the Word Cloud.

- The Stop Words property allows you to turn on the Default Stop Words that are built into the visual, or add your own by simply typing each word separated by a space in the Words property.

- Using the Rotate Text settings you can adjust the angle that each word is displayed at. You provide a Min and Max Angle and the words are automatically displayed between that range of angles. You can even set the Max number of orientations which sets how many possible word rotations can be used between the min and max angles set.

- In addition to these properties, you have a set of settings that appear on every visual to adjust the background color, add a border around the visual and lock the aspect ratio.
Find Out More
You will always be able to find this video module and advanced viewing of future modules on the Pragmatic Works On-Demand Training platform or view my previous blog posts.

By Amir Netz, Technical Fellow and Mey Meenakshisundaram Product Manager
A picture is worth a thousand word. But if you can present the words themselves as a picture, it’s worth even more. To make this art easy and fun for everyone, this week, Word Cloud is joining the growing Power BI custom visuals family.
The world of unstructured data is having explosive growth now with text content. you see text everywhere in the social media be in product reviews, comments, messages, announcements or even simply with status updates.
While Traditional charts and visualization techniques are great at making sense of structured data, they generally fall short when it comes to textual data. We often have to look for creative new ways for presenting text data. Word Cloud makes this experience exciting and fun in Power BI.
Word Cloud is a visual representation of word frequency and value. Use it to get instant insight into the most important terms in your data.
With the interactive experience of Word Cloud in Power BI, you no longer have to tediously dig through large volumes of text to find out which terms are prominent or prevalent. You can simply visualize them as Word Cloud and get the big picture instantly and user Power BI’s interactivity to slice and dice further to uncover the themes behind the text content.
This visual also puts you in control on the appearance of the work cloud, be it the size or usage of space and how to treat the data. You can choose to break the words in the text to look for the frequency word or keep word break off to project a measure as a value of the text. You can also enable stop words to remove the common terms from the word cloud to avoid the clutter. By enabling rotation and playing with the angles allowed, you can become very creative with this visual.
Word Cloud is slick and adds a new dimension to the Power BI custom visuals experience. Check out this video to see this in action.
To use, simply import the Word Cloud from the Visuals gallery to your Power BI report and use it with a text column. Optionally you can also use a measure to provide weightage to the text. If none provided, it will simply use the frequency. Check out the formatting pane for more options.
As usual, we can’t wait to hear your thoughts and your ideas for improvements.
Enjoy!

Now, go, try it out and have some fun and explore your unstructured text data.
- Try Power BI
- Follow @MSPowerBI on Twitter
- Join the conversation at the Power BI Community
In this article, we’ll look at how to create a Word cloud generator in Power BI Desktop, including importing data, customization and more.
In my last article, Power BI Desktop Interactive chord diagrams, we learned about customized visualizations in Power BI Desktop. These visualizations are free to install and we can use them with our data set and customize charts as per our requirements.
Overview
A Word Cloud is a visualization that draws an image from frequently appearing words in the data set. These words are arranged in a cloud shape. The size of the words in the cloud image is proportional to its frequency.
Below is an example of how Word cluster looks like (Image Courtesy – Wikipedia)

We can use word clusters to display keywords, tags, etc. We can quickly locate the items in the Word Cloud based on the size and color of the word.
For example, in the above example, we can see that the fewer words are appearing in the larger font size that shows the most used keyword as per the conditions defined.
We can use Power BI Desktop to create an interactive visualization with control on the appearance of the word cluster on the text, size, color, number of words, background, rotation etc.
Importing Sample data for Word Cloud Generator
To create a word cloud generator, we’ll first need data. In this example, we will use sample data books.csv from GitHub. This data shows the title, author, genre and publisher details.
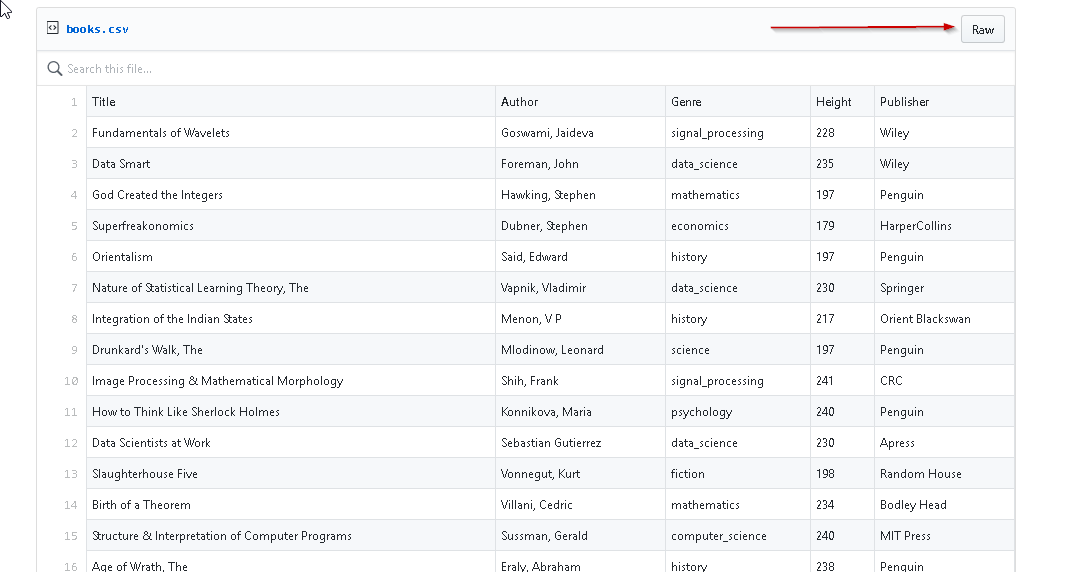
Click on Raw, copy and save the data into.CSV file. We will import this.CSV file to create the Word cloud generator in Power BI Desktop.
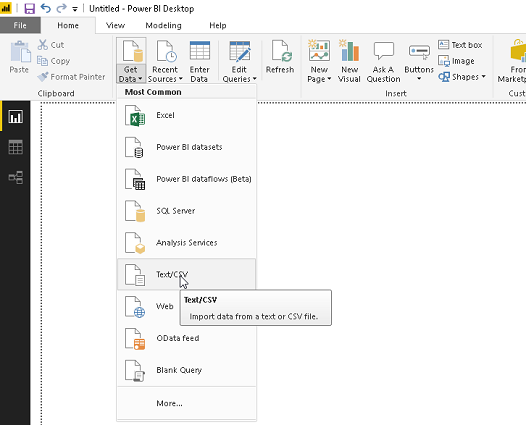
Now open Power BI Desktop and click on ‘Get Data’. Choose ‘TextCSV’ source from the list.
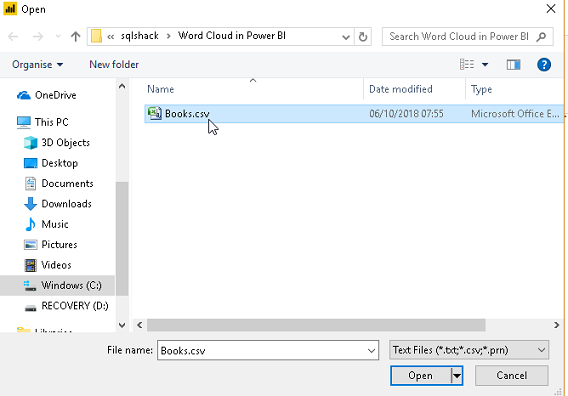
Provide the location of the source data (books.csv) and click Open.
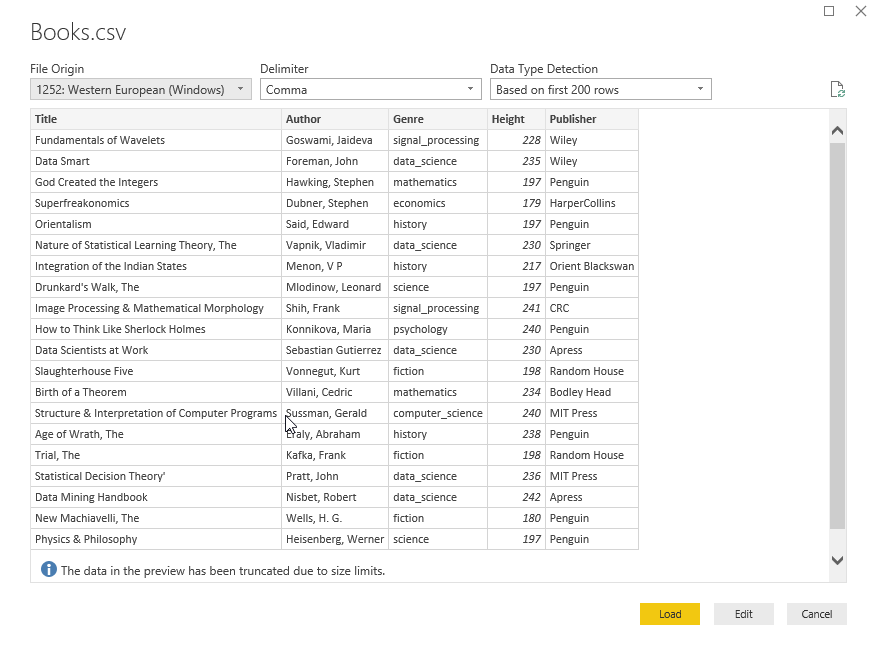
We can get a preview of the data here. If we do not want to make any changes in the data, then click on Load.
In this example, some of the fields contain blank values as well. Therefore, we do not want those blank values data to create a Word Cloud generator. Click on Edit
In this example, some of the fields contain blank values as well. Therefore, we do not want those blank values data to create our Word cluster. Click on Edit
In this example, some of the fields contain blank values as well. Therefore, we do not want those blank values data to create our Word cloud generator. Now click on Edit to make changes in the data.
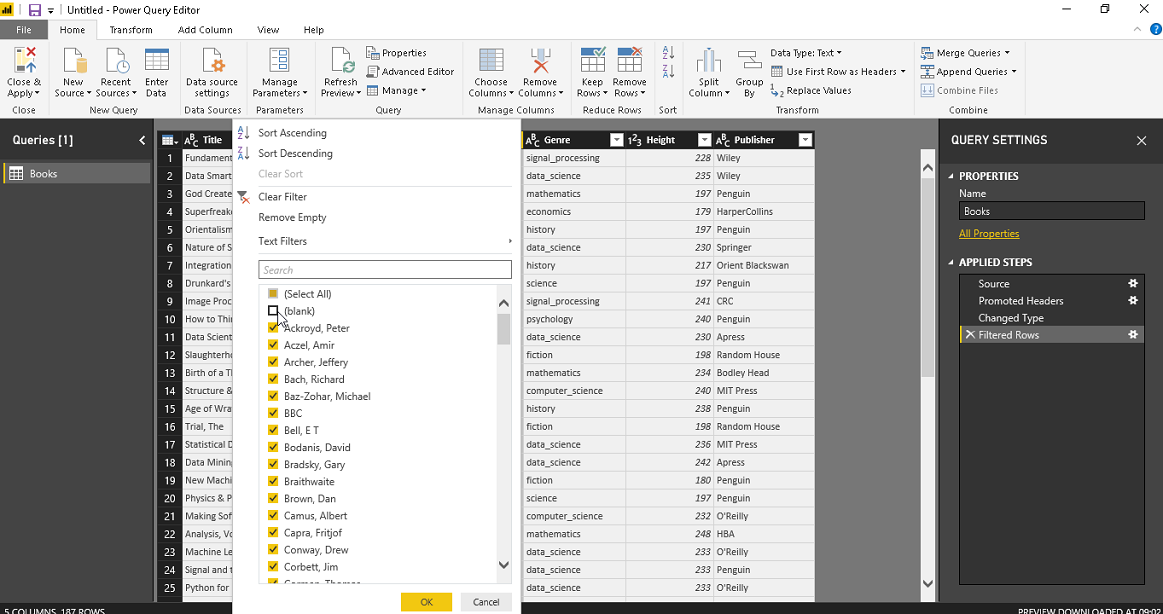
This opens Power Query Editor. Click on the columns and uncheck the blank value option from the publisher column.
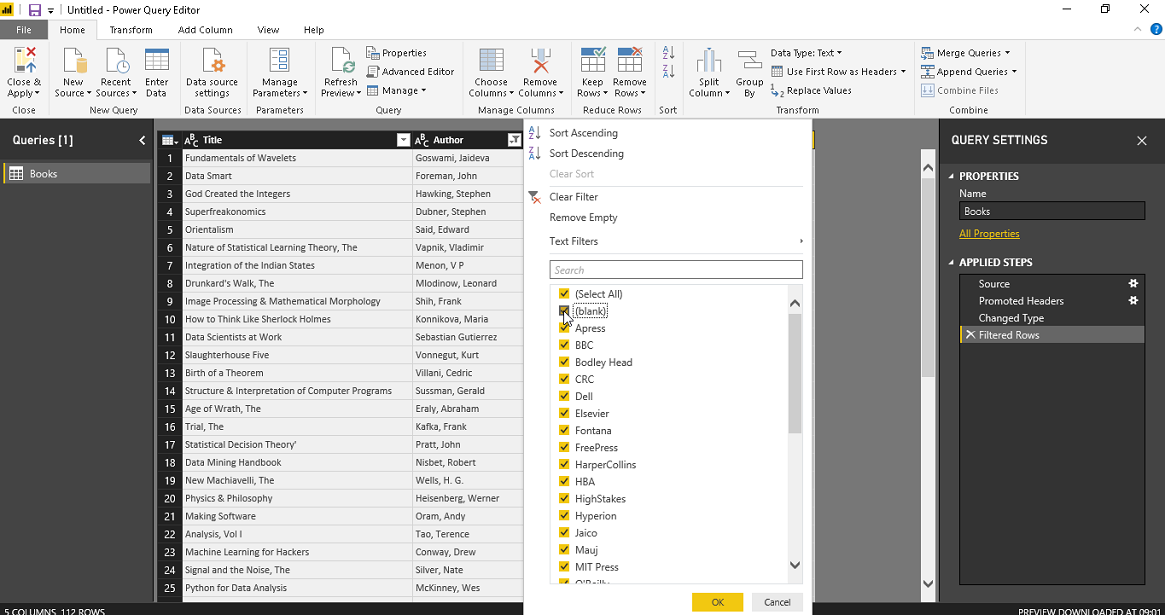
Similarly, uncheck the blank value from the ‘Author’ column.
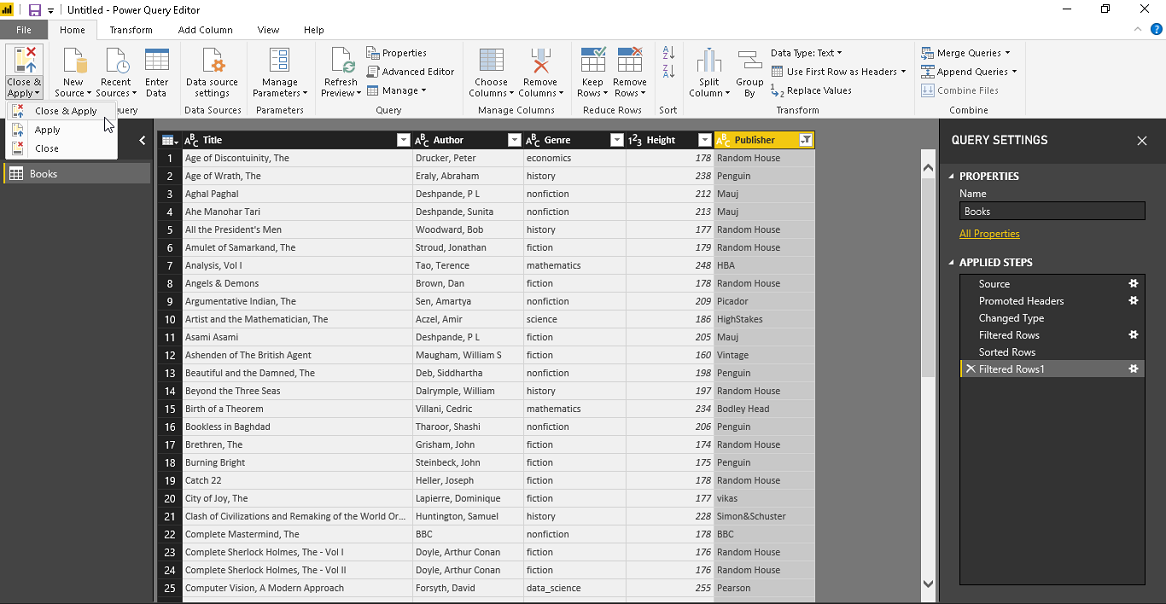
Once we are done, click on ‘Close and Apply’
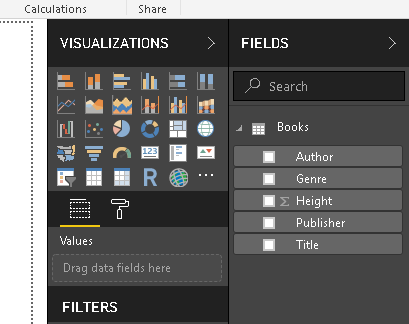
Now, we can see the fields in our dataset in the ‘Fields’ section.
Importing from Microsoft AppSource for Word Cloud Generator
We can get the Word cluster from the Microsoft AppSource. We can view a brief description and tutorial video clip on the page.
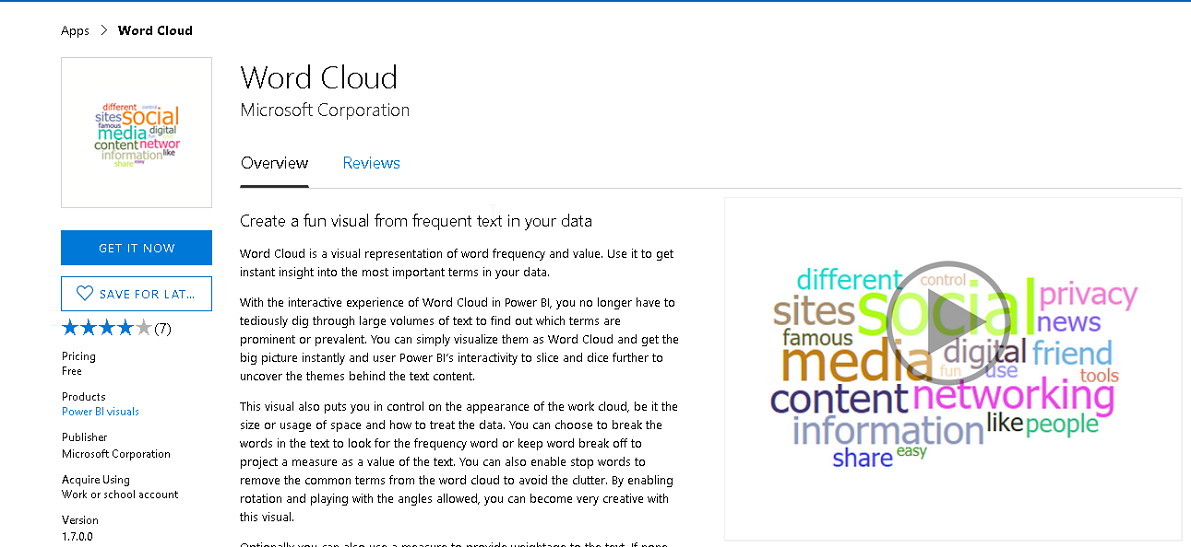
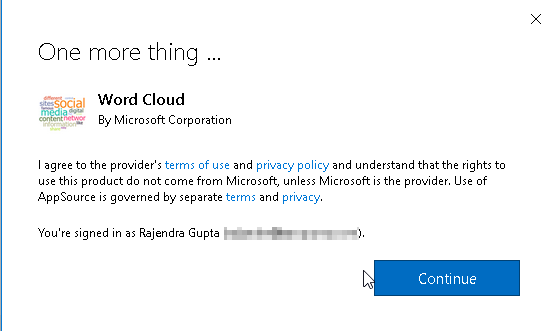
Click on ‘Get IT Now’ and click on continue to accept the terms and conditions. Please note you need to log in with a work account in order to install a Word cluster in Power BI Desktop.
Click on Download for Power BI
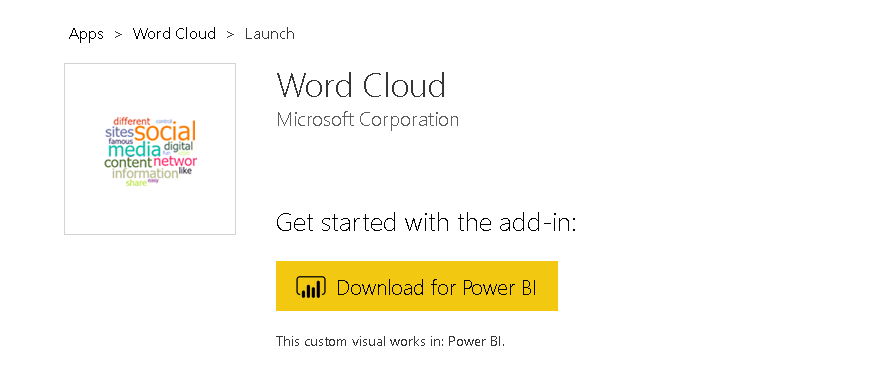
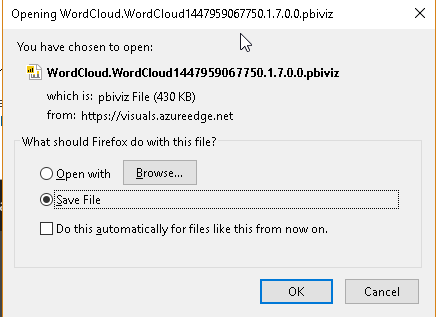
Save the .pbiviz file into the desired location. We will use this file to import into Power BI Desktop.
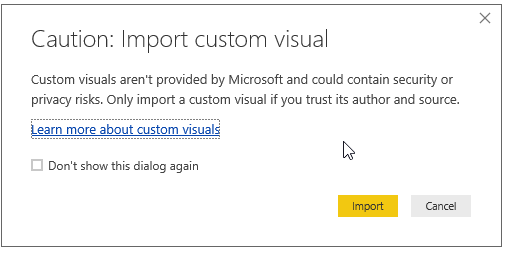
Now in the Power BI Desktop, Click on custom visual section From File. We get a warning message that the custom visuals are not provided by Microsoft and we should consider security or compliance risks before proceeding.
Click on Import to move further.

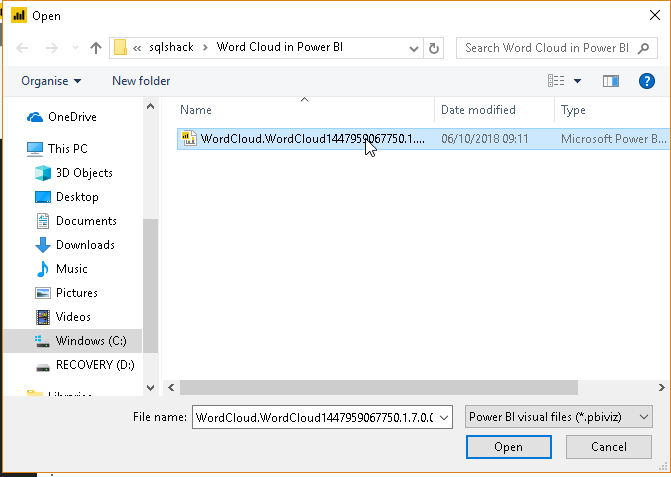
Provide the path of the Power Bi visual file (.pbiwiz) downloaded earlier and click open.
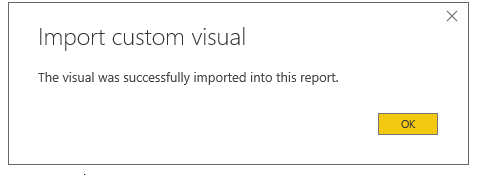
This imports the custom Word cluster visual and results in the following success message.
We can see below the icon for Word cluster in the visualization section of Power BI Desktop now.
![]()
Custom visualizations
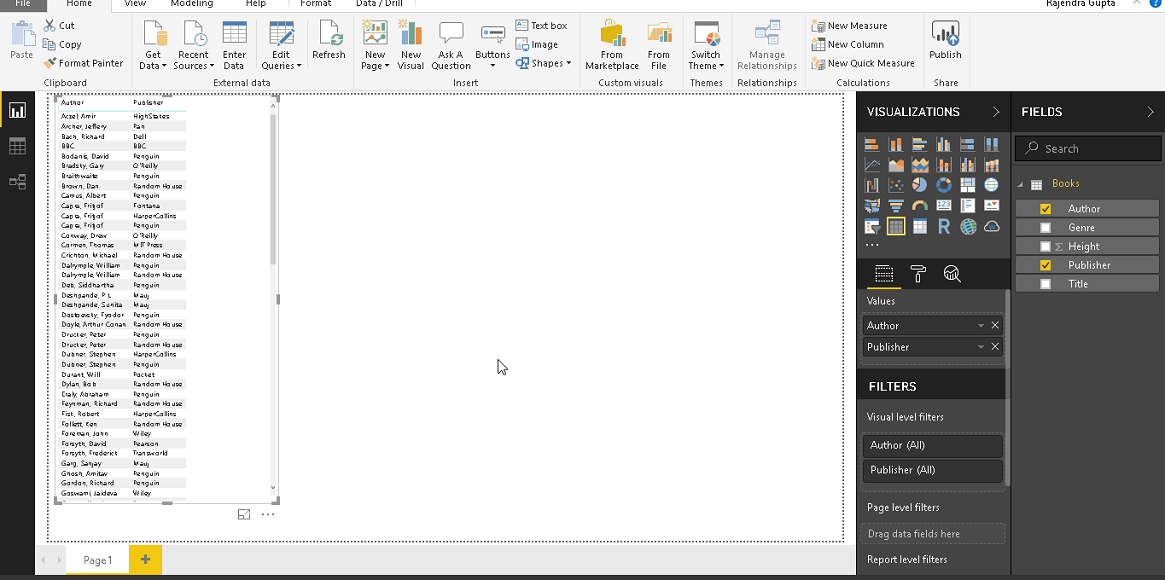
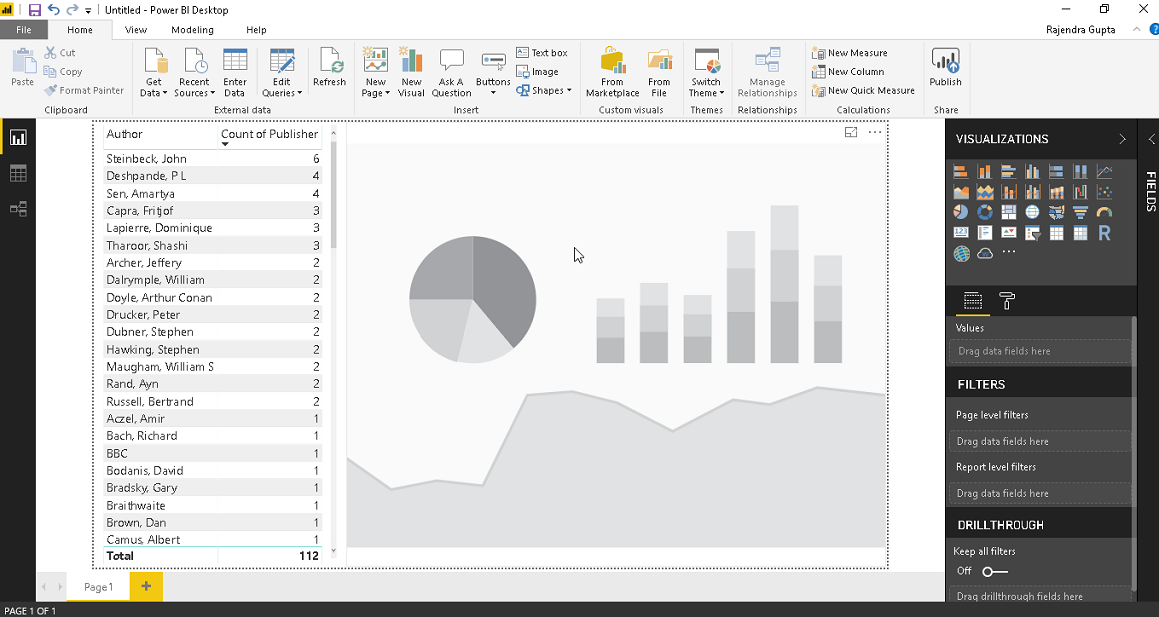
Before we create the Word cloud generator, let us understand the sample data further. Put a check on the Author and Publisher columns and we can see both columns data on the left-hand side.
Let us increase the font size of the data to view it properly. To do so, increase the font size from
Format > Column header > Text Size
Format > Values >Text Size
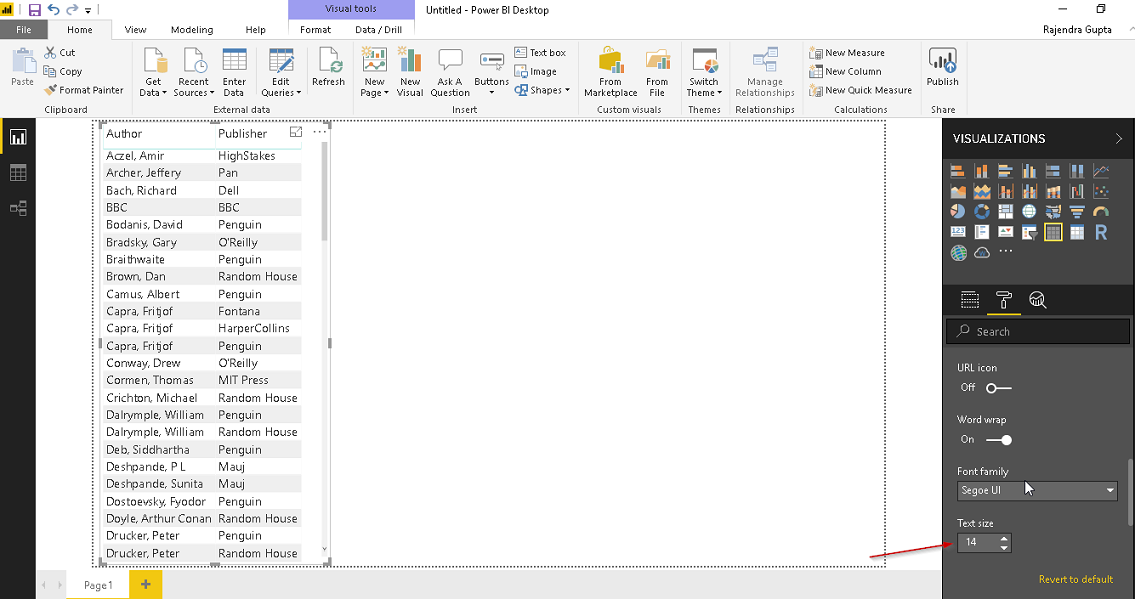
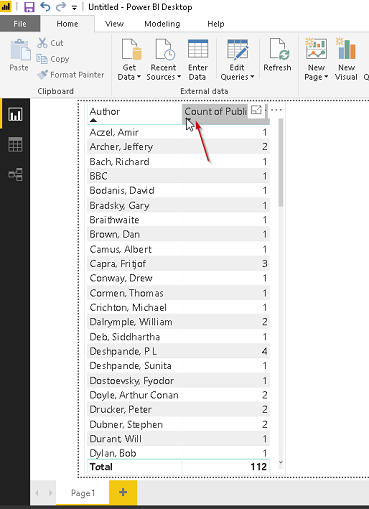
Data is now visible properly. Click on publisher column and select Count.
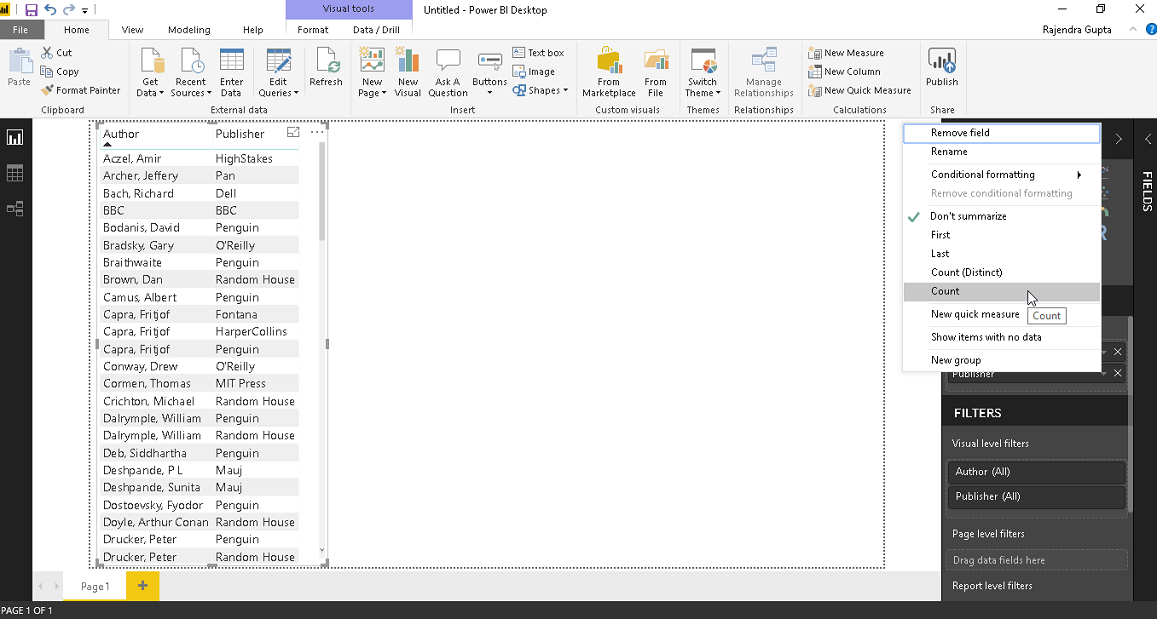
This shows the count of the publisher for the authors.

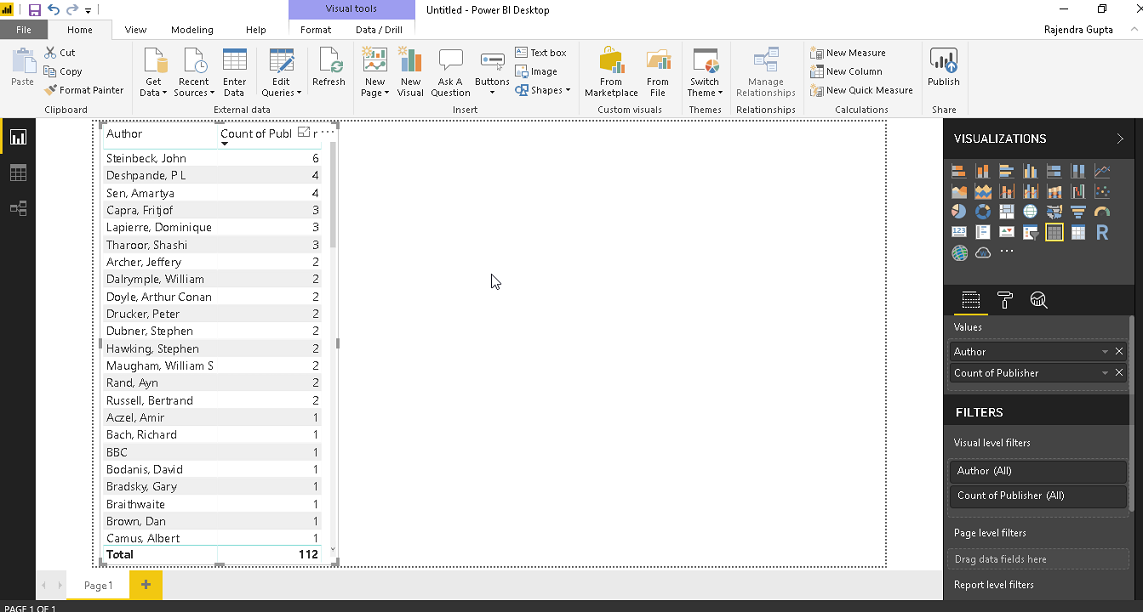
We can sort the data here easily. Simply, click on the column name and sort it in ascending or descending order.
Now, our data looks like below and we are now ready to create a Word Cloud generator from this.
Click on Word Cloud Generator icon from the Visualization section and this draws a blank chart.
Drag the fields from the data set in the category and values section. Below we can see fields as
Category -> Authors
Values -> Publishers
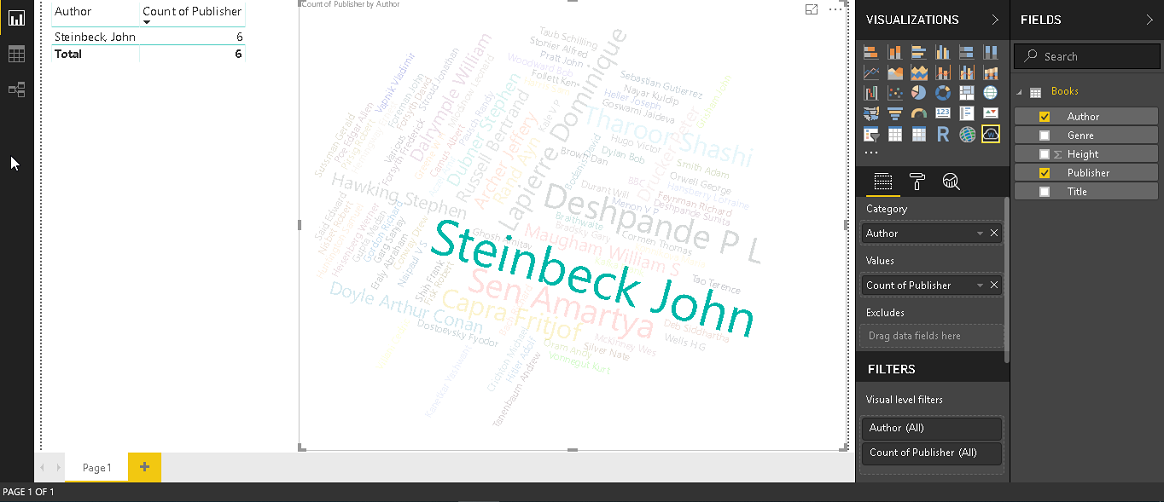
This draws up the Word cluster based on the data we selected.
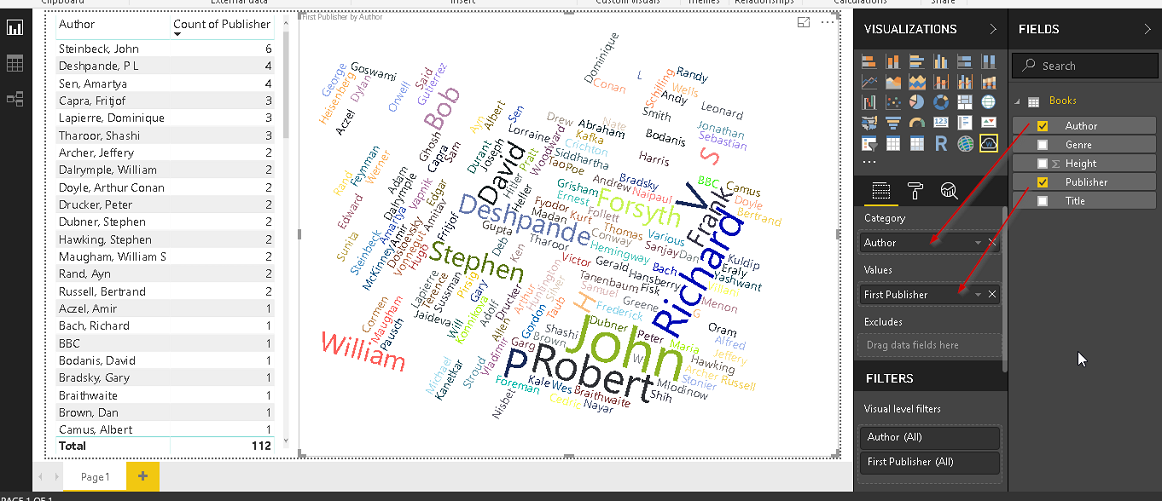
If we click on any particular word, it shows up the details of that particular author. However, as we can see, for author John , it just looked at the first name John and combined the data together.

Similarly, we can change the value to Count of the publisher from the drop-down option.
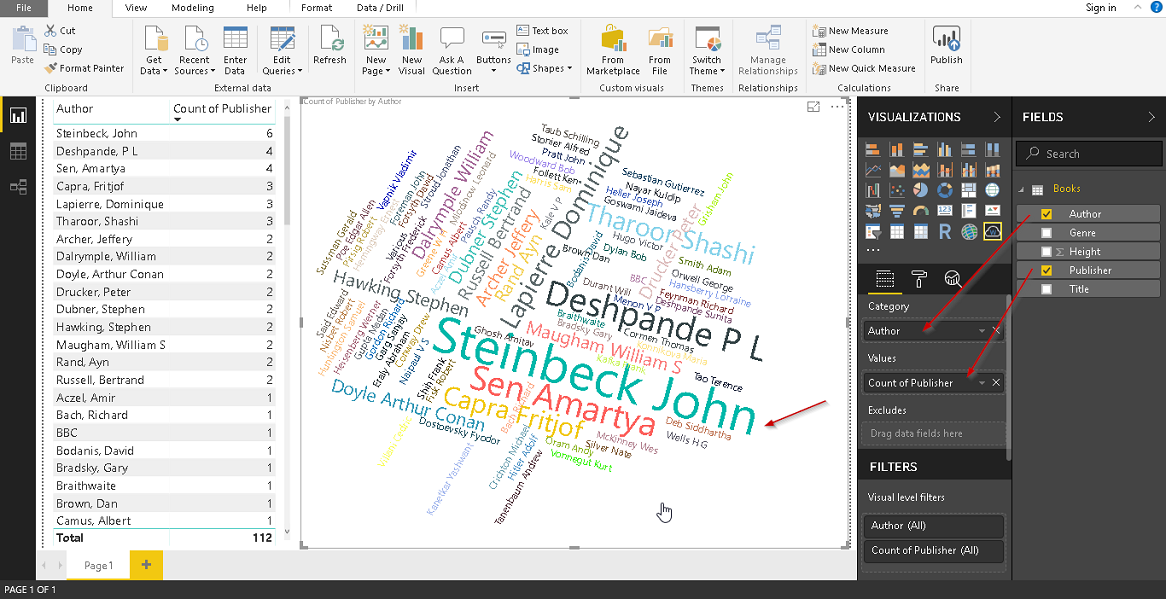
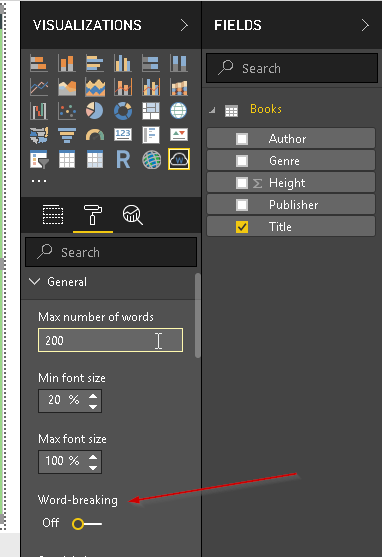
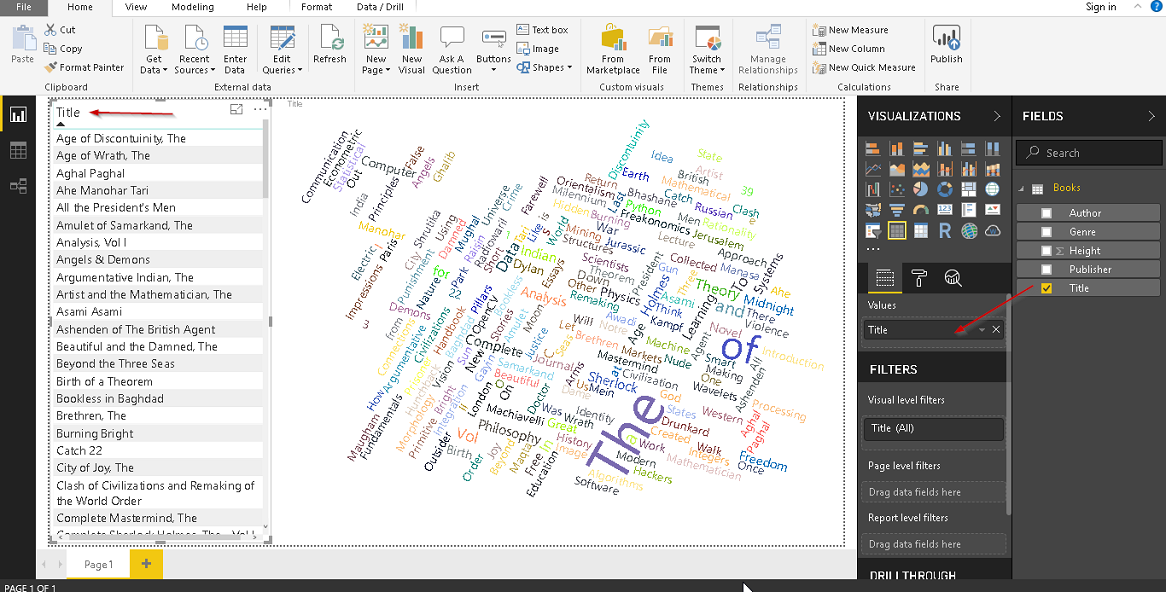
By default, the Word cluster looks for the first word in the value section in Word Cloud Generator. It does not look the entire word as a single word. If we want to create a Word cloud generator for the complete name, go to General ->Word-breaking. By default, it is turned on. Move the slider and turn off the word breaking.
We can now observe the Word cluster; this is now showing the complete name of the author. If we look at our data table, Steinbeck John is having the highest count and it reflects in the Word cluster. The font size of Steinbeck John is largest in the visual.

Now if we click on it, we can see that only one row for it.
Stop Words in Word Cloud Generator
We normally use some common words, for example, a, an, the, etc. Sometimes we do not want these words to appear in the Word cluster since they are commonly used words and if our dataset contains these words, it would be difficult to get a true picture of Word cluster by showing frequently used words.
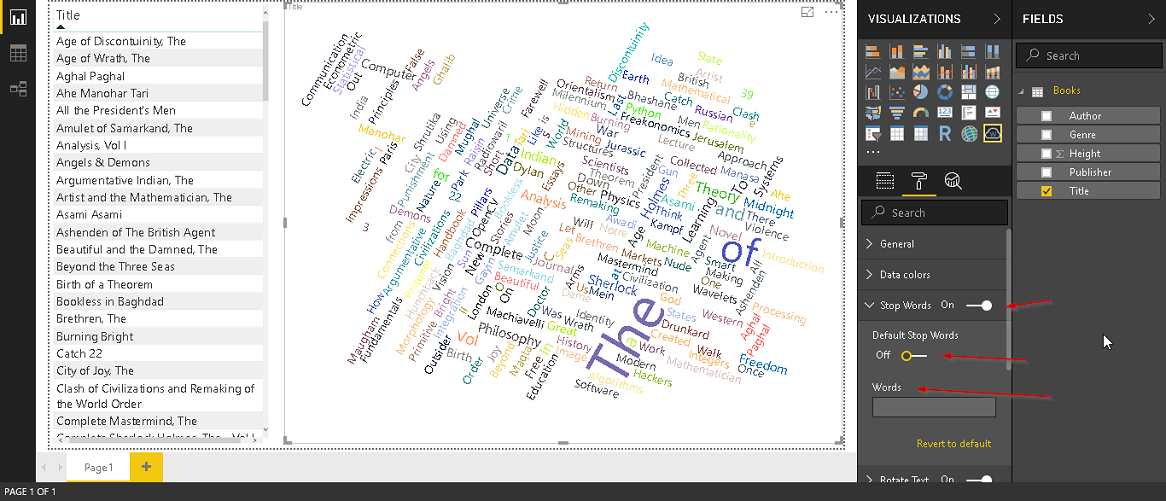
In the below example, we created a Word Cluster visual for ‘Title’.
We can see above, there are a few words (the, of) appearing in the visual and we do not want to show them in this Word cluster.
To exclude those words, go to format -: Stop Words.
Move the slider to turn on this feature and enable Default-Stop Words.
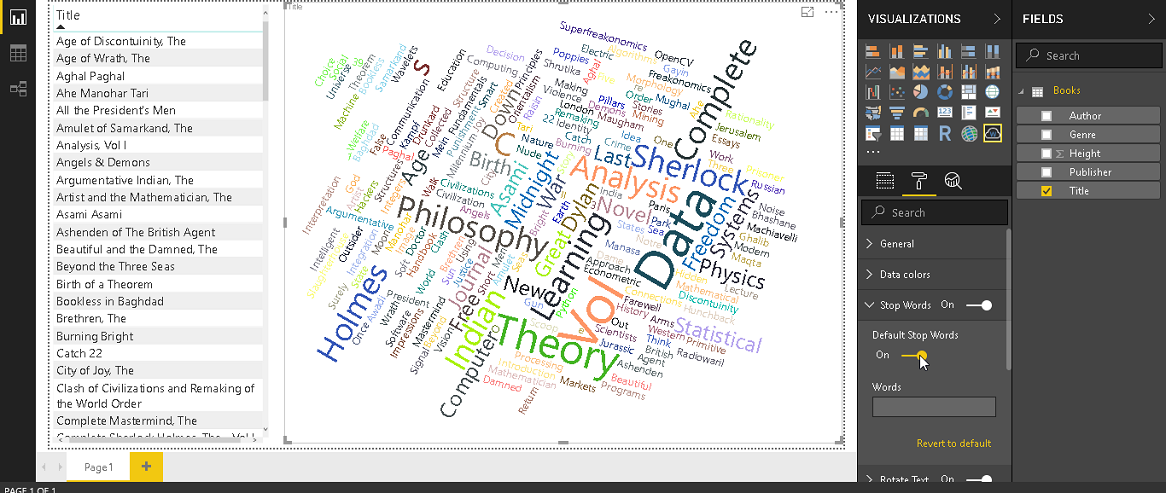
Default stop words removed commonly used stop words from the Word Cloud Generator.
We can see the below visual after we turned on Default-Stop Words.
We can also specify words to exclude apart from the default stop words. For example, we want to exclude the word ‘Vol’ so specify ‘Vol’ in the words section as shown below
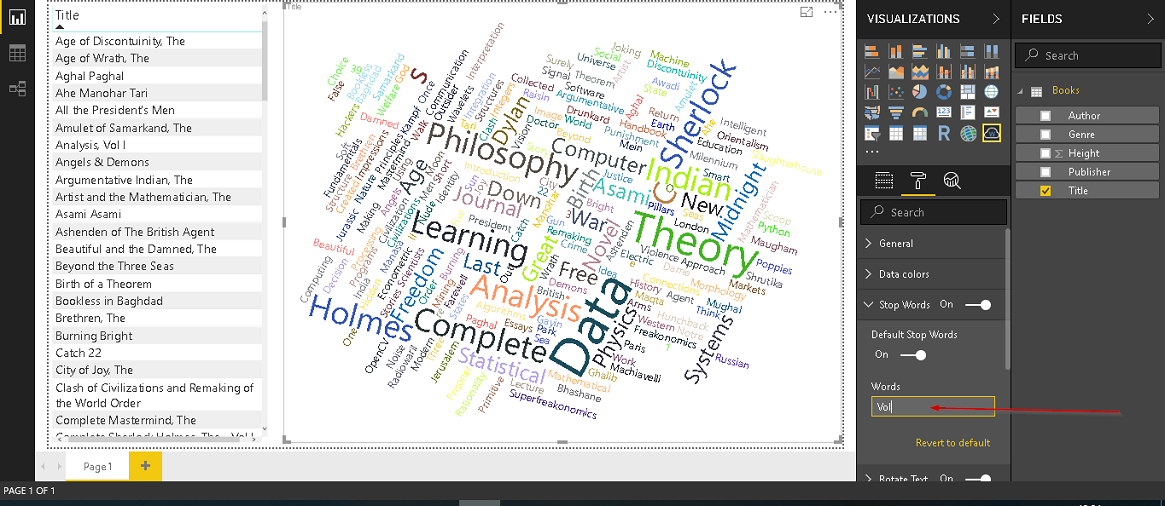
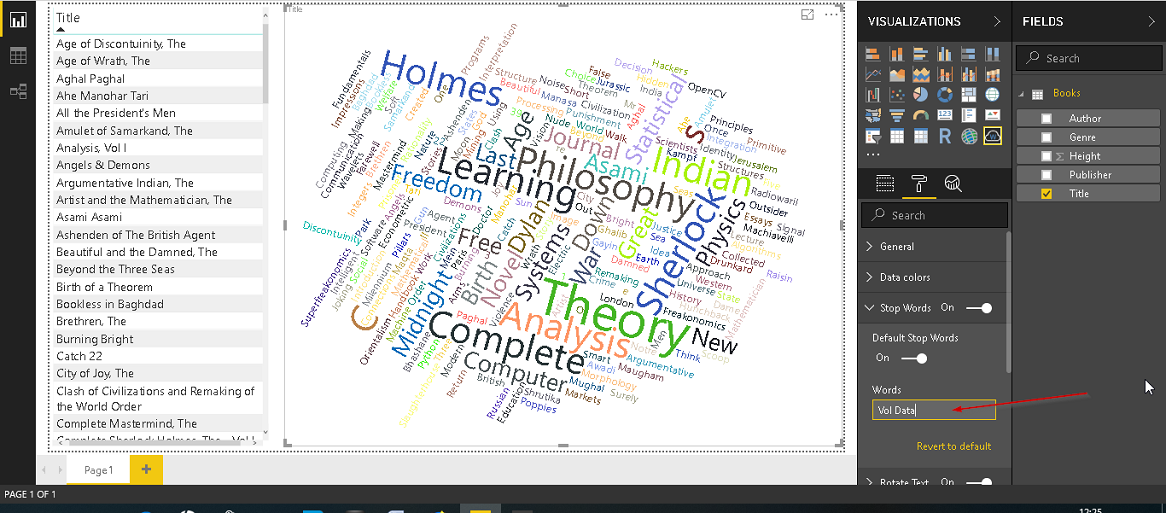
If we want to exclude multiple words, specify them with space. For example, in below visual, we excluded ‘Vol data’ keywords.
Customization in Word Cloud Generator
-
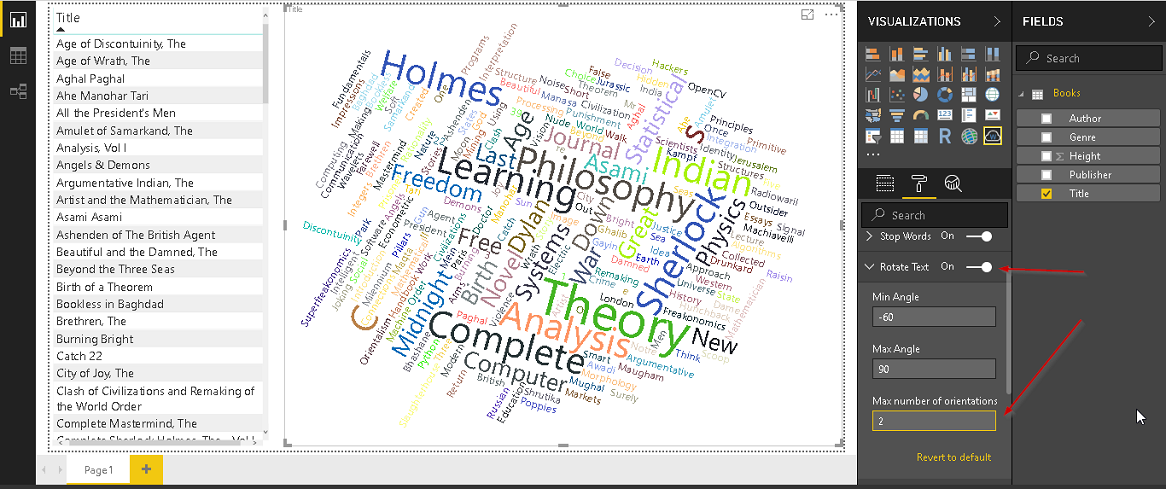
Rotation: we can specify the min and max angle of rotation along with Max number of rotations.
Go to the format section and Rotate Test. Change the desired property and observe the change in the Word cluster visual

-
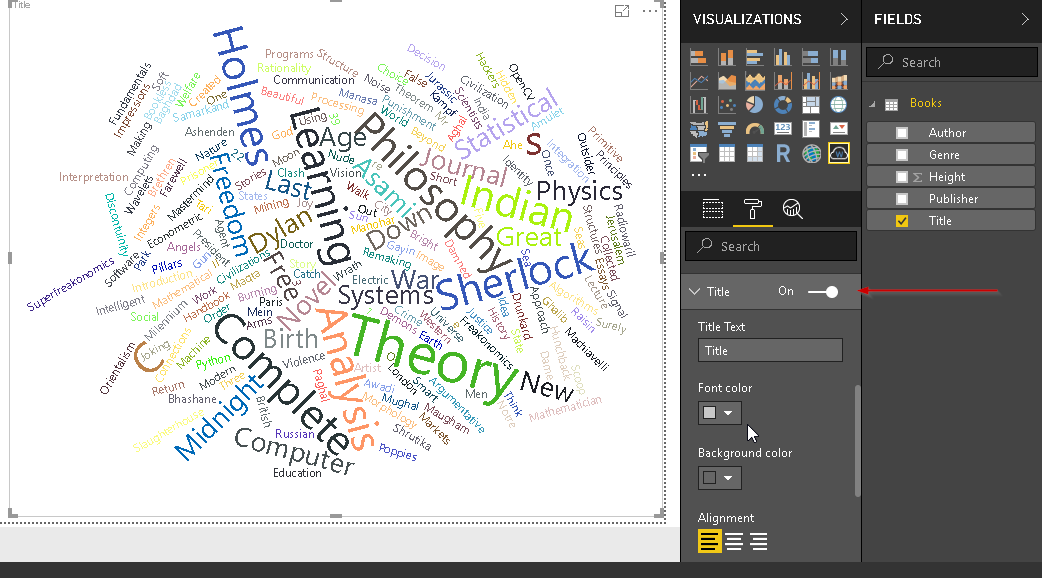
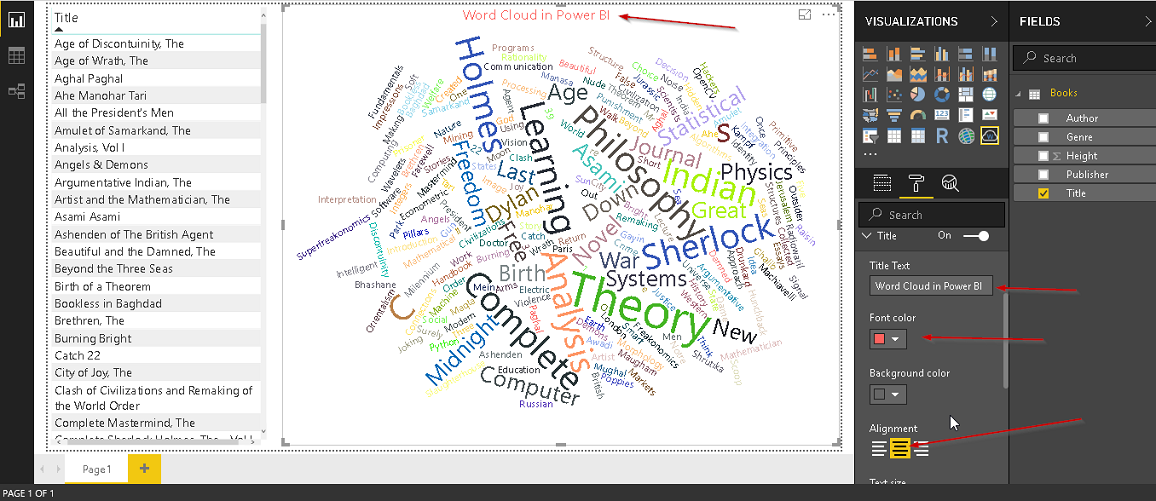
Title: We can set the title of the Word cluster visual from the format ->Title section. If we do not want the title, turn it off.
Specify the title, font colour, size, alignment and we can see that in the Word cluster visual
-
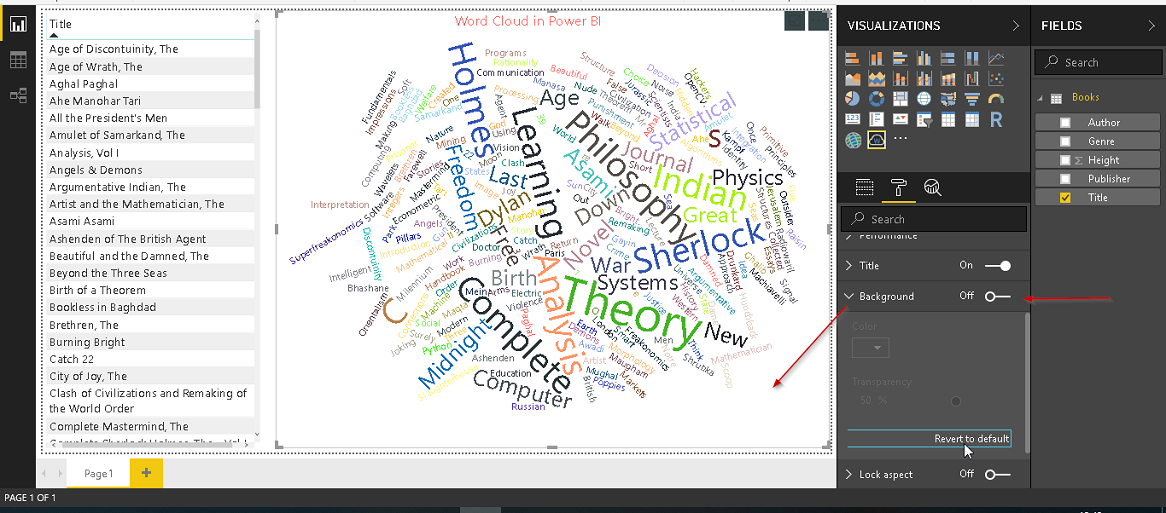
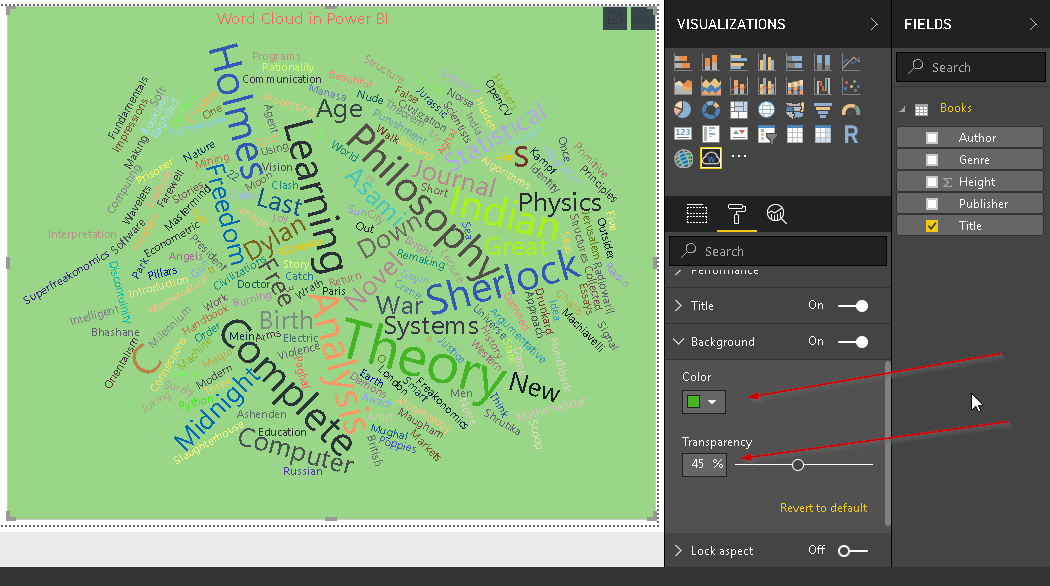
Background: we can change the background color of the Word cluster visual using this property. Go to Background in the format section
Turn it on and select the background color and transparency level

Conclusion
Word Cloud Generator in Power BI offers an interactive method to do the analysis for frequently used words, text with customization. In this article, we reviewed how to create a Word cloud generator with Power BI Desktop. Explore these techniques with your own data sets and enjoy clouding!
Table of contents
| Power BI Desktop Interactive chord diagrams |
| Power BI Desktop Pulse Charts |
| >How to create a Word Cloud generator in Power BI Desktop |
| Power BI desktop Mekko Charts |
| Hexbin Scatterplot in Power BI Desktop |
| Candlestick chart for stock data analysis in Power BI Desktop |
| Enlighten World Flag Slicer in Power BI Desktop |
| Flow Map Chart in Power BI Desktop |
| Ask a Question feature in Power BI Desktop |
| Power BI Desktop Q&A data interaction examples |
| Power BI Desktop and Python; like Peanut Butter and Chocolate |
| Power BI Desktop Pie Chart Tree |
| Importing data from a PDF file in Power BI Desktop |
- Author
- Recent Posts

Hi! I am Rajendra Gupta, Database Specialist and Architect, helping organizations implement Microsoft SQL Server, Azure, Couchbase, AWS solutions fast and efficiently, fix related issues, and Performance Tuning with over 14 years of experience.
I am the author of the book «DP-300 Administering Relational Database on Microsoft Azure». I published more than 650 technical articles on MSSQLTips, SQLShack, Quest, CodingSight, and SeveralNines.
I am the creator of one of the biggest free online collections of articles on a single topic, with his 50-part series on SQL Server Always On Availability Groups.
Based on my contribution to the SQL Server community, I have been recognized as the prestigious Best Author of the Year continuously in 2019, 2020, and 2021 (2nd Rank) at SQLShack and the MSSQLTIPS champions award in 2020.
Personal Blog: https://www.dbblogger.com
I am always interested in new challenges so if you need consulting help, reach me at rajendra.gupta16@gmail.com
View all posts by Rajendra Gupta
PowerBI-visuals-WordCloud
![]()
Word Cloud is a visual representation of word frequency and value. Use it to get instant insight into the most important terms in a set.

Overview
Word Cloud is a visual representation of word frequency and value. Use it to get instant insight into the most important terms in your data.
With the interactive experience of Word Cloud in Power BI, you no longer have to tediously dig through large volumes of text to find out which terms are prominent or prevalent. You can simply visualize them as Word Cloud and get the big picture instantly and user Power BI’s interactivity to slice and dice further to uncover the themes behind the text content.
This visual also puts you in control on the appearance of the work cloud, be it the size or usage of space and how to treat the data. You can choose to break the words in the text to look for the frequency word or keep word break off to project a measure as a value of the text. You can also enable stop words to remove the common terms from the word cloud to avoid the clutter. By enabling rotation and playing with the angles allowed, you can become very creative with this visual.
Optionally you can also use a measure to provide weightage to the text. If none provided, it will simply use the frequency. Check out the formatting pane for more options.
See also Word Cloud at Microsoft Office store
In this article, we will look at how to create a Word Cloud with Microsoft Power BI.
We will see what a word cloud is, why it is useful, and how to perform various transformations on a Word Cloud.
If you would like to learn more Power BI visuals are covered in our training for Power BI beginners.
What Is A Word Cloud?
A word cloud is a diagram that displays a collection of words in various sizes, colours, and orientations.
The sizes of the words in a word cloud usually depends on how often that word occurs in the chosen text.
Words that appear more frequently appear in larger, bolder text.
Here is a typical word cloud.
Historically if you wanted this type of text analysis you have to use advanced text analytics libraries such as Microsoft Azure Text Analytics, or IBM Watson. For very advanced text analysis you still need to use these tools as Power BI can not match their capabilities unless you have an enterprise licence. For more details, we have written an on Power BI licences.
What Is A Word Cloud Used For?
A word cloud is commonly used in text analysis to get a very high-level overview of the vocabulary using in a text.
Examples of how they can be used to include:
- Plotting a word cloud of positive or negative customer reviews to see what the common words used are when customers do or don’t like your product.
- A word cloud of product names from a product sales dataset can reveal a relative comparison of the products with the highest number of sales.
- A word cloud is an excellent way to visualise text insights to an audience with no technical knowledge.
- Word clouds are extremely fast to plot and pleasing to the eye and so useful for presentations.
Including a word cloud visual in a Power BI dashboard is a great way to summarise data for people. Just as a Gantt chart is great for projects and a decomposition tree is great for root cause analysis.
By default, Power BI doesn’t contain the word cloud visualization, it is a custom visual.
To access it, you need to import the word cloud visual from Microsoft’s online marketplace.
To do this, go to the Power BI dashboard in Power BI desktop and then click on three dots just below the list of icons for different visualizations you can use.
Click the “Get more visuals” option.
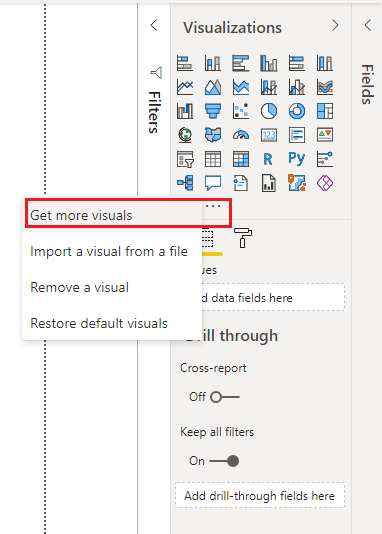
The Power BI marketplace for visuals will open.
Type “word” in the search field.
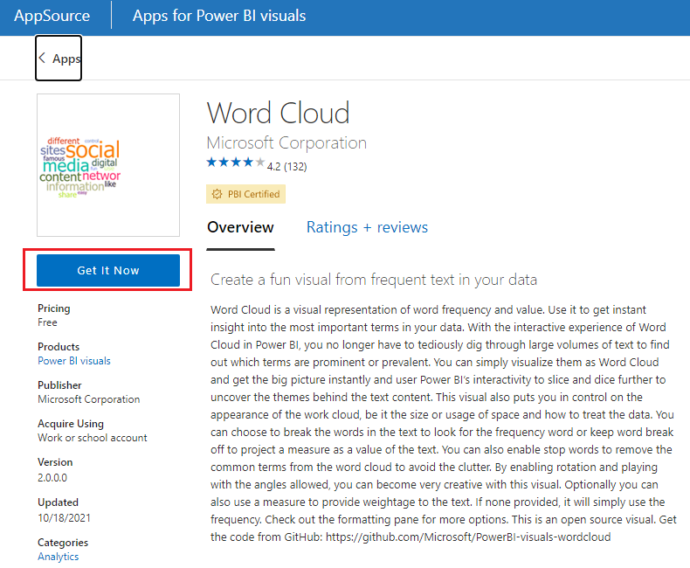
You will see the “Word Cloud” visual developed by Microsoft Corporation appear.
Click on it.
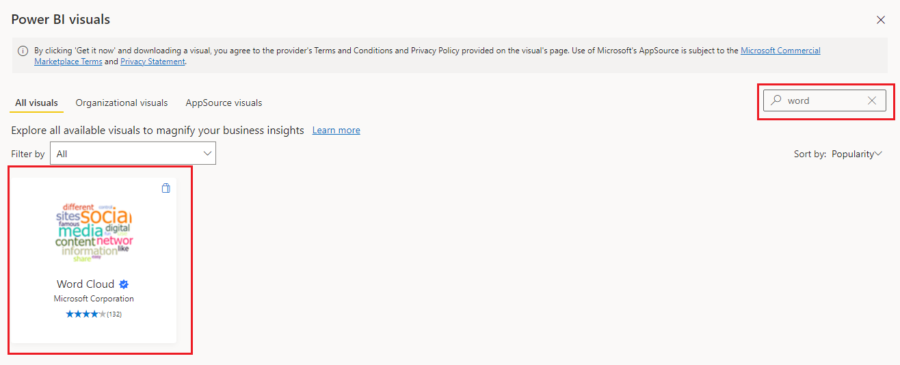
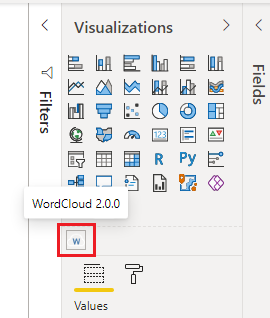
Next, click the “Get it Now” button.
Once Power BI has downloaded the Word Cloud visual it will appear in the Visualizations pane as shown below.
Importing Data For Our Example
Let’s import a dataset to create a word cloud.
The dataset we will be using can be downloaded from Kaggle.
https://www.kaggle.com/datafiniti/consumer-reviews-of-amazon-products?select=1429_1.csv
The dataset contains Amazon reviews in the form of texts for various products along with other information such as integer rating (from 1 to 5) etc.
Download the CSV file for the dataset from the above link.
In your Power BI dashboard, click the “Get data” option from the top menu and then select the “Text/CSV” option from the dropdown list.
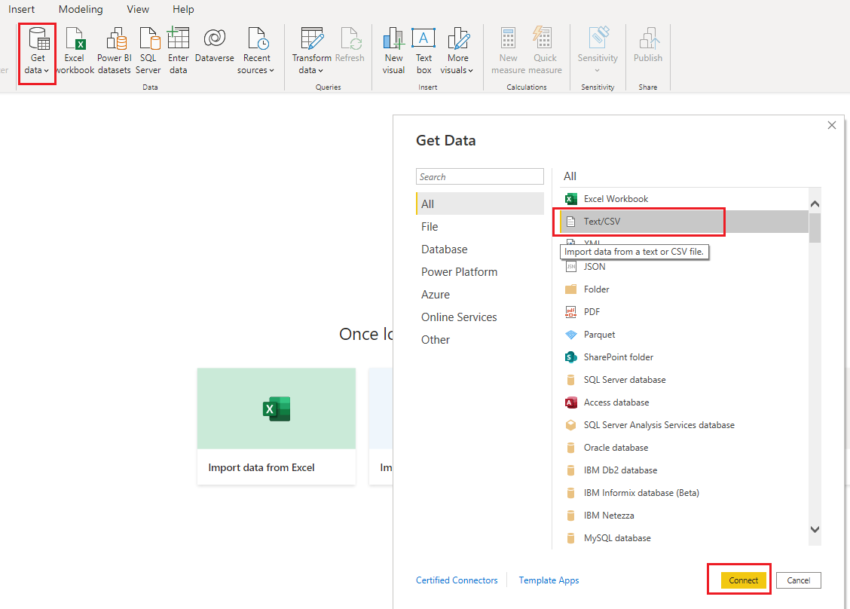
Browse to your downloaded CSV file and open it.
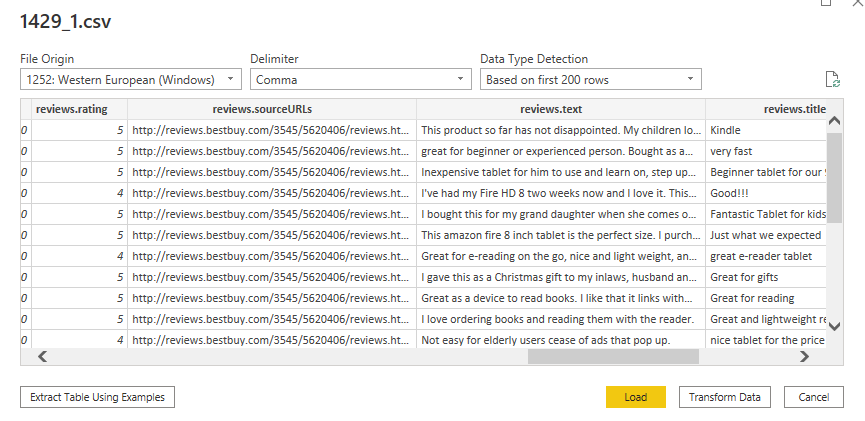
You will see your data displayed, as below, including the column names from your dataset.
Click the “Load” button to load the dataset.
Creating A Simple Word Cloud
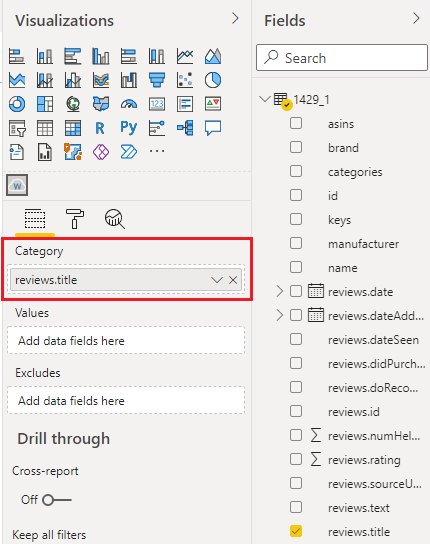
In your visualisations panel, click the “Word Cloud” visual icon.
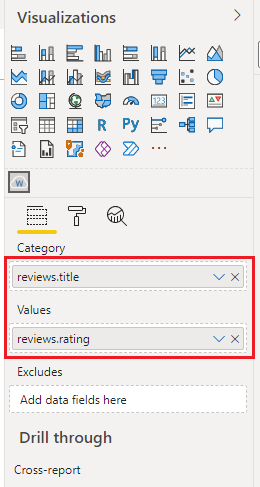
Drag and drop the “reviews.title” column from the dataset into the “Category” data field.
The “reviews.title” column contains titles of text reviews in the dataset.
In the output, you will see the following.
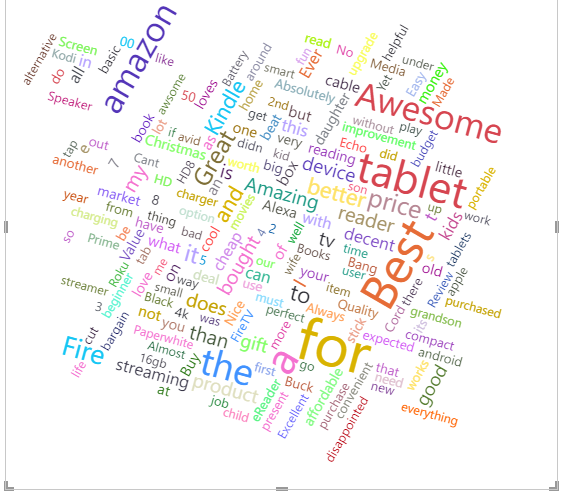
You can see that the words “for” and “Best” occurred in the largest number of review titles as they appear as they are bigger and bolder than any of the other words.
Similarly, the word “disappointed” is very small which shows that this word did not appear in a lot of review titles.
By default, the word cloud is based on the overall frequency of occurrence of words in the complete dataset.
You can create a word cloud based on the information from some other column. For example, a word cloud which uses the sum of the integer ratings for text reviews that that specific word appears in.
Let’s see how you can do this.
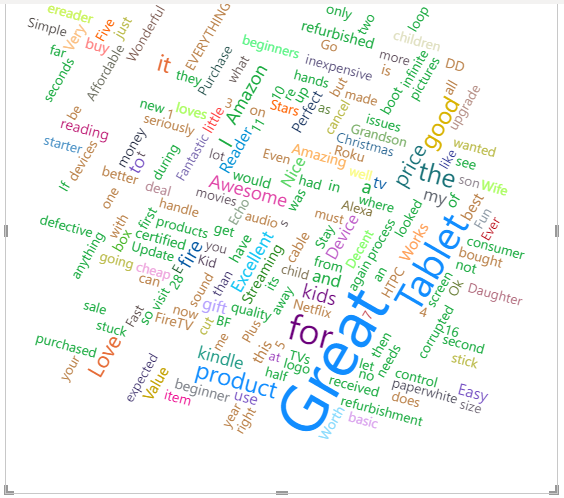
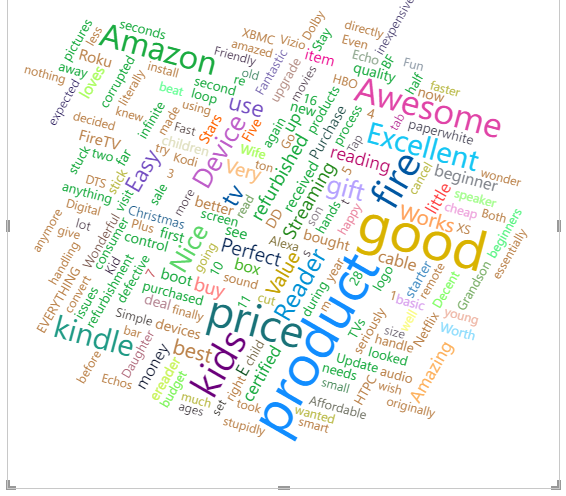
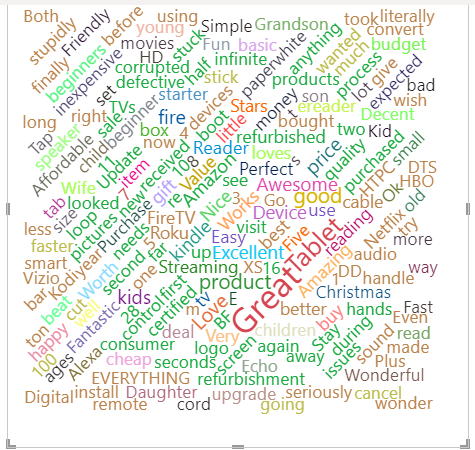
Drag and drop the “reviews.rating” column from the dataset to the “Values” data field of the word cloud visualization as shown below:
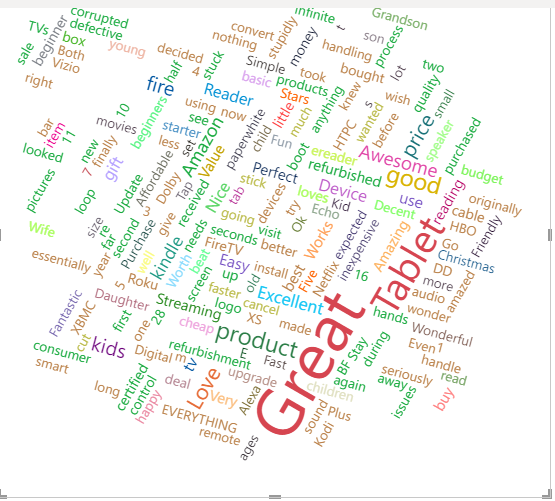
You will see the word cloud below.
This shows that the words “Great” and “Tablet” appear most frequently in reviews with higher ratings. You would expect “Great” to appear frequently in high scoring reviews.
More useful is the fact that “Tablet” frequently appears in high scoring reviews.
Excluding Stop Words From A Word Cloud
Stop words are words that occur frequently and don’t convey any meaningful information. For example – “is”, “am”, “for”, “at” etc.
By default, the Power BI word cloud won’t remove a stop word in your data which is why our word clouds above contain these types of words.
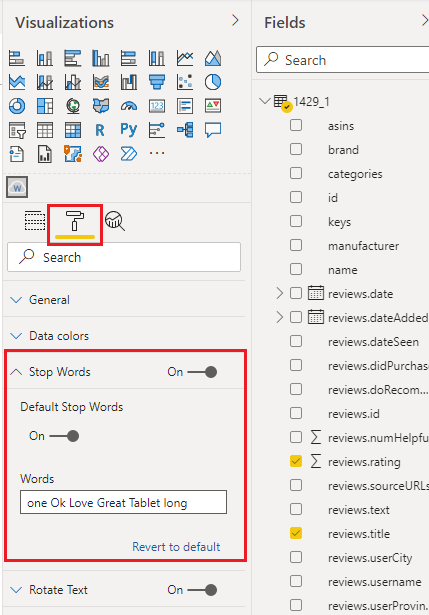
To exclude stop words from your cloud, click on the “Format” option and then select and drag the button to the right of the “Stop Words” option to make it “On”.
Next, to remove default stop words, you need to switch the button for the “Default Stop Words” option to “On“. This removes all the default stop words from your cloud.
You can specify additional words that you would like to exclude.
Simply type them into the “Words” text field separated by spaces.
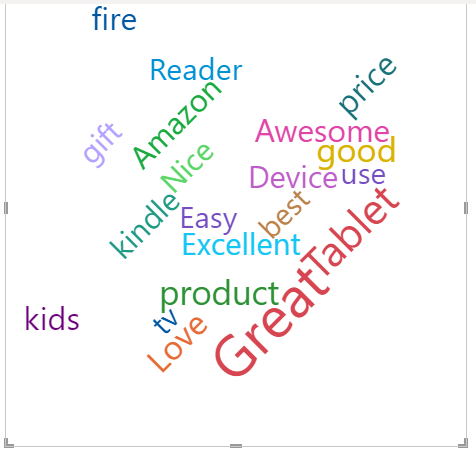
In the figure below, apart from default list of stop words, we will also remove the following words “one OK Love Great Tablet long”.
Now, if you now look at the word cloud, you can see the default and manual stop words have been removed.
Editing A Word Cloud
Let’s now look at some options to edit the default word cloud in Power BI.
Changing Colours
To change the colours of the words in your word cloud, select the “Data colors” option from the “Format” field.
You can now specify colours for all the individual words in your word cloud.
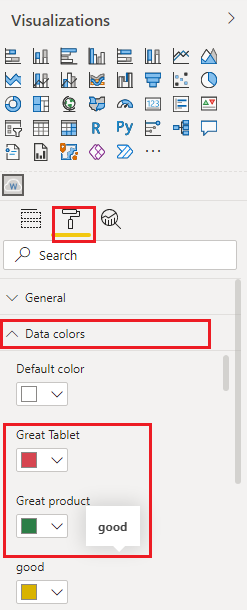
Here is how your word cloud looks after you update the colours:
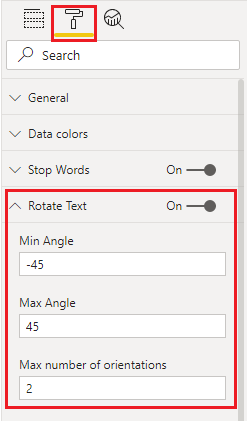
Changing The Orientation of Words
You can also change the orientation of words in your word cloud.
Go to the “Format” > “Rotate Text” option.
Enter the values in degrees for the minimum and maximum angles you would like words displayed at.
You also need to enter an integer value for the maximum number of orientations.
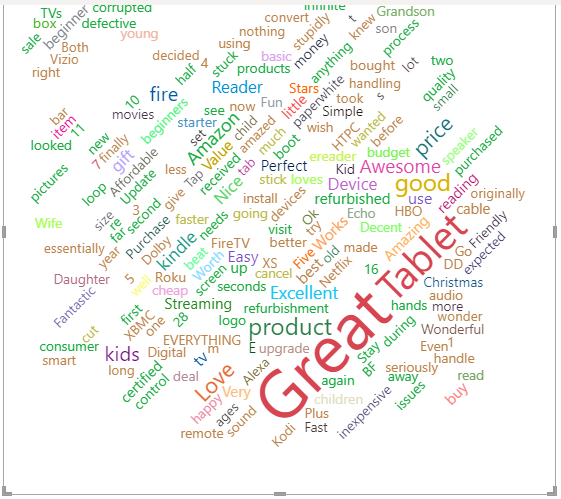
In the figure below we have set the minimum and maximum angle values to -45 to 45.
Power BI will then choose two orientations at random between the maximum and minimum figures set.
Here is the output after you change the orientation of your word cloud.
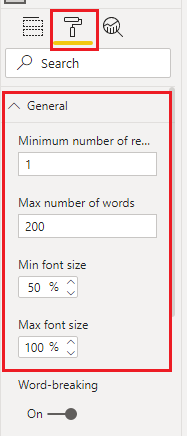
Changing Font Size
To change the font size of our word cloud, enter the minimum and maximum font size values in the “Min font size” and “Max font size” fields, respectively.
These values are obviously relative to the average size.
The default values for minimum and max font sizes are 20% and 100% respectively.
The following figure updates the minimum font size value to 50%.
Since the minimum font size has been increased and the maximum font size kept the same, the words will appear more cramped and pushed together as they take up more space.
They will also appear more similar in size.
Limiting The Number of Words
You may want to change the maximum number of words that appear on your word cloud so that the words that do appear are clearer.
These settings can be found in the “Format” section.
The default value is 200, but in the example below we have reduced this to 20.

In the output below, you can see that only the 20 most frequently occurring words appear in your word cloud.
Changing The Background Colour
Finally, you can also change the background colour of your word cloud in the “Format” options.
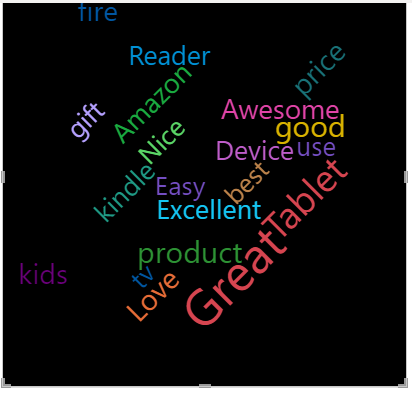
Here is how your word cloud looks once you change the background colour.
As you can see depending on the colours of your words different background will make different words stand out more or less.
Final Thoughts
The Power BI word cloud visual can be extremely useful, especially when producing visuals to be exported to PowerPoint.
It gives you a high-level overview of your text very quickly and simply, and can easily be added to reports or dashboards.
Word clouds are handy as they can be easily understood by non-technical audiences as well.
I have been asked a number of time how I created the word cloud in the Power BI Facebook analysis report shown in a previous video. So I thought it deserved a post on it’s own. I tend to focus more on numerical data, so it is a nice change to show you how you can use and visualize Text Data.
The Word cloud is not part of Power BI standard visuals but instead it is available to download from the Power BI custom visuals website. The visuals available on this website have been created by Power BI Partners and some even by Microsoft.
To use the custom visual, you must first download it and then upload it to Power BI. I would suggest you create a folder just for all of your custom visuals so that way they are all in the one place and you can easily find them.
Once you have downloaded the files, in PowerBI, under visualizations, there are 3 dots, this is the import visuals button. Select this and then locate the visual on your computer. You will get a security warning, but visuals downloaded from this site don’t generally have problems so you can just ignore this warning.
Once it has been installed you will see a new icon within the visualizations pane.
Let’s begin to create our word cloud. The data that I am using are reviews that I have taken directly from some of the online courses I teach. But you can use any sample data once it contains a data type of Text.
Into my categories field on the visualization set up and I am going to drop my text field, which is the column named comment. As soon as I drop this in the word cloud visualization is generated. What happens is it reads though all of the text and selects the most commonly used words. However in our example we can see a lot of words such as ‘and’ ‘If’ ‘or’. These words are known as stop words and really skewer our visualization.
To remove these stop words, if we select format and then turn on both Stop words and Default stop words, common words such as ‘And’ will be removed.

Looking at the word cloud now, I can still see an improvement we could make. I know that all of text that has been analyses relates to my online courses. So there is no real need to include the word ‘Course’ and it is the biggest word in the image.
To remove words other than stop words, you can enter these into the field below default stop words. Once I enter the word Course, my custom visualization updates. I think it’s a much better representation of the common words used that before we made the tweaks.
Other options include
- Rotating text
- Title
- The ability to change coloring of the words under ‘Data Colors’
- The ability to set bot the Maximum and minimum number of words under ‘General’
The Excel Club blog has now been powered with STEEM. We are a tokenized website where you can earn while you learn. To earn STEEM tokens post your questions or feedback in the comments section below.
If you have been waiting on a STEEM account and not yet got one, I can help you out and get you fast tracked. Contact me using this contact form. Or you can apply directly using this link
In return for this tip ‘Power BI Custom Visuals – Text to Generate Word Clouds’ I ask that you share this post or the video with your friends and colleagues
Sign up for my newsletter – Don’t worry, I wont spam. Just useful Excel and Power BI tips and tricks to your inbox
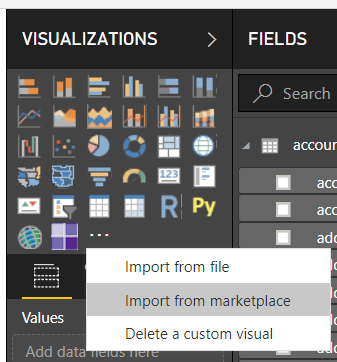
To install the Word Cloud Visual by Microsoft for Power BI, first open Power BI Desktop, and under Visualizations, select Import from marketplace:
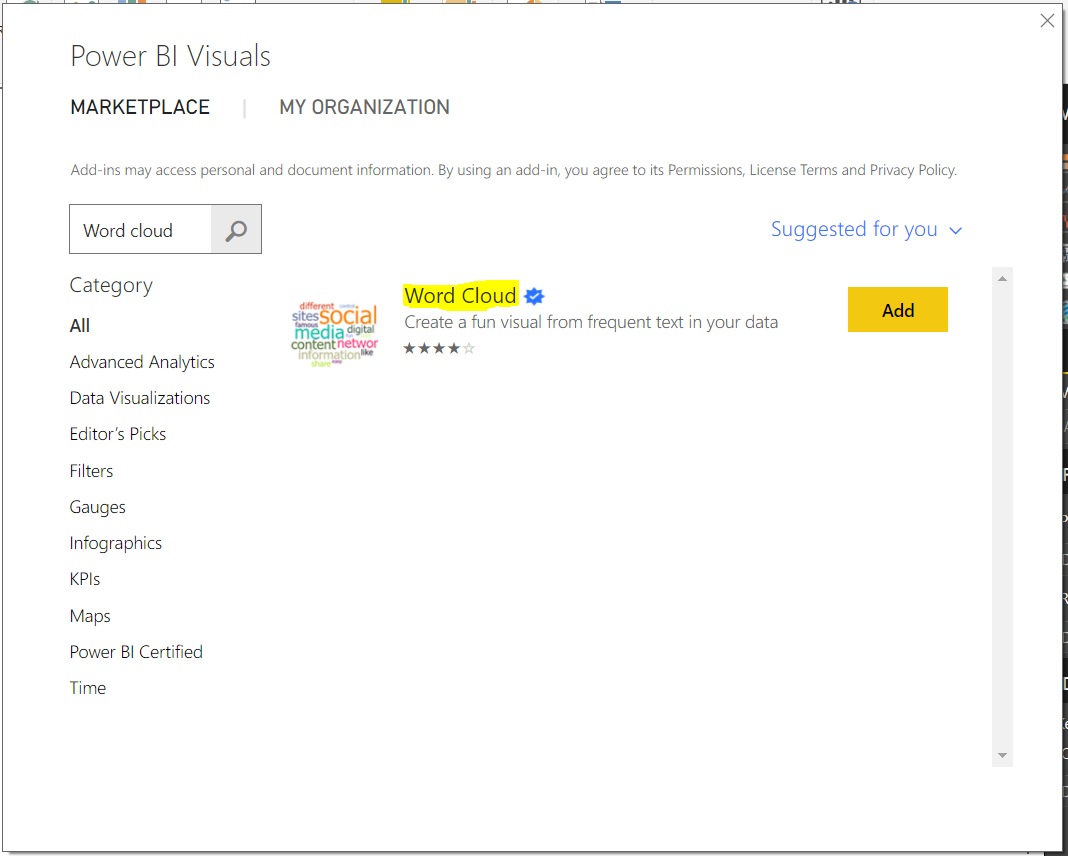
Find Word Cloud and click Add:
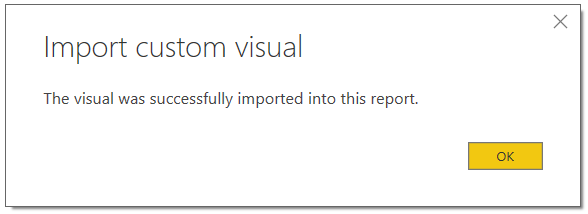
Click OK:
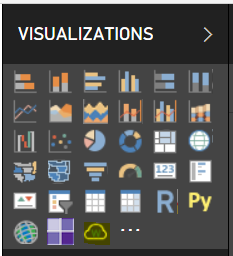
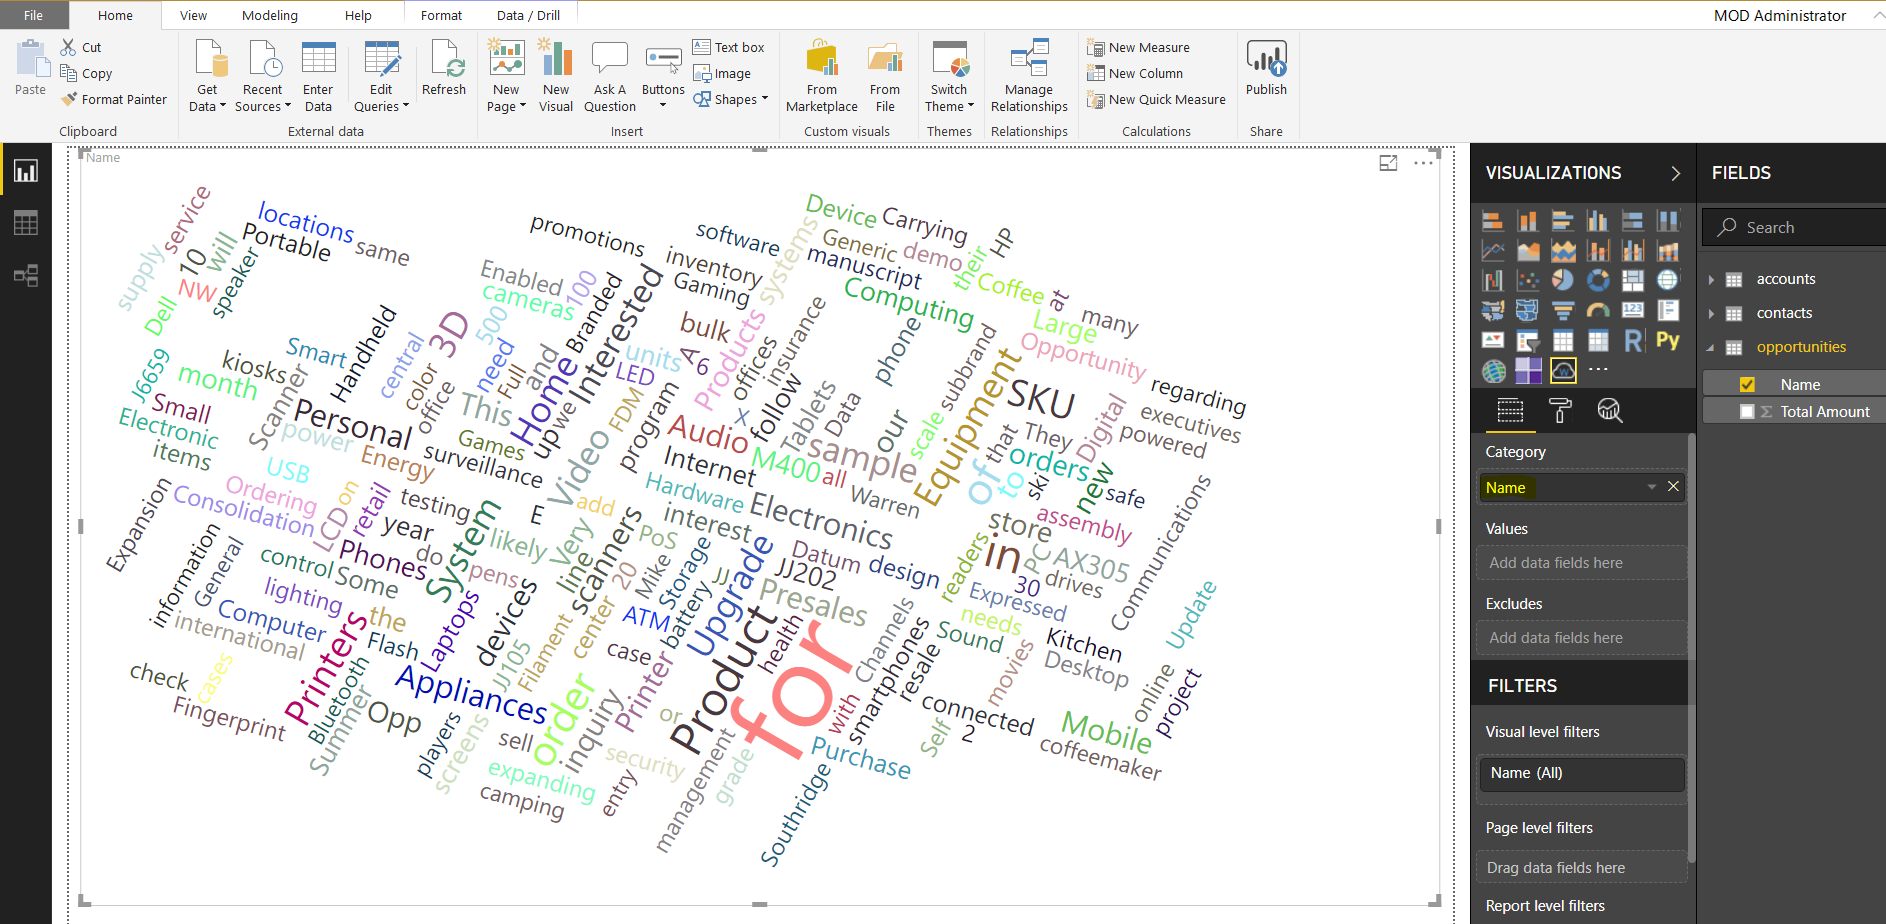
Now under Visualizations you will see the Word Cloud icon:
Select it. In our example, our Opportunity records have a name field, which describes customer opportunities. We will use that as the Category of the word cloud. You can see, “for” is a very common word in the opportunity records, along with “product”:
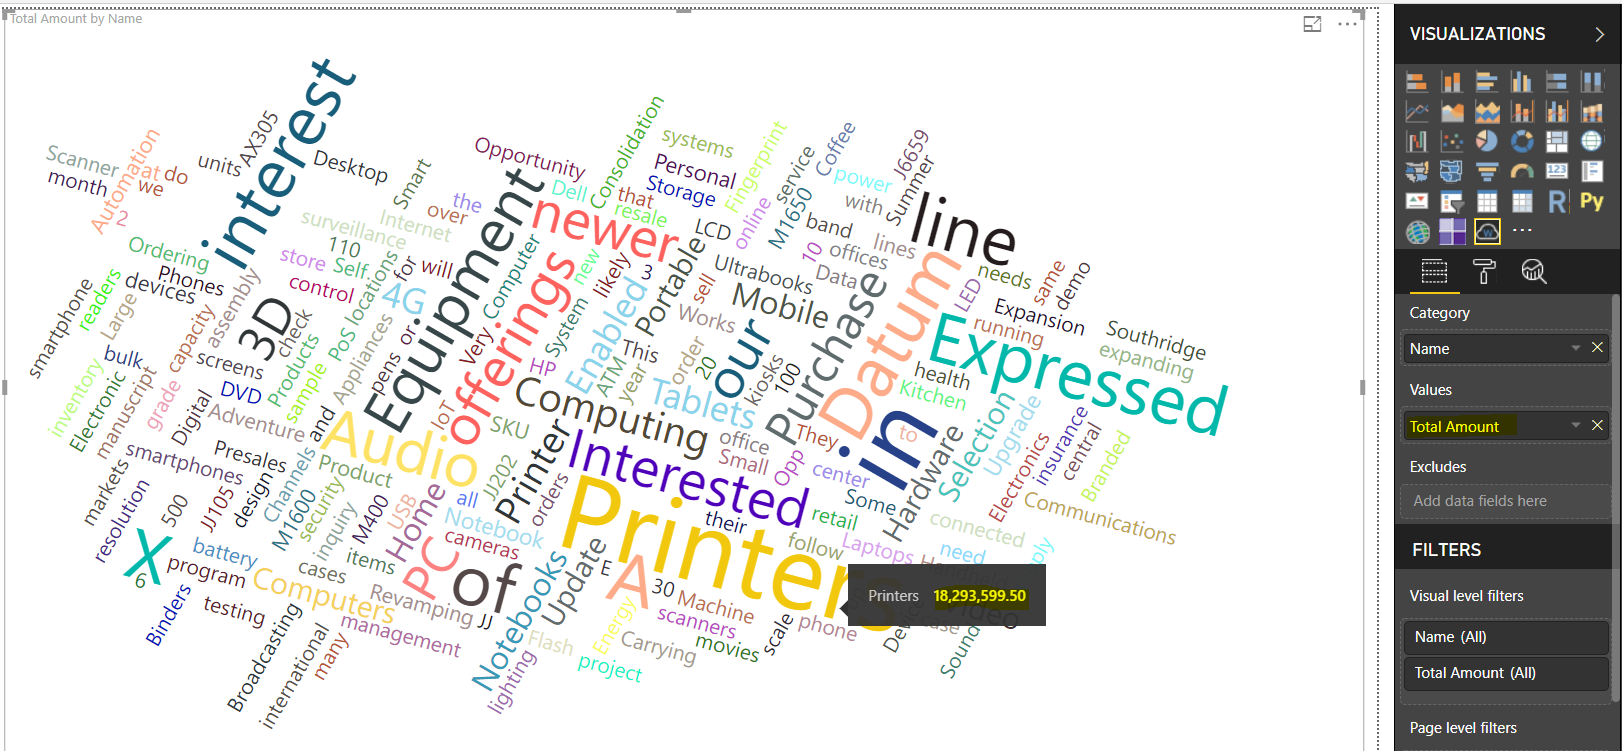
We can also select a Value. We will select the total amount of the opportunity. Here we can see “printers” has a high amount as is represented in the word cloud:
We can also exclude as required.
THANKS FOR READING. BEFORE YOU LEAVE, I NEED YOUR HELP.
I AM SPENDING MORE TIME THESE DAYS CREATING YOUTUBE VIDEOS TO HELP PEOPLE LEARN THE MICROSOFT POWER PLATFORM.
IF YOU WOULD LIKE TO SEE HOW I BUILD APPS, OR FIND SOMETHING USEFUL READING MY BLOG, I WOULD REALLY APPRECIATE YOU SUBSCRIBING TO MY YOUTUBE CHANNEL.
THANK YOU, AND LET’S KEEP LEARNING TOGETHER.
CARL
https://www.youtube.com/carldesouza
