
Excel — очень полезное программное обеспечение, которое может помочь оптимизировать работы, связанные с числами или требующие быстрых расчетов, сортировки огромных источников данных, анализа результатов опросов и т. д.
Вы давно используете Excel, но задумывались ли вы когда-нибудь, что Excel может генерировать облако слов в мозговом штурме и других ледокольных мероприятиях с помощью нескольких простых шагов? Давайте подготовимся к изучению Word Cloud Excel, чтобы повысить производительность и производительность вашей команды.
Содержание
- Что такое Word Cloud Excel?
- Каковы преимущества использования Word Cloud Excel?
- Как создать Word Cloud Excel?
- Альтернативный способ создания Word Cloud Excel
- Выводы
Дополнительные советы с AhaSlides
- Живой генератор облака слов
- Совместное облако слов
- Английские сленговые слова
Когда дело доходит до Word Cloud, также называемого облаком тегов, это функция для сбора и отображения идей, которые придумал каждый участник, чтобы ответить на определенный вопрос темы в сеансе мозгового штурма.
Более того, это своего рода визуальное представление, используемое для обозначения значимых ключевых слов и тегов, используемых в текстовых данных. Теги обычно представляют собой отдельные слова, но иногда представляют собой короткие фразы, и значение каждого слова отображается разными цветами и размерами шрифта.
Есть много умных способов создать Word Cloud, и использование Excel может быть хорошим вариантом, поскольку оно бесплатное и не требует регистрации. Вы можете просто понять, что Word Cloud Excel использует доступные функции в Excel для генерации ключевых слов наиболее наглядным и заметным способом.

Каковы преимущества использования Word Cloud Excel?
Используя Word Cloud, вы можете по-новому взглянуть на то, как ваша аудитория, студенты или сотрудники действительно думают, и вскоре распознать хорошие идеи, которые могут привести к прорывам и инновациям.
- Участники чувствуют, что они являются частью презентации, и чувствуют свою ценность в представлении идей и решений.
- Узнайте, насколько хорошо ваши участники относятся к теме или ситуации и понимают ее.
- Ваша аудитория может резюмировать свои мнения по теме
- Поощряйте вас определять, что важно для вашей аудитории
- Проведите мозговой штурм нестандартных концепций или идей
- Инновационный способ тренировать мозг людей и придумывать благородные концепции
- Следите за ключевыми словами в вашем контексте
- Определить обратную связь аудитории в их собственном выборе слов
- Способствовать взаимной обратной связи
Как создать Word Cloud Excel? 7 простых шагов
Итак, как проще всего создать Word Cloud Excel? Вы можете выполнить следующие шаги, чтобы настроить Word Cloud Excel без использования другого внешнего программного обеспечения:
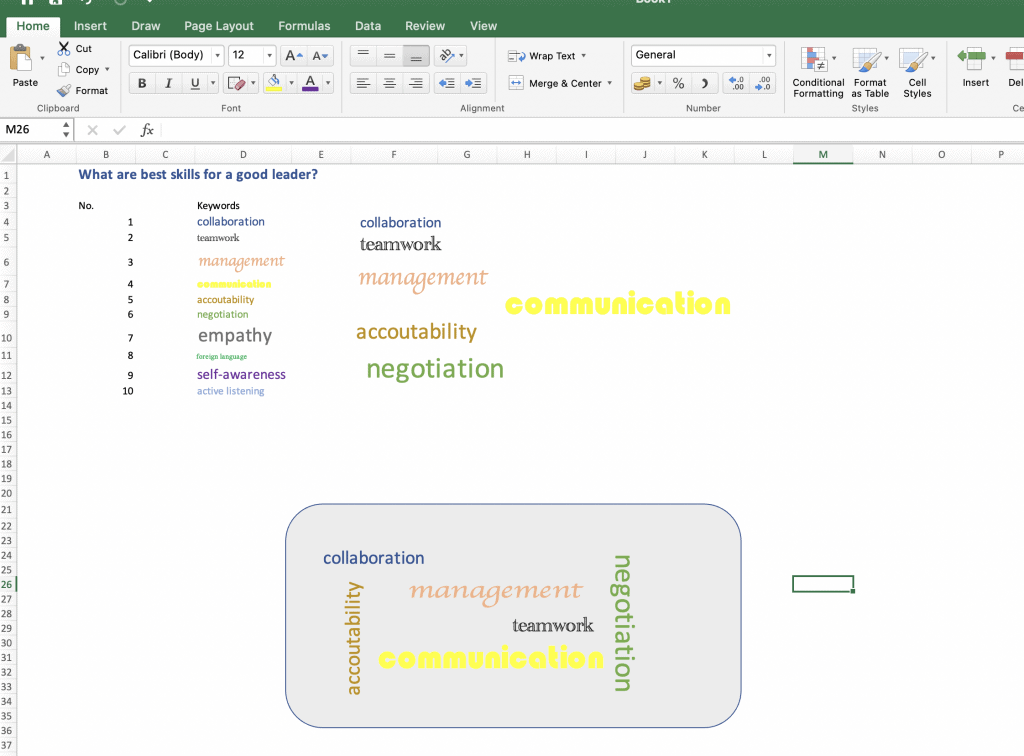
- Шаг 1. Перейдите к файлу Excel, затем откройте лист для создания Word Cloud.
- Шаг 2: Создайте список ключевых слов в одном столбце (например, столбец D) по одному слову в строке без границы строки, и вы можете свободно редактировать размер слова, шрифт и цвет каждого слова в зависимости от ваших предпочтений и приоритетов.
Советы. Чтобы удалить линии сетки в Excel, перейдите к Види снимите галочку с Сетки пунктом.

- Шаг 3: Скопируйте слово из списка слов и вставьте его в следующие столбцы (например, столбец F), следуя опции: Вставить как связанное изображение под Специальная вставка.
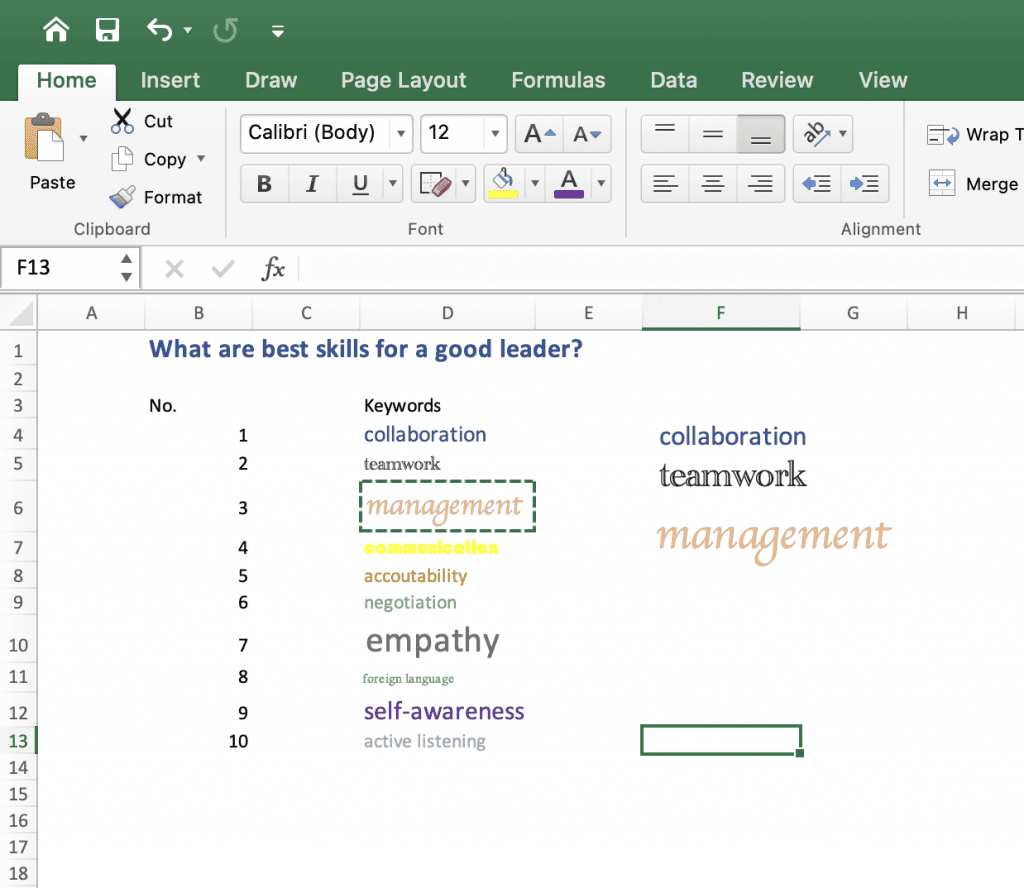
Советы: вы можете перетащить изображение слова напрямую, чтобы настроить его размер.
- Шаг 4: В остальной части листа Excel найдите место для вставки фигуры. Для этого перейдите в Вставить, под Формы, выберите форму, которая подходит для вашего выбора.
- Шаг 5: После того, как округлая форма сформирована, измените цвет, если хотите.
- Шаг 6: Перетащите или скопируйте и вставьте изображение слова в созданные фигуры с любым типом выравнивания, например, вертикальным или горизонтальным и т. д.
Советы: вы можете редактировать слова в списке слов, и они будут автоматически обновляться в облаке слов.
Благодаря вашему терпению и усилиям результат может выглядеть следующим образом:
Альтернативный способ создания Word Cloud Excel
Однако существует еще один вариант настройки Word Cloud Excel с помощью онлайн-программного обеспечения Word Cloud. В Excel интегрировано множество приложений Word Cloud, например Облако слов AhaSlides. Вы можете использовать надстройки для добавления Word Cloud или просто вставить изображение хорошо продуманного Word Cloud через онлайн-приложение на лист Excel.
Существуют некоторые ограничения создания Word Cloud через Excel по сравнению с другими онлайн-приложениями Word Cloud. Некоторые из них можно упомянуть, например, отсутствие интерактивных обновлений в реальном времени, привлекательных и иногда трудоемких.
В отличие от обычного Word Cloud, AhaSlides Word Cloud представляет собой интерактивное программное обеспечение для совместной работы, с помощью которого все приглашенные участники могут делиться своими идеями в обновлениях в режиме реального времени. Это также бесплатное облако слов, которое позволяет настраивать множество удобных функций и простой в использовании интерфейс. Ниже перечислены многочисленные впечатляющие функции AhaSlides, которые вы можете быстро просмотреть, прежде чем принять решение о работе. Вот они:
- Простота использования – работает Слайды PowerPoint
- Установить лимит времени
- Установить ограниченное количество участников
- Скрыть результаты
- Заблокировать отправку
- Разрешить участникам отправлять более одного раза
- Фильтр ненормативной лексики
- Изменить фон
- Добавить аудио
- Предварительный просмотр перед экспортом или публикацией
- Редактировать и обновлять после экспорта или публикации

Вы можете выполнить следующие шаги, чтобы добавить интерактивный Word Cloud Excel через AhaSlides в свои предстоящие действия.
- Шаг 1: Найдите облако слов AhaSlides. Вы можете использовать живое облако слов на целевой странице или с регистрационной учетной записью.
1-й вариант: если вы используете вариант на целевой странице, просто введите ключевые слова, сделайте снимок экрана и вставьте изображение в Excel.
2-й вариант: Если вы используете версию в зарегистрированной учетной записи, вы можете сохранить и обновить свою работу в любое время.
- Шаг 2: В случае второго варианта вы можете открыть шаблон Word Cloud и отредактировать вопросы, фон и т. д.…
- Шаг 3. После завершения настройки Word Cloud вы можете отправить ссылку своим участникам, чтобы они могли вставить свои ответы и идеи.
- Шаг 4: По истечении времени для сбора идей вы можете поделиться результатом со своей аудиторией и обсудить более подробно. Перейдите к электронной таблице в Microsoft Excel и под Вставить , нажмите Иллюстрации >> Картины > > Изображение из файла возможность вставить изображение Word Cloud в лист Excel.

Выводы
Подводя итог, нельзя отрицать, что Word Cloud Excel является приемлемым инструментом для бесплатного преобразования идей в наиболее информативные. Однако все еще существуют некоторые ограничения, которые Excel не может покрыть по сравнению с другим программным обеспечением для онлайн-презентаций. В зависимости от ваших целей и бюджета вы можете использовать множество бесплатных облачных сервисов Word Cloud, которые лучше всего подходят для генерации идей, совместной работы и экономии времени.
Если вы ищете новый способ эффективно и вдохновляюще генерировать идеи, вы можете попробовать Облако слов AhaSlides. Это фантастическое приложение, которое вы можете комбинировать со своими мероприятиями и встречами в учебном и рабочем контексте, чтобы привлечь участников и повысить производительность. Кроме того, вас ждет множество шаблонов викторин и игр.
Содержание
- Создание Word Cloud Excel (полное руководство 2023 г.)
- Содержание
- Содержание
- Начните за секунды.
- Дополнительные советы с AhaSlides
- Что такое Word Cloud Excel?
- Каковы преимущества использования Word Cloud Excel?
- Как создать Word Cloud Excel? 7 простых шагов
- Альтернативный способ создания Word Cloud Excel
- Выводы
- Как создать облако слов в Excel
- Как создать облако слов в Excel
- How to create a Word Cloud in Excel
- How to create Word Cloud in Excel
- Маргарита Успенская
- About the author
Создание Word Cloud Excel (полное руководство 2023 г.)
Астрид Тран • Март 14 2023 • 6 мин чтения
Содержание
Как лучше всего творить Облако слов Excel в 2023?
Excel — очень полезное программное обеспечение, которое может помочь оптимизировать работы, связанные с числами или требующие быстрых расчетов, сортировки огромных источников данных, анализа результатов опросов и т. д.
Вы давно используете Excel, но задумывались ли вы когда-нибудь, что Excel может генерировать облако слов в мозговом штурме и других ледокольных мероприятиях с помощью нескольких простых шагов? Давайте подготовимся к изучению Word Cloud Excel, чтобы повысить производительность и производительность вашей команды.
Содержание
Начните за секунды.
Узнайте, как настроить правильное онлайн-облако слов, готовое поделиться с вашей аудиторией!
Дополнительные советы с AhaSlides
Что такое Word Cloud Excel?
Когда дело доходит до Word Cloud, также называемого облаком тегов, это функция для сбора и отображения идей, которые придумал каждый участник, чтобы ответить на определенный вопрос темы в сеансе мозгового штурма.
Более того, это своего рода визуальное представление, используемое для обозначения значимых ключевых слов и тегов, используемых в текстовых данных. Теги обычно представляют собой отдельные слова, но иногда представляют собой короткие фразы, и значение каждого слова отображается разными цветами и размерами шрифта.
Есть много умных способов создать Word Cloud, и использование Excel может быть хорошим вариантом, поскольку оно бесплатное и не требует регистрации. Вы можете просто понять, что Word Cloud Excel использует доступные функции в Excel для генерации ключевых слов наиболее наглядным и заметным способом.
Каковы преимущества использования Word Cloud Excel?
Используя Word Cloud, вы можете по-новому взглянуть на то, как ваша аудитория, студенты или сотрудники действительно думают, и вскоре распознать хорошие идеи, которые могут привести к прорывам и инновациям.
- Участники чувствуют, что они являются частью презентации, и чувствуют свою ценность в представлении идей и решений.
- Узнайте, насколько хорошо ваши участники относятся к теме или ситуации и понимают ее.
- Ваша аудитория может резюмировать свои мнения по теме
- Поощряйте вас определять, что важно для вашей аудитории
- Проведите мозговой штурм нестандартных концепций или идей
- Инновационный способ тренировать мозг людей и придумывать благородные концепции
- Следите за ключевыми словами в вашем контексте
- Определить обратную связь аудитории в их собственном выборе слов
- Способствовать взаимной обратной связи
Как создать Word Cloud Excel? 7 простых шагов
Итак, как проще всего создать Word Cloud Excel? Вы можете выполнить следующие шаги, чтобы настроить Word Cloud Excel без использования другого внешнего программного обеспечения:
- Шаг 1. Перейдите к файлу Excel, затем откройте лист для создания Word Cloud.
- Шаг 2: Создайте список ключевых слов в одном столбце (например, столбец D) по одному слову в строке без границы строки, и вы можете свободно редактировать размер слова, шрифт и цвет каждого слова в зависимости от ваших предпочтений и приоритетов.
Советы. Чтобы удалить линии сетки в Excel, перейдите к Види снимите галочку с Сетки пунктом.
- Шаг 3: Скопируйте слово из списка слов и вставьте его в следующие столбцы (например, столбец F), следуя опции: Вставить как связанное изображение под Специальная вставка.
Советы: вы можете перетащить изображение слова напрямую, чтобы настроить его размер.
- Шаг 4: В остальной части листа Excel найдите место для вставки фигуры. Для этого перейдите в Вставить, под Формы, выберите форму, которая подходит для вашего выбора.
- Шаг 5: После того, как округлая форма сформирована, измените цвет, если хотите.
- Шаг 6: Перетащите или скопируйте и вставьте изображение слова в созданные фигуры с любым типом выравнивания, например, вертикальным или горизонтальным и т. д.
Советы: вы можете редактировать слова в списке слов, и они будут автоматически обновляться в облаке слов.
Благодаря вашему терпению и усилиям результат может выглядеть следующим образом:
Альтернативный способ создания Word Cloud Excel
Однако существует еще один вариант настройки Word Cloud Excel с помощью онлайн-программного обеспечения Word Cloud. В Excel интегрировано множество приложений Word Cloud, например Облако слов AhaSlides. Вы можете использовать надстройки для добавления Word Cloud или просто вставить изображение хорошо продуманного Word Cloud через онлайн-приложение на лист Excel.
Существуют некоторые ограничения создания Word Cloud через Excel по сравнению с другими онлайн-приложениями Word Cloud. Некоторые из них можно упомянуть, например, отсутствие интерактивных обновлений в реальном времени, привлекательных и иногда трудоемких.
В отличие от обычного Word Cloud, AhaSlides Word Cloud представляет собой интерактивное программное обеспечение для совместной работы, с помощью которого все приглашенные участники могут делиться своими идеями в обновлениях в режиме реального времени. Это также бесплатное облако слов, которое позволяет настраивать множество удобных функций и простой в использовании интерфейс. Ниже перечислены многочисленные впечатляющие функции AhaSlides, которые вы можете быстро просмотреть, прежде чем принять решение о работе. Вот они:
- Простота использования – работает Слайды PowerPoint
- Установить лимит времени
- Установить ограниченное количество участников
- Скрыть результаты
- Заблокировать отправку
- Разрешить участникам отправлять более одного раза
- Фильтр ненормативной лексики
- Изменить фон
- Добавить аудио
- Предварительный просмотр перед экспортом или публикацией
- Редактировать и обновлять после экспорта или публикации
Вы можете выполнить следующие шаги, чтобы добавить интерактивный Word Cloud Excel через AhaSlides в свои предстоящие действия.
- Шаг 1: Найдите облако слов AhaSlides. Вы можете использовать живое облако слов на целевой странице или с регистрационной учетной записью.
1-й вариант: если вы используете вариант на целевой странице, просто введите ключевые слова, сделайте снимок экрана и вставьте изображение в Excel.
2-й вариант: Если вы используете версию в зарегистрированной учетной записи, вы можете сохранить и обновить свою работу в любое время.
- Шаг 2: В случае второго варианта вы можете открыть шаблон Word Cloud и отредактировать вопросы, фон и т. д.…
- Шаг 3. После завершения настройки Word Cloud вы можете отправить ссылку своим участникам, чтобы они могли вставить свои ответы и идеи.
- Шаг 4: По истечении времени для сбора идей вы можете поделиться результатом со своей аудиторией и обсудить более подробно. Перейдите к электронной таблице в Microsoft Excel и под Вставить , нажмите Иллюстрации >> Картины > > Изображение из файла возможность вставить изображение Word Cloud в лист Excel.
Выводы
Подводя итог, нельзя отрицать, что Word Cloud Excel является приемлемым инструментом для бесплатного преобразования идей в наиболее информативные. Однако все еще существуют некоторые ограничения, которые Excel не может покрыть по сравнению с другим программным обеспечением для онлайн-презентаций. В зависимости от ваших целей и бюджета вы можете использовать множество бесплатных облачных сервисов Word Cloud, которые лучше всего подходят для генерации идей, совместной работы и экономии времени.
Если вы ищете новый способ эффективно и вдохновляюще генерировать идеи, вы можете попробовать Облако слов AhaSlides. Это фантастическое приложение, которое вы можете комбинировать со своими мероприятиями и встречами в учебном и рабочем контексте, чтобы привлечь участников и повысить производительность. Кроме того, вас ждет множество шаблонов викторин и игр.
Источник
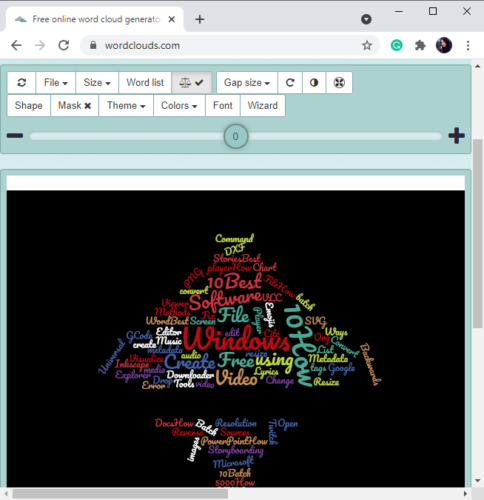
Как создать облако слов в Excel
Облако слов (Word Cloud ) или облако тегов ( Tag Cloud) — это своего рода график, используемый для визуализации важных ключевых слов и тегов, используемых в текстовых данных. Он генерируется на основе частоты и заметности слов, используемых в тексте. В этом руководстве я расскажу о том, как создать облако слов в Microsoft Excel .
Прежде чем я начну, позвольте мне упомянуть, что в MS Excel (MS Excel) нет встроенной функции , позволяющей создавать облако слов. Тем не менее, есть некоторые надстройки, которые вы можете установить для создания облаков тегов в нем, например , облака слов Бьорна, ChartExpo (Bjorn’s Word Clouds, ChartExpo) и т. д . Но большинство из них платные, а другие являются пробными. Чтобы бесплатно добавить облако слов в Excel , вам нужно будет попробовать простой трюк, которым я собираюсь поделиться в этой статье. Я буду использовать бесплатный онлайн-сервис генератора облаков слов, чтобы создать облако тегов из данных Excel , а затем импортировать его в Microsoft Excel . Давайте проверим веб-сервис и шаги для этого.
Как создать облако слов в Excel
Основные шаги для добавления облака слов в Excel :
- Создайте рабочий лист в Excel и экспортируйте его в формате XLSX .
- Запустите веб-браузер и откройте веб-сайт WordClouds.com .
- Импортируйте в него созданный файл Excel , создайте облако тегов, настройте облако слов и экспортируйте его в файл изображения.
- Перейдите в Excel и добавьте сохраненное изображение облака слов в электронную таблицу.
Давайте подробно обсудим эти шаги.
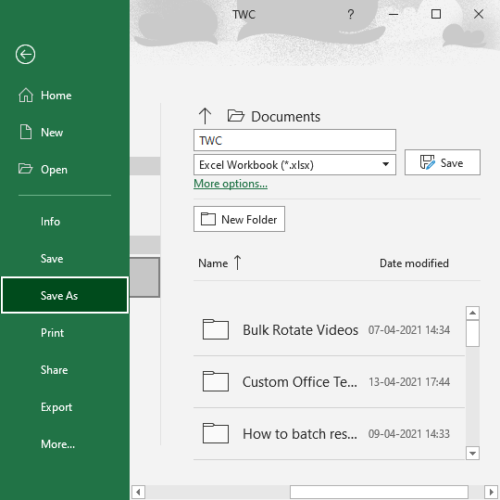
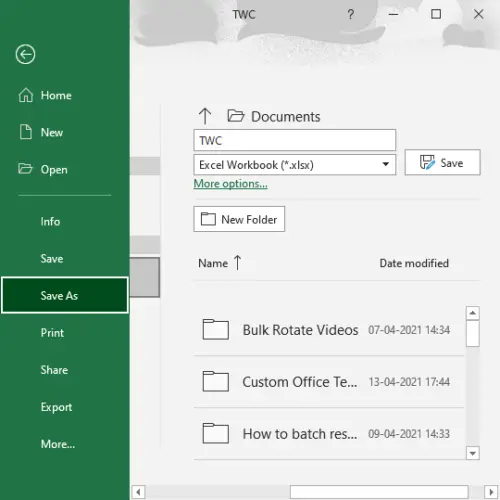
Во-первых, вам нужно создать электронную таблицу или открыть существующую в Excel , для которой вы хотите создать облако слов. После добавления данных в электронную таблицу сохраните их в формате XLSX Excel с помощью параметра « (XLSX Excel) File > Save As ».
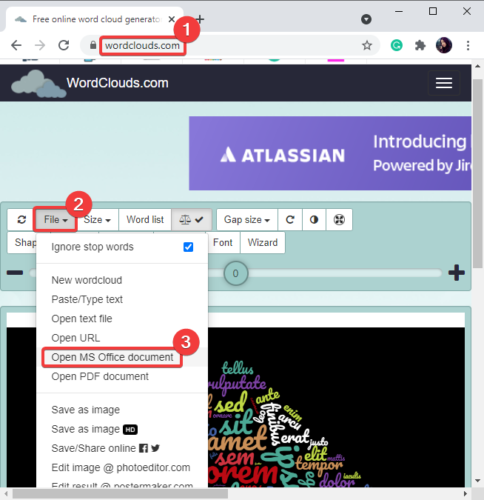
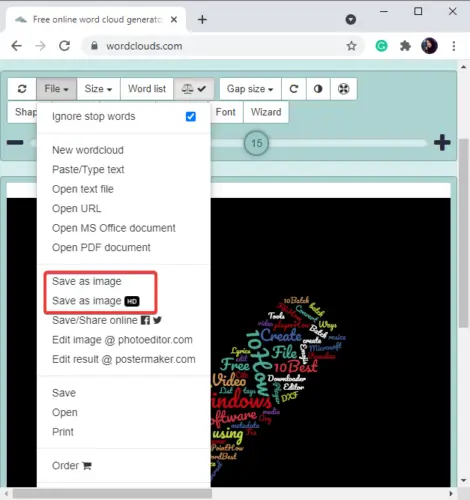
Теперь откройте веб-браузер и перейдите к этой веб-службе под названием WordClouds.com . Этот веб-сервис позволяет создавать облако слов из документов Microsoft Office, текстовых файлов (Microsoft Office documents, text files,) и PDF (PDFs) -файлов .
Затем перейдите в меню « Файл» (File) и нажмите « Открыть документ MS Office (Open MS Office document ) », чтобы импортировать созданный файл электронной таблицы Excel .

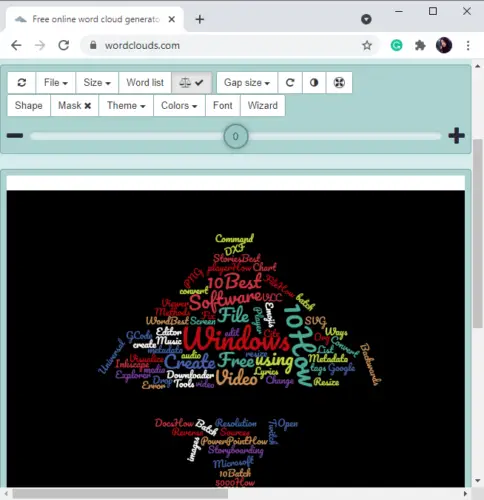
После этого он проанализирует и обработает вашу электронную таблицу XLSX и создаст облако слов из импортированных данных Excel . Затем вы можете настроить множество параметров, чтобы соответствующим образом отредактировать облако слов.
Например, он позволяет вам изменять (change) размер облака слов, настраивать размер промежутка между словами, выбирать тему, редактировать цвета, изменять тип и размер шрифта, выбирать направление слов и (word cloud size, customize gap size between words, select a theme, edit colors, change font type and size, choose direction of words, ) т. д . Он также позволяет вам выбирать форму (select a shape) облака слов из различные доступные формы и буквы.
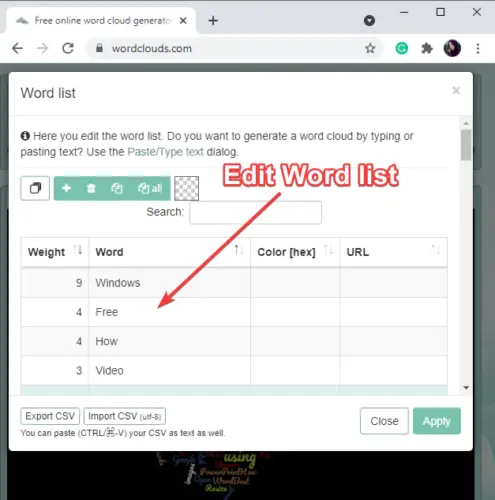
Вы также можете вручную отредактировать список слов ( edit the word list) , полученный из данных Excel , нажав кнопку списка слов (Word list) . Кроме того, он позволяет импортировать пользовательский список слов или экспортировать текущий список в файл CSV .

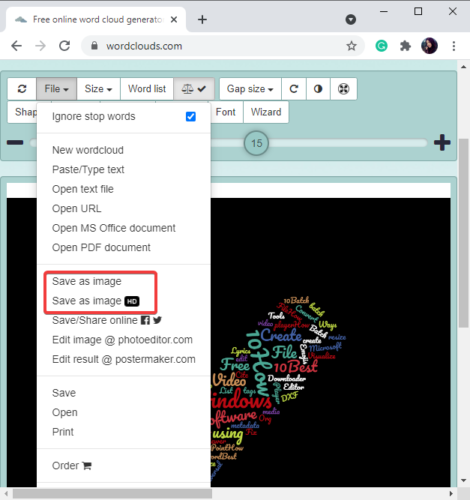
Когда вы закончите настройку облака слов, вы можете загрузить его как обычное изображение или HD-изображение в формате файла JPG , PNG или SVG , используя параметры « File > Save as Image .
Теперь снова перейдите к электронной таблице в Microsoft Excel и на вкладке « Вставка (Insert) » нажмите « Illustrations > Pictures > This Device ».
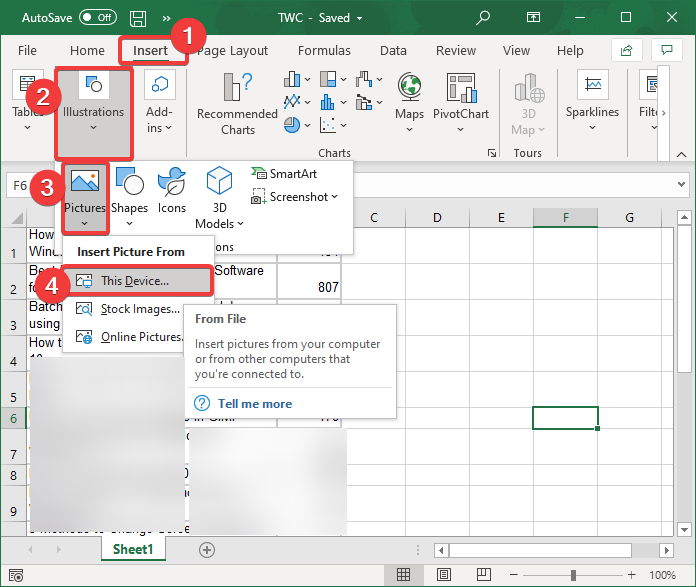
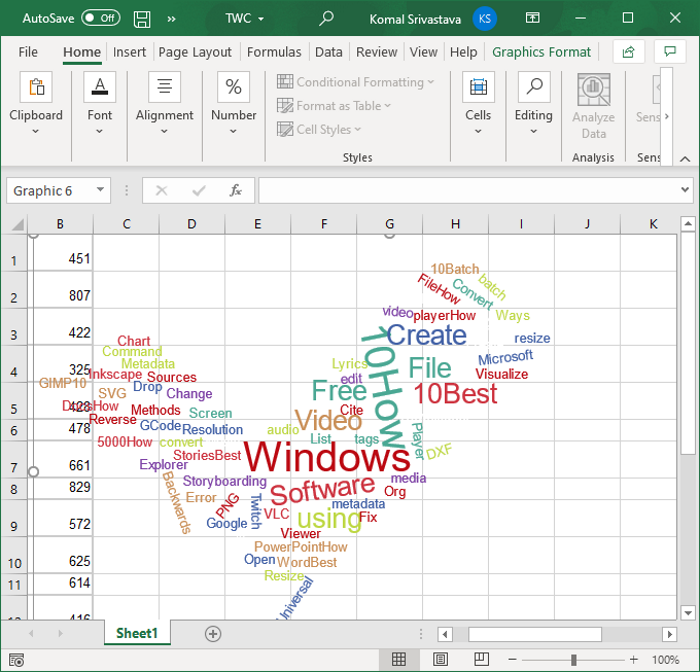
Это позволит вам просматривать и импортировать изображение облака слов, которое вы загрузили ранее. Он будет добавлен на лист Excel , и вы сможете разместить его в любом месте электронной таблицы. Кроме того, вы можете упорядочивать, изменять размер, обрезать, изменять стиль изображения (arrange, resize, crop, change picture style,) и форматировать (format) добавленную графику облака слов.
В этой статье показан простой способ создать облако слов из данных Excel , а затем добавить его на лист Excel с помощью бесплатного онлайн-сервиса. Попробуйте и без особых хлопот добавьте облака тегов на листы Excel .
Связанное чтение: (Related Read:) Создайте облако слов в PowerPoint. (Create a Word Cloud in PowerPoint.)
How to create a Word Cloud in Excel
Word Cloud or Tag Cloud is a kind of graph used to visualize important keywords and tags used in a text data. It is generated based on the frequency and prominence of words used in text. In this guide, I will be sharing a tutorial on how to create a word cloud in Microsoft Excel.
Before I start, let me mention that there is no native feature in MS Excel that lets you generate a word cloud. However, there are some add-ons that you can install to create tag clouds in it, like Bjorn’s Word Clouds, ChartExpo, etc. But, most of them are paid and others are trials. To add a word cloud in Excel for free, you will need to try a simple trick that I am going to share in this article. I will be using a free online word cloud generator service to create a tag cloud from Excel data and then import it into Microsoft Excel. Let’s checkout the web service and steps for doing so.
How to create Word Cloud in Excel
Basic steps to add a word cloud in Excel are:
- Create a worksheet in Excel and export it in XLSX format.
- Launch a web browser and open WordClouds.com website.
- Import created Excel file to it, generate a tag cloud, customize the word cloud, and export it to an image file.
- Go to Excel and add the saved word cloud image to your spreadsheet.
Let’s discuss these steps in detail.
Firstly, you need to create a spreadsheet or open an existing one in Excel, for which you want to generate a word cloud. After adding your data to the spreadsheet, save it in XLSX Excel format using the File > Save As option.
Now, open a web browser and go to this web service called WordClouds.com. This web service lets you create a word cloud from Microsoft Office documents, text files, and PDFs.
Next, go to the File menu and click on the Open MS Office document option to import the Excel spreadsheet file you created.
After that, it will analyze and process your XLSX spreadsheet and generate a word cloud from the imported Excel data. You can then customize a lot of parameters to edit the word cloud accordingly.
For example, it allows you to change word cloud size, customize gap size between words, select a theme, edit colors, change font type and size, choose direction of words, etc. It also lets you select a shape for the word cloud from various available shapes and letters.
You can also manually edit the word list fetched from Excel data by clicking on the Word list button. Additionally, it allows you to import a custom word list or export the current list to a CSV file.
When done with customizing your word cloud, you can download it as a normal or HD image in JPG, PNG, or SVG file format using its File > Save as Image options.
Now again go to the spreadsheet in Microsoft Excel, and from the Insert tab, click on Illustrations > Pictures > This Device option.
This will allow you to browse and import the word cloud image that you downloaded previously. It will be added to the Excel sheet and you can place it anywhere in the spreadsheet. Furthermore, you can arrange, resize, crop, change picture style, and format added word cloud graphic.
This article shows you an easy method to create a word cloud from Excel data and then add it to your Excel worksheet using a free online service. Try it and add tag clouds to Excel worksheets without much hassle.

Маргарита Успенская
Я инженер-программист с более чем 10-летним опытом работы на платформах Windows 11 и 10. Я сосредоточился на разработке и поддержке высококачественного программного обеспечения для Windows 7 и Windows 8. Я также работал над множеством других проектов, включая, помимо прочего, Chrome, Firefox, Xbox One и файлы.
Источник
Word Cloud is a visual representation of keywords and tags used in a selection of text. You can use word clouds to show the prominence of some words over others. Typically, words used more often will be bigger than other words in the word cloud in MS Excel.
To create a word cloud you need to install Excel add-ons or use word cloud tools. There are many word cloud generators to choose from. You can choose from free or premium versions.
Each word cloud generator has its own unique design and customization options. Some of the known word cloud generators are:
- TagCrowd,
- MonkeyLearn Word Cloud generator,
- WordClouds.com
- Bjorn’s Word Clouds, and more.
In this tutorial, we will use WordClouds.com to generate the word cloud from an Excel file. It is free to use. It offers a variety of themes, formatting options, colors, fonts, sizes, and custom shapes to create impressive word art.
Create a Word Cloud in Microsoft Excel
Step #1: Open MS Excel
Create a worksheet.
For this tutorial, the source data is text content that refers to a person’s many interests.
You can write your own text about yourself, your likes, or topics that interest you.
Click the File tab and select Save As, to save the file as an .XLSX file.

Step #2: Go to WordClouds.com
Open your browser window.
Navigate to https://wordclouds.com.
You can use the regular site or the Classic site tab. Both have the same tab options.

For this tutorial, select the Classic Site. All options on this are easy to use. It launches with multiple options.

Step #3: Export the XLSX file
In the application, click the File dropdown tab.
Select Open MS Office document from the menu.
The File Explorer window will open.
Browse to where you have saved the .XLSX file.
Select it and click the Open button.

The word cloud generator analyzes and processes your XLSX worksheet. It checks the frequency and relevance of words to generate a word cloud from the imported Excel data.

Now that the word cloud is generated, let us customize it before importing it to Excel.
Step #4: Customizing the new word cloud
There are various options to choose from. Select according to your preference:
Size – Click the Size dropdown tab to choose from the available sizes. You can also drag the slider to increase or decrease the size.

Word list – You can manually edit the word list by clicking on the Word list tab. The generator also allows you to import a custom word list or export the current list to a CSV file.
Click ![]() to Start multi-select – in this mode, you can click and drag to select or deselect a row. While in this mode, you can:
to Start multi-select – in this mode, you can click and drag to select or deselect a row. While in this mode, you can:
Click ![]() to Select all words or click
to Select all words or click ![]() to Deselect all words or click
to Deselect all words or click ![]() to Delete selected words or click
to Delete selected words or click ![]() to Clone selected words.
to Clone selected words.

Type a new word and click ![]() to Add a word.
to Add a word.
Select a word and click ![]() to Delete a word.
to Delete a word.
Select a word and click ![]() to Clone a word.
to Clone a word.
You can also Search and delete specific words from the word list.
Select a word and click ![]() to change the color of the selected word.
to change the color of the selected word.
After updating the word list, click Apply to save the changes and click Close to return to your word cloud file.
In our example, we updated the word list and removed many words.

Click on ![]() icon to balance the words in the word cloud. Drag the slider and click on the icon to select or deselect the option. Play around to view the changes and select the best look.
icon to balance the words in the word cloud. Drag the slider and click on the icon to select or deselect the option. Play around to view the changes and select the best look.

Gap size – Click the dropdown tab and select a size to increase or decrease the space between the words.

Click the ![]() icon to change the direction of the words from the list and click Close to save and update the word cloud.
icon to change the direction of the words from the list and click Close to save and update the word cloud.

Click the ![]() icon to Invert the position of words as illustrated below.
icon to Invert the position of words as illustrated below.

After generating a word cloud or after customization you may come across warning messages. The warnings are for one or more words that were not drawn as displayed above.
Click on the warning link. The details displayed are self-explanatory. Follow the instructions to include the missing word or words.
Click OK to exit the Words not drawn pop-up box.
Click the ![]() icon to move the words Inside out/Outside in.
icon to move the words Inside out/Outside in.
Shape – Change the shape of the word cloud.

Click on each of the tab options to check and select a shape. You can choose Letters, Colorful images, or Upload shapes from your saved collection.
When you select a shape, you will notice that the shape selected does not match the word cloud shape.
To match the shape, drag the slider until it matches the shape.
Note: If the number of words in your text is less, then the shape may not match. Try adding relevant words to the word list or increase the frequency of the words. The more the words, the better the shape.
Use the Upload tab to upload from your collection of shapes,

Click Close to save the selections made and close the Shape box.
Mask – Apply an arbitrary shape to your word cloud as displayed in the below illustration.

Theme – Change the color scheme of your word cloud. Experiment with the themes and select the one that is relevant to your text and word cloud.

Colors – Change the background color and the cloud colors.

Font – Use this tab option to change the font style.
In the Font box click the dropdown arrow.

The Select a font list opens. Scroll down the list, preview the font and click Select to save the selection.

In the Font box, click Close to save the changes and update the font style.
Wizard – Use this tab option to upload a file to generate a word cloud. You can paste the contents from a different source or you can type your text. Supported file types are PDFs, text files, and MS Office files.

After customizing your word cloud, you can save it as a JPEG, PNG or PDF file.
Click the File tab and select Save as Image or Save as Image HD.

Type in a file name, select format, and click Save to save the file.
Import the Word Cloud to Excel
Once the word cloud has been created and customized, it can be imported into MS Excel.
Step #1: Open MS Excel
Open the worksheet that you used to generate the word cloud.
Click the Insert tab in the main menu bar.
Select the Pictures icon.
From the Insert dropdown, click on This Device.

In Excel’s Insert Picture dialog, browse to select the saved word cloud file, and click Insert to import the file to Excel.

You can insert the word cloud in a different worksheet. You can also insert it in the worksheet with the text content that you used to generate the word cloud.
After inserting the word cloud in Excel, you can use the Picture Format options.
You can further resize, crop, or change the picture style of the cloud.
Conclusion
A word cloud is easy to generate and you can be as creative as you want to be to generate a powerful word cloud. There are many benefits of a word cloud. It helps you brainstorm ideas, identify new topics, keywords, and more. You can also use it to showcase your skill sets and use it on your personal website. The options and benefits are endless.
Download PC Repair Tool to quickly find & fix Windows errors automatically
Word Cloud or Tag Cloud is a kind of graph used to visualize important keywords and tags used in a text data. It is generated based on the frequency and prominence of words used in text. In this guide, I will be sharing a tutorial on how to create a word cloud in Microsoft Excel.
Before I start, let me mention that there is no native feature in MS Excel that lets you generate a word cloud. However, there are some add-ons that you can install to create tag clouds in it, like Bjorn’s Word Clouds, ChartExpo, etc. But, most of them are paid and others are trials. To add a word cloud in Excel for free, you will need to try a simple trick that I am going to share in this article. I will be using a free online word cloud generator service to create a tag cloud from Excel data and then import it into Microsoft Excel. Let’s checkout the web service and steps for doing so.
Basic steps to add a word cloud in Excel are:
- Create a worksheet in Excel and export it in XLSX format.
- Launch a web browser and open WordClouds.com website.
- Import created Excel file to it, generate a tag cloud, customize the word cloud, and export it to an image file.
- Go to Excel and add the saved word cloud image to your spreadsheet.
Let’s discuss these steps in detail.
Firstly, you need to create a spreadsheet or open an existing one in Excel, for which you want to generate a word cloud. After adding your data to the spreadsheet, save it in XLSX Excel format using the File > Save As option.
Now, open a web browser and go to this web service called WordClouds.com. This web service lets you create a word cloud from Microsoft Office documents, text files, and PDFs.
Next, go to the File menu and click on the Open MS Office document option to import the Excel spreadsheet file you created.
After that, it will analyze and process your XLSX spreadsheet and generate a word cloud from the imported Excel data. You can then customize a lot of parameters to edit the word cloud accordingly.
For example, it allows you to change word cloud size, customize gap size between words, select a theme, edit colors, change font type and size, choose direction of words, etc. It also lets you select a shape for the word cloud from various available shapes and letters.
You can also manually edit the word list fetched from Excel data by clicking on the Word list button. Additionally, it allows you to import a custom word list or export the current list to a CSV file.
When done with customizing your word cloud, you can download it as a normal or HD image in JPG, PNG, or SVG file format using its File > Save as Image options.
Now again go to the spreadsheet in Microsoft Excel, and from the Insert tab, click on Illustrations > Pictures > This Device option.

This will allow you to browse and import the word cloud image that you downloaded previously. It will be added to the Excel sheet and you can place it anywhere in the spreadsheet. Furthermore, you can arrange, resize, crop, change picture style, and format added word cloud graphic.

This article shows you an easy method to create a word cloud from Excel data and then add it to your Excel worksheet using a free online service. Try it and add tag clouds to Excel worksheets without much hassle.
Related Read: Create a Word Cloud in PowerPoint.

Komal has done M.Tech in Computer Science & Engineering. She is a keen follower of the Windows ecosystem & a technical writer since the last six years. She loves finding solutions for day-to-day tech problems.
This tutorial will show you how to generate and interpret a Word Cloud in Excel using the XLSTAT software.
Dataset for creating a word cloud
In this tutorial, we will use data from the stateoftheunion.onetwothree website regarding the latest «State of the Union speeches» by Presidents D. Trump and B. Obama whose full texts can be obtained at:
http://stateoftheunion.onetwothree.net/texts/20160112.html for President Obama.
http://stateoftheunion.onetwothree.net/texts/20170228.html for President Trump.
Goal of this tutorial
This tutorial explains how to set up and interpret a word cloud in Excel using the XLSTAT statistical software.
A word cloud is a visual representation of the most frequently used keywords or terms in a text. The font size of a keyword in a word cloud is proportional to its frequency.
Setting up a Word Cloud using XLSTAT
-
Once XLSTAT is opened, select the XLSTAT — Visualizing data — Word cloud command.
-
The dialog box for the Word cloud appears.
-
The Term labels refers to the column A and the Term ferquencies refers to the column B.
-
Enable the Column labels option, since the first row of data contains a header.
-
Check the Frequency option so that the size of the words is proportional to their frequency of appearance.

-
In the Options tab, we choose to activate the Max. words option and the Rotation period option.
We do so in order to limit the number of words displayed in the cloud (here 260 words maximum) as well as to perform a periodic vertical rotation of a word at a defined period (here we have chosen to orient vertically 1 word every four).
-
By default, the Random Position option is disabled to display words in decreasing frequency of appearance from the center to the periphery of the cloud.
-
Finally, select the Custom color Scale option and choose the color gradient from column G. This will highlight the most common words with dark red and the least common ones with light red.

-
The computations begin once you have clicked on OK.
Repeat the same procedure to set up the Trump’s Word cloud with columns D and E.
Interpretation of a Word cloud
The generated Word clouds are displayed below (red for Obama, blue for Trump). hese are standard Excel charts that you can customize afterwards (color, font, …).
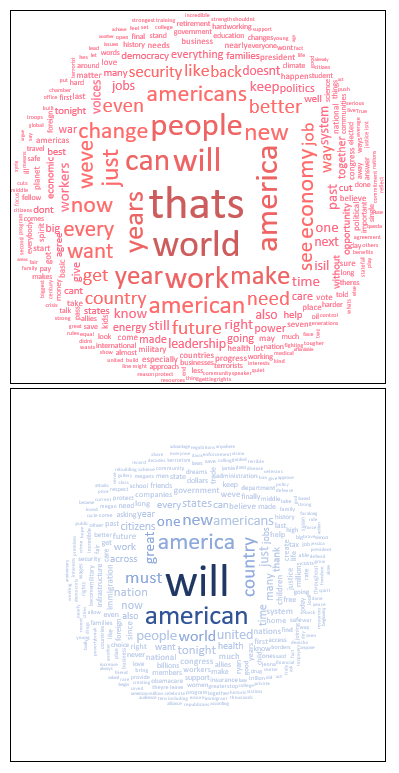
Obama’s word cloud covers a wider range of topics (high number of keywords with a high frequency of occurrence). These terms are centered around the keyword world. On the other hand, Trump’s cloud is built around the keywords will, american, and country.
Was this article useful?
- Yes
- No
![]()
Expert Software for Better Insights, Research, and Outcomes
A word cloud is also known as a tag cloud in Excel, which is a visual representation of text in Excel in different colors or formats. In a word cloud, the frequency of the representation of work is defined by the word’s font. It is made by using the SmartArt and shapes feature of Excel.
Table of contents
- What is Word Cloud in Excel?
- How to Create a Word Cloud in Excel?
- Recommended Articles
What is Word Cloud in Excel?
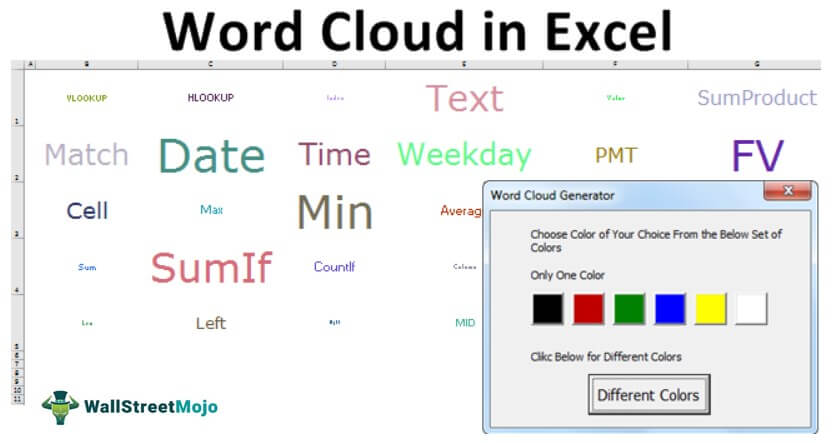
Word cloud is the collection of words to show in the form of visualization in Excel. We hope you have seen some of Excel’s best dashboards with numbers and creative visualizations. Dashboards range from classy fonts with attractive colors to some awesome stuff with them. You must have seen one of the peculiar dashboards with “Word Cloud.” It looks like a sophisticated software downloaded image, but it is not downloaded from anywhere but rather created with Excel VBA coding. Yes! You are correct. It has been created by VBA codingVBA code refers to a set of instructions written by the user in the Visual Basic Applications programming language on a Visual Basic Editor (VBE) to perform a specific task.read more. This article will show you how to create such a word cloud with Excel.
You are free to use this image on your website, templates, etc, Please provide us with an attribution linkArticle Link to be Hyperlinked
For eg:
Source: Word Cloud in Excel (wallstreetmojo.com)
How to Create a Word Cloud in Excel?
You can download this Word Cloud Excel Template here – Word Cloud Excel Template
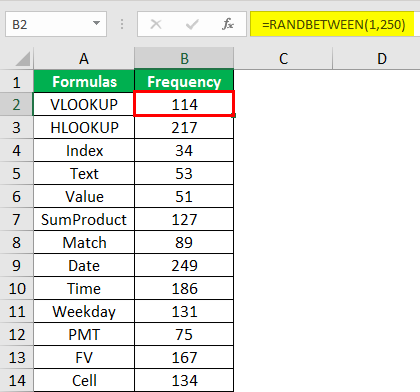
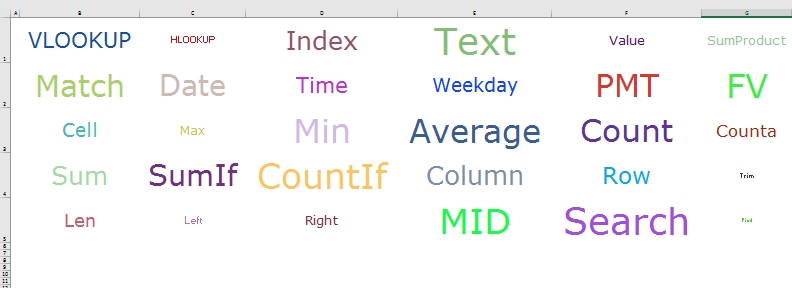
To create a word cloud in Excel, we need to have data of words and what are the colors we need for those words. Assume you are creating a word cloud of 30 Excel formulas. So, make a list of 30 Excel formulas in the worksheet.
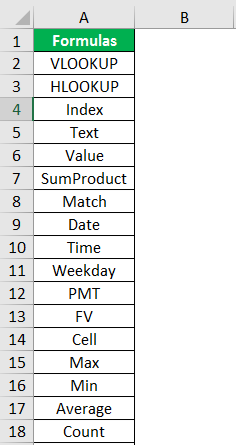
Write the above formulas to your worksheet in the first column.
Once you write the above formula names in column B, apply the RANDBETWEEN function for all the 30. Formulas are as follows: keep the bottom value 1 and the top value 250.
Once the data is ready, we need to head to the Visual Basic Editor. First, create a user form like the one below in VBA.
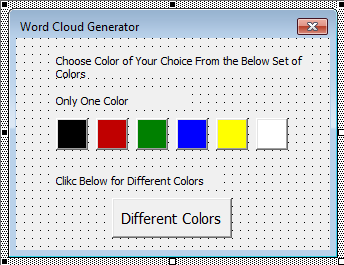
Now, we need to configure the userform in VBAIn VBA, userforms are customized user-defined forms that are designed to accept user input in the form of a form. It has various sets of controls to add such as text boxes, checkboxes, and labels.read more here. For each button, we need to write code. Below is the code for each button.
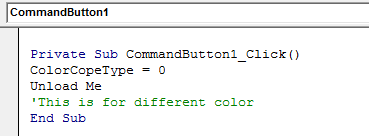
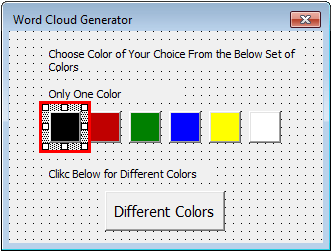
Double click on the “Different Colors” button from the above user form and add the below code.
Code:
Private Sub CommandButton1_Click()
ColorCopeType = 0
Unload Me
'This is for a different color
End Sub
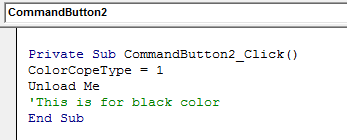
Then, double click on the black-colored button and add the below code.
Code:
Private Sub CommandButton2_Click()
ColorCopeType = 1
Unload Me
'This is for black color
End Sub
Similarly, for all the other buttons, add the below codes.
Code:
Private Sub CommandButton3_Click()
ColorCopeType = 2
Unload Me
'This is for red color
End Sub

Private Sub CommandButton4_Click()
ColorCopeType = 3
Unload Me
'This is for green color
End Sub

Private Sub CommandButton5_Click()
ColorCopeType = 4
Unload Me
'This is for blue color
End Sub

Private Sub CommandButton6_Click()
ColorCopeType = 5
Unload Me
'This is for yellow color
End Sub

Private Sub CommandButton7_Click()
ColorCopeType = 6
Unload Me
'This is for white color
End Sub
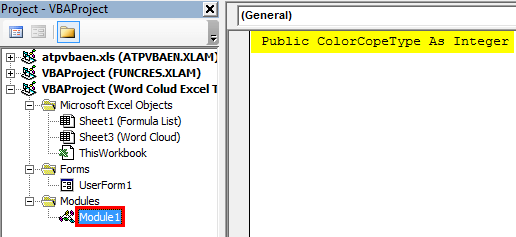
Once we configure the code, we must declare the module’s variable on top.
Now, we need to write a code to create a word cloud, which is lengthy. Below is the code.
Code:
Sub word_cloud()

Dim WordCloud As Range
Dim x As Integer, y As Integer
Dim ColumnA As Range, ColumnB As Range
Dim WordCount As Integer
Dim ColumCount As Integer, RowCount As Integer
Dim WordColumn As Integer, WordRow As Integer
Dim plotarea As Range, c As Range, d As Range, e As Range, f As Range, g As Range
Dim z As Integer, w As Integer
Dim plotareah1 As Range, plotareah2 As Range, dummy As Range
Dim q As Integer, v As Integer
Dim RedColor As Integer, GreenColor As Integer, BlueColor As Integer

UserForm1.Show

WordCount = -1

Set WordCloud = Sheets("Word Cloud").Range("B2:H7")
ColumnCount = WordCloud.Columns.Count
RowCount = WordCloud.Rows.Count

For Each ColumnA In Sheets("Formula List").Range("A:A")
If ColumnA.Value = "" Then
Exit For
Else
WordCount = WordCount + 1
End If
Next ColumnA

Select Case WordCount
Case WordCount = 0 To 20
WordColumn = WordCount / 5
Case WordCount = 21 To 40
WordColumn = WordCount / 6
Case WordCount = 41 To 40
WordColumn = WordCount / 8
Case WordCount = 80 To 9999
WordColumn = WordCount / 10
End Select

WordRow = WordCount / WordColumn

x = 1

Set c = Sheets("Word Cloud").Range("A1").Offset((RowCount / 2 - WordRow / 2), (ColumnCount / 2 - WordColumn / 2))
Set d = Sheets("Word Cloud").Range("A1").Offset((RowCount / 2 + WordRow / 2), (ColumnCount / 2 + WordColumn / 2))
Set plotarea = Sheets("Word Cloud").Range(Sheets("Word Cloud").Cells(c.Row, c.Column), Sheets("Word Cloud").Cells(d.Row, d.Column))

For Each e In plotarea
e.Value = Sheets("Formula List").Range("A1").Offset(x, 0).Value
e.Font.Size = 8 + Sheets("Formula List").Range("A1").Offset(x, 0).Offset(0, 1).Value / 4

Select CaseA select case is a substitute for writing down multiple IF statements in VBA. In the case of many IF statements, it becomes tedious and more complex, but in select case statements, we define the criteria as different cases and results.read more ColorCopeType
Case 0
RedColor = (255 * Rnd) + 1
GreenColor = (255 * Rnd) + 1
BlueColor = (255 * Rnd) + 1
Case 1
RedColor = 0
GreenColor = 0
BlueColor = 0
Case 2
RedColor = 255
GreenColor = 0
BlueColor = 0
Case 3
RedColor = 0
GreenColor = 255
BlueColor = 0
Case 4
RedColor = 0
GreenColor = 0
BlueColor = 255
Case 5
RedColor = 255
GreenColor = 255
BlueColor = 100
Case 6
RedColor = 255
GreenColor = 255
BlueColor = 255
End Select

e.Font.Color = RGB(RedColor, GreenColor, BlueColor)
e.HorizontalAlignment = xlCenter
e.VerticalAlignment = xlCenter

x = x + 1
If e.Value = "" Then
Exit For
End If
Next e
plotarea.Columns.AutoFit

End Sub
Copy and paste the above code to your module. For example, the worksheet with a formula list should be named “Formula List.” Then insert a new worksheet in excelTo add a new worksheet, go to the bottom of the screen and press the ‘+’ button. You can also navigate to ‘Home’, ‘Insert,’ and then ‘Insert Sheet’ to add a new sheet.read more and named it “Word Cloud.”
In the newly inserted sheet, adjust the zoom to 40% and adjust the row height to 85.
So, now execute the code in VBA by pressing the F5 button. You will see the color-choosing user form.
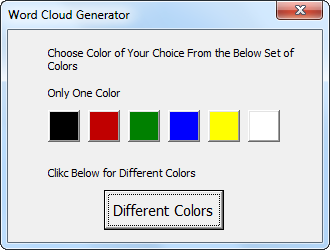
Choose the color as per your wish. If you do not want a single color, choose “Different Colors.” Then, we will get the word cloud in the “Word Cloud” sheet.
Like this, using VBA coding, we can create a word cloud.
Recommended Articles
This article is a guide to Word Cloud in Excel. Here we discuss creating a word cloud in Excel using VBA coding with an example and downloadable Excel sheet. You can learn more about Excel from the following articles: –
- Autofit Excel Row Height
- Excel KPI Dashboard
- Excel Calculator
- Use AverageIF in Excel
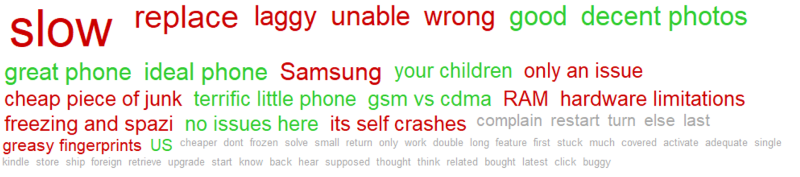
Word cloud is a visual representation of words used in a particular piece of text or series of texts.
Tags are usually single words, and the importance of each word is shown with font colour and size. It is a splendid way to reveal the essential data. Word cloud has another advantage – it is quick to create using our Excel Add-In.
Thus, you save your time and you do not have to analyse every single sentence by your own.
Automated process will do it for you in just a few moments. Word clouds are not only more visually attractive than a table of data but also they are really easy to understand.
To generate word cloud using text2data’s Excel Add-In, select your text data and run the analysis. When analysis is done, click “Create word cloud” icon and wait a few moments. The word cloud will be displayed in a new sheet presenting the most essential words from your text document.
It is worth to mention, the word size is driven by its sentiment and number of occurrences.
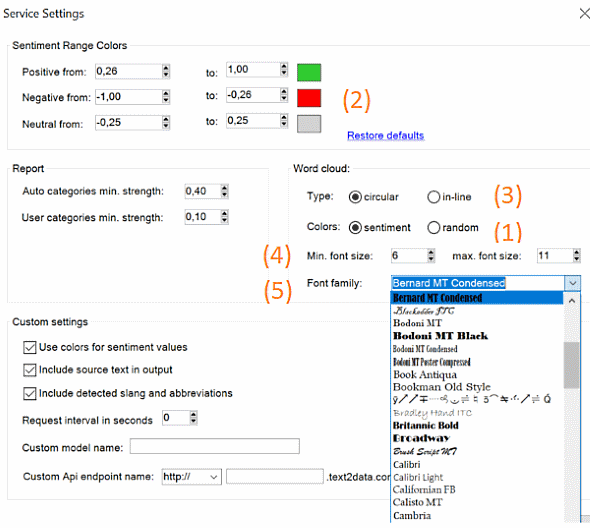
In ‘Service Settings’ you can configure word cloud according to your needs.
(1) You can set the word cloud to display revealed data with the colour of the sentiment of each word/phrase or just set the colour to display it in a random way. By default, the Add-in displays sentiment in six colours. For negative it is red and dark red, for neutral grey and dark grey and for positive green and dark green – which depends on sentiment level.
(2) However, you can adapt colours according to your needs and set custom colours for each sentiment.
(3) Moreover, the type of word cloud can be set too – you can switch between circular or in-line style.
(4) You can also adjust the minimum and maximum size of font according to your preferences.
(5) Setting the font family will let you change the overall look and feel of the word cloud.
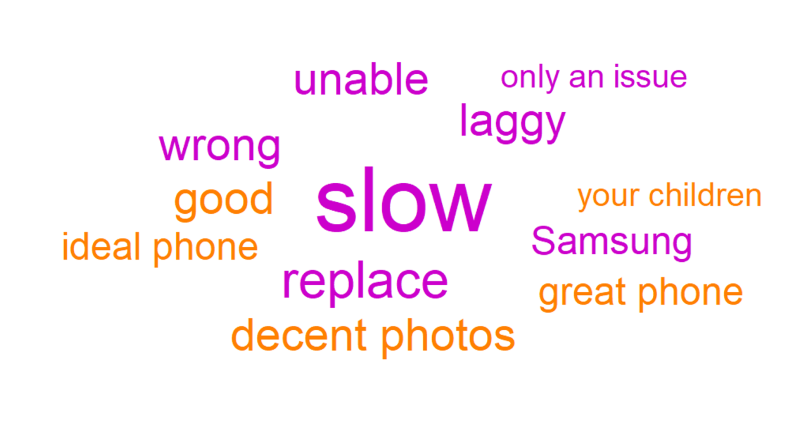
Below you can find prepared examples of word clouds. Each of them contains different configuration which is set in ‘Service Settings’.

To start creating word clouds using our Excel Add-in click here and download the tool. If you had used Excel Add-in before, please download and install it once again to have a current version [3.5.1].