On this page, we’ll focus on how to possibly recover unsaved Word documents if you accidentally closed Word without saving. All Provided solutions can be applied to restore unsaved or lost Word files in MS Office Word 2003/2007/2010/2013/2016 in Windows 10/8/7/Vista/XP.
| Workable Solutions | Step-by-step Troubleshooting |
|---|---|
| Fix 1. Recover from Recent Documents | Open Word > «File» > «Open» > «Recent Documents»…Full steps |
| Fix 2. Recover from Manager Versions | Open Word > «Files» > «Info» > «Manage Document»…Full steps |
| Fix 3. Recover from Temporary Files | Open Word > «File» > «Options» > «Save» > AutoRecover folder…Full steps |
How Can I Recover A Word Document That I Closed Without Saving
Do you know how to recover a closed Word file without saving? If you are looking for a way to recover unsaved Word document after computer restart, shutdown, power off or simply when Microsoft Word has stopped working unexpectedly, stay here.
Most of us may have experienced Word document lost issues in many situations, which can really kill us undoubtedly. In order to provide a better experience in using Microsoft Office, Microsoft added a new feature — AutoSave in all its Office applications, allowing its users to restore unsaved documents, excel files.
Here, we’ve collected all the possible solutions for restoring closed Word without saving. Continue reading and you’ll find the best method for your case.
If you have turned on the AutoSave feature in MS Office, congratulations. You can effectively recover an unsaved Word document that is closed without saving or lost due to other reasons from Recent Documents, Manage Version or Temporary files.
Usually, the AutoSave is enabled by default. If you didn’t turn on the AutoSave feature, a reliable file recovery software can be your last shot for restoring the lost Word file.
Three Solutions to Recover Unsaved Word File
Now, let’s go through the real solutions and learn how to restore an accidentally closed Word without hitting the Save button in MS Word 2003/2007/2010/2016.
Solution 1. Recover closed Word from Recent Documents (Word 2013)
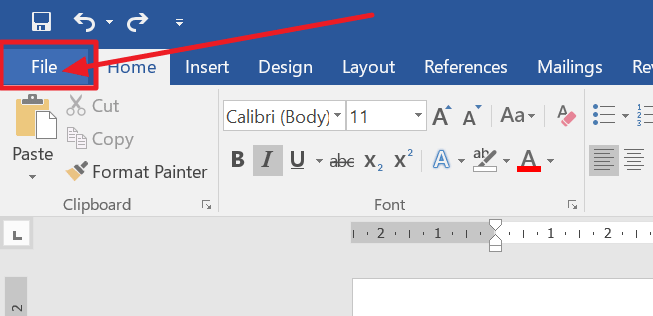
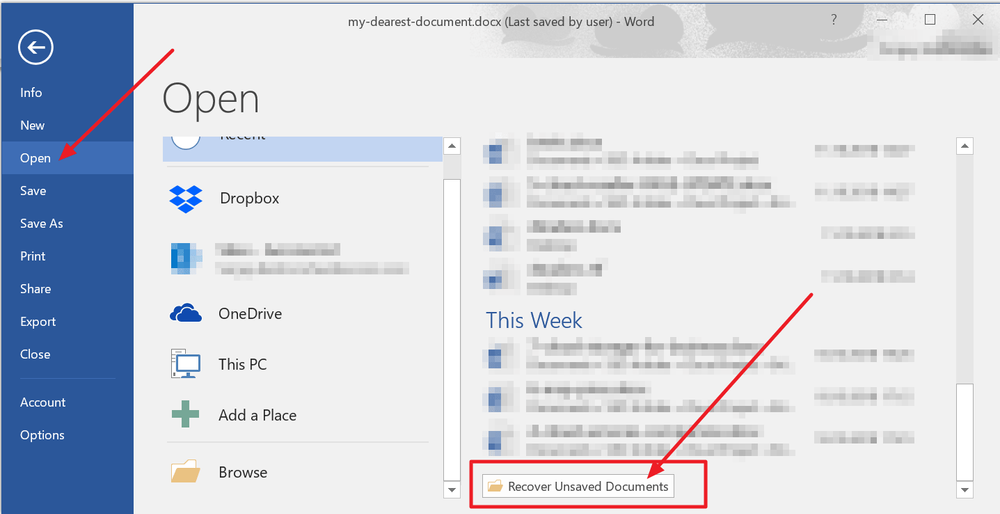
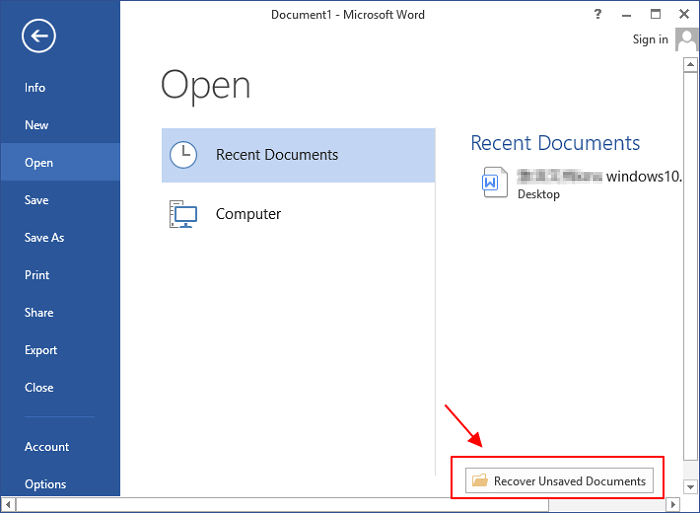
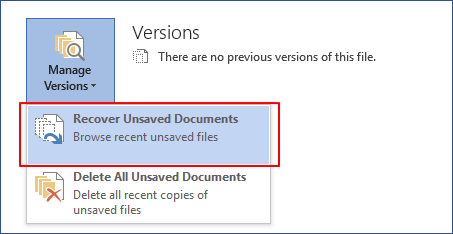
Step 1. Open the Word application and go to File > Open > Recent Documents > Click «Recover Unsaved Documents».
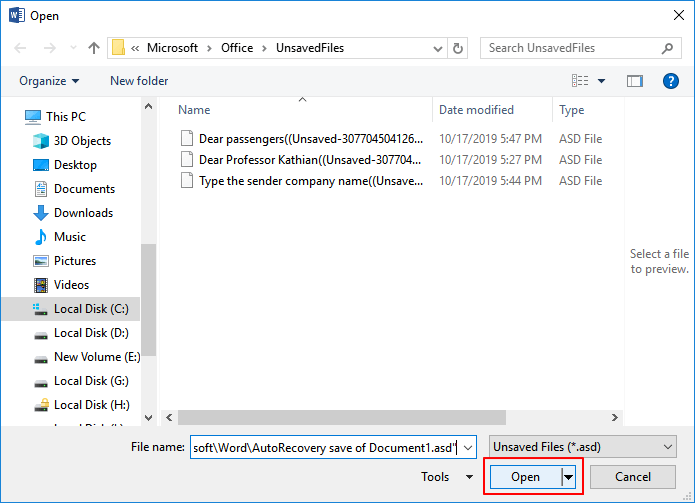
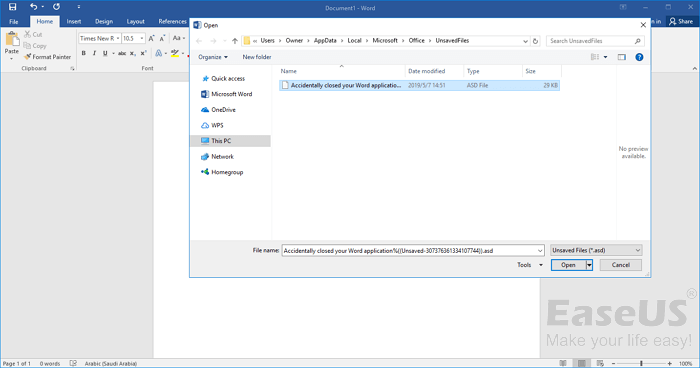
Step 2. Select the listed unsaved document and click «Open» to check the content on a new window in Word.
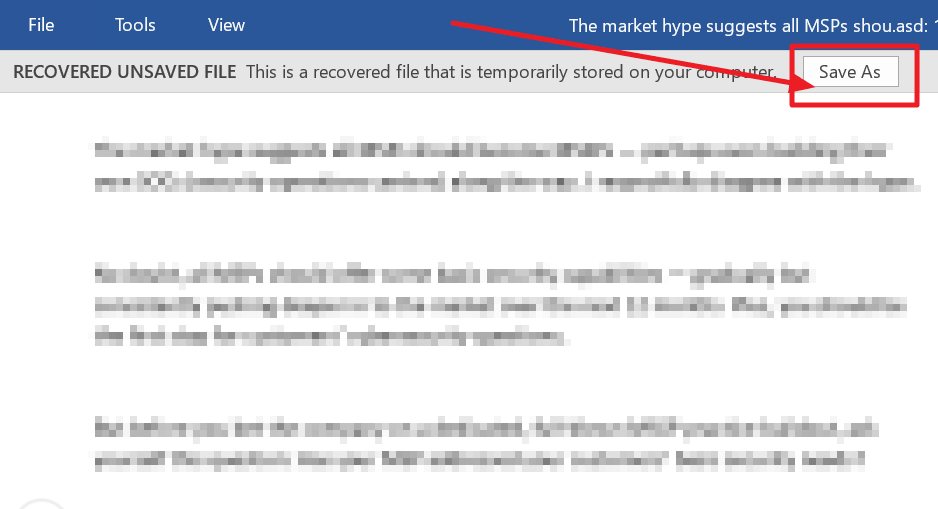
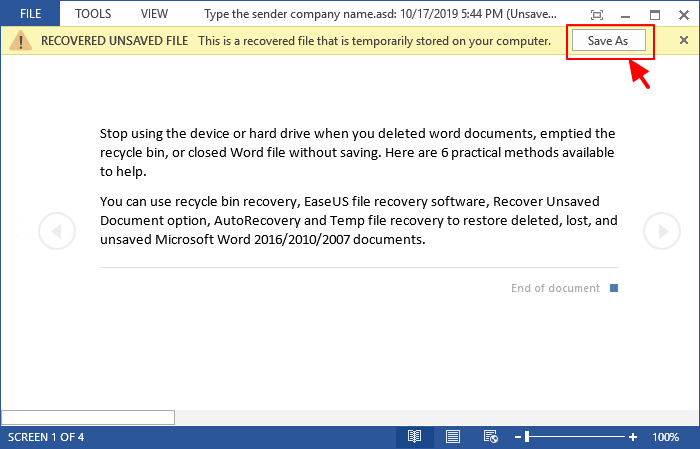
Step 3. Click the «Save As» button in the top banner.
Solution 2. Recover Unsaved Word from Manager Versions
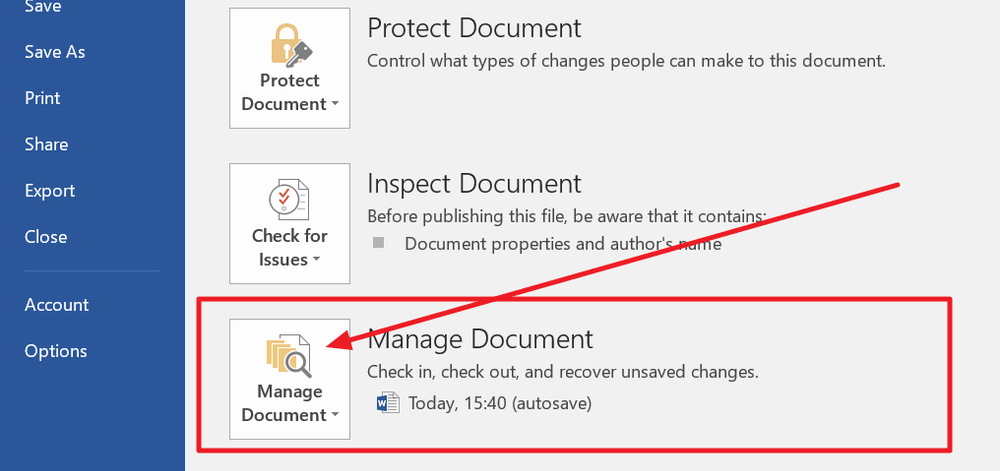
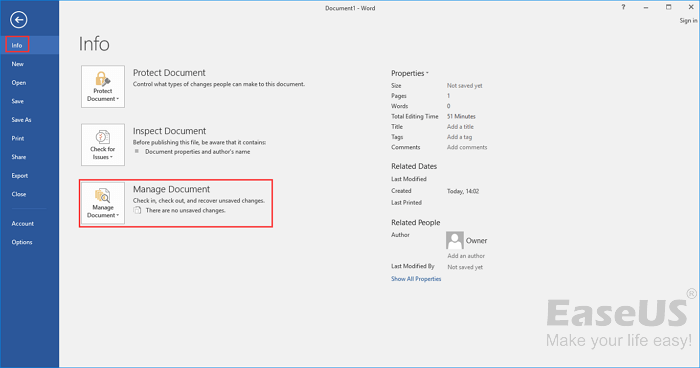
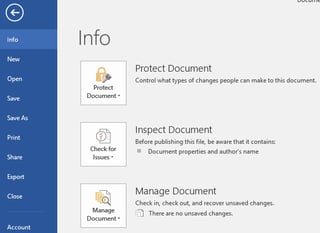
Step 1. Open the Word application, go to Files and then click «Info» > «Manage Document».
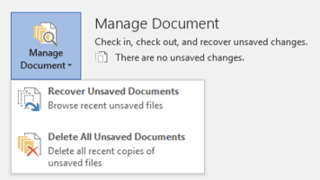
2. Click «Recover Unsaved Documents» from the drop-down menu.
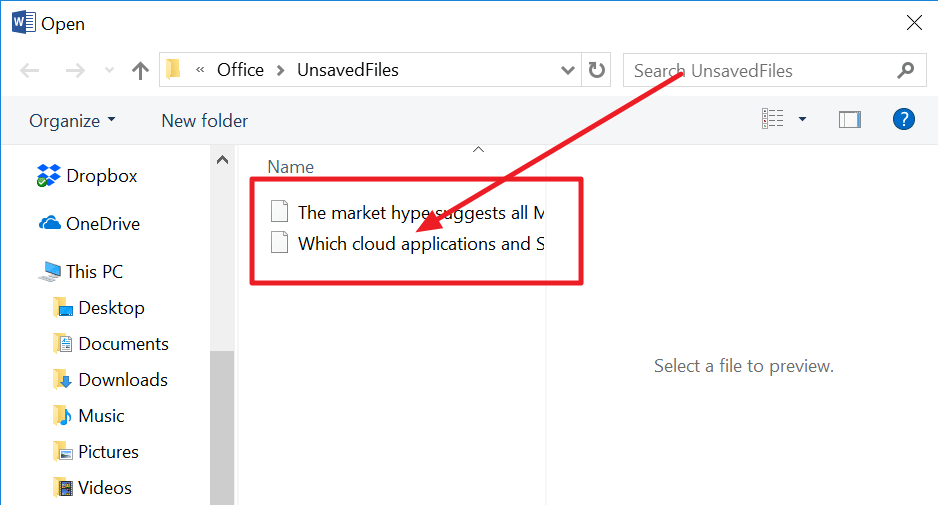
3. Select the unsaved file and click the «Open» button. Then, on the pop-up window, choose «Save As» to store it to any place you like.
Solution 3. Recover Unsaved Word Document from Temporary Files
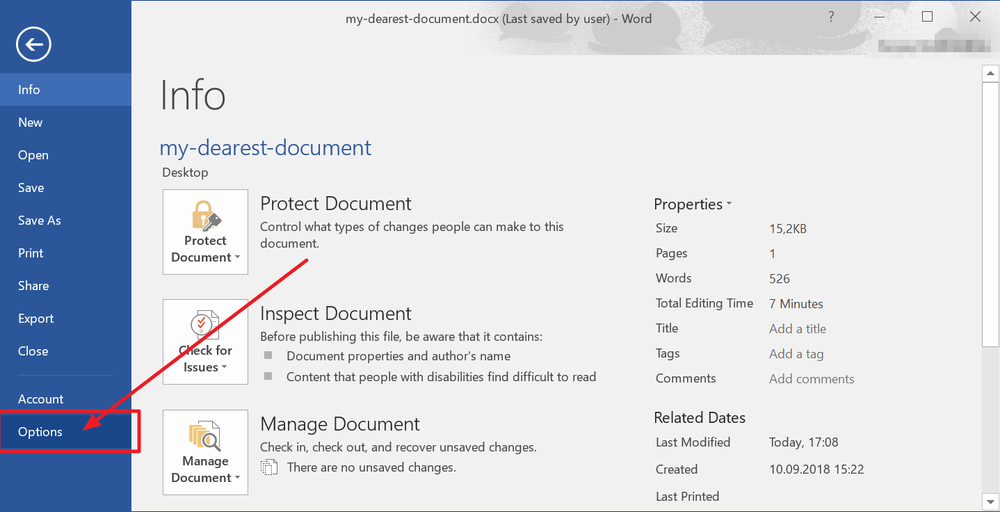
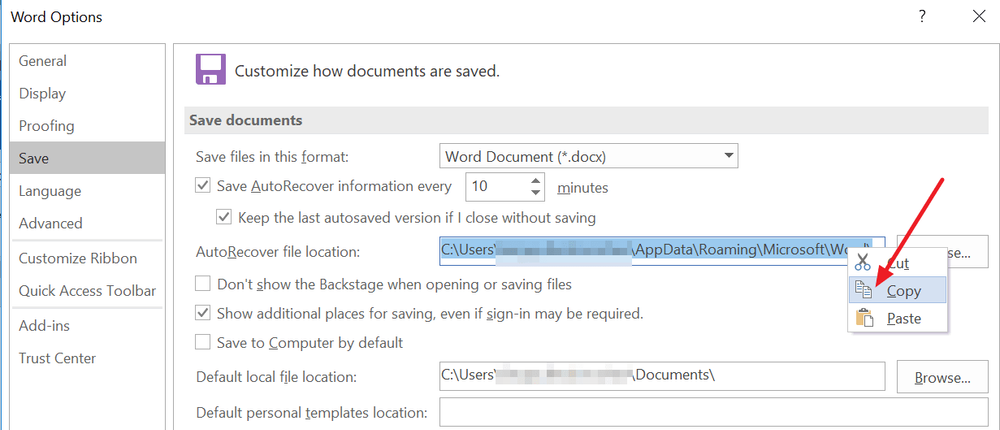
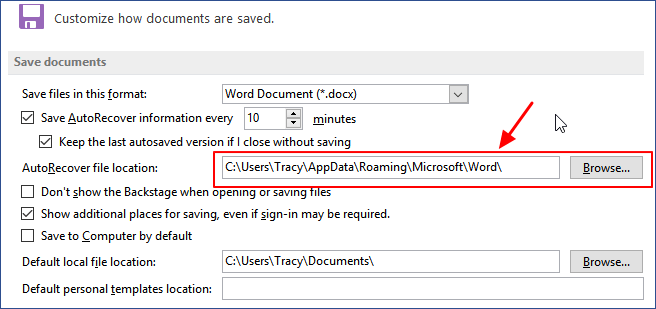
Step 1. Open the Word application, go to File > Options > Save, locate the AutoRecover folder on your PC.
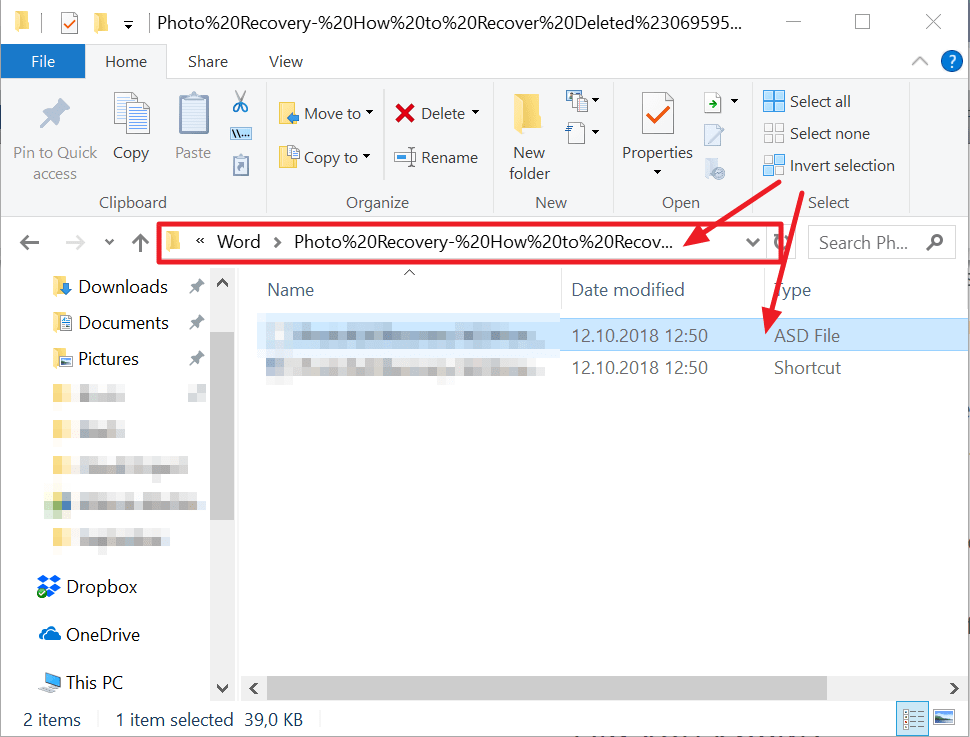
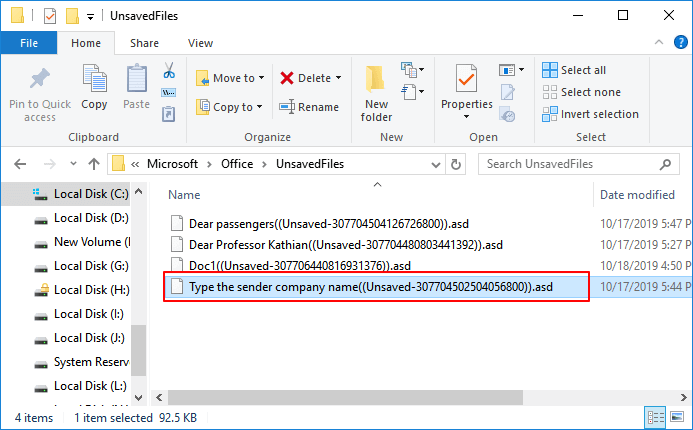
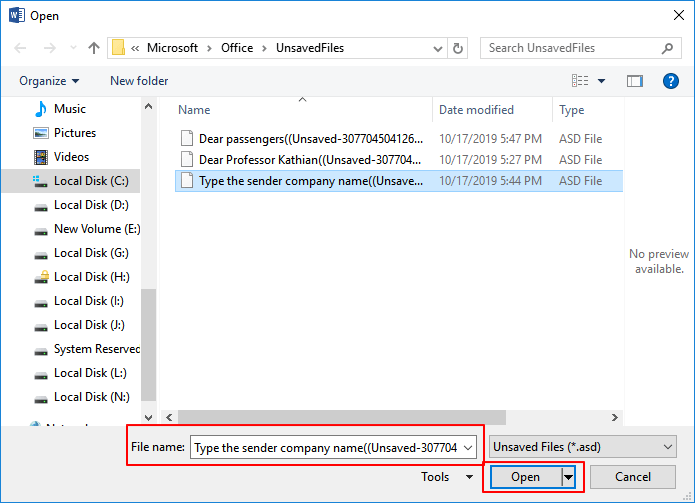
Step 2. Copy the file location path in File Explorer to open the AutoRecover folder. Find and copy the unsaved Word document which is saved with .asd extension.
Usually, the temporary file is saved in C:UsersUserNameAppDataRoamingMicrosoftWord or C:UsersUserNameAppDataLocalMicrosoftOfficeUnsavedFiles.
Step 3. Open Word again, click «File > Open > Recover Unsaved Documents «.
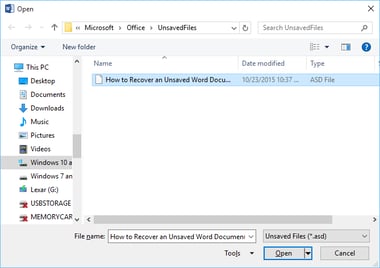
Step 4. Paste the .asd file at the file name column and click «Open». Check the file content and save the file to a new place.
If Word warns that «Word experienced an error…», repeat the steps and click «Open and Repair» at the open Unsaved Document window.
For Mac users, you may also read: Recover unsaved word document on Mac for help.
Extra Tip — Deleted or Lost Word Recovery in 3 Steps
The previous 3 solutions are designed for restoring closed Word without saving. As for the saved Word documents on your computer that were deleted or lost due to device error or other reasons, you may need the reliable EaseUS Data Recovery Wizard for help.
EaseUS Data Recovery Wizard is capable of scanning all over your hard drive where the Word backup is saved and help to find the lost Word document for you in only 3 steps:
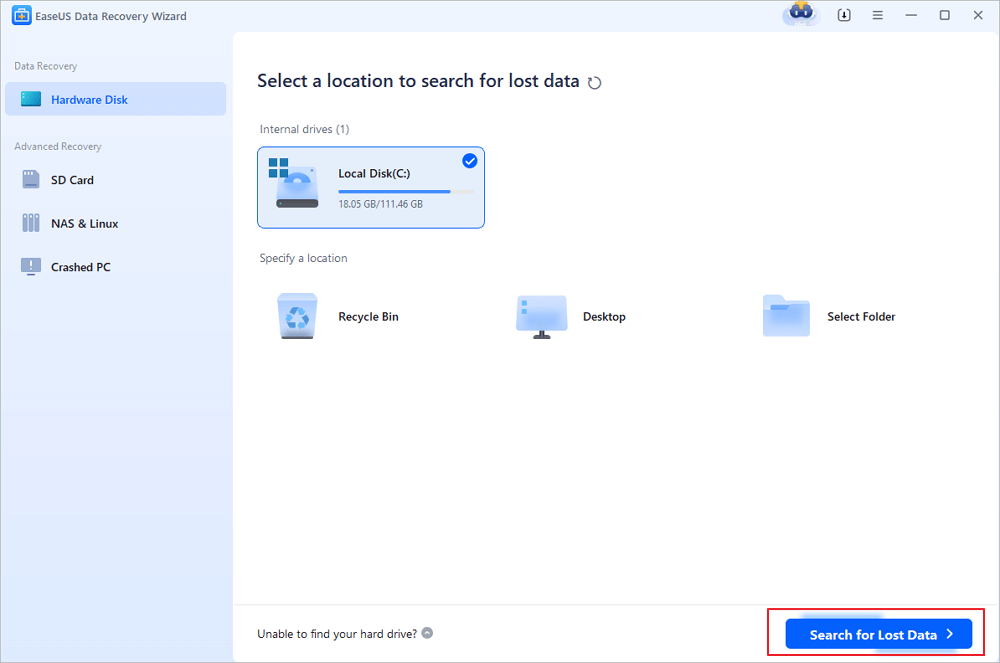
Step 1. Choose the Word file location
Choose the drive or a specific folder and click the «Scan» button.
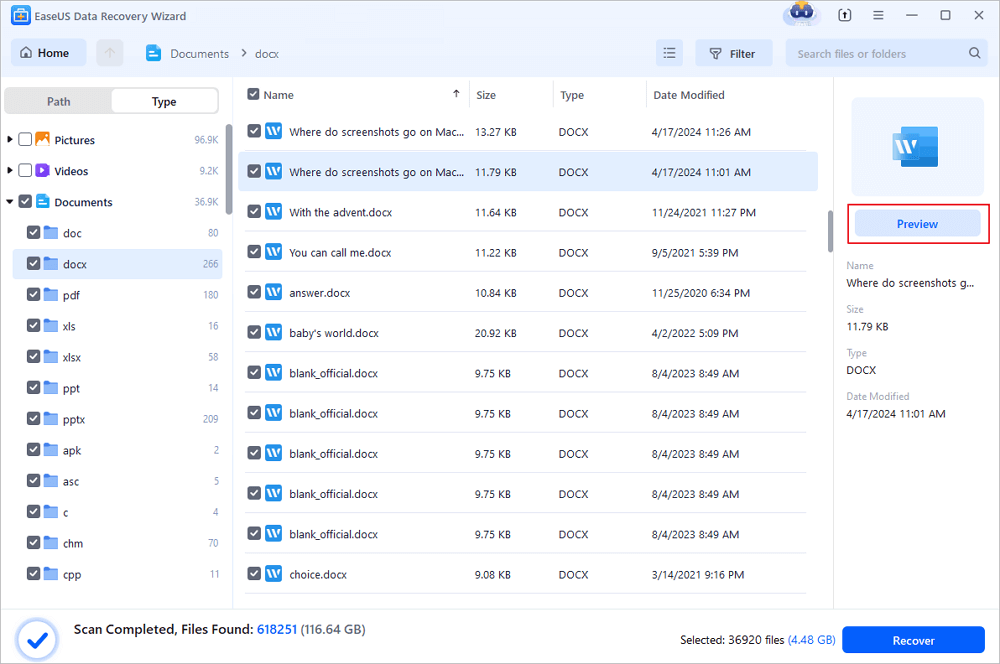
Step 2. Locate your Word files
The software will start immediately scanning all lost data on the selected drive. After the scan, click the «Documents» option in the left panel. Choose «Word» from the category bar. Then, click «Preview».
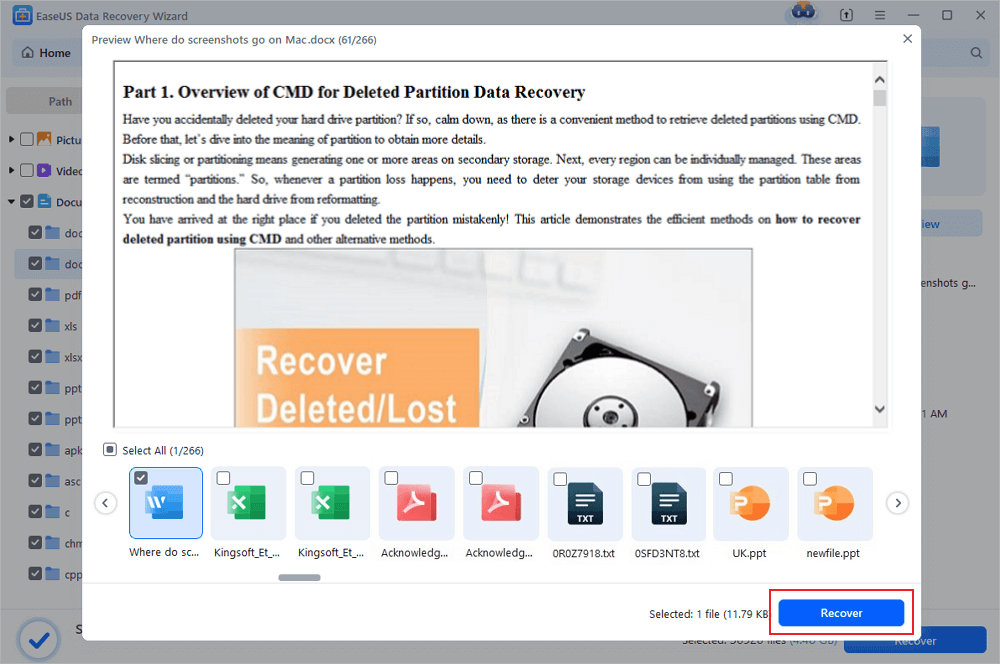
Step 3. Recover Word files
After previewing the lost Word files, select the desired Word files and click «Recover». Then, select a folder to store the Word files.
Conclusion
This page includes 3 reliable solutions for restoring closed Word file without saving on Windows PC. When the locally saved Word files and other data get lost, EaseUS file recovery software will offer you instant help.
Besides Word file recovery, we highly suggest you enable the AutoSave feature in Microsoft Office Word, Excel and PowerPoint to protect all your valuable files.
Here are the steps to turn on AutoSave in MS Word:
Step 1. Open the Word application and go to File > Option > Save.
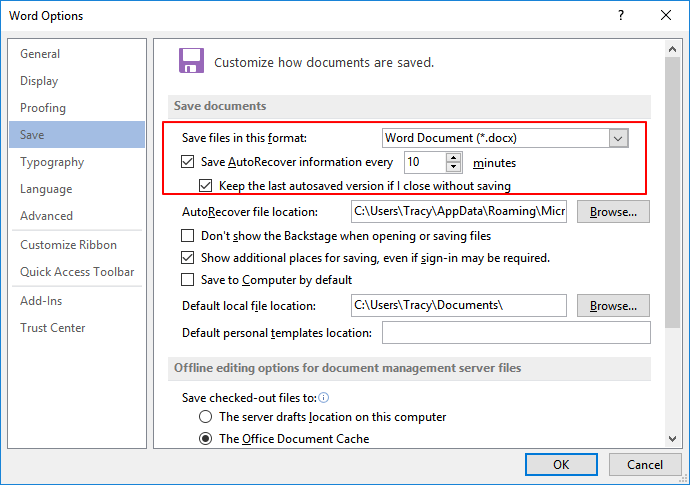
Step 2. Click the Save option, check the below two boxes:
- «Save AutoRecover information every * minute» and set the frequency to 10, 5 or 2 minutes
- «Keep the last autosaved version if I close without saving»
Step 3. Click «OK» to save all the changes.
As for the local Word documents and other files saved on your PC, you may use a reliable file back up software for help.
Further Office FAQs
Some of you may also have the same questions on restoring other Office files on Windows PC. Here we’ve gathered 3 related questions and provided brief answers to help you out:
1. How do I recover an unsaved Word document?
Answer: Yes! When a Word or Office file gets closed without saving, it is still possible for you to recover the unsaved document as long as you have enabled the AutoSave feature. To do so, you can use the Recent Document, Manage Version or locate the temporary files saved on your PC to bring the lost file.
The solutions toward this question are available here on this page for you to refer to now.
2. Can I retrieve a PPT or PowerPoint that you didn’t save?
Answer: Yes. Microsoft Office PowerPoint also contains the AutoSave feature. With this feature enabled, you can efficiently recover unsaved PPT files from the Recent > Recover Unsaved Presentation or Temporary Files saved in the AutoRecove folder on your PC.
For a more detailed guide, you can refer to this link for help: How to Recover Deleted or Unsaved PowerPoint Files.
3. How do I recover Word after MS Office Word has stopped working?
Answer: First, you need to repair the not working Word application. You may end the MS Word task in Task Manager, boot Windows into Safe mode for a quick try. Repairing Office installation, installing the latest update, reinstalling Office, disabling Add-ins in Word, etc. can effectively make Word application work again.
Next, you can restart Word and restore the lost word files. For the lost Word recovery, you can use the AutoSave feature in Word or apply EaseUS file recovery software to bring all the lost files back.
For a more detailed guide, refer to this link for help: MS Word Has Stopped Working.
If you have more questions on file recovery in Word, Excel, PowerPoint, etc. applications, use the Search option on the EaseUS website (https://www.easeus.com) or go to the File-Recovery page to more answers.

How to recover an unsaved Word document using Microsoft Word 2010, Word 2013, and Word 2016
- Click the File tab / Manage Documents.
- Click the Manage Document button.
- From the drop down list, click Recover Unsaved Documents.
- The Open dialog box opens displaying a list of your unsaved recoverable Word documents. Select the Word document you wish to recover and click the Open button.
- The recovered Word document is now open and displays an information banner across the top recommending that you Save the file.
- Click the Save As button and save your Word document.
Not only have you recover your document quickly but it is also saved for future access.
There are few things as frustrating as having to redo work that you just did. If you like these tips, check out our video on 10 amazingly useful features in Word. We love to help people have “AHA!” moments!
Closing an existing Word document without saving it
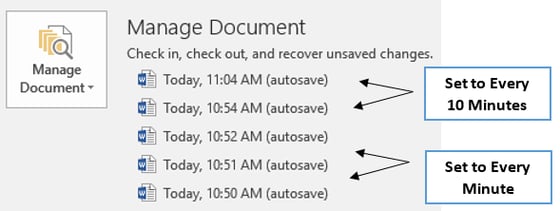
Another situation you might find yourself in: accidentally closing out of a previously saved document but failing to save the latest changes. Microsoft Word will help you recover up to the last 10 minutes of your work. You can also change the amount of time you would like Word to save a recoverable copy of your work. In the screen shot below you will see that I had Word save a temporary copy of my document every minute. I then changed it back to the default setting of 10 minutes.
- Click the File tab / Manage Documents.
- Locate and click on the latest autosave version to recover the latest changes made to your document. Don’t forget to Save your recovered Word document.
Change the save AutoRecover information time
If you would like change the frequency with which Microsoft Word automatically saves a recoverable copy of your document, follow the steps below. The default time is set to 10 minutes.
- Click the File tab / Options.
- In the Options dialog box click the Save option located on the left side.
- Under Save documents change the minutes to how often you would like Word to save a recoverable version of your document.
- When finished click OK
Here’s hoping that you are able to recover all of your work!
You might also like…
Expertly-curated fixes to help you save your Word documents easily
by Milan Stanojevic
Milan has been enthusiastic about technology ever since his childhood days, and this led him to take interest in all PC-related technologies. He’s a PC enthusiast and he… read more
Updated on December 12, 2022
Reviewed by
Alex Serban
After moving away from the corporate work-style, Alex has found rewards in a lifestyle of constant analysis, team coordination and pestering his colleagues. Holding an MCSA Windows Server… read more
- Some users claimed they could not save Word documents, usually for Windows 2010, 2013, and 2016 versions.
- You should try to disable a particular feature and check if the issue persists.
- If you cannot save Word documents, ensure you verify if the antivirus is blocking your actions.
XINSTALL BY CLICKING THE DOWNLOAD FILE
This software will repair common computer errors, protect you from file loss, malware, hardware failure and optimize your PC for maximum performance. Fix PC issues and remove viruses now in 3 easy steps:
- Download Restoro PC Repair Tool that comes with Patented Technologies (patent available here).
- Click Start Scan to find Windows issues that could be causing PC problems.
- Click Repair All to fix issues affecting your computer’s security and performance
- Restoro has been downloaded by 0 readers this month.
Microsoft Word is probably one of the best-known word processors on the market, but many users reported that Word won’t save their documents on their PC.
This is a pretty annoying problem, but today we’ll show you how to fix it properly in a matter of time.
Why can I not save my Word document?
Various potential causes can be responsible if Word won’t save your document. Below are some of the popular ones:
- Faulty add-ins: Sometimes, the reason you get the Office can’t save a copy of your file right now prompt is because of faulty add-ins. To fix this, you need to start Word in Safe Mode and remove the add-ins.
- Antivirus interference: In some cases, Windows Defender might prevent you from saving your document to some directories. You might need to disable certain features to get past this. Alternatively, you can switch to one of the best antiviruses for Windows PC.
- Corrupt file template: If you cannot save your Word document in Windows 10, it might be because the default file template is corrupt. The solution is to rename it and allow Word to create another one.
What can I do if I’m unable to save a Word document?
1. Start Word in Safe Mode
- Make sure that Word is completely closed.
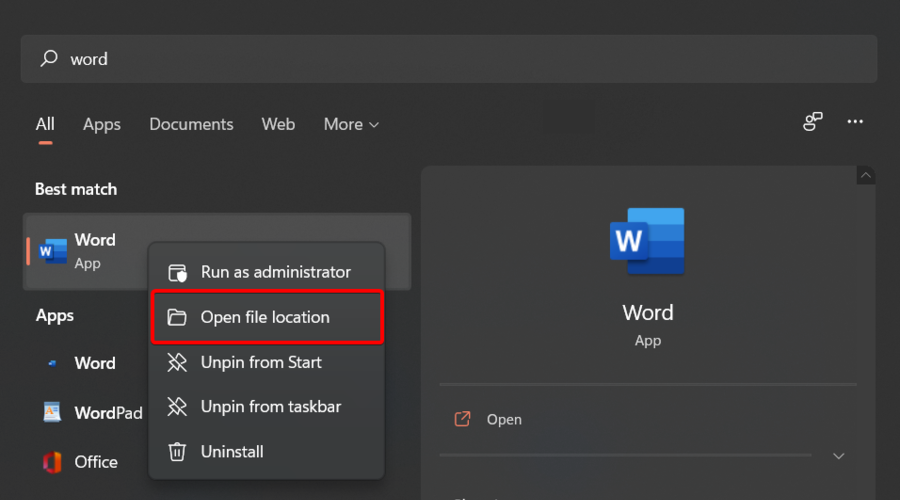
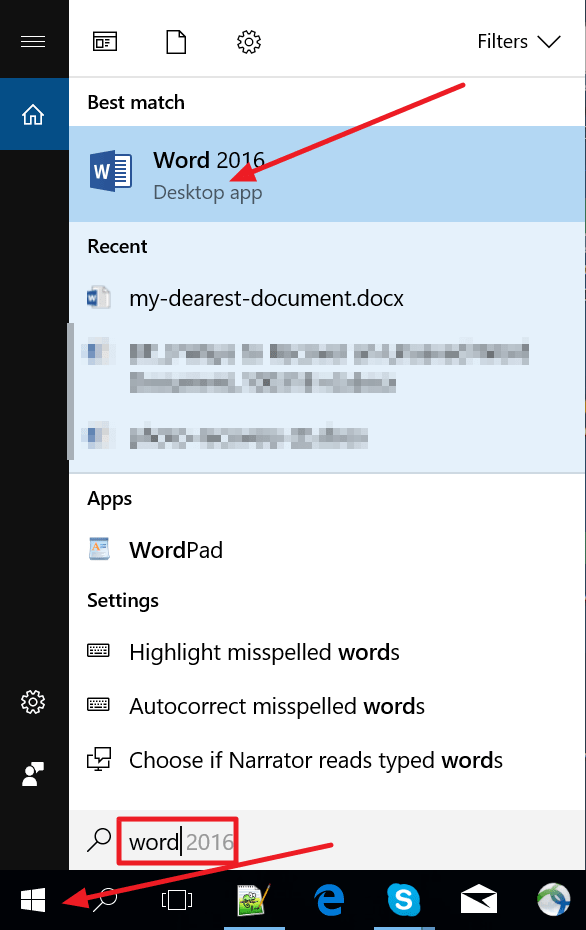
- Now, you have to locate the Word shortcut. To do this, hit the Windows key, type Word, then right-click on the first result and choose to Open file location.
- Locate the Word shortcut, press and hold the CTRL key while double-clicking on Word.
- You’ll be asked to confirm that you want to start Word in Safe Mode.
If Word won’t save your documents to your desktop or any directory on your PC, perhaps the issue is related to one of the add-ins.
To fix the problem, users are suggesting starting Word in Safe Mode. If the issue doesn’t appear in Safe Mode, the problem is most likely related to your add-ins.
You can fix that by finding and disabling the problematic add-ins. This is quite simple, and you can do it by following these steps:
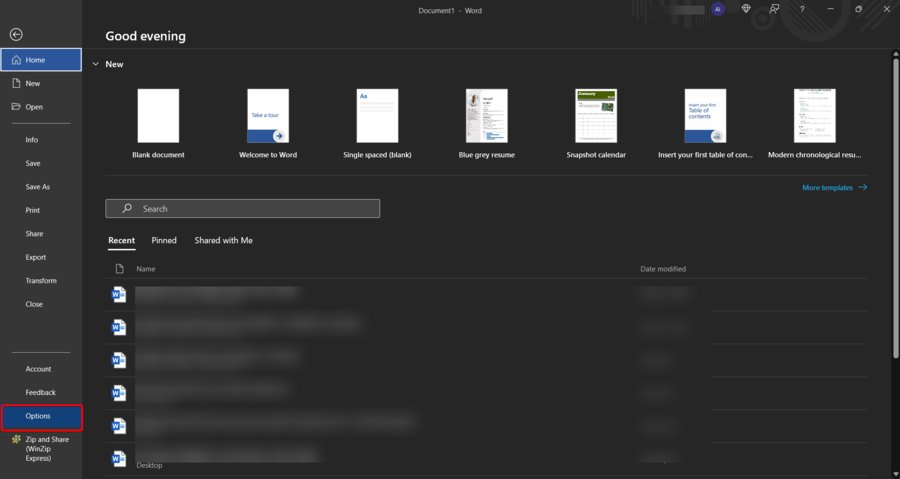
- In Word, go to File.
- Navigate to Options.
- Now, select Add-ins in the left pane, then click the Go… button next to Manage COM Add-ins.
- Locate the problematic add-ins and disable them. Usually, the problem is related to the Send to Bluetooth Add-in, but others can also cause the problem.
After you disable the problematic add-ins, check if the problem is still there.
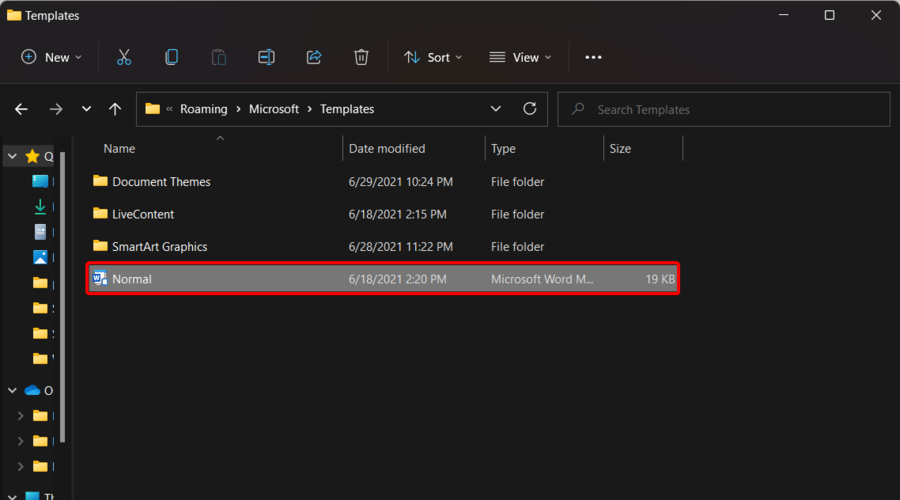
2. Rename Normal.dotm template
- Use the following keyboard shortcut to open the Windows run dialog box: Windows + R.
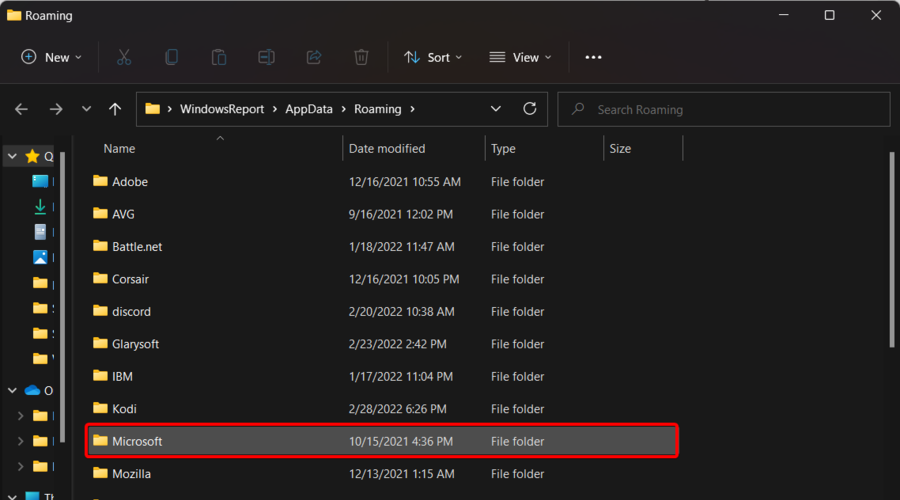
- In the opened window, input %appdata%, then hit Enter.
- Navigate to the Microsoft.
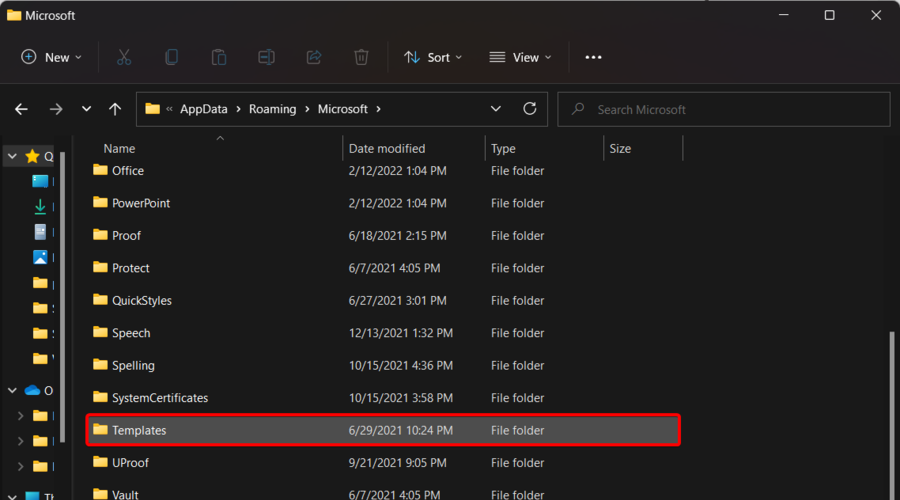
- Now, go to Templates.
- In there, you should see Normal.dotm file.
- Rename the file to OldNormal.dotm.
According to users, sometimes the problem can be caused by your template file. For example, if the default template file is damaged or corrupted, you’ll be unable to save Word documents on your PC.
However, you can easily recreate the template file on your own. This is quite simple to do, and you can do it by following these steps:
After doing that, you’ll force Word to recreate the new default template file. Once you recreate the template file, the issue should be resolved entirely.
Many users reported that this method worked for them, so we encourage you to try it out.
- Can’t edit a Word doc? Here are 7 quick fix solutions
- Fix: Microsoft Office not opening [Word, Excel, PowerPoint]
- Unable to edit Word 2016 documents [SIMPLE GUIDE]
- Microsoft Word hasn’t been activated? Fix it in 5 easy steps
3. Disable Controlled Folder Access
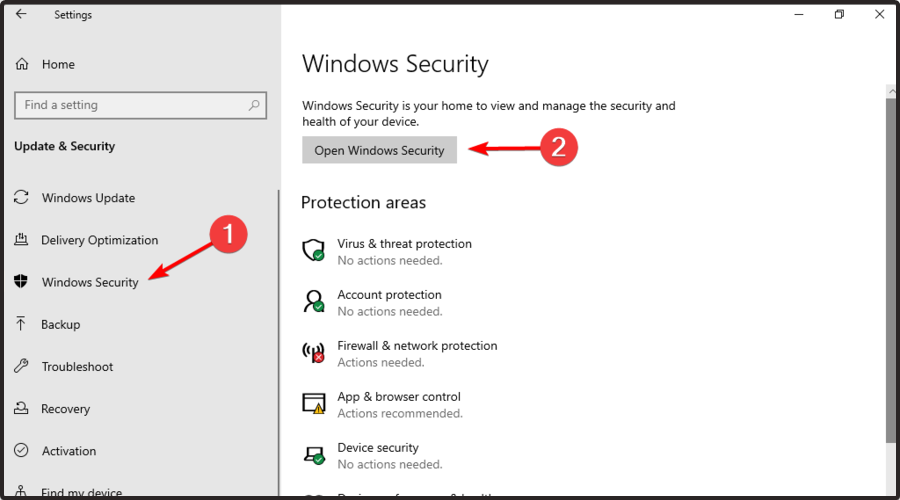
- Press simultaneously on the following keys to open Windows Settings: Windows + I.
- Navigate to Update & Security.
- Select Windows Security from the menu on the left, then choose to Open Windows Security from the right pane.
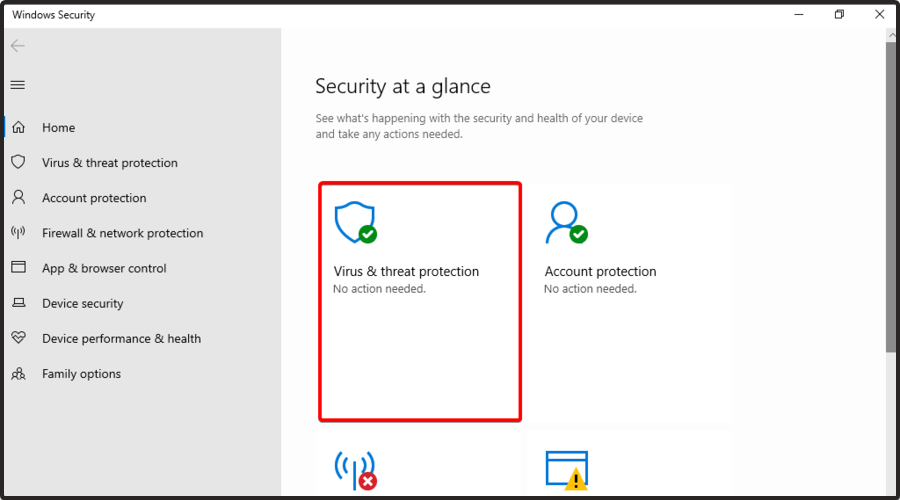
- Navigate to Virus & threat protection.
- Now select Virus & threat protection settings.
- Scroll down until you reach the Controlled folder access section. Then, click on Manage Controlled folder access option.
- Make sure that the Controlled folder access feature is disabled.
Some PC issues are hard to tackle, especially when it comes to corrupted repositories or missing Windows files. If you are having troubles fixing an error, your system may be partially broken.
We recommend installing Restoro, a tool that will scan your machine and identify what the fault is.
Click here to download and start repairing.
Windows Defender and other antivirus software can be why Word won’t save your document.
This is because it has a built-in folder protection feature; if this feature is enabled, you won’t be able to save files into specific directories. To fix this problem, it’s advised that you disable this feature altogether.
4. Check the save location
According to users, sometimes this problem can occur due to your saved location. For example, according to users, Microsoft Word doesn’t work well with long file paths, and if you’re saving your document in a path between 180 and 255 characters long, you might encounter this issue.
To fix the problem, it’s advised that you try saving in a different path, closer to the root directory, and check if that solves your problem. In addition, be sure to remove any special characters from the file path.
Word seems to have some issues with memorable characters, such as apostrophes and similar ones, so be sure not to have them in the file path or the file name. After making these changes, the problem should be resolved entirely.
5. Remove the Word Data registry key
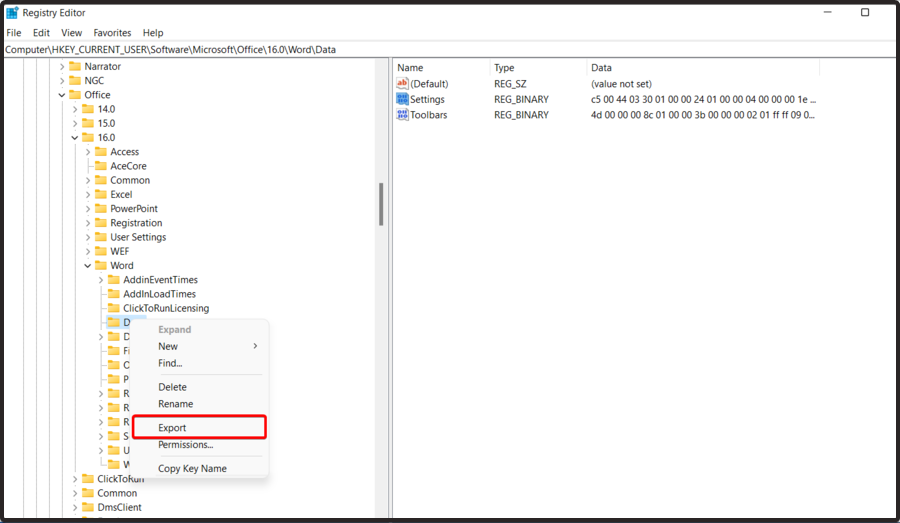
- Press the Windows key + R, type regedit, and press Enter.
- When Registry Editor opens, input this location in the search box:
HKEY_CURRENT_USERSoftwareMicrosoftOffice16.0WordData - Remember that this key might be slightly different depending on the version of Office you’re using.
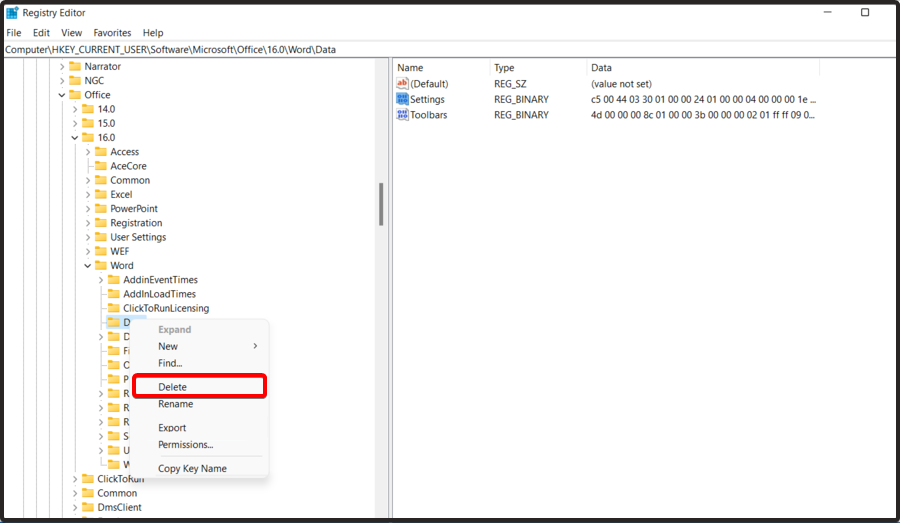
- Right-click the Data key and choose Export from the menu.
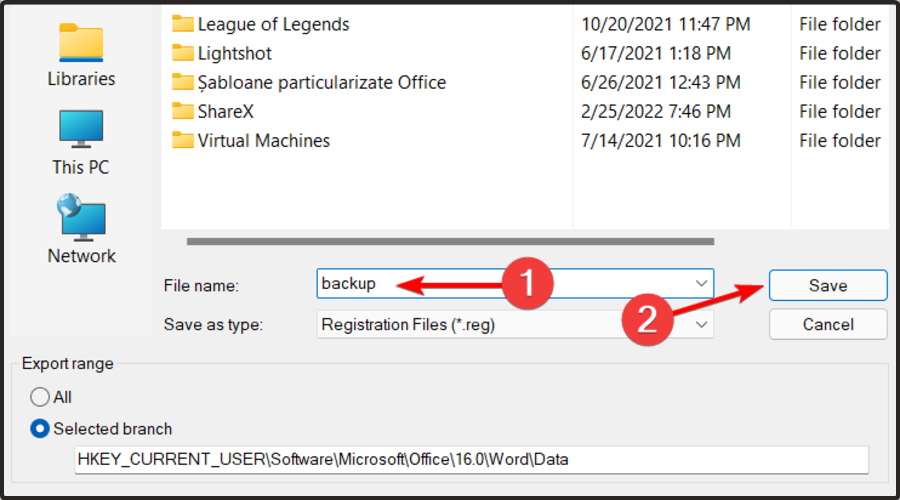
- Select the desired location, enter backup as the File name and click the Save button.
- Right-click the Data key and choose Delete from the menu.
- When the confirmation menu appears, click the Yes button.
According to users, if you’re unable to save Word documents on your PC, perhaps the problem is related to your registry.
Your registry can cause this issue; you need to remove a single key to fixing it. To do that, follow the above steps.
After that, start Word again and check if the problem is still there. If the issue is still present, run the backup.reg file you created in Step 4 to restore the registry to its original state.
As you can see, many issues can prevent you from saving Word documents, but we hope you solve this problem after using one of our solutions.
Similarly, if you can’t edit your Word document, check our detailed guide for expertly curated fixes to solve the problem.
Were you able to solve this issue using any of the solutions above? Please, let us know in the comments below.
Still having issues? Fix them with this tool:
SPONSORED
If the advices above haven’t solved your issue, your PC may experience deeper Windows problems. We recommend downloading this PC Repair tool (rated Great on TrustPilot.com) to easily address them. After installation, simply click the Start Scan button and then press on Repair All.
Newsletter
How to recover unsaved Word documents – 3 simple methods.
How to recover Word document not saved?
In this post I am going to show 3 simple methods on how to recover Word document not saved in MS Office, which applies to Word for Office 365, Word 2019, Word 2016, Word 2013 and Word 2010. I have also shared some tips in the post on how you can stop losing essential files so that you can avoid going through this word document recovery process.
It is not an uncommon occurrence to accidentally close your Office application without saving the document you were working upon or to lose your Word file unsaved due to unexpected program crash. Fortunately, everything is not lost in such circumstances and there are dependable ways to recover Word document not saved.
Although the steps on how to recover unsaved word documents detailed in the post are focused on Microsoft Word 2019, but the methods are pretty much applicable for older versions also and for other Office apps like Excel and PowerPoint.
How to recover Word document not saved in MS Office
Method 1: Recover unsaved Word documents using document recovery task pane
1. Start the Microsoft Office app, say the MS Word that you used for making the unsaved document and open a blank office document;
2. If the app was closed accidentally or the program crashed unexpectedly leaving your document unsaved, you will see the document recovery task pane in the left of the blank office document;
3. Click the down-arrow button for the document to recover and select ‘Save As’;
4. Choose a destination folder and recover the unsaved document by clicking ‘save’;
Method 2: Recover Word document using the option – ‘Recover Unsaved Documents’.
If you can’t see the document recovery task pane, follow the steps below to recover Word document not saved in MS office:
1. Start the Office app, say MS Word that you used for making the unsaved document and open a blank office document;
2. Now go to File >Info >Manage Document;
3. Choose ‘Recover Unsaved Documents’ option from the drop-down list;
4. A list of recoverable unsaved Word documents appears;
5. Choose the Word document you wish to recover from the list and click open;
6. Save the recovered document;
Here’s another way on how to recover unsaved word documents using the above option:
1. Launch the Office app, say Word that you used for the unsaved document;
2. Open a new blank document;
3. Now go to File >Open >Recover Unsaved Documents;
4. Select your unsaved document;
5. Click the Open button;
6. Save the recovered document;
Method 3: Recover unsaved Word documents using the ‘AutoRecover File Location’ folder
Follow the steps below on how to recover Word document not saved by accessing ‘AutoRecover File Location’ folder.:
1. Open the Office app, say Word that you used for creating the unsaved document and open a new blank document;
2. Now go to File >Options >Save;
3. Under the ‘Save documents’ section, select the AutoRecover file Location path and right-click the selection and select the ‘Copy’ option;
4. Press Windows Key+E on your keyboard to open ‘File Explorer’;
5. Right-click and paste the path you copied at 3 above, in the File Explorer address bar;
6. Press Enter on your keyboard;
7. Look for the .asd file of the document that you want to recover and Right-click it;
8. Select the ‘Open With’ option;
9. Select the appropriate app to open the file;
10. Click OK;
In this folder you will only find the unsaved documents of the app that you were using.
If you want to recover word document created with a different Office application, you need to open the said application and follow the same steps above.
How can you avoid using Word document recovery process
Although Office has features relating to recovering unsaved Word document, the mechanism does not work all the time as it should. Therefore, I am going to share the following tips that will help you to avoid using the above word document recovery options.
Create a new document before launching Office
When you launch an Office app you normally start with the start-up experience, which lets you to create a new blank document or allows you to create a document using a template. It is recommended that, when you’re working on a new document you try to create the file manually instead of using the start-up experience. Here’re the steps to follow to do that:
1. Open File Explorer (press Windows Key+E on your keyboard);
2. Navigate to the folder where you want to save the new document;
3. Right-click on the folder and select ‘New’,
4. Now select the type of document you want to create (for instance, Word, Excel or PowerPoint);
5. Give a name of the document and press ‘Enter’;
After completing the above steps, double-click the file you have just created, and you’ll be able to start with an already saved document. This will lower the chances of losing your important files as the changes will now be saved automatically.
Activate the AutoRecover Feature
Although by default, the AutoRecover feature should be enabled, just to be sure, it is advisable to activate this feature manually. Follow the steps below to enable this feature manually on all the Office applications:
1. Open any Office app (for example, Word);
2. Click on File >Options >Save;
3. Go to ‘Save documents’ section and select the following options:
> AutoSave OneDrive and SharePoint Online files by default on Word;
> Save AutoRecover information every 10 minutes;
> Keep the last AutoRecovered version if I close without saving;
> Ensure that AutoRecover file location has a valid path (no empty);
Once completed repeat these steps in other office apps you may use.
Adjust the Settings for the AutoSave Feature
Normally the AutoSave Feature of Office apps by default saves changes automatically every ten minutes, but you can adjust this setting to reduce the ten minutes gap. To do this,
1. Open an Office app (for example, Word);
2. Click on File >Options >Save;
3. Under the ‘Save documents’ section, change the option against ‘Save AutoRecover information’ from every 10 minutes’ to 1 minute;
4. Click OK;
Now the changes you make to the document will save automatically every 1 minute in place of 10 minutes.
Enable Real-Time AutoSave
If you’re an Office 365 subscriber, you can enable its real-time AutoSave feature, which will allow you to save the changes in content in real time. Here’s how to enable this feature:
1. Open an Office app (for example, Word);
2. Go to File menu and click Save;
3. Submit a name for the file;
4. Click Save;
5. Turn on the AutoSave toggle switch in the top-left corner of the document;
After the feature is enabled by following the steps above any changes you make to the document will be saved automatically in real time.
Frequently asked questions
Now that I have shown how to retrieve an unsaved word document let me also address some of the related queries often made by the people.
How to recover unsaved word documents office 365?
Here’re the steps to follow on how to recover unsaved word documents office 365:
1. Click the File Tab in the upper left in MS Word ;
2. Click ‘Manage Document’ and from the drop-down list select ‘Recover Unsaved Documents’;
3. Check for your missing file;
4. Click to open the file to be recovered. This will open the file in Microsoft Word;
5. Click ‘Save As’ button in the top banner;
How do I recover permanently deleted files in Windows 10?
To recover permanently deleted files in Windows 10 do the following:
1. Select the folder where the deleted files were stored and right-click on it;
2. Next click ‘Properties’;
3. Then click ‘Restore previous version’;
Windows will then write down the previous versions of permanently deleted files.
Can I recover permanently deleted photos from my iPhone?
Follow the steps below to recover permanently deleted photos from iPhone:
1. Scroll down until you see the ‘Recently Deleted’ album;
2. Next select ‘Recently Deleted’
3. Then click ‘Select’ from the top right of the screen;
4. Now tap on the photos you’d like to restore;
How to recover Word document not saved in Mac
To recover Word document not saved in Mac, follow the steps below:
1. Ensure that the Word for Mac not running;
2. Click on ‘Home’ under the ‘Go’ menu on the Finder;
3. Next go to Documents > Microsoft User Data;
4. Look for the files having “AutoRecovery save of” at the beginning;
5. Look for the Word document you are trying to recover with ‘AutoRecovery save of’ at the beginning;
6. Once you find the document you want to recover, rename it and add the ‘.doc’ extension to the end of its name. This will allow Word for Mac to open the file;
7. Double-click on the file to have Word open it;
8. Ensure that it’s the same document you wanted to recover;
9. Next click on File > Save As and save the file to your desired location with a file name;
If you have liked this post you may also like to read: How to add signature in Word (step by step guide)
You may also like to read this related post: Recover Overwritten Files – an easy step by step guide
Conclusion
Even if you are careful enough to save your documents you are working upon, there may be situations beyond your control when your computer shuts down abruptly due to power loss or due to some technical issues when you may be at risk of losing your important unsaved documents. This is definitely a disturbing situation unless you know how to recover unsaved Word documents under such circumstances. To save yourself from the stress and worry about losing vital documents it is, therefore, important to know how to retrieve an unsaved word document, as well as how to enable Word’s AutoSave feature to ensure it doesn’t happen again.
If you have liked the post showing the methods to recover Word document not saved please share your experiences on the issue, and leave a comment below for our readers.
There are few experiences as universally familiar as losing a Word document. Everyone from high schoolers with Catcher in the Rye book reports to business executives with quarterly earnings knows the panic of their work disappearing when it’s just a few crossed-t’s away from being completed.
Fortunately, there are dependable ways to recover Word documents quickly and reliably. Whether your work was accidentally deleted, lost in a Microsoft Word crash, or simply disappeared, here’s a simple guide on how to recover unsaved Word documents.
And remember, if all else fails, installing a data recovery program like Acronis Revive or falling back on a recent file or system backup may help get your documents back (at least in a workably recent state).
Can I retrieve a Word document that wasn’t saved?
Whether you rely on Word for personal or business tasks, losing an unsaved document sucks.
If you don’t save your Word documents manually, your files can fall victim to an unexpected crash. If you’ve already experienced such loss, chances are you have a habit of pressing the «Save» button once (or twice) every so minutes. However, not many users have that habit.
Nonetheless, even if your system crashes with an unsaved document open, you can still recover it through several options.
You can recover unsaved files through Temporary Files, AutoRecover Files, Document Recovery, Recycle Bin, and Data Recovery solutions. We’ll explore all of those options more deeply a bit later in the article.
Does Word keep backup files?
Like most programs in its class, Microsoft Word has an in-built «auto-save» feature to automatically back up your progress every few minutes. The default auto-save folder to support this function is the AppData folder.
Examples of the file path to harvest copies of your work are:
C:UsersYour_UsernameAppDataLocalMicrosoftWord
Or
C:UsersYour_UsernameAppDataLocalTemp
Or
C:UsersYour_UsernameAppDataLocalMicrosoftOfficeUnsavedFiles
Word backup files carry the «.wbk» extension. If you haven’t disabled the backup option in Word, the program will make copies of your documents regularly.
To check if the backup option is active, go to «File» -> «Options» -> «Advanced»; then scroll down to the «Save» section -> select «Always create backup copy».
Can Word save to the Cloud?
Yes, it can. If you rely on the native Windows option, your documents will be uploaded to OneDrive.
Having your documents on the cloud enables easier sharing and improves collaboration. It also allows easier mobile access (from a PC, laptop, smartphone, or tablet) and enhances data protection.
To save files to the cloud, do the following:
1. Select the «File» menu and go for the «Save As» option;
2. Choose «OneDrive»;
3. Choose a descriptive file name and go for «Save».
You can save personal and payment information to OneDrive – Personal, with work-related files going to a company OneDrive. You can also pick an alternative location in the list or «Add a Place» of your preference.
If you’re using a third-party backup solution like Acronis Cyber Protect Home Office, you can upload backup files to the Acronis cloud. Storing your files with a dedicated cloud backup service provides improved cybersecurity via backup encryption, automated backups, and concrete data recovery processes.
How do I restore a permanently deleted file?
Multitasking on a device may lead to losing critical data. (files, documents, images, audio, video, etc.)
Sometimes, you can get distracted and accidentally delete files and folders. The most common reasons for an accidental deletion are:
· Accidentally emptying your Recycle Bin;
· Erasing documents via «Shift+Delete» keys;
· Deleting files via the command line;
· Deleting files with the «Do not move deleted files to Recycle Bin» option enabled
File deletion or corruption can also result from malware or virus infection on your device.
Fortunately, you can recover perma-deleted data and documents in several feasible ways. Not all of them are guaranteed to recover permanently deleted documents, but you may try all of them in order when needed.
You can still recover seemingly perma-deleted files due to how your hard drive operates. Every file on your device resides on a specific portion of the hard drive. When you delete a file from your hard drive, the drive removes the deleted data and marks the space it used to occupy as «free» for writing new data.
However, the file can be restored to its original location unless you write new data on the newly available space. Remember, you need to act quickly – even if you don’t save new data to the hard drive manually, your computer can initiate updates or save system data on the newly available space.
In such a scenario, recovering permanently deleted files becomes close to impossible.
How to recover deleted Word documents via Backup?
Windows 10 and 11 pack a new feature called Backup and Restore.
The option enables users to create backups of their data to restore them later if needed. To recover permanently deleted files via Backup and Restore, you’d need to have enabled the option on your Windows device.
Here’s how to do it:
· Connect the external media carrier holding the backup to your primary device
· Go to «Control Panel» -> select «System and Security» -> click «Backup and Restore (Windows 7)» option
· Once in the Backup and Restore menu, go for the «Restore my files» option -> a Restore wizard will pop up to start file recovery
· If you can’t find the «Restore my files» option, go for the «Select another backup to restore files» option. Again, a wizard will pop up to assist you with your recovery
Recovering via Backup and Restore will replace all data on your Windows device with backed-up data. So, to avoid further data loss, make sure the backup contains all your crucial data.
How to recover deleted Word documents via Previous Windows 10/11 version?
Windows 10 and 11 offer another convenient feature to restore permanently deleted files – the «File History» option. If you had enabled the option before deleting a document, you could use it to recover permanently deleted files without additional software.
To do so:
· Type «File History» in the Start menu or the Windows search bar
· Select «File History Settings»
· From the left panel on the pop-up window, choose «Restore personal files»
· Navigate the feature to the backup you wish to restore. You can do that via the left and right navigation buttons at the bottom of the window. While you switch between backups, you can preview backup dates and the folders within them
· Once you’ve located the specific backup storing the deleted documents, press the «Restore» button to recover the files to their original location
· If Windows suggests it already carries a file with the same name in the destination folder, go for the «Replace the file in the destination» option
Lastly, close the window and check if the recovery is successful.
How to recover deleted Word documents via Command Prompt?
Sometimes, files and folders can be hidden due to the «Hidden files and folders» feature in Windows. You can use the Command Prompt to try and recover them.
To do so:
· Type in «cmd» in the Search Bar on the Start menu
· Choose the «Run as administrator» option
· Type chkdsk *: /f in the Command Prompt. The * represents the letter of your hard drive, so replace it properly. Once you do, hit «Enter»
· Type ATTRIB -H -R -S /S /D D:*.* in the Command Prompt window. Here, replace the «D» with the letter corresponding to your hard drive. Once you do, hit «Enter» again
A recovery process should start immediately if you’ve followed the above steps successfully. Let it finish and check if your files have been restored.
How to recover deleted Word documents via System Restore?
If you’re running Windows 10 or 11, you can opt for a System Restore to recover permanently deleted files. As System Restore takes regular (automated) snapshots of your whole OS, you can revert any unwanted changes to your system by reverting it to a previous point in time.
However, you’d need to have activated the System Restore option beforehand.
To recover perma-deleted files via System Restore, you need to:
· Type in «create a restore point» in the Start menu or Windows search bar, and click «Enter»
· Select «System Restore»
· Go through potential system restore points in time and select the most appropriate to recover the deleted document; then, click «Next»
· Confirm the specific restore point and choose «Finish»
· Your PC or laptop will then restart to allow Windows to apply the changes
Although this option is convenient, you must remember that System Restore may affect recently installed drives, programs, and browser updates. As its primary goal is to repair your Windows environment, it will revert your device to an older version of itself. And that older version may not have some programs or apps installed or updated correctly.
Nonetheless, before the System Restore process starts, the feature will show you a window containing all programs that will be affected by it. This way, you can back up all potentially affected programs and files before you revert your system.
How to recover deleted Word documents via System Image Recovery?
System Image backup enables users to back up the entirety of a Windows 10 or 11 OS. However, the feature doesn’t allow single file and folder backup, so you wouldn’t be able to restore individual documents if needed.
Here, it’s either recover everything or don’t recover anything.
To recover documents via System Image Recovery, you need to:
· Type «settings» in the Start menu or Windows search bar, and click «Enter»
· Browse and select «Update & Security»
· From the options list on the left, go for «Recovery»
· Save the progress on any open documents or programs
· Then, go for the «Restart now» button (you can find it under «Advanced Startup»)
· Afterward, select “Troubleshoot” -> “Advanced Options” -> “See more recovery options” -> “System Image Recovery”
· Browse through the list of System Image backup files and select the one containing the deleted document, then click «Next»
· Choose additional restore options, then click «Next»
· Review all System Image properties and click on «Finish» to start the restoration process
Once the restoration is complete, the deleted document should be restored to its original location. (or an alternative location, if you’ve chosen so in the Restore settings)
How to recover deleted Word documents via a third-party Backup solution?
If you’re using a dedicated backup solution, you can initiate data recovery and restore permanently deleted files from your device.
For example, Acronis Backup and Recovery enables users to initiate efficient backups with over 20 supported platforms. Via the cloud, your data is securely stored in physical, cloud, virtual, and mobile environments.
If you need to recover files from Acronis backup, you can do it via the user-friendly interface.
To do so:
· Start Acronis Cyber Protect Home Office -> select «Backup» on the sidebar
· Select the backup containing the deleted documents from the backup list
· On the panel to the right, select «Recovery»
· The interface will present you with possible recovery models for the selected backup; depending on the backup’s type, you’d be able to choose from «Entire PC», «Disks», «Partitions», and «Files» options. To recover one or more documents, select «Files»
· Cyber Protect Home Office will display the backup’s properties and the data inside it. Then, select a specific version of the backup based on the date and time. The default option here is the latest backup
· The panel on the left lets you navigate the files you wish to restore in the panel on the right; after you select all needed documents, press «Next»
· Choose a recovery destination on your device to place the selected documents after restoration. Here, you have two options – recover the data to its original location or choose a new location via the «Browse» button
· You can customize the recovery settings for the current session via the «Recovery options» menu.
· Once you’re done with the settings, go for the «Recovery now» button.
You can terminate recovery via the «Cancel» button at any time. However, aborted recoveries can still cause changes in the selected destination folder, so only go for the option if absolutely necessary.
Tips on preventing your Word Files from being deleted or unsaved
How to recover Unsaved Word Document?
We rely heavily on autosaves, yet huge chunks of progress and entire versions of documents can be lost when we don’t manually save our work. The good news is, this problem is so common that Microsoft has made it easy to recover unsaved Word documents:
1. In MS Word, click the File Tab in the upper left.
2. Click Manage Document and select Recover Unsaved Documents from the drop-down list.
3. Check for your missing file in the dialog box. If it was a recent loss it should appear.
4. Open the recovered Word document and click the Save As button in the top banner.
Did You Know?
You can update the frequency with which Microsoft Word autosaves your documents. Click File > Options > Save and change the number of minutes to ensure you have a recoverable version of all your docs available in case you need to recover Word documents in the future.
Knowing how to recover deleted Word documents will make you seem like a wizard to many of the people in your office, but it’s not complicated at all. Whether you’re trying to recover MS Word documents that were accidentally deleted or compromised by malware, there are a few easy steps that could help you get it back.
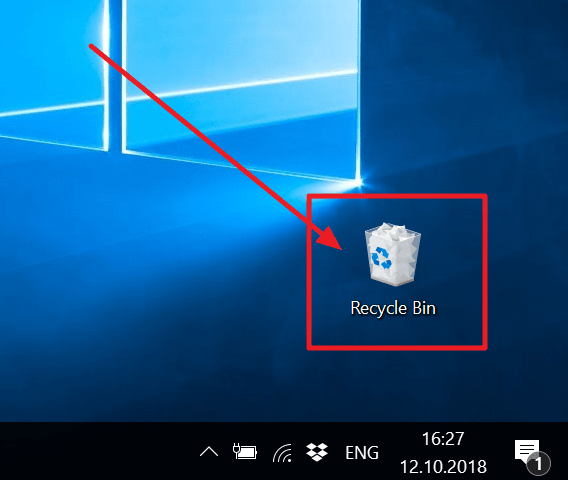
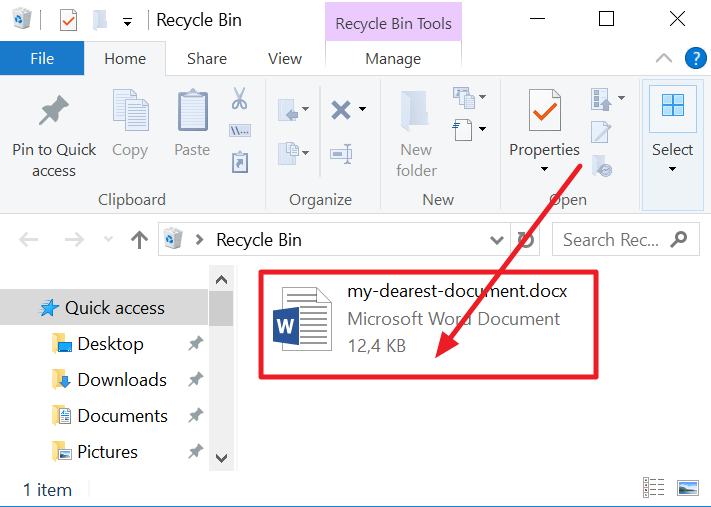
1. On your desktop, open the Recycle Bin
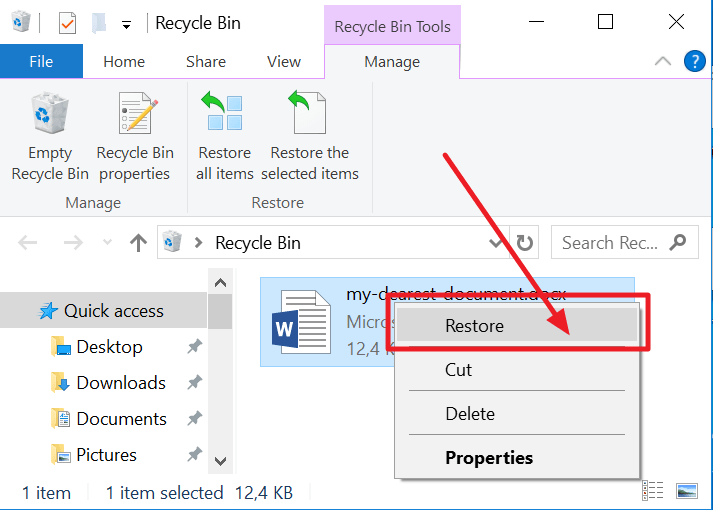
2. Search for your file by document name, file type, or date deleted. If you find your missing file, note the Original Location. When you recover deleted Word documents, they automatically are restored to that location.
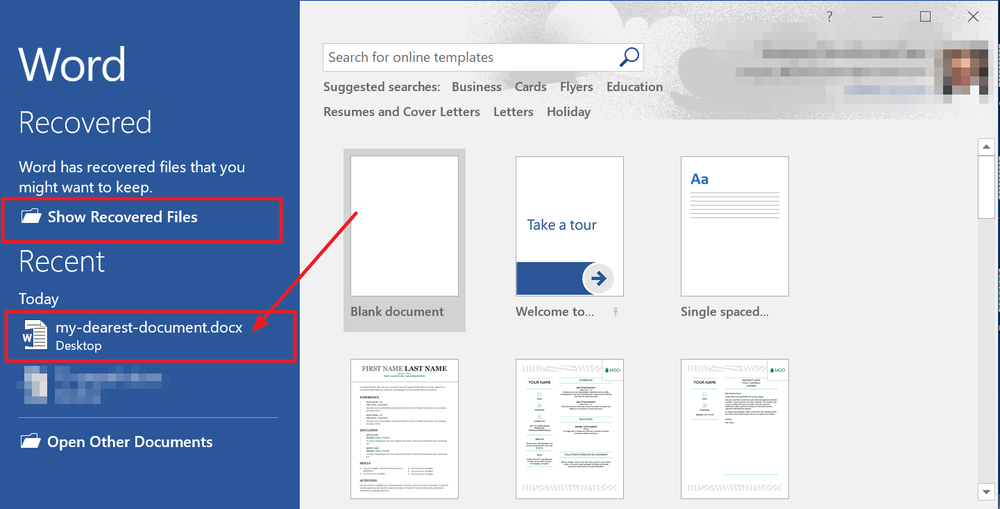
3. Restore the deleted document and either find it in its original location or click Quick Access to find it in the Recent Files list.
Did You Know?
When a file is deleted you’re actually just removing a marker that points to where the file was stored on the disc. The file actually exists on the disc until its space is overwritten by new information. Until that happens, you have a chance to recover Word documents.
How to recover Word Documents after a Crash?
Recovering Word documents that didn’t save doesn’t always stem from user errors. Whether your system unexpectedly went down or Microsoft Word crashed, Word documents can be recovered if you quickly search for the lost files before other files can take their disk space.
1. When your system comes back online, reopen Microsoft Word. The program automatically recovers unsaved Word documents in most cases.
2. If your document doesn’t appear in the AutoRecover list, click on File, then Options, then Save.
3. Copy the AutoRecover file location filepath and paste it into File Explorer.
4. Open the folder with your document’s name and copy the .asd file with the most recent modification date and time.
5. Return to MS Word, click File, then Open, then scroll to the bottom of the recent documents list and click Recover Unsaved Documents.
6. Paste the copied file into the folder that pops up and open the file to recover it.
Did You Know?
One of the most common reasons for Microsoft Word crashing is corrupt add-on or template. If your program consistently crashes, try running Word without any of these features loaded to see if that helps to improve reliability.
Can I recover a permanently deleted word doc without a backup?
Recovering a permanently deleted file via backup is the easiest and most reliable option. However, sometimes, users don’t have the chance to add a specific document to the backup. If they then accidentally delete the document, recovery gets a hell of a lot more complicated.
In such a scenario, you have two primary options.
The first one is to use data recovery software. Nowadays, many recovery tools claim to have an exceptionally high rate of recovering permanently deleted files. Usually, such solutions can recover over 1000 file types and formats and claim to restore data even from corrupted partitions or bad sectors on your hard drive.
They typically operate by collecting the lost data bit-by-bit until they can fully restore its original state. Such an approach can prove handy occasionally, but that depends heavily on the state of your computer’s hard drive.
If you lose a document due to a bad sector on your hard drive, the software may not be able to recover all of the document’s pieces successfully. This may lead to an altered version of the document or may not be able to restore it at all. In such a case, the document would be lost unless you have it stored in some form of backup.
This leads us to the second option.
Suppose a user perma-deletes a document by accident. In that case, most often, their reaction is to panic, especially if they don’t have the document stored in a backup outside their primary device.
However, we live in a technologically webbed world – anyone can send documents to multiple recipients via email, social media platforms, or free cloud services.
You can go through old emails, check DropBox or OneDrive shared storage, or go through your correspondence on Facebook and Instagram to find the deleted file. Nonetheless, if you’re 100% sure you haven’t sent the document to anyone, you can opt for the data recovery software option.
As we’ve mentioned, AutoSave is an in-built feature available in Word, Excel, and PowerPoint. (given you have a Microsoft 365 subscription)
AutoSave saves the progress on your Word files every few seconds unless you tell it otherwise. If you store your Word files on OneDrive, SharePoint, or OneDrive for Business, AutoSave is enabled by default.
To save a copy of your work before implementing any changes, it’s better to use the command «File -> Save a Copy» rather than «File -> Save As». That way, AutoSave will not overwrite the original document with the changes you make afterward.
If you skip that step and end up with an overwritten document, you can still restore the original via Version History. To do so:
· Open the Word file you wish to restore to a previous version
· At the top of the windows, click on the filename and go for «Version History»
· Review the dates and times of all versions to find the one you wish to restore -> click «Open Version»
· An additional window will pop up and show you the specific version of the document
· Once you’ve made sure this is the version you want to restore, click «Restore»
Whenever you open a Word document and make first changes, AutoSave will save those changes by adding a new file version to Version History. Afterward, AutoSave will regularly save changes to the document but only add new versions to Version History about every 10 minutes until you terminate the session. (ending the session means closing the Word document)
How do I get Microsoft Word to save AutoRecover versions every minute?
If you’re handling critical information via Word documents, saving a version of the file every 10 minutes may seem risky. However, Microsoft has thought of that – you can change the AutoRecover frequency to any number that suits you.
Here’s how to do it:
· Open Word and go to File -> Options -> Save
· You’ll see a settings section labeled «Save documents»
· Under the «Save documents» line, type your chosen number (of minutes) in the «Save AutoRecover information every (…)» box
· Once done, press «OK»
If you want to change the location for AutoRecover documents, go to:
· File -> Options -> Save
· Under the «Save documents» line, browse or type in the save path for saved documents in the «AutoRecover file location» field
· Once done, press «OK»
The AutoRecover settings window allows you to also:
· Disable AutoSave for OneDrive and SharePoint online files by default
· Change the cache location for AutoRecover files. The default should be «C:UsersYour_UsernameAppDataRoamingMicrosoft[OFFICEAPPFOLDER]
· Enable AutoSave on the computer by default
According to Microsoft, however, there is no option to use AutoSave locally in Office 2019 or 2021. Nonetheless, the AutoRecovery feature is still active to periodically save copies of your Word files to negate accidental data loss due to a crash.
Can I turn on AutoRecover in Word for Mac?
As with Windows, AutoRecover is available for Mac to protect the progress on your Word documents. Its default function here is the same – it makes a copy of your document every 10 minutes.
To enable AutoRecover and set the timeframe for making copies, you need to:
· With Word open on your Mac, go to the «Word» submenu on the top
· Choose «Preferences»
· Choose the «Save» option
· Choose «Save Auto-Recovery Information» and type in the duration you wish to set for AutoRecover copy creation
Microsoft advises users not to rely on AutoRecover as a substitute for manually saving their documents. (by clicking on the «Save» icon)
The most optimal way to preserve changes to your document is by manually saving it after every significant change. Nonetheless, it doesn’t hurt to set the AutoRecover timer to 5 minutes instead of 10 to guarantee you won’t lose progress due to a crash.
Keep in mind, when you manually save a document, its previous AutoRecover versions are removed.
On the other hand, AutoSave is a feature that saves your documents as you work on them. It works as if you’ve manually saved your progress. For Mac, AutoSave is available in Word, Excel, and PowerPoint for Mac and Microsoft 365 subscribers.
If you have AutoSave enabled, it’s less likely you’d need to rely on AutoRecover files.
Where is Autosave in Word located on Mac?
The AutoSave and AutoRecover features are linked in the Word menu. The path to enable AutoSave follows the same steps as with AutoRecover. However, you’ll have a few extra steps to complete before AutoSave is active for Word on your Mac.
Here’s how to do it:
· Open Word
· From the top menu, choose «Word» -> «Preferences»
· Click on the «Save» icon
· Tick the checkbox labeled «Turn on AutoSave by default»
· From the Word document, enable the AutoSave toggle to save your progress to the cloud (OneDrive or SharePoint)
· Explore more options from the AutoSave tab and select the «Automatically Save» option
· The AutoSave toggle will appear on the top side of the Word toolbar
· Name the document you’re working on and choose OneDrive or SharePoint as the storage location of the Word file
· Click «Save» to enable AutoSave to store changes in your desired location in real-time
· Your document will then be uploaded to the chosen location
·Once that’s done, AutoSave is on, and all changes you make to the document will be saved to OneDrive or SharePoint
Where can I find AutoSave Word documents on my computer?
If a power failure or a crash occurs, AutoRecover will typically recover the last version of your Word document automatically when you launch the app. Once AutoRecover opens the existing recovery file, it’s best to save it before editing or closing it immediately.
However, you may need to find AutoRecover files on your computer for other reasons. To do so:
· Switch to Finder
· Click «Go»
· Click «Go to Folder» (you can also use the SHIFT + COMMAND + G combo)
· Enter the specific folder path corresponding to Word, Excel, or PowerPoint
For Word:
/Users/Your_Username/Library/Containers/com.Microsoft/Data/Library/Preferences/AutoRecovery
For Excel:
/Users/Your_Username/Library/Containers/com.microsoft.Excel/Data/Library/Application Support/Microsoft
For PowerPoint: /Users/Your_Username/Library/Containers/com.Microsoft.Powerpoint/Data/Library/Preferences/AutoRecovery
Just a reminder: Replace «Your_Username» with your actual username.
As the AutoRecovery folder is hidden, typically, you won’t be able to find it by navigating in Finder. That’s why you need to use the «Go to Folder» feature and type in the full path to reach the folder.
Additionally, if you close a Word document and click «Don’t Save», the AutoRecover option won’t be active. The feature will delete the AutoRecover file because it assumes everything is okay and you wouldn’t need the AutoRecover file.
Can Microsoft Word recover previous versions of my document?
If you have turned the AutoRecover option on, it will automatically save versions of your documents regularly. (usually, at 10-minute intervals)
Once you have the AutoRecover files for your document, you can recover them depending on when you saved them.
There are two options: recover a saved file or an unsaved one.
If you have saved the document, you have to:
· Open the document you were working on
· Select “File” -> “Info”
· Find «Manage Documents» and choose the file labeled (when I closed without saving)
· A bar on the top of the file will appear; choose «Restore» to overwrite any previously saved versions
You can also compare AutoRecover versions by choosing «Compare» instead of «Restore».
If you haven’t saved the document, you have to:
· Open Word and go for “File” -> “Info” -> “Manage Document” -> “Recover Unsaved Documents”
· Select the specific file and click «Open»
· In the top file bar, choose «Save As» to save the document
If you have stored AutoRecover files in OneDrive or SharePoint in Microsoft 365, you can view all historical versions of a document.
To do so in Office 365:
· Open the file you want to inspect
· Select “File” -> “Info” -> “Version History”
· Browse through versions and select them to open them in a separate window
· If you want to restore the document to one of the previous versions, choose «Restore»
Keep in mind, if you operate via a Microsoft account, you’d be able to retrieve the last 25 versions of a document. If you sign in with a school or work account, the retrievable version volume will depend on your library configuration.
To view AutoRecover versions in Office 2019-2016:
· Open the document you want to inspect
· Click “File” -> “History”
· Choose a version to open in a separate window
If you can’t locate the «History» tab on the Word navigation pane, you may have a subscription version of Microsoft Office. If that’s the case, click the «Info» button and try accessing Version History from there.
To view AutoRecover versions on Mac:
· Open the document you want to view
· If you are using Microsoft 365 for Mac, choose the name of the document from the app’s title bar -> click «Browse Version History»
If you’re running Office 2016 or 2019 for Mac, go for «File» -> «Browse Version History»
· Browse AutoRecover versions and choose which ones to open in a separate window.
To view AutoRecover versions on the web:
· Open the document you want to view
· Go for “File” -> “Info” -> “Version History”
· Browse through AutoRecover versions and open the ones you want in a separate window
· When you find the version you’re looking for, choose «Restore»
If you use SharePoint in Microsoft 365 to handle documents, you can track AutoRecover versions, share them with others, and check recycle bin storage if you accidentally delete a file.
How to search for Word doc which I know I saved?
If you’re sure you have saved a Word document but haven’t been able to locate it, worry not. There are several ways to unfold saved documents, even when you’re computer is swamped with Word files.
You can search a file via the taskbar, the Documents tab, or File Explorer.
To find a Word document via the taskbar, type in the document’s name (if you remember it correctly) into the search box on the Windows taskbar. If you don’t know the full name of the document, you can use a keyword from it.
You can get results even if you remember a keyword from the text body of the document. (and not its name)
Once you type the name or keyword, Windows will show all matches on your device and OneDrive.
You can select the Documents tab if you wish to narrow your search. Once you do, your search results will only show documents.
Moreover, you can open File Explorer from a taskbar shortcut or right-click the Windows Start menu and choose File Explorer. Afterward, you can select a location on your hard drive from the left window pane.
You can then search or browse to find the document you need. You can search your entire device by selecting «This PC», or go for «Documents» and only look for files stored there.
How to search for Word backup files?
Although Word backup is seamless once set up for users, finding specific Word backups may be difficult without preparation. Luckily, you can learn how to pinpoint different Word backups below.
Check Word settings
If you remember how to open the AutoSave settings in Word, you can skip the next set of instructions. If not, you need to:
· Start Word -> click on «File»
· Choose «Options» and then click on «Save» on the left
· Ensure that the «Save AutoRecover information» option is enabled
Once you reach the settings window, go to the AutoRecover File Location field. Here, you can check the current AutoSave directory location.
By default, it would be «C:UsersYour_UsernameAppDataRoamingMicrosoftWord»
Once you locate the AutoSave directory location, you need to:
· Launch Word
· Navigate to the AutoSave directory
· Look for the version of the automatically saved backup and double-click it; the file will open in Word
As we’ve mentioned, the AutoSave directory may be a hidden folder on your computer, primarily if it resides in the AppData folder. However, you can bypass that by pasting the directory location in File Explorer’s address bar.
Nevertheless, you can navigate to the folder manually if you follow the path. Just make sure to reveal hidden items to be able to see the AppData folder. Once that’s done, you should easily find your way to the AutoSave directory.
Check the AppData folder
As we’ve said, the AppData folder is the default location for AutoSave backups. The pathing to the AutoSave directory can vary; the most common places to look are:
C:UsersYour_usernameAppDataLocalMicrosoftWord
and
C:UsersYour_usernameAppDataLocalTemp
Sometimes, the most recent AutoSave versions may use a different location. Most often, you’d be able to find them in
C:UsersYour_usernameAppDataLocalMicrosoftOfficeUnsavedFiles
As with previously shown paths, replace «Your_Username» with the username corresponding to your user account.
Regardless of which folder holds your Word backups, the AutoSave files have weird-looking names, especially for a casual user. They typically have a tilde before their name and the «.tmp» extension alongside a 4-digit number assigned to them.
Below are some examples of what Word backup files look like in different scenarios:
· ~wrdxxxx.tmp – such a name relates to a Word document within an AutoSave folder;
· ~wrfxxxx.tmp – such a name relates to a temporary document file;
· ~wraxxxx.tmp – such a name relates to an AutoRecovery file;
Complete AutoRecovery files won’t carry the «.tmp» extension but rather the «.wbk» extension. Once you locate them, you can double-click them to open the document in Word. An important note is always to save the file after you open it.
How to use the Recover unsaved documents option?
Sometimes, you’re sure you’ve saved a Word document, but your PC crashes, and you can’t locate the file afterward.
In such cases, you can still recover the document from the AutoSave location. To do so:
· Open Word and go to «File»
· Click «Recent», then select «Recover Unsaved Documents»
· You will be redirected to the AutoSave location folder; you can browse the documents here and find the one you’re looking for
Another path to reach the AutoSave folder is as follows:
“File” -> “Info” -> “Manage Versions” -> “Recover Unsaved Documents”
After you open the file, make sure to save it.
Check the Documents directory
To check the Documents directory, you should:
· Start Word
· Select «File», then choose «Open»
· Go for «Browse» and navigate to the directory you suspect holds the document
· Ensure to change the File Type of the folder from «All Word documents» to «All Files»
· If you’ve opened the correct folder, you should be able to see all corresponding backup files; you should easily spot the specific file as it is typically titled «Backup of (…)»
· Once you find the backup, you can open and save it
How to search your Windows temporary files manually?
In some instances, finding a backup file via traditional methods is more challenging, especially if you can’t find the AutoSave folder.
However, you can manually search for temporary files by tracking their extensions. Autosaved Word files usually carry the .asd or .wbk file extension.
To search for those, you should:
· Press the Windows Key + E on your keyboard; this will launch the File Explorer
· Once it’s up, click on the search bar on the top right
· Type in «.asd» or «.wbk» (without the quotes)
· Press «Enter»
· Windows will now search for all .asd and .wbk extensions
· Once the search is complete, you can browse through the matches and find the file you’re looking for
· Upon finding the specific file, right-click it and choose «Open File Location»; this will open the AutoSave directory location so that you can see all automatically saved backup files
If searching for .asd and .wbk extensions doesn’t bear any fruits, you can search for .tmp extensions. However, .tmp files aren’t necessarily all Word files. Many of them can support files from other applications, so you’d have to do some sorting.
How to recover Word Documents through Data Recovery Programs?
If none of these methods help you recover unsaved Word documents, your best bet is either backup software or data recovery software.
As always, the most secure and reliable way to recover data is with regular full image backups. Whether you use a Windows PC, a Mac, or a mobile device, having up-to-date backups ensure that you don’t lose your files – no matter what.
That said, if you didn’t have a backup plan in-place and active when you lost your Word document, you won’t have a backup to restore the file from.
In this case, personal cyber protection solutions like Acronis Cyber Protect Home Office are the best way to help you recover Word documents. Acronis Cyber Protect Home Office is an easy-to-use software solution that allows you to backup up the entire contents of your system so in the event of a disaster, you can locate a lost file and restore the MS Word document with just a few clicks.
Final Thought
Whether your Word doc was deleted, encrypted by malware or corrupted when it was saved on a faulty partition, you can recover it with Acronis Cyber Protect Home Office. When armed with regular backups, your docs can be recovered quickly and easily so you never have to worry about losing a Word doc or any other file ever again.
You can try WordDoc.Close SaveChanges:=wdDoNotSaveChanges before the Set WordDoc = Nothing
Also, if you want to quit the program entirely you should indeed send the command to quit it before setting the variable to Nothing:
WordApp.Quit SaveChanges:=wdDoNotSaveChanges
Other options for the Quit and Close methods can be found in the documentation: Application.Quit; Document.Close.
Your final code might look like this:
Sub pdf()
    Dim WordApp As Object
    Dim WordDoc As Object
    Set WordApp = CreateObject("Word.Application")

    WordApp.Visible = True

    Set WordDoc = WordApp.Documents.Open("C:testdoc.docx")

    WordDoc.ExportAsFixedFormat OutputFileName:= _
        "C:testdoc.docx.pdf", ExportFormat:= _
        17, OpenAfterExport:=False, OptimizeFor:= _
        0, Range:=0, From:=1, to:=1, _
        Item:=0, IncludeDocProps:=True, KeepIRM:=True, _
        CreateBookmarks:=0, DocStructureTags:=True, _
        BitmapMissingFonts:=True, UseISO19005_1:=False

    'If you want to quit the entire Application:
    WordApp.Quit SaveChanges:=wdDoNotSaveChanges

    'If you want to quit only the Document:
    'WordDoc.Close SaveChanges:=wdDoNotSaveChanges

    Set WordDoc = Nothing
    Set WordApp = Nothing
End Sub






![Fix: Unable to save a Word document [Quick guide]](https://cdn.windowsreport.com/wp-content/uploads/2022/03/sTE6RoE02T.jpg)
