
 Please Note:
This article is written for users of the following Microsoft Word versions: 2007, 2010, 2013, 2016, 2019, Word in Microsoft 365, and 2021. If you are using an earlier version (Word 2003 or earlier), this tip may not work for you. For a version of this tip written specifically for earlier versions of Word, click here: Understanding Click and Type.
![]()
Written by Allen Wyatt (last updated May 14, 2022)
This tip applies to Word 2007, 2010, 2013, 2016, 2019, Word in Microsoft 365, and 2021
Word includes a feature known simply as Click and Type. This feature means that when you are working in Print Layout view or Web Layout view, you can double-click your mouse in any open area of your document (where there isn’t text) and begin typing right away.
Normally, you begin typing at the left side of the screen. If you later want to adjust your text to the right margin or center it on the screen, you do so by using the tools on the various ribbon tabs. Click and Type, however, allows you to quickly format and enter text at the same time. The result is faster editing and formatting.
You can tell if Click and Type is active by how the mouse pointer behaves on screen. If the mouse pointer, when moving within the document window, looks like a simple I-beam insertion pointer, then Click and Type is not turned on. If, instead, it looks like an I-beam with some horizontal lines nearby, then Click and Type is active and ready. These lines indicate the formatting of the text that you can insert. There are four possibilities:
- Left aligned. If the horizontal lines are near the upper-right side of the I-beam, then it indicates that double-clicking your mouse will result in a left-aligned paragraph where you click.
- Left aligned, first line indent. If the horizontal lines are near the upper-right side of the I-beam, but there is also a very small arrow at the left side of the first horizontal line, then double-clicking will result in a left-aligned paragraph where you click, with the first line of the paragraph indented.
- Centered. If the horizontal lines are directly beneath the I-beam, then you can enter a centered paragraph by double-clicking your mouse.
- Right aligned. If the horizontal lines are near the upper-left side of the I-beam, then it indicates that double-clicking will add a right-aligned paragraph where you click.
Remember that Click and Type only works if you are viewing your document in Print Layout view or in Web Layout view.
If you don’t like or don’t use the Click and Type, you may want to turn it off. You can do this by following these steps:
- Display the Word Options dialog box. (In Word 2007 click the Office button and then click Word Options. In Word 2010 and later versions, display the File tab of the ribbon and then click Options.)
- At the left side of the dialog box, click Advanced.
- In the Editing area of the dialog box, make sure the Enable Click and Type check box is cleared. (See Figure 1.)
- Click on OK.
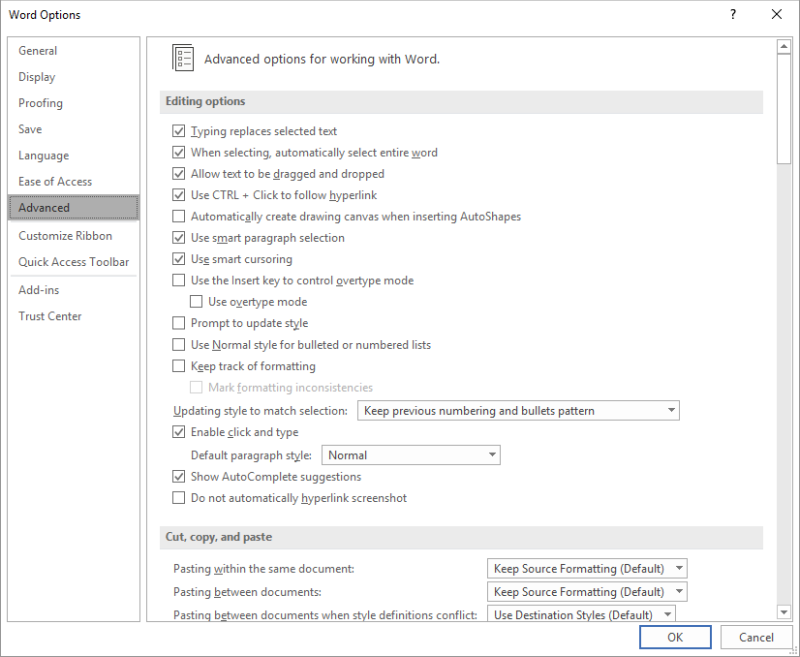
Figure 1. The Editing area of the Word Options dialog box.
WordTips is your source for cost-effective Microsoft Word training.
(Microsoft Word is the most popular word processing software in the world.)
This tip (5999) applies to Microsoft Word 2007, 2010, 2013, 2016, 2019, Word in Microsoft 365, and 2021. You can find a version of this tip for the older menu interface of Word here: Understanding Click and Type.
Author Bio
With more than 50 non-fiction books and numerous magazine articles to his credit, Allen Wyatt is an internationally recognized author. He is president of Sharon Parq Associates, a computer and publishing services company. Learn more about Allen…
MORE FROM ALLEN
Standardizing Note Reference Placement
Want to modify where an endnote or footnote reference appears in relation to the punctuation in a sentence? Here’s a way …
Discover More
Editing a Comment Close to Its Cell
Have you ever chosen to edit a comment, only to find that the comment is quite a ways from the cell with which it is …
Discover More
Finding Cells Filled with a Particular Color
Do you need to find cells that are formatted with a particular color? How you accomplish this task depends on your …
Discover More
-
Word’s Click And Type feature allows you to begin typing anywhere on a blank page. You must first enable this feature before you can use it.
Just follow these simple steps:
- Go to Tools | Options.
- On the Edit tab, select the Enable Click And Type check box in the Click And Type section, and click OK.
- To use this feature, switch to Print Layout view, and double-click anywhere on the blank page. For example, suppose you want to type a title in the middle of the first page. In Print Layout view, double-click the middle of the page where you want the title to appear, and type the title. Word automatically center-aligns the title.
- You can also use the Click And Type feature to insert nontext items. For example, to place a clip art picture in the bottom right corner of your page, go to the Print Layout view, double-click where you want the picture to appear, and insert the picture. Word automatically right-aligns the picture at the bottom of the page.
-

shabbir
Administrator
Staff Member- Joined:
- Jul 12, 2004
- Messages:
- 15,373
- Likes Received:
- 388
- Trophy Points:
- 83
Kool one
")

Share This Page

on
December 8, 2003, 7:22 AM PST
Tech Tip: Word Click And Type/Hide Excel formula cells/Resize Access form controls
Word: Type anywhere on a page with Click And Type Word’s Click And Type feature allows you to begin typing anywhere on a blank page. You must first enable this feature before you can use it. Follow these steps: Go to Tools | Options. On the Edit tab, select the Enable Click And Type check …
Word: Type anywhere on a page with Click And Type
Word’s Click And Type feature allows you to
begin typing anywhere on a blank page. You must first enable this
feature before you can use it.
Follow these steps:
- Go to Tools | Options.
- On the Edit tab, select the Enable Click And
Type check box in the Click And Type section, and click OK.
To use this feature, switch to Print Layout
view, and double-click anywhere on the blank page. For example,
suppose you want to type a title in the middle of the first page.
In Print Layout view, double-click the middle of the page where you
want the title to appear, and type the title. Word automatically
center-aligns the title.
You can also use the Click And Type feature to
insert nontext items. For example, to place a clip art picture in
the bottom right corner of your page, go to the Print Layout view,
double-click where you want the picture to appear, and insert the
picture. Word automatically right-aligns the picture at the bottom
of the page.
Excel: Hide formula cells from users
Excel’s Protect Sheet capability can prevent
users from changing cells, and it can hide formulas from view. For
example, say you want to give users the ability to enter data in a
worksheet for analysis, but you want to keep the proprietary
formulas used in the analysis from being visible.
By default, the Protect Sheet feature locks all
cells from data entry. To unlock cells for data input, follow these
steps:
- Select the
cells for data input, and click Format | Cells. - On the Protection tab, deselect the Locked
check box, and click OK.
To hide formulas from view, follow these
steps:
- Select the
formula cells you want to hide, and go to Format | Cells. - On the Protection tab, select the Hidden
check box, and click OK. - Go to Tools | Protection | Protect Sheet, and
click OK. You can also set a password to prevent others from
unprotecting the sheet.
Access: Quickly resize form controls
The Size command in Access lets you quickly
resize your form controls to a uniform height and width. For
example, say you have four form controls that are about one inch
wide and .5 inch high, and you want to enlarge them to 1.5 inch
wide and .75 inch high.
You can manually resize one control, and let
the Size command do the rest. Follow these steps:
- Manually
resize one of the controls to the desired width and height. - While pressing [Shift], select all
controls. - Right-click the selection, and choose Size |
To Tallest. - With the controls still selected, right-click
them, and select Size | To Widest.
All the controls now assume the size of the
larger resized control. Likewise, if you wanted all controls to
measure .5 inch wide and .25 inch high, first resize one control to
the smaller size, and choose To Shortest in Step 3 and To Narrowest
in Step 4.
-
Software
April 4, 2010 at 4:39 pm
In all recent versions of Word (since at least Word 2003), there is a handy little feature called “Click and Type.”
Similar to WordPerfect’s Shadow Cursor, Click and Type allows you to start typing anywhere in a blank document screen — i.e., not necessarily at the top left side — simply by double-clicking somewhere on the page. And depending on where you double-click, the text will be left-aligned, center-aligned, or right-aligned.
You read that correctly. If you position the cursor at the horizontal center of a line and double-click, any text you type there will be centered. If you position the cursor at the right margin and double-click, any text you type will be right-aligned.
You can preview how text will be aligned at any given point in the document by observing the mouse pointer, which turns into an I-beam pointer “shadowed” by several lines. When the lines are centered below the I-beam pointer (resembling the Center Justification icon), text will be center-justified. When the lines fly out to the left from the I-beam pointer (resembling the Right-Justification icon), text will be right-justified. And when the lines fly out to the right from the I-beam pointer (resembling the Left Justification Icon) — well, you get the idea.
After you have double-clicked within the document, you might notice (if you happen to glance at the horizontal Ruler) that Word has inserted left, center, and/or right tabs (depending on where you double-clicked). In effect, you have changed the tab settings of the paragraph that your cursor is in.
Keep in mind that paragraph formatting codes, including tab settings, are stored in the paragraph symbol (pilcrow) at the end of a particular paragraph and get copied to the next paragraph when you press the Enter key. Thus, when you finish typing and press Enter, the following paragraph will inherit the same tab settings, including any center and right tabs you inserted in the first paragraph. If in fact you set a center tab and a right tab in the first paragraph, you’ll be able to type text at the left margin in the new paragraph, then simply press the Tab key once to move the cursor to the center of the line and type some centered text, and then press Tab again to move the cursor to the right margin and type some right-aligned text.
If the Click and Type feature doesn’t seem to be working on your machine, it’s possible that it has been disabled in the Word Options. (It’s enabled by default.) In Word 2003, you can enable or disable the feature by clicking the Tools menu, Options, Edit tab, then navigating to the bottom of the tab and checking or unchecking the “Enable click and type” box. In Word 2007, click the Office button, Word Options, Advanced; the “Enable click and type” checkbox is at the very bottom of the “Editing options.” In Word 2010, click the File Tab, Options, Advanced, and look toward the bottom of the “Editing options” section. Remember to click “OK” in order to save your settings.
According to Microsoft, Click and Type works in most blank areas of a document, but isn’t available from within a bulleted or numbered list, multiple columns, indents, or graphics that use top or bottom text wrapping. In my tests, the feature seems to function within headers and footers (once you have gone into a header or footer editing screen).
Note that Click and Type is available only in Print Layout and Web Layout views, not in Normal / Draft, Outline, or Full Reading view.
For more information, see this Microsoft Help article. Although it was written about Word 2003, the general principles apply to Word 2007 and Word 2010, as well.
Entry filed under: Uncategorized.
Краткое изложение ваших основных идей и быстрое завершение первого проекта — верный совет для повышения производительности труда. При правильном использовании Outline View может повысить производительность при работе с большими документами на 50%.
Перейдите в View> нажмите кнопку Outline на ленте.
Outline View помогает вам точно настроить организацию сложных документов путем изменения порядка текстовых блоков и девяти уровней заголовков. Outline View вызывает специальную панель инструментов под названием Outlining с элементами управления для продвижения или понижения выбранного текста. Используйте элементы управления, чтобы скрыть или отобразить выделенный текст.
- Хотите добраться до определенного пункта в длинном документе? Переключитесь на Outline View и перейдите к определенному уровню заголовка.
- Хотите быстро набросать? Распланируйте основные разделы в Outline View, а затем переключитесь на другие макеты, чтобы написать тело.
- Хотите реорганизовать отчет, переместив огромные блоки текста? Перетащите заголовок, чтобы переместить не только этот заголовок, но и все подуровни под ним и основной текст. Используйте стрелки вверх-вниз для их работы.
- Хотите быстро отформатировать заголовки? Используйте заголовки 1, 2 и 3 вместо изменения размера и использования заглавных букв.
3. Используйте Word как инструмент быстрого мозгового штурма
Дважды щелкните в любом месте и начните печатать. Вам не нужно беспокоиться о позиционировании курсора, если вы этого не хотите. Это самое близкое MS Word к фристайлу. Click and Type существует с Word 2002. Эта функция работает только в представлении «Макет печати» или в представлении «Веб-макет».

Хотя это очень полезно для вставки текста и графики, вы также можете использовать его для импровизированного мозгового штурма в качестве инструмента для создания мыслей произвольной формы. помогут вам быстро провести мозговой штурм и продумать помогут вам провести
4. Преобразовать таблицы в графики за 3 шага
Выберите — аккуратно отформатированную таблицу с большим количеством данных ИЛИ хорошо составленную диаграмму, визуализирующую эти данные для вас?
Будучи визуальными существами, часто легко выбрать последнее. Word позволяет легко преобразовывать табличную информацию в диаграмму. Если у вас не слишком много табличных данных, создайте диаграмму в Word вместо чрезмерного уничтожения в Excel. Выберите таблицу с данными и выполните три шага …
1. Нажмите на вкладку Вставить на ленте.
2. Выберите инструмент « Объект» в группе « Текст » и откройте диалоговое окно « Объект» .

3. Из списка типов объектов выберите Microsoft Graph Chart . Нажмите ОК.

Word отображает табличные данные в виде аккуратной столбчатой диаграммы. Измените таблицу данных, которая появляется.
Вы также можете отформатировать этот график с другим типом диаграммы. Дважды щелкните свой график. Щелкните правой кнопкой мыши в пустом пространстве, которое находится внутри ограничительной рамки рисунка, и выберите « Тип диаграммы» .
Вы также можете использовать Microsoft Word для создания потрясающих потоковых диаграмм. с особенностью форм.
5. Напишите уравнения в Word
И вы думаете, что удивительны только формулы Excel Редактор формул всегда был важной особенностью MS Word. В последних версиях Word он просто известен как уравнение (доступно из « Вставка»> «Группа символов»> «Уравнение» ).
Выберите « Вставка»> «Уравнение»> «Вставить новое уравнение» .

Используйте панель инструментов Equation для разработки собственных расширенных уравнений для математики, физики или химии. Word дает вам много известных уравнений, которые можно вставить одним щелчком мыши.

6. Держите 24 предмета в буфере обмена
Буфер обмена Office может содержать 24 элемента, и он может взаимодействовать между всеми файлами Office. На вкладке « Главная » щелкните маленькую стрелку раскрывающегося списка рядом с «Буфер обмена», чтобы открыть панель слева. Для быстрого доступа дважды нажмите Ctrl + C, чтобы открыть панель буфера обмена.
Эта вместимость позволяет вам вырезать и копировать несколько элементов и перемещать их в любое место документа или между открытыми программами Office.

Используйте параметры буфера обмена для управления его функциями. Например, вы можете отключить « Показывать статус рядом с панелью задач при копировании», которая отображает количество элементов, которые вы скопировали в правом нижнем углу окна Word. Он включен по умолчанию.
7. Переводите языки на ходу
Microsoft Office использует Microsoft Translator для обработки всех переводов. Используйте функцию « Перевести» на вкладке « Обзор ». Перевести слово или предложение. Или переведите весь документ и отобразите его в отдельном документе Word.
Вкладка « Переводчик » появляется справа, и вы можете выбирать и менять языки. Используйте эту боковую панель, чтобы выделить каждое слово и полностью изучить его значение.

8. Украсить шрифты с помощью кернинга
Кернинг регулирует расстояние между двумя отдельными буквами для лучшего визуального взгляда. При разработке документа каждый шрифт требует своего собственного конкретного кернинга. Кернинг становится важным, когда вы создаете большие шрифты в Word, например обложку для электронной книги.
В Word по умолчанию отключен кернинг, и обычно вам не нужно беспокоиться об этом. Но скажем, вам нужно отправить домашнее задание на пять страниц. Экономьте усилия, увеличивая ширину между буквами вместо написания пуха!
Нажмите маленькую стрелку на шрифте (на вкладке « Главная »). В качестве альтернативы: нажмите Ctrl + D. Перейдите на вкладку « Дополнительно ». Установите флажок для кернинга для шрифтов . Поэкспериментируйте, введя небольшой размер точки в поле. Помните, что некоторые шрифты и размеры шрифтов плохо выглядят при кернинге.

Если вы действительно хотите стать лучше с кернингом и шрифтами, попробуйте игру типа Керн, о которой мы упоминали в предыдущей статье о шрифтовых играх.
9. Проверьте ваш документ
Сегодня важной особенностью MS Word является совместная работа, но вы также должны обратить внимание на безопасность. Инспектор документов в Word поможет вам проверить документ на наличие информации, которую вы хотите сохранить в секрете.
Всякий раз, когда вы создаете или даже редактируете документ, некоторая пользовательская информация автоматически добавляется в файл. Инспектор документов поможет вам стереть информацию такого рода перед публикацией документа.
Для доступа к Инспектору документов:
Перейдите в Файл> Информация> Проверить документ> Проверить наличие проблем> Проверить документ .

Проверьте скрытый контент, установив флажки. После проверки любые категории с конфиденциальными данными получают восклицательный знак. Кнопка Удалить все для каждой категории удаляет данные и завершает документ.

Служба поддержки Office предлагает вам пошаговые инструкции по использованию инспектора документов.
10. Воспользуйтесь преимуществами скрытого текста
О да. Эта функция действительно скрыта. Скрытый текст — это непечатный символьный атрибут, который имеет свою полезность. Скрытие текста может быть полезно во многих ситуациях:
- Создайте простой тест, скрывая ответы.
- Управляйте макетом для определенного задания печати, вставляя скрытый текст.
- Распечатать две версии документа. В одном скрыть части текста. Вам не нужно создавать две копии или удалять какую-либо часть документа.
- Временно скрыть конфиденциальную информацию, которую вы не хотите, чтобы другие видели.
С другой стороны, мы показали, как добавить водяной знак в Word для текста, который люди не могут удалить.
Скрыть или показать текст

- Выберите текст, который вы хотите скрыть или скрытый текст.
- Нажмите Главная> Диалоговое окно «Шрифт»> «Шрифт»> установите или снимите флажок « Скрытый» .
- Печать скрытого текста: перейдите на вкладку « Файл » > «Параметры»> «Показать»> установите флажок « Скрытый текст» > установите флажок « Печать скрытого текста» > нажмите « ОК» .
Непечатные символы — это «метки форматирования», которые позволяют пользователю устранять неполадки и настраивать макет документа.
Например, слова должны быть через один интервал; Ваши абзацы должны быть разделены правильными переносами строк; все вкладки должны быть выстроены в ряд; ячейки таблицы должны быть аккуратно отформатированы; нумерация страниц должна течь и т. д.
Пилки, маркеры табуляции, пробелы, разрывы строк, разрывы страниц, привязки объектов и скрытый текст — это лишь некоторые из непечатаемых элементов, которые удобны для управления макетом документа Word. Отобразите непечатаемые символы, нажав кнопку «Pilcrow» на вкладке « Главная ». Или нажмите Ctrl + * .
Примечание. В Word 2013 и более поздних версиях вы также можете развернуть или свернуть части документа для выборочного отображения информации.
Используйте эти секреты продуктивности в Word
Знаете ли вы о ежегодном чемпионате Microsoft Office ? Участники являются экспертами в использовании пакета, и вы можете поспорить, что они нашли более быстрые или более эффективные способы использования таких инструментов, как Word, для своей повседневной работы. Возможно, внутри тебя есть чемпион.
Чтобы углубиться, почему бы не проверить скрытую вкладку «Разработчик» на ленте Word который откроет больше способов использовать Word. А если вы создаете профессиональный документ, обязательно узнайте о титульных страницах