
Word for Microsoft 365 Outlook for Microsoft 365 Word 2021 Outlook 2021 Word 2019 Outlook 2019 Word 2016 Outlook 2016 Word 2013 Outlook 2013 Word 2010 Outlook 2010 Word 2007 Outlook 2007 More…Less
To convert text to a table or a table to text, start by clicking the  Show/Hide paragraph mark on the Home tab. This lets you see how text is separated in your document.

Convert text to a table
-
Insert separator characters—such as commas or tabs—to indicate where to divide the text into table columns.
Note: If you have commas in your text, use tabs for your separator characters.
-
Use paragraph marks to indicate where you want to begin a new table row.
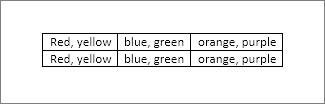
In this example, the tabs and paragraph marks will produce a table with 3 columns and 2 rows:

-
Select the text that you want to convert, and then click Insert > Table > Convert Text to Table.
-
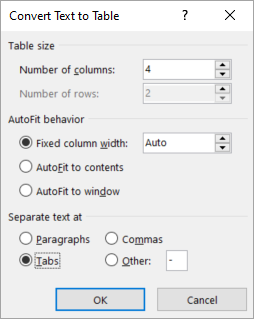
In the Convert Text to Table box, choose the options you want.
Under Table size, make sure the numbers match the numbers of columns and rows you want.
Under AutoFit behavior, choose how you want your table to look. Word automatically chooses a width for the table columns. If you want a different column width, choose one of these options:
To do this
Choose this option
Specify a width for all the columns
In the Fixed column width box, type or select a value.
Resize the columns to fit the width of the text in each column
AutoFit to contents
Resize the table automatically in case the width of the available space changes (for example, web layout or landscape orientation)
AutoFit to window
Under Separate text at, choose the separator character you used in the text.
-
Click OK. The text converted to a table should look something like this:


Convert a table to text
-
Select the rows or table you want to convert to text.
-
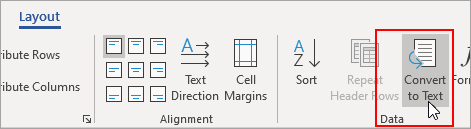
On the Layout tab, in the Data section, click Convert to Text.
-
In the Convert to Text box, under Separate text with, click the separator character you want to use in place of the column boundaries. Rows will be separated by paragraph marks.
-
Click OK.
Need more help?
Typically, Word documents like books, reports, and letters have paragraphs that occupy the whole page width. In articles, newsletters, flyers, and brochures, all or only parts of the text may be arranged in two or more columns:

You don’t need to create tables to structure text into columns. Tables are useful for displaying translated versions of the legal document side-by-side, but table cells break the text flow and are not recommended for multi-column layouts. It is more convenient to use columns for text formatting in most other cases. Word also allows you to adjust your columns by adding column breaks.
Format text in columns
To format a text into columns, do the following:
1. Do one of the following:
- To use the same number of columns for an entire document, click anywhere in the document (empty or with content).
If you choose to format text in columns, Word fills the first column with text on the page and then moves to the beginning of the next column. When all columns on one page are filled, the text moves to the next page.
- To format only a part of the document, select the paragraphs that you want to wrap in columns.
If you select a part of the text and wrap it in columns, Word inserts section breaks at the beginning and end of the selected text to delineate the area where the column layout is applied:

See more about breaks and how to display them.

To manually specify where the text in each column should end, you can use a column break.
2. On the Layout tab, in the Page Setup group, click the Columns button:

3. In the Columns dropdown list, select one of the options:

- One (used by default),
- Two, Three to create two or three columns of equal width,
- Left, Right to create two columns of unequal width,
- More Columns… to specify more options in the Columns dialog box:

- In the Presets section, you can choose the same options as in the Columns dropdown list – One, Two, Three, Left, or Right.
- If you need more columns, type or select the number of columns you need in the Number of columns field. The maximum number of columns may vary depending on the font, font size, margins, etc. E.g., 13.
- The Line between checkbox inserts a vertical line between columns. This line clearly defines column borders, especially if you want to fit as much content on the page as possible (very handy for cheat sheets).
See more options below.

Format columns
I. It is recommended to justify the paragraphs in columns to give the page a clean and organized appearance. To justify the column text, select it and do one of the following:
- On the Home tab, in the Paragraph group, click the Justify button:

- Press Ctrl+J.

II. To change the width of columns or the space between them, do the following:
1. Click anywhere in the columnar text.
2. Do one of the following:
- On the Layout tab, in the Page Layout group, click the Columns button, then choose More Columns…
In the Columns dialog box, in the Width and spacing section:
In the Width box for any columns, enter or select a new width.
The Width measurements for the other columns change to match, and the width of all the columns changes.
See how the columns will be displayed in the Preview section.
- On the horizontal ruler, drag the margins to change the width of the columns:


III. To reduce white space on text lines, you can set up Word to hyphenate the text and break long words into syllables. See how to hyphenate automatically and manually for more details.
Remove columns
To remove column layout for the selected text or entire document, do the following:
1. Click anywhere in the columnar text.
2. On the Layout tab, in the Page Layout group, click the Columns button, then choose One.
Insert a column break
In the Word document, you can manually break columns. When you break a column, the text after the break moves to the top of the next column:

You can display column breaks as regular nonprintable symbols. Word displays them as ![]() .
.
To insert a column break, position the cursor at the beginning of the line you want to start in the new column, and then do any of the following:
- On the Layout tab, in the Page Setup group, click the Breaks button, and then click Column to insert a column break:

- Press Ctrl+Shift+Enter.

The column break is inserted, and the cursor moves to the beginning of the next column.
Remove a column break
To remove a column break, click at the left end of the break or select the break and press the Delete key.
You can split text into columns in Microsoft Word in just a few simple steps.
This feature works the same in all modern versions of Microsoft Word: 2010, 2013, and 2016.
- In the Layout tab, on the Page Setup group, click Columns.
- Click one of the options in the menu to select it or click More Columns to add more than three columns or columns with custom width and spacing.
- By default, changes to columns affect only the section in which you are working. To apply column changes to a whole document, click More Columns and then Apply to: Whole document.


-
1
Open Microsoft Word. Its icon resembles a blue background with a white «W» on top.
- If you’d rather edit an existing document, simply double-click the document in question.
-
2
Click Blank document. It’s in the top-left corner of the templates page.
- If you’re editing an existing document, skip this step.
Advertisement
-
3
Click the Layout tab. It’s at the top of the Word window, to the right of the Home, Insert, and Design tabs.
-
4
Click Columns. This option is below and to the left of the Layout tab. Clicking it will prompt a drop-down menu with the following options:
- One — Default setting for Word documents.
- Two — Splits the page into two distinct columns.
- Three — Splits the page into three distinct columns.
- Left — Concentrates most of the text on the right side of the document, leaving a narrow column on the left.
- Right — Concentrates most of the text on the left side of the document, leaving a narrow column on the right.
- If you highlight a part (or all) of your document before clicking a column option, your document will be reformatted to appear in columns.
-
5
Click a column option. Doing so will apply invisible columns to your document; as you type, you’ll notice that your text jumps to a new line before reaching the standard right-most margin. Once you reach the bottom of the page, your text will continue in the next column until you reach the bottom of the page again, and so on.


Advertisement
-
1
Open Microsoft Word. Its icon resembles a blue background with a white «W» on top.
- If you’d rather edit an existing document, simply double-click the document in question.
-
2
Click Blank document. It’s in the top-left corner of the templates page.
- If you’re editing an existing document, skip this step.
-
3
Click the Layout tab. It’s at the top of the Word window, to the right of the Home, Insert, and Design tabs.
-
4
Click Columns. You’ll find this option below and to the left of the Layout tab.
-
5
Click More Columns. It’s at the bottom of the Columns drop-down menu.
-
6
Click a number of columns. You’ll see options like One, Two, Three, and so on at the top of this window. Clicking an option will apply it to your document.
- If you highlighted text, your settings will be applied only to the highlighted text.
-
7
Modify the column width and separation. You can do this by clicking the up or down arrow to the right of «Width» and the «Spacing» values, respectively.
- You can also uncheck the box next to «Equal column width» in order to make one column wider than the other.
-
8
Check the box next to «Line between» to draw a divider. Doing so will place a visible line between your columns.
- If you don’t want a visible divider, leave this option unchecked.
-
9
Click the «Apply to» drop-down menu. Doing so will allow you to click Selected text or Whole document to apply your column settings to the respective amounts of text.
-
10
Click OK. This will apply your settings and divide any selected text as per your customized column rules.


Advertisement
Add New Question
-
Question
How do I add columns to the middle of the document without changing the format of the entire document?

In Word, type the lines of text in a single column anywhere in the document. Then, select the lines of text and click the Page Layout tab. In the Page Setup options, click Columns and select the desired number of columns. Word automatically creates continuous section breaks before and after the columns. In some cases, it may be impossible to do without changing the format of the document.
-
Question
How do I rotate a page in Word?
Select the pages or paragraphs whose orientation you want to change. Click Page Layout > Page Setup Dialog Box Launcher. In the Page Setup box, under Orientation, click Portrait or Landscape. Click the Apply to box and click Selected text.
Ask a Question
200 characters left
Include your email address to get a message when this question is answered.
Submit
Advertisement
Thanks for submitting a tip for review!
About This Article
Article SummaryX
1. Open Microsoft Word or an existing Word document.
2. Click Blank document.
3. Click Layout.
4. Click Columns.
5. Click a number of columns.
Did this summary help you?
Thanks to all authors for creating a page that has been read 533,628 times.
Is this article up to date?
In the Word document, you can split (divide) text into different columns for different pages and sections wherever you want.
The column Format includes one column, two columns, three columns, left columns and right columns and also you can insert the line in between the columns.
Formally, the column format is a great way to arrange the content of the document in a minimal space and gives a good look. It helps you reduce the printing burden and also gives a formal look to your material.
In this article, you can learn to split the text into columns, for all pages, split the text into columns using selection, and split the text into columns using section breaks features. These are explained below.
Table of Contents
- Splitting Text into Columns for all the Pages:
- Change Columns for Different Pages using the Selection:
- Different Columns for Different Pages Using Section Breaks (Next page):
- How to apply line between the columns in MS Word
Splitting Text into Columns for all the Pages:
Enter and select the text you want to change as columns.
Go to the Layout (Page Layout) tab
Click on the columns
Select one of the options given under columns, such as one, two, three, left and right or click on more columns to customize them.
In this way, you can change your default column into different columns.

Change Columns for Different Pages using the Selection:
To split the text into different columns for different pages using the selection, follow the steps given below:
Select the text that you want to split the text into columns,

Go to the Layout/Page Layout tab
Click on the columns
Then select one of the options given under columns, such as one, two, three, left and right or click on more columns to customize them.

Picture: Accommodate Columns for Different Pages and Sections in MS Word by Using Columns
Different Columns for Different Pages Using Section Breaks (Next page):
To split the text into different columns for different pages wherever you want, follow the steps below:
Click at the beginning of the first line of a page that you want to start the new section (any column you want). For example, assume that this is a 3rd page from the beginning. Note: If you start the new section from the 3rd page, the previous column format stops at the 2nd page and the new column formatting starts from the page 3rd page.
Then go to the “Layout” or Page Layout tab, and then click “Breaks”.
Afterwards, select “Next Page” under “Section Breaks”.

To start the new section or to stop the previous section wherever you want, click at the beginning of the first line of the next page, rather than the page that you want to stop.
For example, if you start the new section from the 5th page, the previous column format stops at the 4th page and the new column formatting starts from the 5th page.
Again, go to the Layout tab, and click on the Breaks in the Page Setup group.
And then select “Next Page” under “Section Breaks”.
Now, click between the 2nd and 4th page in which you have applied the section breaks.
Then go to the layout in (Word 2013 and later versions) or the Page Layout tab (In Word 2010 and earlier versions).
In the Page Setup group, click on the columns and select any column divider you want. For example, select the Right column.
In this way, you can apply the different columns for different pages wherever you want.
How to apply line between the columns in MS Word
After splitting the text into columns you like, click the page in which section of the columns you want to apply lines in the document.
go to the Layout tab and click on the columns, and then select more column options.

Check to mark the “Line Between option” which is on the dialogue box and click Ok.

What are the Columns for Different Pages and Sections in MS Word?
Split (divide) text into different columns for the different sections and pages wherever you want in your document for a professional look.