
Word for Microsoft 365 Word for Microsoft 365 for Mac Word for the web Word 2021 Word 2021 for Mac Word 2019 Word 2019 for Mac Word 2016 Word 2016 for Mac Word 2013 Word 2010 Word for Mac 2011 More…Less
You can easily resize pictures, text boxes, shapes, and WordArt in your Office file. You can also remove unwanted portions of a picture by cropping it.
Resize a picture, shape, WordArt, or other object
-
Select the picture, shape, WordArt, or other object to resize.
-
To increase or decrease the size in one or more directions, drag a sizing handle away from or toward the center, while doing one of the following:
-
To keep the center in the same place, press and hold Ctrl while you drag the sizing handle.
-
To maintain the proportions, press and hold Shift while you drag the sizing handle.
-
To both maintain the proportions and keep the center in the same place, press and hold both Ctrl and Shift while you drag the sizing handle.

-
Note: Resizing a WordArt object doesn’t resize the text, only the container. If you want to resize the text, select the text and change the font size on the Home tab.
Resize an item to an exact height and width
-
Select the picture, shape, WordArt, or other object to resize.
To resize multiple objects at the same time, press and hold Shift while selecting each object.
-
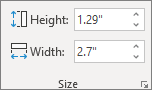
Select Shape Format, Picture Tools Format, or Drawing Tools Format and enter the new measurements into Height and Width.
Notes:
-
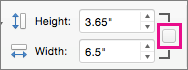
If you don’t see Height and Width, press the down arrow in the Size group
-
-

If you’re not able to change the height and width independently, you’ll need to unlock the aspect ratio:
-
Select the dialog box launcher
in the Size group. -
Clear the Lock aspect ratio check box.
 in the Size group.
Resize to an exact proportion
-
Select the picture, shape, WordArt, or other object to resize.
To resize multiple objects at the same time, press and hold Shift while selecting each object.
-
Go to Shape Format, Picture Tools Format, or Drawing Tools Format, in the Size group, select the dialog box launcher
.Notes:
-
If your screen size is smaller, you might need to select the down arrow in the Size group to see the dialog box launcher.
-
-
-
To choose between the original or a different proportion, select or clear Lock aspect ration and enter a Scale percentage for Height or Width.
 .
.Resize a picture, shape, text box, or WordArt
Resize manually
-
Select the picture, shape, WordArt, or other object to resize.
-
To increase or decrease the size in one or more directions, drag a sizing handle away from or toward the center, while doing one of the following:
-
To keep the center of an object in the same place, press and hold CTRL while you drag the sizing handle.
-
To maintain the object’s proportions, press and hold SHIFT while you drag the sizing handle.
-
To both maintain the object’s proportions and keep its center in the same place, press and hold both CTRL and SHIFT while you drag the sizing handle.
-
Resize to an exact height and width
-
Select the picture, shape, WordArt, or other object to resize.
-
Under Picture Tools or Drawing Tools, on the Format tab, in the Size group, enter the measurements that you want into the Height and Width boxes.
-
In the Size group, select the Size and Position dialog box launcher
. -
On the Size tab, under Size and rotate, clear Lock aspect ratio.
Resize to an exact proportion
-
Select the picture, shape, WordArt, or other object to resize.
-
Under Picture Tools or Drawing Tools, on the Format tab, in the Size group, select the Size and Position dialog box launcher
. -
On the Size tab, under Scale, enter the percentages of the current height and width that you want to resize to, in the Height and Width boxes.
-
Clear the Lock aspect ratio check box.
Tip: To apply the same size to different objects, select all objects to have the same dimensions, and then set Height and Width. To select multiple objects, click the first object, and the press and hold SHIFT while you click the other objects.
Quickly resize a picture, shape, WordArt, or other object
-
Select the picture, shape, WordArt, or other object to resize.
-
To increase or decrease the size in one or more directions, drag a sizing handle away from or toward the center, while doing one of the following:
-
To keep the object’s center in the same place, press and hold the OPTION key while you drag the sizing handle.
-
To maintain an object’s proportions while resizing it, press and hold the SHIFT key while you drag a corner sizing handle.
-
-
Select the picture, shape, WordArt, or other object to resize.
-
Select Picture Format or Shape Format and then make sure the Lock aspect ratio check box is cleared.
-
Go to Picture Format or Shape Format and enter the measurements in the Height and Width boxes.

-
Select the picture, shape, WordArt, or other object to resize.
-
Go to Picture Format or Shape Format > Position > More Layout Options.
-
Go to Size and under Scale, make sure the Lock aspect ratio check box is clear.
Enter percentages you want for Height and Width.
-
Select OK when finished.
Tip: To apply the same dimensions to different objects, select all objects and then enter the dimensions in the Height and Width boxes. To select multiple objects, select the first object, and then press and hold SHIFT while you select the other objects.
Resize a picture, shape, WordArt, or other object
-
Select the picture, shape, WordArt, or other object to resize.
-
To increase or decrease the size in one or more directions, drag a sizing handle away from or toward the center, while doing one of the following:
-
To keep the center in the same place, press and hold Ctrl while you drag the sizing handle.
-
To maintain the proportions, press and hold Shift while you drag the sizing handle.
-
To both maintain the proportions and keep the center in the same place, press and hold both Ctrl and Shift while you drag the sizing handle.
-
Note: Resizing a WordArt object doesn’t resize the text, only the container. If you want to resize the text, select the text and change the font size on the Home tab.
For more precise control, use the desktop version of Word Size options on the Picture Tools Format tab or the Drawing Tools Format tab.
Need more help?
Working with images and text often requires adjusting the size of the image to squeeze it into a small area or expand it to fill the available space, to cropping the image to make it more appealing, or adjusting the size of multiple images to the same height or width.
Microsoft Word allows you to do all the above and more. We will explain the several methods available, in simple steps:
6 Ways to Resize Image in MS word
- Resize an image by cropping it
- Resize an image by stretching, shrinking, or changing its size
- Resize an image maintaining its aspect ratio
- Resize an image to an exact height and width
- Resize an image in percentages
- Resize multiple images quickly
Method #1: Resize an image by cropping it
Step #1: Open the Word document
Open the Word document containing an image you want to change.

Step #2: Use the Crop tool
Click on the image, and then click on the Format tab on the top menu bar to change the ribbon. Click on the Crop icon in the Size section. Word introduces several straight and circular handles on the sides and corners of the image.

Step #3: Crop the image
Using the mouse, drag any of the straight handles towards the center of the image. The straight handles move inwards to cut off or crop some part of the image.

When you are satisfied with the result, release the mouse, and click anywhere outside the image. Word keeps the cropped part of the image and discards the rest.

Method #2: Resize an image by stretching, shrinking, or changing its size
Step #1: Open the Word document
Open the Word document containing an image you want to change.

Step #2: Select the image
Click on the image to select it. Several circular handles appear all around the image on its sides and corners.

Step #3: Resize the image
Using the mouse:
- Drag one of the side handles away from the image to stretch it, or
- Drag one of the side handles inwards to shrink the image, or
- Drag one of the corner handles to change the size of the image, and
Word changes the shape of the image accordingly.

Click anywhere outside the image, and Word retains the changes you made.
Method #3: Resize an image maintaining its aspect ratio
Step #1: Open the Word document
Open the Word document containing an image you want to change.

Step #2: Enter any one dimension
Click on the image to select it. Click on the Format tab on the top menu bar to change the ribbon. In the Size section, Word displays the present height and width of the image in the document. Click on the dimensions and change any one of them to your requirement. Note that Word maintains the height-to-width or aspect ratio while changing the dimensions.

Method #4: Resize an image to an exact height and width
Step #1: Open the Word document
Open the Word document containing an image you want to change.

Step #2: Open the Layout dialog
Right-click on the image to open several choices.

Click on Size and Position to open the Layout dialog.

Under the Size tab, Word displays the current Height and Width of the image in the document in absolute measurements.
Step #3: Change the dimensions
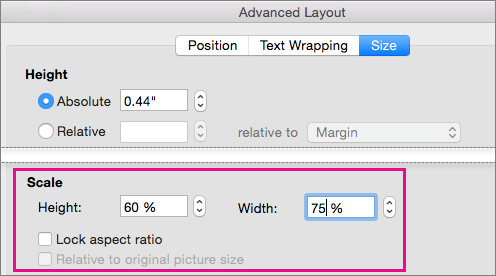
Under Scale, click on Lock aspect ratio to remove the tick mark from the box on its left. Click on Relative to original picture size to remove the tick mark from the box on its left.
Click on the absolute figures of the Height and Width and change them to your requirement.
Step #4: Return to document
Click on Ok to return to document. Word has resized the image to the measurements you had entered.

Method #5: Resize an image in percentages
Step #1: Open the Word document
Open the Word document containing an image you want to change.

Step #2: Open the Layout dialog
Right-click on the image to open several choices.

Click on Size and Position to open the Layout dialog.

Under the Size tab, Word displays the current height and width of the image in the document in absolute measurements. Note that under Scale, Word shows Height and Width as 100%, meaning original size.
Step #3: Change the scale
Under Scale, click on Lock aspect ratio to place a tick mark in the box on its left. Click on Relative to original picture size to place a tick mark in the box on its left.
Under Scale, click on and change either the Height or the Width in percentage to your requirement. Word changes the other dimension keeping the aspect ratio of the image. Note that 100% means no change in size. Also note that changing any one of the parameters changes all the dimensions the dialog is displaying.
If you do not want Word to maintain the aspect ratio while changing the percentages, click on Lock aspect ratio to remove the tick mark in the box on its left.
Step #4: Return to document
Click on Ok to return to document. Word has resized the image to the percentages you had entered.

Method #6: Resize multiple images quickly
Step #1: Open the Word document
Open the Word document containing multiple images you want to change.
Step #2: Resize one image
Select one of the images and resize it using any one of the methods above.
Step #3: Resize the other image/images
Select the next image, and press F4 on your keyboard. Word resizes the other image to the same dimensions as that of the first image. Repeat this for other images in the document.

Conclusion
Word offers many ways to resize images embedded in documents.
Here, we have covered only the simplest methods for resizing images, Follow the methods and steps we have shown, and you can resize images easily.
Here are 3 ways to get your document looking the way you want
Updated on December 19, 2020
If your Microsoft Word documents contain anything other than straight text, there may be times when a certain component (such as an image or a text box) needs to be a different size. Word makes it easy to change the size of objects.
Instructions in this article apply to Word for Microsoft 365, Word 2019, Word 2016, Word 2013, Word for Microsoft 365 for Mac, Word 2019 for Mac, and Word 2016 for Mac.
Resize an Image by Clicking and Dragging
Resize an image to shrink it down to fit in a tight spot in a document or to make it larger to fill up more space. Any type of object can be resized, including images, shapes, SmartArt, WordArt, charts, and text boxes.
-
In the Word document, select the object you want to resize.
-
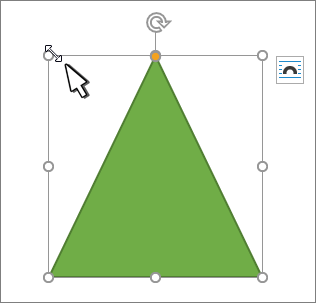
Use the mouse or touchpad to select and drag a Sizing handle. The Sizing handles are located on each corner of the object, as well as on the top, bottom, left, and right borders.
Once you’ve resized the object, you may also need to reposition it.
-
To keep the proportions of the object the same, press and hold the Shift key while you select and drag. To keep the object centered in its current location, press and hold the Ctrl key while you select and drag. Press and hold both keys together to perform both functions.
Resize an Image by Setting an Exact Height and Width
Resize an object based on an exact size if you need to make two or more images the same size or if images must be a certain size to fit a template or other requirement.
-
In the Word document, select the object you want to resize. Then, on the ribbon, select Picture Format.
When resizing something other than an image, the name of the tab will differ. For example, for WordArt, text boxes, or shapes, go to the Shape Format tab. For SmartArt or charts, go to the Format tab.
-
To resize the object to an exact size, go to the Size group and enter the values you want in the Height and Width boxes. Or, use the arrows to change the height and width of the object.
-
To resize the object to an exact proporation, select the dialog box launcher.
-
In the Layout dialog box, select the Size tab.
-
In the Scale section, select Lock Aspect Ratio. In the Height or Width section, use the controls to change the height or width. The other dimension automatically changes to maintain the ratio.
-
Select OK.
Crop an Image
Crop an image to remove a portion of it, which is helpful if you don’t need all the content within the image.
-
In the Word document, select the image you want to crop. Then, on the ribbon, select Picture Format.
-
In the Size group, select Crop. The image displays crop handles around the outside border.
-
Select and drag a handle to crop the image.
-
As with resizing an image, press Shift while you crop to maintain the size ratio. Press Ctrl to keep the images centered. Press both Shift and Ctrl to do both.
Thanks for letting us know!
Get the Latest Tech News Delivered Every Day
Subscribe
Contents
- 1 How do I resize a picture to a specific size in Word?
- 2 Why can’t I change the size of an image in Word?
- 3 How can I resize a picture size?
- 4 How do I make a picture a specific size?
- 5 How do I make an image fit in Word?
- 6 How do I change a picture to CM in Word?
- 7 What size is 10×15 photo?
- 8 How do I resize a picture to 2×2 in Word?
- 9 How do I find the scale in Word?
- 10 How do you scale a Word document?
- 11 How do I resize a JPEG image?
- 12 How do I resize photos in Windows 10?
- 13 How do I reduce a JPG file size?
- 14 How can I resize a picture without cropping it?
- 15 How do I resize an image in CM?
- 16 Is 10×15 the same as 6×4?
- 17 What does 16s mean in sizes?
- 18 How many cm is 6×4?
- 19 What is the size of 2×2 picture in MM?
- 20 What is the size of 2×2 picture in PX?
How do I resize a picture to a specific size in Word?
To resize a picture, on the Picture Tools Format tab, in the Size group, enter the new measurements into the Height and Width boxes. To resize a shape or other object, on the Drawing Tools Format tab, in the Size group, enter the measurements you want into the Height and Width boxes.
Why can’t I change the size of an image in Word?
Try right mouse button on image, and then size and position then type in the correct size. After this you can change the image again in the ribbon menu. Hope this works!
How can I resize a picture size?
Find and select the image you want to resize, and then click the “Open” button. On the Home tab of the Paint toolbar, click the “Resize” button. Paint gives you the option of resizing by percentage or by pixels.
How do I make a picture a specific size?
How to Convert a Photo to a Certain Size
- Find the picture you wish to re-size. Right-click it and then click “Re-size pictures.”
- Choose which size you would like your photo to be.
- Click “OK.” The original file will be unedited, with an edited version next to it.
How do I make an image fit in Word?
Here are the steps on how you can do that.
- Step 1: Open an MS Word document. First, you have to open up a Word document.
- Step 2: Insert the image.
- Step 3: Select the Text Wrap Style.
- Step 4: Drag and resize the image.
How do I change a picture to CM in Word?
Click on Advanced in the menu at the left of the Word Options window and scroll down to the section headed Display. Set the drop down box beside ‘Show measurements in units of:’ to Centimetres and then click OK to save the change.
What size is 10×15 photo?
Avaliable print sizes
| Named size | Real size (mm) | Real size (inch) |
|---|---|---|
| 9×13 cm | 89×127 mm | 3.5×5 inches |
| 10×15 cm | 102×152 mm | 4×6 inches |
| 13×18 cm | 127×178 mm | 5×7 inches |
| Single photo | various | various |
To resize the canvas, move the cursor to the black line on the edge of the canvas and then drag it around. Once you’re satisfied with the appearance of the photo, it’s time to resize it to the 2×2 picture size. On the Format menu and right next to the Crop button, you will see the height and width of the picture.
How do I find the scale in Word?
Show the rulers
- Go to View and select Ruler.
- If the vertical ruler doesn’t show, make sure you’re in Print Layout view. If it still doesn’t show, you might need to turn the ruler on. Go to Word > Preferences > View (under Authoring and Proofing Tools). Then, in the View dialog box, select the Vertical ruler box.
How do you scale a Word document?
Here’s how:
- Open the document containing the announcement.
- Press [Ctrl]P.
- In the Zoom section, click the Scale To Paper Size drop-down arrow.
- Scroll to and select the desired sheet size.
- Enter how many copies you want and then click OK.
How do I resize a JPEG image?
How To Resize An Image
- Open the image in Paint.
- Select the entire image using the Select button in the Home tab and choose Select All.
- Open the Resize and Skew window by navigating to the Home tab and selecting the Resize button.
- Use the Resize fields to change the size of the image either by percentage or by pixels.
How do I resize photos in Windows 10?
How to resize an image on Windows using the Photos app
- Double-click the image file you want to resize to open it in Photos.
- Once it’s opened, click the three dots in the top-right corner, then click “Resize.”
- A small pop-up will appear, offering you three preset sizes for the picture.
How do I reduce a JPG file size?
Alternatively, you can select Ctrl while clicking the image, and then choose Open > Preview. Under the Tools option on the menu bar, choose Adjust Size. In the Image Dimensions popup window, select if you want the adjustments to be done by Percent or Size. Adjust the width/height, and resolution.
How can I resize a picture without cropping it?
Practically, you only need three simple steps to resize images for Instagram without cropping them.
- Step 1: Load the image to iResizer.
- Step 2: Select objects on the image you want to protect from distortion.
- Step 3: Change the aspect ratio.
- Step 4: Enjoy the perfect square photo.
How do I resize an image in CM?
- Choose Image > Image Size.
- Measure width and height in pixels for images you plan to use online or in inches (or centimeters) for images to print. Keep the link icon highlighted to preserve proportions.
- Select Resample to change the number of pixels in the image. This changes the image size.
- Click OK.
Is 10×15 the same as 6×4?
6×4 photo paper is the common photo album size that will fit into off the shelf albums.You will likely see the same selection in our photo paper 10×15 category as some customers refer to this size in its imperial definition while others in its metric.
What does 16s mean in sizes?
Pocket Watch Sizes
| Size | Inches | Millimeters |
|---|---|---|
| 16s common | 1 21/30″ (1.700″) | 43.18 |
| 14s | 1 19/30″ (1.633″) | 41.48 |
| 12s common | 1 17/30″ (1.566″) | 39.78 |
| 10s common | 1 15/30″ (1.500″) | 38.10 |
How many cm is 6×4?
Standard Imperial ‘Inch’ picture frame sizes
| Inches | Centimetres (cm) | Milimmetres (mm) |
|---|---|---|
| 6 x 6 inch | 15.24 x 15.24 cm | 152.4 x 152.4 mm |
| 6 x 8 inch | 15.24 x 20.32 cm | 152.4 x 203.2 mm |
| 8 x 8 inch | 20.32 x 20.32 cm | 203.2 x 203.2 mm |
| 8 x 10 inch | 20.32 x 25.4 cm | 203.2 x 254 mm |
What is the size of 2×2 picture in MM?
The equivalents of a 2 x 2 inches size photo are: 51 x 51 milimetres photo (i.e. photo’s width 51 mm and height 51 milimetres)
What is the size of 2×2 picture in PX?
600×600 pixels
What size is a passport photo in pixels?
| Size (cm) | Size (inches) | Size (pixels) (300 dpi) |
|---|---|---|
| 5.08×5.08 cm | 2×2 inches | 600×600 pixels |
| 3.81×3.81 cm | 1.5×1.5 inches | 450×450 pixels |
| 3.5×4.5 cm | 1.38×1.77 inches | 413×531 pixels |
| 3.5×3.5 cm | 1.38×1.38 inches | 413×413 pixels |
Inserting images to your document is a good method to make it more understandable to readers. To match the text in MS Word, you need to resize all images perfectly. It might be time-consuming for you to change the size of several images quickly.
There are different ways to adjust images in Word, which are easy and practical. This post will introduce three tips of resizing single image and one tip of how to batch resize multiple images.
Tip 1: Drag Sizing Handle
1. Select the image which you want to resize.
2. Drag the sizing handle to increase or decrease the size of the image.
3. If you want to maintain the proportion, press [Shift] in the keyboard while dragging the sizing handle.
4. If you want to keep the center in the same place, press [Ctrl] in the keyboard while dragging the sizing handle.
5. If you want to achieve both of them, just press [Shift] + [Ctrl] at the same time while dragging the sizing handle.

Tip 2: Picture Tools
1. Select the image which you want to resize.
2. In Picture Tools, click Format tab and go to Size group.
3. Enter the measurements you prefer in the box of Height and Width.
4. If you want to resize a shape or object, click Format tab in Drawing Tools, go to Size group and enter the measurements in the box of Height and Width.

Tip 3: Layout Options
● From Ribbon Area
1. Select the image which you want to resize.
2. In Picture Tools, go to Format tab and click Position in Arrange group.
3. Click More Layout Options in the drop-down list.
4. Layout dialog box will display, go to Size tab.
5. Enter the measurements you prefer in the box of Height and Width.
6. Click OK at bottom right when you are done.

● Right-click Image
1. Right-click the image which you want to resize.
2. Select Size and Position in the dialog box.
3. Layout dialog box will display, go to Size tab.
4. Enter the measurements you prefer in the box of Height and Width.
5. Click OK at bottom right when you are done.

Tip 4: Use Shortcuts [F4]
1. Follow the above steps to resize the first image.Click another image and press [F4]. It will be modified to the same size as the previous one.
2. Select the rest of them in turn, and you can batch resize all images quickly.
3. [F4] could redo your last action, which replace the function of format painter, copy & paste.

Copyright Statement: Regarding all of the posts by this website, any copy or use shall get the written permission or authorization from Myofficetricks.

My first digital camera came as a freebie with a new computer sometime around 1998. The photos from it were 640×480 pixels which meant that they were little more than thumbnails if you tried to print them at a print resolution of 300dpi. Nowadays even fairly basic phones can beat that so it’s highly likely that when you try to paste a photograph into a page of text it isn’t going to fit at first and you’ll end up with something like this:

A picture that you wanted to be an illustration taking up a whole page by itself and wonky on it too!
Ever since I first started using Word, I’ve been finding ways of getting pictures and text to sit together exactly the way I want them to: first as a teacher making worksheets then doing layout for community magazines. But before you can begin to think about getting an image into the right place on a page, you need to make it roughly the right size so you can see how the text will fit around it — and that’s what this post is all about.
Note on versions of Word
I’m working in Word 2013, which has significant improvements to picture handling, but I have included what to do in Word 2010 where this is different (the same instructions are good for Word 2007). If you are using an earlier version of Word then some of the things now on the ribbon were on the picture toolbar and most of the methods that go through a right-click menu will also work, although the exact appearance of some of the menus will vary.
How do I make the picture fit the space I have available?
There are two things you can do to make a picture take up less space on the page and it is important to be aware of the differences between them.
- When you resize a picture, you basically squash it so it looks the same but fits in a smaller space.
- When you crop a picture you are effectively trimming some off, part of it disappears from view.
In the case of the picture above, we’re not even seeing all of it. Can you see little white boxes in the middle of two of the edges and at one of the corners? These are called handles, and we’ll be using them in a moment to re-size the picture. For now, though, the ones on the bottom and on the right-hand side don’t show because they, and some of the picture, are off the edge of the page.
Using the handles
The easiest way is to hover over a handle at one corner of the picture. A double-headed diagonal arrow appears.
Simply click on this and drag the corner of the picture inwards. As you do, you will see a black box showing you the new outline or / and, depending on the original size and how much working memory your computer has available, the resized picture. (The arrow turns to a black cross in Word 2013 when you start to drag it, don’t worry about this.)
When you let go, your new, smaller picture is in place.
Warning: don’t try this with one of the handles in the middle of an edge unless you want to want to squish or spaghettify your image. (OK then – try it once, just to see what I mean.)
Using the Picture Tools|Format ribbon
In ribbon versions of Word, when you click on a picture a new ribbon appears and, right at the end of it is a group called Size. The two boxes on the right show you the height and width of the image. You can change these using the little arrows. Notice that, as you change one the other changes automatically (although the change may not show until you stop using the arrows).

If you want to make a big change it can take a while to scroll through a millimetre at a time. Instead, you can click in one of the boxes to highlight the measurement, type in your new value (no need to type ‘cm’ or ‘ cm’, Word knows you’re working in the same unit) and press Enter. The other will magically change to match and your picture will appear at its new size.
Using the right click menu
If you right click on the picture (you might have to do it twice in Word 2013), one of the items on the menu which pops up is Size and Position. If you select this you get this box (If it doesn’t look like this, it’s probably opened with the Position tab open – just click on Size at the top):

Just as on the ribbon controls, you can scroll through alternative sizes or type in new values for height and width. You also have the option of making the lengths a certain percentage of the original values.
Make sure that Lock Aspect Ratio stays ticked so that the height and width keep changing together.
How do I crop a picture?
You’ll have already spotted that Crop command on the Picture Tools|Format ribbon. The down arrow takes you to all sorts of interesting possibilities, but we’re going to do a simple crop which you can get just by selecting your picture then clicking on the icon, or selecting Crop from the little menu that comes up when you press the arrow. (In Word 2003 you need to have the picture toolbar showing, select your picture and then click the crop icon.)
When you do this, thick black crop marks appear at the corners and edges of the picture.

As with using handles for resizing, simply click on these and drag them inwards. The bit of the picture that will remain stays bright and the bits that are going to be lost go grey.

When you are happy with what you have, simply click somewhere else in the document and only the cropped bit will remain.
You can also crop pictures by using the right click menu to go to Format Picture and choosing options from there, but it involves typing in where you want to crop from, and how much, using numbers. Again, depending on the size of the picture and the amount of working memory your computer has available, you may be able to see what’s happening to the picture as you change the figures, but it’s still not as straightforward as using the crop marks.

How do I make pictures go where I want them?
So now the picture is a reasonable size to fit on one page with the words, but the page doesn’t look very good. The picture is stuck randomly in the middle of the text and there’s a huge white space. I’ve written a post about one way of making the picture nestle in amongst the words over on Liz Dexter’s LibroEditing blog, and next week I’ll show you a way of dealing with a lot of pictures in a single document.