You can change the look of a line shape by changing its color, line style, or weight. If you are using Excel, Outlook, Word, or PowerPoint, you can apply a predefined Quick Style to quickly change the look of your line.
Note: These features are available only in the desktop versions of the programs listed above.
What do you want to do?
-
Add a Quick Style to a line
-
Change the color of a line
-
Make a line dotted or dashed
-
Change the weight of a line
-
Work with lines in Project
-
Format cell borders in Excel
Add a Quick Style to a line
Quick Styles for lines include theme colors from the document theme, shadows, line styles, gradients, and three-dimensional (3-D) perspectives. When you position your pointer over a Quick Style thumbnail, you can see how the style affects your line. Try different Quick Styles until you find one that you like.
-
Select the line you want to change.
If you want to change multiple lines, select the first line, and then press and hold Ctrl while you select the other lines.
-
On the Format tab, click the Quick Style you want.
To see more Quick Styles, click the More button
.
Note: If you don’t see the Format tab, make sure you’ve selected the line.
Top of Page
Change the color of a line
-
Select the line that you want to change.
If you want to change multiple lines, select the first line, and then press and hold CTRL while you select the other lines.
-
On the Format tab, click the arrow next to Shape Outline, and then click the color that you want.
Note: If you don’t see the Format tab, make sure you’ve selected the line.
To use a color that isn’t a theme color, click More Outline Colors, and then click the color you want on the Standard tab, or mix your own color on the Custom tab. Custom colors and colors on the Standard tab are not updated if you later change the document theme.
Top of Page
Make a line dotted or dashed
-
Select the line you want to change.
If you want to change multiple lines, select the first line, and then press and hold CTRL while you select the other lines.
-
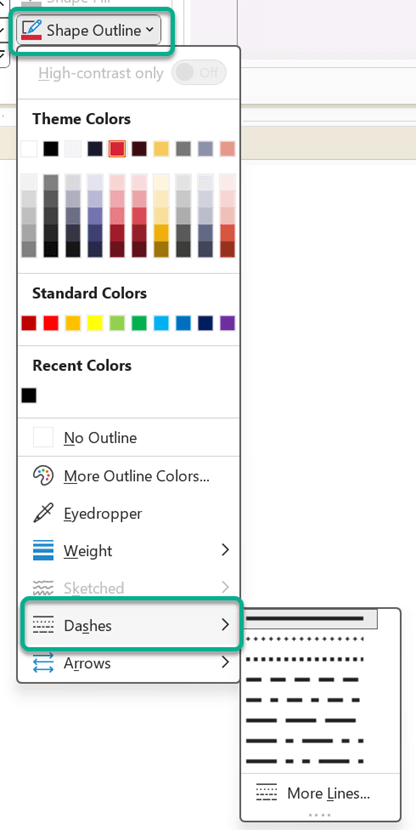
On the Format tab, click the arrow next to Shape Outline.
Note: If you don’t see the Format tab, make sure you’ve selected the line.
-
Point to Dashes, and then click the style you want.
To create a custom style, click More Lines, and then choose the options that you want.
Top of Page
Change the weight of a line
-
Select the line that you want to change.
If you want to change multiple lines, select the first line, and then press and hold Ctrl while you select the other lines.
-
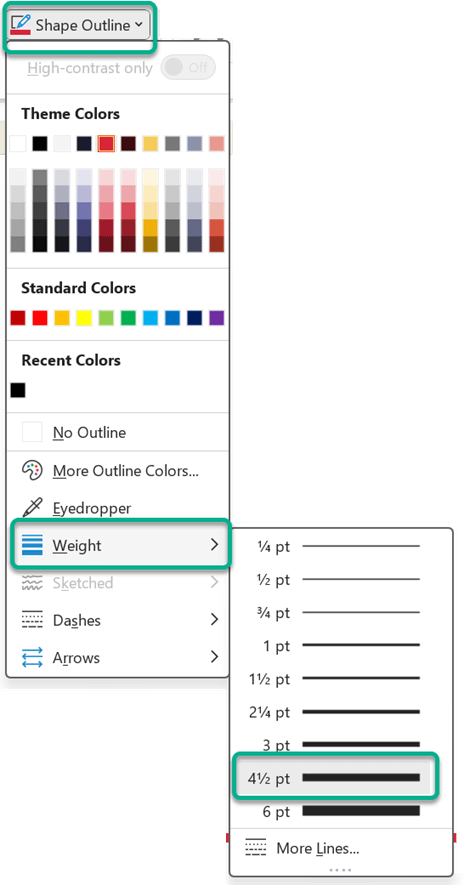
On the Format tab, click the arrow next to Shape Outline.
Note: If you don’t see the Format tab, make sure you’ve selected the line.
-
Point to Weight, and then click the line weight that you want.
To create a custom line weight, click More Lines, and then choose the options that you want.
Note: To draw a double line, draw a single line, copy and paste a second line next to it, and then group the two lines.
Top of Page
Format cell borders in Excel
If you want to apply line styles and colors to borders in Excel spreadsheets or tables, see the following articles:
-
Apply or remove cell borders
-
Create and apply a border cell style
-
Show or hide gridlines on a worksheet
Top of Page
Work with lines in Project
You need to have a Gantt chart open to follow these steps.
-
Right-click the line you want to change and click Properties.
-
Under Line, choose a color from the Color list and a line thickness from the Line list.
Top of Page
See Also
Draw or delete a line or connector
Format the bar chart of a Gantt Chart view in Project
Important:
Office 2010 is no longer supported. Upgrade to Microsoft 365 to work anywhere from any device and continue to receive support.
Upgrade now
What do you want to do?
-
Add a Quick Style to a line
-
Change the color of a line
-
Make a line dotted or dashed
-
Change the weight of a line
Add a Quick Style to a line
Quick Styles for lines include theme colors from the document theme, shadows, line styles, gradients, and three-dimensional (3-D) perspectives. Try different Quick Styles until you find one that you like. With live preview, when you position your pointer over a Quick Style thumbnail, you can see how the Quick Style affects your line.
-
Select the line that you want to change.
If you want to change multiple lines, select the first line, and then press and hold CTRL while you select the other lines.
-
Under Drawing Tools, on the Format tab, in the Shape Styles group, click the Quick Style that you want.
To see more Quick Styles, click the More button
.
Example of the Shape Styles group on the Format tabIf you do not see the Drawing Tools or Format tabs, make sure that you have selected the line. You might have to double-click the line to open the Format tab.
Top of Page
Change the color of a line
-
Select the line that you want to change.
If you want to change multiple lines, select the first line, and then press and hold CTRL while you select the other lines.
-
Under Drawing Tools, on the Format tab, in the Shape Styles group, click the arrow next to Shape Outline, and then click the color that you want.
Example of the Shape Styles group on the Format tab.If you do not see the Drawing Tools or Format tabs, make sure that you have selected the line. You might have to double-click the line to open the Format tab.
To change to a color that is not in the theme colors, click More Outline Colors, and then either click the color that you want on the Standard tab, or mix your own color on the Custom tab. Custom colors and colors on the Standard tab are not updated if you later change the document theme.
Top of Page
Make a line dotted or dashed
-
Select the line that you want to change.
If you want to change multiple lines, select the first line, and then press and hold CTRL while you select the other lines.
-
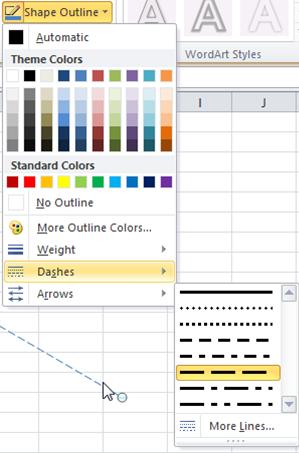
Under Drawing Tools, on the Format tab, in the Shape Styles group, click the arrow next to Shape Outline.
If you do not see the Drawing Tools or Format tabs, double-click the line to make sure that you selected it.
-
Point to Dashes, and then click the line style that you want.
To create a custom style, click More Lines, and then choose the options that you want.
Top of Page
Change the weight of a line
-
Select the line that you want to change.
If you want to change multiple lines, select the first line, and then press and hold CTRL while you select the other lines.
-
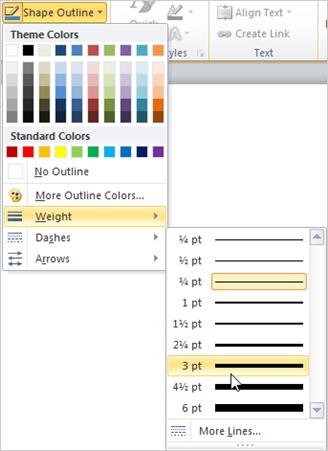
Under Drawing Tools, on the Format tab, in the Shape Styles group, click the arrow next to Shape Outline.
If you do not see the Drawing Tools or Format tabs, double-click the line to make sure that you selected it.
-
Point to Weight, and then click the line weight that you want.
To create a custom line weight, click More Lines, and then choose the options that you want.
Note: To draw a double line, draw a single line, copy and paste a second line next to it, and then group the two lines.
Top of Page
See Also
Draw or delete a line or connector
What do you want to do?
-
Add a Quick Style to a line
-
Change the color of a line
-
Make a line dotted or dashed
-
Change the weight of a line
-
Work with lines in Publisher
Add a Quick Style to a line
Important: Quick Styles are available only in these 2007 Microsoft Office system programs: Excel, Outlook, Word, and PowerPoint.
Quick Styles for lines include theme colors from the document theme, shadows, line styles, gradients, and three-dimensional (3-D) perspectives. Try different Quick Styles until you find one that you like. When you place your pointer over a Quick Style thumbnail, you can see how the Quick Style affects your line.
-
Select the line that you want to change.
If you want to change multiple lines, select the first line, and then press and hold CTRL while you select the other lines. For more information about selecting lines, see Select a shape or other object.
-
Under Drawing Tools, on the Format tab, in the Shape Styles group, click the Quick Style that you want.
To see more Quick Styles, click the More button
.
If you do not see the Drawing Tools or Format tabs, double-click the line to make sure that you selected it.
Top of Page
Change the color of a line
-
Select the line that you want to change.
If you want to change multiple lines, select the first line, and then press and hold CTRL while you select the other lines. For more information about selecting lines, see Select a shape or other object.
-
Under Drawing Tools, on the Format tab, in the Shape Styles group, click the arrow next to Shape Outline, and then click the color that you want.
If you do not see the Drawing Tools or Format tabs, double-click the line to make sure that you selected it.
To change to a color that isn’t in the theme colors, click More Outline Colors, and then either click the color that you want on the Standard tab, or mix your own color on the Custom tab. Custom colors and colors on the Standard tab are not updated if you later change the document theme.
Make a line dotted or dashed
In Excel, Outlook, PowerPoint, and Word
-
Select the line that you want to change.
If you want to change multiple lines, select the first line, and then press and hold CTRL while you select the other lines. For more information about selecting lines, see Select a shape or other object.
-
Under Drawing Tools, on the Format tab, in the Shape Styles group, click the arrow next to Shape Outline.
If you do not see the Drawing Tools or Format tabs, double click the line to make sure that you selected it.
-
Point to Dashes, and then click the line style that you want.
To create a custom style, click More Lines, and then choose the options that you want.
Change the weight of a line
In Excel, Outlook, PowerPoint, and Word
-
Select the line that you want to change.
If you want to change multiple lines, select the first line, and then press and hold CTRL while you select the other lines. For more information about selecting lines, see Select a shape or other object.
-
Under Drawing Tools, on the Format tab, in the Shape Styles group, click the arrow next to Shape Outline.
If you do not see the Drawing Tools or Format tabs, double click the line to make sure that you selected it.
-
Point to Weight, and then click the line weight that you want.
To create a custom line weight, click More Lines, and then choose the options that you want.
Top of Page
Work with lines in Publisher
-
Select the line that you want to change.
If you want to change multiple lines, select the first line, and then press and hold CTRL while you select the other lines.
-
On the Drawing toolbar, click Dash Style
, Line/Border Style
, or the arrow next to Line Color
, and then click the style that you want.
To change to a color that is not displayed, click More Outline Colors, and then either click the color that you want on the Standard tab, or mix your own color on the Custom tab.
To create a custom weight, click More Lines, and then choose the options that you want.
Top of Page
See Also
Draw or delete a line or connector
Word has a set of AutoFormat shortcuts that make horizontal lines, here’s how they work, how to change them, color the lines and how to stop lines when they get out of control.
Line shortcuts
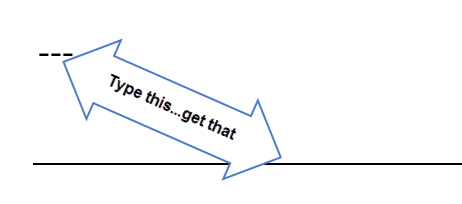
There are six horizontal line shortcuts. For each one type the same character three times at the start of a new line then press Enter.
For example, press the dash key three times on a new line, then enter.
Dashes give you a horizontal line
Underscores give you a bold horizontal line
Equals gives you a double horizontal line
And there’s more …
The three above are the best known but there are others.
Asterisk makes a dotted line
Tilde makes a wavy line
Pound/Hash makes a triple line
Tooltip controls
Whenever you automatically make a line, a small tooltip appears with some options.
Undo Border Line – changes back to the characters you typed. The usual undo shortcut, Ctrl + Z, will do the same thing.
Stop Automatically Creating Border Lines – will turn off the AutoFormat | Border Lines option entirely.
Control AutoFormat Options … goes to the settings for AutoFormat as you type.
Autoformat Options
The automatic lines and all other AutoFormat options are controlled from Options | Proofing | AutoCorrect options | AutoFormat As You Type:
Border lines can be turned on/off from there. There are no options to select just some character/line combinations – it’s all or nothing.
Under the hood
Word isn’t making the lines by adding a lot more characters across the page. That’s where confusion can begin if you’re trying to stop the lines appearing.
It’s converting your dash/underscore/equals etc. into a paragraph border. Specifically, a bottom border line on the paragraph.
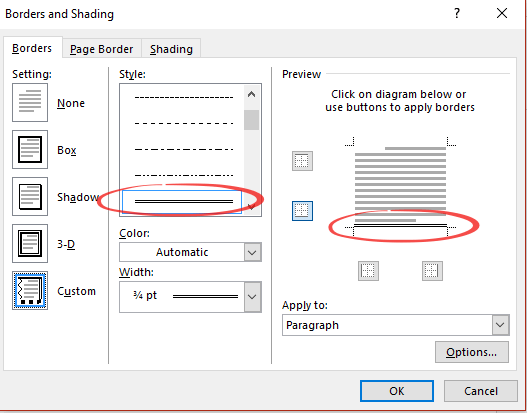
For example, here’s how an automatic double horizontal line appears in Paragraph | Borders and Shading
It’s just the double line style applied to the bottom line of the paragraph. Strictly, at the bottom of group of paragraphs with the same formatting. Knowing that detail is useful when you’re fixing the extra lines that start appearing.
Color
The automatic lines are always black (actually ‘Automatic’). Word doesn’t pick up the color of the three characters nor the paragraph as you might expect.
To change the line color, select the line then go to Home | Paragraph | Borders | Borders and Shading. Select the color you want from the pull-down list and then click on the borders you want the color change to apply.
Other lines
You’re not limited to the lines that Microsoft provides via AutoCorrect. You can add your own or change the look of a line added with AutoCorrect.
Select the line then go to Home | Paragraph | Borders | Borders and Shading. That opens up the many options you have:
Styles: there are over 20 line styles to choose from.
Color: as mentioned above, the full Word color range is available.
Width: thin, medium or thick – take your pick from ¼ point to 6pt.
Top, bottom, left, right – click in the preview box to choose which lines to show and the style of each one.
Whatever you choose, remember to click on the line/s in the preview box to apply the look you want.
For consistency, you can have a horizontal line as part of a paragraph style. For example, a line above or below a heading.
Unwanted horizontal lines
A common problem with the automatic lines is extra lines appearing where you don’t want them.
It happens when you add paragraphs immediately above the horizontal line. Each of those paragraphs inherits the same (bottom border) formatting that Word made for the horizontal line.
You won’t see a line under each paragraph because Word groups together paras with the same formatting. Only the last paragraph of a group will have a bottom border line.
The problem usually rises because people try to fix the extra lines by selecting just the paragraphs showing horizontal line and change the formatting.
That doesn’t change the ‘bottom border’ formatting for other lines that have the setting. So it seems like extra lines keep popping up without reason!
The solution is to make sure you select all the affected paragraphs – not just the ones with horizontal lines.
Choose a paragraph and look carefully at the Home | Paragraph | Borders icon. That icon changes according to the current border settings. In this, enlarged, example you can see the bottom line is solid.
To change the border setting, pull-down the borders list and choose ‘No Border’.
To stop the creeping lines in the first place, get into the habit of not adding extra paragraphs from the horizontal line itself. Instead, go to the paragraph ABOVE the horizontal line and add new paras from there.
Five ways to add vertical lines in Word
Six Word tricks to reduce space between lines
Multi-Line Picture Borders in Word or PowerPoint
Create your own I ♥ Love…. Signs in Word
Add or change the line color
- Click the table or select the cells where you want to add or change borders.
- On the Tables tab, under Draw Borders, click the arrow next to Line Color. , and then click the line color that you want.
- On the Tables tab, under Draw Borders, click the arrow next to Borders.
Contents
- 1 How do I change the border color in a table?
- 2 How do I change the lines on a table in Word?
- 3 How do I change the page border color in Word?
- 4 How do I make table lines darker in Word?
- 5 How do I change the space between lines in a table in Word?
- 6 How do I change the line spacing in Word table of contents?
- 7 How do I shade a whole line in Word?
- 8 How do you put a decorative border around text in Word?
- 9 How do I change the color of a table in Word?
- 10 How do I insert a thick black line in Word?
- 11 How do I change the border color in Word 2016?
- 12 How do I get rid of the white space in a table in Word?
- 13 How do I get rid of the white space after a table in Word?
- 14 How can you change the column width of a table?
- 15 How do I get rid of the dotted line in a Table in Word?
- 16 Why is there a gap in my Word Table?
- 17 What type of line spacing is used on a Table of Contents?
- 18 How do I highlight just one line in Word?
- 19 How do you highlight a full line?
- 20 How do you quickly highlight lines?
How do I change the border color in a table?
Go to Table Tools >Design > Table Styles > Borders, and then click the border option that you want to change.
Add or change a table border
- Use Pen Color to change the color of the border.
- Use Pen Weight to change the thickness of the border.
- Use Pen Style to change the line style of the border.
How do I change the lines on a table in Word?
Changing Spacing Between Table Cells
- Right-click anywhere within the table you want to format.
- Choose the Table Properties option from the Context menu.
- Make sure the Table tab is selected.
- Click on the Options button at the bottom of the dialog box.
- Make sure the Allow Spacing Between Cells check box is selected.
How do I change the page border color in Word?
Click the “Box” button on the left of the “Page Border” tab’s window. Click the “Color” drop-down menu and choose a color for the border. This color will apply to any black default borders under the “Style” or “Art” drop-down menus, but you can still get more colorful.
How do I make table lines darker in Word?
Add or change the line color
- Click the table or select the cells where you want to add or change borders.
- On the Tables tab, under Draw Borders, click the arrow next to Line Color. , and then click the line color that you want.
- On the Tables tab, under Draw Borders, click the arrow next to Borders.
How do I change the space between lines in a table in Word?
Change the line spacing in a portion of the document
- Select the paragraphs you want to change.
- Go to Home > Line and Paragraph Spacing.
- Choose the number of line spaces you want or select Line Spacing Options, and then select the options you want under Spacing.
How do I change the line spacing in Word table of contents?
LIne spacing in the table of contents
- Click in an entry you want to change.
- Right-click on that entry and select Paragraph.
- Change the space before and space after settings to what you want.
- Click on an entry for a different level and do the same.
- Repeat as needed.
How do I shade a whole line in Word?
Apply shading to words or paragraphs
- Select the word or paragraph that you want to apply shading to.
- On the Home tab, in the Paragraph group, click the arrow next to Shading.
- Under Theme Colors, click the color that you want to use to shade your selection.
How do you put a decorative border around text in Word?
Go to Home > Borders, and then open the menu of border choices.
Add a border to selected text
- Select a word, line, or paragraph.
- On the Home tab, click the arrow next to the Borders button.
- In the Borders gallery, click the border style that you want to apply.
How do I change the color of a table in Word?
Add Color With Page Borders Design Tab
- Highlight the table cells to which you want to apply the background color.
- Select the Design tab.
- In the Page Background group, select Page Borders.
- Select the Shading tab.
- Select the Fill drop-down arrow, then choose a color from the color chart.
How do I insert a thick black line in Word?
Step 1: Go to the Word document where you want to add a bold line. Step 2: Press the “Enter key” to make a space between text and line. Step 3: Press and hold the Shift and dash (“-“) keys. Once the line is drawn on the page, press “Enter Key.” You can see the Word automatically generate a bold line on the page.
How do I change the border color in Word 2016?
Change the color of fills, lines, and borders
- Right-click the object you want to change, and then click Format
Whenever you type === or something alike in Microsoft word and click enter, it inserts a breakline, I would like to know the way to change the color of it, since i don’t really feel like inserting lines and reorganizing them every time I make changes in the document
I’d like to know if there is a way to change that breakline said color, tried changing colors and messing around with the menus but couldn’t find the option.
Máté Juhász
21.2k6 gold badges53 silver badges72 bronze badges
asked May 20, 2019 at 4:43
To change the color of the break line in Microsoft Word:
- Place the curser immediately above the horizontal break line.
- In the Home tab > Paragraph group, click the arrow next to the
Borders icon. This opens a menu. - From the menu, select Borders and Shading.
- Select a color.
- Again, from the menu, select Bottom Border.
The color of the break line will now be the color that you have chosen.
answered May 20, 2019 at 6:07
moshmosh
313 bronze badges
Just How To Alter The Shade Or Eliminate The Underline From Hyperlinks In Word?
This way, you can make your table more dazzling with numerous different colors. I have actually been using personality designs to alter typefaces to add attributes such as bold, shade, italics, and so on . There is no other way to do this instantly. To put it simply, you can not specify in the Tabs dialog box what shade you desire the leader personality to be. You can, however, layout the leader character by hand. This is due to the fact that the leader is thought about just a single tab character by Word.
- If so, you can transform the color of Track Changes markup in Microsoft Word.
- You can accomplish this by adjusting the shades of your boundaries, then applying this modification to the whole table.
- The steps in this article will reveal you exactly how to alter the shade of your table in Word 2013.
- Yet a table in Microsoft Word can look a little boring with its’ default settings, so you might choose to change the shade of your Word table.
- Do you choose editing and enhancing with a details color?
Yet a table in Microsoft Word can look a little boring with its’ default setups, so you may decide to transform the shade of your Word table. You can attain this by changing the colors of your borders, after that using this modification to the entire table. The steps in this short article will certainly reveal you just how to change the shade of your table in Word 2013. This will affect the shade of the lines in your rows and also columns. Do you like modifying with a certain shade? If so, you can alter the color of Track Modifications markup in Microsoft Word.
All you need to do is to choose this single personality and afterwards change its color. Word’s large form collection allows you to organize and also design the photo you desire. While you may not require shapes in every document you produce, they can add aesthetic allure. Microsoft Word ships with numerous typical Shade Styles you can choose for your record. To see them, go to the Design tab as well as pick Colors. If you have a lot of message to highlight, change the arrow right into a highlighter. Go to the House tab, choose the Text Highlight Color drop-down arrowhead, select a color, then drag over the lines of text you want to highlight.
The file history isn’t restricted to solid shades. Include a pattern, texture or photo as a history. To do this, pick Fill Impacts and also pick Gradient, Structure, Pattern or Photo. When you are in the appropriate area, select the options you wish to apply. You can transform the border and also background of any selection of table cells. Pyvn often utilizes a right-aligned tab with an emphasize as a leader in order to produce fill-in-the-blank lines in his documents.
By default, the highlight shade in Word is established as “Automatic”. Yet it can be monotonous occasionally. So to both expand the color embeded in your record, and to stand apart the crucial materials, it’s a great choice to alter the color of underscore. You can spruce up web pages in a file with web page borders as well as background setups. Extra recent versions of Word have alternatives for transforming the colors of background and also message, but those shades print out as component of the paper. Open up the Word record in which you intend to transform the history shade.
Specifically, you can pick from eighteen various colors for insertions, deletions, message motions, and also comment balloon borders, as received this tutorial. Pick a design of borders you like and your cursor will certainly end up being an icon of paintbrush. You can after that click any kind of section of borders to transform it into the design you pick.
About the author
Hi There! I’m Lee. Welcome to A Pretty Fix, a home DIY blog about making your home colorful, decorating, and helping colors ideas and fun. Here you’ll find ideas, tips, and inspiration to live life more colorfully and beautifully. Hope you stick around!
- Remove From My Forums
-
Question
-
Hi
I uce — + Enter to get a line across my page. Is there an easy way to change the colour of this line?
Thanks, Viv
Viv Haig
Answers
-
The ‘line’ created by entering at least three hyphens — or equal signs = and pressing Enter is a paragraph border.
Click in the paragraph containing the border, i.e. immediately above the ‘line’.
On the Home tab of the ribbon, in the Paragraph group, click the dropdown arrow on the right hand side of the Border button.
Select Borders and Shading from the dropdown menu.
Select a color from the color dropdown.
Click the bottom border in the Preview area. It will take on the color you selected.
Click OK.
Regards, Hans Vogelaar
-
Marked as answer by
Tuesday, December 11, 2012 4:10 PM
-
Marked as answer by
-
You can use the Borders and Shading dialog directly, instead of first creating the border using — or ===.
Regards, Hans Vogelaar
-
Marked as answer by
VHaig
Tuesday, December 11, 2012 4:26 PM
-
Marked as answer by
Microsoft Word is the most powerful and best word processor ever created by Microsoft.When you’ve been using Word for a while, at some point or another, you’ve probably generated a line or employed line for the purpose of breaking up a paragraph.You find, however, that the line is basic and erratic.
You like to style them by adding color, line style, weight, and other elements like that.It has been shown that including color in the break line helps to attract the attention of the viewers and improves the overall impression.
But you weren’t successful in finding any of them, in which case you’ve come to the proper place: Ourtechroom will make an attempt to change the color of the break line in Microsoft Word.
Method 1 Using Border and Shading Option
MS Word’s Border and Shading Options help to make paragraphs and text look nice and appealing.
Let use Border and Shading Options for adding color and other styles to line break.
1 Just beneath the paragraph, generate a line break by inserting «-» 3 times and then Press Enter.This is simple looking line.
2 Then Goto Home Tab ,
3 Navigate to Paragraph Group Section and click on 4 box tile icon ie. Borders Icon.
4 Under Dropdown click on Borders and Shading .
5 Border and Shading Popup will appear, their just goto Page Border tab and under Color dropdown select your desire color and styles and click on Ok.
6 Again follow step 2 and 3.
7 Then select Bottom border .
Your line break will now be highlighted in the desired color and style. I’ve set the width to 3pt and the color to red.
Method 2: Using Insert Shape and Line option
Steps for this are as follows:
1 Goto the place where you want to set color and style to Line.
2 Then Goto Insert Tab
3 Click on Shapes under Illustrations
4 Under Line select your desire line.
5 Then, go to the location where you want to insert the line, and simply click on an empty area and drag it straight to draw a straight line break.
6. At the top, Shape Styles ,click on Down arrow.
7 Select your desire color of the line and weight.
You will get your desire color line break in MS Word.
Conclusion
In this way with two method Using Insert Shape and Line Option and Using Border and Shadding Option you can draw colored and stylish line break between paragraph and text in MS Word.
TheTechieSenior.com is reader supported. We may earn a commission if you buy through links on this site. As an Amazon Associate, we earn from qualifying purchases. Learn more here.
If your chosen communication method is through written documents, changing text color is probably the easiest way to have a word or section stand out. I’ll show you how to change text color in Microsoft Word.
Table of Contents
Change text color in Microsoft Word
As with most formatting features in MS Word, you can either change a setting prior to typing your text or you can type it and change the color, size, font, etc. later.
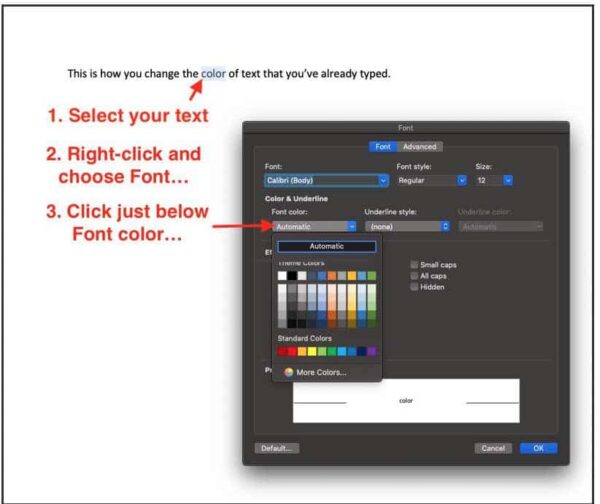
Let’s say you’ve already typed your document and you want to change the color of a single word from the default black to red. Click your mouse just before the first letter of the word or words that you wish the alter the color, then drag your mouse or your finger on a trackpad across until your target text is selected. Once you’ve selected the text, use one of the following methods to change the color.
You can use any of these methods to change your font color for an entire document. If you haven’t typed anything into your document yet, you’d simply use one of the methods given below to change the text color at the beginning of the document.
If your document is fully typed and you decide to change the text color, say from black to dark grey, just select the entire text before you use the methods given below.
Hint: Click anywhere in the document with your mouse. Then, Control + A on Windows computers or Command + A on Mac computers will select the text of the entire document.
Method one – change text color in Word
Leave your text selected and select the Home tab in the ribbon.
- The second section from the left is the text section. Look for a capital A icon with a colored underline. Click that A icon to change your text to the color of the underline under that icon.
- If you want a different color, click the small arrow just on the right of that A icon. An options panel will open where you can select from a number of colors.
- If you don’t see the color you’re looking for, click More Colors… to open a color wheel that will allow you to choose from many more colors.
Method two – change text color in Word
Leave your text selected.
- Right-click on the text and choose “Font….”
- Be sure the Font tab is selected, then in the second section down (Font and Underline), click in the drop-down box below Font Color….
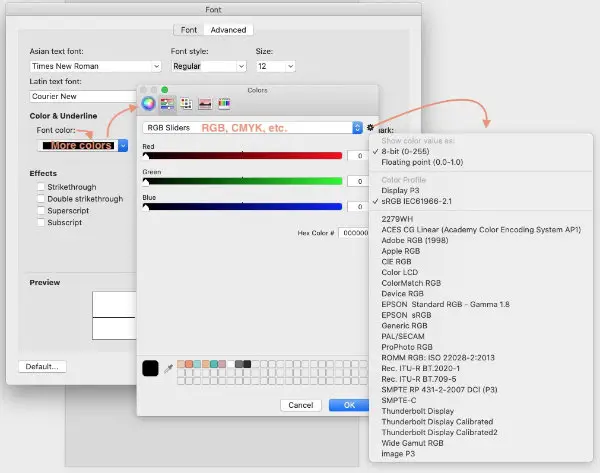
In Microsoft Word for Mac, you could possibly have a huge assortment of font colors available to you. The exact number depends on whether you have other software such as graphic design or photo editing software on your computer that might install additional colors.
When you open the Font panel from the right-click menu, then open the Font color drop-down box, you will see an assortment of color pickers – wheels, etc.. Any of those may present your with more colors to select from.
In the panel that you see when you click the font color drop-down box, there is another drop-down at the top that lets you choose the type of sliders that you want to use. You can RGB, CMYK and more.
To the right of that option, there is a tiny gear icon. If you click on that gear icon, you will see a long list of color profiles to select from. In most cases, writers will not need to change those, but they are available if needed.
Set your font color before typing text in Microsoft Word
You can also set the font color prior to typing the words in MS Word. To do that, just follow the previous instructions except that you will not select your text before you choose the color. Instead, when you come to the place in your document where you want the different colored word, stop just prior to the different colored word. Use the instructions above to set the font color. The menu/ribbon and right-click options will work.
When you’re ready to return to black or whatever your basic document text color is, follow the instructions again and choose black. Continue typing. You should see your colored word in line with your black text.
Personally, if I know ahead of time that I want one or more upcoming words to be a different color, I find it easier to just do it as I type than to return and change it later.
You’ll find more of our tips for styling your text in Microsoft Word here.
You can learn more about styling text in the Microsoft Style Guide.
|
05-27-2021, 05:17 AM |
|||
|
|||
|
Help needed in changing text & line colour please Hi All, I have a Word document which has lots of lines, autoshapes around text and text in a colour that I want to change. Currently it’s in orange and I want to change everything to blue. Is there a simple way of doing this? I’ve managed to work out how to change all the font colours using the find & replace tool but am struggling on lines and autoshapes. Thanks in advance
Daz |
|
05-27-2021, 08:14 AM |
|
Probably too late, but… |
|
05-27-2021, 09:39 AM |
|||
|
|||
|
I�m not sure if this method is useful to you or even applies � regarding the shapes & lines, in the Editing group, try pressing Select > Selection Pane > Press the Ctrl key (keep pressed) > Select all the items showing > Release the Ctrl key when all selected. |
Download Article
A user-friendly guide to making different types of lines in Microsoft Word
Download Article
- Using Shapes to Draw a Line
- Using Borders to Add a Line
- Using Keyboard Shortcuts
- Using the Mobile App
- Q&A
- Tips
|
|
|
|
|
Do you want to create a horizontal line in your resumé or other Microsoft Word document? If you want to customize the color and format of the line, you can use the Shapes tool. If you need to make a quick, basic line, you can use the keyboard shortcut. While you can use the keyboard shortcut on Windows and Mac, you cannot use it on the mobile app. This wikiHow will show you how to insert different lines in Microsoft Word on your Windows, Mac, iPhone, or Android device.
Things You Should Know
- On desktop, go to the Insert tab. Click Shapes, then select a line. Click and drag across the document to create a line.
- To customize the line, double-click it. Click Shape Outline to change the color.
- On mobile, click the three dots. Tap Home and select Insert. Tap Shapes to select a line. Tap and drag across the document to create a line.
-
1
Open Microsoft Word on your Windows or Mac computer. Click or double-click the Word app icon, which resembles a white «W» on a dark-blue background.
- If you want to draw a line in an existing Word document, double-click the Word document to open it and skip the next step.
- You’ll need a subscription to use Office 365.
-
2
Click Blank document. It’s in the upper-left side of the page.
Advertisement
-
3
Click the Insert tab. This tab is in the blue ribbon at the top of the Word window, between Home and Draw.
-
4
Click Shapes. It’s in the Insert toolbar, next to the icon of an overlapping circle and square.
- A drop-down menu will appear.
-
5
Select a line shape. In the «Lines» heading, click one of the line templates. You can choose a line, line arrow, double line arrow, and more.
-
6
Draw your line. Click and drag across the document to create your line.
- If you need to adjust the line’s length and orientation, click the left or right circle. Drag it left or right to adjust the length, or drag it up and down to adjust the orientation.
- To move the line, double-click and drag it to the desired position.
Advertisement
-
1
Open Microsoft Word on your Windows or Mac computer. Click or double-click the Word app icon, which resembles a white «W» on a dark-blue background.
- If you want to draw a line in an existing Word document, double-click the Word document to open it and skip the next step.
-
2
Click Blank document. It’s in the upper-left side of the page.
-
3
Click the Home tab. This tab is in the blue ribbon at the top of the Word window, between File and Insert.
- You may already be on this tab by default.
-
4
Click the «Borders» arrow. This is next to the icon of the dotted square with a solid bottom line.
- A drop-down menu will open.
-
5
Click Horizontal Line. This will be towards the bottom, above Draw Table.
- A horizontal line will be added.
-
6
Format your line. Double-click the line; a dialogue box will appear.
- To change the line thickness, use the up and down arrow below Height. The higher the number, the thicker the line will be.
- To change the color, click the color box underneath Color. Select your desired color.
- Click OK to save and apply your changes.
- To move the line, double-click and drag it to the desired position.
Advertisement
-
1
Open Microsoft Word on your Windows or Mac computer. Click or double-click the Word app icon, which resembles a white «W» on a dark-blue background.[1]
- If you want to draw a line in an existing Word document, double-click the Word document to open it and skip the next step.
-
2
Click Blank document. It’s in the upper-left side of the page.
-
3
Place your cursor where you want your line to appear. You’ll need to be on a blank line, as this won’t work if there is text before or after your cursor on the same line.
- You’ll be creating a horizontal line that spans from one edge of your page to the other. The line will stop at your set margins.
- If you want to make the line span the whole page, you’ll need to change your document margins.
-
4
Type three dashes in a row. Use your dash key on the number row at the top of your keyboard, or on the numeric pad.
-
5
Press ↵ Enter to convert the dashes into a line. AutoCorrect will automatically create a solid line that will situate itself directly beneath the previous line of text.
- Note that the line does not occupy the space of a line of text, but instead exists between lines of text.
- If you do not have AutoCorrect enabled, do so by clicking File → Options → Proofing → AutoCorrect Options…. This will open a new window.
- Make sure the Border Lines box is checked. This can be found underneath Apply as you type.
- If you want to turn off AutoCorrect, uncheck the boxes.
-
6
Use different characters for different line styles. There are a variety of different lines that you can create by using characters other than the dash:[2]
- Thin line: Three hyphens (-).
- Thick line: Three underscores (_).
- Double line: Three equal signs (=).
- Dotted line: Three asterisk (*).
- Triple line: Three pound signs (#).
- Squiggly line: Three tildes (~).
-
7
Move the line by entering text above it. You can prompt the line to move down by typing text above it and then pressing Enter.
- Deleting text above the line will prompt it to move upward.
Advertisement
-
1
Open a document in the Microsoft Word app. This looks like a blue notebook next to a W.
- Microsoft Word is available for iOS in the App Store and for Android in the Google Play Store.
- Tap Blank document to open a new document or tap a file to open an existing document.
-
2
Tap ••• . This can be found above the keyboard, to the right.
- If you don’t see your keyboard, tap the document to bring it up.
- A new menu will open.
-
3
Tap Home. This will be to the left of the formatting window.
- A drop-down menu will open.
-
4
Tap Insert. You’ll see a list of all objects you can insert.
-
5
Tap Shapes. This is next to the icon of an overlapping circle and square.
-
6
Select a line shape. In the «Lines» heading, tap one of the line templates. You can choose a line, line arrow, double line arrow, and more.
-
7
Draw your line. Tap and drag across the document to create your line.
- Use two fingers to pinch and zoom out to view the entire document.
- If you need to adjust the line’s length and orientation, tap the left or right circle. Drag it left or right to adjust the length, or drag it up and down to adjust the orientation.
- To move the line, tap and drag it to the desired position.
Advertisement
Add New Question
-
Question
How do I view all available symbols in Microsoft Word?
Click «Insert» and then click «Symbols» and you should be shown a box with all of the symbols in it.
-
Question
How do I add a line on the first page, and no lines on the second?
Click «Insert» and then click «Symbols» and you should be shown a box with all of the symbols in it.
-
Question
How do I change the color of the line?
In the paragraph section, open the drop-down menu on the «Borders» button. At the very bottom is a «Borders and Shading» option. In that option, change the color of the bottom border to your specified color. Click the «Borders» button.
See more answers
Ask a Question
200 characters left
Include your email address to get a message when this question is answered.
Submit
Advertisement
-
Looking for money-saving deals on Microsoft Office products? Check out our coupon site for tons of coupons and promo codes on your next subscription.
Thanks for submitting a tip for review!
Advertisement
About This Article
Article SummaryX
1. Click Insert.
2. Click Shapes.
3. Select a line template.
4. Click and drag across your Microsoft Word document to draw the line.
Did this summary help you?
Thanks to all authors for creating a page that has been read 2,043,877 times.


 .
.

 , Line/Border Style
  , or the arrow next to Line Color
  , and then click the style that you want.