
Align text horizontally
-
In the text box, select the text that you want to change the horizontal alignment for.
-
On the Home tab, click the alignment option that you want
 .
.
 .
.Align text vertically
You can align all the text in a text box with the top, middle, or bottom of the text box.
-
Click the outer edge of the text box to select it.
-
On the Shape Format tab, click Format Pane.
-
Click the Shape Options tab if it isn’t already selected.
-
Click the text box icon
, and then click Text Box. -
Choose Top, Middle, or Bottom from the Vertical alignment drop-down list.
 , and then click Text Box.
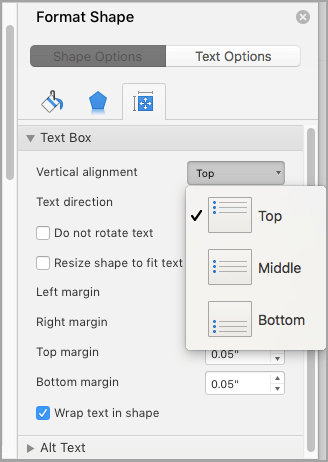
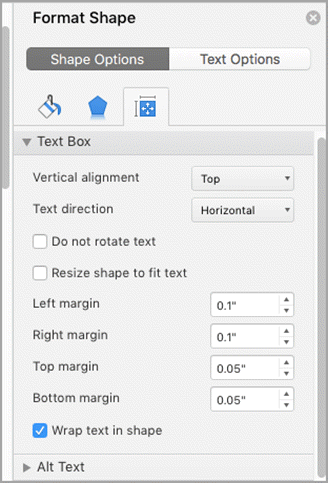
Adjust the text box margins
-
Click the outer edge of the text box to select it.
-
On the Shape Format tab, click Format Pane.
-
Click the Shape Options tab if it isn’t already selected.
-
Click the text box icon
, and then click Text Box. -
You can adjust the left, right, top, and bottom margins.
Important:
Office for Mac 2011 is no longer supported. Upgrade to Microsoft 365 to work anywhere from any device and continue to receive support.
Upgrade now
Align text horizontally
-
In the text box, select the text that you want to change the horizontal alignment for.
-
On the Home tab, under Paragraph, click the alignment option that you want
.
Align text vertically
You can align all the text in a text box with the top, middle, or bottom of the text box.
-
Click the outer edge of the text box to select it.
-
Click the Format tab (the purple contextual tab that appears next to the Home tab), and then under Text Box, click Change text alignment within the text box
. -
Click the alignment option that you want.
 .
.Adjust the text box margins
-
Click the outer edge of the text box to select it.
-
On the Format menu, click Shape.
-
In the left pane of the Format Shape dialog box, click Text Box.
-
Under Internal Margin, adjust the measurements to increase or decrease the distance between the text and the outer border of the text box.
Select the text that you want to center. in the Page Setup group, and then click the Layout tab. In the Vertical alignment box, click Center. In the Apply to box, click Selected text, and then click OK.
Contents
- 1 How do you center a textbox?
- 2 How do you align all text boxes in Word?
- 3 How do I center a textbox in CSS?
- 4 How do I center align a textbox in CSS?
- 5 How do I center a text box in a div?
- 6 How do you center a text box in HTML?
- 7 How do I center text in a div?
- 8 How do I align all text boxes in HTML?
- 9 How do you center a form?
- 10 How do I vertically align text in the middle of a div?
- 11 How do I center text vertically in CSS?
- 12 How do you center a table in CSS?
- 13 How do I align all text boxes in CSS?
- 14 How do I align a text box to the right in HTML?
- 15 How do I center in the middle of the page?
- 16 How do you center a button?
- 17 How do you center a form of an element?
- 18 How do I center a horizontal list in CSS?
How do you center a textbox?
Right-click the text box for which you want to set vertical alignment. On the shortcut menu, click Format Text Box. In the Format Text Box dialog box, click the Text Box tab. In the Vertical alignment box, select Top, Middle, or Bottom.
How do you align all text boxes in Word?
Hold down Shift , click the objects that you want to align, and then click the Shape Format tab. Click Arrange > Align > Align Selected Objects.
How do I center a textbox in CSS?
Center Align Text
To just center the text inside an element, use text-align: center; This text is centered.
How do I center align a textbox in CSS?
To center text in CSS, use the text-align property and define it with the value “center.” Let’s start with an easy example. Say you have a text-only web page and want to center all the text. Then you could use the CSS universal selector (*) or the type selector body to target every element on the page.
How do I center a text box in a div?
Wrap a div around with text-align: center; . In modern browsers that support CSS 3 you can do an easy centering using these three lines of code: position: absolute; left: 50%; transform: translateX(-50%);
How do you center a text box in HTML?
To center text using HTML, you can use the <center> tag or use a CSS property. To proceed, select the option you prefer and follow the instructions. Using the <center></center> tags. Using a style sheet property.
How do I center text in a div?
Using CSS, you can center text in a div in multiple ways. The most common way is to use the text-align property to center text horizontally. Another way is to use the line-height and vertical-align properties. The last way exclusively applies to flex items and requires the justify-content and align-items properties.
How do I align all text boxes in HTML?
In order to align the labels, you only need to set the width width of the label to a certain value, such as 150px in this example, because the label label and the input label belong to the P label, they are displayed from left to right. Specify the length of the label label to align the text box of the form.
How do you center a form?
- Wrap your form in a div.
- Set the div’s display to block and text-align to center (this will center the contained form).
- Set the form’s display to inline-block (auto-sizes to content), left and right margins to auto (centers it horizontally), and text-align to left (or else its children will be center-aligned too).
How do I vertically align text in the middle of a div?
The CSS just sizes the div, vertically center aligns the span by setting the div’s line-height equal to its height, and makes the span an inline-block with vertical-align: middle. Then it sets the line-height back to normal for the span, so its contents will flow naturally inside the block.
How do I center text vertically in CSS?
How to Vertically Center Text with CSS
- Use the CSS vertical-align property.
- Use CSS Flexbox.
- Use the CSS display property.
- Use the CSS line-height property.
- Set equal top and bottom padding.
- Set absolute positioning and negative margin.
- Set absolute positioning and stretching.
- Set the CSS transform property.
How do you center a table in CSS?
Center a table with CSS
- Method 1. To center a table, you need to set the margins, like this: table.center { margin-left:auto; margin-right:auto; }
- Method 2. If you want your table to be a certain percentage width, you can do this: table#table1 { width:70%; margin-left:15%; margin-right:15%; }
- Method 3.
How do I align all text boxes in CSS?
4 Answers. You are making your inputs inline-block , but you are also floating them to the left. If you remove the float: left and add <br> after each input, you will get the correct behavior. To align the boxes, add a div wrapper around each label/input, make your label inline-block with a fixed width.
How do I align a text box to the right in HTML?
text-align:right; will only right align text elements. It appears that your are using bootstrap. You could try giving your form a class of pull-right , which is a bootstrap class for float right. Don’t use align:right; , there’s no such CSS rule, use float:right; instead.
How do I center in the middle of the page?
If you want to do a horizontal centering, just put the form inside a DIV tag and apply align=”center” attribute to it. So even if the form width is changed, your centering will remain the same.
How do you center a button?
How to center a button in CSS?
- text-align: center – By setting the value of text-align property of parent div tag to the center.
- margin: auto – By setting the value of margin property to auto.
- display: flex – By setting the value of display property to flex and the value of justify-content property to center.
How do you center a form of an element?
To centre block elements (such as divs and forms and paragraphs), give it a width and set margin-right and margin-left to auto. It’s important to understand the difference between block and inline elements.
How do I center a horizontal list in CSS?
There are two simple ways to center list item horizontally.
- display: inline-block & text-align: center. .list-container { text-align: center; .list-item { display: inline-block; } }
- width: fit-content & margin: 0 auto;
![]()
Download Article
An easy-to-follow guide on changing the direction of text in Microsoft Word
![]()
Download Article
- Rotating Text
- Making Text Vertical
- Mirroring Text
- Changing Paper Orientation
|
|
|
Do you want to type vertically in word? You can create vertical text by creating a textbox and adjusting its settings to set the position. You can change the text’s direction, rotate it, and mirror it. You could also change the document’s orientation from portrait to landscape mode. This wikiHow will show you how to write vertically in word on your Windows or Mac computer.
Things You Should Know
- Create a textbox with your text. Click «Shape Format» → «Text Direction» → «Rotate all text 90°».
- To make text vertical, drag the right-center circle of your textbox towards the left.
- To mirror text, right-click the textbox, then «Format Shape». Click «Effects», then input «180» into the X or Y Rotation field.
-
1
-
2
Create a textbox. To do this, click the Insert tab in the top toolbar, then click the Text Box icon in the Text section. You can select Simple Text Box from the presets.
Advertisement
-
3
Insert your text. Input the text you want to edit. You can copy and paste from another program into Microsoft Word.
- Make sure the textbox is still selected.
-
4
Click Shape Format. You can find this at the top toolbar, next to Help. Alternatively, double-click the edge of the textbox to be quickly redirected.
-
5
Click Text Direction. This will be in the Text section.
- A drop-down menu will open.
-
6
Select Rotate all text 90°. You can also select Rotate all text 270° if you want the top of the words to face the left side.
- Your text will be rotated.
- You can continue to edit your text in the textbox. The words will type in the direction set.


Advertisement
-
1
Open a project in Microsoft Word. This looks like a W on top of a blue square. Microsoft Word is available to install for Windows and Mac.
- You must have a subscription to use Office 365.
-
2
Create a textbox. To do this, click the Insert tab in the top toolbar, then click the Text Box icon in the Text section. You can select Simple Text Box from the presets.
-
3
Insert your text. Input the text you want to edit. You can copy and paste from another program into Microsoft Word.
- Make sure the textbox is still selected.
-
4
Click and drag the center circle on the right towards the left. With the textbox selected, you’ll see four circles at each point of the text box and one circle between each corner. Use the middle circle on the left side.
- As you drag the text box towards the left, it will become smaller. The text inside will adjust to fit the size of the box in vertical format.
- Make sure not to drag past the point of the left line. This could result in the words returning to their normal positions.
-
5
Remove the textbox lines (optional). If you want to remove the lines around the text, double-click the textbox to return to the Shape Format tab.
- Click Shape Outline, then select No Outline from the drop-down menu.
- The textbox lines will be hidden. Be sure to save your document if you need to return to it later.


Advertisement
-
1
Open a project in Microsoft Word. This looks like a W on top of a blue square. Microsoft Word is available to install for Windows and Mac.
- You must have a subscription to use Office 365.
-
2
Create a text box. To do this, click the Insert tab in the top toolbar, then click the Text Box icon in the Text section. You can select Simple Text Box from the presets.
-
3
Insert your text. Input the text you want to edit. You can copy and paste from another program into Microsoft Word.
- Make sure the textbox is still selected.
-
4
Right-click the textbox. A drop-down menu will open.
-
5
Click Format Shape…. This will be at the very bottom of the menu.
- A panel will open on the right side.
- If you don’t see this option, make sure the textbox is selected, not the text.
-
6
Click the «Effects» icon. This looks like a pentagon, next to the paint bucket icon.
-
7
Enter 180 in the X or Y field. If you want your text to be mirrored left-right, enter 180 into the X Rotation field. If you want your text to be mirrored up-down, enter 180 into the Y Rotation field.
- The changes will take effect immediately.
-
8
Remove the textbox lines (optional). If you want to remove the lines around the text, double-click the textbox to return to the Shape Format tab.
- Click Shape Outline, then select No Outline from the drop-down menu.
- The textbox lines will be hidden. You can print your document if needed.


Advertisement
-
1
Open a project in Microsoft Word. This looks like a W on top of a blue square. Microsoft Word is available to install for Windows and Mac.
- You must have a subscription to use Office 365.
- Use this method if you want to change your paper orientation from portrait to landscape.
-
2
Click Layout. This will be in the top toolbar, between Design and References.
-
3
Click Orientation. You can find this at the top, next to Margins.
- A drop-down menu will open.
-
4
Click Landscape. Your Microsoft Word document will change to landscape orientation.
- If you change back to portrait mode after inputting text, the text will follow the portrait mode orientation. It will not save in its landscape position.


Advertisement
Ask a Question
200 characters left
Include your email address to get a message when this question is answered.
Submit
Advertisement
Thanks for submitting a tip for review!
About This Article
Article SummaryX
1. Click Insert.
2. Click Text.
3. Click Text Box.
4. Click Draw Text Box.
5. Click and drag a text box.
6. Type text into the box.
7. Hover the mouse over the box outline.
8. Click the rotation icon and drag in any direction.
Did this summary help you?
Thanks to all authors for creating a page that has been read 1,279,441 times.
Is this article up to date?
Text in a Microsoft Word document occasionally needs to be put in the center of the page between the left and right margins.
You might also need to know how to center text in Word vertically in Word documents, which means that it needs to be in the middle of the top and bottom margins.
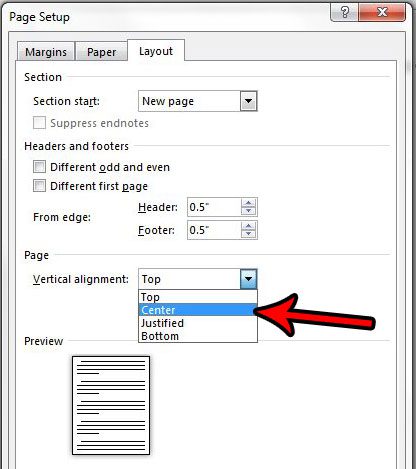
You can vertically center text in Microsoft Word by selecting the text, choosing the Layout tab, clicking the Page Setup button, choosing the Layout tab, clicking the Vertical Alignment tab, choosing Center, then clicking Apply.
How to Horizontally Center Text in Microsoft Word
- Open the document in Word that contains the text you want to center.
- Use your mouse to select the text.
- Click the Home tab at the top of the window.
- Click the Center button in the Paragraph section of the ribbon.
How to Vertically Center Text in Microsoft Word
- Open the document containing the text to center vertically.
- Use your mouse to select the text you wish to center.
- Click the Page Layout tab.
- Click the small Page Setup button at the bottom-right corner of the Page Setup section of the ribbon.
- Click the dropdown menu to the right of Vertical alignment and choose the Center option.
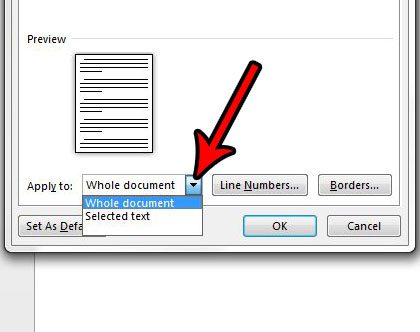
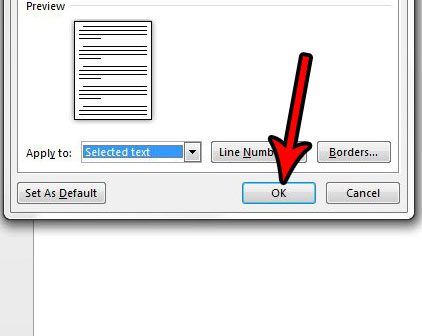
- Click the dropdown menu to the right of Apply to and choose the appropriate option, then click the OK button.
Our article continues below with additional information on how to center align text in Microsoft Word, including expanded sections with pictures for the steps above.
Last update on 2023-04-13 / Affiliate links / Images from Amazon Product Advertising API
| As an Amazon Associate, I earn from qualifying purchases.
Adding content to a document in Microsoft Word can include a variety of options. You can format that text using a number of different tools and dialog box menus in the application, and many of those changes can be applied by simply selecting the text you want to change.
But if you need to align text to the center of the page, whether it is vertical alignment or horizontal alignment, then you may be wondering where that setting is found.
When you start typing in a Word document that is using the Normal template, all of the text that you enter will be left aligned by default.
This means that the first letter on each line will be against the left margin of the page. This is the standard for most corporations and institutions and is the most common alignment format used in documents.
But sometimes, a part of your document will need to be centered on the page, either horizontally or vertically.
Our tutorial below will show you how to center text in Microsoft Word using either the horizontal or vertical alignment option so that you can achieve the desired display result for your document.
You may also want to know how to get rid of space after paragraphs in Google Docs if you use that application for document editing, too.
Expanded – How to Center Text in Microsoft Word Horizontally
The summary section above gives a brief overview of how to horizontally center text in Word, but this section provides pictures as well if you would like a little more information. Note that I am using Microsoft Word 2013 in the images below, but the process is the same in most other versions of Word as well.
Find out how to use all small caps in Word if you have been struggling to manually apply that formatting in your document.
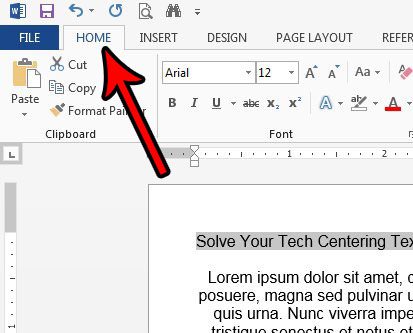
Step 1: Open your document in Microsoft Word.
Step 2: Use your mouse to highlight the text that you want to center horizontally.
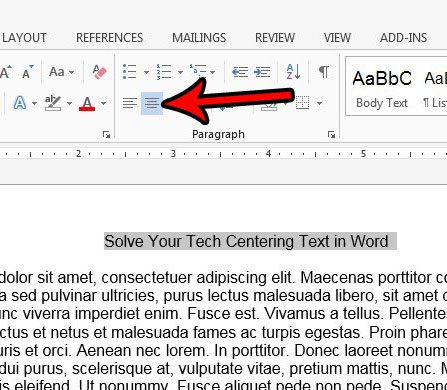
Step 3: Click the Home tab at the top of the window.
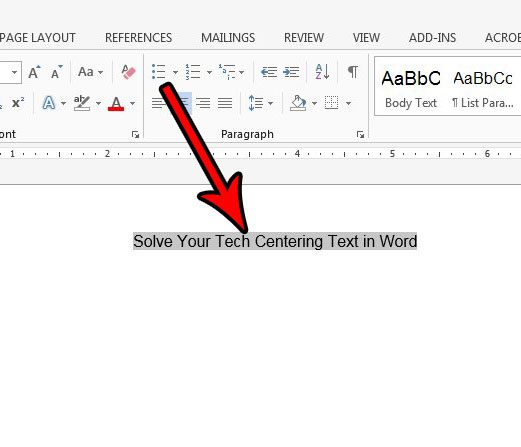
Step 4: Select the Center button in the Paragraph section of the ribbon.
The next section includes information on how to center text vertically if the text you want to modify in your document needs to be in the middle of the page.
Expanded – How to Center Text in Microsoft Word Vertically
We outlined how to vertically center text in the summary section above, but this section will provide images as well. This section was performed using Microsoft Word 2013.
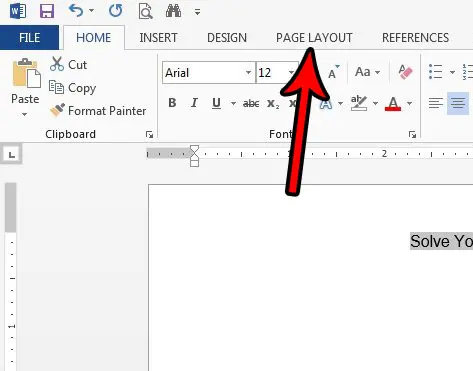
Step 1: Open your document in Microsoft Word.
Step 2: Use your mouse to select the text that you want to center vertically.
If you wish to center the entire document you can skip this step.
Step 3: Click the Page Layout tab at the top of the window.
Step 4: Click the Page Setup button in the Page Setup section of the ribbon.
It’s the tiny button at the bottom-right corner of the section.
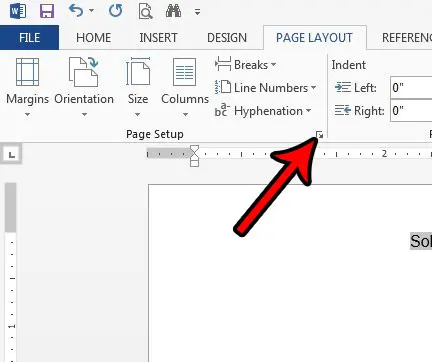
Step 5: Click the dropdown menu to the right of Vertical alignment, then choose the Center option.
Note that the vertical alignment drop down menu also has options for Top, Justified, and Bottom.
Step 6: Select the dropdown menu to the right of Apply to, then choose the option that fits your needs.
If you selected text earlier, then the Selected sections option will only vertically center that selected text. The Whole document option will vertically center the entire document, and the This point forward will vertically center all of the document text after the point at which your mouse cursor is currently located. Some of the vertical alignment options may not appear depending on the selected text’s locations, whether or not any text is selected, or the composition of the document.
Step 7: Click the OK button to apply the vertical centering.
How to Center Text in a Table in Microsoft Word
If you have a table in your document and need to center the text in one of the table cells, then you get to use some table-specific centering options. By default the data in your table will be horizontally centered at the top of the table cell, but there are options that let you customize the alignment within a cell.
Step 1: Open the document containing the table text that you want to center.
Step 2: Click inside the cell containing the data you wish to center.
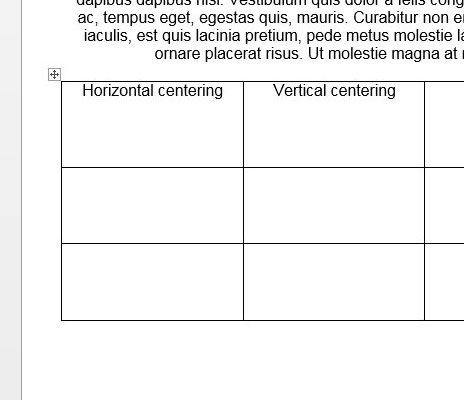
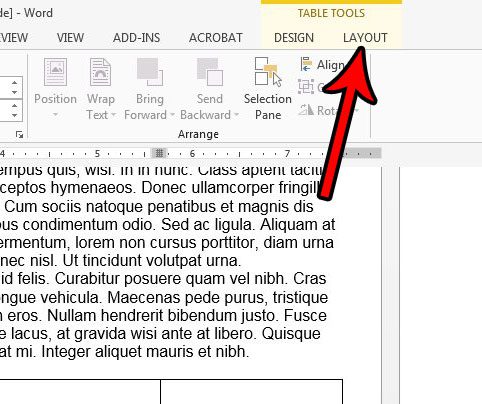
Step 3: Click the Layout tab at the top of the window under Table Tools.
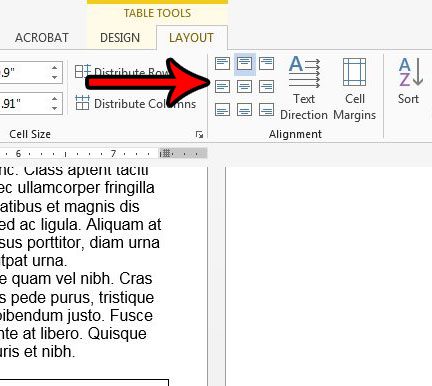
Step 4: Click the desired alignment option in the Alignment section of the ribbon.
Additional Notes on How to Center Text in Word
- You can also center text horizontally by selecting it and then pressing Ctrl + E on your keyboard.
- One of the most common reasons to align text either horizontally or vertically is to add a title. If you are adding a title, be sure to check your work or school’s guidelines on titles, as they often include additional requirements like font sizes. You can adjust font styles in the Font section of the ribbon on the Home tab.
- If you center some text in your document, the center align text setting will typically persist. You will likely need to select the Left Align option after centering your text if you want to return to normal text alignment after centering some of your text.
- If you vertically center text in Word, you will have several options concerning what parts of your document should be centered. These options include the selected text, the whole document, or “this point forward.”
If you have left aligned text on a page and you need it to be center aligned, then the keyboard shortcut option might be a little easier than using the option on the Home tab.
However, when you need to create vertical centered text on a cover page or title pages, then you will need to use the Page Setup button in the Page Setup group and make the adjustment from the Vertical alignment drop down menu on the Layout tab.
Does your document have a title page, but you need to number your pages and skip that title page? Find out how to start page numbering on the second page in Word so that a page number doesn’t display on the title page.
Additional Sources

Matthew Burleigh has been writing tech tutorials since 2008. His writing has appeared on dozens of different websites and been read over 50 million times.
After receiving his Bachelor’s and Master’s degrees in Computer Science he spent several years working in IT management for small businesses. However, he now works full time writing content online and creating websites.
His main writing topics include iPhones, Microsoft Office, Google Apps, Android, and Photoshop, but he has also written about many other tech topics as well.
Read his full bio here.
In this article, we would like to introduce you with 2 methods to center all pictures and text boxes in your Word document.
Pictures and shapes, such as text boxes, play vital important in making a wonderful document. With a growing number of images and shapes being inserted, the demand to integrate their formatting, say to center them starts to surface.
What you should know is that all pictures inserted into document is set in “In line with text” layout, while text boxes are flowing shapes. You may change the picture layout as required, but to center them you will have to consider the text wrapping. Because text formatting can be easily tampered, leaving you with a layout you don’t like.
Therefore, we will focus on 2 ways to center “In line with text” pictures and text boxes.
Method 1: Center One Picture or Text Box Manually
To center a “In line with text” picture, follow these steps:
- Firstly, click on the picture to select it.
- Secondly, click “Center” in “Paragraph” group under “Home” tab. Or you can use the shortcuts “Ctrl+ E” instead.


Then to center a text box, go through these instructions:
- Similarly, click on text box to have it in selection.
- Then click “Format” tab under “Drawing Tools”.
- Next click “Align” in “Arrange” group.
- And choose “Align Center” on its drop-down menu.


Method 2: Batch Center Multiple Pictures or Text Boxes Automatically
Most of us would favor an automatic process to save efforts. Here you go.
- First off, press “Alt+ F11” to open the VBA editor.
- Next click “Normal” project.
- Click “Insert” tab and choose “Module”.

- Then double click on the module to bring out the editing space on the right side.
- Next to center pictures, you paste the following codes there:

Sub CenterInLinePictures()
  Dim objInLineShape As InlineShape
  Dim objDoc As Document

  Set objDoc = ActiveDocument

  For Each objInLineShape In objDoc.InlineShapes
    objInLineShape.Select
    Selection.ParagraphFormat.Alignment = wdAlignParagraphCenter
  Next objInLineShape
End Sub
To center all text boxes, you need the bellowing macro:
Sub CenterTextBoxes()
  Dim objDoc As Document
  Dim objTextBox As Shape

  Set objDoc = ActiveDocument

  For Each objTextBox In objDoc.Shapes
    If objTextBox.Type = msoTextBox Then
      objTextBox.RelativeHorizontalPosition = wdRelativeHorizontalPositionPage
      objTextBox.Left = wdShapeCenter
    End If
  Next objTextBox
End Sub
To center both pictures and text boxes, you will have to use this one:
Sub CenterInLinePicturesAndTextBoxes()
  Dim objInLineShape As InlineShape
  Dim objShape As Shape
  Dim objDoc As Document

  Set objDoc = ActiveDocument

  For Each objInLineShape In objDoc.InlineShapes
    objInLineShape.Select
    Selection.ParagraphFormat.Alignment = wdAlignParagraphCenter
  Next objInLineShape

  For Each objShape In objDoc.Shapes
    If objShape.Type = msoTextBox Then
      objShape.RelativeHorizontalPosition = wdRelativeHorizontalPositionPage
      objShape.Left = wdShapeCenter
    End If
  Next objShape
End Sub
- Lastly, click “Run” button or hit “F5”.


Address Document Problems
No matter how reluctant we have to admit that Word is not foolproof. Its breaking down can lead to corruption of documents while inheriting a corrupted docx can be heart-broken for us. In order to ease such anxiety, it’s advisable to get hold of a document recovering tool in advance. Then you won’t have to worry about the data loss.
Author Introduction:
Vera Chen is a data recovery expert in DataNumen, Inc., which is the world leader in data recovery technologies, including xlsx corruption and pdf repair software products. For more information visit www.datanumen.com
Apply Left, Center, Right or Justify Alignment to Text in Microsoft Word
by Avantix Learning Team | Updated April 13, 2022
Applies to: Microsoft® Word® 2010, 2013, 2016, 2019, 2021 and 365 (Windows)
You can align or justify text or other content in Word in several ways including using keyboard shortcuts, selecting commands in the Ribbon, using the Paragraph dialog box or modifying a style. It’s important to note that alignment or justification is paragraph formatting so applies to entire paragraphs. You can align text or inline graphics in paragraphs that are followed by a hard return (you pressed Enter or Return).
To see where paragraphs have been created in a Word document, it’s helpful to turn on Show/Hide ¶ on the Home tab in the Ribbon.
In this article, we’ll review 4 different ways to change horizontal alignment or justification in Word documents.
Recommended article: How to Insert a Line in Word (3+ Ways)
Do you want to learn more about Microsoft Word? Check out our virtual classroom or in-person Word courses >
There are 4 types of alignment that can be applied to paragraphs:
- Align left – aligns text or inline graphics with the left margin or indent
- Center – centers text or inline graphics between the left and right margins or indents
- Align right – aligns text or inline graphics with the right margin or indent
- Justify – distributes text evenly between the left and right margins or indents
A paragraph aligns within the indents (indent markers appear on the Ruler). The indents may be different from the margins. Paragraphs are also entered in cells in tables and each paragraph in a cell may have different indents and alignment settings.
1. Align or justify using keyboard shortcuts
To align or justify paragraphs using keyboard shortcuts:
- Align left – select the paragraph(s) and press Ctrl + L to align to the left.
- Align right – select the paragraph(s) and press Ctrl + R to align to the right.
- Align center – select the paragraph(s) and press Ctrl + E to align center.
- Justify – select the paragraph(s) and press Ctrl + J to justify.
2. Align or justify using the Ribbon
To align or justify paragraphs using the Word Ribbon
- Select the paragraph(s) to which you want to apply alignment or justification. If you would like to select all paragraphs, press Ctrl + A.
- Click the Home tab in the Ribbon and then click Align Left, Center, Align Right or Justify in the Paragraph group.
Align and Justify commands appear on the Home tab in the Ribbon in the Paragraph group:
![]()
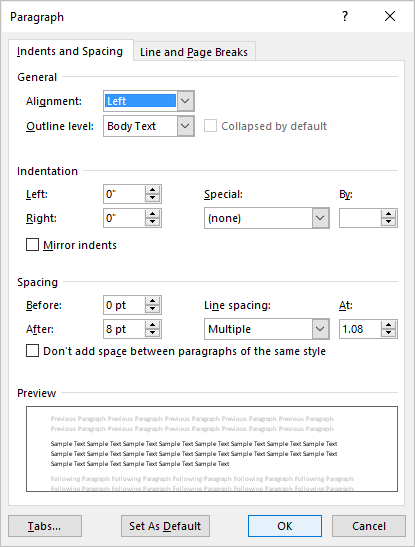
3. Align or justify using the Paragraph dialog box
To align or justify paragraphs using the Paragraph dialog box:
- Select the paragraph(s) to which you want to apply alignment or justification. If you would like to select all paragraphs, press Ctrl + A.
- Right-click and select Paragraph. The Paragraph dialog box appears.
- From the Alignment drop-down menu, select Left, Center, Right or Justify.
- Click OK.
You can also display the Paragraph dialog box by clicking the Home tab in the Ribbon and then clicking the dialog box launcher on the bottom right of the Paragraph group.
The Paragraph dialog box includes a drop-down menu to select Alignment:
4. Align or justify by modifying a style
When you create a new blank document, it starts out using the Normal style which contains default paragraph and character formatting.
If you want to apply alignment or justification to multiple paragraphs throughout a document (such as a heading), you can modify a style (such as Heading 1).
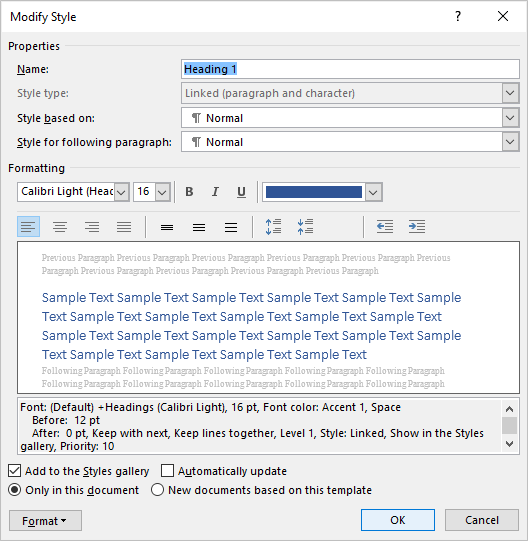
To change the alignment for a heading style (such as Heading 1):
- Click in a paragraph using the heading style (typically applied through the Home tab in the Ribbon).
- Click the Home tab in the Ribbon.
- In the Styles group, right-click the heading style. A dialog box appears.
- Click Format. A drop-down menu appears.
- Click Paragraph. The Paragraph dialog box appears.
- From the Alignment drop-down menu, select Center or your preferred alignment.
- Click OK twice.
Below is the Modify Style dialog box with align and justify commands:
There may be issues if you modify alignment or justification in the Normal style since other styles are based on this style by default. Cells in tables would likely be affected and so would other styles that are based on the Normal style (such as Header, Footer and Heading styles). Paragraphs using these styles would then inherit the alignment or justification (unless alignment or justification has been specifically modified in these styles). If you are comfortable using styles, you could create your own style or modify a different Word style to avoid this issue.
Subscribe to get more articles like this one
Did you find this article helpful? If you would like to receive new articles, join our email list.
More resources
How to Double Space in Word (4 Ways + Shortcut)
How to Hide Comments in Word (or Display Them)
How to Find and Replace in Word (and Use Wildcards)
How to Create a Hanging or First Line Indent in Word (3 Ways)
How to Superscript or Subscript in Microsoft Word (with Shortcuts)
Related courses
Microsoft Word: Intermediate / Advanced
Microsoft Excel: Intermediate / Advanced
Microsoft PowerPoint: Intermediate / Advanced
Microsoft Word: Long Documents Master Class
Microsoft Word: Styles, Templates and Tables of Contents
Microsoft Word: Designing Dynamic Word Documents Using Fields
VIEW MORE COURSES >
Our instructor-led courses are delivered in virtual classroom format or at our downtown Toronto location at 18 King Street East, Suite 1400, Toronto, Ontario, Canada (some in-person classroom courses may also be delivered at an alternate downtown Toronto location). Contact us at info@avantixlearning.ca if you’d like to arrange custom instructor-led virtual classroom or onsite training on a date that’s convenient for you.
Copyright 2023 Avantix® Learning
Microsoft, the Microsoft logo, Microsoft Office and related Microsoft applications and logos are registered trademarks of Microsoft Corporation in Canada, US and other countries. All other trademarks are the property of the registered owners.
Avantix Learning |18 King Street East, Suite 1400, Toronto, Ontario, Canada M5C 1C4 | Contact us at info@avantixlearning.ca
I have created a textbox in Word and can set various properties for it, such as position, text, text style, text horizontal alignment (left/right/center), color, and so on.
But I cannot find any settings to set the vertical alignment of text in the box to Top/Middle/Bottom. There’s a button for vertical alignment on the ribbon to set that property, but I can’t find it through the object inspector, through Intellisense, or through searching the net. I tried recording a macro, but the only line that showed up in the macro was the VBA line to select the textbox. Nothing else. 
The ribbon button is beside the «set text direction» option, but I couldn’t find VBA for that setting either. I also tried the Textframe2 property, but saw nothing in there for vertical alignment.
Here’s the code that sets the horizontal alignment of text. Also, I included the enum that I think I need to use. But I can’t find the property to accept a value from the enum.
   tbox.TextFrame.TextRange.ParagraphFormat.Alignment = wdAlignParagraphRight

WdVerticalAlignment enumeration (Word):
Name                 Value  Description
wdAlignVerticalBottom   3   Bottom vertical alignment.
wdAlignVerticalCenter   1   Center vertical alignment.
wdAlignVerticalJustify  2   Justified vertical alignment.
wdAlignVerticalTop      0   Top vertical alignment.
Does anyone know the syntax for the property that I need to set to vertically align text inside a textbox shape? Thank you
Achieve more control and flexibility with your documents
Updated on September 11, 2022
What to Know
- Select Insert > Text Box > choose a text box template. Select and drag box to the position you want.
- To resize text, select and drag circles around the edge. To rotate text, select and drag the circular arrow.
- Place the cursor inside the text box and type the information you want to appear.
This article explains how to use text boxes in Microsoft Word. Instructions apply to Word for Microsoft 365, Word 2019, Word 2016, and Word 2013.
How to Insert a Text Box in Word
Start by opening the document you want to add a text box to. Then follow the steps below.
-
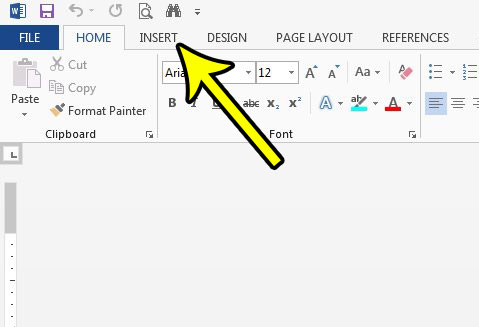
On the ribbon, select Insert.
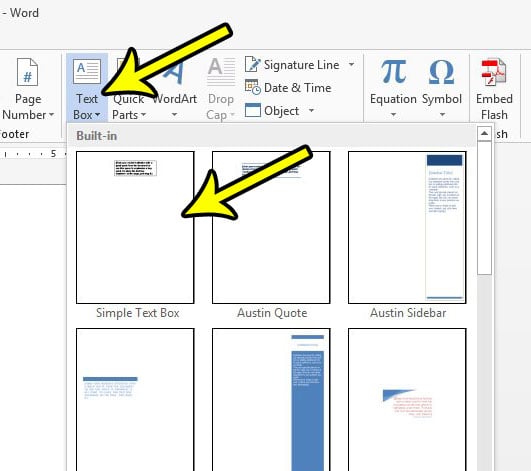
-
In the Text group, select Text Box, then choose a text box template.
-
The new text box appears in the middle of the text, and the Shape Format tab is automatically selected.
-
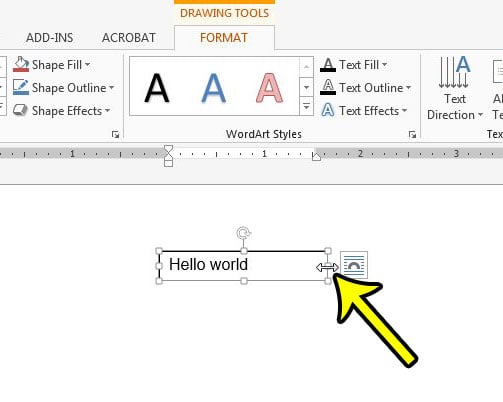
Select and drag the box to the position you want. To resize the text box, select and drag the circles around the edge. To rotate the text box, select and drag the circular arrow at the top of the box.
-
Place the cursor inside the text box and type the information you want to appear there.
Why Use Text Boxes?
When you type text in Microsoft Word, you have options for making it look a particular way on the page (such as changing the page margins), but those options are limited. Text boxes expand your formatting repertoire by offering additional control and flexibility for how your text appears. You can place a text box anywhere within a document and format it with different colors and fonts. This feature is especially helpful for creating a blockquote or a sidebar.
Customize a Text Box
After you create a text box, you can customize it in a number of ways.
-
To bring up options, place the cursor inside the text box and right-click. Choose an option and follow the screen prompts to add a border, change the style, or adjust the way the text box interacts with the other text on the page.
Alternatively, use the controls on the Shape Format tab.
-
To go directly to the Layout Options menu, select the text box, then select the Layout Options icon (it looks like a horseshoe and is located to the right of the text box).
-
Change the text, make more adjustments, or move the box to another location at any time. To delete a text box, select its border, then press Delete on the keyboard.
Thanks for letting us know!
Get the Latest Tech News Delivered Every Day
Subscribe
Certain types of documents, like flyers or newsletters, might need special formatting when they are created. If text in that document needs to be displayed in a manner other than horizontal, you may need to know how to write vertically in Word 2013. It’s an option that is found relatively easily in some other Microsoft Office products, but you may be having trouble finding it in Word.
While normal text that is inserted into your document can not be written vertically, you can write vertically in Word 2013 with the assistance of a text box. A text box in Microsoft Word exists on a level above the actual document and can be manipulated separately from the main document body. So continue below to see two ways that you can write vertically in Word by taking advantage of text boxes.
- Open the document.
- Click Insert.
- Choose Text Box, then Simple Text Box.
- Select Text Direction, then Rotate all Text 90 or Rotate all Text 270.
- Type the text to display vertically.
Our guide continues below with additional information on writing vertically in Microsoft Word, including pictures of these steps.
How to Make Vertical Text in Word 2013 (Guide with Pictures)
The steps in this guide will show you how to write vertically in Word. This guide was written specifically for the Word 2013 version of the program, but the same concept will work in other versions as well.
Step 1: Open your document in Word 2013.
Step 2: Click the Insert tab at the top of the window.
If the vertical text is going in a specific location of an existing document then you might want to click at that spot in the document before continuing with these steps.
Step 3: Click the Text Box button in the Text section of the ribbon, then click the Simple Text Box option.
You can use one of the other text box options, however, if you would prefer.
Step 4: Click the Text Direction button in the Text section of the ribbon, then click the Rotate all text 90 or Rotate all text 270 option, depending upon the direction that you would like your vertical text to go.
The Rotate all text 90 option has your text going from the top of the text box to the bottom, while the Rotate all text 270 option has the text going from the bottom of the text box to the top.

If this isn’t creating the desired result, or if you would prefer to use another option, then the next section shows an additional way to type vertically in Word.
Alternate Method – How to Rotate Text in Word 2013
If you want to write vertically in Word 2013 without rotating your text, however, then you will need to use a very thin text box that you manually resize. Once a text box gets thin enough, the letters in your text will be forced onto separate lines. You can do this by typing your text into a normal text box, then clicking and dragging the right border of the text box to the left.
Once you make the text box thin enough, the text will start splitting into additional rows, with one letter on each row.
This can look pretty odd depending on what you are typing and which font options you have chosen, so you may need to select all of the text in the text box and adjust various formatting options to make it look better.
Does your document need to be single-spaced, but you are having difficulty getting that setting to work properly? Find out how to single space in Word 2013 by changing some style settings that you can even set as default options.
Why Would I Want to Write Vertically in Microsoft Word?
Many users that create a Word document will do so infrequently for school assignments, or for something at work. For many of these users Microsoft Word is thought of more as a text editor than anything else.
But there are a ton of Format options on the Format tab of the application, and you can add a number of useful objects from the Insert tab where we showed how to insert a text box. For example, you might want to adjust the text alignment of a sentence or phrase and make it appear at the center of the page, such as when you create a title page.
The Layout tab, or Page Layout tab, also lets you dramatically change the appearance of your document and the positioning of the objects within that document.
All of these different tabs have assorted ways to change your text or add a shape or item to the document, and even more options can be found among the dialog box menus that appear when you click the small buttons at the bottom-right corner or many of the sections of these ribbon tabs.
This combination of menu options and tools generates an impressive assortment of ways to create more visual documents like newsletters or flyers. Microsoft Word is quite advanced as you start exploring its features and can be used in many more ways than it might initially seem possible.
More Information on How to Write Vertically in Word
Before you elect to use vertical text in your Word doc, it’s best to make sure that you are creating this document for a school or organization that has strict formatting restrictions. Most of those formatting restrictions will not allow things like vertical text, so it’s best to ensure that its usage is approved before changing content in the document.
In the tutorial above I recommend selecting the “Simple Text Box” option, but this is more a habit of mine than something that is required. You can choose from most of the other text box options and achieve the desired result.
If you don’t want to enter your text vertically, but instead want it to be at an angle, or you want to write diagonally, then you can select the Rotate option in the Arrange section of the ribbon. You will find some default rotation options there, as well as a “More Rotation Options” item that allows you to choose the specific angle of the rotation, which allows for custom rotation options like 45 degrees and other non-90 degree options.
If you choose the “Text Direction” option to write vertically then you will see the text immediately in the desired orientation. If you choose the “Rotate” method for writing vertical text then you will need to click out of the text box before you can see what it will look like on your document page.
Additional Reading

Kermit Matthews is a freelance writer based in Philadelphia, Pennsylvania with more than a decade of experience writing technology guides. He has a Bachelor’s and Master’s degree in Computer Science and has spent much of his professional career in IT management.
He specializes in writing content about iPhones, Android devices, Microsoft Office, and many other popular applications and devices.
Read his full bio here.
A text box is a graphical container that holds text and works like a minidocument you can place anywhere within a regular document. Although it holds text, a text box itself is actually a graphic; the text it contains is independent from the document’s body text. You can format a text box’s text in most of the same ways you can format a document’s normal text. But because the box is a shape, you can drag it to a different position, resize it, and format it like other shapes.
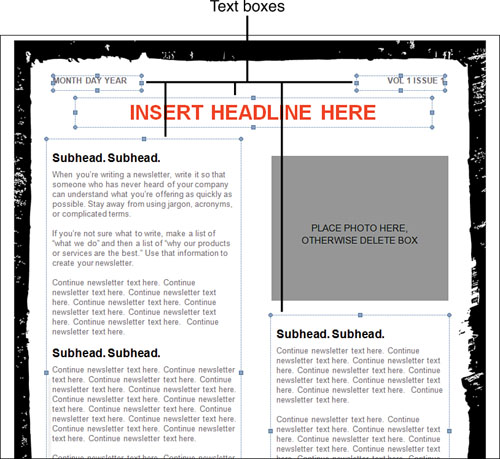
The text box is one of the secret weapons of great document layouts. In fact, lots of multicolumn documents, such as the newsletter template shown in Figure 1, don’t use columns at all. Instead, they are laid out with text boxes. In the figure, the newsletter is just a series of text boxes, sized and formatted in different ways, but neatly arranged to imitate a two-column design.
Figure 1. A newsletter template laid out with text boxes rather than columns. Each text box is indicated by its handles and borders.
The following sections show you how to insert a text box into a document, resize and move it, format the box itself and the text inside it, and other cool tricks.
Inserting a Text Box
You can create a text box in two ways. The first (and quicker) way is to insert a building block that is already formatted. The second (and slower) way is to draw a text box with your pointer and do all the formatting yourself. Either way, when a text box is selected, the Drawing Tools Format tab appears on the Ribbon and the text box is surrounded by a thin border and selection/sizing handles.
Creating a Text Box from a Building Block
If you create a text box from a building block, most of the work is done for you. The building blocks used for text boxes are preformatted with a border (and sometimes a fill) that coordinates with the document’s theme colors. The text is already formatted, too. All you need to do is add your own text. Here’s how to create a text block from a building block:
|
1. |
On the Insert tab, click Text Box. A menu drops down, showing thumbnail versions of Word’s built-in building blocks for text boxes, as shown in Figure 2. Figure 2. Selecting a building block from the Text Box menu.
|
|
2. |
In the Built-In section of the menu, click one of the thumbnails. The new text box contains sample text, so you can see how it is formatted. The sample text is selected so you can delete it or type over it. If you select the Simple Text Box building block, Word inserts a box in the middle of the page, in front of the document’s text. If you select any other building block, it is inserted as shown in the Text Box menu; the document’s text wraps around the block according to that block’s default text wrapping setting. |
|
3. |
Press Del to delete the sample text from the box. A blinking insertion point appears in its place. |
|
4. |
Type your text into the text box. |
|
5. |
Click outside the text box to deselect it. |
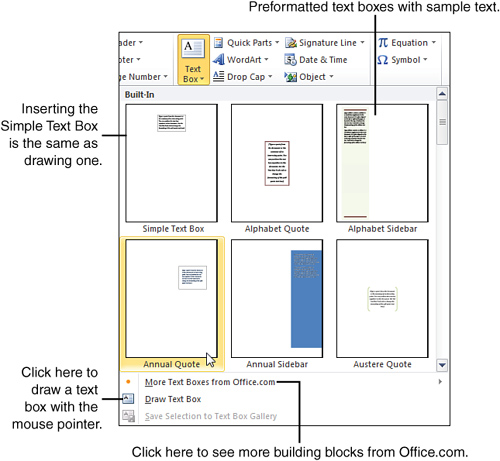
If you want to see more building blocks, click More Text Boxes From Office.com on the Text Box menu. A submenu pops out, showing a selection of text boxes available from the Office.com website. Click any building block to add it to the document.
Drawing a Text Box
You can draw a text box with your pointer, but you’ll have to do all the formatting when you’re done. Here’s how to draw a text box:
|
1. |
On the Insert tab, click Text Box. |
|
2. |
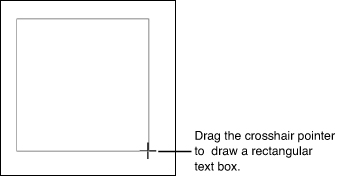
Click Draw Text Box. The pointer changes to a crosshair. |
|
3. |
Drag the pointer to draw a box, as shown in Figure 3. When you release the mouse button, the insertion point appears inside the finished text box. Figure 3. Drawing a text box.
|
|
4. |
Type your text into the text box. |
|
5. |
Click outside the text box to deselect it. |
When you draw a text box, Word inserts the box wherever you draw it and places the box in front of the document’s text.
Resizing a Text Box
The way you can resize a text box depends on how you created it:
- If you drew the box (or inserted the Simple Text Box building block), resize it by doing any of the following:
- Drag any of its handles.
- On the Format tab, click the Size button; then use the Height and Width spin controls to set specific dimensions for the box.
- Click the Size group’s dialog box launcher to open the Layout dialog box. On the Size tab, set specific dimensions in the Height and Width sections, or use the Scale section to set the text box’s size as a percentage of its current size. Click OK when you finish.
- If you created the text box from a building block, its sizing options may be restricted, as shown in Figure 4. If you can’t resize the box by dragging its handles or by using the Size tools on the Format tab, open the Layout dialog box. On the Size tab, click Absolute in both the Height and Width sections; then click OK. Now you can resize the box as if it were drawn.
Figure 4. By default, a building block’s height or width may be set to Relative, restricting your ability to resize it.

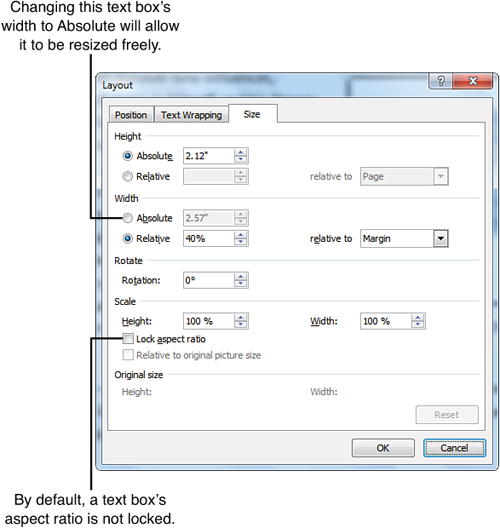
For some building blocks, the height and/or width may be set to Relative in the Layout dialog box. The Relative option ensures that the box’s height or width always stays in proportion to some aspect of the page. For easy resizing, change the text box’s Height and Width options to Absolute.
By default, a text box’s aspect ratio is not locked; if you leave it that way, you can resize the text box freely by dragging.
Moving a Text Box
To move a text box, click its border and drag it to a new location, as shown in Figure 5. If the text box was created from a building block (other than the Simple Text Box building block), the document’s text wraps around the box as determined by the building block’s text wrapping setting.
Figure 5. Moving a text box by dragging its border.
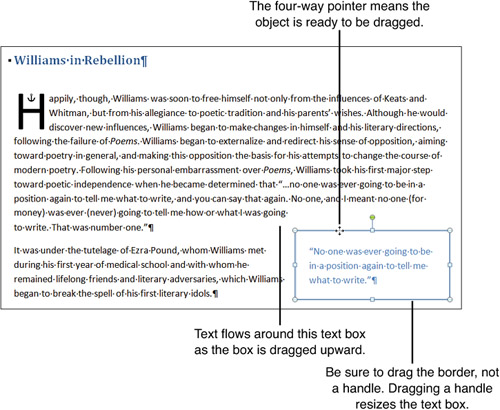
If you created the box by drawing it or by using the Simple Text Box building block, the box appears in front of the document’s text. You can change this by applying a different text wrapping option to the text box. Then you can move the text box by dragging.
Formatting a Text Box
A text box is basically the same thing as an AutoShape (a rectangle), but this shape is special because it’s already set up to hold text. You can format a text box by using the shape-formatting tools on the Format tab.
By default, Word formats a text box with an outline and a fill. The outline and fill can be the same or different colors, or you can apply a special effect to either one. However, in some cases, it’s a good idea to remove both the outline and the fill. For example, if your document has a colored background, you can make the background show through the text box by removing its shape formats. If you ever use text boxes for laying out a page (as shown back in Figure 1), the document will look cleaner if you omit the fills and outlines from the text boxes.
Formatting Text in a Text Box
Text in a text box is basically the same as text in a document; it just fits in a smaller space. A text box can hold multiple paragraphs, including numbered and bulleted lists. You can format a text box’s text in just about all the same ways you format a document’s body text. Select the text in the box; then apply formats from the Font and Paragraph groups of the Home tab. Text in a text box can be formatted with styles, too.
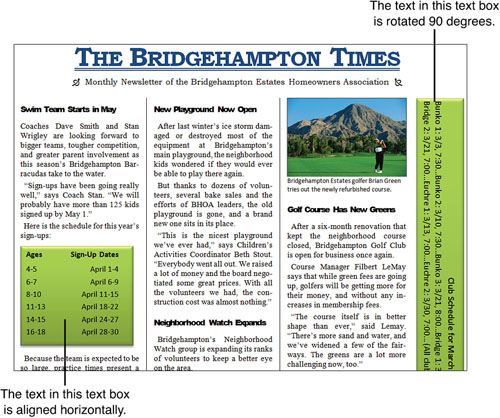
You can also do a couple of neat tricks with a text box’s text:
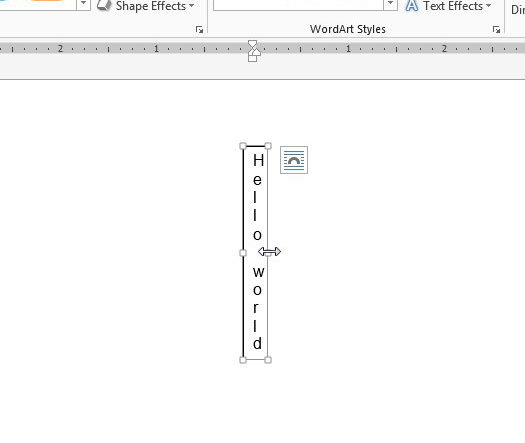
- Change text direction: By default, text is aligned horizontally in a text box. You can set text to run vertically, reading either from top to bottom (rotated 90 degrees) or from bottom to top (rotated 270 degrees). Figure 6 shows an example of how rotated text can be used to create a cool effect and make use of limited page space. To change text direction, click the text box to activate the Format tab, click Text Direction, and then choose an option from the drop-down menu.
Figure 6. In the text box along the right-hand edge of this newsletter, the text is rotated 90 degrees.

- Change text alignment: You can vertically align text at the top, center, or bottom of a text box. To set the alignment, go to the Format tab, click Align Text, and then choose an option from the drop-down menu.
Linking Text Boxes
You can use multiple text boxes to create fancy or complicated-looking layouts. For example, if you’re designing a multicolumn document but don’t want to mess with columns, you can use text boxes instead. Or if you want to create a boxed “sidebar” that spans two pages of a document, you can use two text boxes (one on each page) to hold the sidebar’s content.
The key to tricks like this is linking. When you link two or more text boxes, Word treats them as though they are a single box. When you fill the first box with text, just keep typing; the text jumps to the next box and continues there.
Creating Linked Text Boxes
To make the linking process easy, start by creating all the text boxes you’re going to need. Here’s a simple example:
|
1. |
Create two text boxes. Figure 7 shows two empty text boxes; the first is at the bottom of one page, and the second is at the top of the following page. Figure 7. Two text boxes, ready for linking.
|
|
2. |
Click the first text box. The Format tab appears on the ribbon. |
|
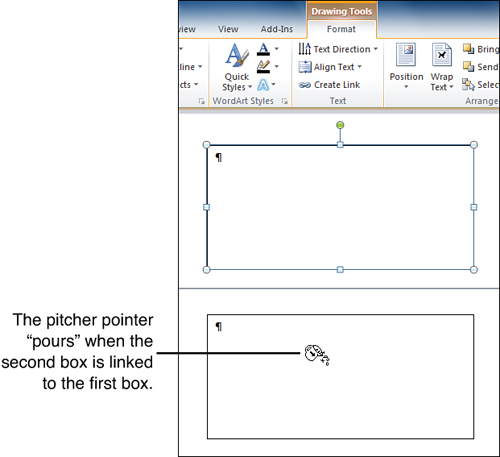
3. |
Click Create Link. The mouse pointer changes to the shape of a pitcher. |
|
4. |
Point to the second text box, and notice that the pitcher is tilted to look like its contents are pouring into the second text box, as shown in Figure 8. Figure 8. Linking the second text box to the first one.
|
|
5. |
Click the second text box. It is now linked to the first text box. |
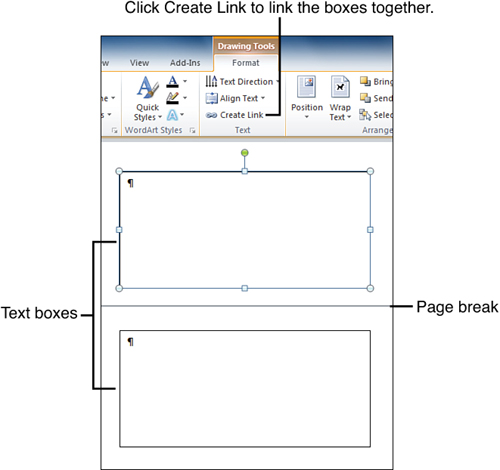
The linking process goes a little differently if you need to link three or more boxes. Suppose you have four boxes; in this case, you would start by linking box 3 to box 4, then link box 2 to box 3, and finally link box 1 to box 2. Sounds crazy, but it works