
Align text horizontally
-
In the text box, select the text that you want to change the horizontal alignment for.
-
On the Home tab, click the alignment option that you want
 .
.
 .
.Align text vertically
You can align all the text in a text box with the top, middle, or bottom of the text box.
-
Click the outer edge of the text box to select it.
-
On the Shape Format tab, click Format Pane.
-
Click the Shape Options tab if it isn’t already selected.
-
Click the text box icon
, and then click Text Box. -
Choose Top, Middle, or Bottom from the Vertical alignment drop-down list.
 , and then click Text Box.
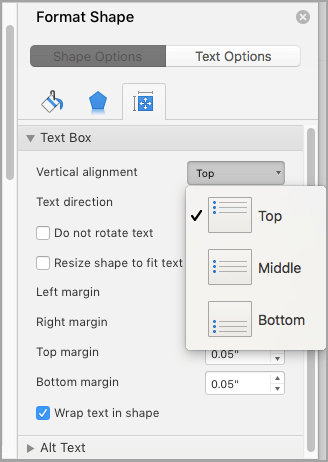
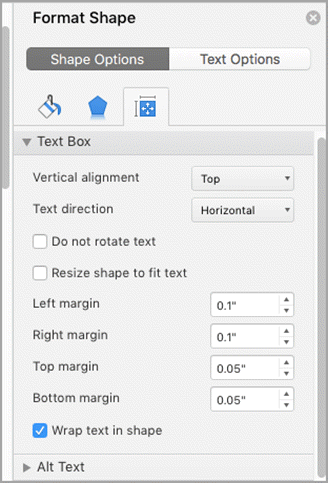
Adjust the text box margins
-
Click the outer edge of the text box to select it.
-
On the Shape Format tab, click Format Pane.
-
Click the Shape Options tab if it isn’t already selected.
-
Click the text box icon
, and then click Text Box. -
You can adjust the left, right, top, and bottom margins.
Important:
Office for Mac 2011 is no longer supported. Upgrade to Microsoft 365 to work anywhere from any device and continue to receive support.
Upgrade now
Align text horizontally
-
In the text box, select the text that you want to change the horizontal alignment for.
-
On the Home tab, under Paragraph, click the alignment option that you want
.
Align text vertically
You can align all the text in a text box with the top, middle, or bottom of the text box.
-
Click the outer edge of the text box to select it.
-
Click the Format tab (the purple contextual tab that appears next to the Home tab), and then under Text Box, click Change text alignment within the text box
. -
Click the alignment option that you want.
 .
.Adjust the text box margins
-
Click the outer edge of the text box to select it.
-
On the Format menu, click Shape.
-
In the left pane of the Format Shape dialog box, click Text Box.
-
Under Internal Margin, adjust the measurements to increase or decrease the distance between the text and the outer border of the text box.
Select the text that you want to center. in the Page Setup group, and then click the Layout tab. In the Vertical alignment box, click Center. In the Apply to box, click Selected text, and then click OK.
Contents
- 1 How do you center a textbox?
- 2 How do you align all text boxes in Word?
- 3 How do I center a textbox in CSS?
- 4 How do I center align a textbox in CSS?
- 5 How do I center a text box in a div?
- 6 How do you center a text box in HTML?
- 7 How do I center text in a div?
- 8 How do I align all text boxes in HTML?
- 9 How do you center a form?
- 10 How do I vertically align text in the middle of a div?
- 11 How do I center text vertically in CSS?
- 12 How do you center a table in CSS?
- 13 How do I align all text boxes in CSS?
- 14 How do I align a text box to the right in HTML?
- 15 How do I center in the middle of the page?
- 16 How do you center a button?
- 17 How do you center a form of an element?
- 18 How do I center a horizontal list in CSS?
How do you center a textbox?
Right-click the text box for which you want to set vertical alignment. On the shortcut menu, click Format Text Box. In the Format Text Box dialog box, click the Text Box tab. In the Vertical alignment box, select Top, Middle, or Bottom.
How do you align all text boxes in Word?
Hold down Shift , click the objects that you want to align, and then click the Shape Format tab. Click Arrange > Align > Align Selected Objects.
How do I center a textbox in CSS?
Center Align Text
To just center the text inside an element, use text-align: center; This text is centered.
How do I center align a textbox in CSS?
To center text in CSS, use the text-align property and define it with the value “center.” Let’s start with an easy example. Say you have a text-only web page and want to center all the text. Then you could use the CSS universal selector (*) or the type selector body to target every element on the page.
How do I center a text box in a div?
Wrap a div around with text-align: center; . In modern browsers that support CSS 3 you can do an easy centering using these three lines of code: position: absolute; left: 50%; transform: translateX(-50%);
How do you center a text box in HTML?
To center text using HTML, you can use the <center> tag or use a CSS property. To proceed, select the option you prefer and follow the instructions. Using the <center></center> tags. Using a style sheet property.
How do I center text in a div?
Using CSS, you can center text in a div in multiple ways. The most common way is to use the text-align property to center text horizontally. Another way is to use the line-height and vertical-align properties. The last way exclusively applies to flex items and requires the justify-content and align-items properties.
How do I align all text boxes in HTML?
In order to align the labels, you only need to set the width width of the label to a certain value, such as 150px in this example, because the label label and the input label belong to the P label, they are displayed from left to right. Specify the length of the label label to align the text box of the form.
How do you center a form?
- Wrap your form in a div.
- Set the div’s display to block and text-align to center (this will center the contained form).
- Set the form’s display to inline-block (auto-sizes to content), left and right margins to auto (centers it horizontally), and text-align to left (or else its children will be center-aligned too).
How do I vertically align text in the middle of a div?
The CSS just sizes the div, vertically center aligns the span by setting the div’s line-height equal to its height, and makes the span an inline-block with vertical-align: middle. Then it sets the line-height back to normal for the span, so its contents will flow naturally inside the block.
How do I center text vertically in CSS?
How to Vertically Center Text with CSS
- Use the CSS vertical-align property.
- Use CSS Flexbox.
- Use the CSS display property.
- Use the CSS line-height property.
- Set equal top and bottom padding.
- Set absolute positioning and negative margin.
- Set absolute positioning and stretching.
- Set the CSS transform property.
How do you center a table in CSS?
Center a table with CSS
- Method 1. To center a table, you need to set the margins, like this: table.center { margin-left:auto; margin-right:auto; }
- Method 2. If you want your table to be a certain percentage width, you can do this: table#table1 { width:70%; margin-left:15%; margin-right:15%; }
- Method 3.
How do I align all text boxes in CSS?
4 Answers. You are making your inputs inline-block , but you are also floating them to the left. If you remove the float: left and add <br> after each input, you will get the correct behavior. To align the boxes, add a div wrapper around each label/input, make your label inline-block with a fixed width.
How do I align a text box to the right in HTML?
text-align:right; will only right align text elements. It appears that your are using bootstrap. You could try giving your form a class of pull-right , which is a bootstrap class for float right. Don’t use align:right; , there’s no such CSS rule, use float:right; instead.
How do I center in the middle of the page?
If you want to do a horizontal centering, just put the form inside a DIV tag and apply align=”center” attribute to it. So even if the form width is changed, your centering will remain the same.
How do you center a button?
How to center a button in CSS?
- text-align: center – By setting the value of text-align property of parent div tag to the center.
- margin: auto – By setting the value of margin property to auto.
- display: flex – By setting the value of display property to flex and the value of justify-content property to center.
How do you center a form of an element?
To centre block elements (such as divs and forms and paragraphs), give it a width and set margin-right and margin-left to auto. It’s important to understand the difference between block and inline elements.
How do I center a horizontal list in CSS?
There are two simple ways to center list item horizontally.
- display: inline-block & text-align: center. .list-container { text-align: center; .list-item { display: inline-block; } }
- width: fit-content & margin: 0 auto;
![]()
Download Article
An easy-to-follow guide on aligning text in the center of Word documents
![]()
Download Article
Microsoft Word offers a huge array of options for customizing your documents — so huge, in fact, that it can be hard to figure out how to do simple things like center your text. Luckily, the method is easy to remember once you know it. Simply click the «Center» option under the «Paragraph» label at the top of the page (or hit Ctrl+E as a shortcut to switch between centered and left-aligned text).
-
1
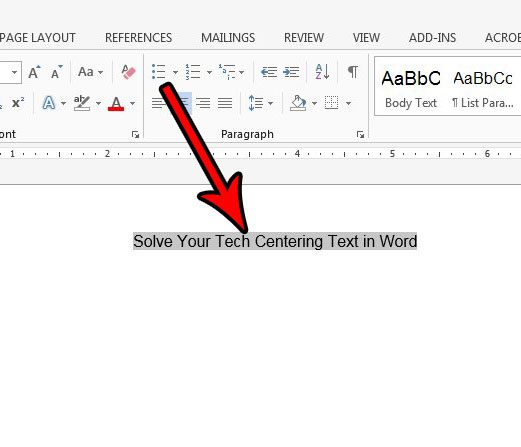
Highlight the text you want to center. If you already have text in the document, the first thing you must do is highlight it. Put the mouse cursor at the start of the text you want to center. Click and hold the left mouse button. Move the cursor to the end of the text you want to highlight. The text should now be bordered by a transparent blue box.
-
2
Click the «Center» button in the upper toolbar. Follow these directions:[1]
- Look at the toolbar at the top of the Word window (the space with all the options). The word «Home» in the top left should be selected (it will be by default). If it isn’t (or you’re not sure), click on «Home.»
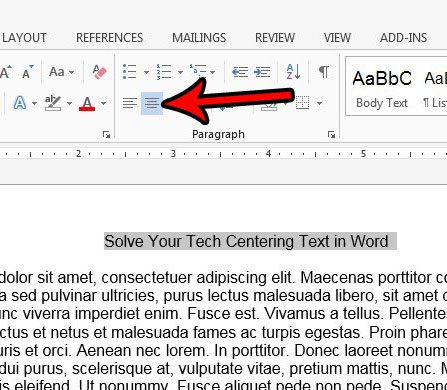
- Next, look under the «Paragraph» header, which is below «Home» and to the right. You should see three small buttons that look like pages with the text aligned to the left, center, and right.
- Click the button with the text aligned in the center.
Advertisement
-
3
Deselect your text. The text you selected should now be aligned evenly between the left and right margins. Now, click where you would like to continue typing and proceed with the rest of your document.
- If your text didn’t center, you may have accidentally deselected it before hitting the center button. You need to center your text while it’s selected without clicking anywhere else on the page.
-
4
If you haven’t typed anything yet, just click the «Center» button. If your document is completely blank, click the «Center» button from the directions above and any text you type will be center-aligned.
- If you want to add centered text at the end of your document, click at the end of your document, hit the enter/return key to start a new line, and click the «Center» button.
-
5
Alternatively, hit Ctrl+E. This keyboard combination will switch you back and forth between left-aligned text and centered text.[2]
If you use it while text is highlighted, the text will change to centered (and back if you hit the keys again). If you use it on a blank line, it will change the alignment of the cursor so that the next words you type are centered. -
6
Use the other buttons to change your alignment. The buttons next to the «Center» button in the toolbar allow you to get different text alignments. They all work the same way as the center button does. From left to right, the alignment buttons are:
- Align left
- Align center
- Align right
- Justify (similar to center except that words will automatically be stretched so that all the lines are the same width).


Advertisement
-
1
Highlight the text you want to center. This method will align the text midway between the top and bottom margins on the page. To start, highlight the text the same way as you would if you were aligning it horizontally (see method above).
- If you haven’t typed anything yet, skip this step. When you’re done, the text that you type will be centered vertically.
-
2
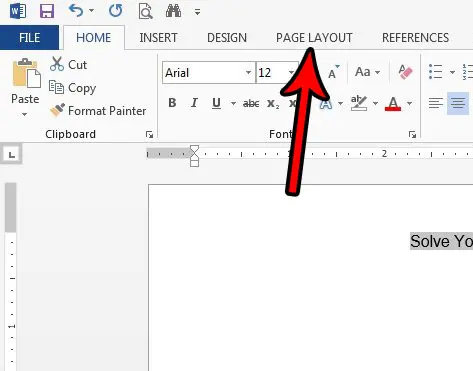
Open the Layout menu. Follow these directions:[3]
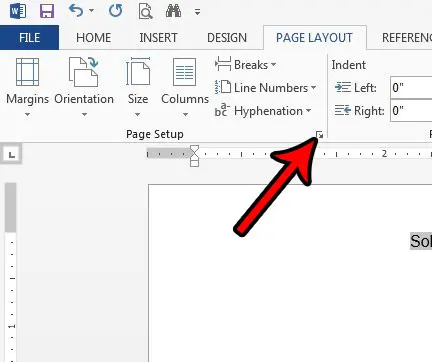
- Click «Page Layout» in the upper toolbar (to the right of the «Home» tab that’s selected by default).
- Click the «Page Setup» button.
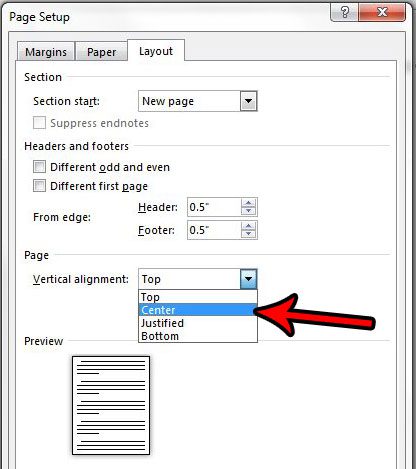
- In the window that pops up, click the «Layout» tab.
-
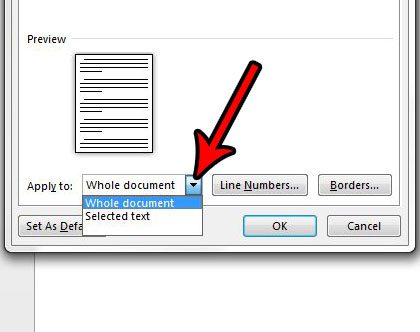
3
Select a centered vertical alignment. In the tab you just selected, look for the «Vertical Alignment» box. Select «Center.»
-
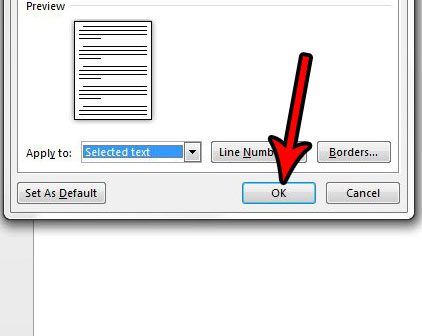
4
Apply the changes. Clicking «OK» will change the alignment and return you to your document. If you like, you can use the options under «Apply to» to change which parts of your document are centered vertically.
- For example, if you have highlighted text that you want to center vertically, be sure to choose the «Selected text» option from the «Apply to» menu.


Advertisement
Add New Question
-
Question
How do I vertically align text in a table with rows?

Ankit Bhatt
Community Answer
Select the text within the table, then go to Layout in the ribbon area. You’ll see an alignment tab there; select any option from the Center line (Align Center Left, Align Center or Align Center Right). All of these will align your text vertically, along with the horizontal alignment you specify.
-
Question
How can I save a document in a folder on the desktop?
In the top left hand corner of the program, select ‘File’ and then select the ‘Save As…’ option. You can then save it to any directory you want. If the folder you want to put it into isn’t already on the desktop, you’ll need to move it there using windows explorer, or if you want to create a new folder on your desktop, right-click the desktop, and mouse over the ‘New’ option, and select ‘Folder’.
-
Question
If I have 3 lines, should 2 be above the center or below?
If the text is centered, the second line should be directly in the center, not above or below it.
Ask a Question
200 characters left
Include your email address to get a message when this question is answered.
Submit
Advertisement
-
If you want to emphasize important information, you may want to bold, italicize, or underline your information in addition to—or instead of—centering it. By default, these options are to the left of the alignment options under the «Font» header.
Thanks for submitting a tip for review!
Advertisement
About This Article
Thanks to all authors for creating a page that has been read 290,097 times.
Is this article up to date?
The text Text Box content in Word will default to the top but not between the Text Box. So how to adjust the content in the Text Box to center, increase aesthetics?
- How to align text between cells in Word and Excel
- How to Center Text in Microsoft Word
Text Box in Word is a tool to create text content in blocks, diagrams, or other eye-catching shapes to increase content dynamics. And when entering content into the Text Box, automatically the text content is automatically aligned in the upper part. To adjust the content to the middle, the user will have to adjust the Text Box, shrink or scale. However, there is no need to resize the Text Box, users can center text according to the article below.
- Word 2013 Complete Guide (Part 18): How to insert Text Box and WordArt
- How to create Text Box in Excel
- How to design PowerPoint with Text box and SmartArt
How to adjust Text Box position on Word
Step 1:
In Word documents insert Text Box content, right-click the border of the Text Box and select Format Text Box . Please select the correct border of the new Text Box that appears above option.
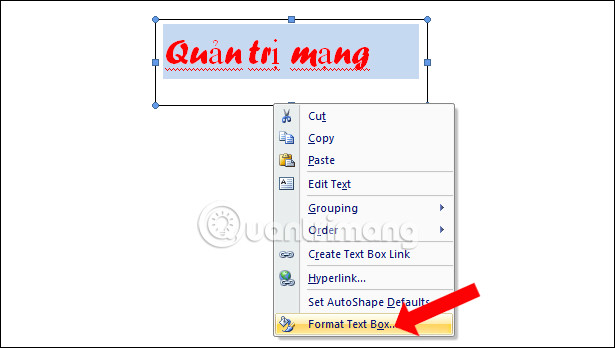
Step 2:
In the next dialog box interface, click on the Text Box to adjust.

Step 3:
In the Vertical alignmen section click on the Center position to bring the content in the Text Box to the middle, press Ok to save.

The content in the Text Box will be instantly transferred to the center as shown.
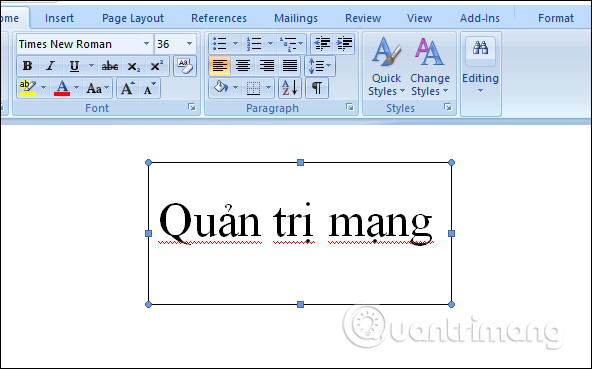
After we have finished aligning the content in the middle of the Text Box, you proceed with the editing, such as changing the font, font style, changing the border of the Text Box text box. Including content in the Text Box will increase the aesthetics and professionalism when editing Word content.
See more:
- Guide to Word Word 2016 (Part 19): Inserting Text Box
- Word 2013 Complete Guide (Part 15): Insert Images and Text Wrapping functions
- Tutorial for Word 2016 (Part 18): How to add Shape shapes
I wish you all success!
Read more
- How to create text inverted, reverse the word in Word
- How to center the cell in the table on Word
- How to create large text at the beginning of the text on Word
- Guide font formatting, change stretch and create artistic text in Word
- Useful tips on Microsoft Word 2016
- Word 2013 Complete Guide (Part 6): Aligning page layout
- Useful Word tips you should not miss
- Insert images into text content
- Tips for handling columns in Microsoft Word
- How to lock the Text box in Word
Text in a Microsoft Word document occasionally needs to be put in the center of the page between the left and right margins.
You might also need to know how to center text in Word vertically in Word documents, which means that it needs to be in the middle of the top and bottom margins.
You can vertically center text in Microsoft Word by selecting the text, choosing the Layout tab, clicking the Page Setup button, choosing the Layout tab, clicking the Vertical Alignment tab, choosing Center, then clicking Apply.
How to Horizontally Center Text in Microsoft Word
- Open the document in Word that contains the text you want to center.
- Use your mouse to select the text.
- Click the Home tab at the top of the window.
- Click the Center button in the Paragraph section of the ribbon.
How to Vertically Center Text in Microsoft Word
- Open the document containing the text to center vertically.
- Use your mouse to select the text you wish to center.
- Click the Page Layout tab.
- Click the small Page Setup button at the bottom-right corner of the Page Setup section of the ribbon.
- Click the dropdown menu to the right of Vertical alignment and choose the Center option.
- Click the dropdown menu to the right of Apply to and choose the appropriate option, then click the OK button.
Our article continues below with additional information on how to center align text in Microsoft Word, including expanded sections with pictures for the steps above.
Last update on 2023-04-13 / Affiliate links / Images from Amazon Product Advertising API
| As an Amazon Associate, I earn from qualifying purchases.
Adding content to a document in Microsoft Word can include a variety of options. You can format that text using a number of different tools and dialog box menus in the application, and many of those changes can be applied by simply selecting the text you want to change.
But if you need to align text to the center of the page, whether it is vertical alignment or horizontal alignment, then you may be wondering where that setting is found.
When you start typing in a Word document that is using the Normal template, all of the text that you enter will be left aligned by default.
This means that the first letter on each line will be against the left margin of the page. This is the standard for most corporations and institutions and is the most common alignment format used in documents.
But sometimes, a part of your document will need to be centered on the page, either horizontally or vertically.
Our tutorial below will show you how to center text in Microsoft Word using either the horizontal or vertical alignment option so that you can achieve the desired display result for your document.
You may also want to know how to get rid of space after paragraphs in Google Docs if you use that application for document editing, too.
Expanded – How to Center Text in Microsoft Word Horizontally
The summary section above gives a brief overview of how to horizontally center text in Word, but this section provides pictures as well if you would like a little more information. Note that I am using Microsoft Word 2013 in the images below, but the process is the same in most other versions of Word as well.
Find out how to use all small caps in Word if you have been struggling to manually apply that formatting in your document.
Step 1: Open your document in Microsoft Word.
Step 2: Use your mouse to highlight the text that you want to center horizontally.
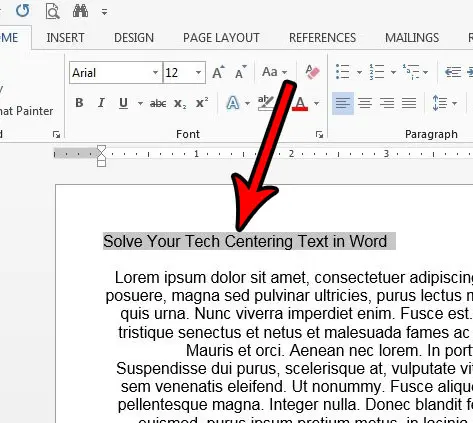
Step 3: Click the Home tab at the top of the window.
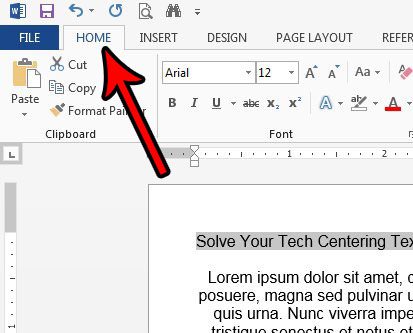
Step 4: Select the Center button in the Paragraph section of the ribbon.
The next section includes information on how to center text vertically if the text you want to modify in your document needs to be in the middle of the page.
Expanded – How to Center Text in Microsoft Word Vertically
We outlined how to vertically center text in the summary section above, but this section will provide images as well. This section was performed using Microsoft Word 2013.
Step 1: Open your document in Microsoft Word.
Step 2: Use your mouse to select the text that you want to center vertically.
If you wish to center the entire document you can skip this step.
Step 3: Click the Page Layout tab at the top of the window.
Step 4: Click the Page Setup button in the Page Setup section of the ribbon.
It’s the tiny button at the bottom-right corner of the section.
Step 5: Click the dropdown menu to the right of Vertical alignment, then choose the Center option.
Note that the vertical alignment drop down menu also has options for Top, Justified, and Bottom.
Step 6: Select the dropdown menu to the right of Apply to, then choose the option that fits your needs.
If you selected text earlier, then the Selected sections option will only vertically center that selected text. The Whole document option will vertically center the entire document, and the This point forward will vertically center all of the document text after the point at which your mouse cursor is currently located. Some of the vertical alignment options may not appear depending on the selected text’s locations, whether or not any text is selected, or the composition of the document.
Step 7: Click the OK button to apply the vertical centering.
How to Center Text in a Table in Microsoft Word
If you have a table in your document and need to center the text in one of the table cells, then you get to use some table-specific centering options. By default the data in your table will be horizontally centered at the top of the table cell, but there are options that let you customize the alignment within a cell.
Step 1: Open the document containing the table text that you want to center.
Step 2: Click inside the cell containing the data you wish to center.
Step 3: Click the Layout tab at the top of the window under Table Tools.
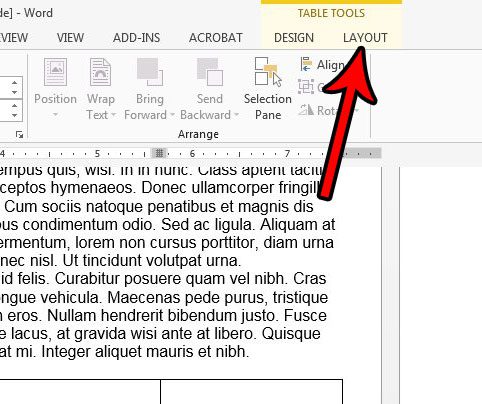
Step 4: Click the desired alignment option in the Alignment section of the ribbon.
Additional Notes on How to Center Text in Word
- You can also center text horizontally by selecting it and then pressing Ctrl + E on your keyboard.
- One of the most common reasons to align text either horizontally or vertically is to add a title. If you are adding a title, be sure to check your work or school’s guidelines on titles, as they often include additional requirements like font sizes. You can adjust font styles in the Font section of the ribbon on the Home tab.
- If you center some text in your document, the center align text setting will typically persist. You will likely need to select the Left Align option after centering your text if you want to return to normal text alignment after centering some of your text.
- If you vertically center text in Word, you will have several options concerning what parts of your document should be centered. These options include the selected text, the whole document, or “this point forward.”
If you have left aligned text on a page and you need it to be center aligned, then the keyboard shortcut option might be a little easier than using the option on the Home tab.
However, when you need to create vertical centered text on a cover page or title pages, then you will need to use the Page Setup button in the Page Setup group and make the adjustment from the Vertical alignment drop down menu on the Layout tab.
Does your document have a title page, but you need to number your pages and skip that title page? Find out how to start page numbering on the second page in Word so that a page number doesn’t display on the title page.
Additional Sources

Matthew Burleigh has been writing tech tutorials since 2008. His writing has appeared on dozens of different websites and been read over 50 million times.
After receiving his Bachelor’s and Master’s degrees in Computer Science he spent several years working in IT management for small businesses. However, he now works full time writing content online and creating websites.
His main writing topics include iPhones, Microsoft Office, Google Apps, Android, and Photoshop, but he has also written about many other tech topics as well.
Read his full bio here.
In this article, we would like to introduce you with 2 methods to center all pictures and text boxes in your Word document.
Pictures and shapes, such as text boxes, play vital important in making a wonderful document. With a growing number of images and shapes being inserted, the demand to integrate their formatting, say to center them starts to surface.
What you should know is that all pictures inserted into document is set in “In line with text” layout, while text boxes are flowing shapes. You may change the picture layout as required, but to center them you will have to consider the text wrapping. Because text formatting can be easily tampered, leaving you with a layout you don’t like.
Therefore, we will focus on 2 ways to center “In line with text” pictures and text boxes.
Method 1: Center One Picture or Text Box Manually
To center a “In line with text” picture, follow these steps:
- Firstly, click on the picture to select it.
- Secondly, click “Center” in “Paragraph” group under “Home” tab. Or you can use the shortcuts “Ctrl+ E” instead.


Then to center a text box, go through these instructions:
- Similarly, click on text box to have it in selection.
- Then click “Format” tab under “Drawing Tools”.
- Next click “Align” in “Arrange” group.
- And choose “Align Center” on its drop-down menu.


Method 2: Batch Center Multiple Pictures or Text Boxes Automatically
Most of us would favor an automatic process to save efforts. Here you go.
- First off, press “Alt+ F11” to open the VBA editor.
- Next click “Normal” project.
- Click “Insert” tab and choose “Module”.

- Then double click on the module to bring out the editing space on the right side.
- Next to center pictures, you paste the following codes there:

Sub CenterInLinePictures()
  Dim objInLineShape As InlineShape
  Dim objDoc As Document

  Set objDoc = ActiveDocument

  For Each objInLineShape In objDoc.InlineShapes
    objInLineShape.Select
    Selection.ParagraphFormat.Alignment = wdAlignParagraphCenter
  Next objInLineShape
End Sub
To center all text boxes, you need the bellowing macro:
Sub CenterTextBoxes()
  Dim objDoc As Document
  Dim objTextBox As Shape

  Set objDoc = ActiveDocument

  For Each objTextBox In objDoc.Shapes
    If objTextBox.Type = msoTextBox Then
      objTextBox.RelativeHorizontalPosition = wdRelativeHorizontalPositionPage
      objTextBox.Left = wdShapeCenter
    End If
  Next objTextBox
End Sub
To center both pictures and text boxes, you will have to use this one:
Sub CenterInLinePicturesAndTextBoxes()
  Dim objInLineShape As InlineShape
  Dim objShape As Shape
  Dim objDoc As Document

  Set objDoc = ActiveDocument

  For Each objInLineShape In objDoc.InlineShapes
    objInLineShape.Select
    Selection.ParagraphFormat.Alignment = wdAlignParagraphCenter
  Next objInLineShape

  For Each objShape In objDoc.Shapes
    If objShape.Type = msoTextBox Then
      objShape.RelativeHorizontalPosition = wdRelativeHorizontalPositionPage
      objShape.Left = wdShapeCenter
    End If
  Next objShape
End Sub
- Lastly, click “Run” button or hit “F5”.


Address Document Problems
No matter how reluctant we have to admit that Word is not foolproof. Its breaking down can lead to corruption of documents while inheriting a corrupted docx can be heart-broken for us. In order to ease such anxiety, it’s advisable to get hold of a document recovering tool in advance. Then you won’t have to worry about the data loss.
Author Introduction:
Vera Chen is a data recovery expert in DataNumen, Inc., which is the world leader in data recovery technologies, including xlsx corruption and pdf repair software products. For more information visit www.datanumen.com
Asked by: Rossie Waters
Score: 4.7/5
(38 votes)
Use your mouse to select the text you wish to center. Click the Page Layout tab. Click the small Page Setup button at the bottom-right corner of the Page Setup section of the ribbon. Click the dropdown menu to the right of Vertical alignment and choose the Center option.
How do you center align text in Word?
Select the text that you want to center. in the Page Setup group, and then click the Layout tab. In the Vertical alignment box, click Center. In the Apply to box, click Selected text, and then click OK.
How do I center text in the middle of the page in Word?
1 Select the text you want to center between the top and bottom margins. 2 On the Page Layout tab, click the Page Setup Dialog Box Launcher. 3 Select the Layout tab. 4 In the Vertical alignment box, click Center 5 In the Apply to box, click Selected text, and then click OK.
Where is the Center text button in Word?
To align text using the alignment buttons:
Select or click anywhere inside the paragraph you want to align. Click the align left, center, align right, or justify button on the Formatting toolbar.
How do I adjust text in Word?
Change text alignment
- Place the insertion point anywhere in the paragraph, document, or table that you want to align.
- Do one of the following: To align the text left, press Ctrl+L. To align the text right, press Ctrl+R. To center the text, press Ctrl+E.
41 related questions found
Which button is used align the text?
To align text to the right, select the text you want to modify and use the Ctrl + R keyboard combination. To align text to the center, select the text you want to modify and use the Ctrl + E keyboard combination.
How do I center a page vertically in Word?
Click the “Page Setup” button in the lower-right corner of the “Page Setup” section of the “Page Layout” tab. On the “Page Setup” dialog box, click the “Layout” tab. In the “Page” section, select “Center” from the “Vertical alignment” drop-down list. Your cover page text is now centered vertically on the page.
How do you center text in the middle of a page in Word for Mac 2019?
Select the “Layout” tab and then click the arrow next to “Vertical Alignment” in the “Page” section. A selection of vertical alignment options will appear. Go ahead and click “Center” (or choose another option that better suits your requirements). Your text will now reflect the selected vertical alignment option.
How do you center a table vertically in Word?
All you need to do is position the insertion point somewhere within the text and then click on the Center button on the Home tab of the ribbon or press Ctrl+E. Centering text vertically is almost as easy: Position the insertion point within the cell you want to vertically center.
Why can’t I Align Center in Word?
Select the text that you want to center, and then click Paragraph on the Format menu. On the Indents and Spacing tab, change the setting in the Alignment box to Centered, and then click OK. … On the Indents and Spacing tab, change the setting in the Alignment box to Centered, and then click OK.
How do I align text horizontally?
To align text horizontally on a page, highlight the text you want to center. Next, click the “Center Alignment” icon in the “Paragraph” group of the “Home” tab. Alternatively, you can use the Ctrl+E keyboard shortcut. Your text will now be horizontally aligned.
How do I center a table in Word 2020?
Centering a Table
- Right-click on the table. Word displays a Context menu.
- Choose Table Properties from the Context menu. Word displays the Table Properties dialog box.
- Make sure the Table tab is selected. (See Figure 1.)
- Click on Center.
- Click on Close.
How do I fit text into a table in Word?
To adjust table row and column size in Word:
- To fit the columns to the text (or page margins if cells are empty), click [AutoFit] > select «AutoFit Contents.»
- To fit the table to the text, click [AutoFit] > select «AutoFit Window.»
How do I flush left in Word?
Flush Left and Flush Right On the Same Line
- Make sure the paragraph is formatted as left-aligned.
- Choose the Tabs option from the Format menu. Word displays the Tabs dialog box. …
- Insert a right-aligned tab near the right edge of the line.
- Click on Set.
- Click on OK.
- Type your text.
How do I show formatting marks in Word?
Turn the display of formatting marks on or off
- Go to File > Help > Options > Display.
- Under Always show these formatting marks on the screen, select the check box for each formatting mark that you always want to display regardless if the Show/Hide. button is turned on or off.
How do I type vertically in Word 2010?
8 Answers
- Enter your Word art as usual.
- Then click on the word art box you just made.
- Make sure you click on ‘Format’ on the top of Publisher.
- Third option across the top says ‘vertical text’
- Click and your text is vertical

Where is Page Setup in Word?
Click Page Layout tab
- Click Page Layout tab.
- Move to Page Setup group.
- Click the little square with an arrow in the right bottom of the group.
- The Page Setup window pops up.
How do you clear the formatting in Word?
Clear formatting from text
- Select the text that you want to return to its default formatting.
- In Word: On the Edit menu, click Clear and then select Clear Formatting. In PowerPoint: On the Home tab, in the Font group, click Clear All Formatting .
How do I align text in pages?
Select text or tap a text box or a shape with text to select it; if you’re working in a table, tap a table cell or select a row or column. in the shortcut bar above the keyboard, then tap an alignment option. , then tap one of the alignment buttons (scroll down to see them).
How many types of alignment are there?
There are four main alignments: left, right, center, and justified.
What is the text wrapping?
Text wrap is a feature supported by many word processors that enables you to surround a picture or diagram with text. The text wraps around the graphic. … Text wrap is also called text flow.
How do you center a table in Word HTML?
To center align text in table cells, use the CSS property text-align. The <table> tag align attribute was used before, but HTML5 deprecated the attribute. Do not use it. So, use CSS to align text in table cells.
How do I center a table on a page?
2 Answers
- Select your table, then right click.
- On the Table Tab, Text Wrapping, choose Around. This should activate the Positioning option.
- Select Positioning, and in the Table Positioning dialog box, set: Horizontal Position = Center, Relative to Page. …
- OK out of the dialog boxes and your Table should be centered.
Achieve more control and flexibility with your documents
Updated on September 11, 2022
What to Know
- Select Insert > Text Box > choose a text box template. Select and drag box to the position you want.
- To resize text, select and drag circles around the edge. To rotate text, select and drag the circular arrow.
- Place the cursor inside the text box and type the information you want to appear.
This article explains how to use text boxes in Microsoft Word. Instructions apply to Word for Microsoft 365, Word 2019, Word 2016, and Word 2013.
How to Insert a Text Box in Word
Start by opening the document you want to add a text box to. Then follow the steps below.
-
On the ribbon, select Insert.
-
In the Text group, select Text Box, then choose a text box template.
-
The new text box appears in the middle of the text, and the Shape Format tab is automatically selected.
-
Select and drag the box to the position you want. To resize the text box, select and drag the circles around the edge. To rotate the text box, select and drag the circular arrow at the top of the box.
-
Place the cursor inside the text box and type the information you want to appear there.
Why Use Text Boxes?
When you type text in Microsoft Word, you have options for making it look a particular way on the page (such as changing the page margins), but those options are limited. Text boxes expand your formatting repertoire by offering additional control and flexibility for how your text appears. You can place a text box anywhere within a document and format it with different colors and fonts. This feature is especially helpful for creating a blockquote or a sidebar.
Customize a Text Box
After you create a text box, you can customize it in a number of ways.
-
To bring up options, place the cursor inside the text box and right-click. Choose an option and follow the screen prompts to add a border, change the style, or adjust the way the text box interacts with the other text on the page.
Alternatively, use the controls on the Shape Format tab.
-
To go directly to the Layout Options menu, select the text box, then select the Layout Options icon (it looks like a horseshoe and is located to the right of the text box).
-
Change the text, make more adjustments, or move the box to another location at any time. To delete a text box, select its border, then press Delete on the keyboard.
Thanks for letting us know!
Get the Latest Tech News Delivered Every Day
Subscribe
Hi there,
I am following instruction from:
http://office.microsoft.com/en-us/word/HA102384571033.aspx
It says:
…
Vertical alignment
Shapes showing vertical alignment of text
1. Right-click the border of the shape or text box.
2. On the shortcut menu, do one of the following:
* For a shape, click Format AutoShape, and then click the
Text Box tab.
Note The Text Box tab is unavailable in a shape unless
the shape contains text.
* For a text box, click Format Text Box, and then click the
Text Box tab.
3. Under Vertical alignment, click the option that you want.
…
unfortunately when I reach the «vertical alignment» option it is
grayed out. The documentation does nto explain what I need to do in
this case.
thanks !
Содержание
- 0.1 Выравниваем текст в таблице
- 0.2 Выравнивание всей таблицы
- 0.3 Помогла ли вам эта статья?
- 0.4 Метод 1 Горизонтальное выравнивание текста по центру
- 0.5 Метод 2 Вертикальное выравнивание текста по центру
- 1 Советы

Как вы знаете, в текстовом редакторе MS Word можно создавать и изменять таблицы. Отдельно стоит сказать о большом наборе инструментов, предназначенных для работы с ними. Говоря непосредственно о данных, которые можно вносить в созданные таблицы, довольно часто возникает необходимость их выровнять относительно самой таблицы или всего документа.
Урок: Как в Ворде сделать таблицу
В этой небольшой статье мы расскажем о том, как можно выровнять текст в таблице MS Word, а также о том, как выровнять саму таблицу, ее ячейки, столбцы и строки.
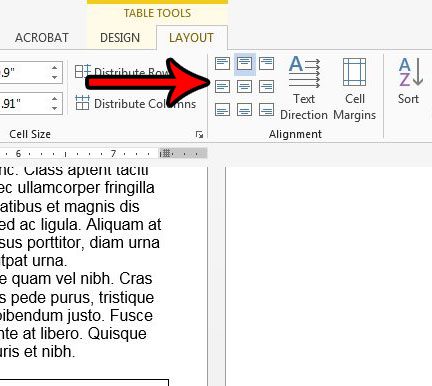
Выравниваем текст в таблице
1. Выделите все данные в таблице или отдельные ячейки (столбцы или строки), содержимое которых нужно выровнять.

2. В основном разделе “Работа с таблицами” откройте вкладку “Макет”.

3. Нажмите кнопку “Выровнять”, расположенную в группе “Выравнивание”.

4. Выберите подходящий вариант для выравнивания содержимого таблицы.

Урок: Как в Ворде скопировать таблицу
Выравнивание всей таблицы
1. Кликните по таблице, чтобы активировать режим работы с ней.
2. Откройте вкладку “Макет” (основной раздел “Работа с таблицами”).

3. Нажмите кнопку “Свойства”, расположенную в группе “Таблица”.

4. Во вкладке “Таблица” в открывшемся окне найдите раздел “Выравнивание” и выберите необходимый вариант выравнивания для таблицы в документе.


Урок: Как в Word сделать продолжение таблицы
На этом все, из этой небольшой статьи вы узнали, как выровнять текст в таблице в Ворде, а также о том, как выровнять саму таблицу. Теперь вы знаете немного больше, мы же хотим пожелать вам успехов в дальнейшем освоении этой многофункциональной программы для работы с документами.
Мы рады, что смогли помочь Вам в решении проблемы.
Задайте свой вопрос в комментариях, подробно расписав суть проблемы. Наши специалисты постараются ответить максимально быстро.
Помогла ли вам эта статья?
Да Нет
2 метода:Горизонтальное выравнивание текста по центруВертикальное выравнивание текста по центру
В Microsoft Word существует огромное количество опций, с помощью которых можно изменить свой документ. Их количество настолько огромно, что иногда трудно вспомнить, как сделать что-то простое, например, выровнять текст по центру. К счастью, ознакомившись с этим методом, вам не составит труда его запомнить. Просто нажмите на опцию «По центру» в разделе «Параграф» в верхней части документа (или нажмите Ctrl+E, чтобы переключиться между центрированным текстом и текстом, выровненным по левому краю).
Метод 1 Горизонтальное выравнивание текста по центру
-

Выделите текст, который хотите выровнять по центру. Если в вашем документе уже есть текст, первое, что вы должны сделать, это выделить его. Поставьте курсор в начало текста, который вы хотите центрировать. Нажмите и зажмите левую кнопку мыши. Двигайте курсор в конец текста, который хотите выделить. После этого текст будет выделен прозрачной синей (а иногда серой) рамкой.
-
 Нажмите на кнопку «По центру» на верхней панели инструментов.
Следуйте этим указаниям:
- Взгляните на панель инструментов в верхней части окна Word (раздел с множеством опций). В левом верхнем углу должна быть выбрана вкладка «Главная» (по умолчанию). Если это не так (или вы не уверенны), нажмите на нее.
- Затем найдите секцию «Абзац», которая находится чуть ниже и справа от вкладки «Главная». Вы увидите три небольших кнопки, напоминающие страницы с текстом, выровненным по левому краю, по правому краю и по центру.
- Нажмите на кнопку с текстом, выровненным по центру.
- Отмените выделение текста.
Выделенный вами текст будет выровнен точно между левым и правым краем. Теперь нажмите туда, откуда вы хотите продолжить печатать текст и продолжите работу со своим документом.
- Если текст не был отцентрирован, возможно, что перед нажатием на кнопку, вы случайно убрали выделение. Вы должны выровнять текст, когда он выделен. Никуда не нажимайте, пока не отцентрируете его.
- Если вы еще ничего не напечатали, просто нажмите на кнопку «По центру».
Если в вашем документе пока пусто, нажмите на кнопку «По центру», следуя вышеупомянутым указаниям. Все, что вы начнете печатать, будет выровнено по центру.
- Если вы хотите добавить в конце документа выровненный по центру текст, нажмите на конец документа, нажмите клавишу Enter/Return, чтобы перейти на новую строку и нажмите на кнопку «По центру».
- Вы также можете выровнять текст по центру, нажав Ctrl+E.
Эта комбинация клавиш переключает выравнивание текста (по левому краю или по центру).
Если вы нажмете ее, пока текст будет выделен, тогда он будет выровнен по центру (и обратно по левому краю, если вы нажмете ее снова). Если вы нажмете эту комбинацию клавиш на пустой линии, то следующее напечатанное слово будет отцентрировано.
- Измените выравнивание другими кнопками.
Кнопки на панели инструментов рядом с кнопкой «По центру» позволят вам выбрать для текста другое выравнивание. Они действуют так же, как и кнопка «По центру». Слева направо здесь присутствуют следующие кнопки:
- Выровнять по левому краю
- По центру
- Выровнять по правому краю
- Выровнять по ширине (похоже на функцию «По центру», но с тем исключением, что слова будут растянуты так, чтобы все линии были одной ширины).

 Нажмите на кнопку «По центру» на верхней панели инструментов.
 Отмените выделение текста.
 Если вы еще ничего не напечатали, просто нажмите на кнопку «По центру».
 Вы также можете выровнять текст по центру, нажав Ctrl+E.
 Измените выравнивание другими кнопками.
Метод 2 Вертикальное выравнивание текста по центру
- Выделите текст, который хотите выровнять по центру.
Этот метод выровняет текст точно между верхним и нижним краем страницы. Для начала, выделите текст аналогично методу горизонтального выравнивания текста.
- Если вы еще ничего не напечатали, пропустите этот шаг. В результате ваших действий печатаемый текст будет автоматически выравниваться вертикально.
- Откройте меню «Макет», выполнив следующие шаги:
- Откройте вкладку «Макет» на верхней панели (справа от вкладки «Главная», которая открывается по умолчанию).
- Нажмите на кнопку «Параметры страницы».
- В появившемся окне откройте вкладку «Источник бумаги».
-
Выберите вертикальное выравнивание по центру. Обратите внимание на поле «Вертикальное выравнивание». Выберите «По центру».
- Примените изменения.
Нажав «ОК», вы измените выравнивание и вернетесь к своему документу. Если хотите, можете задействовать функцию «Применить», чтобы выбрать, к какой части документа будет применено вертикальное выравнивание.
- Например, если вы выделили текст, который хотите выровнять по вертикали, не забудьте выбрать пункт «к выделенному тексту» в меню «Применить».
 Выделите текст, который хотите выровнять по центру.
 Откройте меню «Макет», выполнив следующие шаги:

 Примените изменения.
Советы
- Если вы оформляете название для своего документа, в дополнение к выравниванию не помешает и увеличить и размер текста. В данной статье рассказывается об изменении размера шрифта.
- Если вы хотите выделить важную информацию, можете применить полужирное или курсивное начертание, или подчеркнуть его вдобавок или вместо выравнивания. В стандартных настройках эти инструменты находятся слева от опций выравнивания в секции «Шрифт».
Информация о статье
Эту страницу просматривали 10 400 раза.
Была ли эта статья полезной?
Для этого сначала выберите все содержимое ячеек, которые вы хотите выровнять. Также вы можете выбрать несколько ячеек. В правом верхнем углу строки меню щелкните «Работа с таблицами | Макет».
 В правой части окна, в инструменте «Выравнивание» доступно несколько вариантов расположения текста, например, «Выровнять по центру по левому краю» или «Выровнять сверху по правому краю».
 Еще лучше таблица выглядит, если расстояние до краев ячейки является равным. Выберите соответствующие ячейки и вновь щелкните по «Работа с таблицами | Макет».
 Оптимизация таблиц Word. Выровненный в едином стиле текст обеспечивает скучным таблицам привлекательный внешний вид
Теперь щелкните в области «Выравнивание» по кнопке «Поля ячейки». В новом окне вы можете точно указать расстояние от каждого края ячейки. После подбора требуемого значения щелкните OK.
Фото: компания-производитель