
Contents
- 1 Can you put a box around text in Word?
- 2 How do I draw a shape around text in Word?
- 3 How do you put a red box around something in Word?
- 4 How do I turn a text box into a frame?
- 5 Can you put a border around a text box?
- 6 Where is enclose character in Word?
- 7 How do you frame in Word?
- 8 How do you format a box border around a paragraph in Word?
- 9 How do I circle something in a PDF?
- 10 How do you make circles around letters?
- 11 How do I make letters with circles around them?
- 12 What is enclosed character?
- 13 Can you draw a box in Word?
- 14 How do I draw a rectangle in Word?
- 15 How do you draw a box and line in Word?
- 16 How do you save a text box as an image?
- 17 How do I save multiple text boxes as an image?
Can you put a box around text in Word?
Select the texts you will add borders, click Home > Borders > Borders and Shading. See screenshot: 2. In the Borders and Shading dialog box, select the Up, Down, Left and Right border boxes in the Preview section, select Text from the Apply to drop-down, and then click the OK button.
Draw an oval or circle
- On the Insert tab, click Shapes.
- Under Basic Shapes, click Oval.
- Click where you want the oval to start, and drag to draw the shape.
- To draw a circle, press Shift while you drag. Notes: You can change the look of your circle or curve by adding a shape fill or effect or changing the border.
How do you put a red box around something in Word?
Try these steps:
- Put the insertion pointer on the page you want to border.
- Summon the Borders and Shading dialog box.
- Click the Page Border tab.
- Choose the border you want: Use a preset box or pick a line style, color, and width.
- Choose which pages you want bordered from the Apply To drop-down list.
How do I turn a text box into a frame?
Converting a Text Box to a Frame
- Right-click on the text box. Word displays a Context menu.
- Choose the Format Text Box from the Context menu. Word displays the Format Text Box dialog box.
- Click on the Text Box tab. (See Figure 1.)
- Click on Convert to Frame.
- Click on OK.
Can you put a border around a text box?
Add a custom border
Right-click the text box, AutoShape, picture, or object that you want to add the border to. Select the appropriate Format
-

1
Click the Insert tab.
-
2
On the right side of all of the things you can insert, look for ‘Text Box.’
Advertisement
-
3
Select the text box that you want to use and double click on it.
-
4
Cut and paste the text into the text box.


Advertisement
Ask a Question
200 characters left
Include your email address to get a message when this question is answered.
Submit
Advertisement
Video
-
To change the size of the text box, click on it once, and drag one of the 8 circles.
-
You can change the design of the text box you have selected by going into the format tab.
Thanks for submitting a tip for review!
Advertisement
About This Article
Thanks to all authors for creating a page that has been read 98,536 times.
Is this article up to date?
wikiHow Tech Help Pro:
Level up your tech skills and stay ahead of the curve
Let’s go!
![]()
Written by Allen Wyatt (last updated May 29, 2021)
This tip applies to Word 2007, 2010, 2013, 2016, 2019, and Word in Microsoft 365
Timothy apparently hit some control key that caused paragraphs in his document to appear in a box. The box enlarges with long sentences; pressing Enter begins a new box. The boxes do not print (thankfully), but they appear in new blank documents. It is as if there is a one-cell table, but there isn’t. Selecting the paragraphs and formatting for «no border» does not make the boxes go away. If Timothy just knew what to call it, he’s sure he could find the answer, but he’s stumped as to why this is happening.
If this problem crops up and you are using Word 2013 or a later version, it is very possible that you’ve inadvertently turned on the display of text boundaries. In older versions of Word, turning on text boundaries displayed a border on the page corresponding to the margins. In Word 2013 or a later version, the text boundaries are displayed around each paragraph on the page. (See Figure 1.)

Figure 1. Text boundaries appear around individual paragraphs.
If this is your problem, you can turn off the display of text boundaries in this manner:
- Display the Word Options dialog box. (In Word 2007 click the Office button and then click Word Options. In Word 2010 or a later version, display the File tab of the ribbon and then click Options.)
- At the left side of the screen click Advanced.
- Scroll through the options until you see the Show Document Content section. (See Figure 2.)
- Make sure the Show Text Boundaries check box is cleared.
- Click OK.
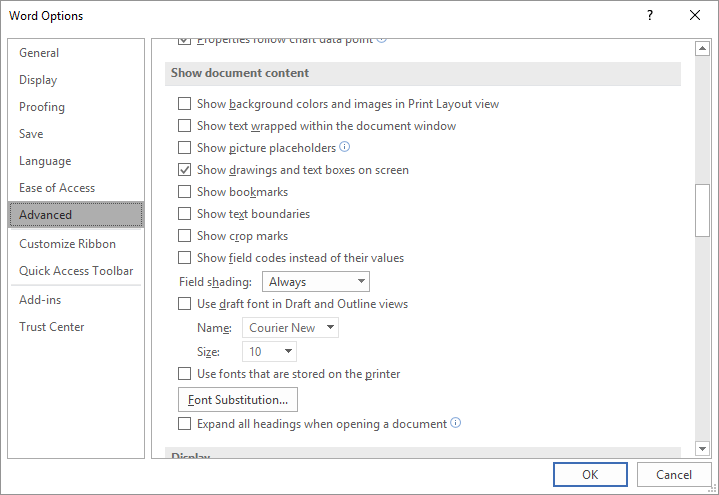
Figure 2. Advanced options in the Word Options dialog box.
If that does not fix your problem (or if you are not using Word 2013 or a later version), then check the style formatting for the Normal paragraph style. (How you modify styles has been discussed frequently in other WordTips.) In the universe of styles, the Normal style holds preeminence. It is the «root» style for almost all other built-in styles, and even for many custom styles.
The bottom line is that if the Normal style is formatted to have a box around it, then there is a good chance that all your paragraphs will have boxes around them. Check the style formatting and remove any boxes that may be associated with the style, and your problem may be immediately fixed.
In all honesty, though, the problem probably isn’t related to the Normal paragraph style. If it were, then the boxes would also print, and Timothy specifically said that his boxes didn’t print. There is, however, one final possibility—document or template corruption.
If the problem occurs in only a single document or a handful of documents, it could be that either the document or the template on which the document is based is corrupted in some way. Start by locating the Normal template (outside of Word) and renaming it to something else. Then, start Word and open the offending document. Create a new document and copy everything from the problem document (with the exception of the ending paragraph mark) to the new document. This process is detailed in this tip:
https://wordribbon.tips.net/T013284
WordTips is your source for cost-effective Microsoft Word training.
(Microsoft Word is the most popular word processing software in the world.)
This tip (10385) applies to Microsoft Word 2007, 2010, 2013, 2016, 2019, and Word in Microsoft 365.
Author Bio
With more than 50 non-fiction books and numerous magazine articles to his credit, Allen Wyatt is an internationally recognized author. He is president of Sharon Parq Associates, a computer and publishing services company. Learn more about Allen…
MORE FROM ALLEN
Using Crop Marks with a PostScript Printer
Want to add crop marks to a printout? It’s easy to do, provided you are using a PostScript printer.
Discover More
Copying Headers and Footers
Need to get headers and footers from one document to another? You can use the steps in this tip to help make quick work …
Discover More
Double-Spacing Your Document
Need to produce a quick double-spaced printout of your document? You can do it by using the simple steps in this tip.
Discover More

When you need to highlight a portion of text, it’s not always convenient to use a text box. To emphasize a paragraph while keeping it within the main content, you can put a border around that text in Word instead.
You can put a border around specific text, such as a single sentence, or an entire paragraph. Let’s look at how to do both as well as customize the border.
Select the text you want to surround with a border and go to the Home tab. Click the drop-down arrow next to Borders and choose “Borders and Shading.”

Use a Setting option on the left or the buttons below Preview on the right to add the border around the text. You can also adjust the Style, Color, and Width settings in the center of the window to customize the line for the border.
RELATED: How to Add Borders to or Change Borders on a Table in Word
In the Apply To drop-down box on the right side, select “Text” and when you finish, click “OK” to apply the border.
You’ll then see your text outlined with a border.
Put a Border Around a Paragraph
If you have an entire paragraph you’d like to place a border around, the process is similar. However, you have a few extra customization options.
RELATED: How to Put Borders Around Images in Microsoft Word
Select the paragraph you want to surround with a border and head to the Home tab. Click the Borders drop-down arrow and pick one of the quick border options such as Outside Borders or All Borders.
This places the border around the paragraph from margin to margin on each side and gives you a fast way to add the border. But you can also customize the border and adjust the space between the border and the text.
Select the bordered paragraph, click the drop-down arrow next to Borders on the Home tab, and choose “Borders and Shading.”
Like with customizing the border for specific text, you can change the Style, Color, and Width for the border line. Confirm that “Paragraph” is selected in the Apply To drop-down box. Then, to adjust the spacing, click “Options” on the right side of the window.
At the top, use the arrows or enter the number of points for the spacing on the top, bottom, left, and right of the border in relation to the text. As you make the changes, you’ll see a preview directly below. Click “OK” when you finish.
Make any other adjustments you want in the Borders and Shading window and click “OK” when you’re done to apply the border.
RELATED: How to Change Page Margins in Word
Remove a Border From Text in Word
If you decide later to remove a border you’ve added, it takes only a few clicks. Select the text or paragraph containing the border and revisit the Home tab. Click the drop-down arrow next to Borders and pick “No Border.”
Text boxes in Word are great ways to call out portions of text. But if you want to keep your text in line with the rest and simply highlight a small piece, consider surrounding it in a border. For other types of borders, take a look at how to create a page border in Word.
READ NEXT
- › How to Outline Text in Adobe Photoshop
- › How to Mirror or Flip Text in Microsoft Word
- › How to Install Unsupported Versions of macOS on Your Mac
- › The Best Steam Deck Docks of 2023
- › Microsoft Outlook Is Adding a Splash of Personalization
- › This 64 GB Flash Drive From Samsung Is Just $8 Right Now
- › Liquid Metal vs. Thermal Paste: Is Liquid Metal Better?
- › Why Your Phone Charging Cable Needs a USB Condom
How-To Geek is where you turn when you want experts to explain technology. Since we launched in 2006, our articles have been read billions of times. Want to know more?
Paul,
Thanks for your offer, not sure how to attach a doc to a forum message.
In the meantime, I have been experimenting with this and below are steps, results and solutions that I have found in this area. When I use the term «body text», it includes either table or non-table source data. Have found no difference in either source.
1. Enter some text in a property field. Select that text. Copy and Paste (standard) into the body area. Result: Body text is copied but is encapsulated a rectangle box (not a text box). This box will be printed along with the text. Solution: Select the boxed body text; Home tab, Font, Click on Clear Formatting icon upper, right.
2. Like 1 but Paste Special (unformatted text). Result and Solution same as 1.
Note: interesting in that once the boxed data appears in the body, all other line feeds will continue the boxing of directly entered data.
3.Enter text in a new document body. Select the text; Copy and Paste (standard) into a property field. Result: Text entered into the property field but the source body text is delineated by brackets. These brackets do not print. As you noted Paul, this indicates the text is bookmarked. Solution (as you suggested): Select the bracketed text. Select the Insert tab. Click the Bookmark icon. A Bookmark window lists all the bookmarks. Find the two that relate to this bookmark and delete from the table.
4. This is interesting! Like 3; however, Paste Special (unformatted text). Make sure the cursor is in the desired property box. Do the paste. Result: the body text is not pasted into the selected property field but into the body where the cursor was last set! Solution: None.
The purpose of this activity is based on the fact I am a heavy user of Metadata. I try to be consistent in the what field is used with what type of information. This leads to having an example pattern for each file’s field of use. Copy example from body text reference file to property fields. Sometimes, I find it useful to go the other direction; copy a property field data into my reference document for future use.
This is another problem that may not belong here, but does anyone know of any WORD to PDF convertor that does not place quotes around the keyword set in the resultant PDF document? With quotes around the complete set, cannot do single word searches. Must go into the resultant PDF document and remove the quotes each time.
Any of these problems fixed in Word2012?