
In this tutorial , we will discuss 2 methods to change table border color of a word document.

- Using the Borders and Shading option.
- Using the Border Styles button.
Method 1: Using the Borders and Shading option.
This is a simple method which lets you quickly change the border colors of the whole table.
Step 1: Open Word document.

Step 2: Prompt the Borders and Shading dialogue box.
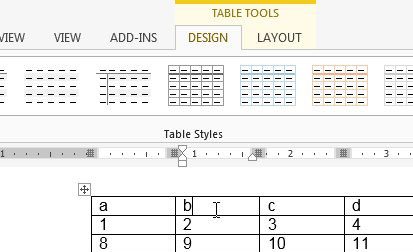
Click anywhere in the table. A Table Selection Icon will appear at the top corner.
Click on this icon to select the whole table.
Selecting the table will display a horizontal context menu.
You will find Borders and Shading Button there.
Click on this button to open the Borders and Shading dialogue box.

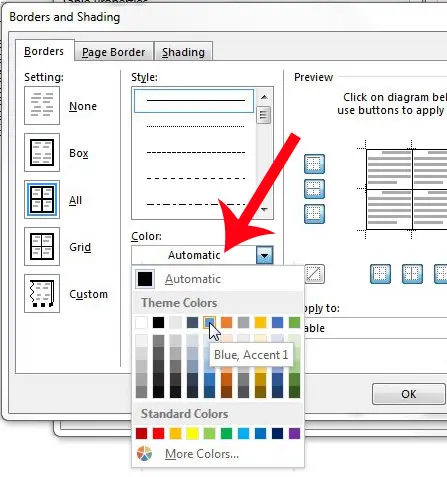
Step 3: Choose the color of your border.
You will see a Color Dropdown under the Borders Tab.
Simply select the color of your choice.
By default the Border color will apply to the whole table.
You can use the “Apply to” Setting to apply the color to a cell or a paragraph.

Method 2: Using the Border Styles button.
This method lets you select certain borders to apply color too.
Step 1: Open Word document.

Step 2: Locate the Border Styles Button.
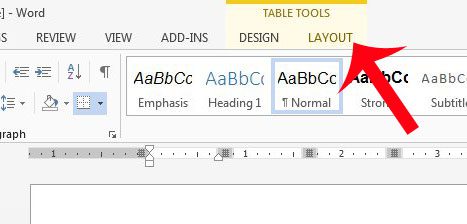
Click anywhere on the table and go to Table Tools -> Design – Border Styles.

Step 3: Choose your border style.
Click on Border Styles Button. It will show a selection of border styles.
Select the border style of your choice.

At this point, the cursor is changed to a Border Painter tool.
Clicking on specific borders will apply color with the style of your choosing. You can also click and drag to apply through borders with intersections.

Conclusion
Changing borders colors is quite simple. We hope you’ve found this article helpful!
Every time you insert a table in Word document, the color of borders is black by default. If you want to make some changes to express your personal style, try these methods below.
1. Borders and Shading
Select the whole table. Click Home tab, find the button of Borders in the lower right corner of Paragraph section. Then select Borders and Shading… in the drop-down list.
Click the drop-down arrow beside Automatic color in Borders tab, choose the one you like in the list or click More Color to customize it. Then hit OK to confirm your choice.
Now the change has been made to your table.

2. Borders Styles
Right click any section of the borders, put your cursor at the selection of Border Styles. You can see a list of Theme Borders.

Choose a style of borders you like and your cursor will become an icon of paintbrush. You can then click any section of borders to turn it into the style you choose. In this way, you can make your table more vivid with multiple different colors.

Copyright Statement: Regarding all of the posts by this website, any copy or use shall get the written permission or authorization from Myofficetricks.
Word for Microsoft 365 Outlook for Microsoft 365 Word 2021 Outlook 2021 Word 2019 Outlook 2019 Word 2016 Outlook 2016 Word 2013 Outlook 2013 Word 2010 Outlook 2010 Word 2007 Outlook 2007 More…Less
To set or change table options in Word or Outlook, right-click a table and choose Table Properties.
Note: If you want to set properties for a particular row, column, or cell, click in that row, column, or cell before making changes in the Table Properties dialog box.
In this article
-
Table properties
-
Row properties
-
Column properties
-
Cell properties
-
Alt text
Table properties

Click the Table tab to apply settings to your entire table:
-
Under Size, set the table’s overall width by selecting Preferred width and choosing a size. In the Measure in box, choose whether you want to measure the width in inches or a percentage of the page.
-
Under Alignment, choose whether you want to align your table to the left, center, or right of page. If you select Left, you can select an indentation distance in the Indent from Left box.
-
Under Text wrapping, select Around if you want nearby text on your page to wrap around your table; you can make text wrapping more precise by clicking Positioning, and then choosing options in the Table Positioning dialog box. If you don’t want text wrapping, select None.
-
Click Borders and Shading to change the border style, line color, and line width of your table.
-
Click Options to set more table properties, including top and bottom cell margins, cell spacing, and automatic resizing of cell contents.
Top of Page
Row properties
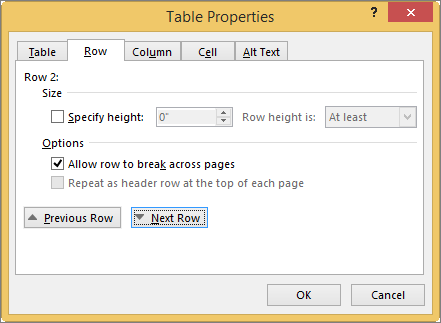
First, click in the row or select the rows you want to change, right-click, choose Table Properties, and then click the Row tab.
-
Under Size, set the row’s height by selecting Preferred height and choosing a size; you can further refine the height by selecting an option in the Row height is box.
-
Under Options, select options for breaking rows across pages or creating header rows.
-
To display the currently selected row at the top of the tab and navigate between rows without leaving the Table Properties dialog box, click Previous Row or Next Row.
Top of Page
Column properties
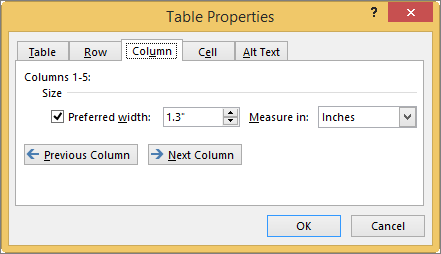
First, click in the column or select the columns you want to change, right-click, choose Table Properties, and then click the Column tab.
-
Under Size, set the column’s width by selecting Preferred width and choosing a size. In the Measure in box, choose whether you want to measure the width in inches or a percentage.
-
To display the currently selected column or columns at the top of the tab and navigate between columns without leaving the Table Properties dialog box, click Previous Column or Next Column.
Top of Page
Cell properties
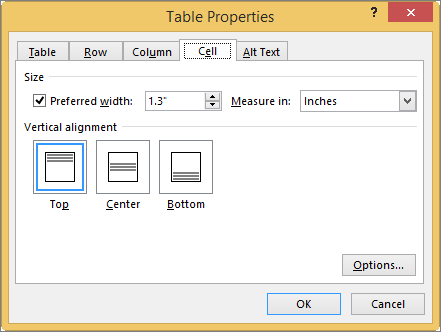
First, click in the cell that you want to change, right-click, choose Table Properties, and then click the Cell tab.
-
Under Size, set the cell’s width by selecting Preferred width and choosing a size. In the Measure in box, choose whether you want to measure the width in inches or a percentage.
-
Under Vertical alignment, choose an alignment option for the cell contents—Top (the default alignment), Center, or Bottom.
-
Click Options to set more cell properties, including top and bottom cell margins and text wrapping and fit options.
Top of Page
Alt text
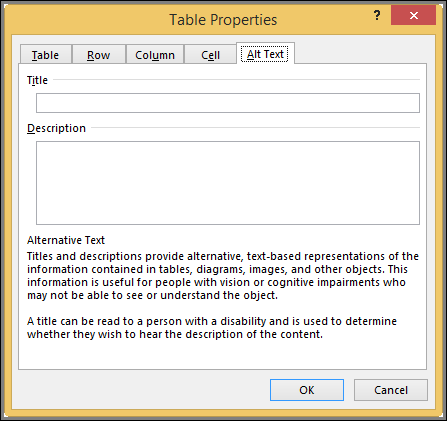
You can create alternative text (alt text) for your table to help people with screen readers understand the content of the table.
-
In the Description box, enter an explanation of the table.
-
In the Title box, enter a brief summary of the table.
Note: Unless you have a complex table, you will usually want to enter text in just the Description box. When you have complex content to describe, filling in the Title field is useful so that reading the full description is not necessary unless desired.
Top of Page
Need more help?
Want more options?
Explore subscription benefits, browse training courses, learn how to secure your device, and more.
Communities help you ask and answer questions, give feedback, and hear from experts with rich knowledge.
Как изменить цвет границ таблицы в Ворде. Подробное руководство
Классический серый цвет таблицы в документах не всегда удобен. Иногда табличная информация воспринимается намного лучше, если она выполнена в цвете. Создать такую таблицу в текстовом редакторе Microsoft Word вполне реально, т.к. в нем уже предусмотрен такой набор инструментов. При помощи этих инструментов можно изменить не только цвет границ, но и внешний вид всей таблицы. О том как изменить цвет границ таблицы в Ворде, мы сейчас и поговорим.
Содержание:
- Меняем цвет границ таблицы
- Как изменить цвет и толщину внутренних границ таблицы
- Как изменить цвет всех границ таблицы одновременно
- Видео «Как изменить цвет границ в таблице Ворда»
Меняем цвет границ таблицы

Пример я буду показывать в текстовом редакторе Microsoft Word 2016.
Итак, мы создали таблицу.
Как создать таблицу в Word. Подробное руководство для начинающих
Как пронумеровать строки и столбцы в таблице ворда автоматически
Как в Word повернуть нумерацию страниц на 90 градусов
Как в Word преобразовать таблицу в текст и наоборот
Как добавить столбец в таблицу в Ворде
Выделяем её. Для этого достаточно подвести курсор к верхнему левому углу и кликнуть мышкой по маленькому плюсику.

Теперь щелкаем правой кнопкой мыши по выделенной таблице и жмем в выпадающем контекстном меню кнопку «Границы». В открывшемся меню в самом низу выбираем пункт «Границы и заливка».

В открывшемся окне на вкладке «Граница» выбираем тип «Сетка». Чуть правее выбираем тип линии границы, цвет границы, и её ширину. Еще правее, в поле «Применить к:» выставляем параметр «таблице». После этого в самом низу жмем кнопку «ОК».

И вот что у нас появилось.

Как изменить цвет и толщину внутренних границ таблицы
Для того, чтобы изменить цвет и толщину внутренних границ таблицы, необходимо включить отображение всех границ.
- Выделяем всю таблицу. Подводим курсор к левому верхнему углу. Появится небольшой крестик. Курсор тоже примет вид крестика. Кликаем мышкой по этому крестику.
- Переходим на ленту с меню. Жмем на ленте в блоке «Абзац» на кнопку «Границы». В открывшемся меню выбираем пункт «Все границы».

Это же можно проделать, как описано выше.
Как изменить цвет всех границ таблицы одновременно
Чтобы изменить цвет всех границ (и внешних и внутренних):
- Выделяем всю таблицу. Подводим курсор к левому верхнему углу. Появится небольшой крестик. Курсор тоже примет вид крестика. Кликаем мышкой по этому крестику.
- Теперь щелкаем правой кнопкой мыши по выделенной таблице и жмем в выпадающем контекстном меню кнопку «Границы». В открывшемся меню в самом низу выбираем пункт «Границы и заливка».
- В открывшемся окне на вкладке «Граница» выбираем тип «Все». Чуть правее выбираем тип линии границы, цвет границы, и её ширину. Еще правее, в поле «Применить к:» выставляем параметр «таблице». После этого в самом низу жмем кнопку «ОК».


И вот что у нас получилось.

Видео «Как изменить цвет границ в таблице Ворда»
Удачи!
How to Change Table Background Color in Word 2013
- Open the document.
- Click in a table cell.
- Select Layout under Table Tools.
- Click the Properties button.
- Click the Borders and Shading button.
- Select the Shading tab.
- Click the Fill dropdown, then choose the desired color.
- Click OK.
Contents
- 1 How can I change the color of my table?
- 2 How do you change the color of a table border in Word?
- 3 How do I change the appearance of a table in Word?
- 4 How can I change the color of my wood table?
- 5 How do I get a rainbow border in Word?
- 6 How do you change border color?
- 7 How can you apply border to a table and change its Colour short answer?
- 8 How do you change table styles?
- 9 Can you change the Colour of wooden furniture?
- 10 How do you paint a wooden table?
- 11 Can you paint a dining table?
- 12 How do you make your Word document colorful?
- 13 How do I fill a border with color in Word?
- 14 How do you add color bars in Word?
- 15 Which tool is used to apply different background Colours in a table?
- 16 How do I change the border color of a table in HTML?
- 17 How do you put a border color in a div?
- 18 Which button changes the border color?
- 19 How can you apply border to a table?
- 20 How do you change the color of a table in Excel?
How can I change the color of my table?
Add or change a table background color
- Click a cell in the table.
- Under Table Tools, on the Design tab, in the Table Styles group, click the arrow next to Shading, and then point to Table Background.
- Click the color that you want, or to choose no color, click No Fill.
How do you change the color of a table border in Word?
Open the Borders and Shading dialog box. Select the Borders tab. From the Style scroll box, select the desired border style. From the Color pull-down list, select the desired border color.
How do I change the appearance of a table in Word?
Applying a table style
- Click in the table.
- Click the Table Tools Design or Table Design tab in the Ribbon.
- Click the More down arrow on the bottom right in the Table Styles gallery. A drop-down menu appears.
- Hover over the various table styles.
- Click the table style you want to apply.
How can I change the color of my wood table?
Method 1: Change Wood Color with a New Stain
- Remove the existing finish completely by sanding or stripping.
- Determine the wood species.
- Determine the undertone of the wood stains you are considering.
- Choose a wood stain that will either complement or counteract the existing undertone to get the look you want.
How do I get a rainbow border in Word?
Click the “Box” button on the left of the “Page Border” tab’s window. Click the “Color” drop-down menu and choose a color for the border. This color will apply to any black default borders under the “Style” or “Art” drop-down menus, but you can still get more colorful.
How do you change border color?
On the Border tab, under Line Color, click the color that you want to apply, and then under Border, click the specific pieces of the cell border to apply the color to. Click OK. Tip: To apply your new cell style, select the cells that you want to change, and then on the Home tab, click Cell Styles, and click the style.
How can you apply border to a table and change its Colour short answer?
Answer: Select the table cells that you want to add or change the table border for. Under Table Tools, on the Design tab, in the Draw Borders group, do one or more of the following: To change the color of the border, click the arrow next to Pen color, and then click the color that you want.
How do you change table styles?
To change the table style:
- Select any cell in your table. The Design tab will appear.
- Locate the Table Styles group. Click the More drop-down arrow to see all of the table styles.
- Hover the mouse over the various styles to see a live preview.
- Select the desired style. The table style will appear in your worksheet.
Can you change the Colour of wooden furniture?
Minwax® PolyShades® is an easy way to change the color of your currently stained or polyurethane finished wood.Simply give it a light sanding with fine-grit sandpaper, remove sanding dust, and brush on a coat of PolyShades® (see step-by-step instructions provided in this Guide).
How do you paint a wooden table?
Steps for Refinishing a Table:
- Remove any hardware from the furniture.
- Give everything a light sanding.
- To clean up the dust, Mauro used a HEPA vac.
- Paint the primer on using a paint roller.
- Wait about 2 hours for the primer to dry.
- Start painting with the same technique.
Can you paint a dining table?
If you’re tired of your kitchen table, you don’t need to get rid of it and start from scratch; a few coats of paint can easily turn it into a beautiful new piece. Or if you found a beaten-up kitchen table at a flea market or garage sale, you can create the table of your dreams with just a few coats of paint.
How do you make your Word document colorful?
Go to Design > Page Color. Choose the color you want under Theme Colors or Standard Colors. If you don’t see the color you want, select More Colors, and then choose a color from the Colors box.
How do I fill a border with color in Word?
Change the inside (fill) color
- Select the shape or text box.
- On the Drawing Tools Format tab, click Shape Fill > More Fill Colors.
- In the Colors box, either click the color you want on the Standard tab, or mix your own color on the Custom tab.
How do you add color bars in Word?
Place insert cursor where you need to insert colored region and head over to Home tab, from Paragraph group, under shaded color palette, select one. Upon click, it will insert shaded region, now you can insert text in it. What is this? Click More Colors, if you need to choose colors from color palette.
Which tool is used to apply different background Colours in a table?
The Shading tool is used to apply different background colours in a table.
How do I change the border color of a table in HTML?
To change the border’s color, use the attribute bordercolor=”color” where color is the same format as all the other web colors we’ve been using. The table below has the bordercolor set to #ff00ff with the table tag
. To change the background color, use the attribute bgcolor=”color”.
How do you put a border color in a div?
CSS Border Color
- name – specify a color name, like “red”
- HEX – specify a HEX value, like “#ff0000”
- RGB – specify a RGB value, like “rgb(255,0,0)”
- HSL – specify a HSL value, like “hsl(0, 100%, 50%)”
- transparent.
Which button changes the border color?
Answer: Select the table cells that you want to add a border to (or change the border of). Select the Table Tools / Design tab on the ribbon. Select one of the following in the Draw Borders group: Use Pen Color to change the color of the border.
How can you apply border to a table?
Click the Table Design tab.) Click Border Styles and choose a border style. Click Borders and choose where you want to add the borders. Tip: To change or add borders for part of your table, check that Border Painter is selected and then, in the table, click each border that you want to change or add.
How do you change the color of a table in Excel?
Apply color to alternate rows or columns
- Select the range of cells that you want to format.
- Click Home > Format as Table.
- Pick a table style that has alternate row shading.
- To change the shading from rows to columns, select the table, click Design, and then uncheck the Banded Rows box and check the Banded Columns box.
Microsoft Word has a remarkable amount of options for controlling the appearance of the objects in your document.
This applies to the tables you create, too.
Our tutorial below will show you several ways that you can adjust the colors of the table borders and cell backgrounds in Microsoft Word tables.
- Open the document.
- Click inside the table.
- Select Layout under Table Tools.
- Choose Properties.
- Click the Borders and Shading button.
- Select All.
- Click the Color dropdown, then choose the color.
- Click OK.
Our article continues below with additional information on changing the table color in Word, including pictures of these steps.
Formatting a document in Microsoft Word often consists of adjusting the margins, adding page numbers, or simply trying to adhere to your organization’s formatting guidelines, such as MLA.
But when you start adding other objects and media to your document, you can have a little more freedom to customize. If you have a table in Microsoft Word you might even want to change the color of its borders or background.
Tables are a great way to display groups of information in a Word document.
The grid layout offers a structural option that is difficult to achieve with the paragraph layout that is normally associated with Word documents.
While table work is often done in spreadsheet applications like Microsoft Excel, Word does have some useful tools to present table data in an appealing fashion.
But a table in Microsoft Word can look a little boring with its default settings, so you might decide to change the color of your Word table. You can achieve this by adjusting the colors of your borders, then applying this change to the entire table.
How to Change Table Color in Microsoft Word 2013 (Guide with Pictures)
The steps in this article will show you how to change the color of your table in Word 2013.
This will affect the color of the lines in your rows and columns. If you want to change the color of the text in your table, then you can follow the steps in this article, but only select the table instead of the entire document.
Step 1: Open the document containing the table for which you want to change the color.
Step 2: Click inside one of the table cells, which will display the Table Tools menu at the top of the window.
Step 3: Click the Layout tab under Table Tools at the top of the window.
Step 4: Click the Properties button in the Table section at the left side of the navigational ribbon.
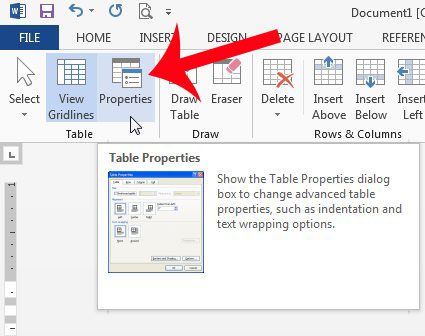
Step 5: Click the Borders and Shading button.
This will open the Borders and Shading dialog box where you will be able to make a number of different changes to your borders.
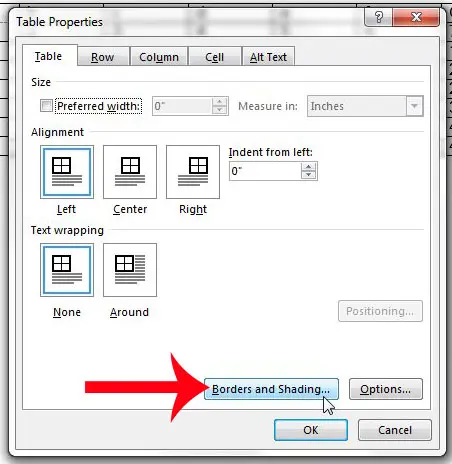
Step 6: Click All at the left side of the window.

Step 7: Click the drop-down menu under color, then click the color you want to use for the table.
Step 8: Make any additional changes to the style of the table border or the line width, confirm that Table is selected under the Apply to option at the right side of the window, then click the OK button.
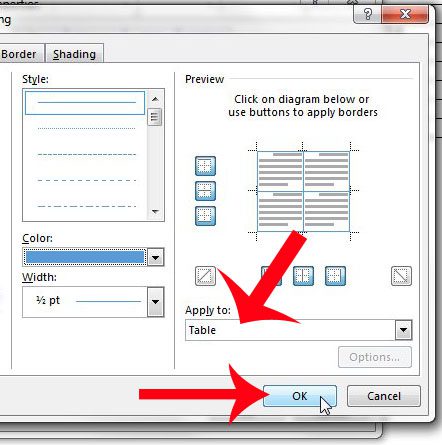
Step 9: Click the OK button at the bottom of the Table Properties window, then your selected color will be applied to the table.
If you are trying to change the color of your table’s background instead, then the next section will show you how.
How to Change Table Background Color in Word 2013
The steps in this section are pretty similar to the ones that we used to change the border, or gridline, color in our table.
- Open the document.
- Click in a table cell.
- Select Layout under Table Tools.
- Click the Properties button.
- Click the Borders and Shading button.
- Select the Shading tab.
- Click the Fill dropdown, then choose the desired color.
- Click OK.
More Information on How to Change Table Color in Word
You can also change the table color and the background color in newer versions of Word as well, but the process is slightly different.
For example in Word for Office 365, after you click inside the table you will choose the Table Design tab, then click the Borders button and choose the Borders and Shading option. Then you will see the window we described above where you can make your color adjustments.
All of the instructions above assume that you want to apply the same border color or background to the entire table.
If you only want to apply it to one cell you can click the Apply to dropdown at the bottom right of the Borders and Shading window, then select the Cell option.
If you are looking to change the appearance of your table in Word, but wish to adjust something other than the border color or the background color, then check out the other options on the Design tab and the Layout tab under Table Tools.
There you will find a variety of other options to customize your table, including some existing styles and theme colors that can make it much simpler to create an appealing table without a lot of manual formatting.
Do you want to customize your table even further? Learn how to add spacing between table cells to give a unique appearance to your table.
Frequently Asked Questions About How to Change the Color of a Table in Word
Can I change table color in Google Docs, too?
Yes, the Google Docs word processing application has a similar option.
To change the cell background color or border color in Docs you will need to select the table, then click the Background color or Border color button and choose a new option.
You can read this guide for more information.
Is there a way to edit the border style of my table borders in Word?
Yes, Microsoft Word’s Borders tab has several border styles that you can choose from.
Once you have the Borders and Shading dialog box open in the steps above you can click the Styles drop down list and select borders styles from the selection they have.
There are quite a few options here, so you can probably create the specific borders that you are looking for via a combination of the styles, color, and width options on this menu.
How do I add or change the fill color of a table cell in Word?
If you are trying to add or remove shading in a table in a Microsoft Word document, then you can do so on the Shading tab of the table Borders and Shading dialog box.
1. Select the table cell(s) to modify.
2. Click Layout under Table Tools.
3. Choose the Properties option in the ribbon.
4. Click the Borders and Shading button.
5. Select the Shading tab at the top of the window.
6. Click the Fill drop down arrow, then click the desired color.
7. Click OK to apply the changes when you’re done.

Matthew Burleigh has been writing tech tutorials since 2008. His writing has appeared on dozens of different websites and been read over 50 million times.
After receiving his Bachelor’s and Master’s degrees in Computer Science he spent several years working in IT management for small businesses. However, he now works full time writing content online and creating websites.
His main writing topics include iPhones, Microsoft Office, Google Apps, Android, and Photoshop, but he has also written about many other tech topics as well.
Read his full bio here.
Изменение цвета таблицы в MS Word

Стандартный серый и непримечательный вид таблицы в Microsoft Word устроит далеко не каждого пользователя, и это неудивительно. Благо, разработчики лучшего в мире текстового редактора понимали это изначально. Вероятнее всего, именно поэтому в Ворде есть большой набор инструментов для изменения таблиц, средства для изменения цвета тоже в их числе.
Забегая вперед, скажем, что в Ворде можно изменить не только цвет границ таблицы, но и их толщину и внешний вид. Все это можно выполнить в одном окне, о чем мы и расскажем ниже.
1. Выделите таблицу, цвет которой вы хотите изменить. Для этого кликните по небольшому плюсику в квадрате, расположенном в ее верхнем левом углу.

2. Вызовите на выделенной таблице контекстное меню (правый клик мышкой) и нажмите кнопку «Границы», в выпадающем меню которой нужно выбрать параметр «Границы и заливка».

Примечание: В ранних версиях Word пункт «Границы и заливка» содержится сразу в контекстном меню.
3. В открывшемся окне во вкладке «Граница», в первом разделе «Тип» выберите пункт «Сетка».

4. В следующем разделе «Тип» установите подходящий тип линии границы, ее цвет и ширину.

5. Убедитесь, что в разделе «Применить к» выбрано «таблице» и нажмите «ОК».
6. Цвет границ таблицы будет изменен согласно выбранным вами параметрам.

Если у вас, как и в нашем примере, полностью изменилась только рамка таблицы, а ее внутренние границы, хоть и изменили цвет, не изменили стиль и толщину, необходимо включить отображение всех границ.
1. Выделите таблицу.

2. Нажмите кнопку «Границы», расположенную на панели быстрого доступа (вкладка «Главная», группа инструментов «Абзац»), и выберите пункт «Все границы».

Примечание: Аналогичное можно проделать и через контекстное меню, вызванной на выделенной таблице. Для этого нужно нажать кнопку «Границы» и выбрать в ее меню пункт «Все границы».
3. Теперь все границы таблицы будут выполнены в едином стиле.

Использование шаблонных стилей для изменения цвета таблицы
Изменить цвет таблицы можно и с помощью встроенных стилей. Однако, стоит понимать, что большинство из них меняют не только цвет границ, но и весь внешний вид таблицы.
1. Выделите таблицу и перейдите во вкладку «Конструктор».

2. Выберите подходящий стиль в группе инструментов «Стили таблиц».

- Совет: Чтобы увидеть все стили, нажмите кнопку «Больше» , расположенную в правом нижнем углу окна со стандартными стилями.
3. Цвет таблицы, как и ее внешний вид, будут изменены.

На этом все, теперь вы знаете, как изменить цвет таблицы в Ворде. Как видите, в этом нет ничего сложного. Если вам часто приходится работать с таблицами, рекомендуем прочесть нашу статью об их форматировании.
Мы рады, что смогли помочь Вам в решении проблемы.
Помимо этой статьи, на сайте еще 11902 инструкций.
Добавьте сайт Lumpics.ru в закладки (CTRL+D) и мы точно еще пригодимся вам.
Отблагодарите автора, поделитесь статьей в социальных сетях.
Опишите, что у вас не получилось. Наши специалисты постараются ответить максимально быстро.
Помогла ли вам эта статья?
Поделиться статьей в социальных сетях:
Еще статьи по данной теме:
Частично закрашена ячейка. При нажатии на Enter закраска остается. Нужно после нее, закраски/заливки, чистую ячейку сделать
Здравствуйте. Вы можете к следующему комментарию прикрепить скриншот этой частично закрашенной ячейки? Просто совсем не понимаю, как в Microsoft Word ее можно закрасить частично, а не полностью. Предполагаю, что и в вашем случае она закрашена полностью. Единственным возможным, но не факт, что подходящим решением будет разбивка этой ячейки на две по горизонтали, и тогда эта «пара» будет по размеру как все ячейки в одной строке, при этом залить цветом из них можно будет только одну. Делается это так: правый клик по нужной ячейке — «Разделить ячейки» — задаете «Число столбцов» 1, а «Число строк» 2 — нажимаете «ОК» для подтверждения. То, что получается в результате, показано на скриншоте ниже. Дополнительно может потребоваться выровнять строки по высоте. Также, если есть необходимость, можно скрыть границу, которая разделяет залитую цветом и следующую за ней «чистую» ячейку, скрытой. На всякий случай уточню, что вместо нажатия «Enter», которым вы наверняка хотите перейти на следующую строку для ввода записи в ячейку, нужно будет с помощью мышки или стрелок на клавиатуре переходить в соседнюю, не закрашенную ячейку.

Добрый день!
Каким образом можно создать стиль, применяемый не ко всей таблице, а только к выбранной строке?
Необходимо закрашивать фон строки в таблице в разные цвета, причем в цвета, которых нет в стандартной палитре.
Если делать это напрямую, то каждый раз необходимо выделять строку, затем в панели инструментов выбирать «Заливка», затем «Другие цвета» (т.к. стандартные не походят), затем «Обычные» и затем выбрать цвет из «сотовой» палитры.
Можно ли создать свой стиль, применение которого сразу закрасит фон выбранной строки в цвет, определенный в стиле?
Спасибо!
P.S. Если документ находится локально на ПК, то один раз выбранный нестандартный цвет заливки строки сохраняется в пункте «Последние цвета» инструмента «Заливка», и проблем с последующим долги выбором цвета не возникает. Но если документ находится на сетевом ресурсе (на сервере), и открывается разными людьми, то цвет не сохраняется…
Задайте вопрос или оставьте свое мнение Отменить комментарий
Блог копирайтера GALANT
Для заказчиков контента и новичков – копирайтеров
Все о границах/рамках таблиц в WORD 2016

Здравствуйте, друзья! В сегодняшней «Шпаргалке», как и было обещано, приступаем к форматированию таблицы в Word 2016. И начнем с вопросов об их границах. Все, кто прочел уже первую «табличную» статью , знают, что при создании таблицы любым из пяти описанных там способов рамки проставляются по умолчанию. Понятное дело…. Иначе какая же это таблица будет? Другой вопрос, что эти внешние и внутренние разграничительные линии не всегда нас устраивают. Вот сейчас мы с вами и разберем, как изменить границы таблиц в Word по своему усмотрению. Мы научимся делать рамки и внутренние линии таблиц жирными, выбирая нужную толщину линий, цветными, невидимыми.
Для удобства моих посетителей я разбила эту статью на мелкие подразделы, отвечающие на один конкретный вопрос по оформлению границ/рамок вордовских таблиц. Получился такой своеобразный FAQ, ориентироваться в котором вам, друзья, будет проще.
Как сделать границы таблицы в Ворде c использованием коллекции «Стили таблицы»

Щелкаем по таблице левой кнопкой мышки, при этом открывается панель «Работа с таблицами». Заходим в ее вкладку «Конструктор». Слева в окне «Параметры стилей таблиц» для удобства восприятия табличных данных мы можем задать необходимое выделение строк или рядов, их чередование, цвет и интенсивность заливки. Можно подчеркнуть окраской или выделить линиями строку/столбец заголовков или итогов (см. рис.1).
После этого открываем следующее окно «Стили таблиц». Здесь Ворд предоставляет нам большое количество шаблонов с различными комбинациями заливки и рамок (см. рис. 2).


А если еще и выбранный шаблон хочется как-то модифицировать, то кликаем по строке «Изменить стиль таблицы». Эта строчка прячется в самом низу всех табличных шаблонов. При клике по ней открывается окно, в котором можно менять толщину и цвет линий, убирать/добавлять заливку отдельных ячеек (см. рис. 3).
У вас, друзья, также есть возможность посмотреть, как проводятся все эти операции, своими глазами. Видео к вашим услугам. 🙂
Как установить рамки с использованием коллекции «Стили границ»
Как и в первом случае открываем панель «Работа с таблицами» и вкладку «Конструктор». Выделяем таблицу. Это проще всего сделать, щелкнув по расположенному вверху слева маленькому крестику, который называется «маркер перемещения таблицы». Переходим в раздел «Обрамление», «Стили оформления границ». По умолчанию Word предлагает выбрать рамку одну из 12 вариантов, впрочем, и в этом случае меняйте по своему усмотрению их цвет и толщину. В выпадающем окне «Границы» можно уточнить расположение линий, требующих изменения (см. рис. 4).

Желающие могут посмотреть короткий видеоролик с объяснением всех нюансов.
Как настроить/выделить рамки таблицы по своему усмотрению без применения готовых стилей
Выделяем таблицу щелчком по «маркеру перемещения таблицы», то есть крестику вверху и слева, затем в панели «Работа с таблицами» вкладке «Конструктор» заходим в раздел «Обрамление». В открывшемся окне выбираем тип контура, толщину и цвет линий, а в окне «Границы» устанавливаем их местоположение (внешние, внутренние и т.п.) (см. рис. 5).

Как выделить границы только одной или нескольких ячеек
Первый способ. Чтобы поменять границы частично (выделить какие-то ячейки) можно выполнить все действия по пунктам 2 или 3 кроме выделения всей таблицы. А курсор нужно поставить в той ячейке, границы которой подлежат особому обрамлению.
Второй способ. Можно действовать через кнопку «Раскраска границ по образцу» из меню в таблице «Стили границ». Предварительно там же нужно выбрать подходящие контур, ширину и цвет линий. В видеоролике, который расположен ниже я наглядно демонстрирую как создать рамки таблиц по своему усмотрению и как выделить одну или несколько ячеек.
Как сделать границы таблицы в Ворде невидимыми/убрать
Для того, чтобы убрать границы таблицы в WORD нужно:
Как удалить верхнюю/нижнюю границы таблицы или границы отдельных ячеек в Ворде
Отдельные участки табличных границ проще и быстрее удалить с помощью кисти-ластика. Для этого следует:
- раскрыть панель «Работа с таблицами»;
- выбрать вкладку «Конструктор»;
- щелкнуть в выпадающем окне «Тип линии» по строке «нет границы»; курсор примет вид кисти;
- стереть кистью любые, подлежащие удалению участки границ.
В нижерасположенном видео я демонстрирую всю цепочку несложных действий по удалению всех границ таблицы или их отдельных участков.
Итак, друзья, сегодня мы разобрали, как делать различные виды границ в таблицах Ворд, а также, как удалять их. Надеюсь, эта статья была полезна для вас. На этом цикл статей про таблицы в Ворде не заканчивается. Следите за новыми публикациями. Всего вам доброго.
Ваш гид по WORD 2016 GALANT.
А эти статьи вы еще не читали? Советую…
Добавление и удаление заливки в таблице
Добавление заливки в таблицу позволяет выделить в документе определенные строки, столбцы или ячейки либо всю таблицу целиком. Самый простой способ добавить к таблице цветную заливку — использовать меню заливки .
Добавление заливки в таблицу
Выделите ячейки, которые требуется изменить.
Чтобы выделить всю таблицу, щелкните ее, а затем щелкните маркер перемещения таблицы в левом верхнем углу.
Чтобы выбрать строку, столбец, ячейку или группу ячеек, выделите соответствующий диапазон мышью.
На вкладке Работа с таблицами | конструктор ( Макет работа с таблицами в OneNote) выберите меню Заливка .
Выберите нужный цвет заливки в группе Цвета темы или Стандартные цвета. Вы также можете щелкнуть элемент Другие цвета, чтобы открыть дополнительные варианты цветов. Дополнительные сведения о диалоговом окне цвета можно найти в разделе Выбор цветов в диалоговом окне цвета.

В меню » Заливка » в PowerPoint доступно несколько дополнительных вариантов:
Выбрав Щелкните любой цвет слайда, чтобы применить этот цвет к выбранной ячейке или ячейкам.
Рисунок Выберите любой рисунок с компьютера или Интернет-адрес, чтобы добавить его в выделенную ячейку или ячейки.
Узла Заполните выделенную ячейку или ячейки одним из нескольких встроенных градиентов или создайте собственный настраиваемый градиент.
Текстуры Заполнение выделенной ячейки или ячеек одной из нескольких встроенных текстур или создание собственной пользовательской текстуры.
Фон таблицы Быстро примените цвет или изображение к фону всей таблицы.
Удаление заливки из таблицы
Выделите ячейки, которые требуется изменить.
Чтобы выделить всю таблицу, щелкните ее, а затем щелкните маркер перемещения таблицы в левом верхнем углу.
Чтобы выбрать строку, столбец, ячейку или группу ячеек, выделите соответствующий диапазон мышью.
На вкладке Работа с таблицами | конструктор ( Макет работа с таблицами в OneNote) выберите меню Заливка .
This tutorial is about How to change the Table Border Color in Word. We will try our best so that you understand this guide. I hope you like this blog, How to change the Table Border Color in Word. If your answer is yes, please do share after reading this.
So lets keep reading for intertesting info:
Check How to change the Table Border Color in Word
Starting a Microsoft Word document is like starting from scratch or a new sheet of digital paper. While the many white spaces provide plenty of room for your text, the default black on white can feel a bit drab for some needs. Bring a Word document to life by adding a colorful border. With Word’s auto-formatted borders, you don’t have to create lines or adjust anything in the page margins because it’s all done for you. Just pick a design and get colorful.
Edges can enhance the appearance of a table and give it a polished, professional look. They also make it easy to visually separate information into different cells.
How to change the color of the table border in Word
Using the Borders and Shadows option
- Open the Word document.
- Prompt Borders and Shading dialog
- Click anywhere in the table. A table selection icon will appear in the top corner.
- Click this icon to select the entire table.
- Selecting the table will display a horizontal context menu.
- You will find the Borders and Shading button there.
- Click this button to open the Borders and Shading dialog box.
- Choose the color of your border.
- You will see a dropdown menu of colors on the Borders tab.
- Simply select the color of your choice.
- By default, the border color will be applied to the entire table.
- You can use the “Apply To” setting to apply the color to a cell or a paragraph.
Using the Border Styles button
- Open the Word document.
- Locate the Border Styles button.
- Click anywhere on the table and go to Table Tools -> Layout – Border Styles.
- Choose your border style.
- Click the Border Styles button. It will display a selection of border styles.
- Select the border style of your choice.
- At this point, the cursor changes to an Edge Painter tool.
- Clicking on specific borders will apply the color in the style you choose. You can also click and drag to apply across intersecting edges.
Final words: How to change the Table Border Color in Word
I hope you understand this article, How to change the Table Border Color in Word. If your answer is no, you can ask anything via the contact forum section related to this article. And if your answer is yes, please share this article with your friends and family to give us your support.
James Hogan
James Hogan is a senior staff writer at Bollyinside, where he has been covering various topics, including laptops, gaming gear, keyboards, storage, and more. During that period, they evaluated hundreds of laptops and thousands of accessories and built a collection of entirely too many mechanical keyboards for their own use.
Работая в Microsoft Word с таблицами, может возникнуть необходимость выделить некоторые части в ней, или полностью ее залить. Это поможет акцентировать внимание на заголовках, или на тех ячейках, информация в которых крайне важна.
Вот давайте в этой статье мы с Вами и рассмотрим, как изменить цвет таблицы в Ворде, всей целиком, или только определенных ячеек, и каким образом он меняется для границ.
Для того чтобы полностью залить таблицу, выделите ее – нажмите на стрелочки в левом верхнем углу. Откройте вкладку «Работа с таблицами» – «Конструктор». Дальше в статье, мы только с этой вкладкой работать и будем, поэтому не буду каждый раз напоминать, чтобы Вы ее открыли.
Нажмите на стрелку на кнопке «Заливка» и выберите из выпадающего списка подходящий вариант.

Если хотите закрасить только шапку, или любые другие ячейки, тогда выделите только их, а потом выбирайте оттенок в списке.
Для того чтобы закрасить всего одну ячейку, достаточно поставить в ней курсив, а затем выбрать цвет.

Теперь давайте разбираться, как можно изменить цвет границ. Выделите все, нажмите на стрелочку возле кнопки «Границы» и выберите из списка «Границы и заливка».

Откроется вот такое окно. В нем выберите из выпадающего списка нужный цвет. Кроме того, здесь же можно изменить тип линий, сделать их точками или пунктиром, и их ширину. Потом слева нажмите на кнопку «Все». Посмотрите, чтобы в поле «Применить к» было указано «таблице» и жмите «ОК».

У меня закрасились все линии, даже те, которые были убраны. Как удалить линии в таблице в Ворде, прочтите, перейдя по ссылке.

Для этого нужно выделить ячейки, которые с ними связаны, и в выпадающем списке «Границы» убрать те, которые не нужны.

Для закрашивания, можно воспользоваться и одним из готовых стилей. Выделите ее и разверните список доступных стилей, нажав на стрелку, указывающую вниз. Затем выберите подходящий вариант.

В готовых стилях изменяется цвет ячеек и границ, причем можно сделать акцент на заголовки или левый столбец.
Если нужно, чтобы заголовки таблицы в Ворде повторялись на каждой странице, прочтите, как это сделать.

Если же у Вас наоборот есть документ с цветной таблицей, тогда убрать ее цвет в Ворде получится следующим образом. Выделите ее, откройте уже знакомое окно и в поле «Цвет» выберите «Авто». Слева нажмите на «все», а потом кликайте по кнопке «ОК».
Таким образом, все границы станут стандартные черные.

Для изменения заливки нужно нажать по одноименной кнопке и выбрать из списка «Нет цвета». В результате, все ячейки станут такими же, что и сам лист.

Вот такими способами, получится изменить или цвет всей таблицы полностью, или отдельные ячейки, или ее границы. Ну а если Вам не подойдут сделанные изменения, их всегда можно удалить.
![]() Загрузка…
Загрузка…

Об авторе: Олег Каминский
Вебмастер. Высшее образование по специальности «Защита информации». Создатель портала comp-profi.com. Автор большинства статей и уроков компьютерной грамотности
Download PC Repair Tool to quickly find & fix Windows errors automatically
Borders can be a line around your Word document page or a line around a cell in a table; you can change its style, weight, and color, but there is another feature in Microsoft Word other than the common Borders tools that can format a border around your table cells, this feature is called Border Painter. The Border Painter is a feature that is used to apply formatting to specific borders to your table.
Using Border Painter, you can apply a Border & Shading to a Table and change its Color in Microsoft Word documents. Follow the steps below to use the Border Painter in Word:
- Launch Microsoft Word.
- Create a Table.
- Click the Table Design tab.
- Click the Border Painter button and the cursor will turn into a paintbrush.
- Use the paintbrush to draw on the borderline.
Launch Microsoft Word.
Create a Table.

Click the Table Design tab (Ensure that the table is selected to see the Table Design tab.)
In the Borders group, you can change the Line Width or Pen Color.
The Line Width is a feature that changes the width of borders, and the Pen Color is a feature that changes the color of borders. You have to select a color and width first before using the Border Painter.
Click the Border Painter button and the cursor will turn into a paintbrush.
Use the paintbrush to draw on the borderline on the table.
If you want to change the Paintbrush cursor back to the original cursor, click the Border Painter button again or press the ESC button on the keyboard.
We hope this tutorial helps you understand how to use Border Painter in Microsoft Word; if you have questions about the tutorial, let us know in the comments.
Also read: How to insert Text in Circle OR Circle Text in Microsoft Word
How do I put a border around text in Word?
To place a border around a text, follow the steps below:
- Enter a Text in your Word document.
- Highlight the text.
- Click the Border button in the Paragraph group and select Borders and Shadings from its drop-down menu.
- A Borders and Shadings dialog box will open.
- On the Border tab, click Box on the left pane.
- On the left, click the ‘Apply to‘ list box and select the Text option.
- Then click OK.
What is border style used for in Word?
When you create borders in Microsoft Word you would want it to look more appealing or unique so users would add a border style to their page or table. Border style is a feature that helps you to change the style to your page or table borders.
Shantel has studied Data Operations, Records Management, and Computer Information Systems. She is quite proficient in using Office software. Her goal is to become a Database Administrator or a System Administrator.